
Jimny Servicing
Servicing is a fairly fundamental part of keeping a car running happily. If you use your Jimny for intensive 4wding then you might want to consider DIY servicing even between workshop servicing just to keep everything happy. As I tackle more of the servicing items I’ll cover them here. Some might get split off onto their own page if they are detailed (e.g. the valve clearance check and change if I ever get around to doing this myself) but otherwise I’ll keep this as a big reference page for people.
I appreciate some input into this section from Royce Murphy, Trinity Vitetta and Jordan Rath in the various Jimny groups on FB.
Looking for torque values for bolts? I’m slowly adding to this list.
What about wiring stuff and connectors? This is even more sparse but I’ll add details here.
I go into a bit more details on fluids/fluid selection separately, mostly to help you understand what you need to know before making certain choices around substitutions of fluids.
Sections
- Quick reference of service supplies
- Service intervals
- Filter servicing
- Oil changes
- Other fluids
- Brakes
- Engine servicing
- Other servicing
Supplies list
| Capped price service kits | |
| Kit A (minor service kit) Engine oil filter, drain plug washer 3 and 5 door kits are the same, but the 5 door kit includes a Maruti sourced oil filter | 99999-SER22-A01 (3 door) includes: 1x 16510-82703, and 1x 09168-14015 99999-SER54-AT3 (5 door) includes 1x 16510M68K20, and 1x 09168-14015 |
| Kit B (major service kit) Engine oil filter, drain plug washer, air filter, cabin air filter, valve cover gasket, 4x spark plugs | 99999-SER55-BS1, includes 1x 16510-82703, 1x 09168-14015, 1x 13780-78R00, 1x 95860-74P00, 1x 11189-62R10, and 4x 09482-00618 |
| Kit C (extra major service kit) Need to verify what this includes, but appears to include some A/C parts – maybe R1234yf related cars? | 99999-SER28-CS1 |
| Engine oil service | |
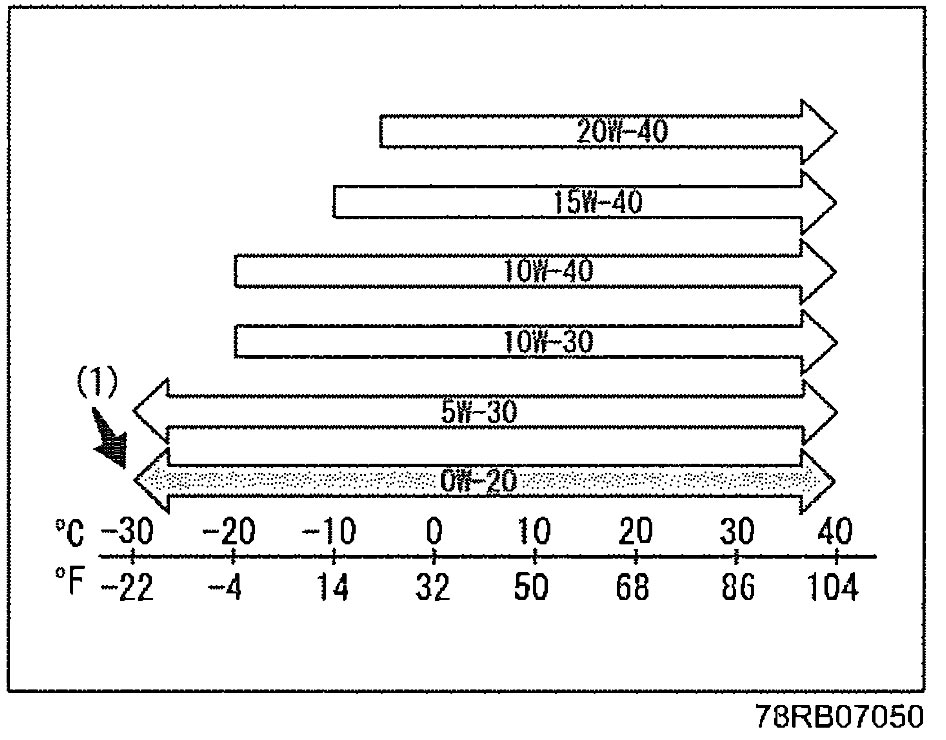
| Engine oil | 3.9L 0W-20 or 5W-30 |
| Engine oil filter | Suzuki 16510-82703 Maruti Suzuki 16510M68K20 Ryco Z443 Sakura C1218 / C1219 Mann W 67/2 Bosch 0 986 452 058 (OD 058), 0 986 AF0 062 Wesfil WZ443NM Valvoline VO-40 ACDelco AC078 |
| Engine sump plug washer | M14 (09168-14015) |
| Engine sump plug | M14-1.5 x 19mm (11518-63J20) 14 mm socket |
| Filters | |
| Air filter | 3 door Suzuki 13780-78R00 Ryco A2021 Wesfil WA5540 K&N 33-3151 JS Filters A988J NTK ARFL0195 BMC FB01089 Mann C 25 077 5 door (There appear to be some differences, with 3 door filters not fitting properly into 5 door air boxes; some of these cross references have not been tested!) Suzuki 13780M78R00, 13780M78R10 |
| Cabin filter | Suzuki 95860-74P00 (regular) 99000-79AJ3 (PM2.5 activated charcoal) Maruti 95850M66RC0 (3 and 5 door ones cross reference) Ryco RCA403P Wesfil WACF0275 Other cross references from Sakura CA-14120 (regular), CAC-14120 (activated carbon), CAV-14120 (anti virus) Other cross references based on 3rd party parts catalogues Blue Print ADK82516 Corteco 49412332 Filtron K1426 Hengst E4966LI Mahle LA1566 Mazda 1A04-61-148 Mecafilter ELR7386 Motaquip LVCF690 Muller FC516 Wix WP2206 |
| Transmission and transfer case | |
| Manual transmission oil | 1.2L, GL-4 75W-80 |
| Manual drain and fill plug seal | Liquid thread sealant/Threebond |
| Automatic transmission | 4-5L (refill unknown amount) Suzuki ATF3317 |
| Automatic transmission drain plug washer | M10 (24781-57B00) |
| Automatic transmission filter | Suzuki 26570-76J10 Azumi JT29004 JT514 |
| Transfer case oil | 1.2L, GL-4 75W-80 |
| Transfer drain and fill plug seal | Liquid thread sealant/Threebond |
| Differentials | |
| Front differential oil | 1.6L, GL-5 75W-85 |
| Rear differential oil | 1.3L, GL-5 75W-85 |
| Differential drain plug washers (needed for each) | M12 (09168B12002N000) |
| Differential fill plug washers (needed for each) | M20 (09168-20003) Note this part number is a copper washer; thanks to contributor PC for finding out that the older nylon one is superseeded |
| Spark plugs and valve cover | |
| Spark plugs (4 needed) | NGK KR6A-10 (09482-00618) Gap 0.95-1.05 mm IKR6G11 (iridium option) |
| Valve cover gasket (only needed if checking valve clearances) | 11189-62R10 |
| Belts | |
| A/C belt | 95141-77R10 (some list it as 17521-40724); 4PK725 |
| Water pump belt | 17521-78R00 (some list it as 17521-50951); 5PK951 – presumably 5PK950 would work |
| Cooling system | |
| Coolant | Suzuki Super Long Life Coolant (blue): 4.9 (A/T) – 5.0L (M/T) for total fill amount First change: 8 years or 150,000 km / second and subsequent changes 4 years or 75,000 km |
| Thermostat | 82º thermostat. Thermostat begins to open 80-84ºC fully open 95ºC. Suzuki 17670-81AB0 (82ºC thermostat) Tridon TT775-180 (180ºF thermostat / 82.2ºC) |
| Radiator cap | Suzuki 17920-68HA0 Tridon CB16110 |
| Water pump | Suzuki 17400-69L02 (maybe superseeded by 17400-69L03) Gates GWP8863 Graf PA1052 Febi Bilstein 39300 INA 538 0307 10 |
| Brakes (full table in relevant section) | |
| Front brake rotors | Suzuki: 55211-76J02 DBA/RDA: DBA587 (DBA587S for T2 upgraded rotors) |
| Front brake pads | Suzuki: 55810-78R00 Bendix/RDA (this is for JB43, but appears to fit): DB403 Bendix/RDA JB74 pads (1mm thicker than JB43): DB26064WD (4wd/SUV pad) |
| Rear brake shoes | Suzuki: 53200-76J01 DBA: DBAS1764 Bendix: BS1764 |
| Clutch | |
| Clutch | Suzuki: 22100-78R00 (pressure plate) 22400-78R00 (friction disc) 6x 01550-0816B or 09117M08096 (pressure plate to flywheel bolts, M8x16) 23265-81A40 (throwout bearing) Xtreme Outback standard replacement kits: KSZ19020 (pressure plate, friction, throwout, spigot bearing, alignment tool) KSZ19520 (as above, with flywheel) Exedy: SZK-9065 (complete replacement pressure plate, friction disk and throwout bearing) |
| Upgraded clutch options | Exedy: SZK-9065HD (Heavy duty upgrade – replacement pressure plate, friction disk and throwout bearing) Xtreme Outback: KSZ19020-1A (stage 1 upgrade pressure plate, friction disc, throwout, spigot bearing, alignment tool) KSZ19520-1A (as above, with flywheel) KSZ19020-1B (stage 2 using sprung ceramic) KSZ19520-1B (stage 2, with flywheel) KSZ19020-1C (stage 2 using cushioned ceramic) KSZ19520-1C (stage 2, with flywheel) KSZ185232B (multi plate conversion – everything included – for super high HP applications) |
| Flywheel | Suzuki: 12620-78R00 (flywheel) 12623-71C00L000 or 12623-61J00-000 (input shaft bearing) 6x 09103-10440 (bolts: M10x18.5, with threadlocker) |
| Wiper blades | |
| Front left and right | Suzuki OEM (complete): 38340-77R10 Suzuki OEM (rubber insert): 38346-77R00 Tridon TBL16 Bosch Aerotwin BBA400 |
| Rear | Suzuki OEM (complete): 38340-77R40 Suzuki OEM (rubber insert): 38346-77R20 Tridon TBL12 |
| Touch-up paint | |
| See article here: paint codes |
Service intervals
This is relevant for the Australian market, of which there are two service intervals. Cars delivered pre October 2019 were done to a 6 monthly/10,000 km interval, and after this it is 12 monthly/15,000 km interval.
Capped price servicing varies according to delivery month and also if it is a Suzuki Australia delivered car or a Suzuki Queensland delivered car. Official prices are listed on Suzuki Australia’s or Suzuki Queensland’s websites; I have used these as a guide in late 2023 to try to provide an estimate.
In the following service intervals tables I have underlined things that might make this service more expensive than you expect e.g. diff oil change at the first service, or the spark plugs and valve clearance checks every few years. I have not listed everything you should inspect/adjust in these. Transmission and transfer fluids, diff fluids, and things like the handbrake adjustment should all be inspected along with suspension components, drive belts and similar things.
Suzuki also recommend halving service intervals in ‘severe use’ conditions, which include offroad use, lots of stop start driving, or driving in dusty or hot conditions.
A number of the fluids are predicated on the type e.g. fully synthetic genuine Suzuki manual transmission or transfer oil, or diff oils, are inspection only, but are replace every 2 or 3 years if not using genuine oils. Green coolant is every 3 years/45,000 km, but blue is 8 years/160,000 km; automatic transmission fluid is also replace every 160,000 km. For your own specific use case and lubricants, you are best off contacting Suzuki to verify exact intervals as it gets problematic fast.
6 monthly servicing
(Total price: $2656 over the 5 years, $531.20/year.
As low as $26.56/thousand km driven @ 20,000 km/year; @15,000 km/year: $35.41/thousand km)
| 6 months 10,000 km | 1 year 20,000 km | 1.5 years 30,000 km | 2 years 40,000 km | 2.5 years 50,000 km | 3 years 60,000 km | 3.5 years 70,000 km | 4 years 80,000 km | 4.5 years 90,000 km | 5 years 100,000 km | |
|---|---|---|---|---|---|---|---|---|---|---|
| Suzuki Aus pricing | $269 | $175 | $175 | $459 | $175 | $379 | $175 | $499 | $175 | $175 |
| Service items | ||||||||||
| Engine oil & filter | Replace | Replace | Replace | Replace | Replace | Replace | Replace | Replace | Replace | Replace |
| Engine air filter | Replace | Replace | ||||||||
| Spark plugs | Replace | Replace | ||||||||
| Valve clearance | Inspect | Inspect | ||||||||
| Brake fluid | Replace | Replace | ||||||||
| Manual gearbox oil | Replace | |||||||||
| Differential oils | Replace | |||||||||
| Cabin filter | Replace |
12 monthly servicing
(Total price: pre September 2022 $1655 or $331/year, post September 2022 $2265 or $453/year, +extra if travelled 90 or 105 thousand km before 5 years is up.
As low as $22.07/thousand km pre 09/2022, $30.20/thousand km pre 09/2022 @ 15,000 km/year)
| 1 year 15,000 km | 2 years 30,000 km | 3 years 45,000 km | 4 years 60,000 km | 5 years 75,000 km | 90,000 km (if travelled that far in 5 years) | 105,000 km (if travelled that far in 5 years) | |
|---|---|---|---|---|---|---|---|
| Suzuki Aus pricing – pre September 2022 | $329 | $329 | $429 | $329 | $239 | ||
| Suzuki Aus pricing – post September 2022 (Includes free wheel rotation woooooo!) | $449 | $429 | $589 | $449 | $349 | $849 | $349 |
| Service items | |||||||
| Engine oil & filter | Replace | Replace | Replace | Replace | Replace | Replace | Replace |
| Engine air filter | Replace | Replace | |||||
| Spark plugs | Replace | Replace | |||||
| Valve clearance | Inspect | Inspect | |||||
| Brake fluid | Replace | Replace | Replace | ||||
| Transfer fluid | |||||||
| Differential oils | Replace | ||||||
| Cabin filter | Replace | ||||||
| Engine belt(s) | Inspect | Inspect | Inspect | Inspect | Inspect | Replace | Inspect |
Filter servicing
Air filter change
This one is super easy: unclip the clips on the airbox to lift the lid…
This exposes the filter, swap it out for a new one.
Air filter part numbers
- Suzuki OEM: 13780-78R00
- Ryco: A2021
- K&N reusable: 33-3151
Pollen/cabin filter
Official installation instructions for this one are given on the Global Suzuki accessories site. This one is super easy, and I’ll document it anyway for completeness.
The filter hides behind the glove box.
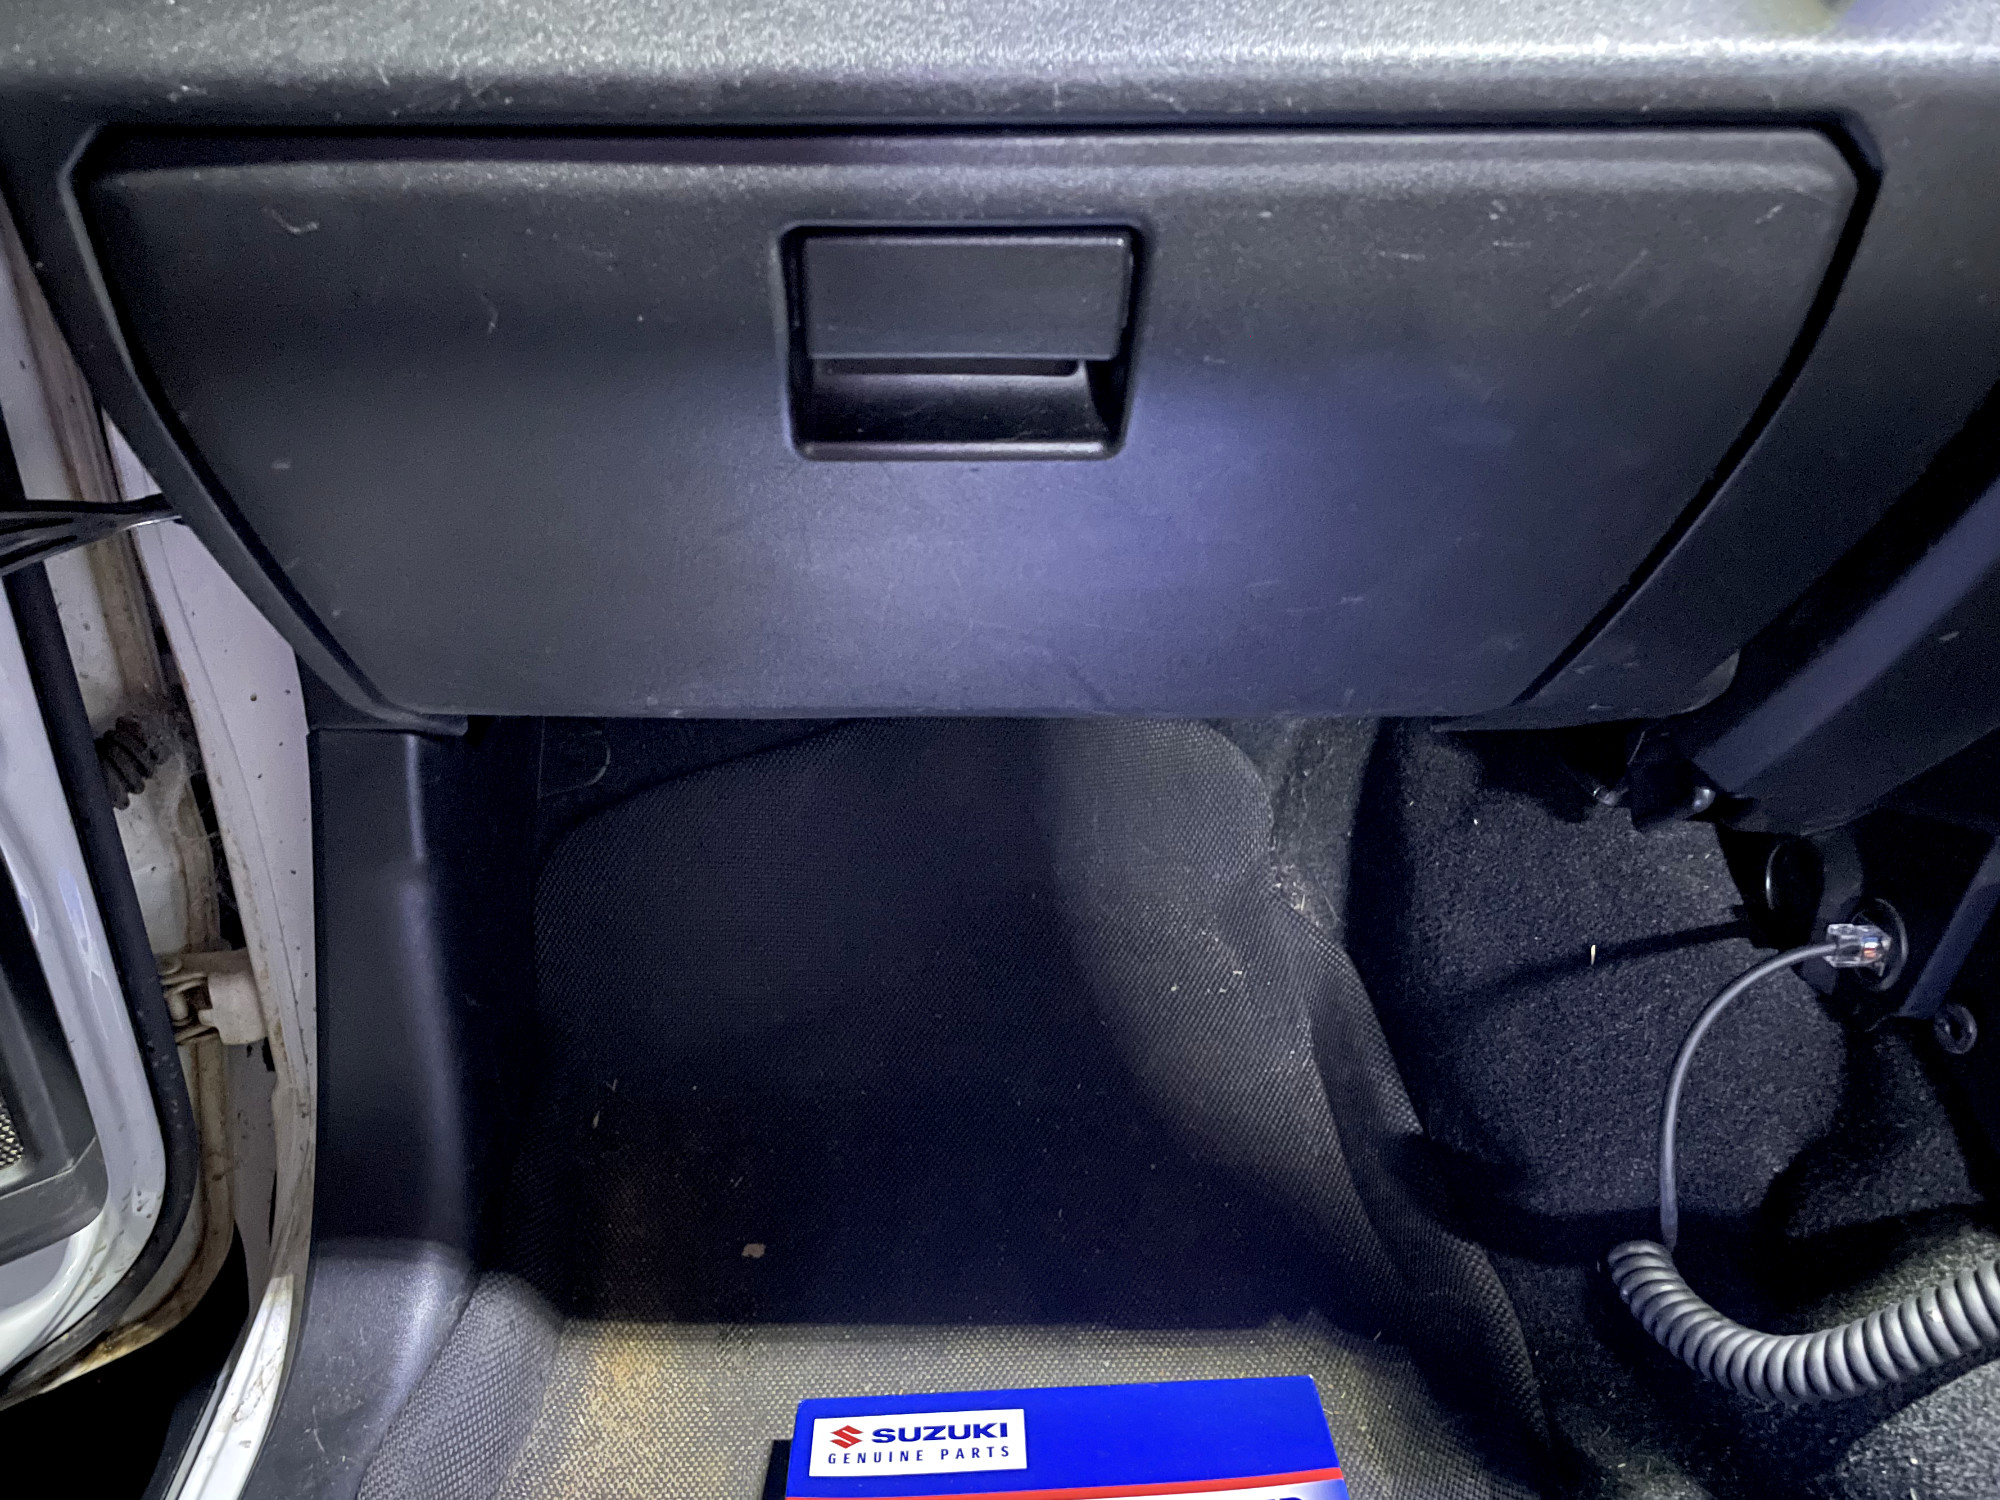
Open the glove box and empty it. The glove box is retained from fully coming down by two plastic pins on the sides.
If you squeeze each side you can get the pins to come in far enough to get past their stops. I find it is easier to do one side then the other.
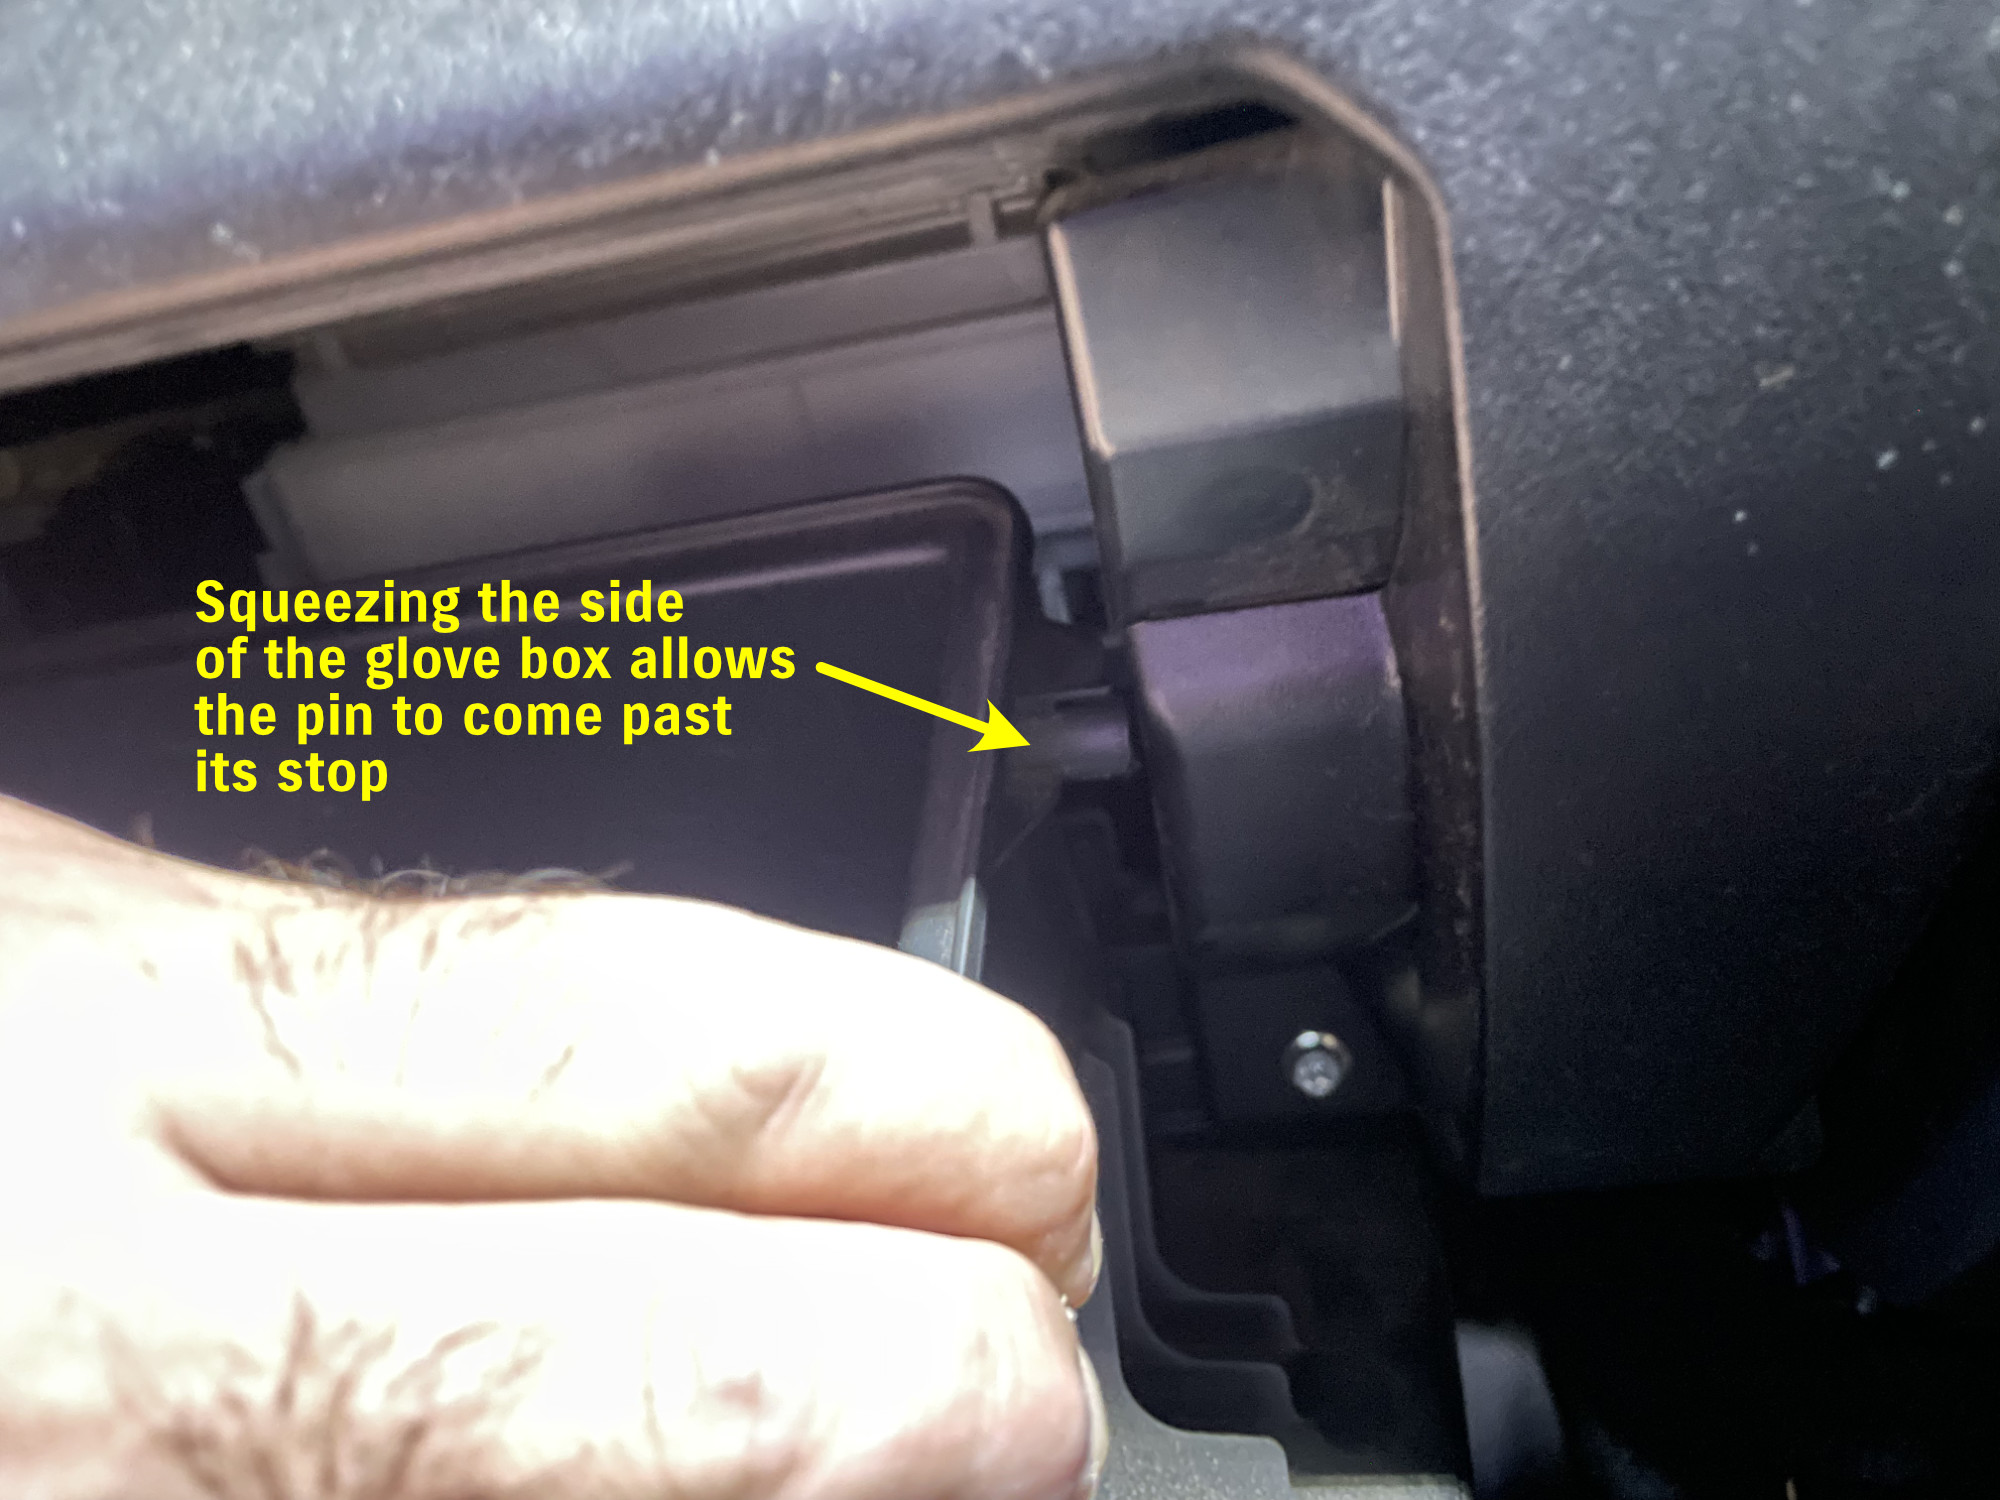
Note that it does kinda need a bit of force and feels like you might break something, but so far in my 6 years of changing these I haven’t! Just be warned it takes a bit of force and a little thinking and getting stuff to move just the right way to get it to come past the stops and fully open the glove box up. This reveals the plastic door behind which the cabin filter resides.

Pull the old one out; they get pretty dusty pretty fast and end up with a few more interesting things on them (warning: arachnid in next picture)

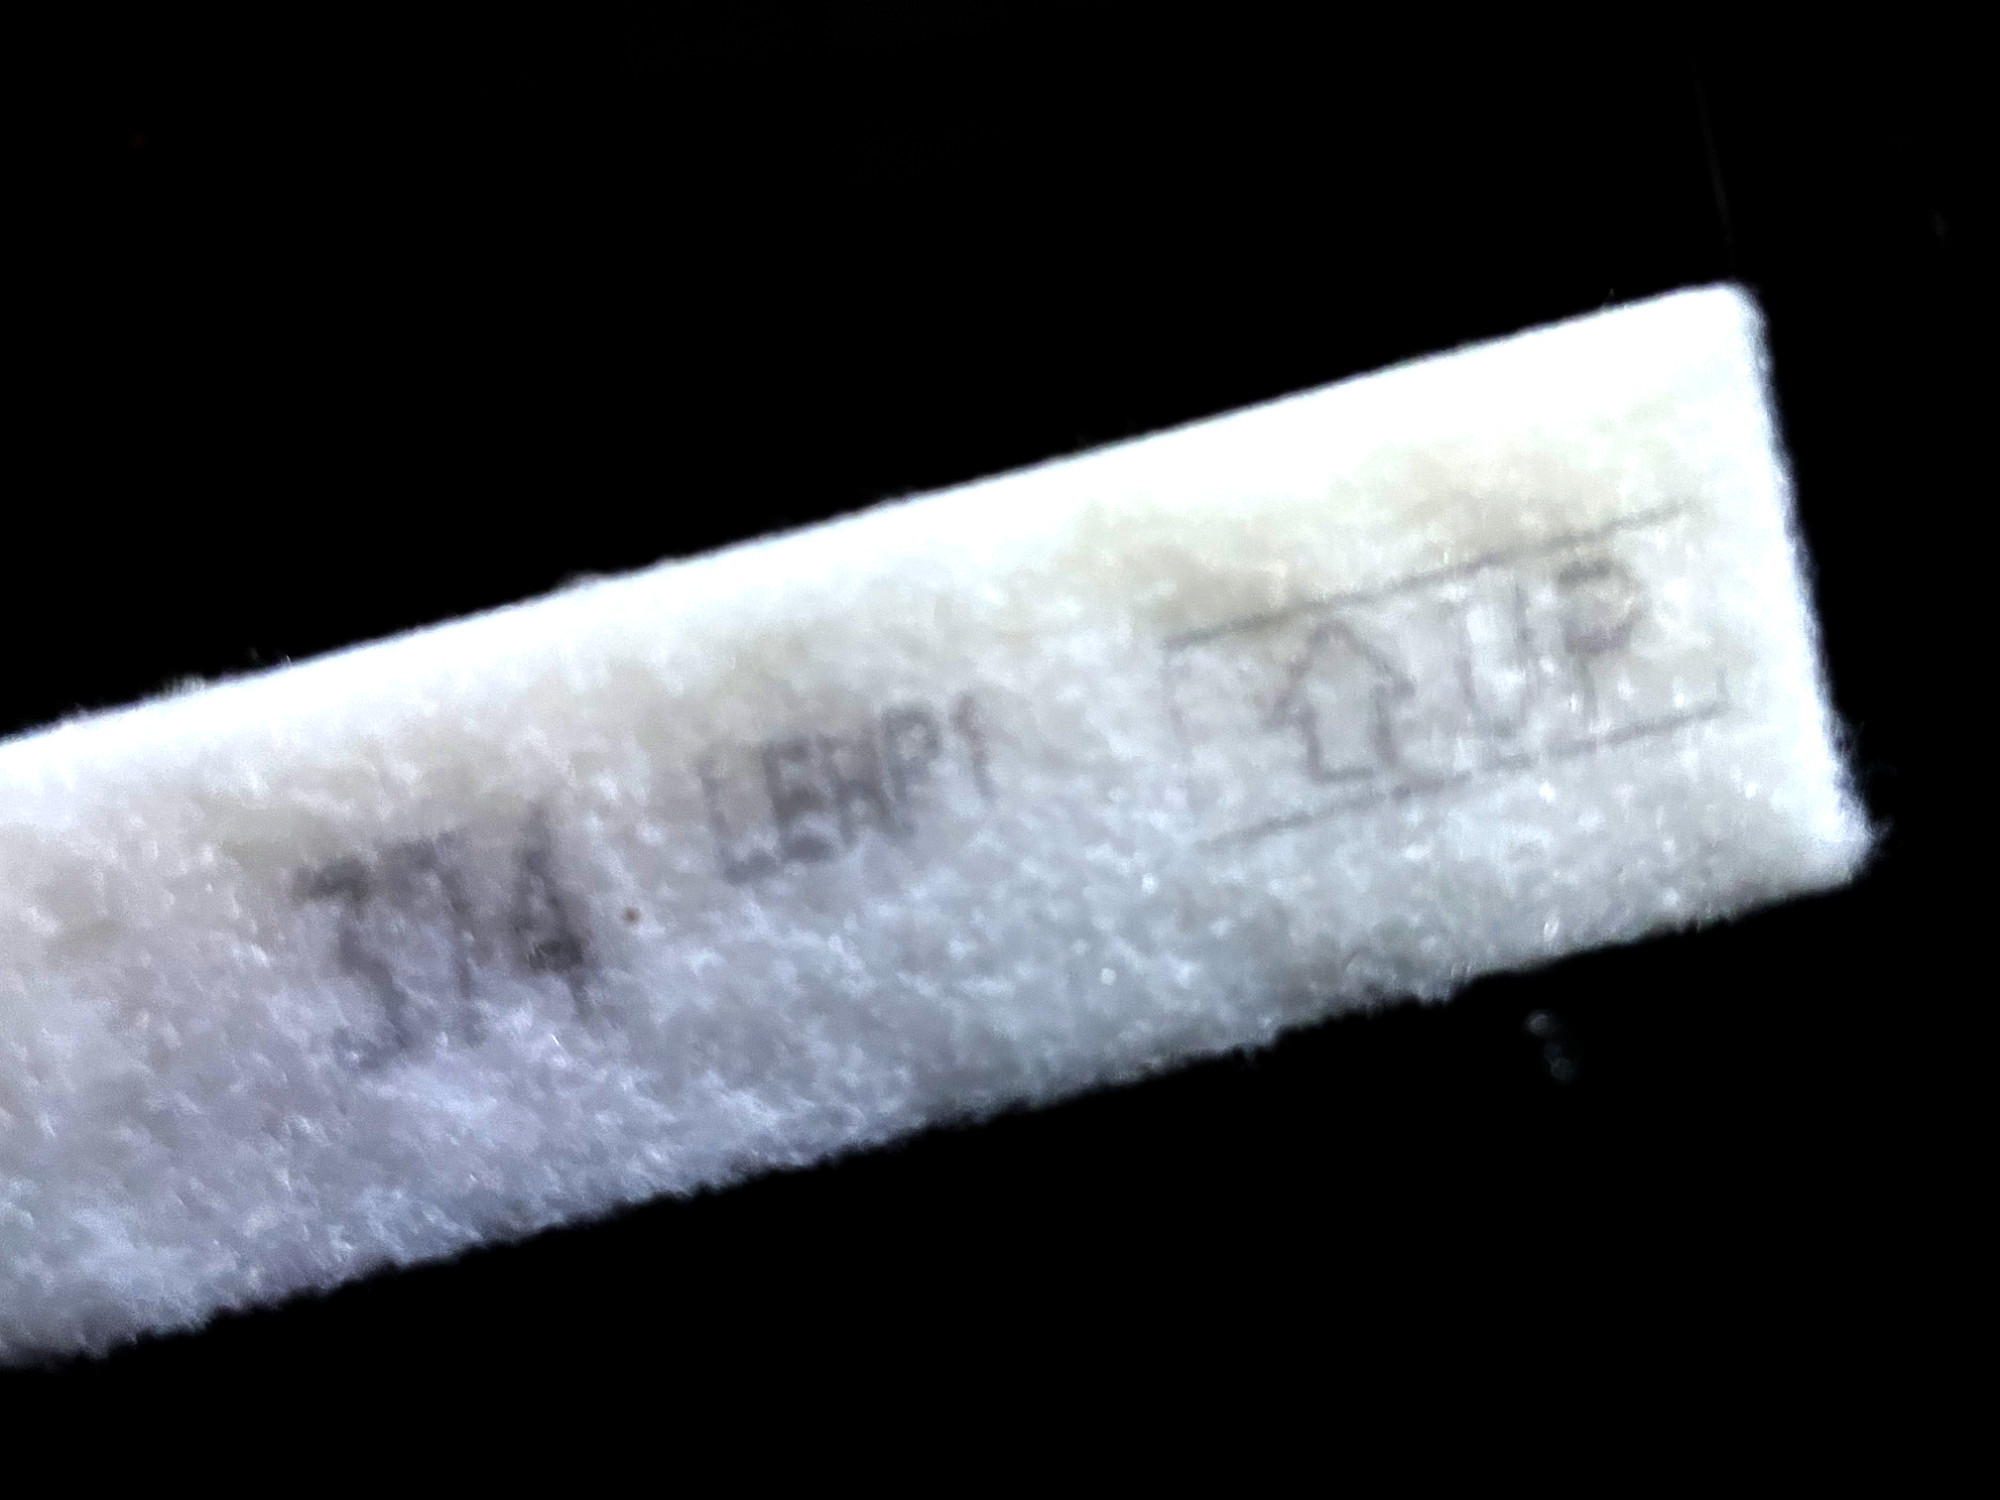
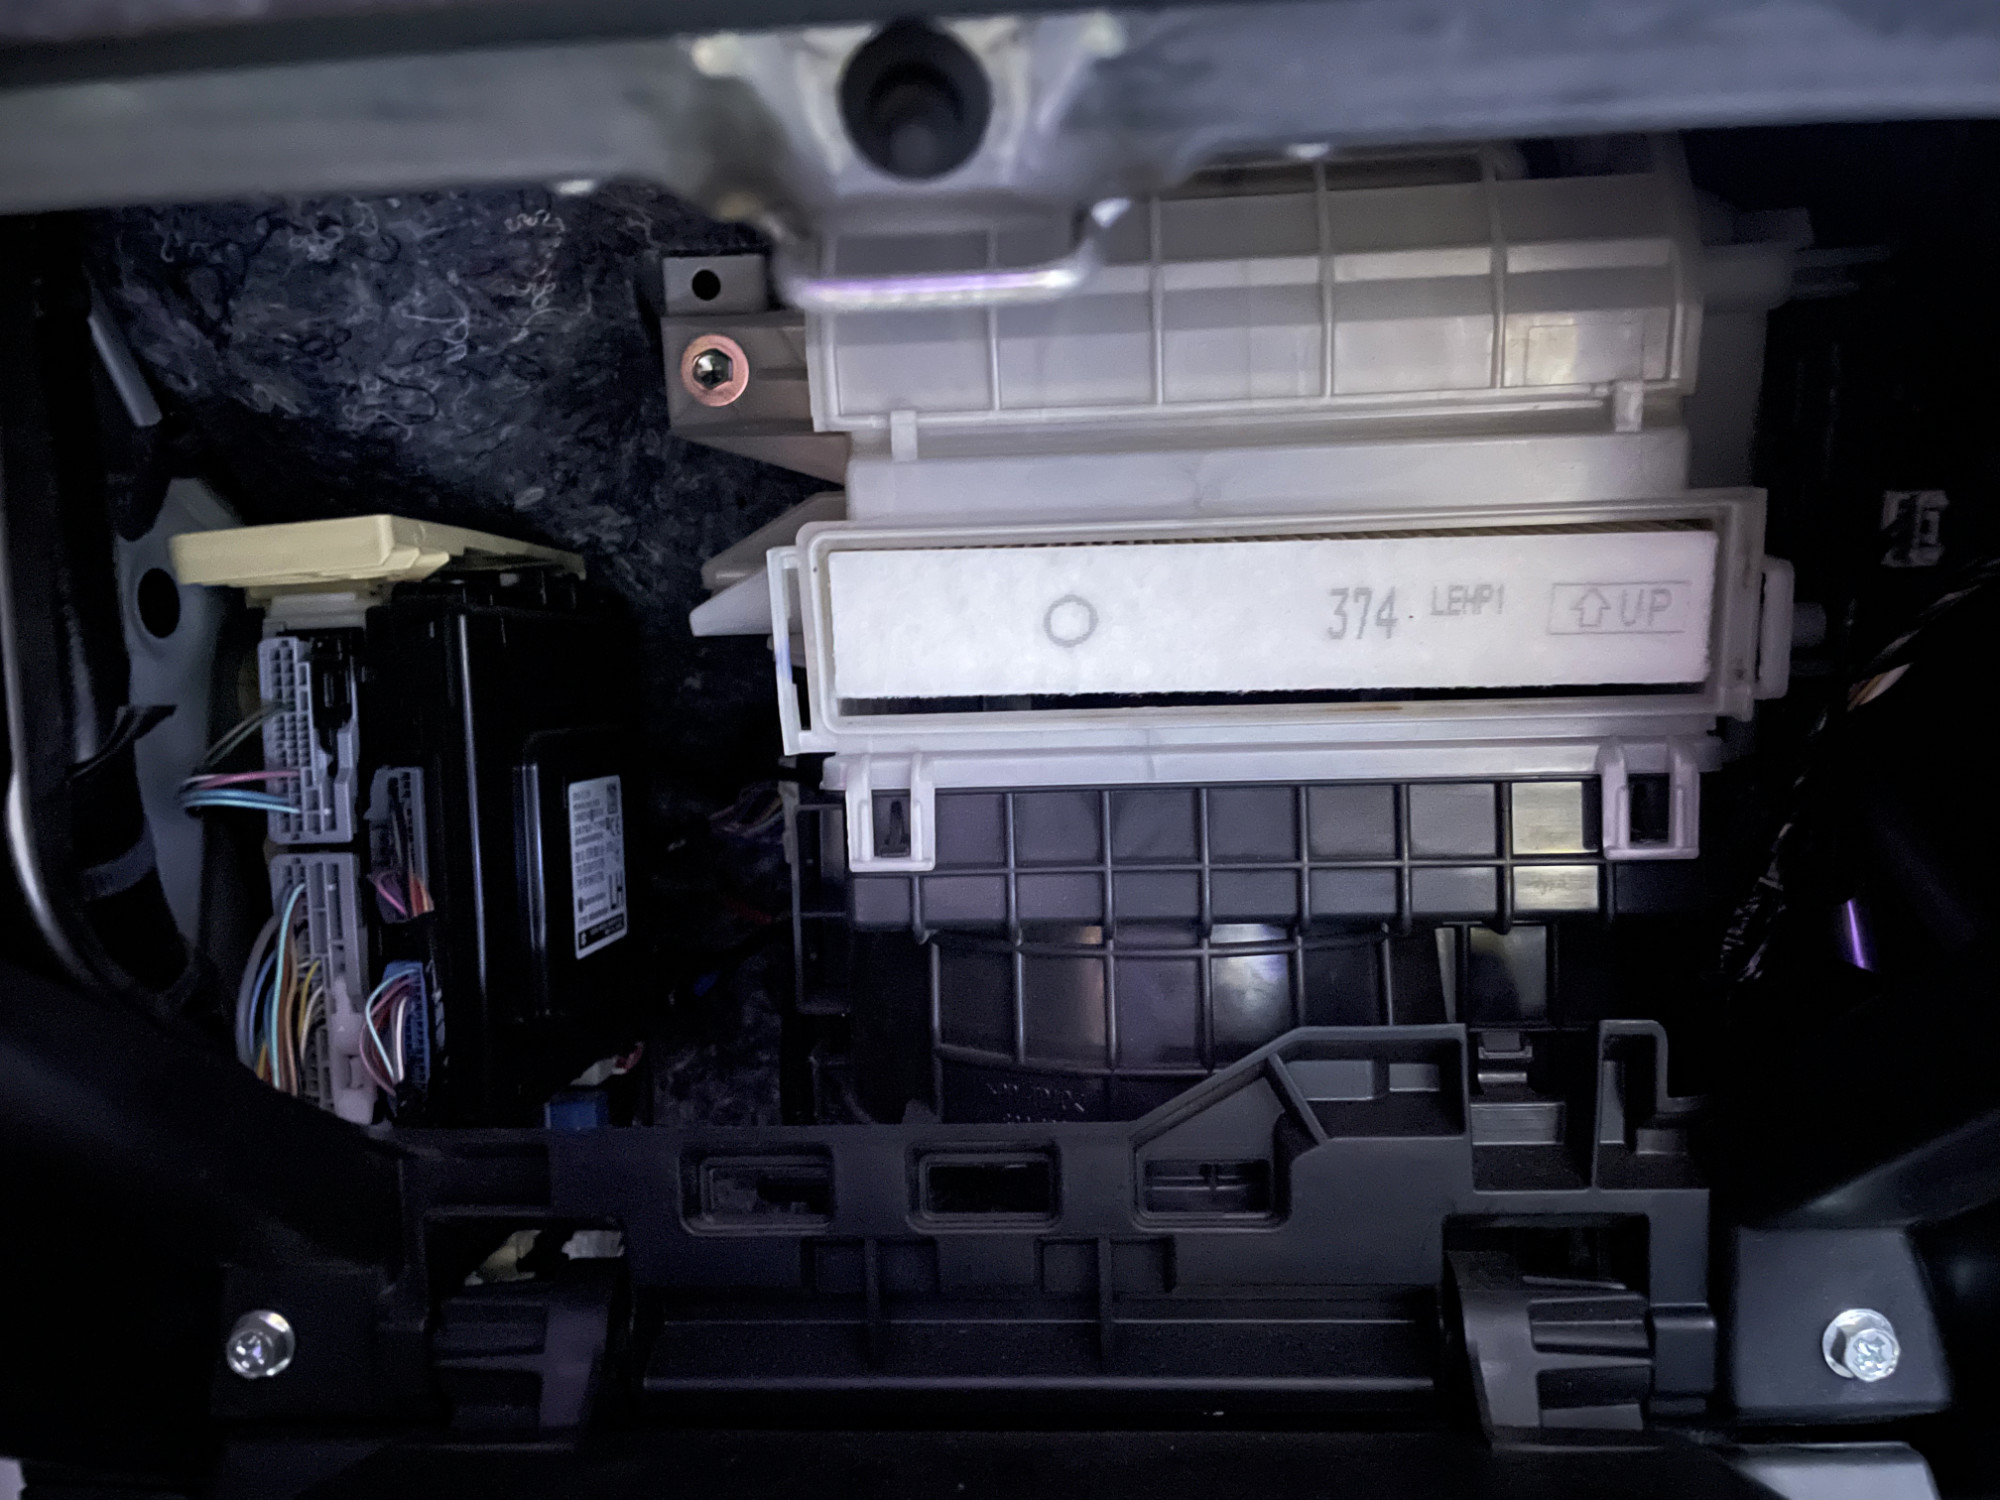
Your new filter just goes back in; note that they quite often have an orientation. The factory ones have a printed UP direction on them which makes them pretty easy to get right.
Just slide the filter in till it’s all the way into the filter housing.
Plastic door goes back on, and the glove box pins are pushed in a bit to get them past the stops again and all is done. This part is so simple I forgot to get photos, but when you’re done it should look like the start with the glove box all closed up.
Pollen filter part numbers
The factory filters are pretty cheap and so I stick with them.
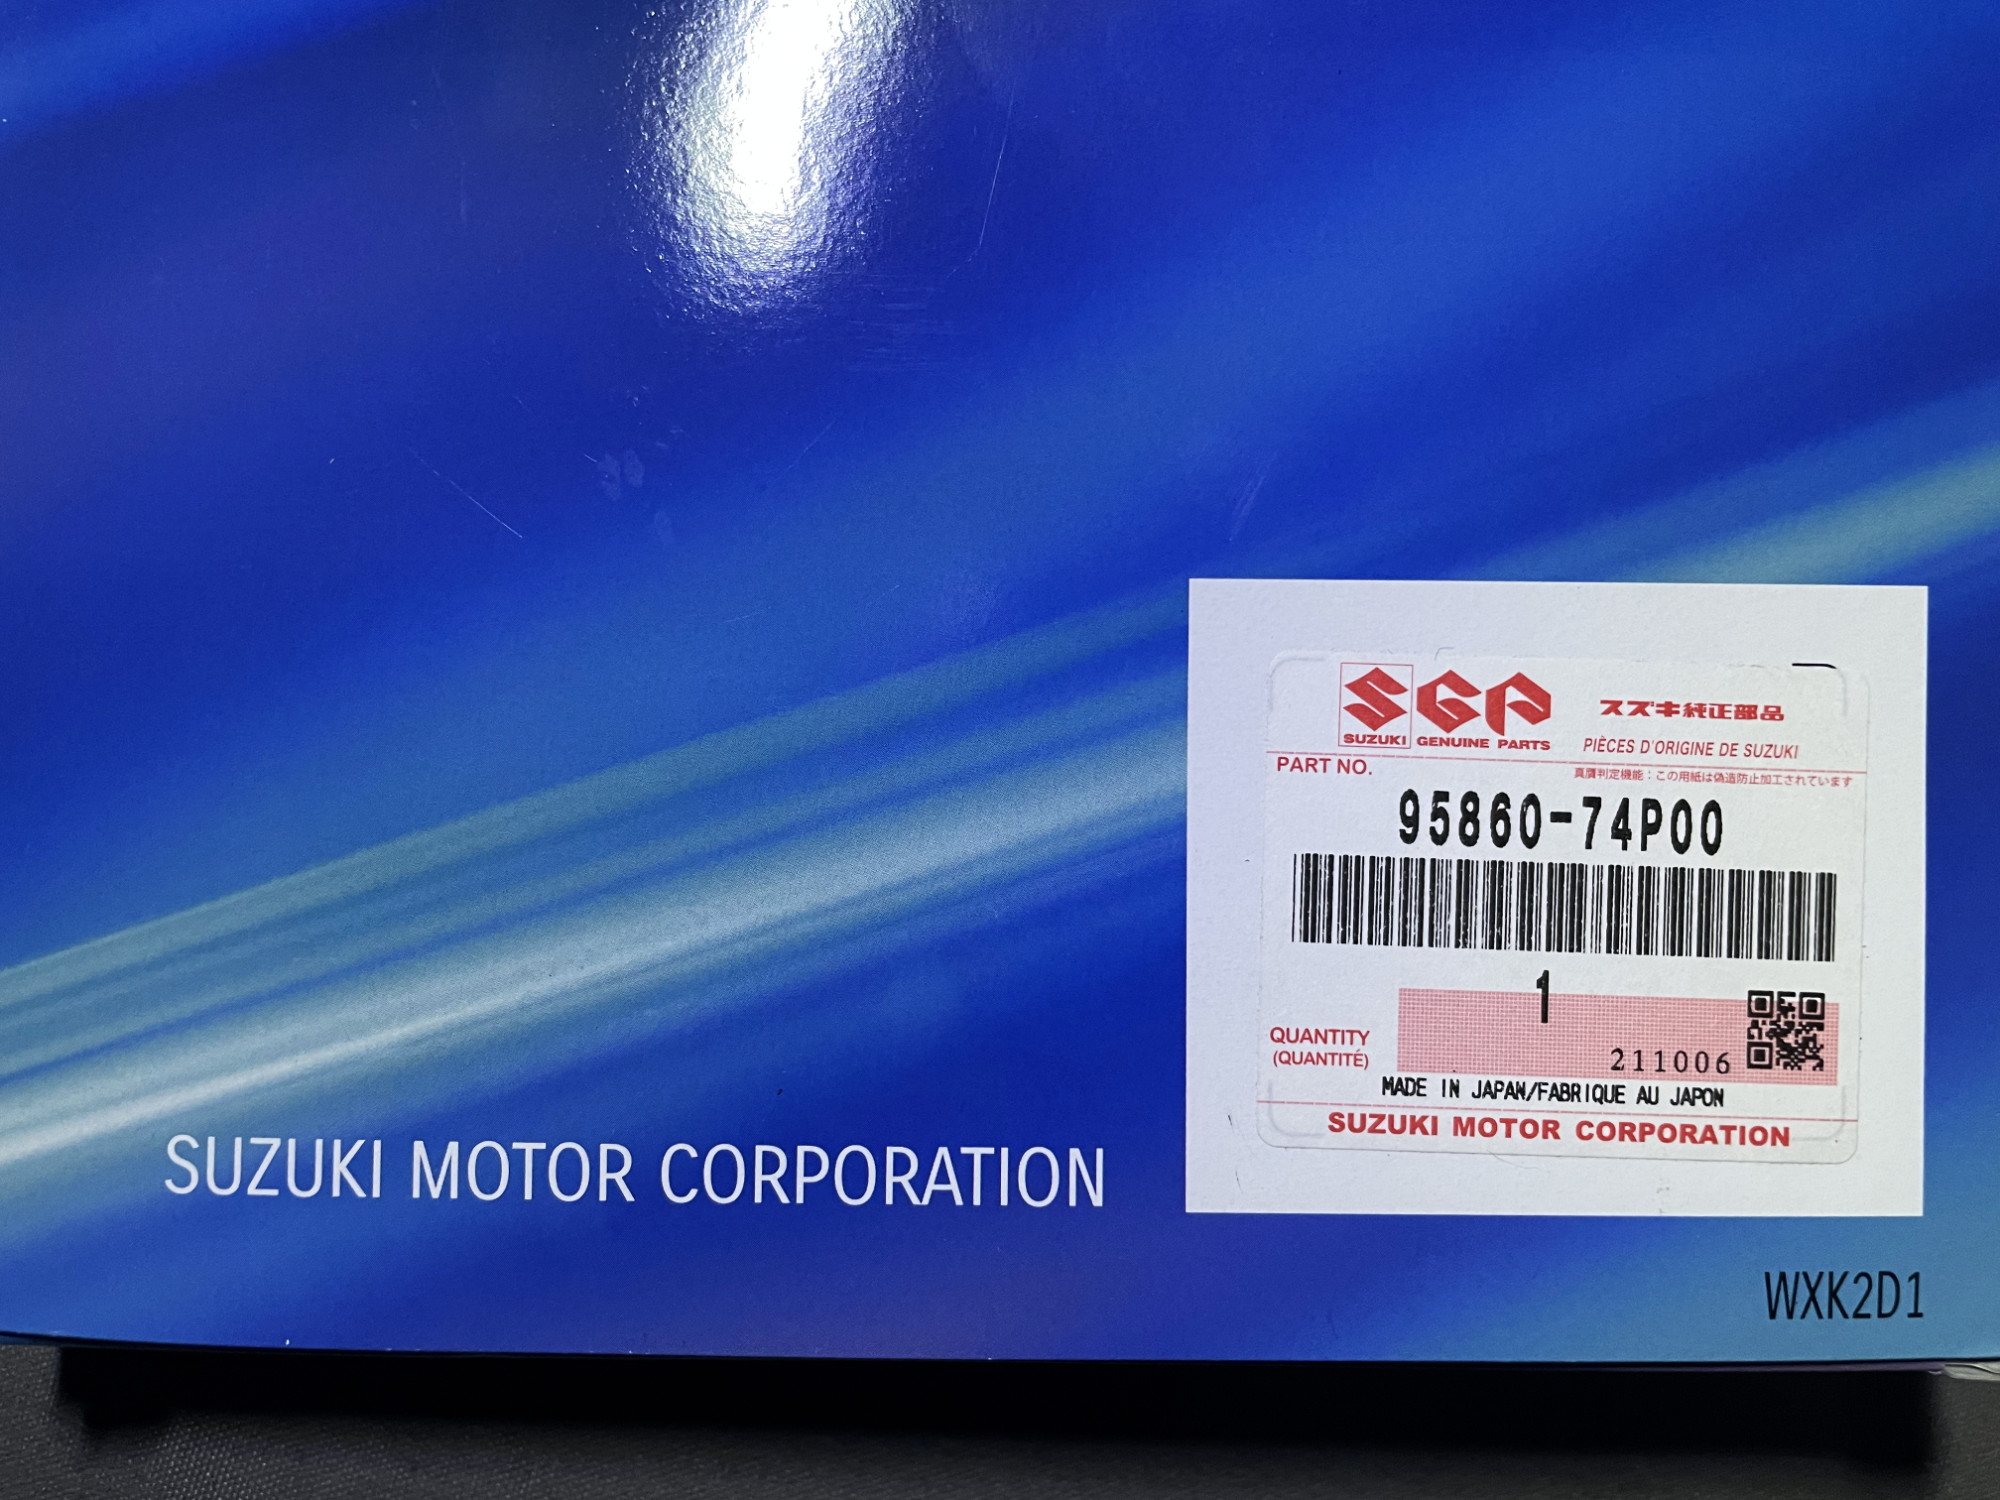
- Suzuki OEM: 95860-74P00
- Denso: DCC7010
- Ryco: RCA403P
- Wesfil: WACF0275
- Bosch: 1987435161
- Blue Print: ADK82516
- Sakura: CAC-14120
There are a couple of other factory filter options e.g. a PM2.5 filtering one is (apparently) part 99250-78R00.
Oil changes
Engine oil
Oil specifications
Viscosity recommendations do vary according to climate and stuff, but for Australia 0W-20 is the preferred one. This is probably for economy; a lot of dealerships seem to go for a 5W-30 which is probably better for hotter conditions. Oil is also meant to meet API SG, SH, SJ, SL, SM, or SN specifications, but no other specific requirements are listed for it. I’d recommend a quality brand synthetic oil.
Capacity for oil change is specified at 3.9L, but this includes about 0.25L for the filter and 0.3L for stuff that probably still is in the engine. Safe option here as I described above is refill to somewhere between low and high on the dipstick and start it up once you’ve done the filter & check the level after running the engine for a minute or so.
Next up to consider is the filter and removing and refitting it. On the Jimny the filter is a little trick to access due to how it is recessed into the sump/block. For this task Suzuki recommend an oil filter tool with part number 09915–47341, which is superseeded by part number 09915-40611. This one cross references with a filter removal tool for a lot of Suzuki motorcyles like basically every year of GSX-R1000 etc. I have one, however, when I went to take pics of this I discovered I’ve never got it back from loaning it out…
NB this filter removal tool probably does not suit non OEM filters which often have a different tool pattern on them.
Procedure
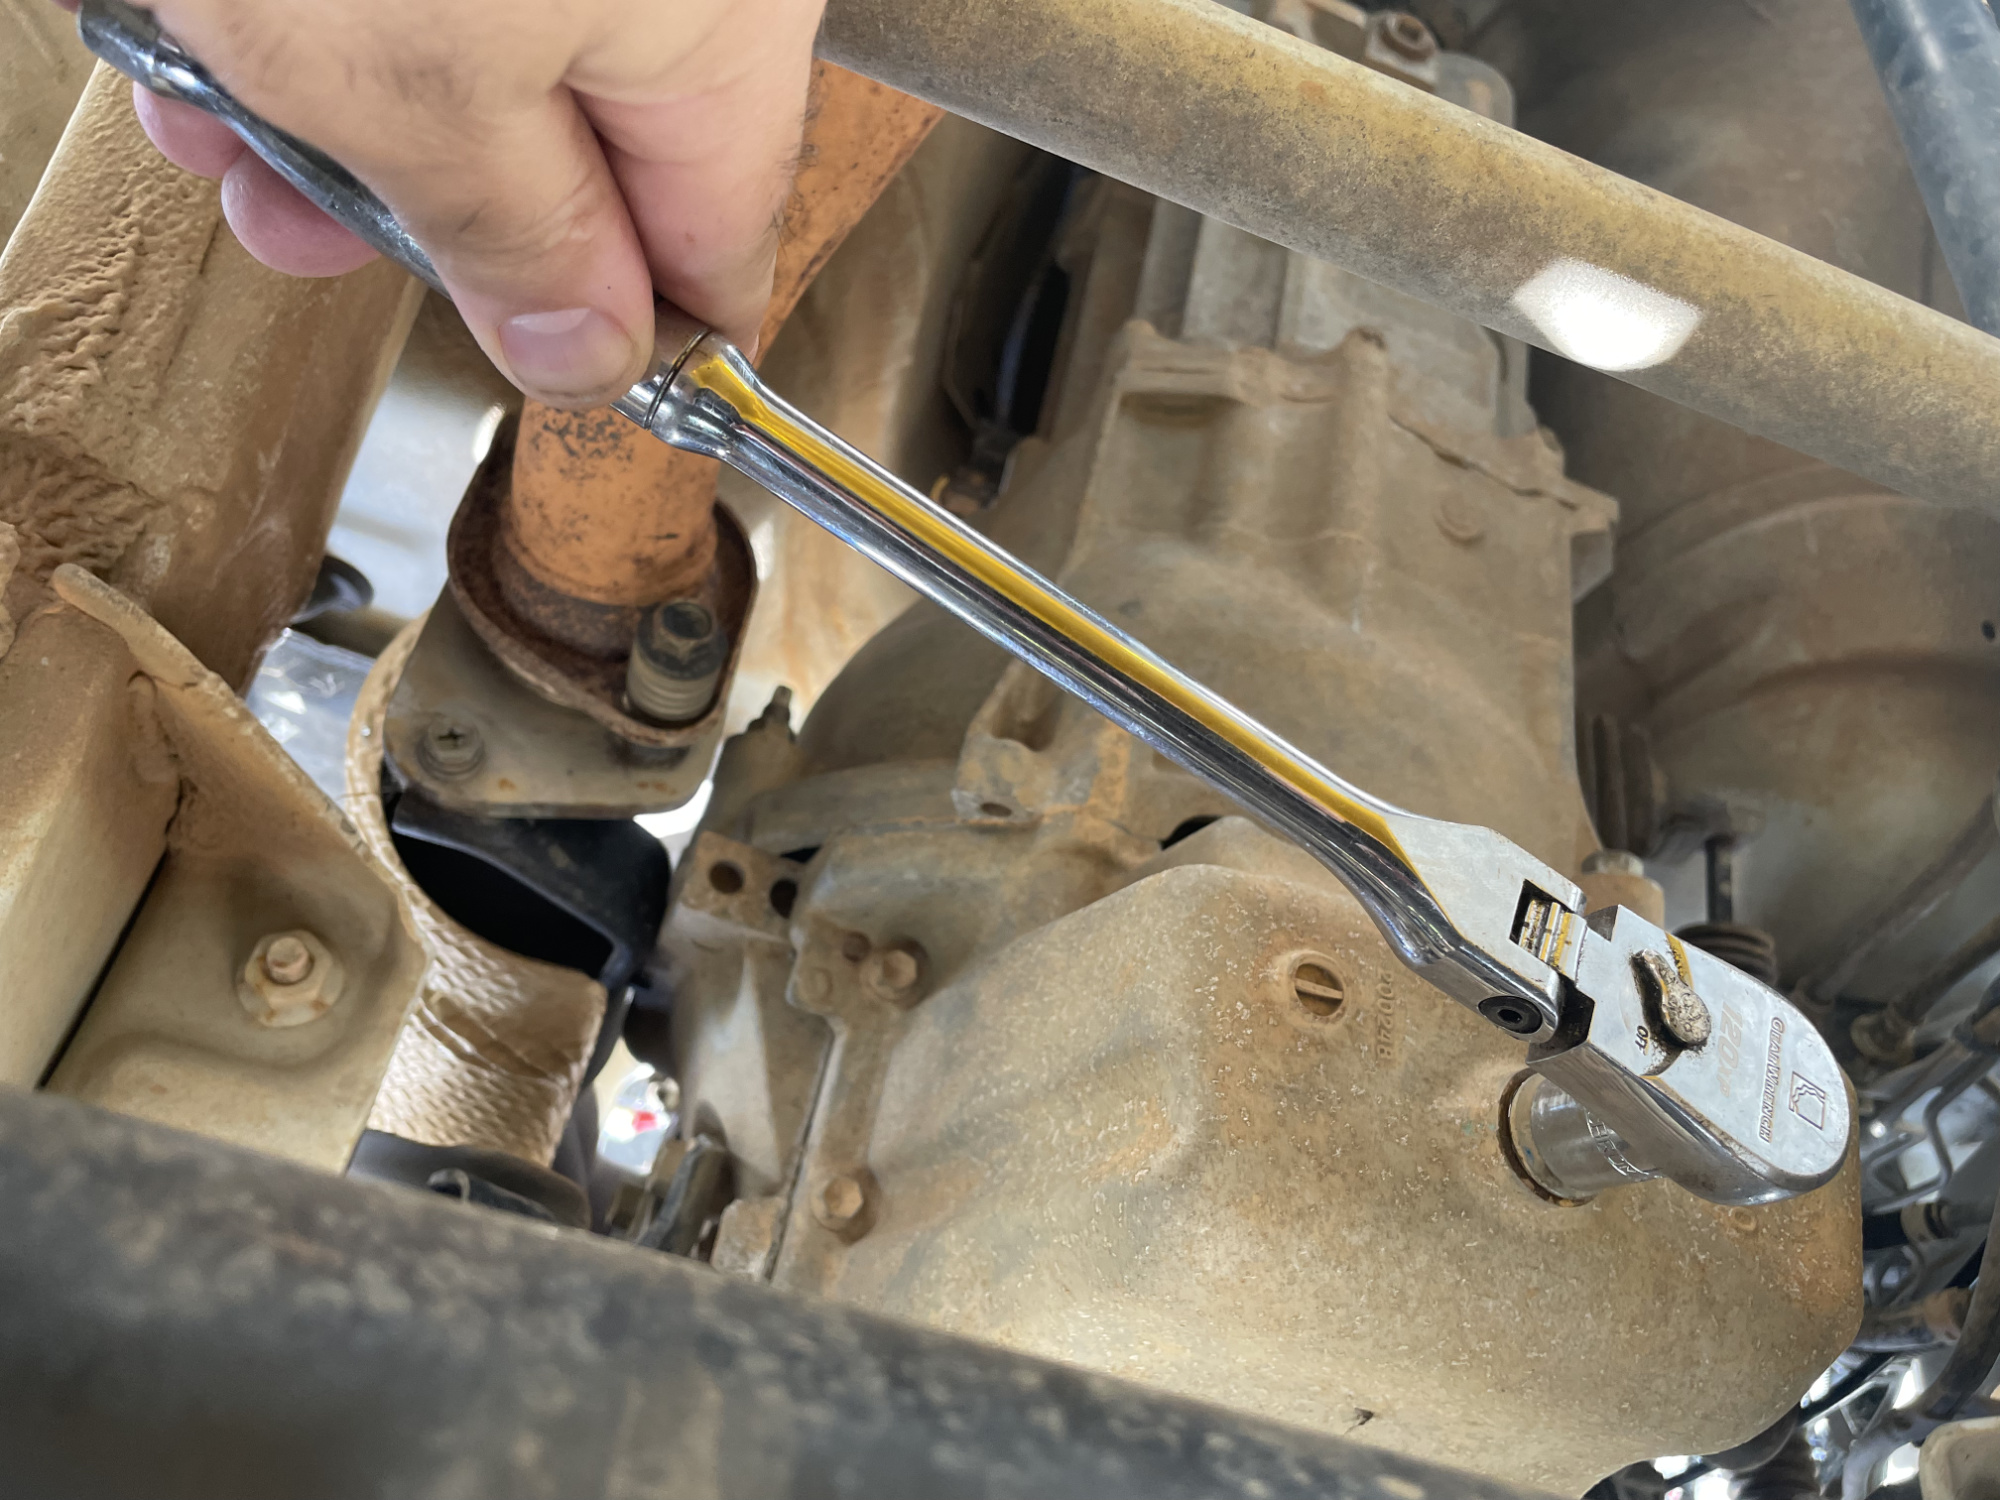
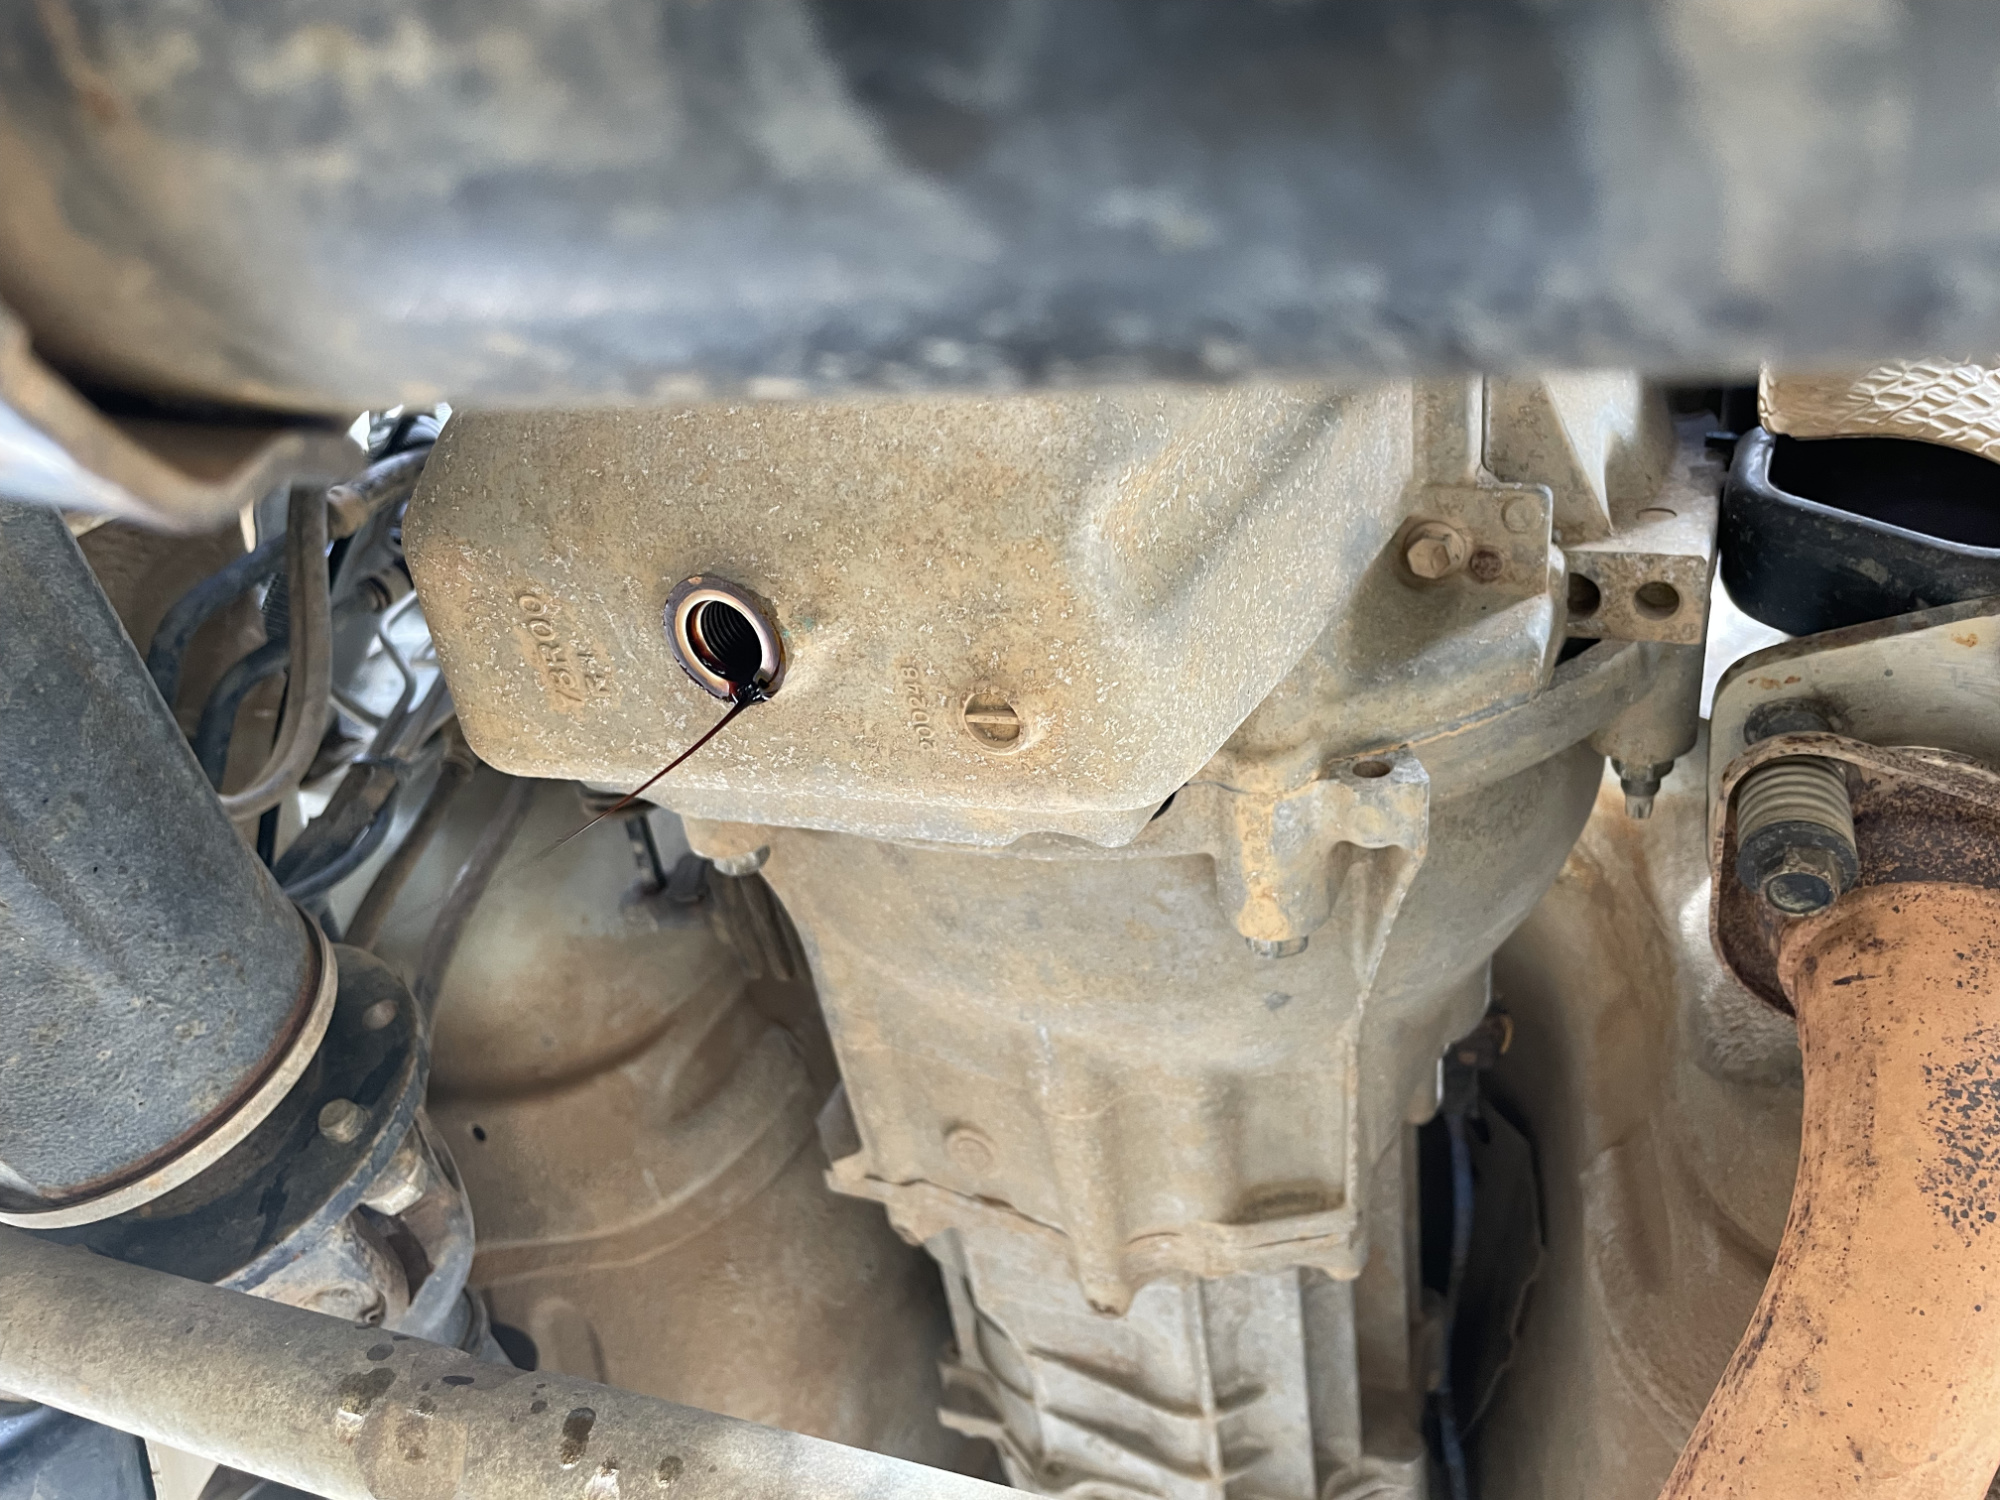
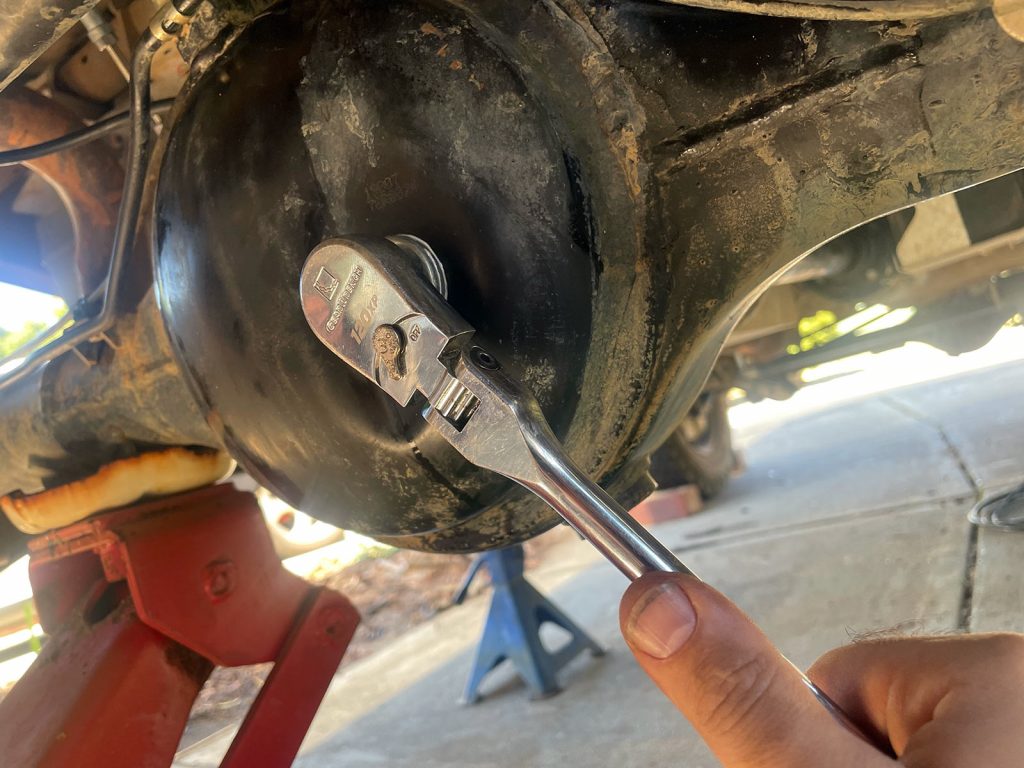
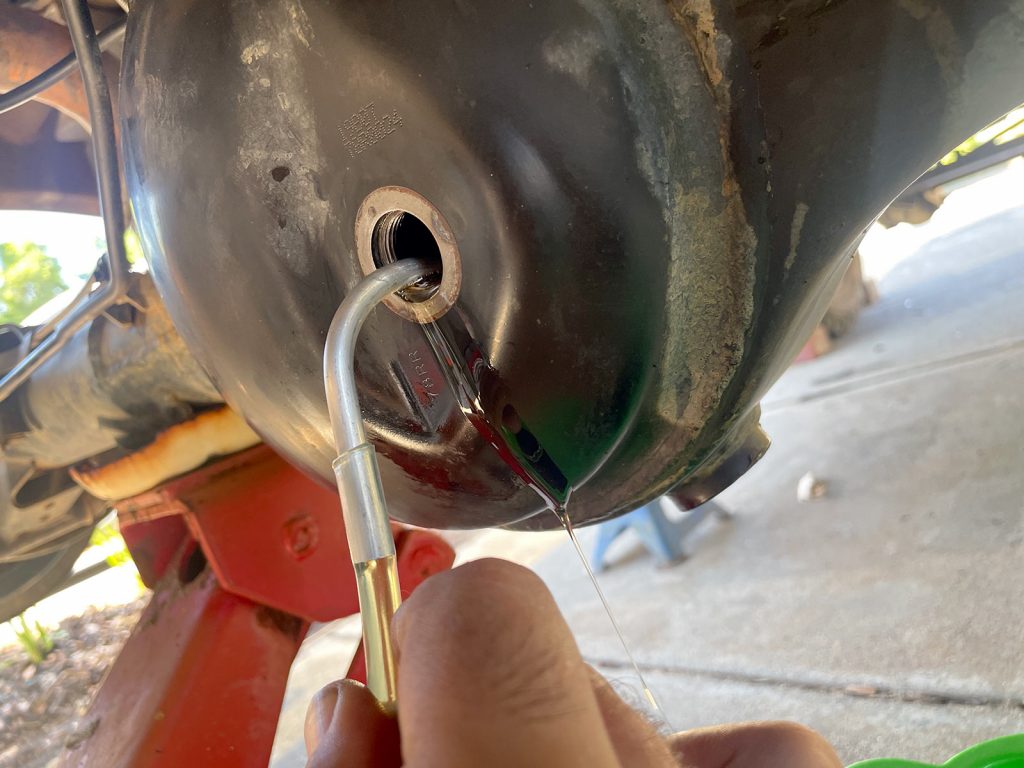
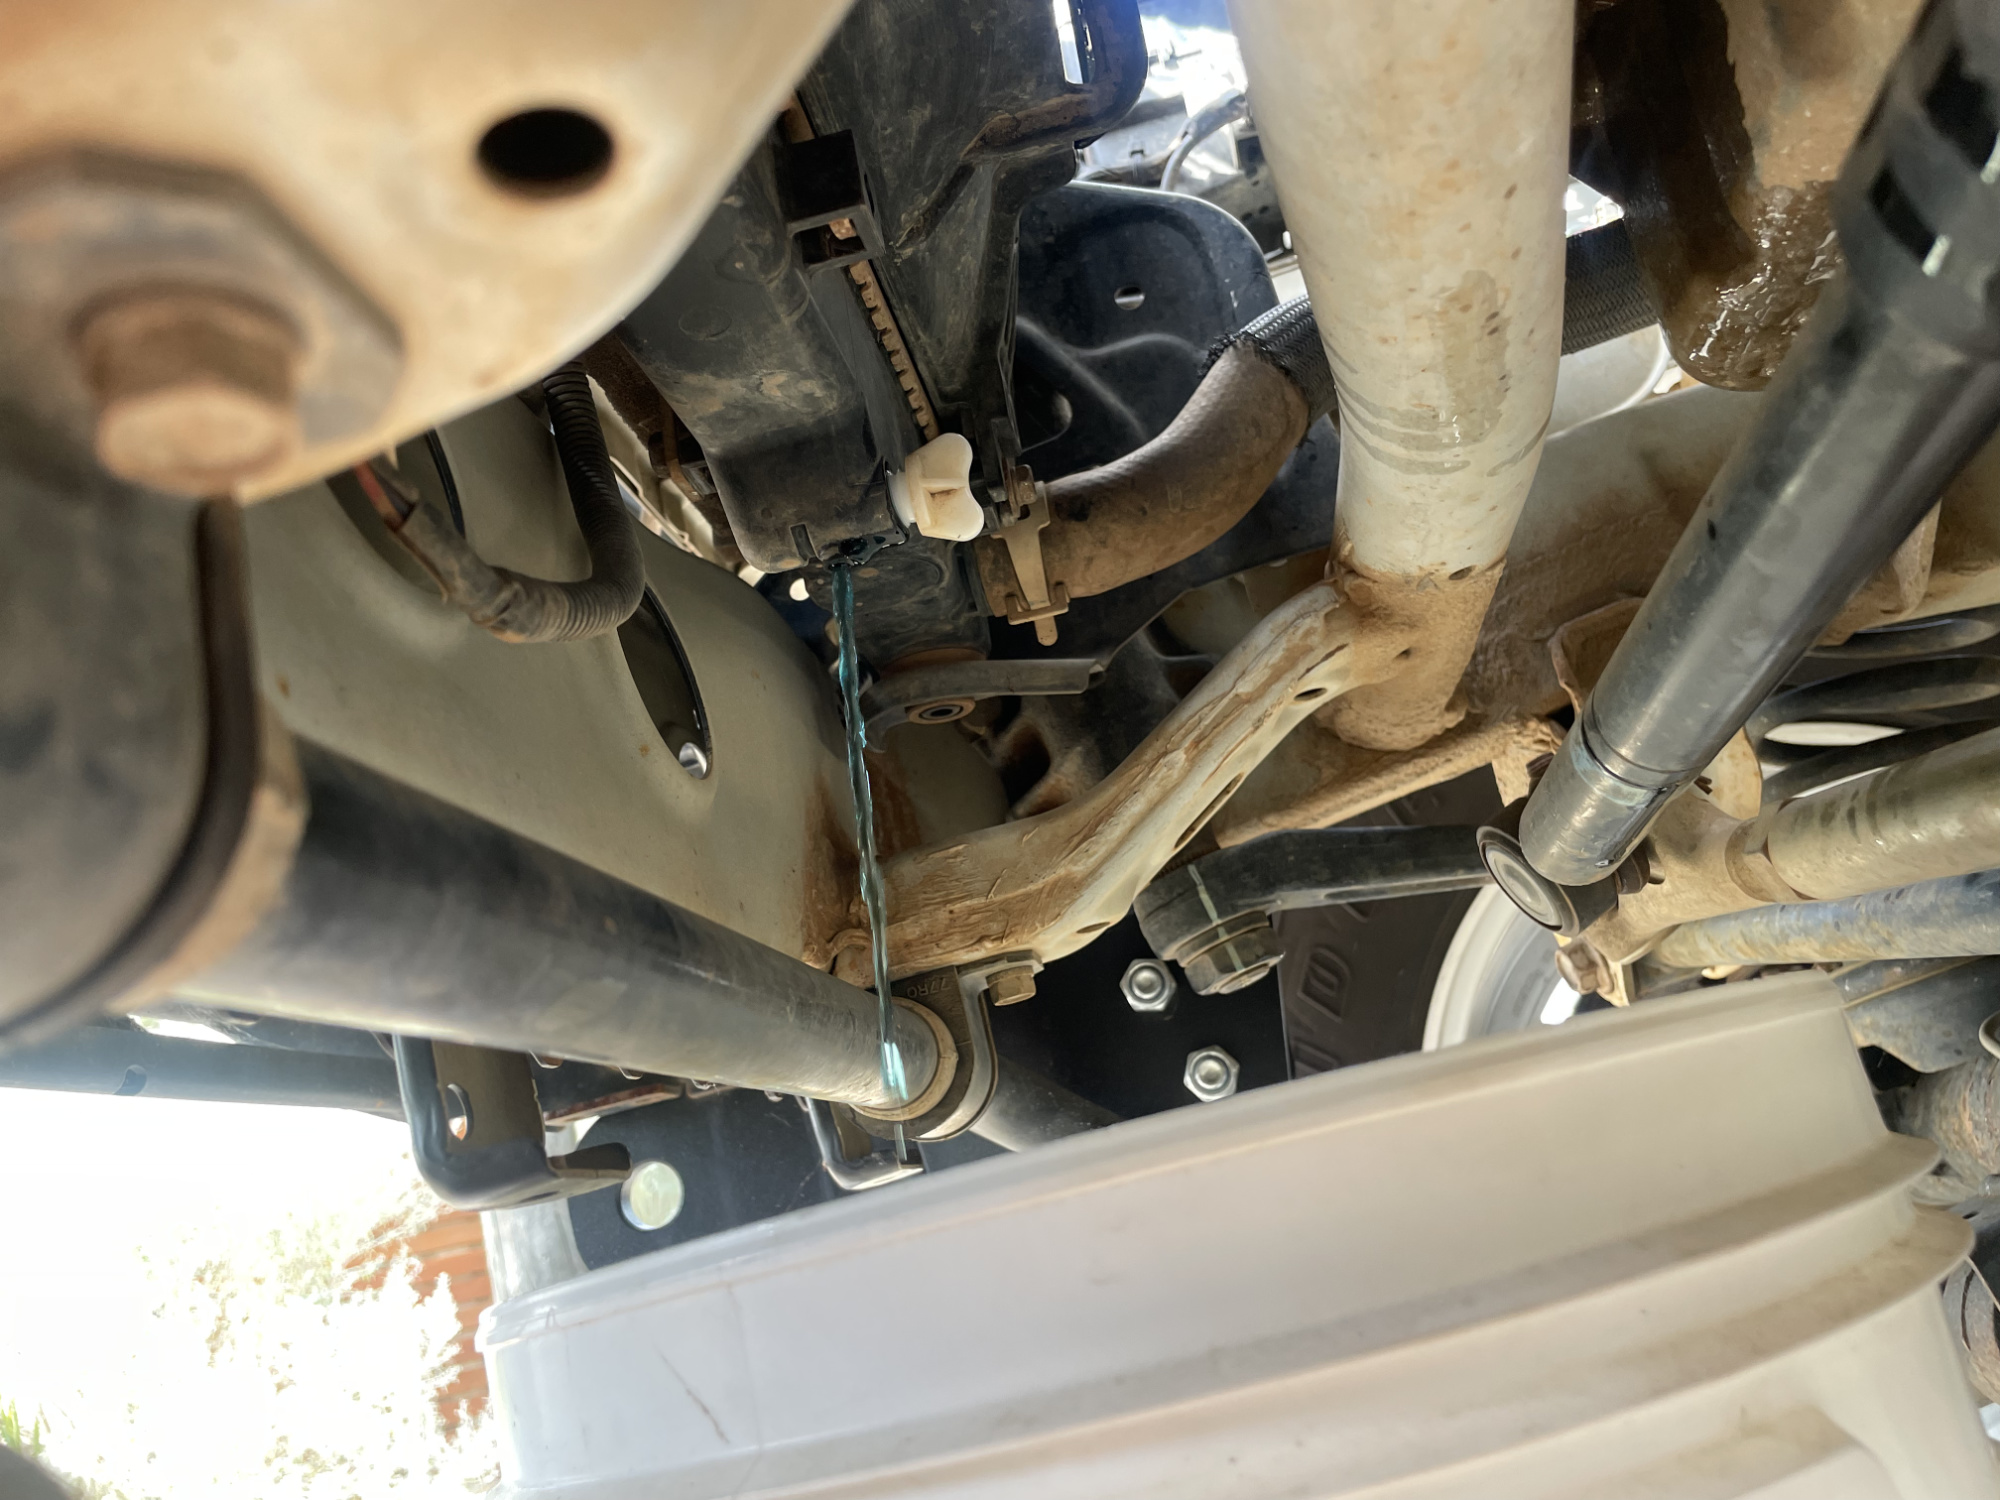
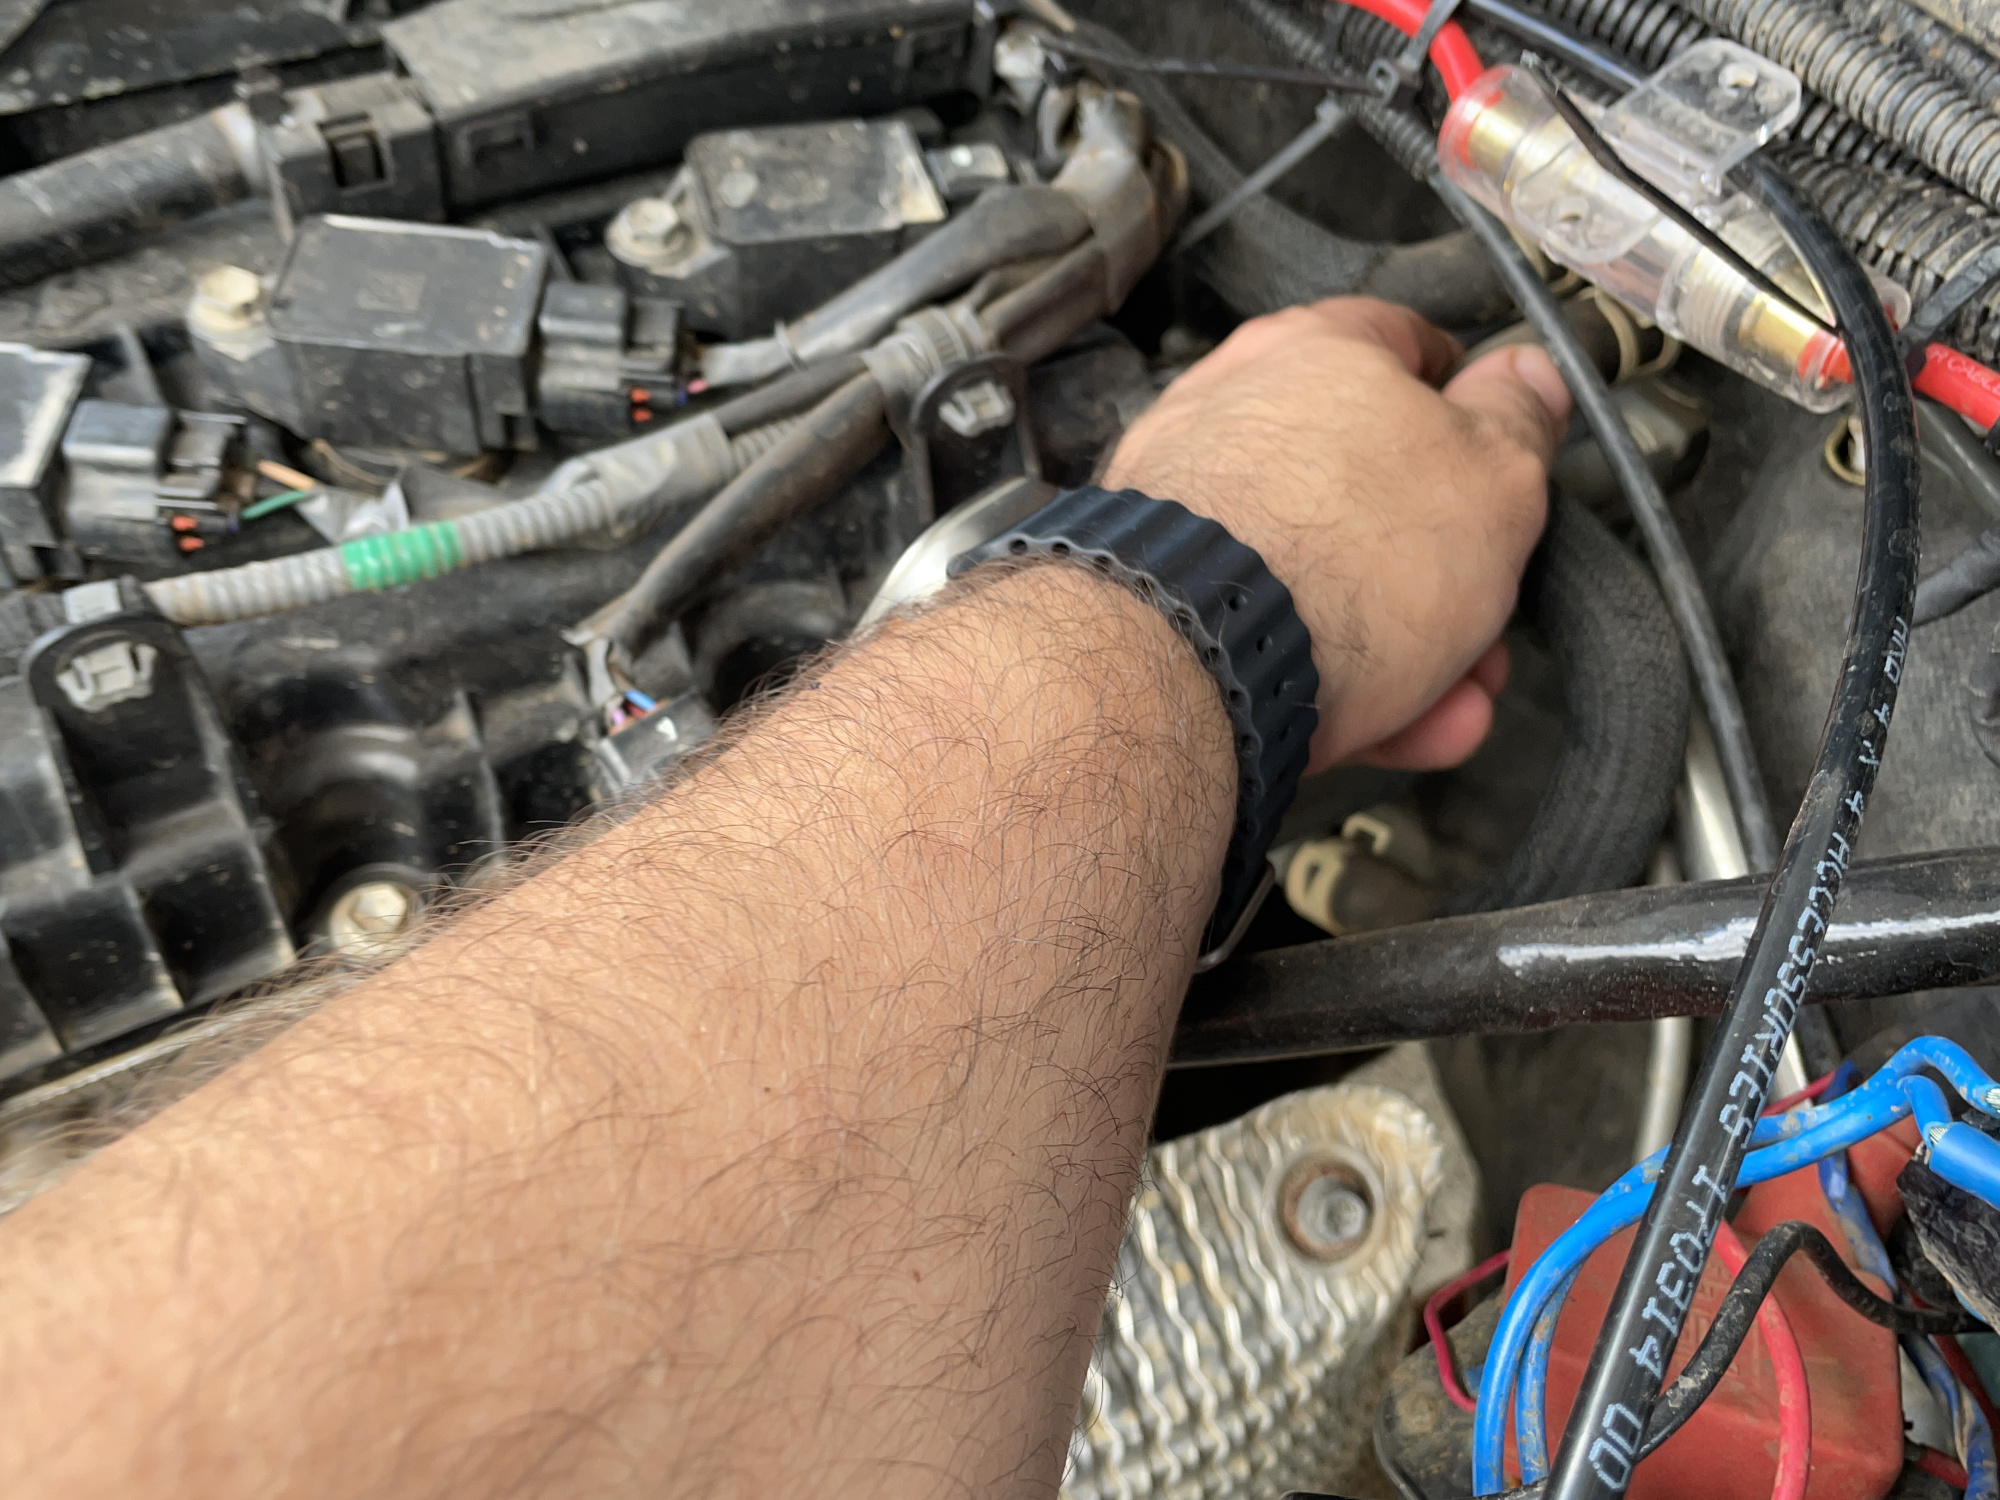
You need to make sure you’ve identified the oil sump plug; I’ve known at least one person to mistakenly drain an automatic transmission. Looking from the passengers side you can see the very deeply shaped alloy sump and also the oil filter in front of it.

14 mm headed bolt if it’s a factory sump plug. Undoes like normal; if you struggle for access or strength you can put your ratchet close to the front axle housing and use it for some leverage to help pull.
Note the sump plug is pretty long, you have a heap of thread before it comes out.
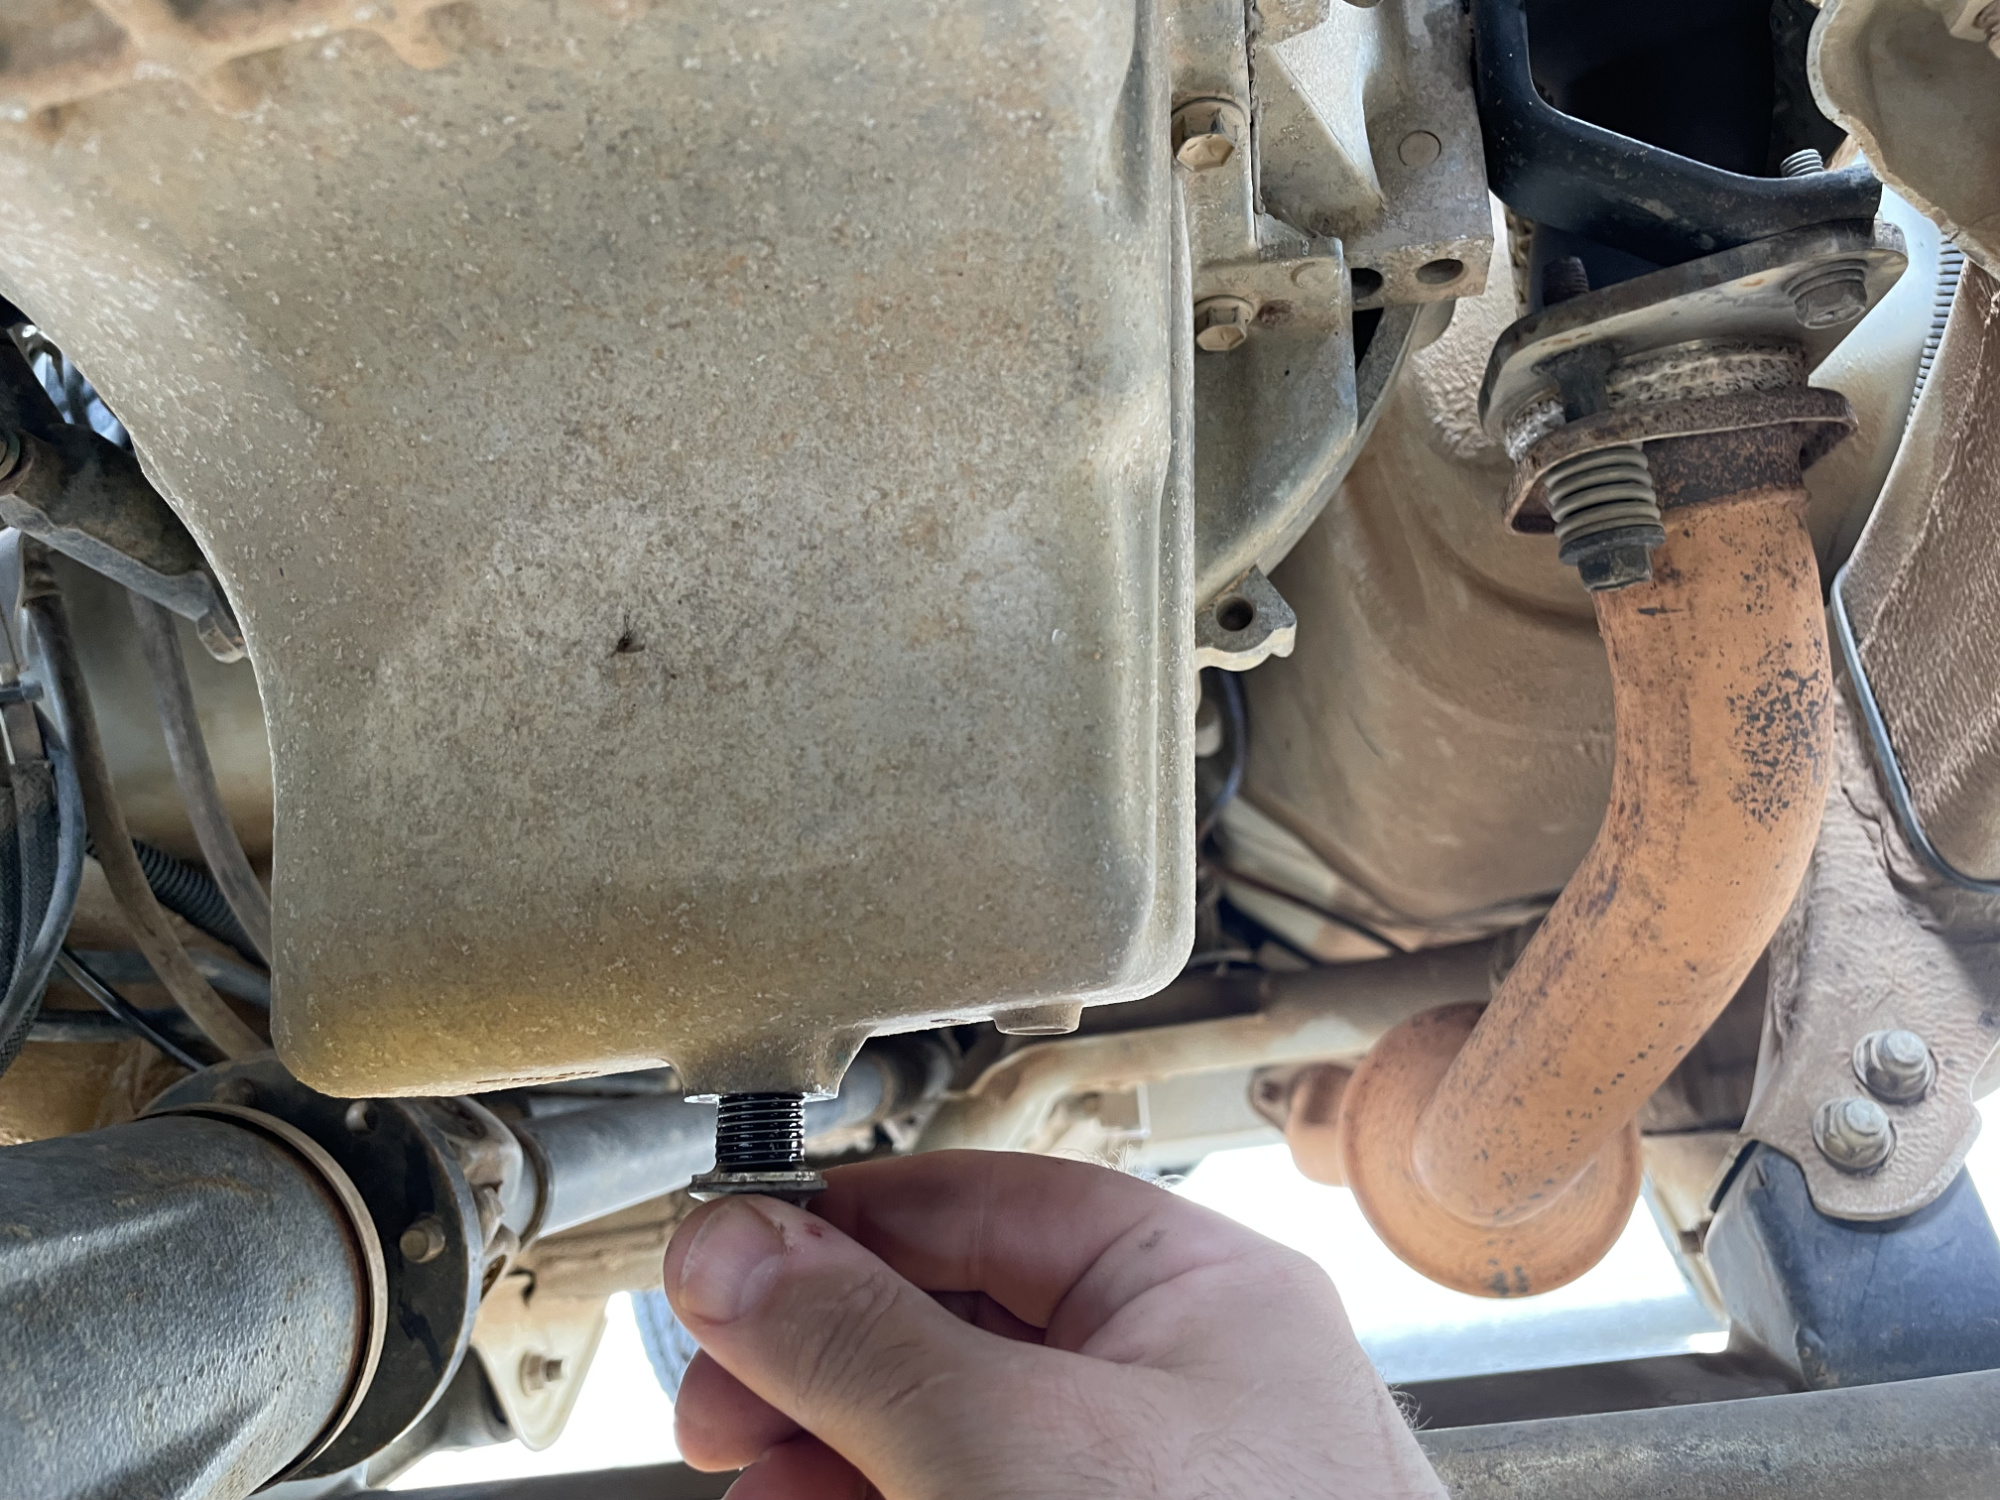
There’s a heap of room here so you have a nice clear path down to the drain pan you’re using.
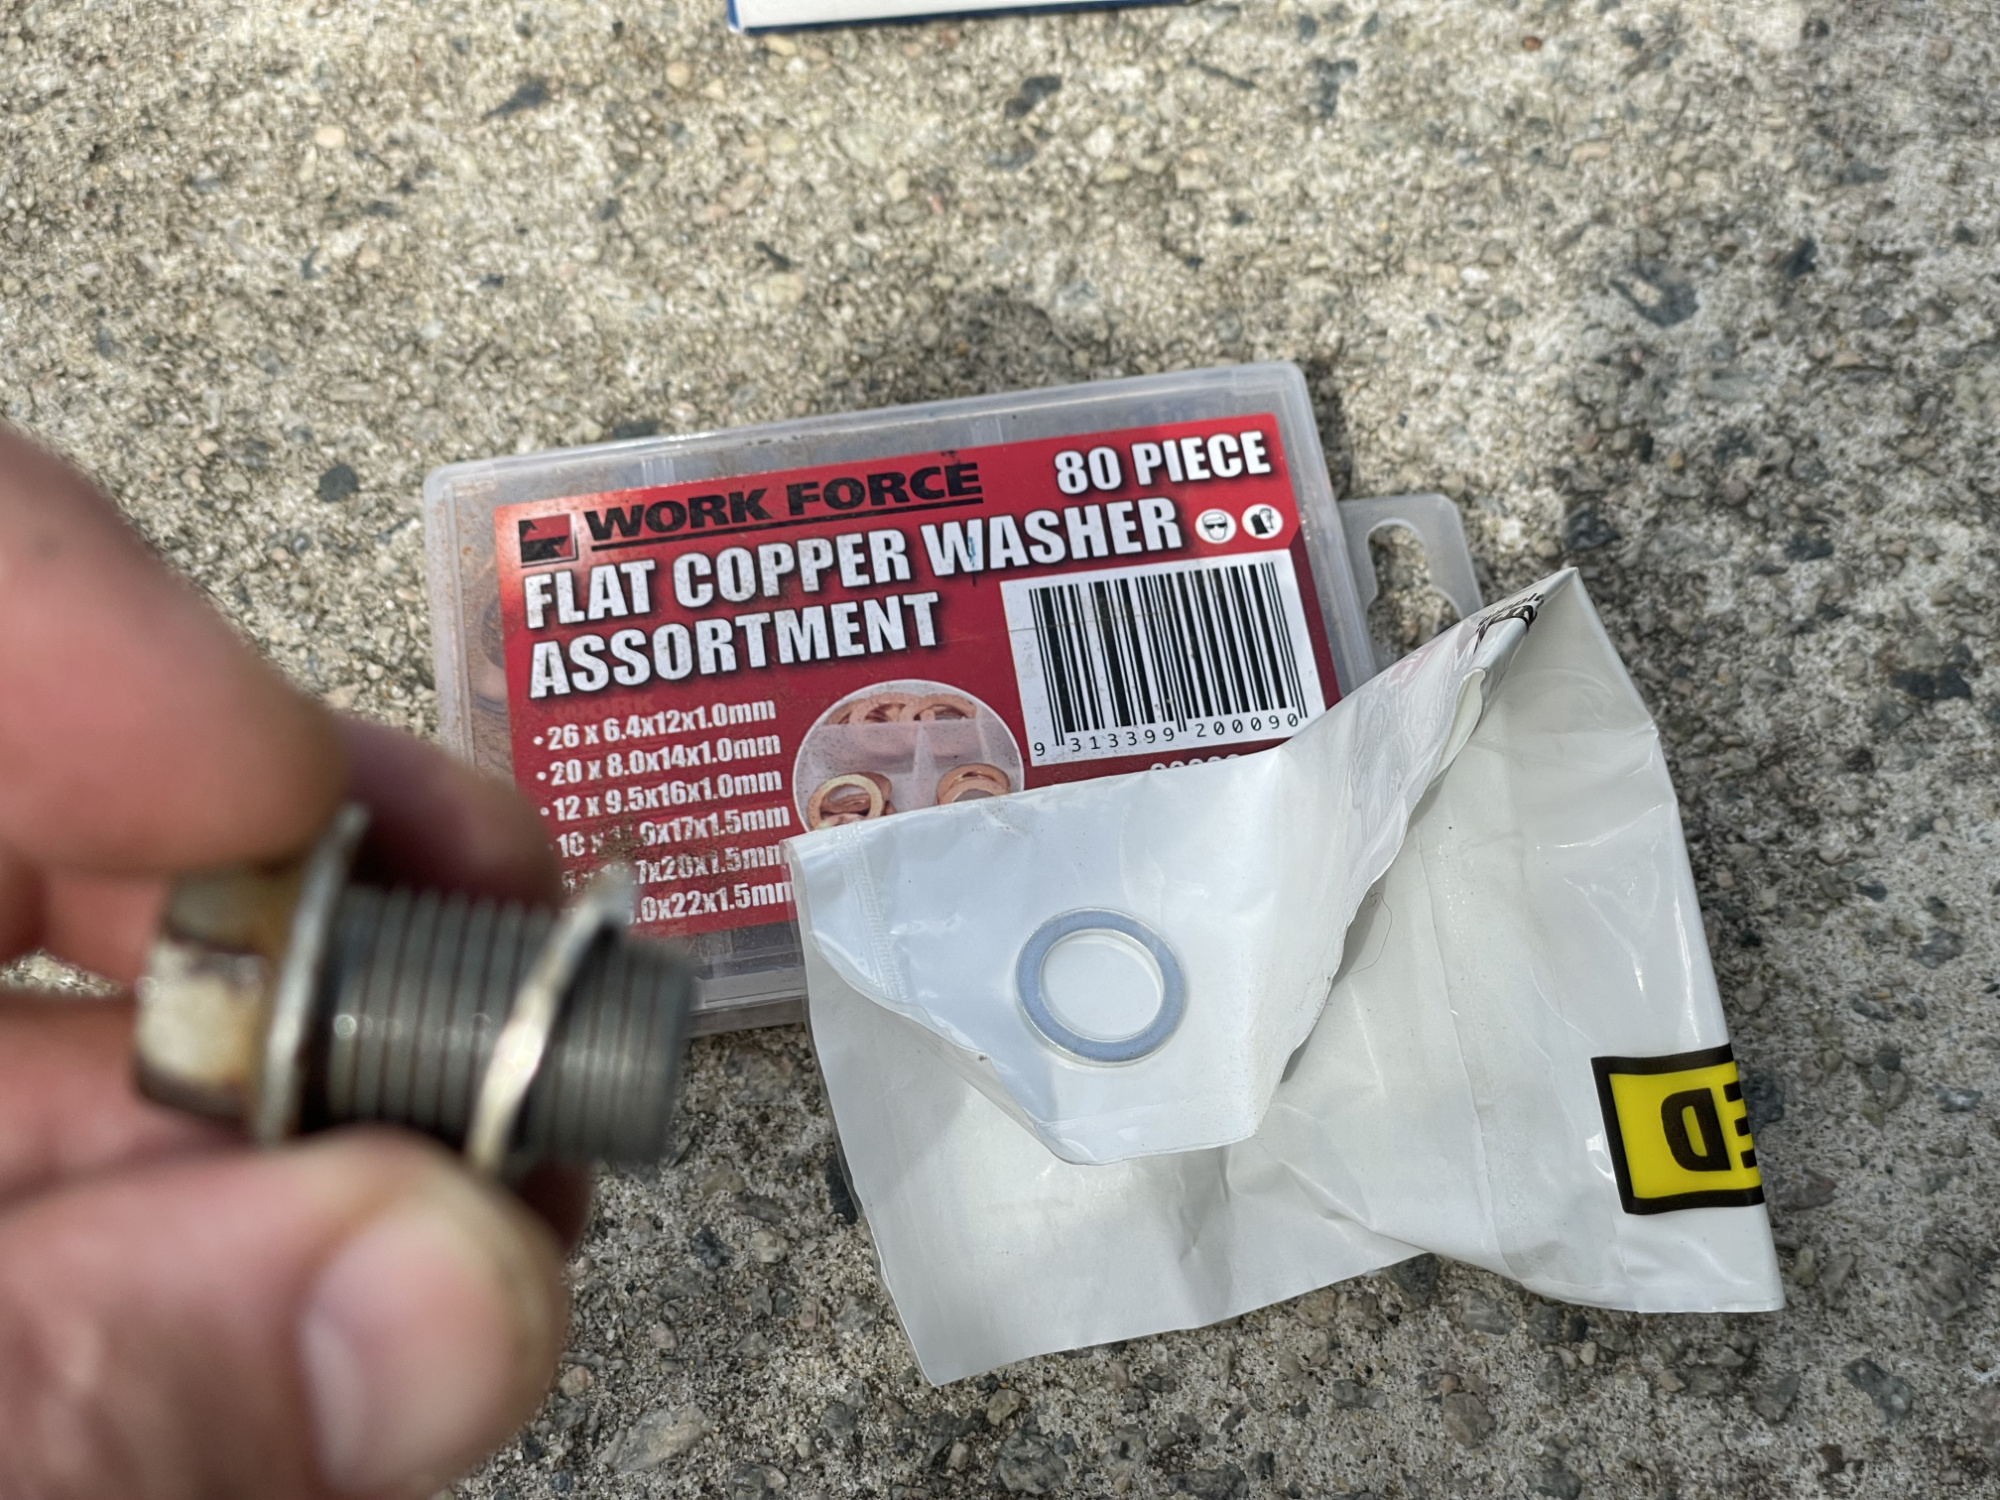
Remember to swap out the old sealing washer. In the foreground is the factory aluminium crush washer that came with the genuine service kit; in the background is my little container of random copper washers just in case I need them when servicing something.
Once it’s finished draining and you’re just getting the teeniest drip then refit the sump plug.
Now before you do anything else, so you don’t forget it:
DO THE SUMP PLUG UP. Not later. Not when you’ve posted something to the gram.
NOW.
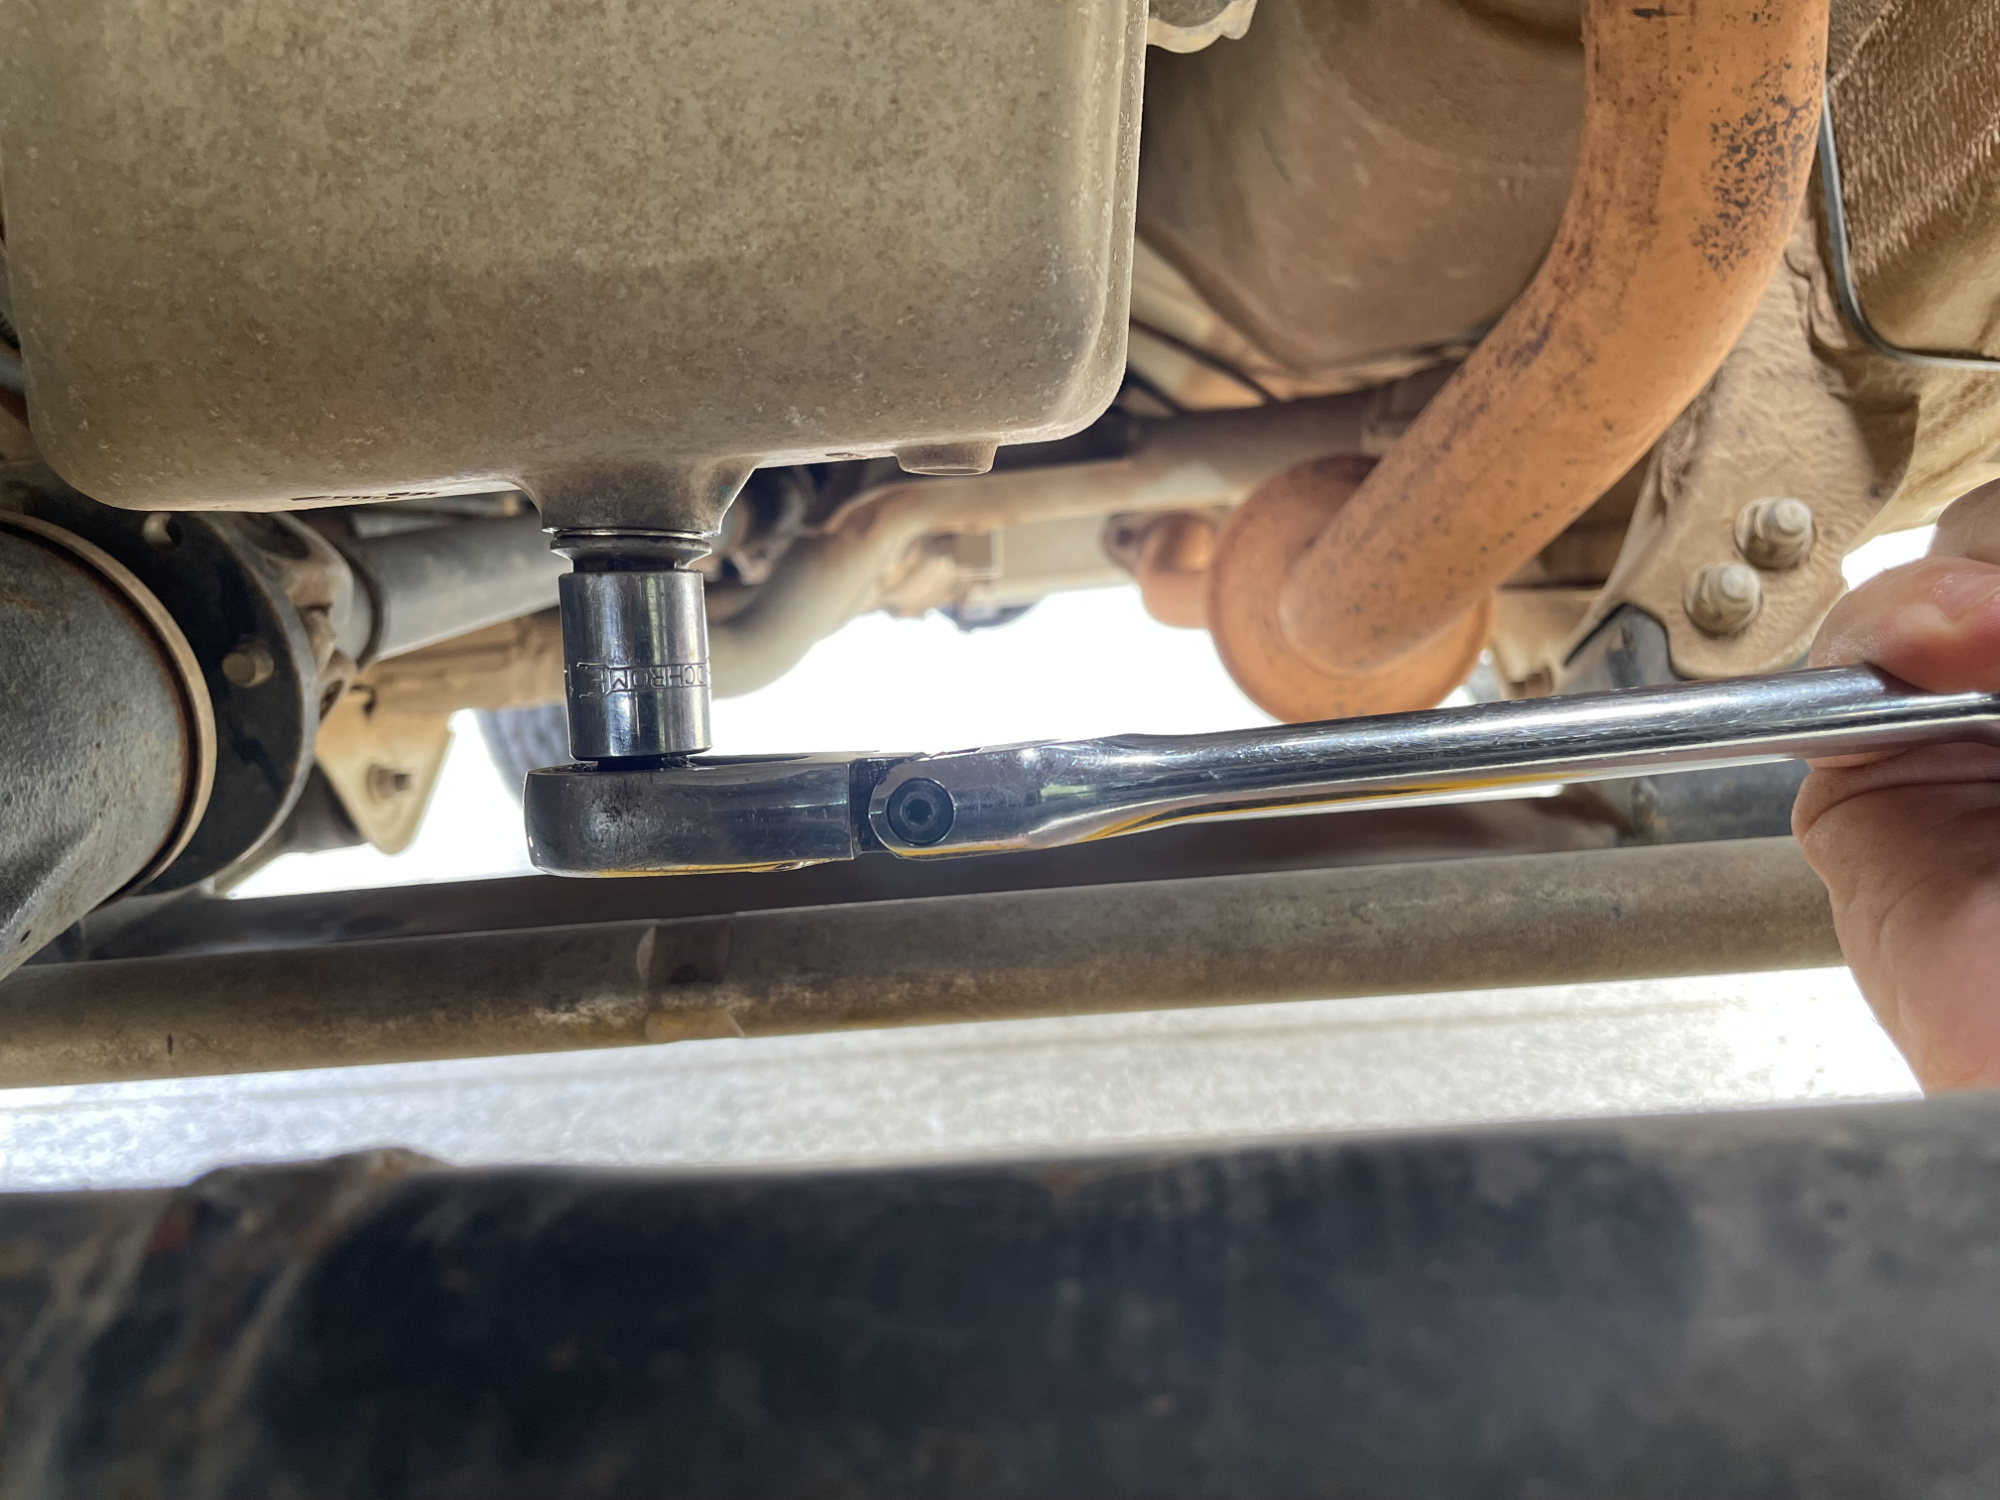
35 Nm is the torque here if you are whipping out the torque wrench, or gudentight if you’re German.
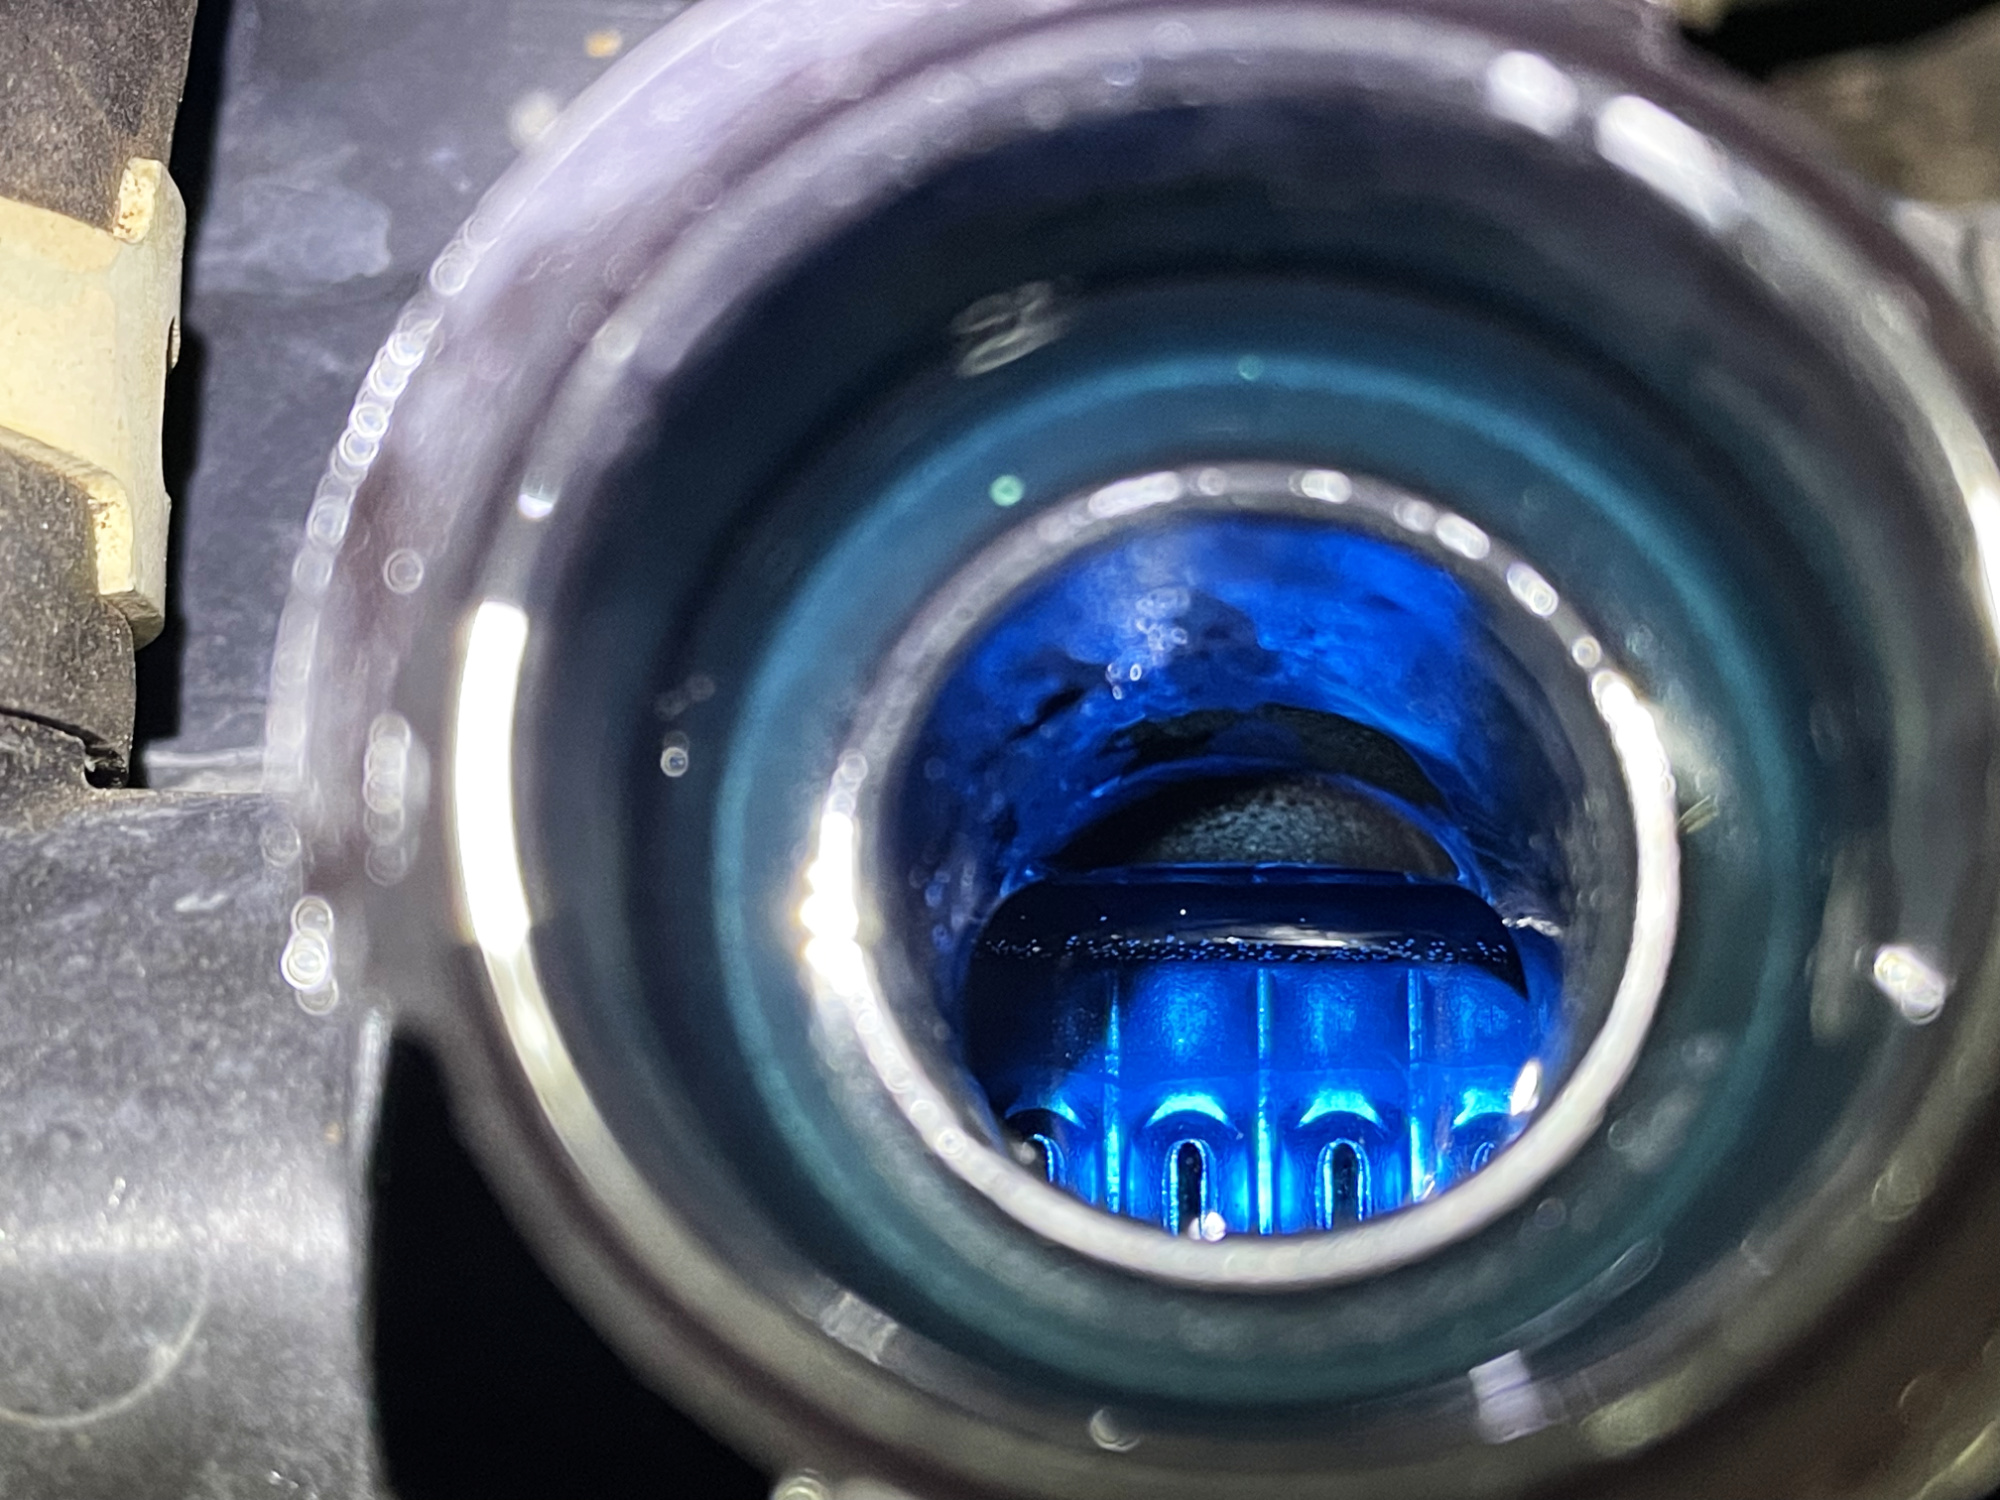
With the sump plug tightened (and you did tighten it, right?) you can undo the oil filter.
This is much easier with an oil filter socket but even a pair of chunky multigrips will do, or a belt style filter wrench or a million other things. If you’re lucky you can get it by hand, but I definitely couldn’t. It’s definitely easier with a filter cup socket.
OEM filter tool is part number 09915–47341, superseeded by 09915-40611. This is a 67 mm filter tool with 14 flutes to match the OEM filter (16510-82703). If you use other filters then obviously different tool needed to match that filter, as they aren’t guaranteed to be the same size externally as the OE filter.

Unlike the path from the sump plug, the drain path for the oil filter will result in you anti-corrision coating your front suspension components. The filter also is a bit annoying and your hand has to take a convoluted path to remove it but otherwise nothing difficult.
Best to clean up any spills now, makes it easier to identify if you have a leak once you refit and refill.

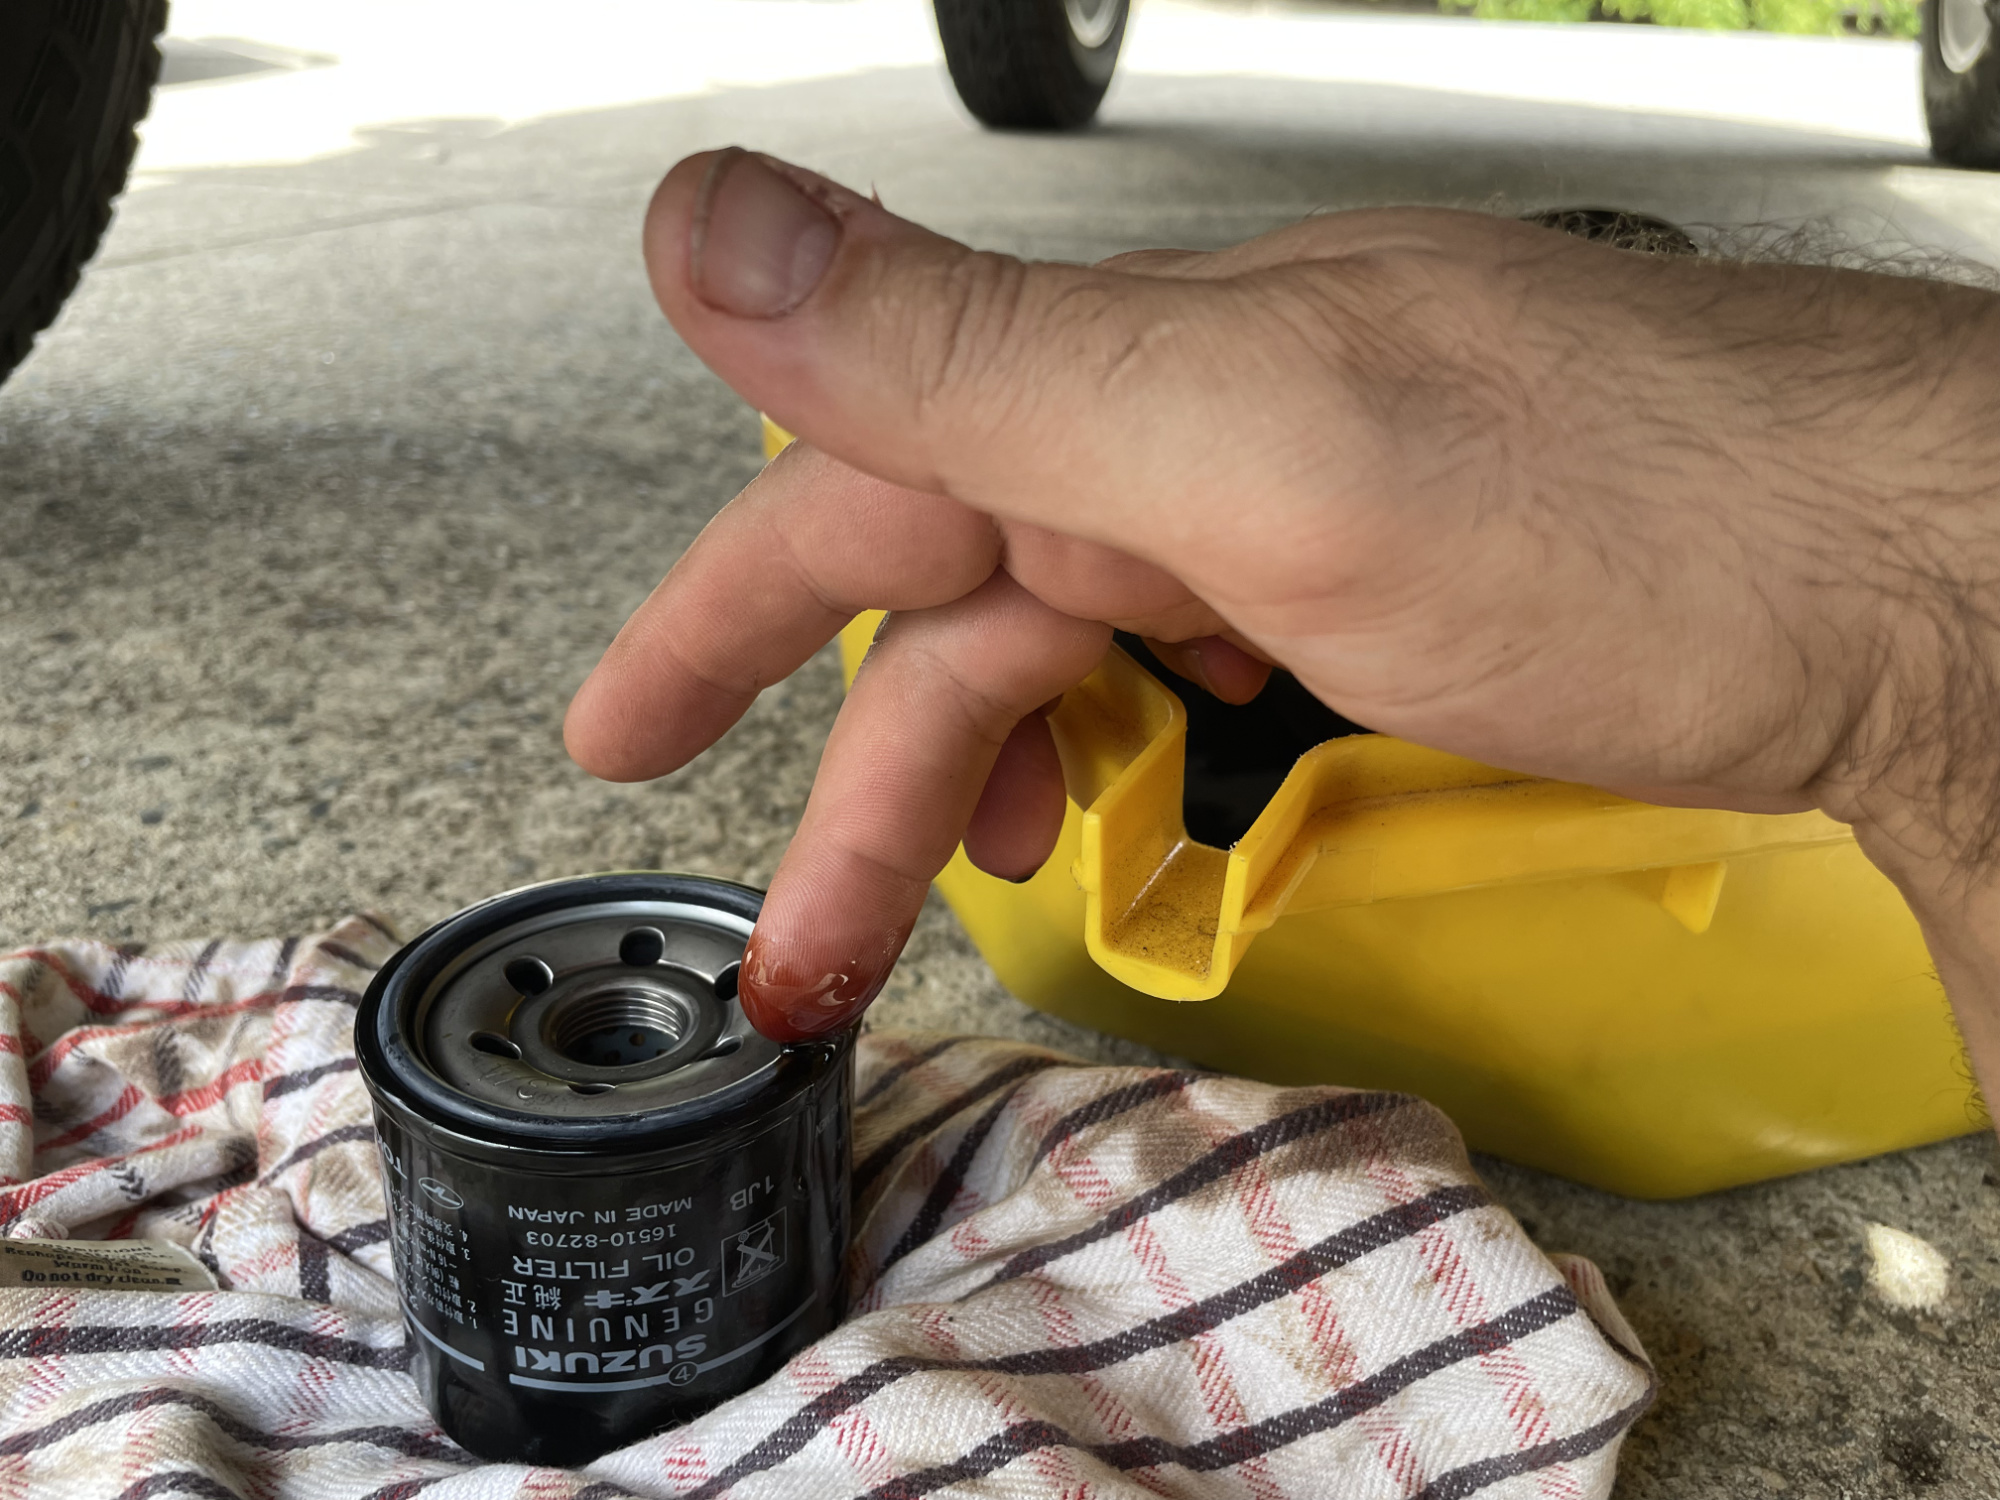
New filter gets a smear of oil onto the rubber sealing o-ring.
Clean off the mating surface for this to go onto up on the engine, too. While not common, it does happen that the old filter’s o-ring gets stuck up here and then you have an almighty leak when you restart the car. So take 30 seconds to clean off the mating surface and make sure there’s nothing left up there from the old filter.
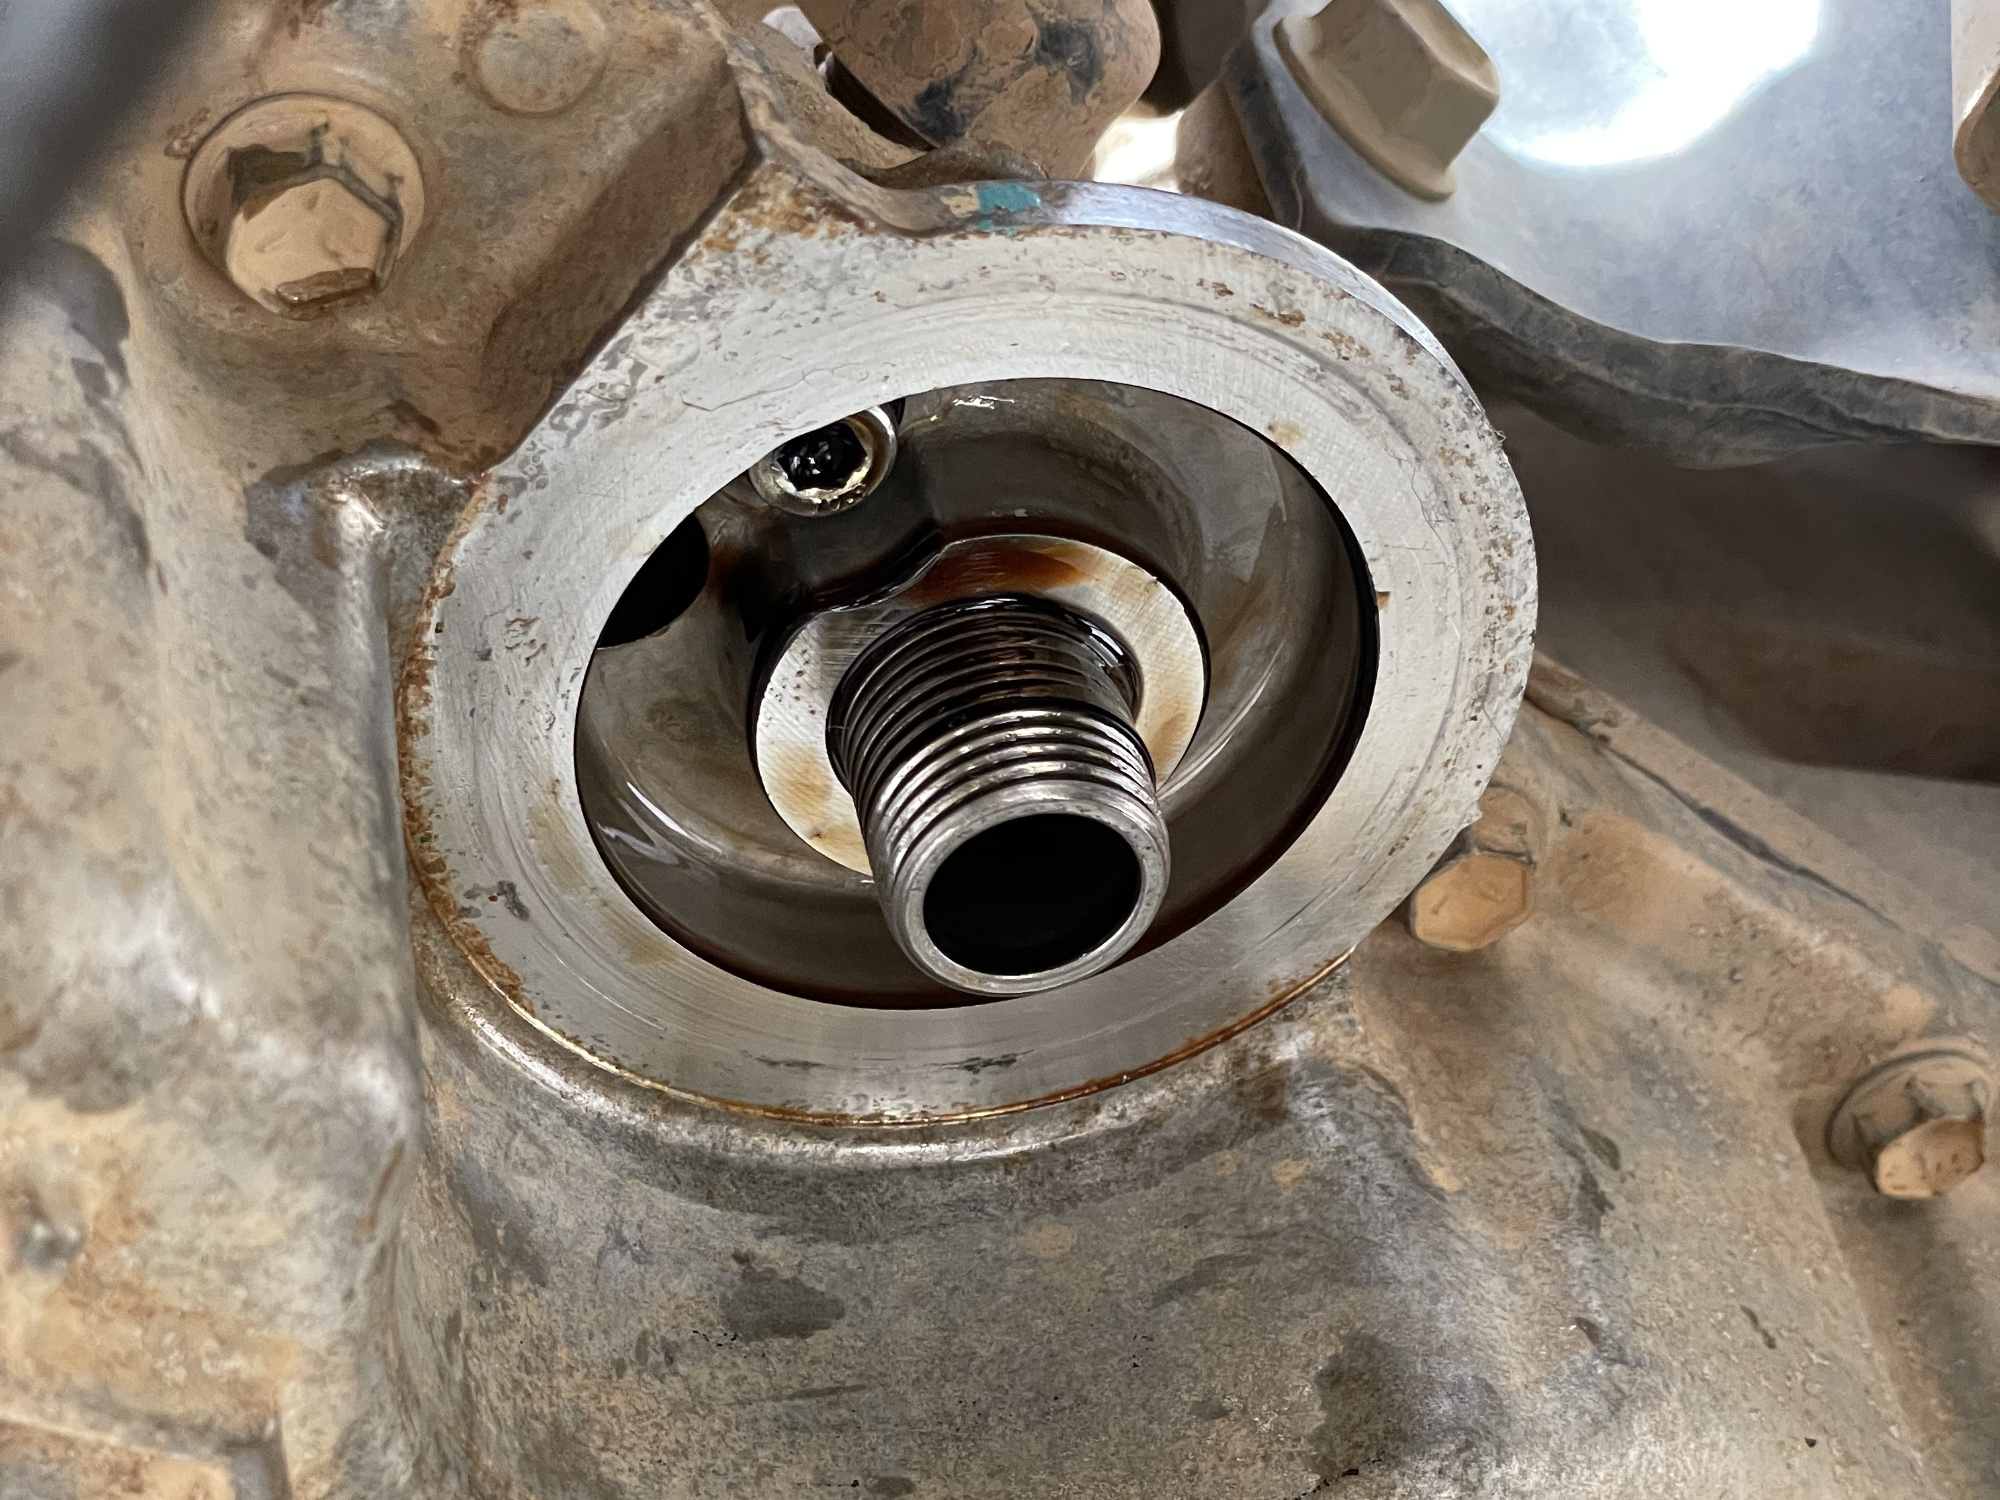
On goes the new filter. There is a torque setting if you have a cup wrench for the filter (14 Nm) but you can just lightly seat the o-ring against the engine and then tighten it on a further 3/4 of a turn by hand. Easy as.

Now to fill it up. Nominally 3.9L is the capacity, but you’ll always have a bit in the engine elsewhere and when you first fill it up the filter will be empty. (Yeah, I know some people advise you to pre-fill the filter; it doesn’t matter. Seriously.) so add about 3.5L as a start.
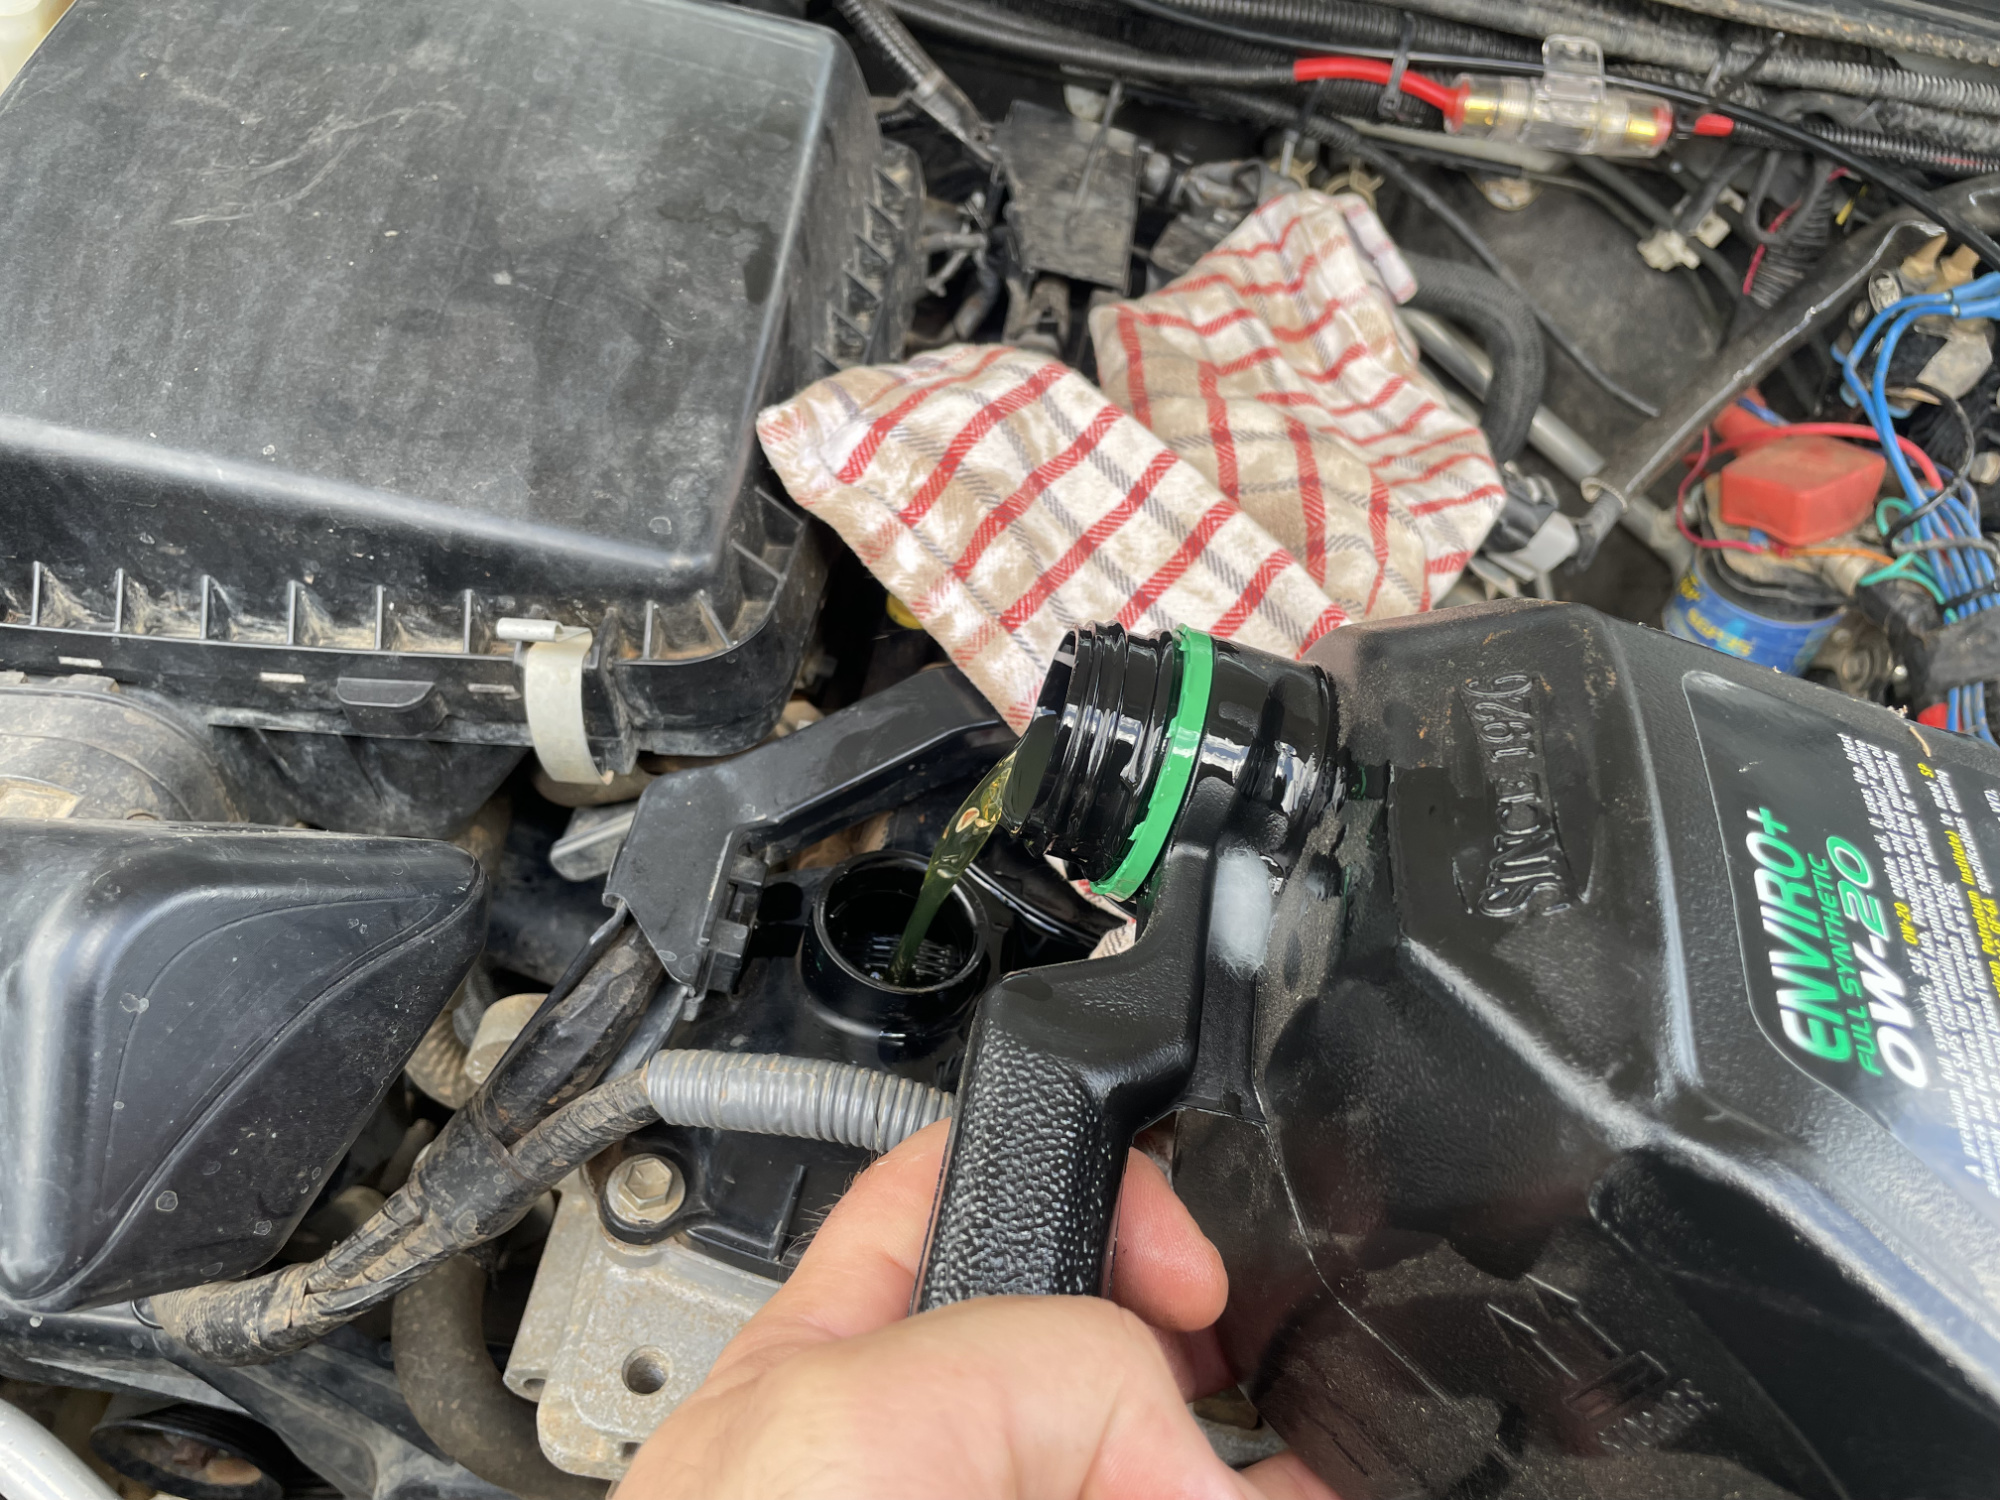
You want it to be on the full mark to ever so slightly above; if you didn’t prefill the filter then there’s about 250 – 300 mL that’ll end up there, reducing the sump level by that much.
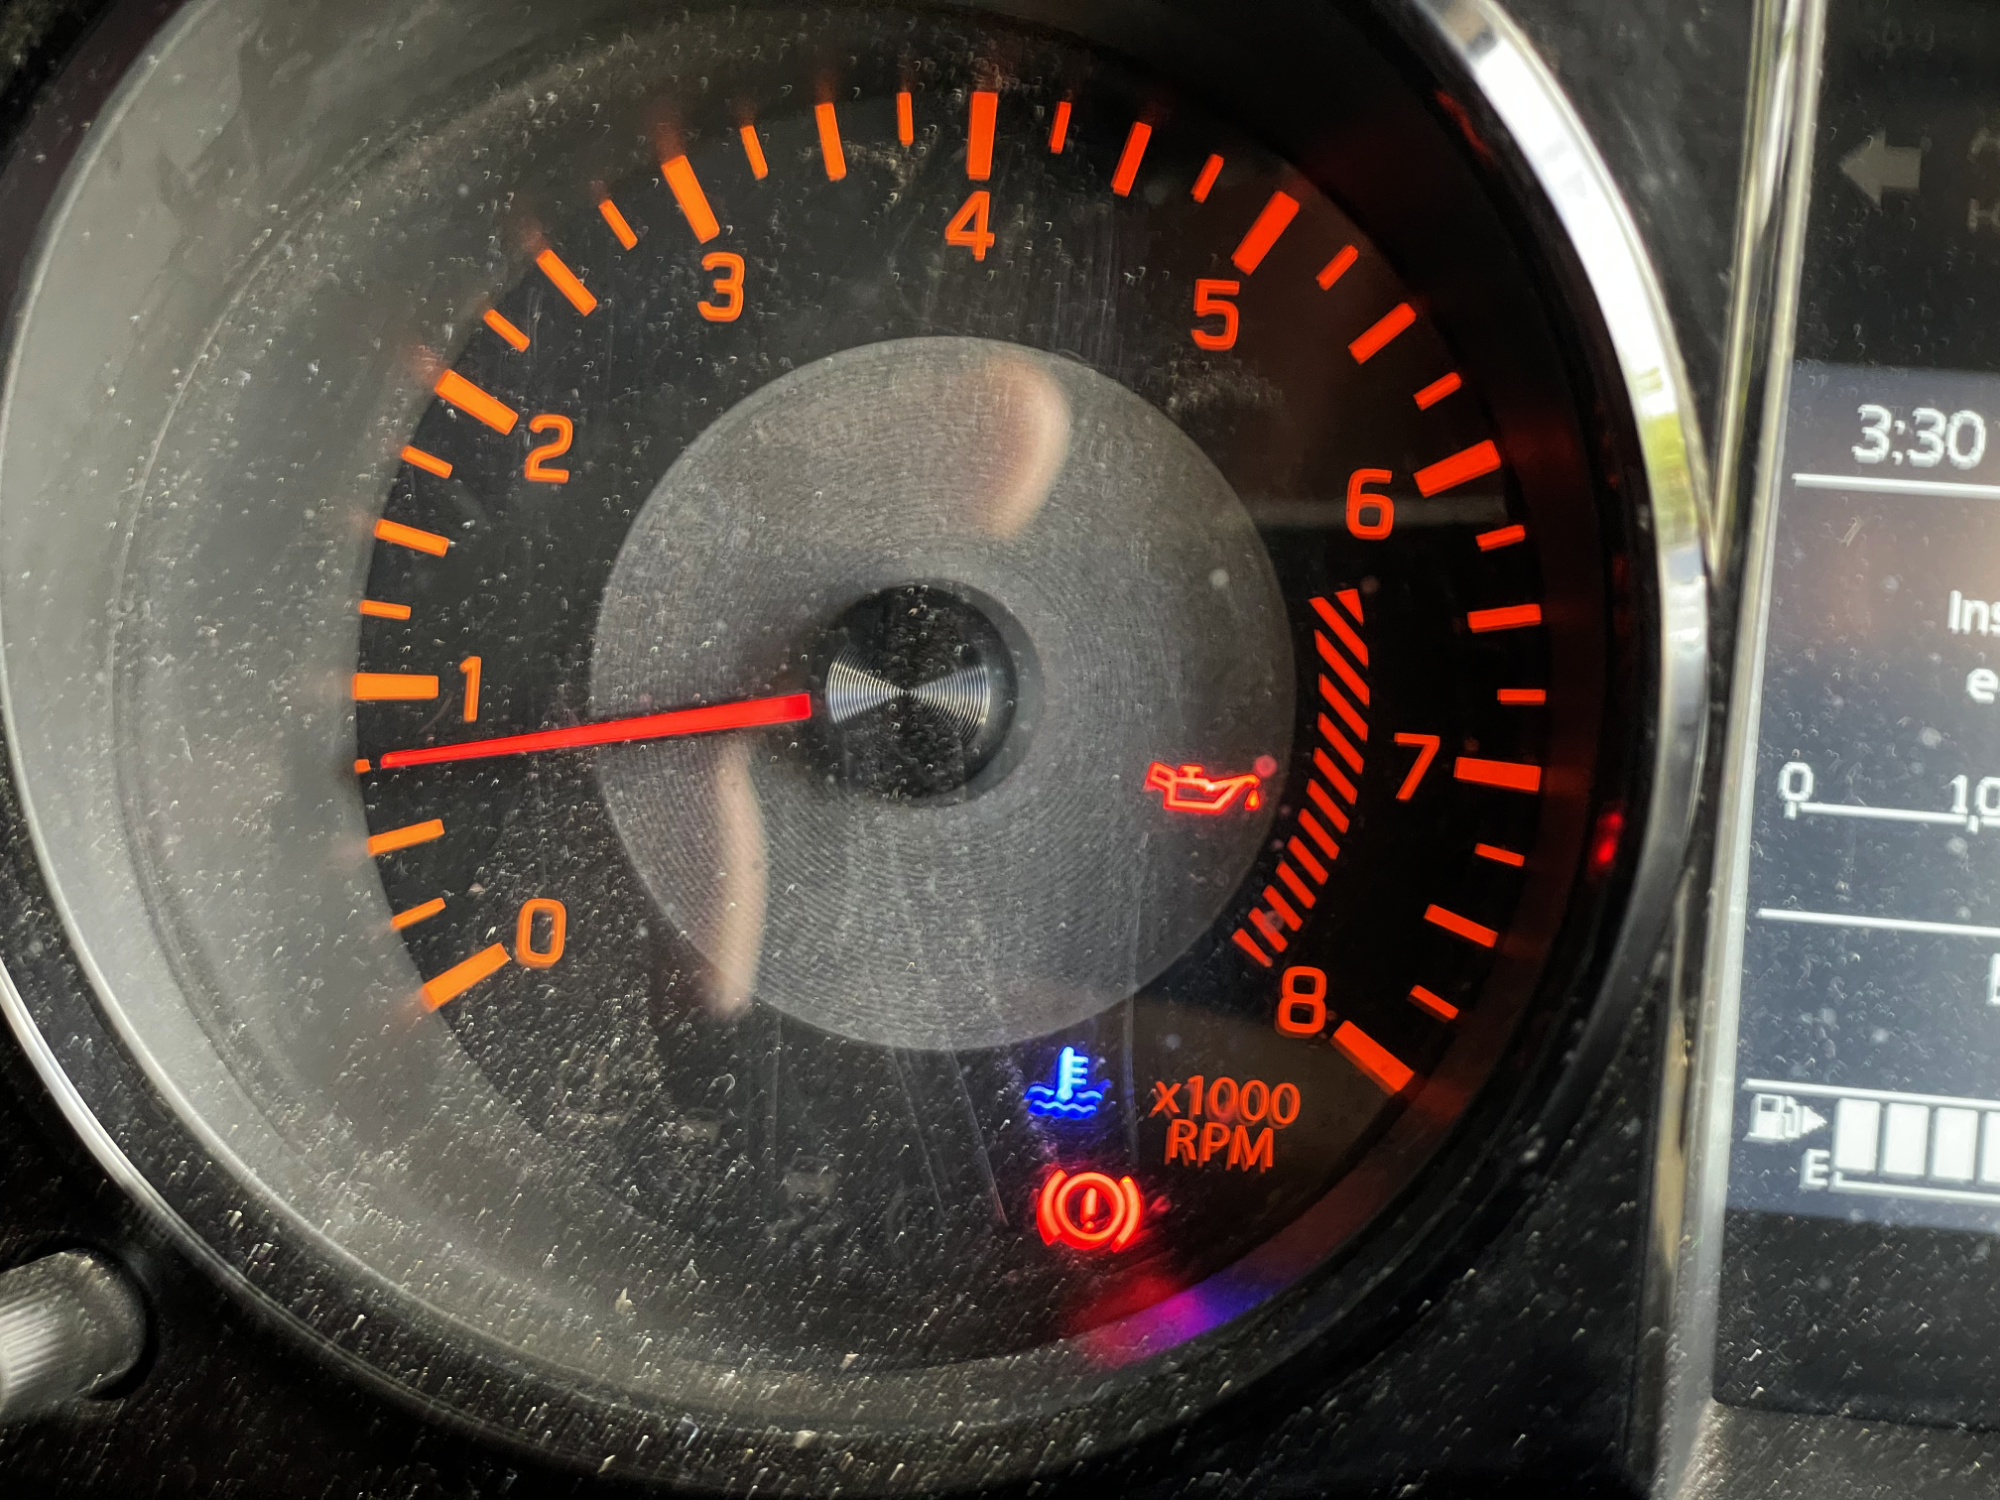
When you start it up you’ll have a few seconds with the oil pressure light on. No need to panic, just make sure it goes out after a few seconds of idling.
Run the car for about 30 seconds to a minute and go look for leaks while it’s running, then shut it off. Give it a moment for the oil to settle down, check the level and top it up to near the full mark and you’re done.
Remember to correctly store and then dispose of your used oil according to your local regulations. This includes consideration on contaminated stuff like the oil filter and the like.

Oil filter part numbers
- Suzuki OEM 16510-73002L000
- Ryco Z443
- Sakura C1218
- Mann W 67/2
Oil filter cup tools
- Suzuki OEM: 09915–47341, superseeded by 09915-40611 (67 mm 14 flute)
- Ryco: RST202 (67 mm 14 flute)
Manual transmission oil change
This is very straightforwards to change. The biggest trick is finding the appropriate oil: Suzuki specify a fully synthetic 75W gear oil of their own type (Suzuki part 99000-22B27-036), but then specify a 75W-80 viscosity. This oil also needs to adhere to GL-4. Penrite recommend a semi-synthetic GL-4 75W-80 oil; I’m trying out using a fully synthetic 75W-85 GL-4 oil with a bit of moly additive (Penrite Shift Eze).
Drain and fill plugs are pretty obvious. 3/8″ square drive (or probably 10mm square tool) for these. They’re easiest accessed from the left-hand side of the car from underneath.
Like any gearbox or differential you should first remove the fill plug to make sure you can get it out. Once you have removed the fill plug then you remove the drain plug and remove it.
Drain plugs on the Jimny transmission, transfer case and differential all have magnets in them to pick up any metal. Large chunks are not good, small bits are pretty common in transmissions and are not an immediate cause for alarm.

Once you have both plugs removed then either put some Threebond sealant or some liquid teflon thread sealer on them. Plugs are tightened to 23 Nm. When the transmission has drained, reinstall and torque the drain plug.
The manual transmission takes 1.2 L to fill. Fill it up with the car level until the barest amount comes out of the fill point and then reinstall the fill plug & torque it up.
Automatic transmission
Since I don’t have an automatic I need to speak theoretically here as I’m unlikely to do a change of ATF.
ATF specification is a bit funky and it’s hard to know what ATF to put in it. The Suzuki fluid is specified to be ATF3317; as far as I can tell either the genuine fluid, Mobil Multi-Vehicle ATF or Castrol Multi-Vehicle meet this spec. The genuine ATF is probably the safest choice here.
The ATF is drained through the drain plug on the transmission sump.
This drain plug needs a new crush washer (24781-57B00, appears to be M10 aluminium crush washer) and is refitted to a torque of 17 Nm.
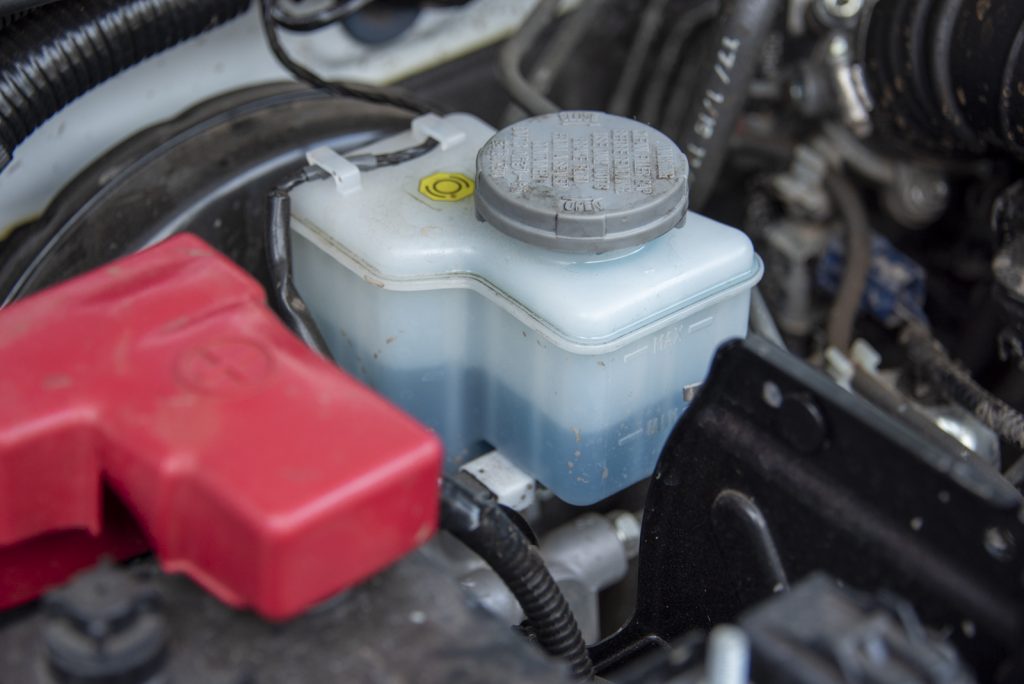
The transmission is refilled via the transmission dipstick which is accessed via the engine bay. The ATF capacity is not specified, but ~5.5L is needed for a full transmission rebuild so you’ll need a fair bit less than that for just a simple drain of the pan.
To set the level correctly, you need to get the level roughly right and then get the engine up to full operating temperature. With the car level, shift from park to low and back to park again a couple of times, and check the level.
Level should be between LOW HOT and FULL HOT (ideally at the FULL HOT level). It takes a bit under 0.5L to go from low to full hot, in case you’re worried about not adding enough. It shouldn’t take too much, and overfilling an automatic transmission is in many ways worse for the transmission than a little underfilled.
Transfer case
This is also super simple to do, although access is a little trickier to the drain and fill plugs. Access these from the right hand side of the car. Oil specification recommended for this (Suzuki part for the oil is 99000–22B27–036) is the same as the manual transmission except they seem to suggest only a straight 75W GL-4 synthetic gear oil. Again 1.2 L of oil is used to fill it up. Penrite suggest for this one to use the fully synthetic pro-gear 70W-75, which is different from their suggestion for the gearbox.
Both drain and fill plugs take a 3/8″ (or 10mm square) square fitting to undo and do up. Remove the fill plug to make sure you can get it off, and then remove the drain plug. I found it ejected fluid a far way from the transfer case so consider your drain pan placement.
Drain and fill plugs both are meant to have some sealant put on them before reinstallation. Suzuki recommend Threebond, but I generally use liquid teflon thread sealer on them.
Once the transfer has fully drained then reinstall the drain plug and refill the transfer case with 1.2L of oil. Once some oil comes out of the fill point then you’re done and can reinstall the fill plug. Both drain and fill plugs are torqued to 23 Nm.
Differentials
Both front and rear differentials are done the same way and take the same oil. The rear takes slightly less (1.3L) oil than the front (1.6L). The key thing to note here is that Suzuki specify a GL-5 oil for this: their own GL-5 fully synthetic gear oil (99000-22B65-045) in 75W-85 viscosity. Penrite make a GL-5 fully synthetic oil (Pro Gear GL-5 75W-85) and note that this is a lot harder to find than the much more common GL-4/GL-4 plus 75W-85 fully synthetic oil. Be warned it’s easy to buy the wrong oil!
Fill and drain plugs remove with 3/8″ or 10mm square fitting. Remove the fill plug before removing the drain plug to make sure you can get everything off.
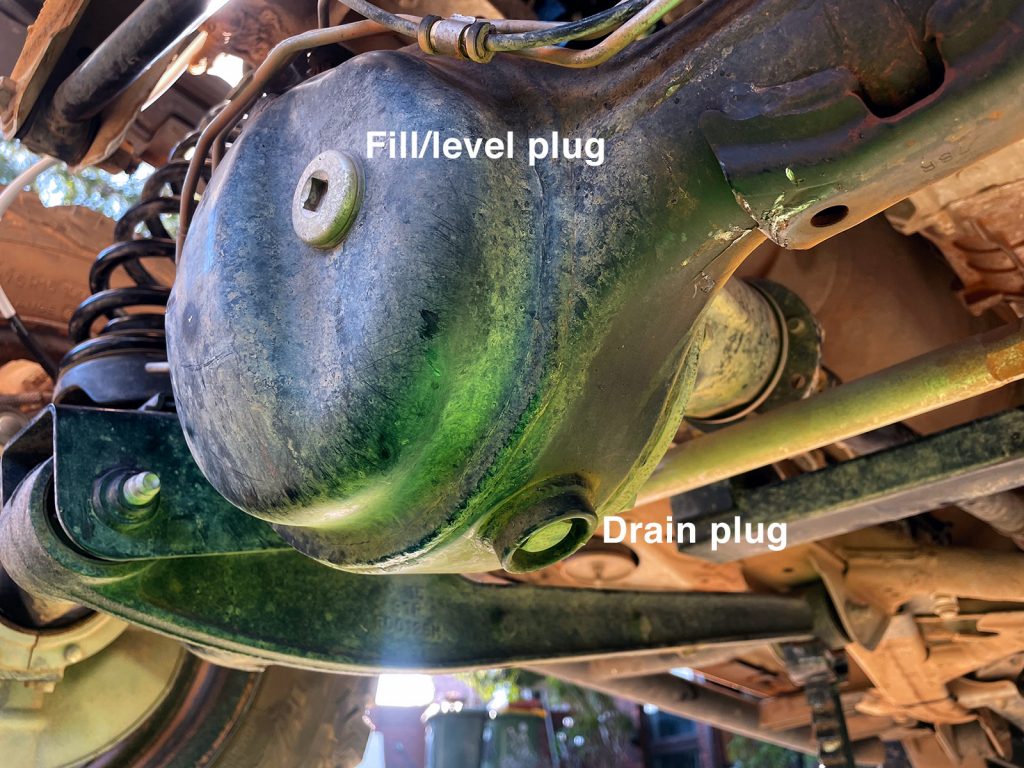
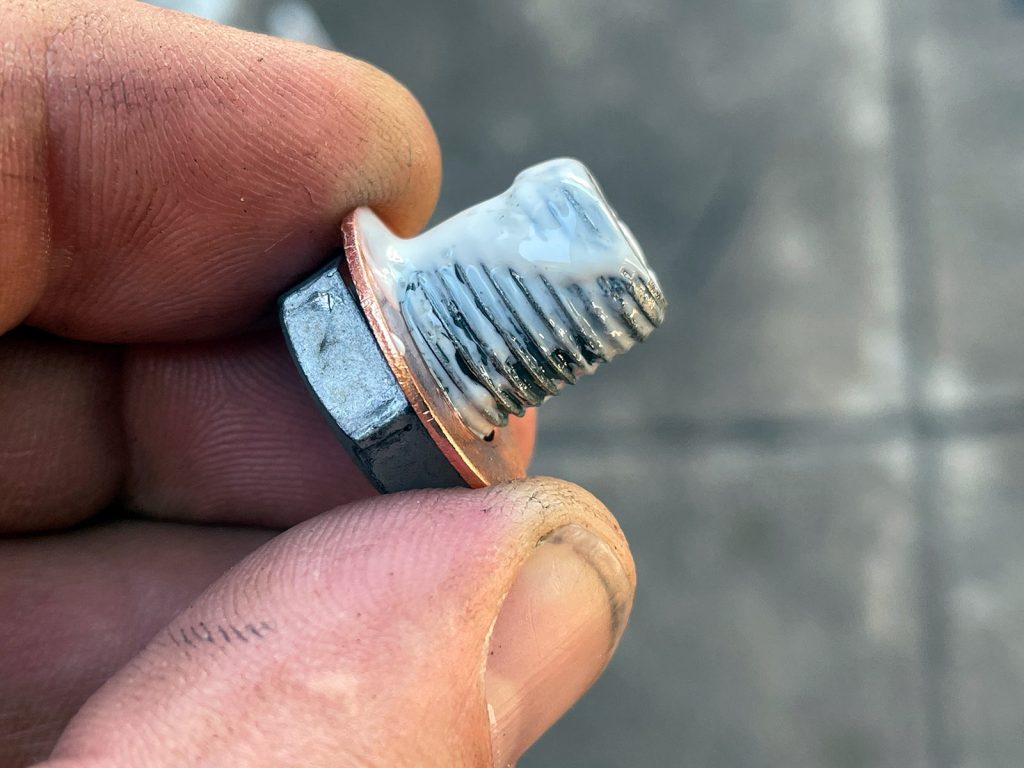
The fill plug for both diffs is an M20 nylon washer which can be replaced (Suzuki part number 09168-20002-000) or be a bit naughty and reuse it but put some teflon thread sealer on the threads as well. The drain plug for the differentials is an M12 copper or aluminium crush washer (Suzuki part number 09168B12002N000); replace this each time you drain the oil. I also like to put some teflon thread sealer on the threads just as an added precaution.
Once the differential has drained, you can reinstall the drain plug. The drain plug gets torqued to 55 Nm.
With the drain plug is reinstalled then you can start filling the differential up. The front differential takes 1.6L, the rear 1.3L.
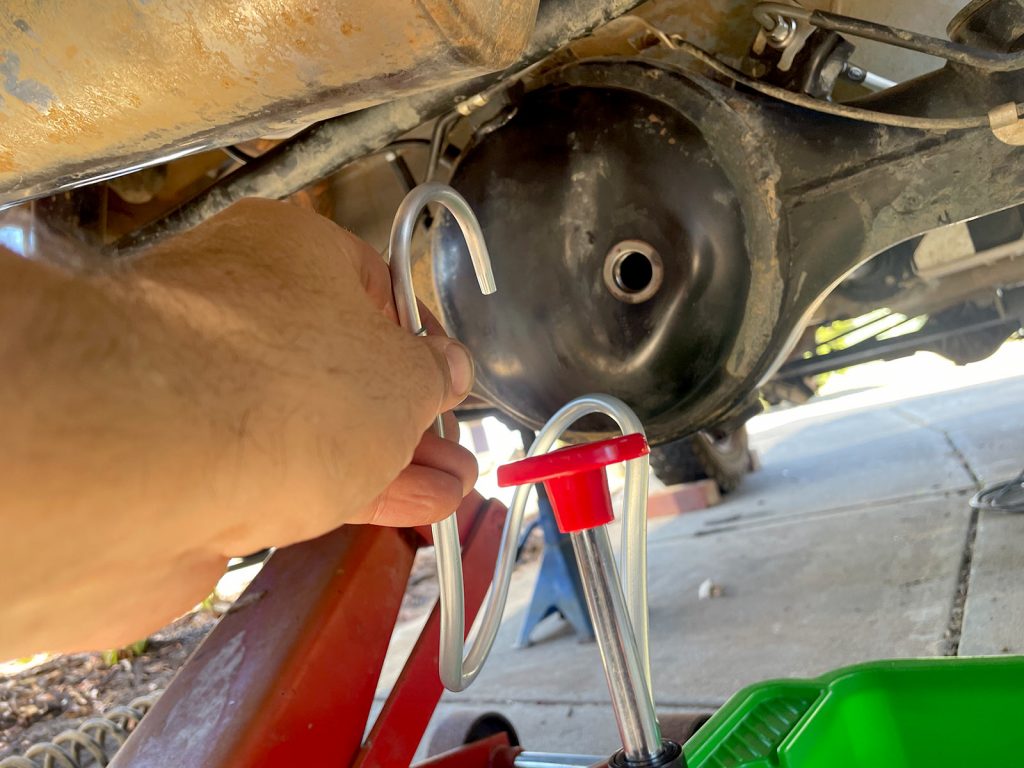
You fill up the differential until some oil runs from the fill point then you remove your filling hose and put in the fill plug. This is torqued to 50 Nm.
Other fluids
Brake fluid change
Suzuki specify a brake fluid change every 2 years which is good practise; if you’re in a humid environment or do lots of hard driving then I would consider doing it yearly. Brake fluid absorbs moisture from the air and also goes pretty goopy and terrible if you leave it too long.
A brake fluid change is easiest done with a bit of brake bleeding till you get some fresh fluid out of each corner. To slightly speed up the process just suck out the master cylinder reservoir first to just below minimum and refill, then suck it out again to below minimum and refill again with fresh fluid. Then starting from the back left corner, bleed this brake until you get fresh fluid coming out of the bleed nipple. Repeat on each corner until you have fresh fluid out of each side.
Brake fluid is specified to be only DOT3 not the much more common DOT4. You can use DOT4 fluid in it if you wish for the higher boiling point but it’s probably not worth it.
Bear in mind the brake fluid is also shared with the clutch hydraulic circuit in manual cars; if you are low on brake fluid then you might have a leaking slave cylinder.
Coolant change
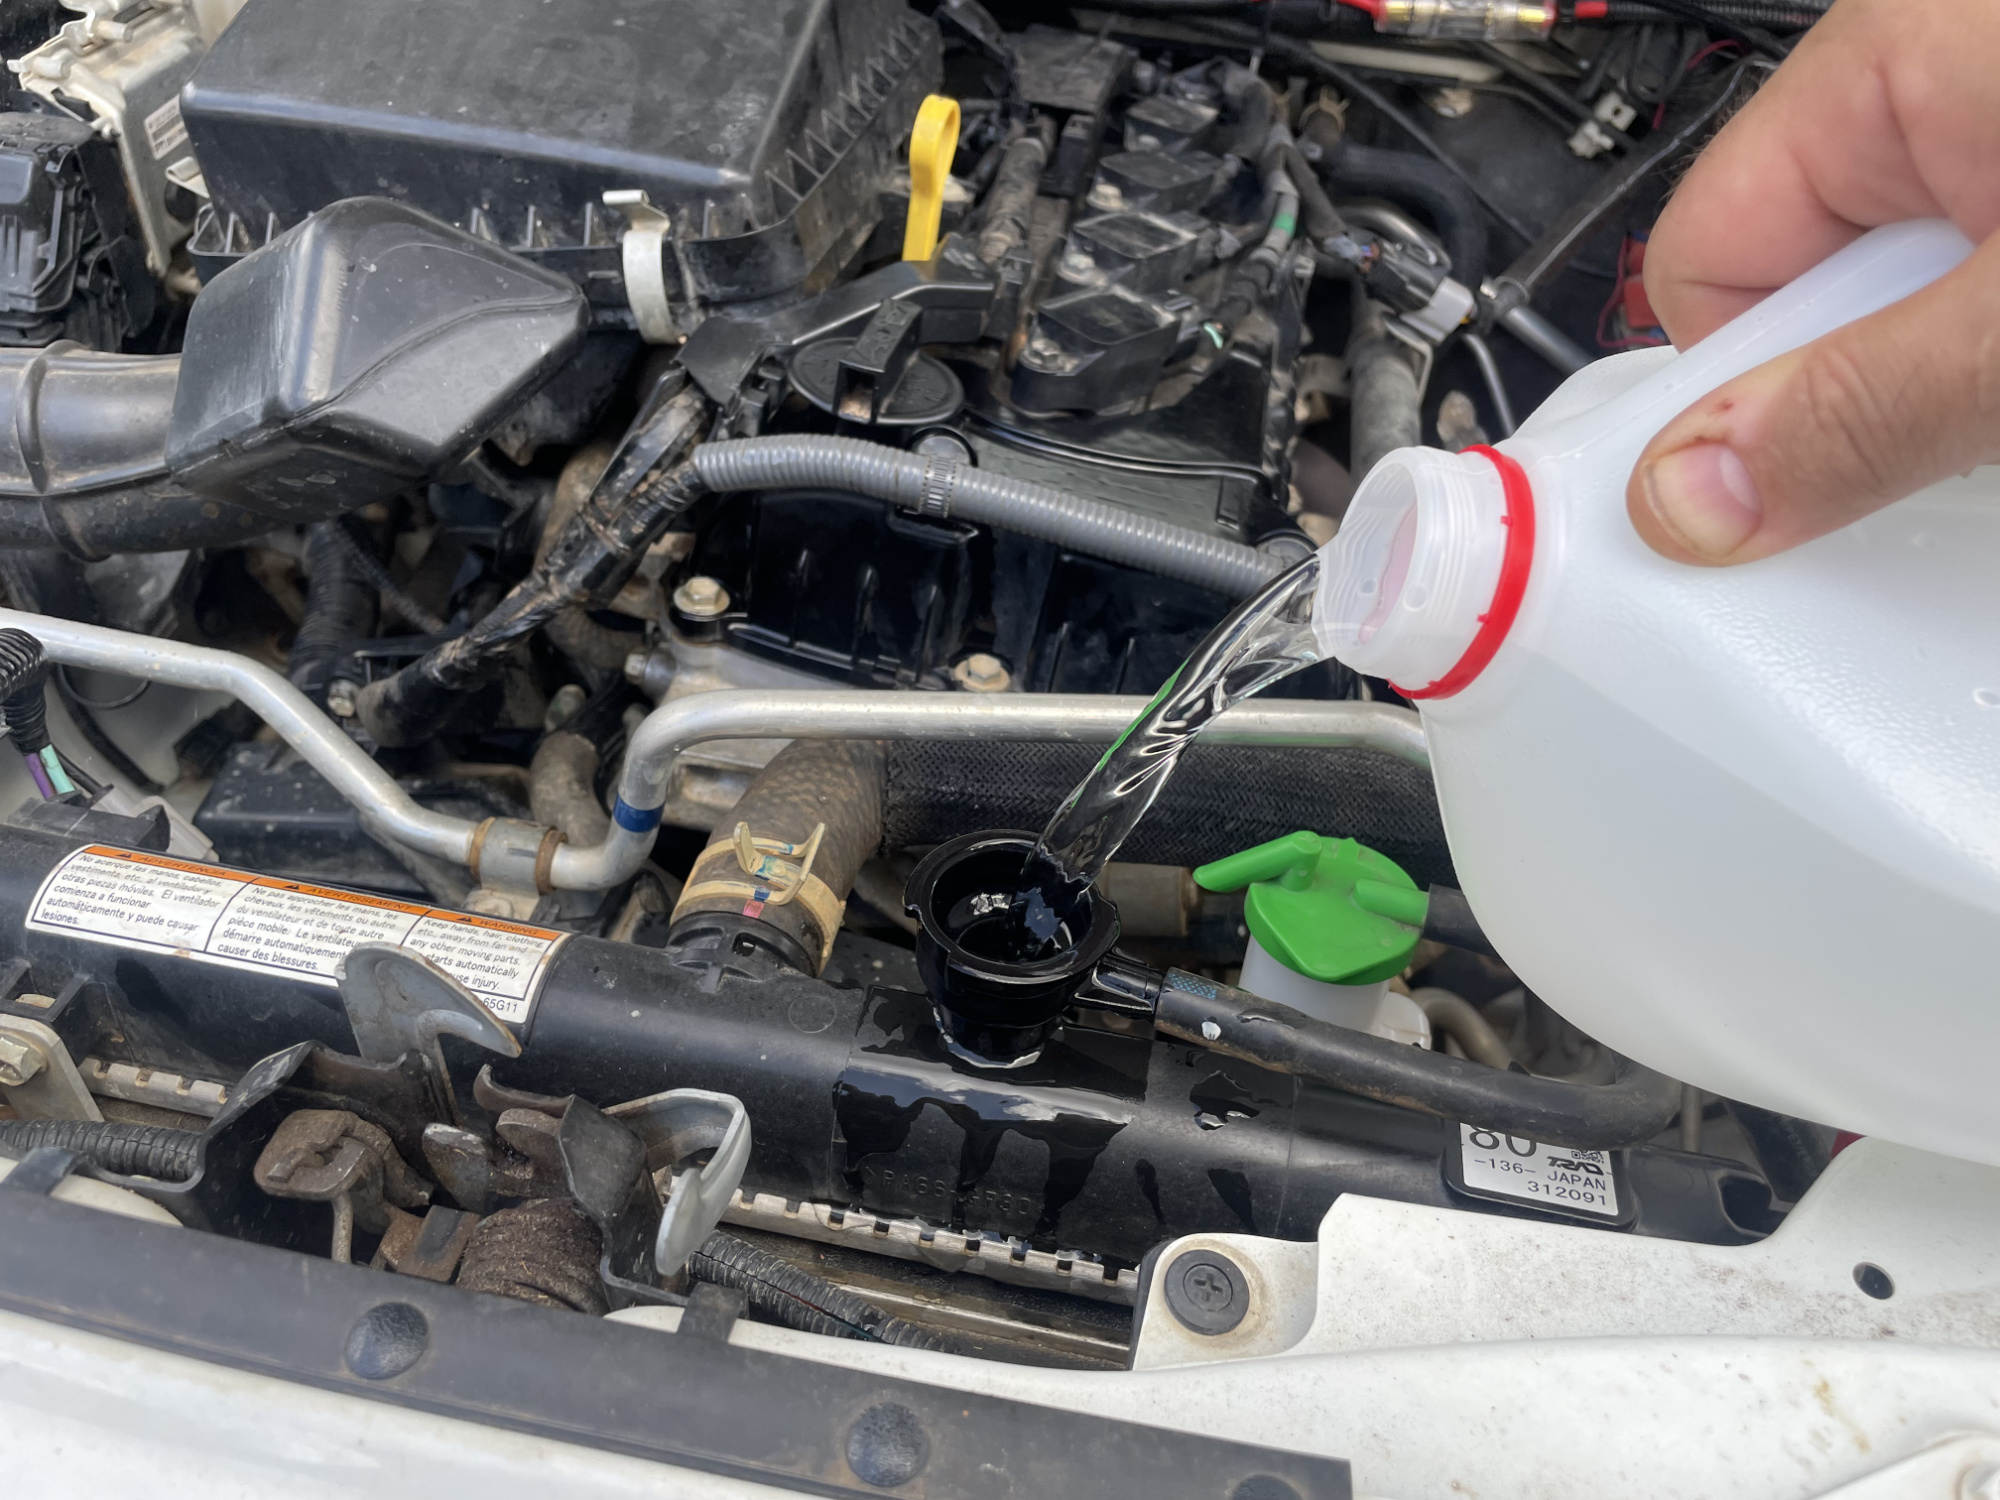
Suzuki specify a ‘super’ long-life coolant in the Jimny (blue in colour, if that’s your thing). This fluid is meant to not require replacing until 150,000 km or 8 years; future changes after this are 75,000 km or 4 years. If your car has green coolant from the factory then this is meant to be changed every 45,000 km or 3 years. If you are swapping to a different brand/chemistry of coolant you should flush the system entirely with distilled water before swapping to this coolant. Incompatible coolants are not fun and can block thin passageways like are found in the radiator.
To drain the coolant, first remove the radiator cap and then undo the drain plug at the bottom of the radiator. So long as you don’t fully unscrew it then you will just get coolant coming out of the drain hole. If you fully unscrew it then this will instantly spew coolant everywhere on you and the car but it will get drained much faster.
Radiator cap is a two stage undo – push it down and it will rotate so far, a bit further down and it’ll fully rotate and come off.
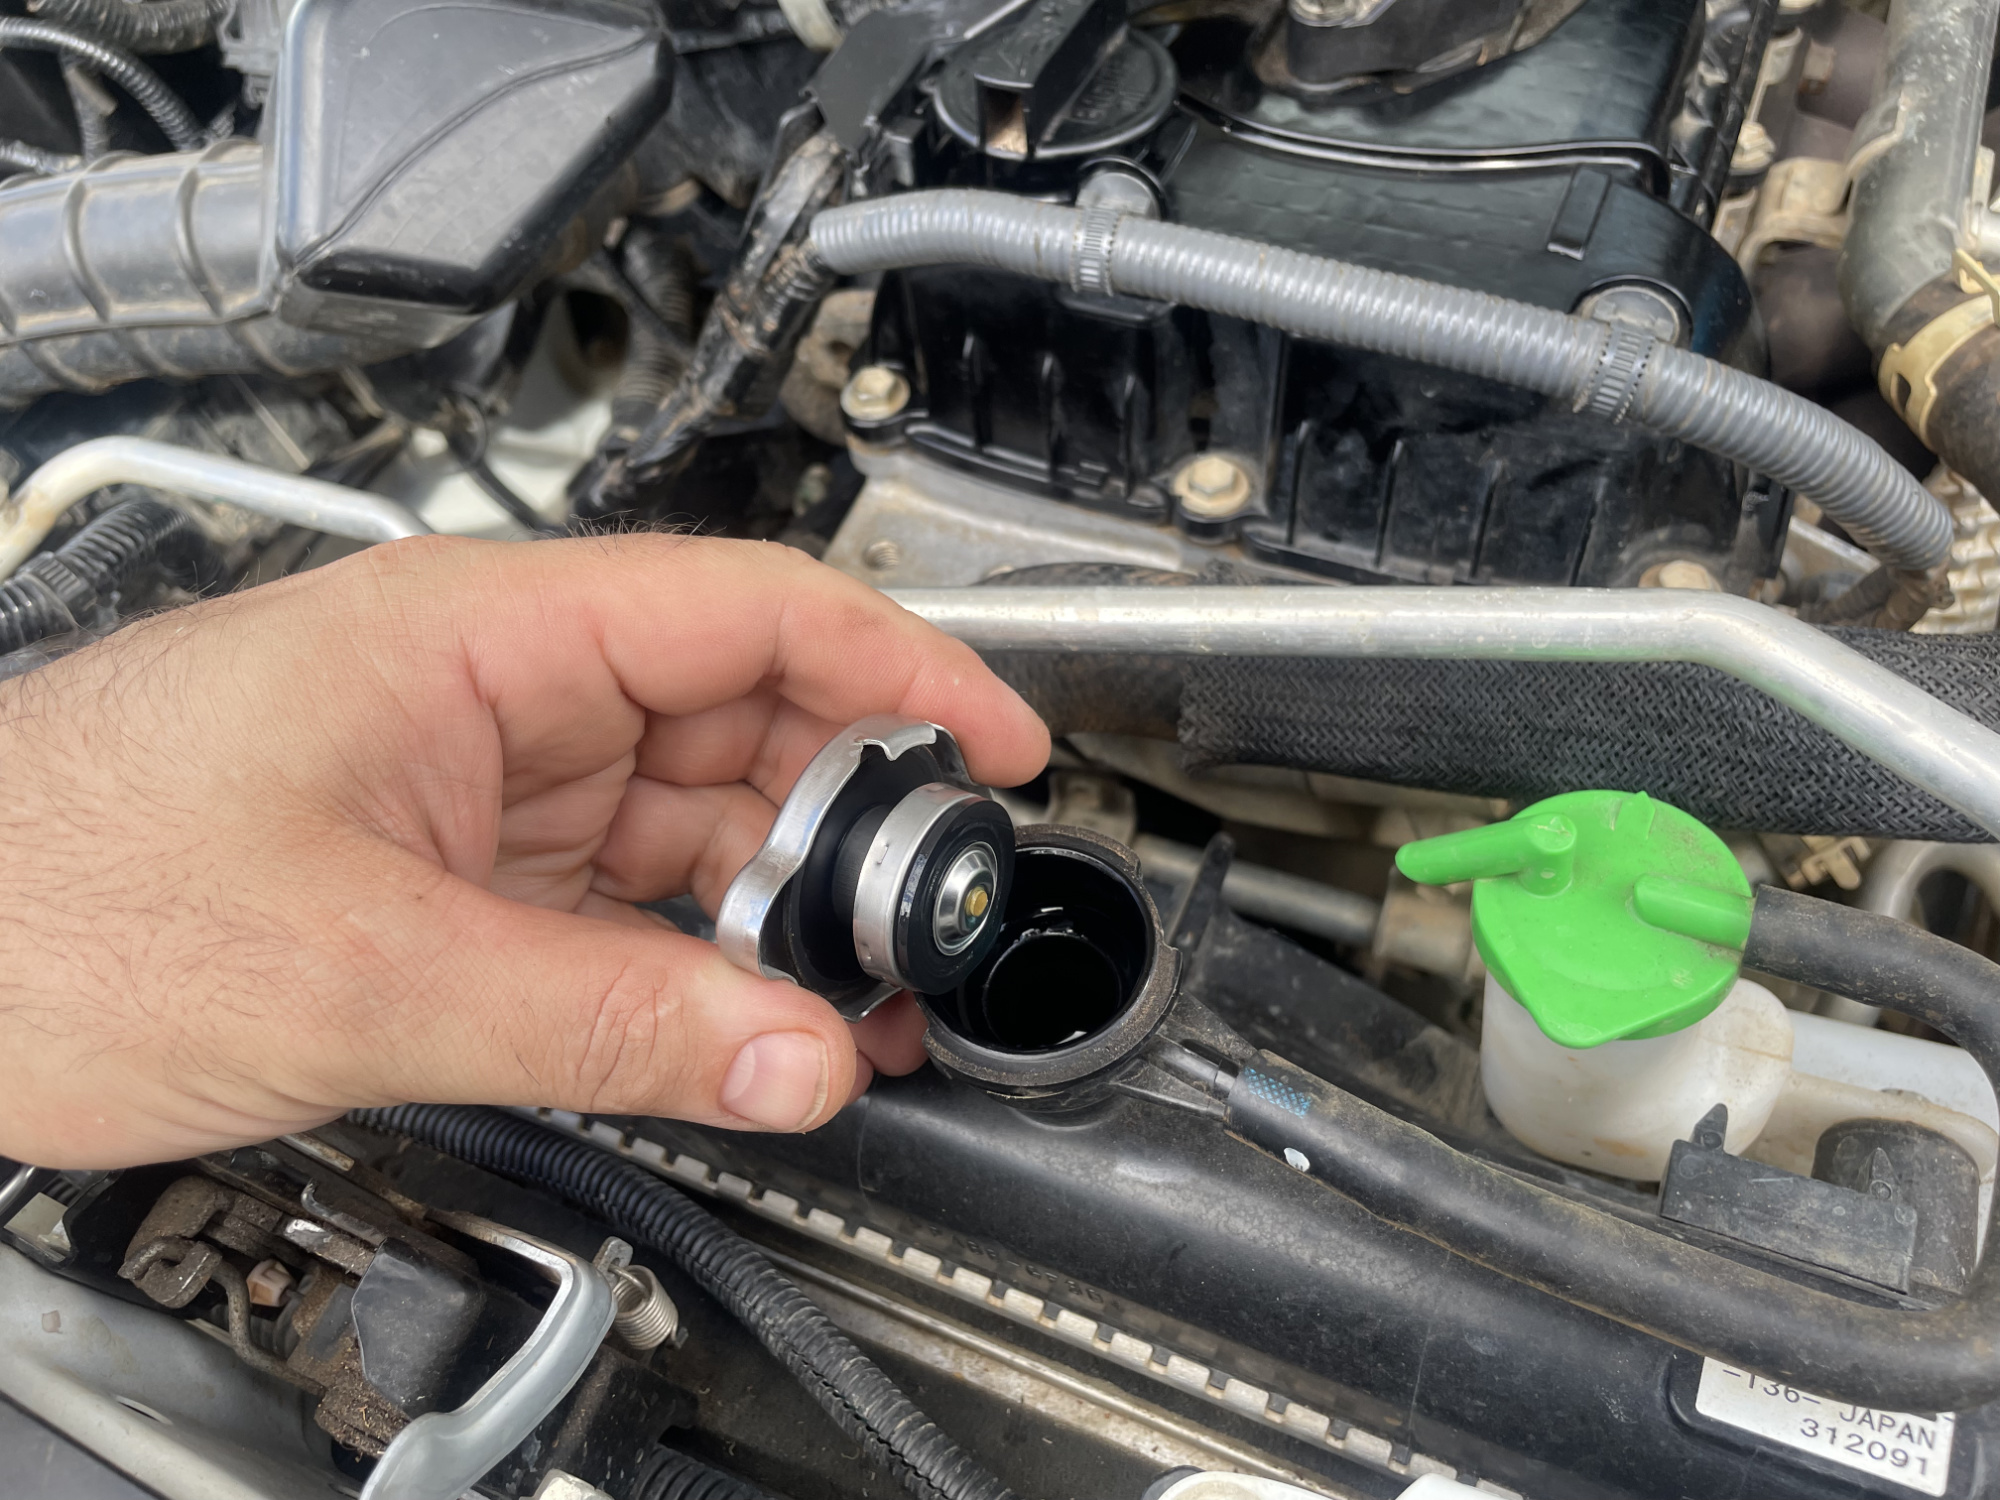
Coolant drain screw is only done up just past finger tight (2.5 Nm) though sometimes the rubber can get a bit stuck onto the plastic tank. If your car has a lift kit and bigger tyres then congrats, you can fit a 20L Bunnings bucket under the drain and that helps a lot for stopping mess. A stock car might need a flatter drain pan.
Let it fully drain, then tighten the drain plug just finger tight.
You can also pop off the bottom radiator hose to try to drain it through there, but I found I really didn’t get any more coolant out there after I’d fully drained via the drain valve anyway.
If you are swapping coolants to a different brand (or your coolant was extra manky), then you’ll need to follow the next few steps to flush the system out. If you aren’t then you can skip ahead to the bit where you fill it with coolant.
I use distilled water to flush out the system; in many parts of Australia water straight from the hose is fine but Perth water is pretty hard so it’s better to just use distilled water.
Fill it up and make sure to squeeze the top radiator hose to burp it a few times to make sure there’s minimal trapped air (i.e. the system is absolutely full).

Now you can drain this distilled water just like you drained the first lot of coolant.

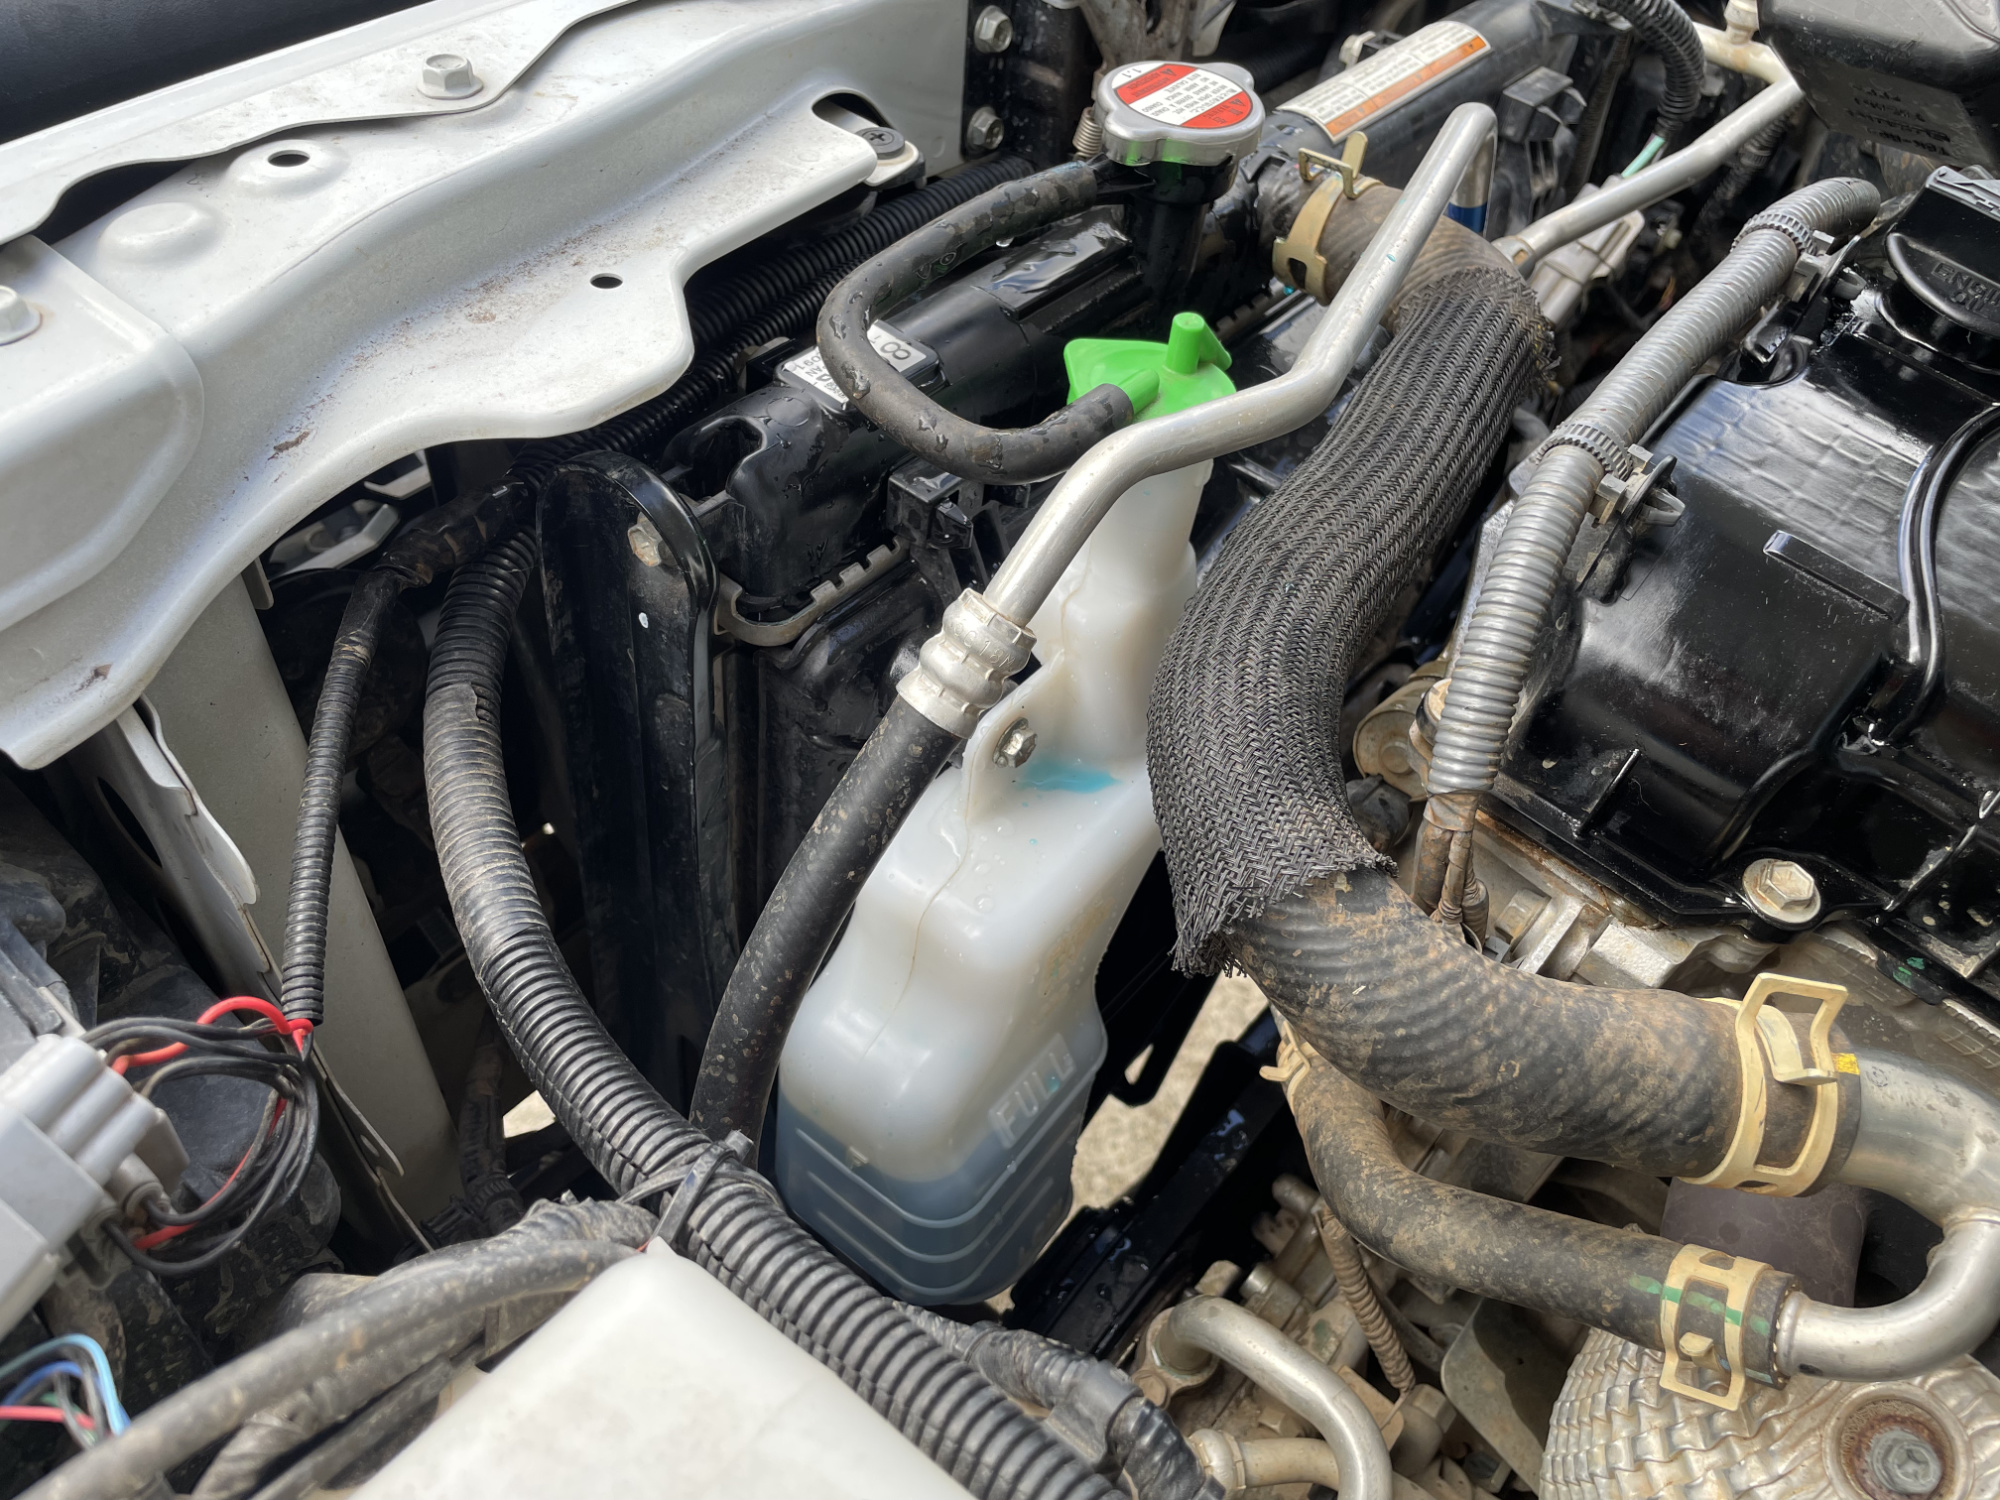
An often forgotten part of flushing the system out of old coolant is the expansion bottle. This is held on with one single 10mm headed bolt; however, before unbolting just lift the cap off and pull the suction tube all of the way out of the bottle; you can then tuck the suction tube into the top of the radiator to keep it out of the way.

Undo the single bolt and the expansion bottle will be loose but still held in via a plastic bit at the bottom of the bottle.
If you sort of push the top back towards the engine and then just lift straight up the bottle will come out. You’ll then be able to see the tab (plus also the slot that locates it on the fan shroud/radiator).

Flush this out with a bit of distilled water, clean it off and then put it back into the car and do up the bolt (11 Nm for the torque on this, if you care).
You’re now ready to start refilling the system, though make sure that it is fully drained before you start, and that you’ve done up the drain plug.
First start by removing the coolant reservoir to the full mark and install the cap on the reservoir. I went a bit far here but basically just up to the full mark is fine.
After doing this, then fill the radiator up to the bottom of the radiator filler neck. I like to burp the top radiator hose and also the two hoses on the firewall that go from and to the heater.
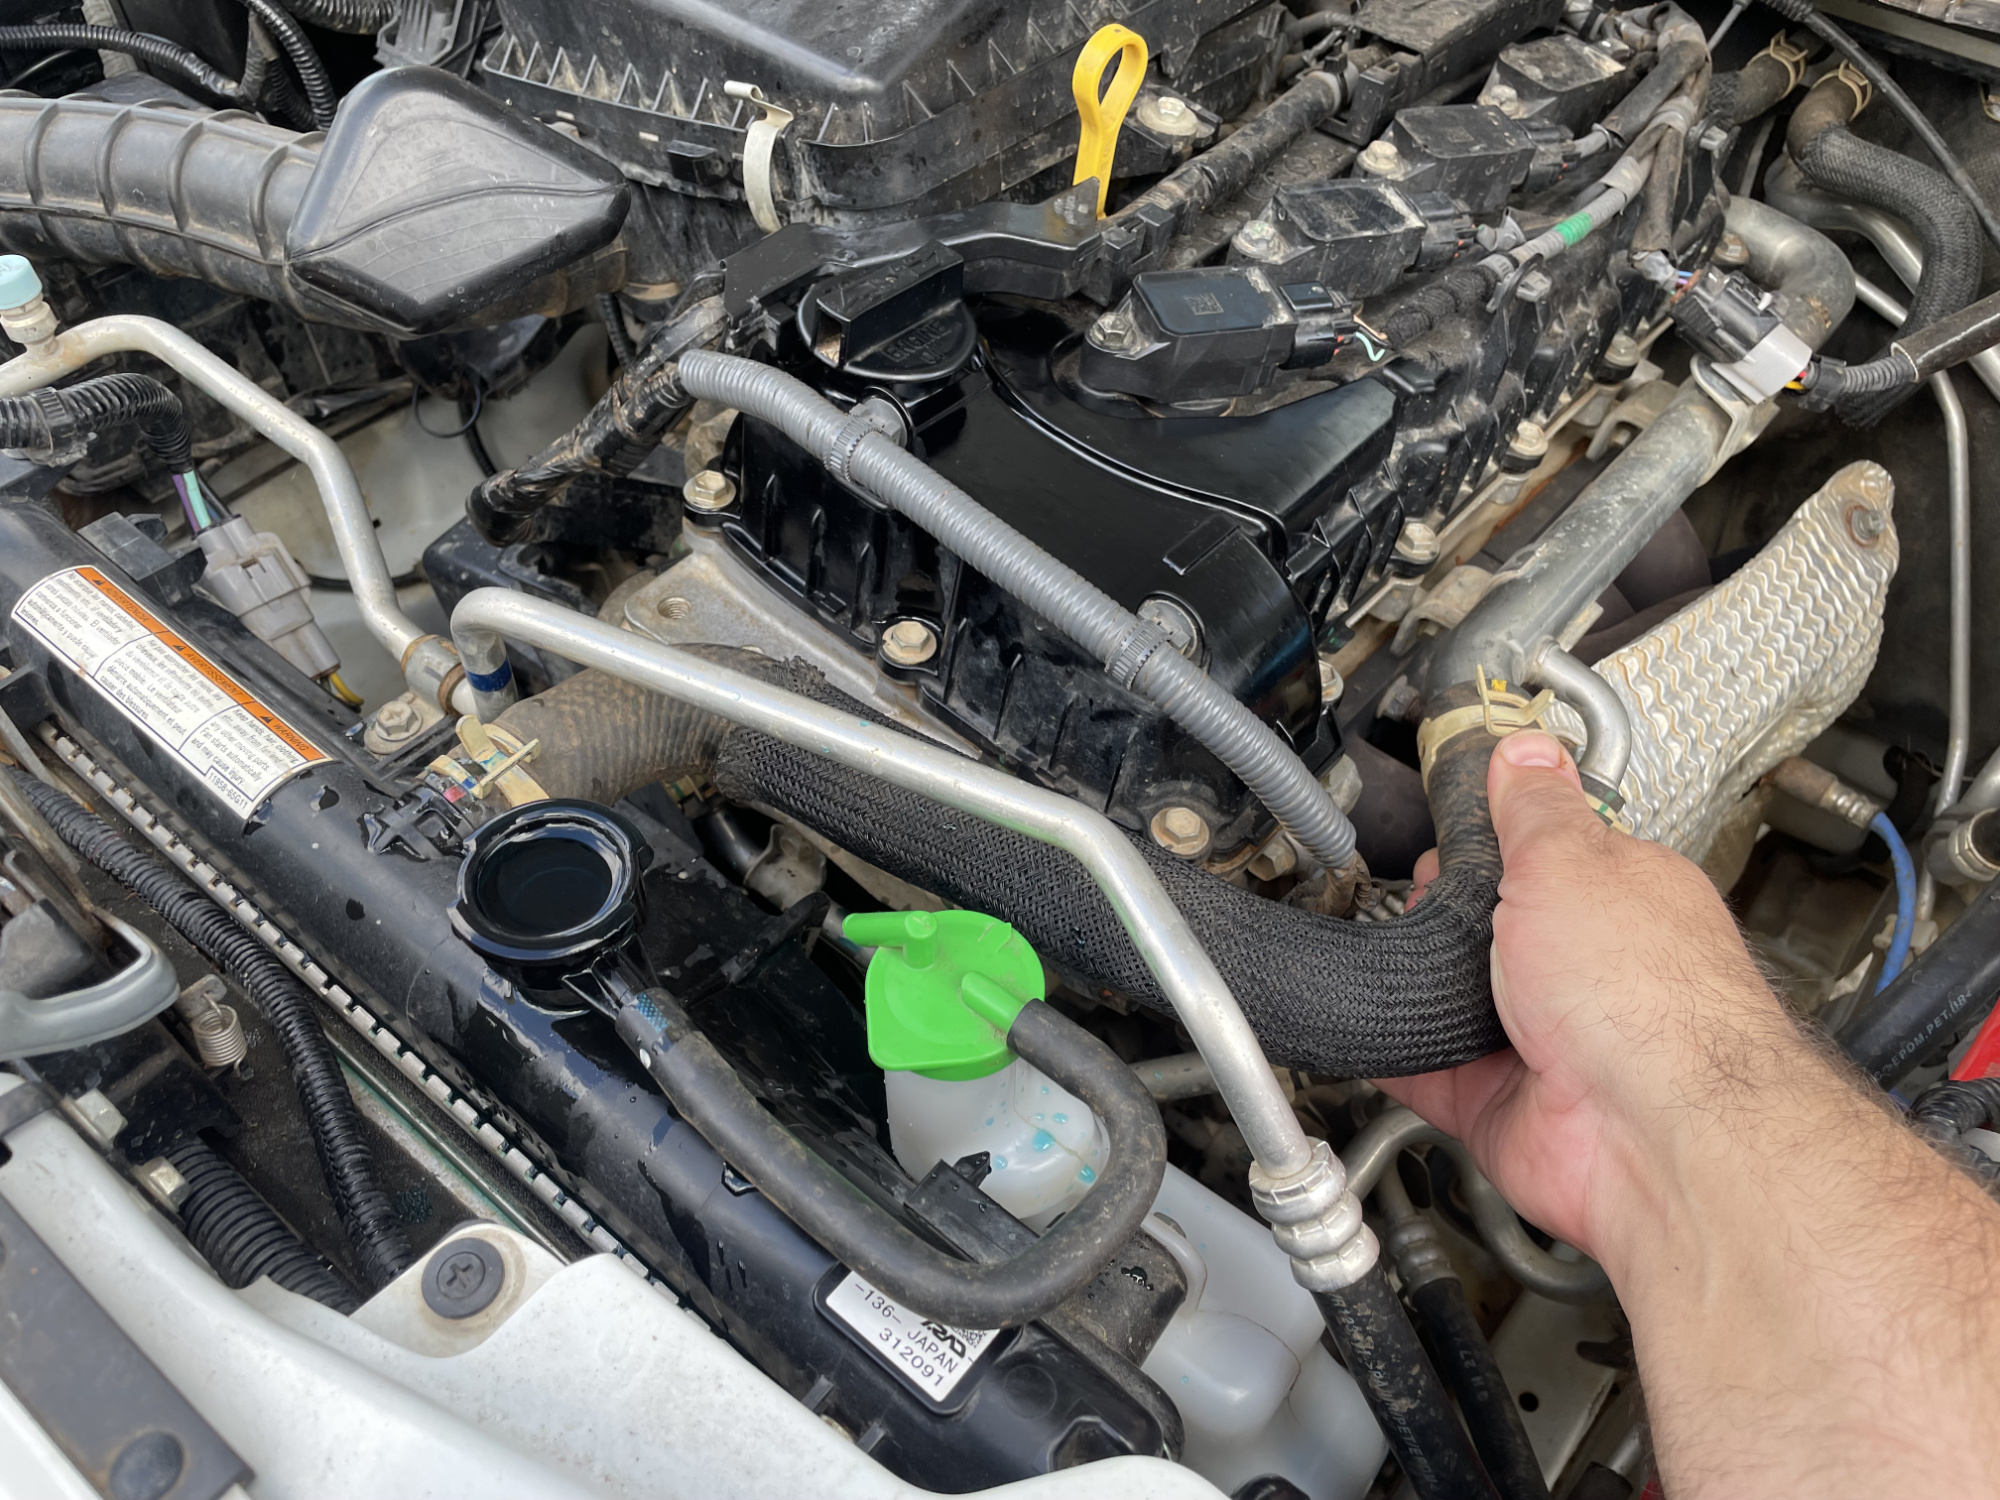
Give each hose a few squeezes till you’re sure it’s pumping just water back to the radiator.
Refit the radiator cap fully and start the car.
Even though it shouldn’t matter (the heater core gets flow no matter what) I put the HVAC onto the highest heat setting, turn off the A/C and also use the mode switch to make sure it’s definitely on manual settings rather than automatic.
I also idle the car at a slightly higher idle speed to help it get up to temperature.
By having the A/C off, the thermofan is only controlled by the engine coolant temperature. Basically you want to keep the car warming up until the thermofan kicks on: low speed starts at 97º, at which point the thermostat should have been fully opened.
Note that you can only rely on the thermofan for understanding if you’re up to temperature if you have the A/C off; with the A/C on the thermofan is really responding to what the refrigerant is doing. You can also use an OBD2 based gauge to see what the engine coolant temperature is reading, too.
If you want to verify thermostat operation, when it is warming up the radiator hoses will be different temperatures; once the thermostat is open both the bottom and top hoses will be the same temperature. If you want to check this, do not try to check the bottom radiator hose from the engine bay side – check it from underneath. It’s awfully close to the alternator and its spinning belt and I wouldn’t want you to get caught up in that.
Once the car has reached operating temperature, turn the car off and wait for it to fully cool down. You can then open the radiator cap (DO NOT OPEN IT WHEN IT IS STILL HOT), and refill the radiator to the bottom of the filler neck and top up the expansion bottle if needed.
You can repeat this process a few times till you make sure all of the air is out of the system. The radiator top and the heater hoses are very similar heights so it can be hard to bleed all of the air out of the heater core unless you park facing up a hill or jack the front of the car up.
Nominally the system takes 5L for a manual and 4.9L for an automatic: 4.5L in the radiator (4.4L in an auto), and 0.5L in the expansion bottle. However, it is very hard to drain everything, and after refilling my car but before all of the air had been bled out, I only had added about 3.5L to the system.
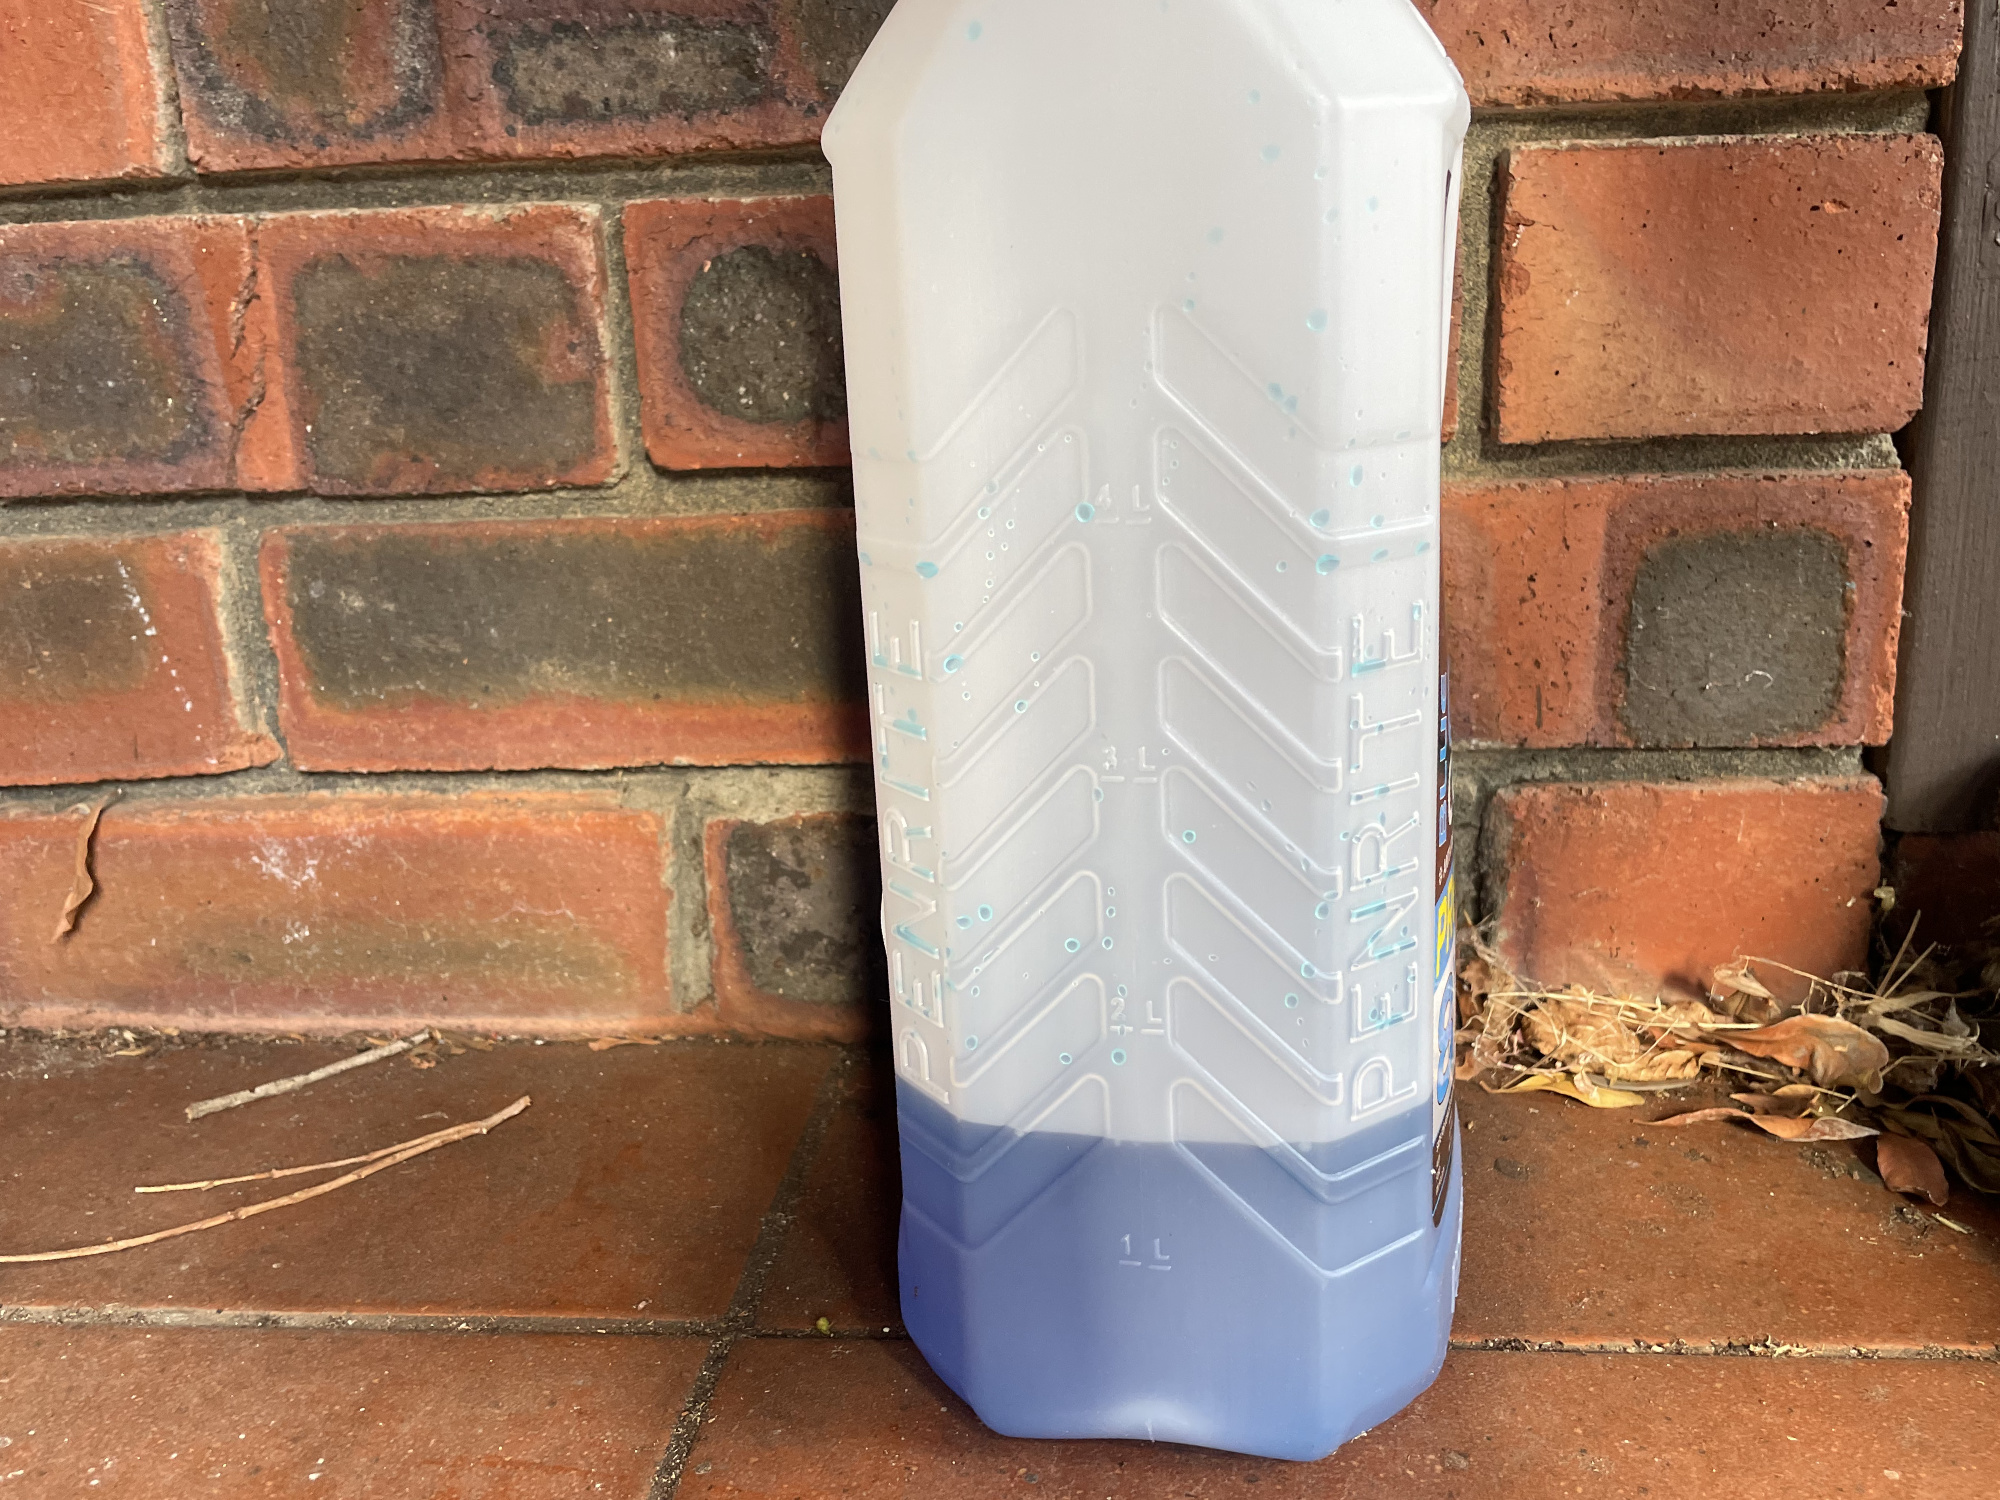
The car took a further 0.5L after cooling down and removing air from the system.
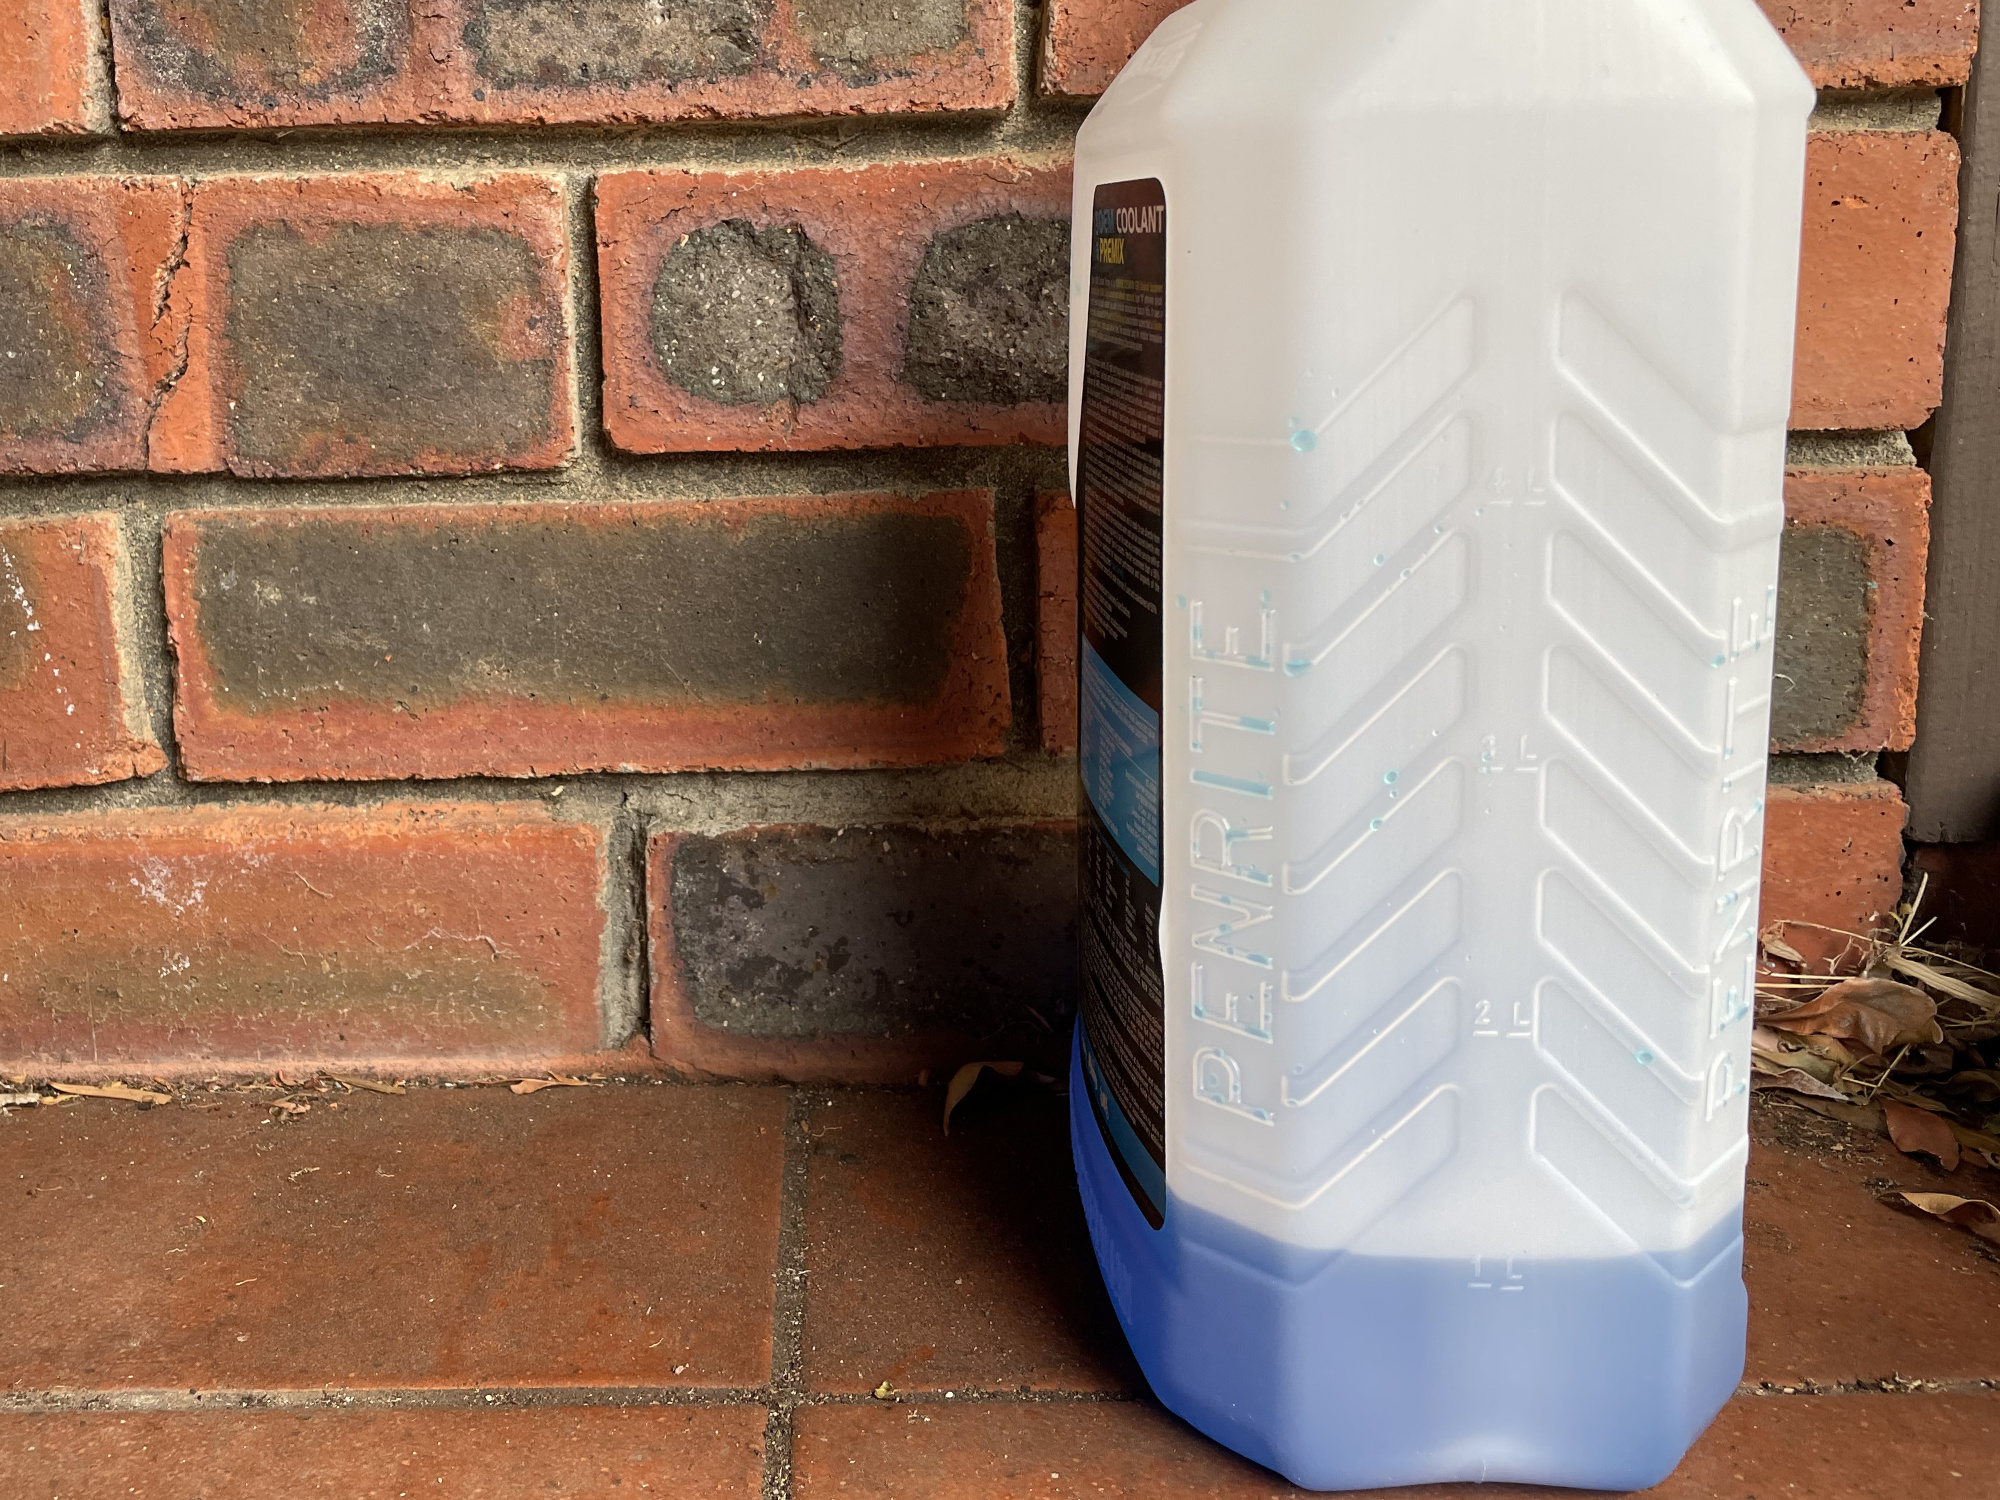
Here’s where the level in the radiator had dropped down to after running and heat cycling the car once.
… and the corresponding position in the expansion bottle.
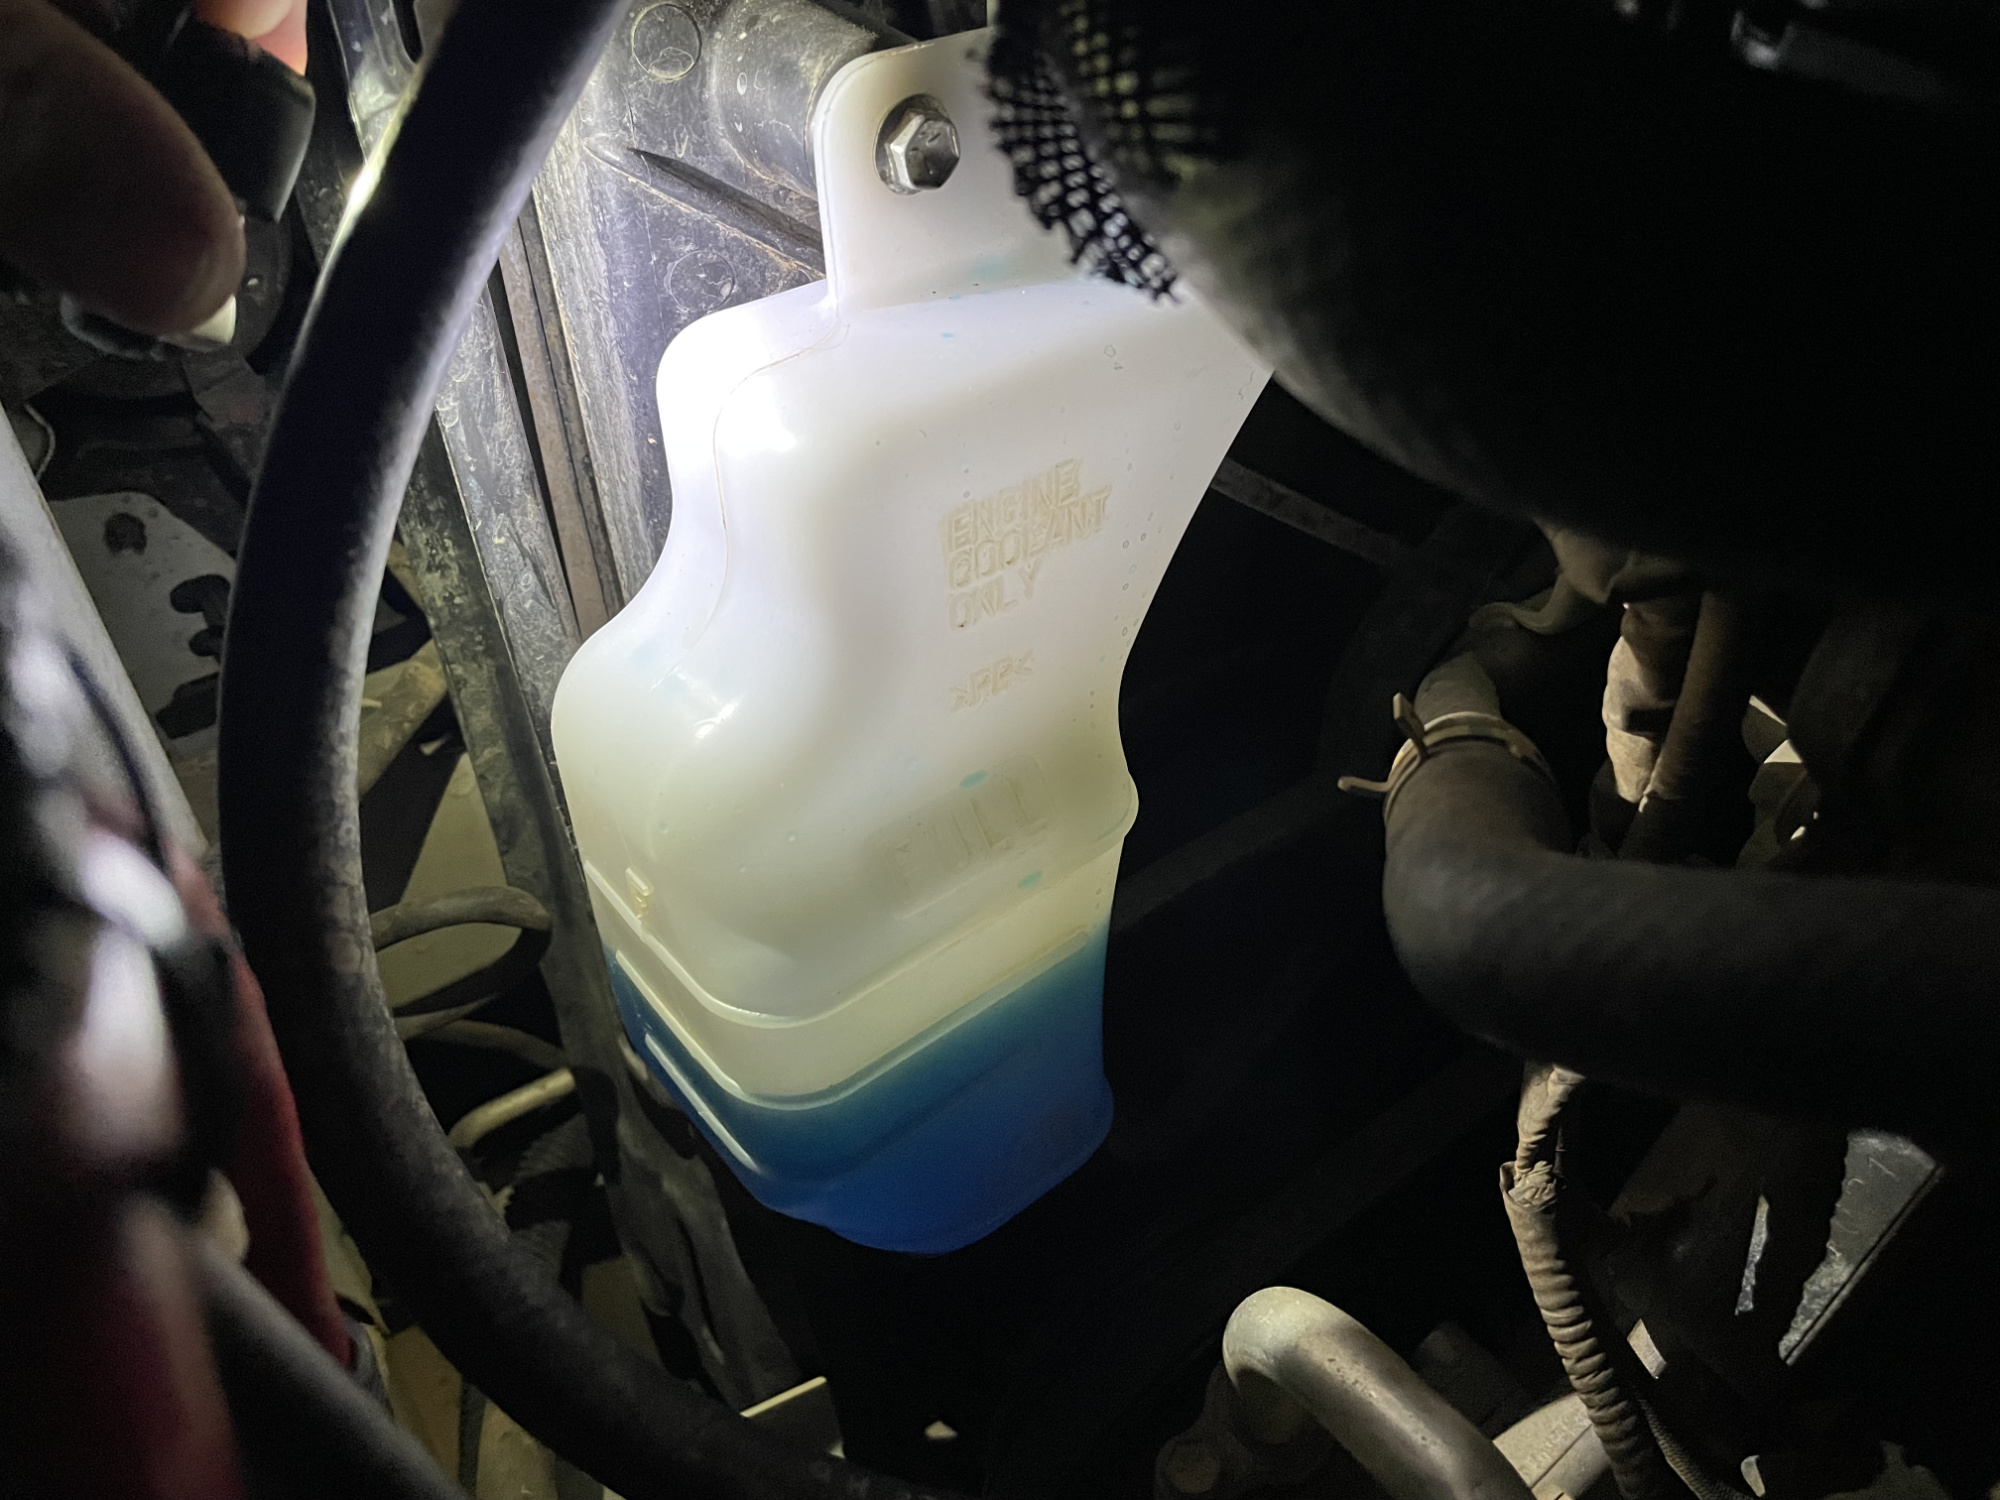
4ish litres is roughly what I drained out, so this now probably represents the cooling system is full again.
Based on total capacity of 5L, this 80% change means that about 1L of the old coolant is left over if you just do a drain and refill. This is why I use distilled water and do a couple of changes; you will have slight dilution of the new coolant but limited old coolant for reacting with your new coolant. Two flushes of distilled water will mean ~40 mL of old coolant remains (3 flushes would mean ~8 mL remain, and 4 gives 1.6 mL remaining). If you want maximum new coolant then you’d really need to drain off the first fill of new coolant and refill, but I think that’s overkill for the Jimny.
Brakes
Replacing brakes and adjusting the handbrake
Front pads have the OEM part number 55810-78R00. There don’t appear to be a heap of options, and plenty of pads appear to be listed as ‘in development’ but not available right now. In any case, I was able to dredge up the following apparent cross references but use this info at your own risk. I’m not a brake pad manufacturer so I can’t guarantee it’s correct.
| Manufacturer | Part number | Notes |
| Suzuki | 55810-78R00 | Original pads |
| Pagid | T2836 | |
| Mintex | MDB4175 | |
| Brembo | P79040, P79040N | In development |
| Delphi | LP3637 | |
| Metelli | 2212150 | |
| Icer | 182373 | |
| Don | PCP1835 | |
| Hella Pagid | 355040421, 8DB355040421 | |
| Nisshinbo | NP9033 |
I haven’t found any good part numbers for replacement shoes, but they do exist if you need rear shoes. Front brakes appear to match DBA part DBA587, which you can get in fancy semi-slotted design as DBA587S.
Front and rear brake service stuff covered in this super long page here.
Engine services
Spark plug change
Super super simple to do this. Coilpacks off, spark plug undone with a 16mm spark plug socket, new spark plug installed.
Spark plugs are specified to be standard electrode NGK plugs, NGK part KR6A-10. A Denso part is listed for an iridium plug (ZXU20PR11). Spark plug gap is 0.95 to 1.05 mm for the NGK plugs, and 1.0 to 1.1 mm for the Denso plugs.
Spark plugs are installed to 18 Nm of torque.
Valve clearance check/change
This isn’t something I’ve done yet but it is a placeholder for when I do it.
If you get in there, you might need a spare valve cover gasket. Suzuki part number for this is 11189-62R10. Often these can be reused but they go hard and start to leak with age so it’s worthwhile throwing a new one in there when you take off the valve/rocker cover.
You access the rocker area to check the valve clearances by first removing the airbox and the ignition coils. After that it’s a case of measuring stuff and swapping out different sized valve buckets to change the clearances as needed.
Other servicing
Headlight adjustment
Even with automatic levelling headlights, the headlights will require some degree of adjustment. Each headlight bucket has a screw to adjust up and down alignment, and also left and right adjustment.
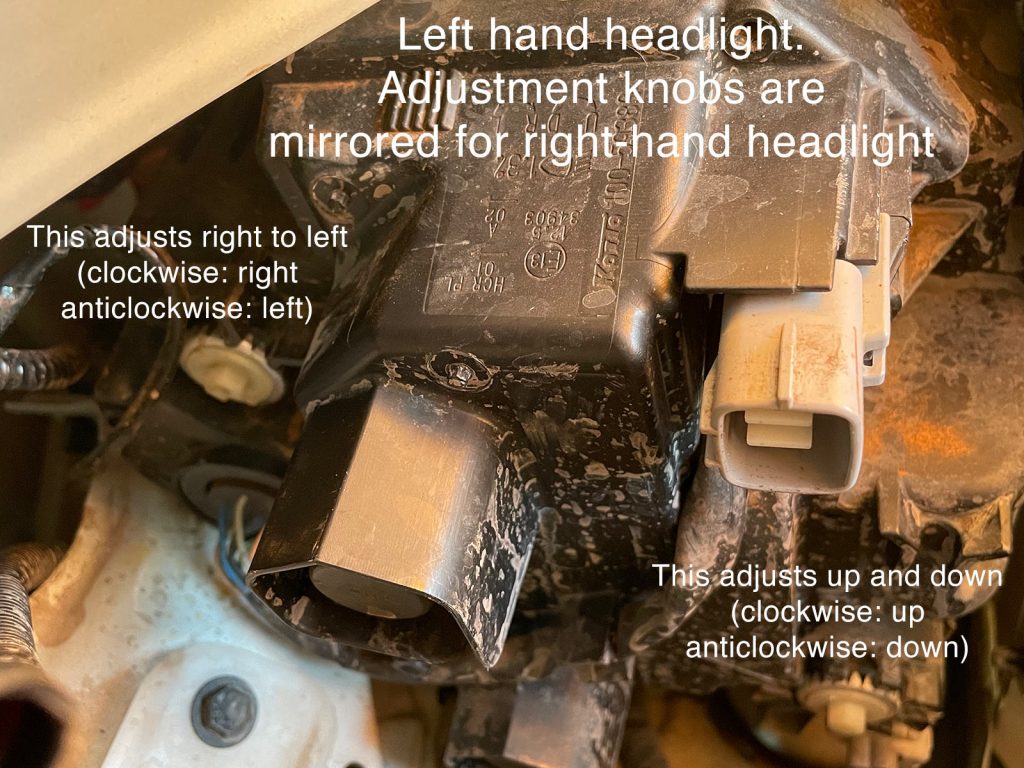
It is well worth sorting out this alignment to have maximum brightness headlights especially at low beam. Note that cars with LED headlights have self levelling functions: you need to modify this bracketry or actuating arms if you lift your suspension up and this is independent of the headlight alignment.
Alignment needs to have the drivers side headlight a bit lower than the passengers side headlight. This is best done parking parallel to a wall on a level piece of ground, and marking where the centre of the car is on the wall and also the centre of the headlight height-wise is on the wall. The specifications are based on 10m distance (discussed below) but you could account for the differences in ‘drop’ at different distances if you didn’t have enough space.
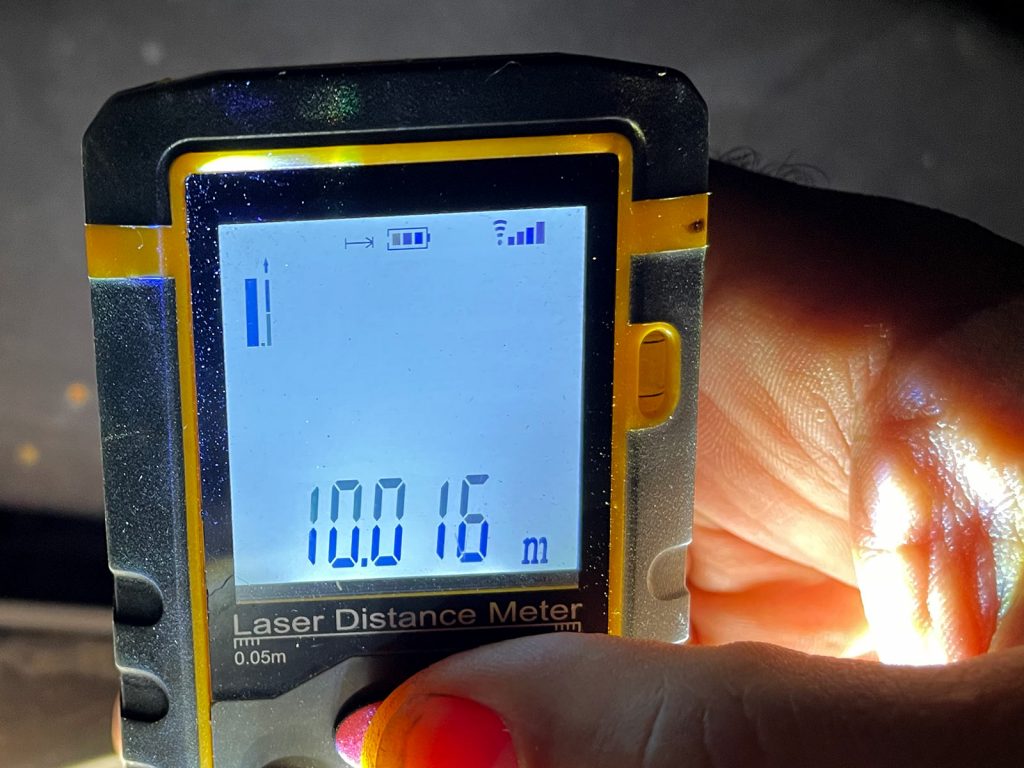
Honestly it was probably overkill to use a laser measurer but I wanted to quickly verify I was square to the wall I was measuring against, and it’s a quick way to check the centre height position of the headlights & also the centreline of the car.
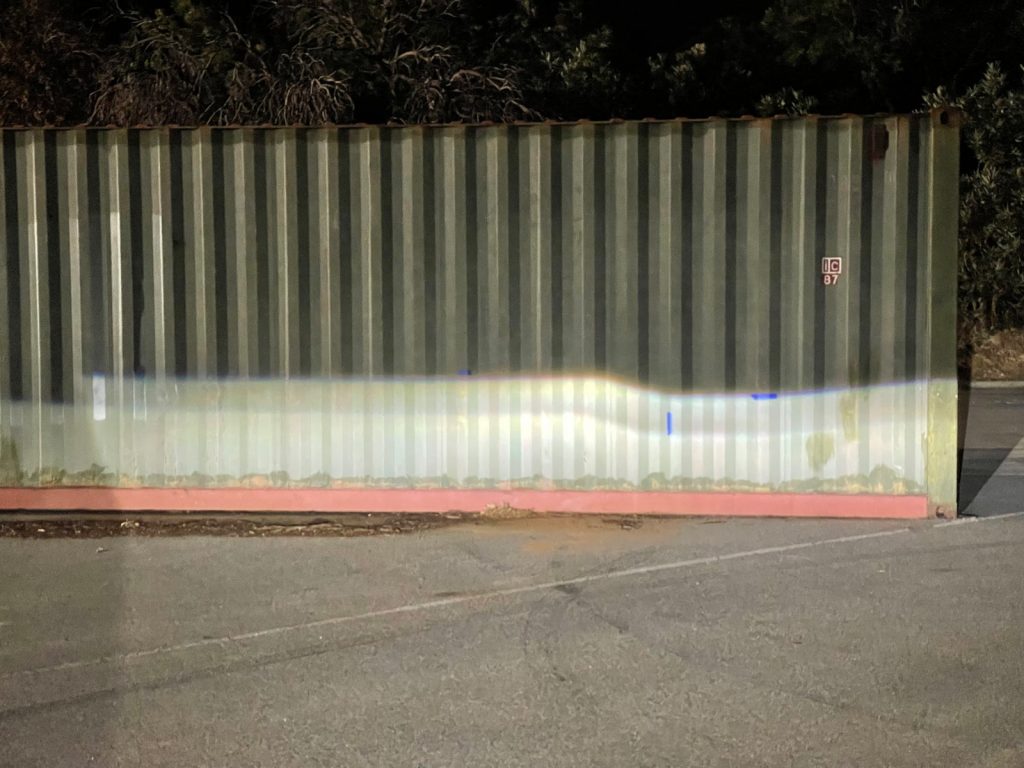
In terms of the adjustment and the beam position, you can see this in the 3 marks I made with masking tap on the ‘wall’ (actually a shipping container) when I sorted out my headlight alignment after installing my snorkel.

On low beam the passengers side headlight cutoff of the light beam should be at the same height as the centre of the headlight (this depends on your particular suspension lift!). The drivers side light should be 100 mm lower at 10 m distance for halogen headlights and 130 mm lower at 10 m distance for LED headlights. This equates to a dip of 0.57º for halogen headlights and 0.74º for LED headlights between the drivers side cutoff and the passengers side cutoff.
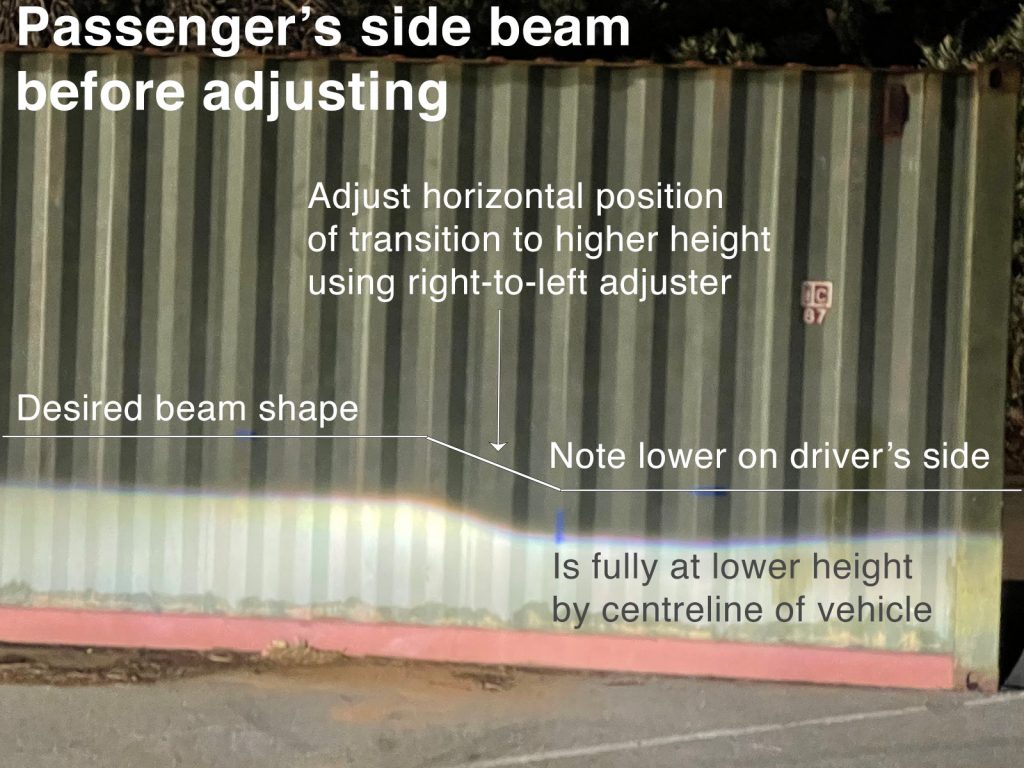
The cutoff should be complete at the centreline of the car i.e. the entire beam from the centre of the car to the drivers side should be the lower height, and then transition up to the higher height from the centre line gradually.
I didn’t get a chance to get a final ‘after’ image because I had to run away to do other tasks, but, below is a photo where the driver’s side headlight has been correctly adjusted both horizontally and vertically, and the passenger’s side headlight is where it was at from the factory. You can see it was far from ideal.
Tyre rotation
This is overlooked. I wouldn’t pay a workshop to do this, you should just do this as part of your regular check-over of the vehicle. It also ensures you yourself can change a wheel, which means you won’t get stuck out somewhere with a flat tyre you can’t change as you trusted a monkey with an impact gun to fit your tyres and now you cannot undo them.
For a full 5 wheel rotation, the simplest method is as follows:
- Remove the spare tyre. Fit this to the drivers back wheel.
- Former driver’s side back wheel goes to the driver’s side front wheel.
- Former driver’s side front wheel goes to the passenger’s side back.
- Former passenger’s side rear wheel goes to the passenger’s side front wheel.
- Former passenger’s side front wheel goes on the back as a spare.
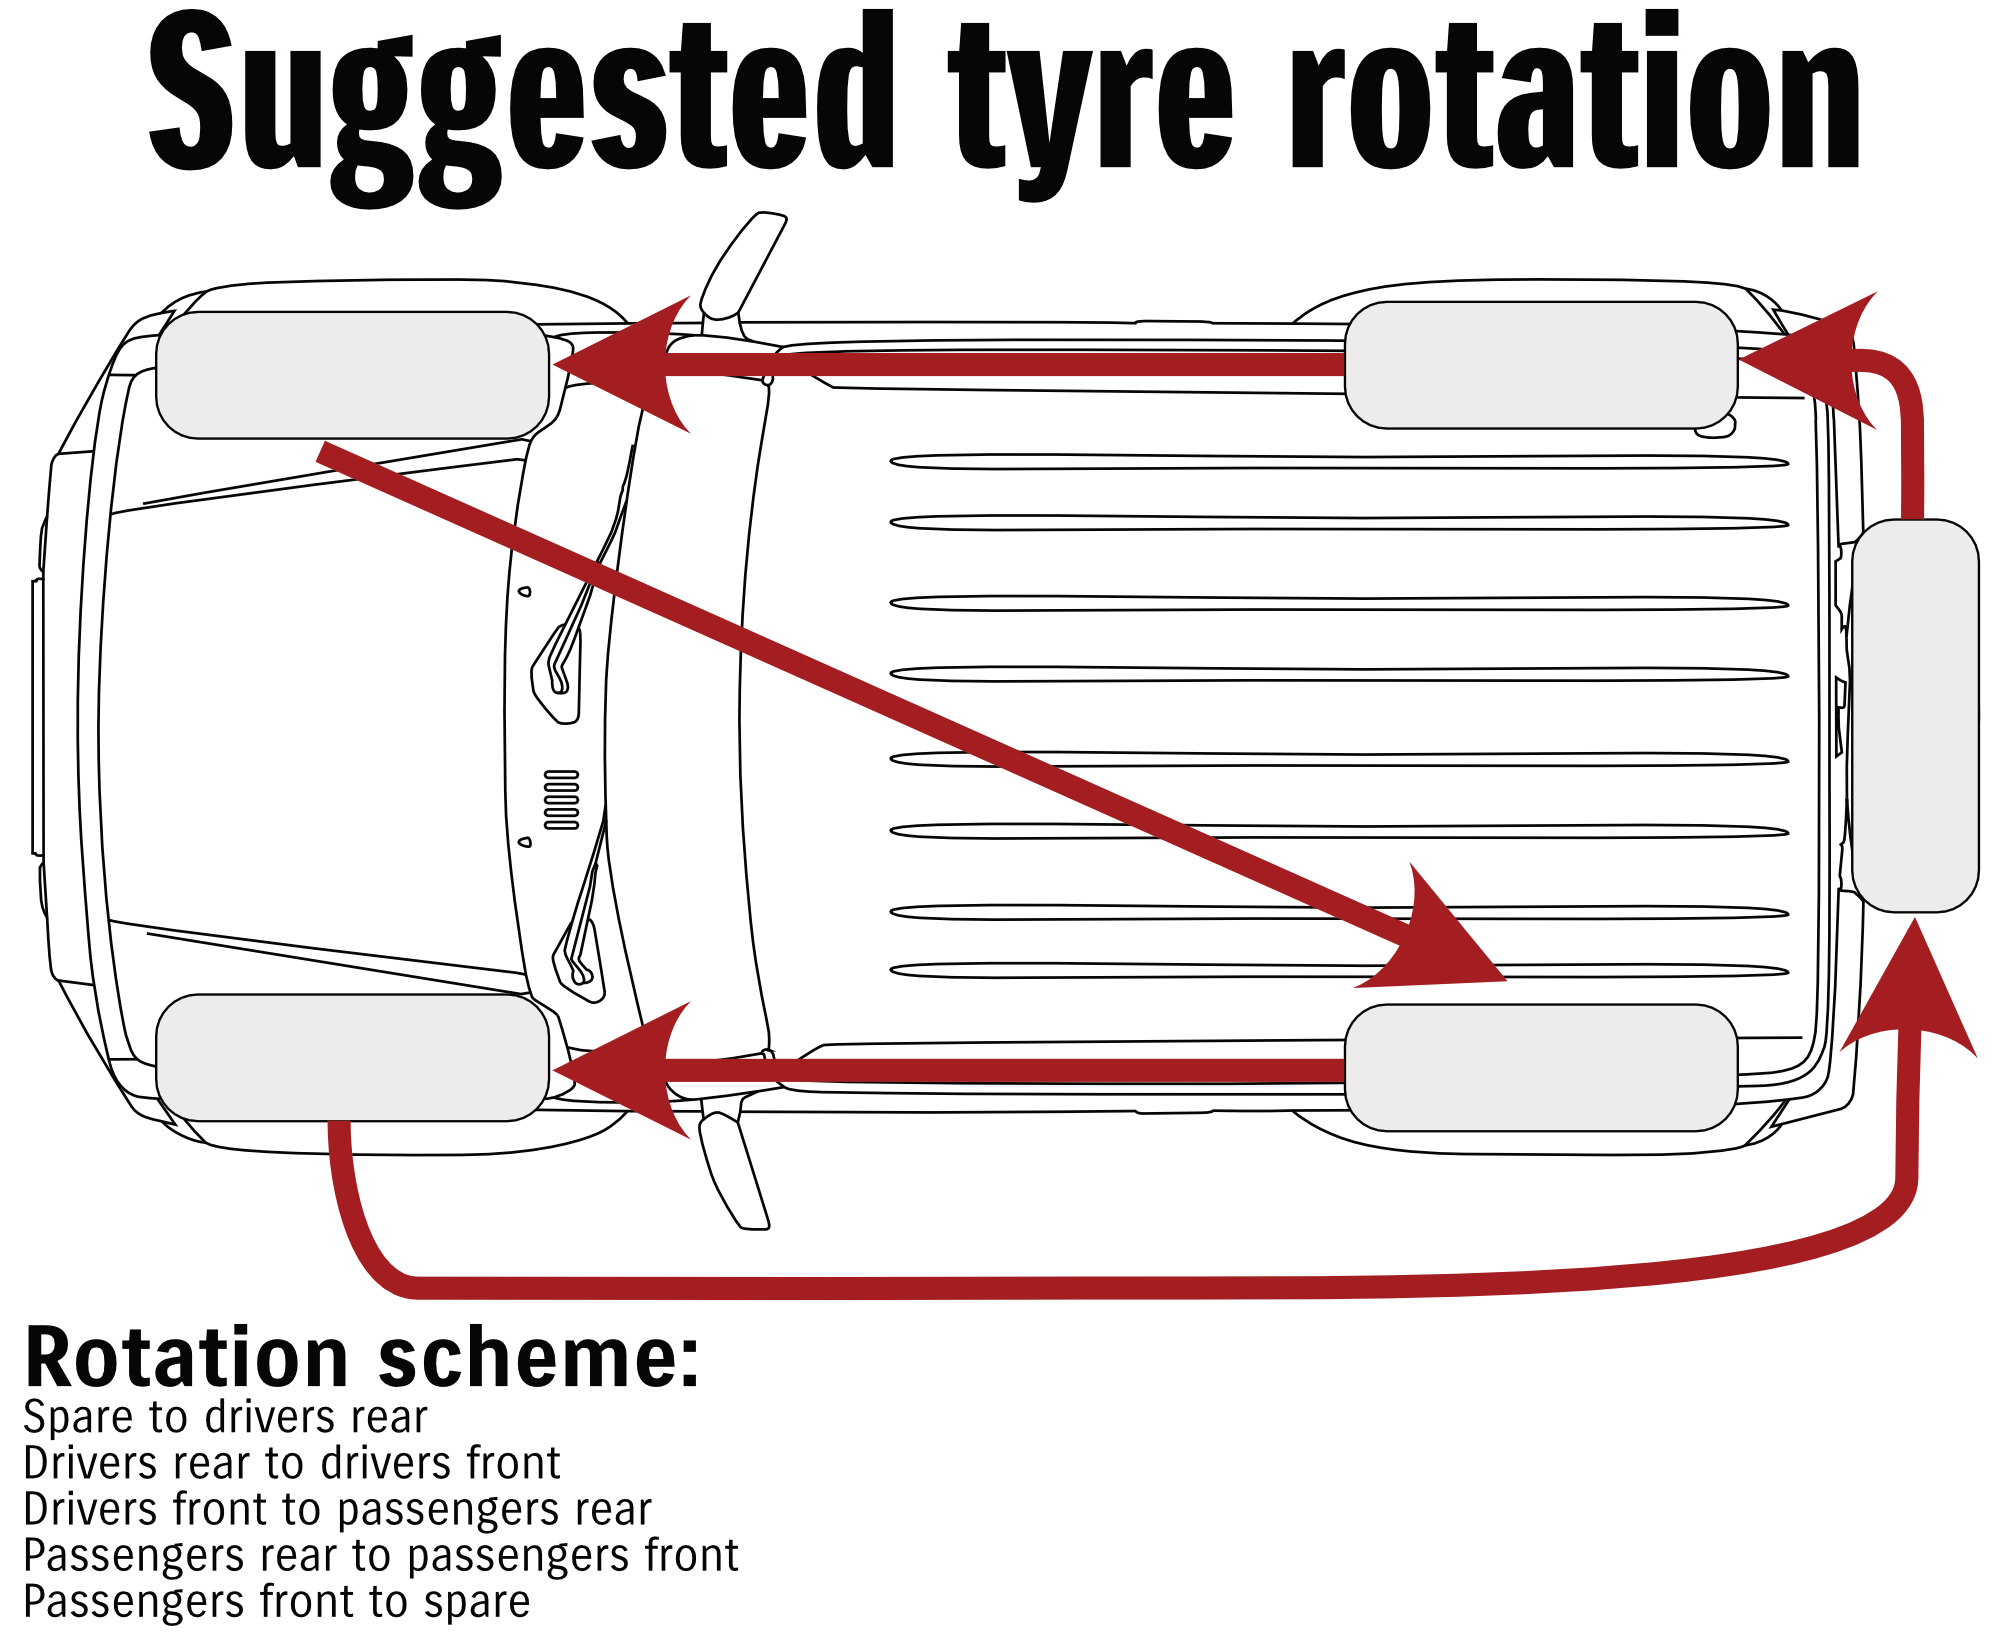
You obviously will need to lift the car to do this, but you can even do it with the factory jack and do one corner at a time. Just start with the driver’s side rear being lifted up, and fit the spare on here, then take that tyre and put it onto the driver’s side front and keep following the previous diagram.
One of the main reasons to do this with the Jimny is just how much differently the front and rear tyres will wear. This is down to how the suspension works and the limitations of having live axles front and rear. By sticking to a reasonably robust rotation schedule you’ll get better life out of the tyres by making sure you wear down the middles (when they’re fitted to the back) alongside the side tread block wear (when they’re fitted to the front).
Wiper blades
Wiper blade swap is pretty easy, especially if you replace the entire cartidge rather than just the blade insert itself. I’ll show how you remove the inserts themselves, but also how you change the entire cartridge/assembly as that’s easier and often a better choice.
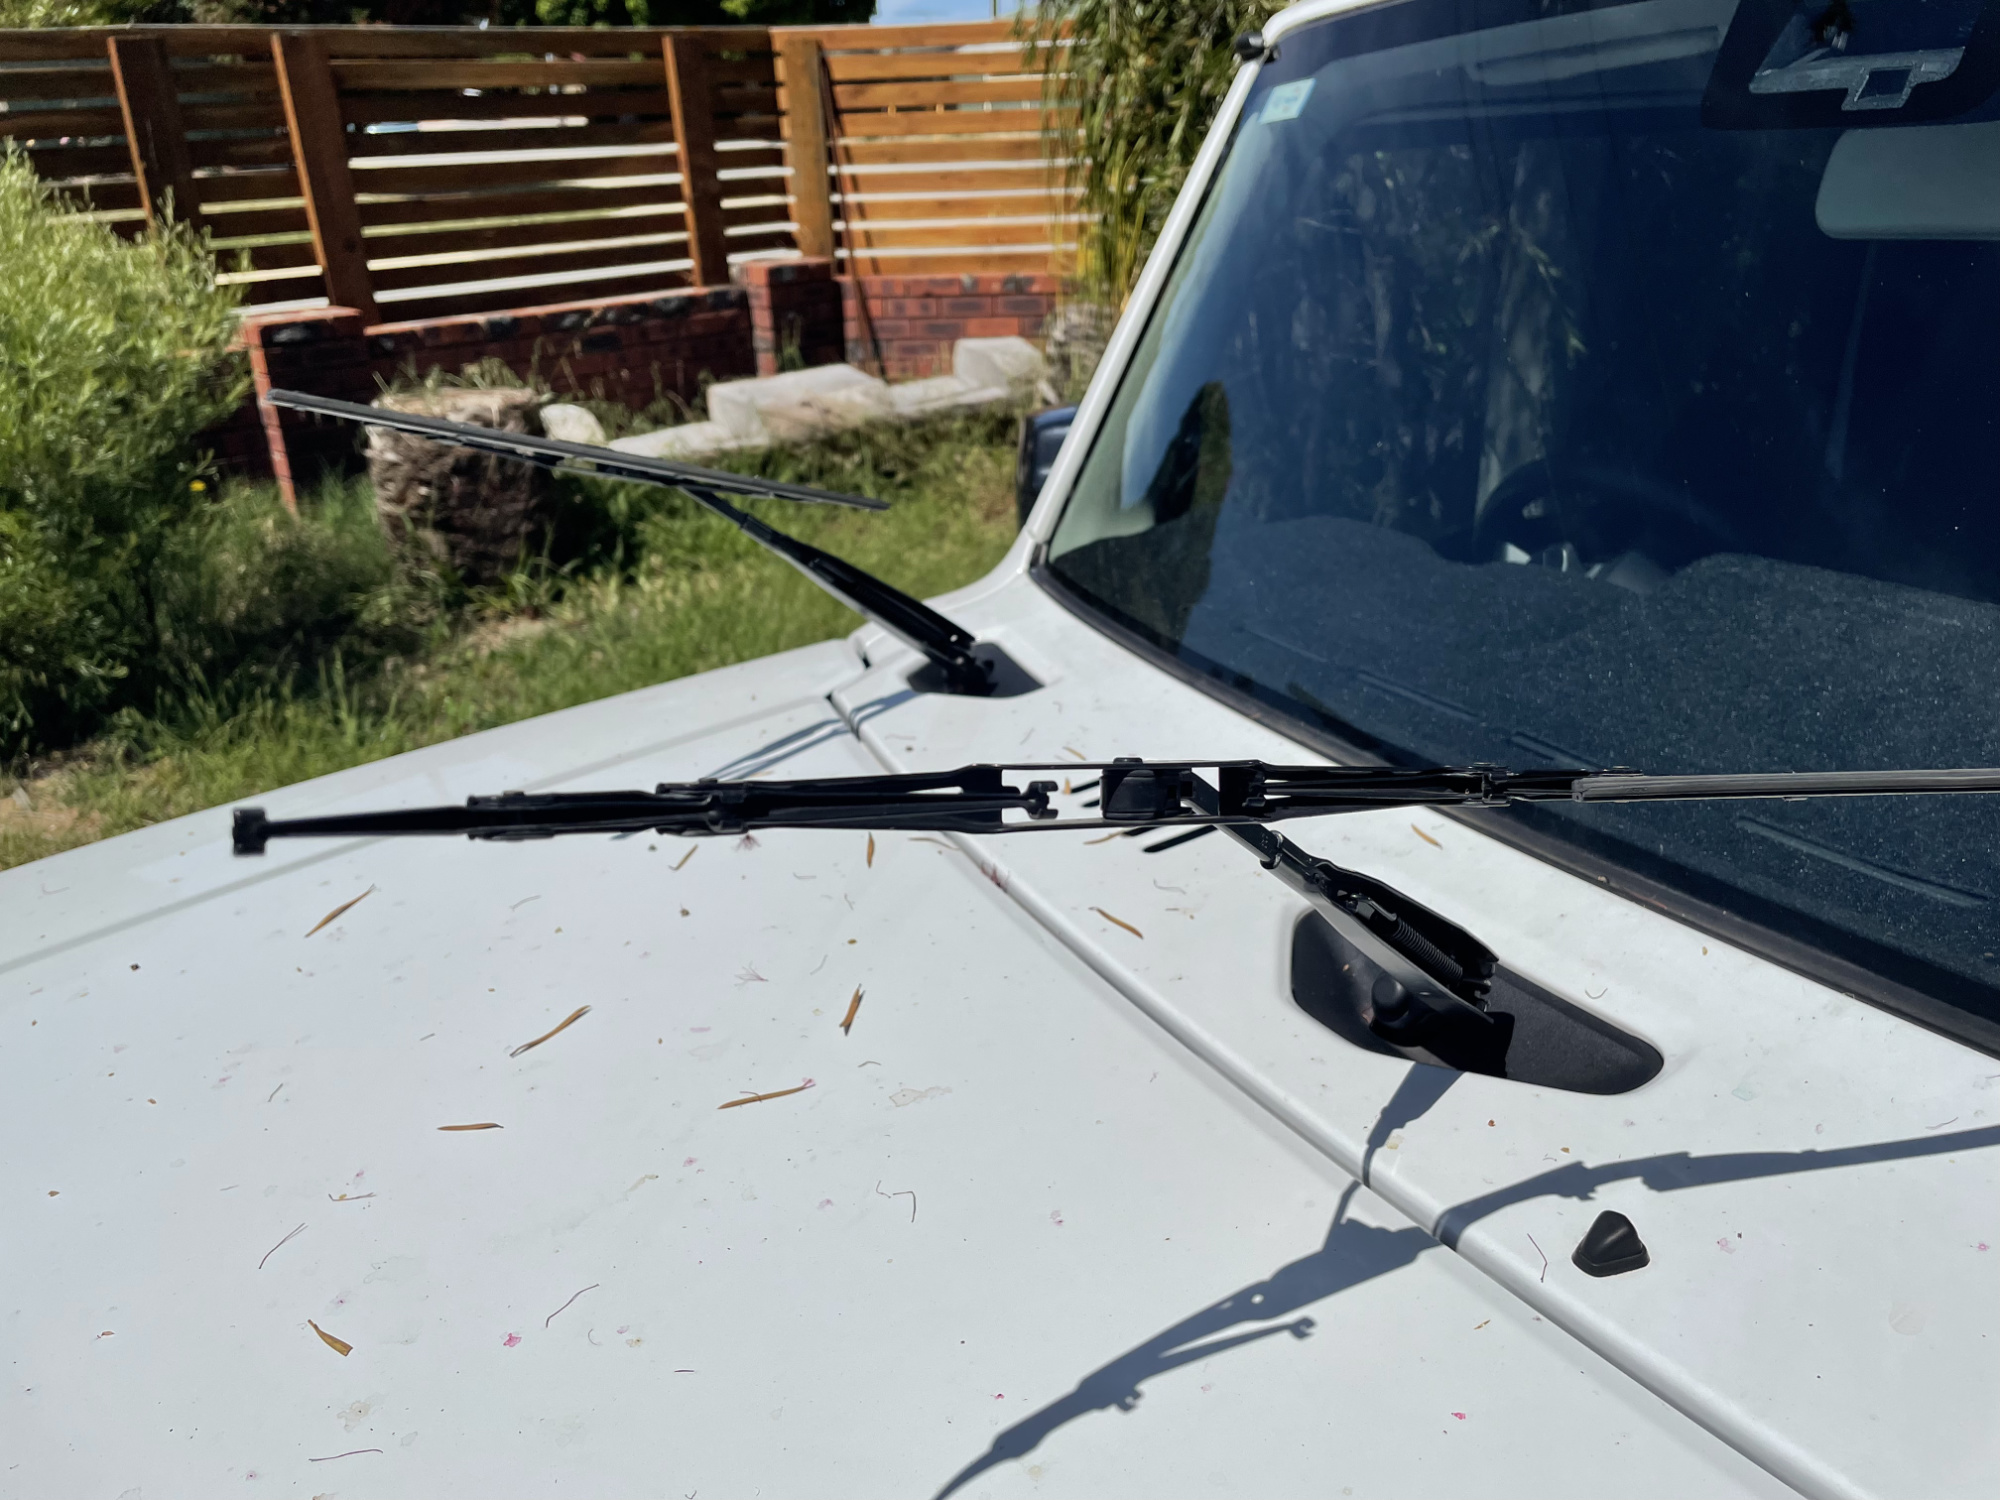
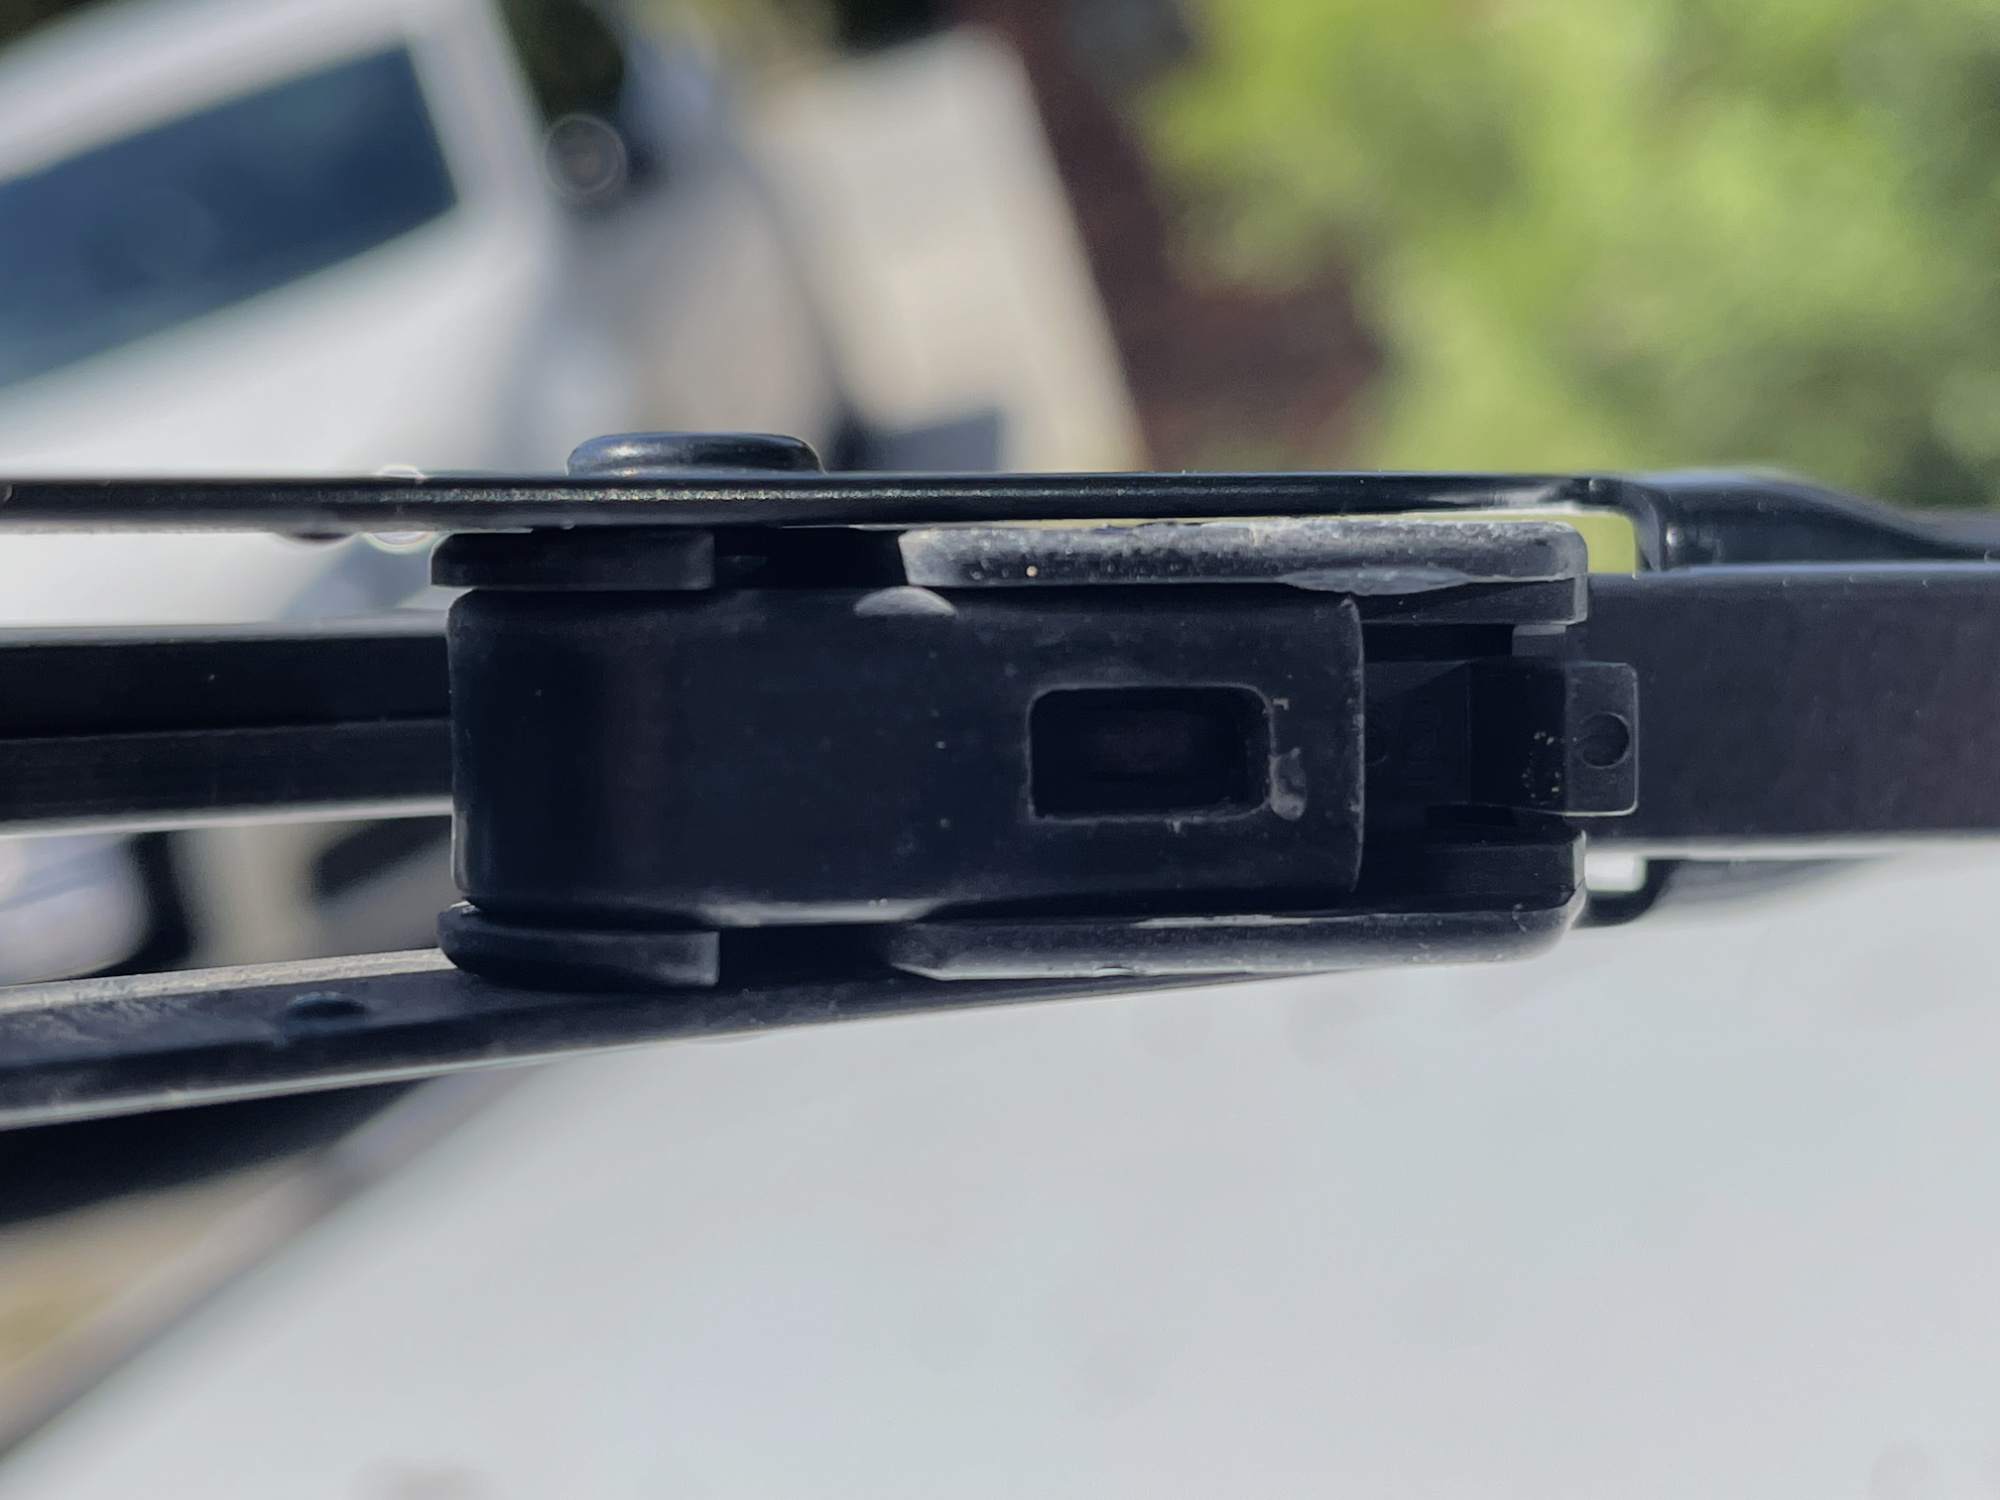
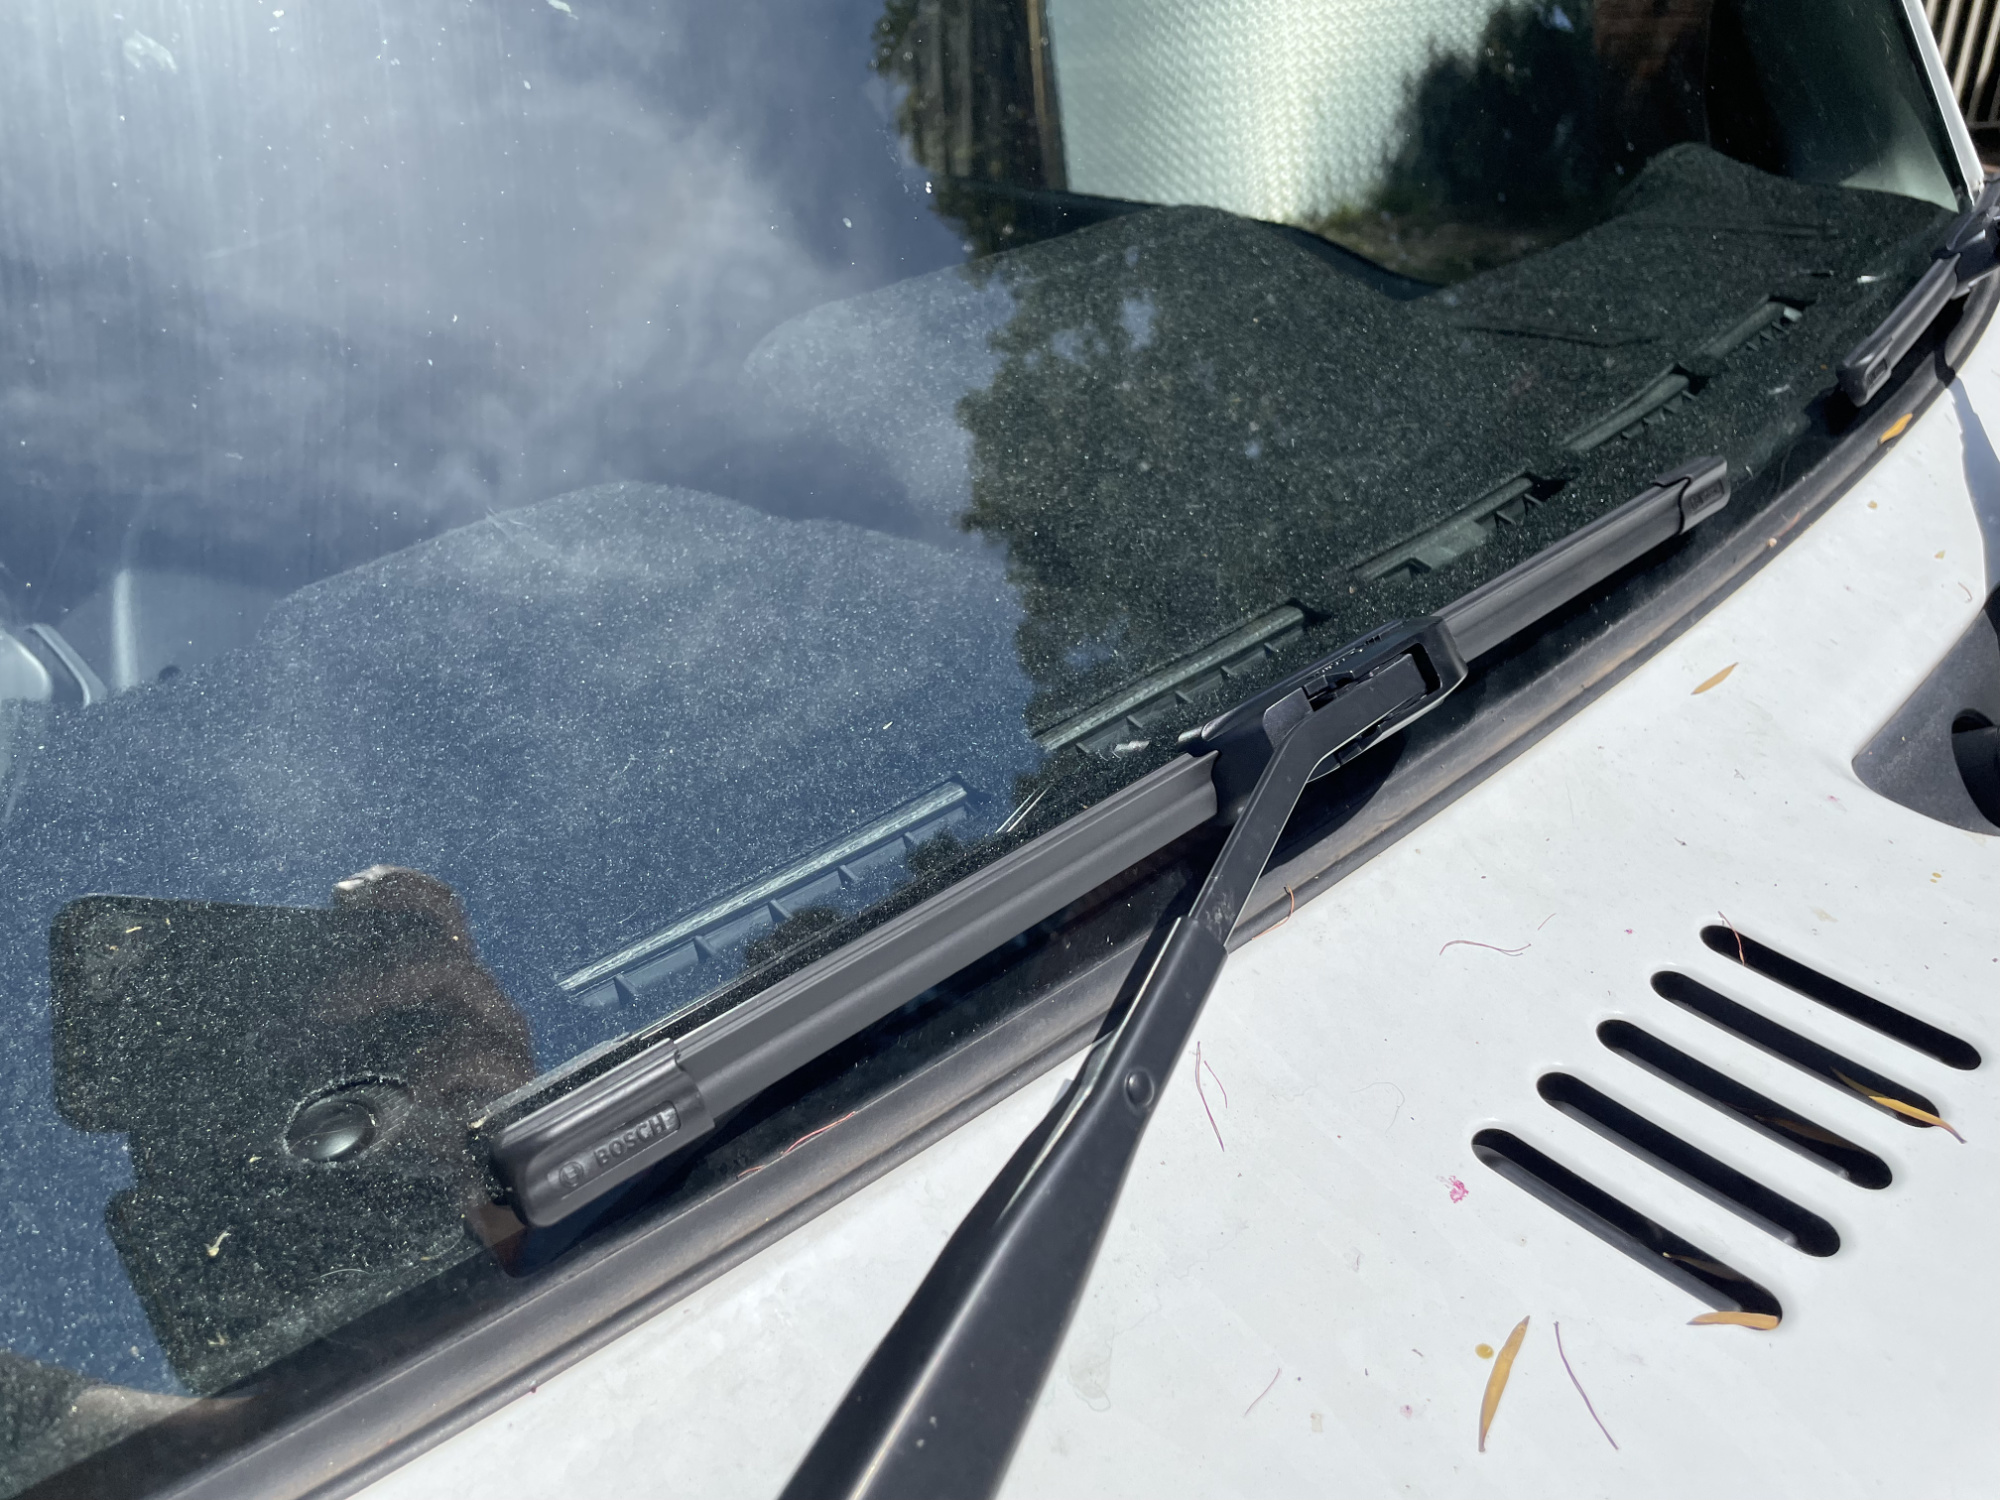
Lift the wipers up off the screen for either procedure.
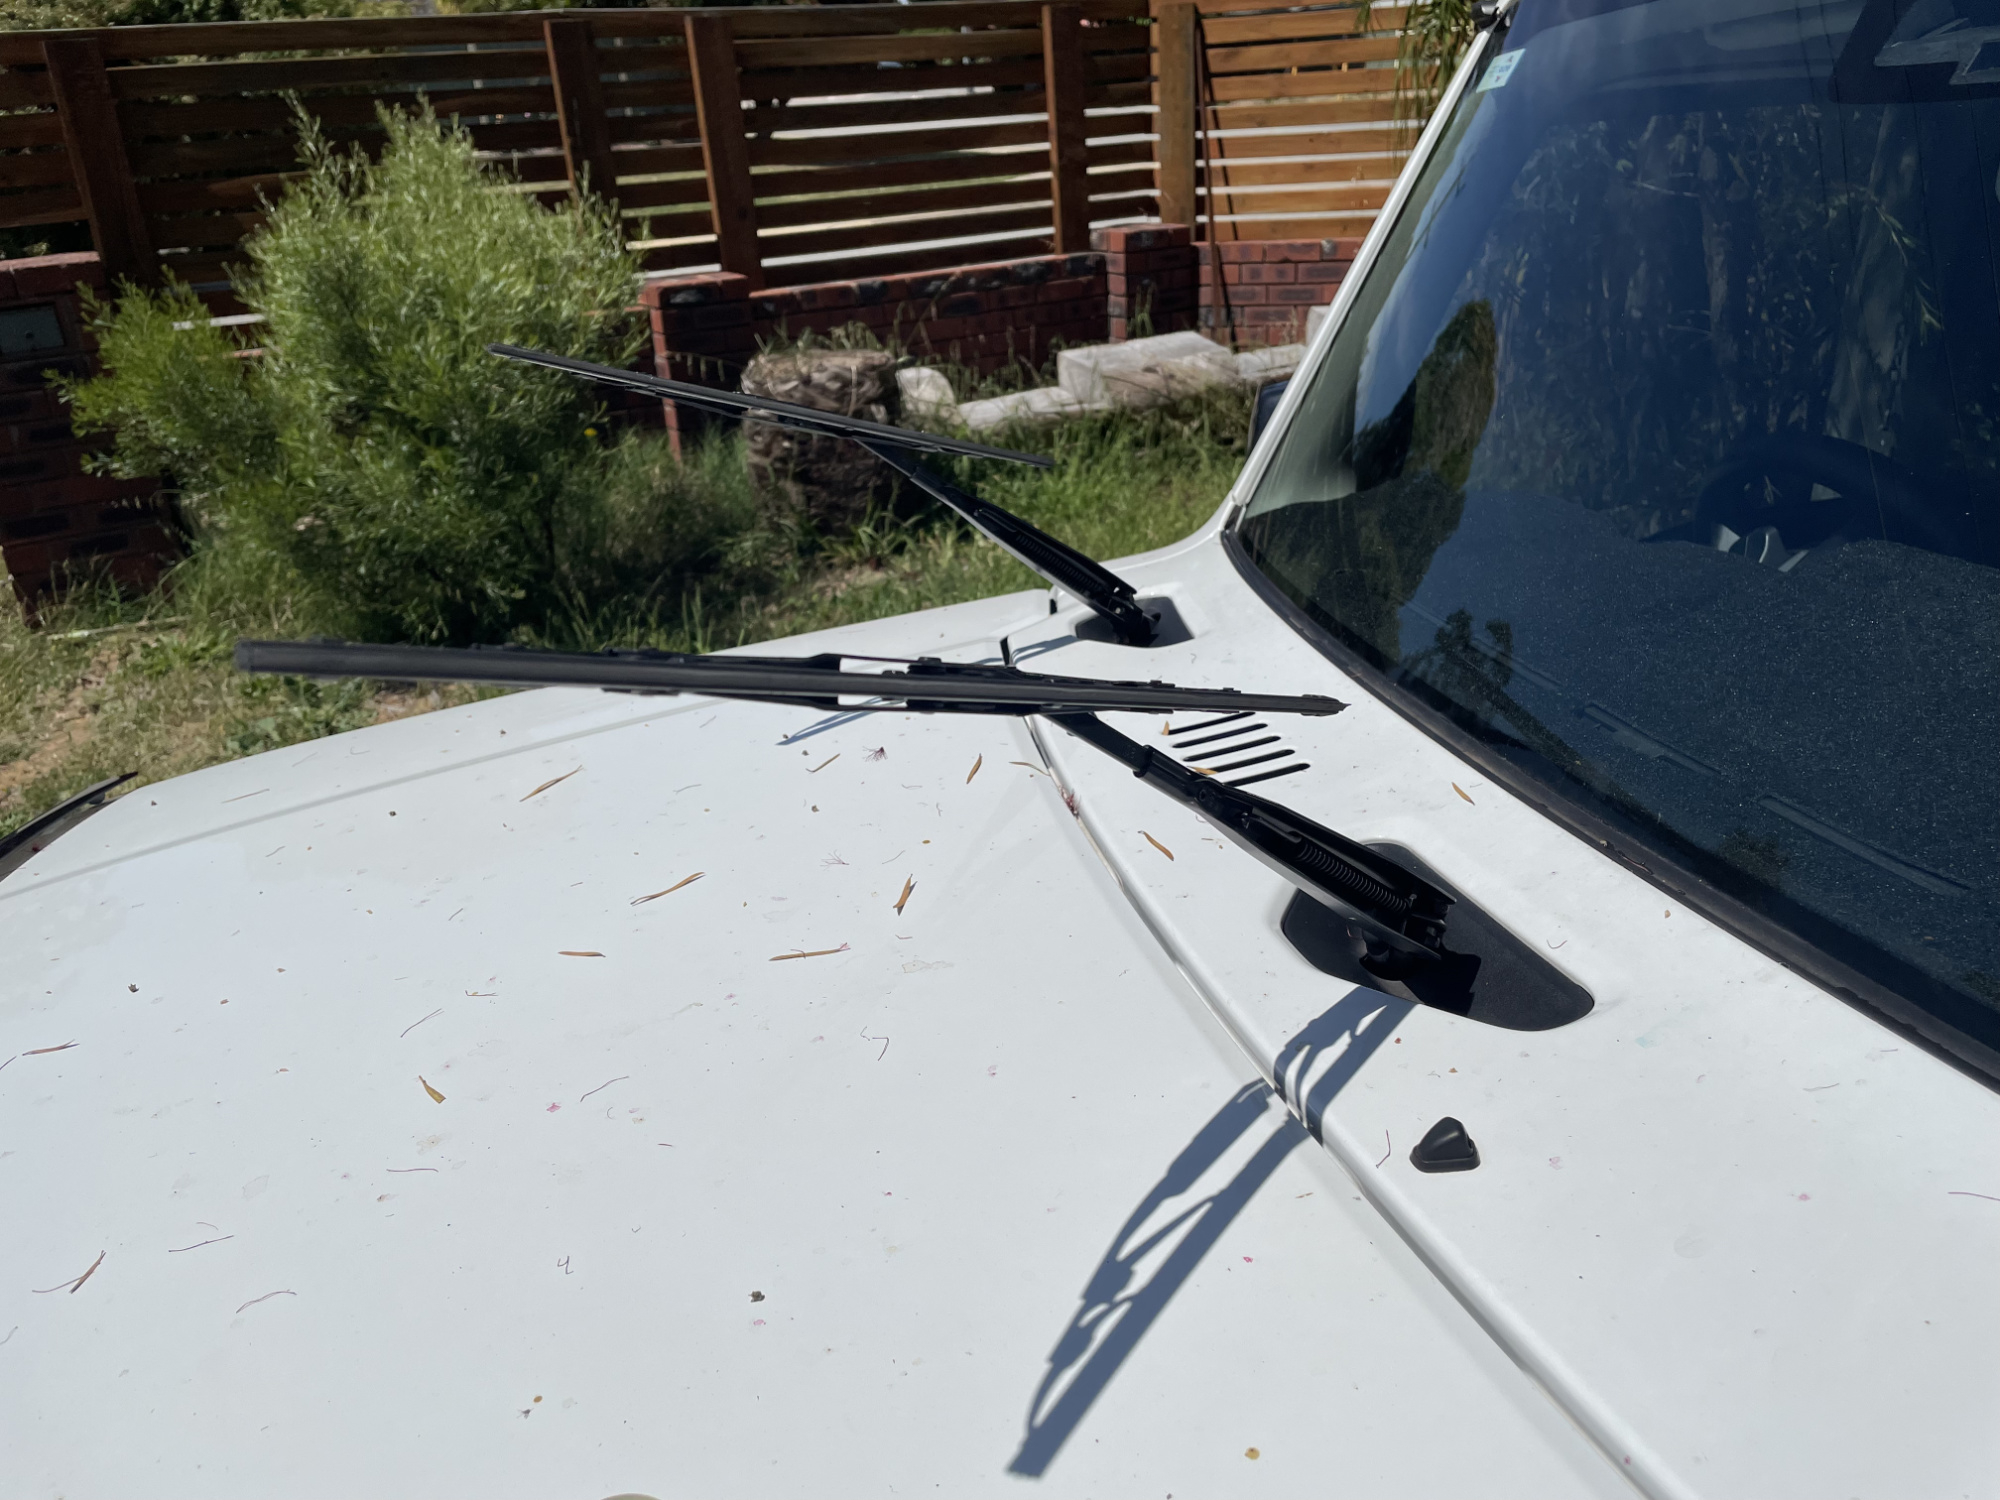
If you are just going to replace the inserts, then go to the ‘bottom’ of the wiper arm and you’ll see that the blade essentially clips into the arm.
Using some needle nosed pliers, you can squeeze on this clip part/plastic bit and that will help release it. (Note that different brands may have an actual larger physical metal clip here; the factory Suzuki ones essentially are just a plastic recess and squeezing helps to narrow the outer parts).
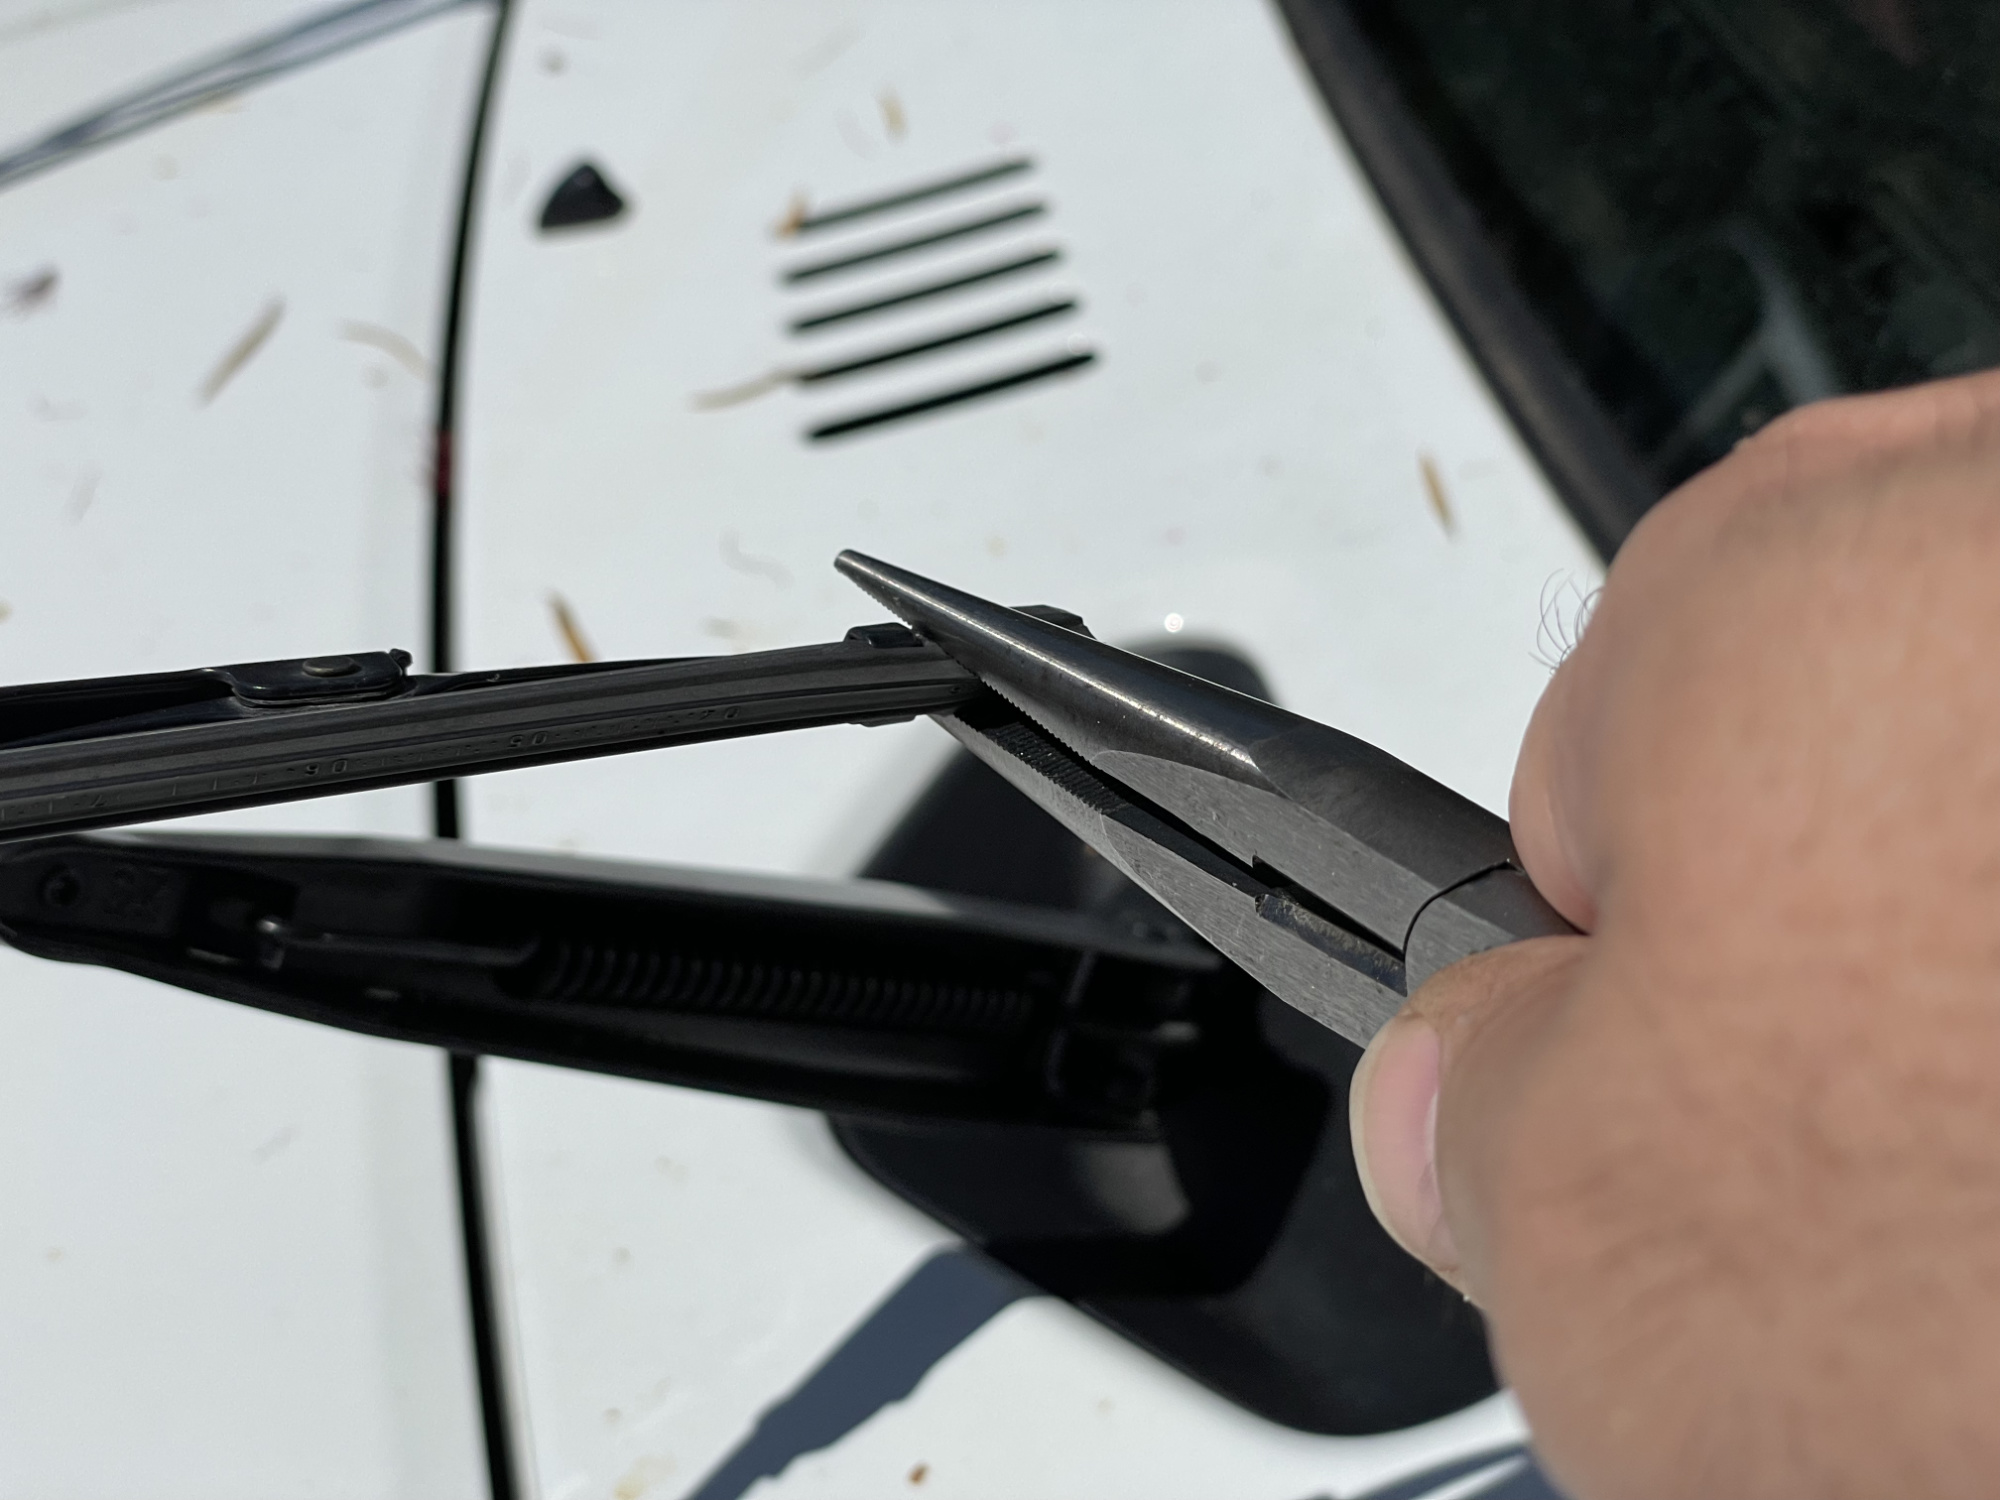
The blade insert then just slides straight out.
New wiper blade just slides into the housing the same way and inserted into the end you just pulled the other one out from.
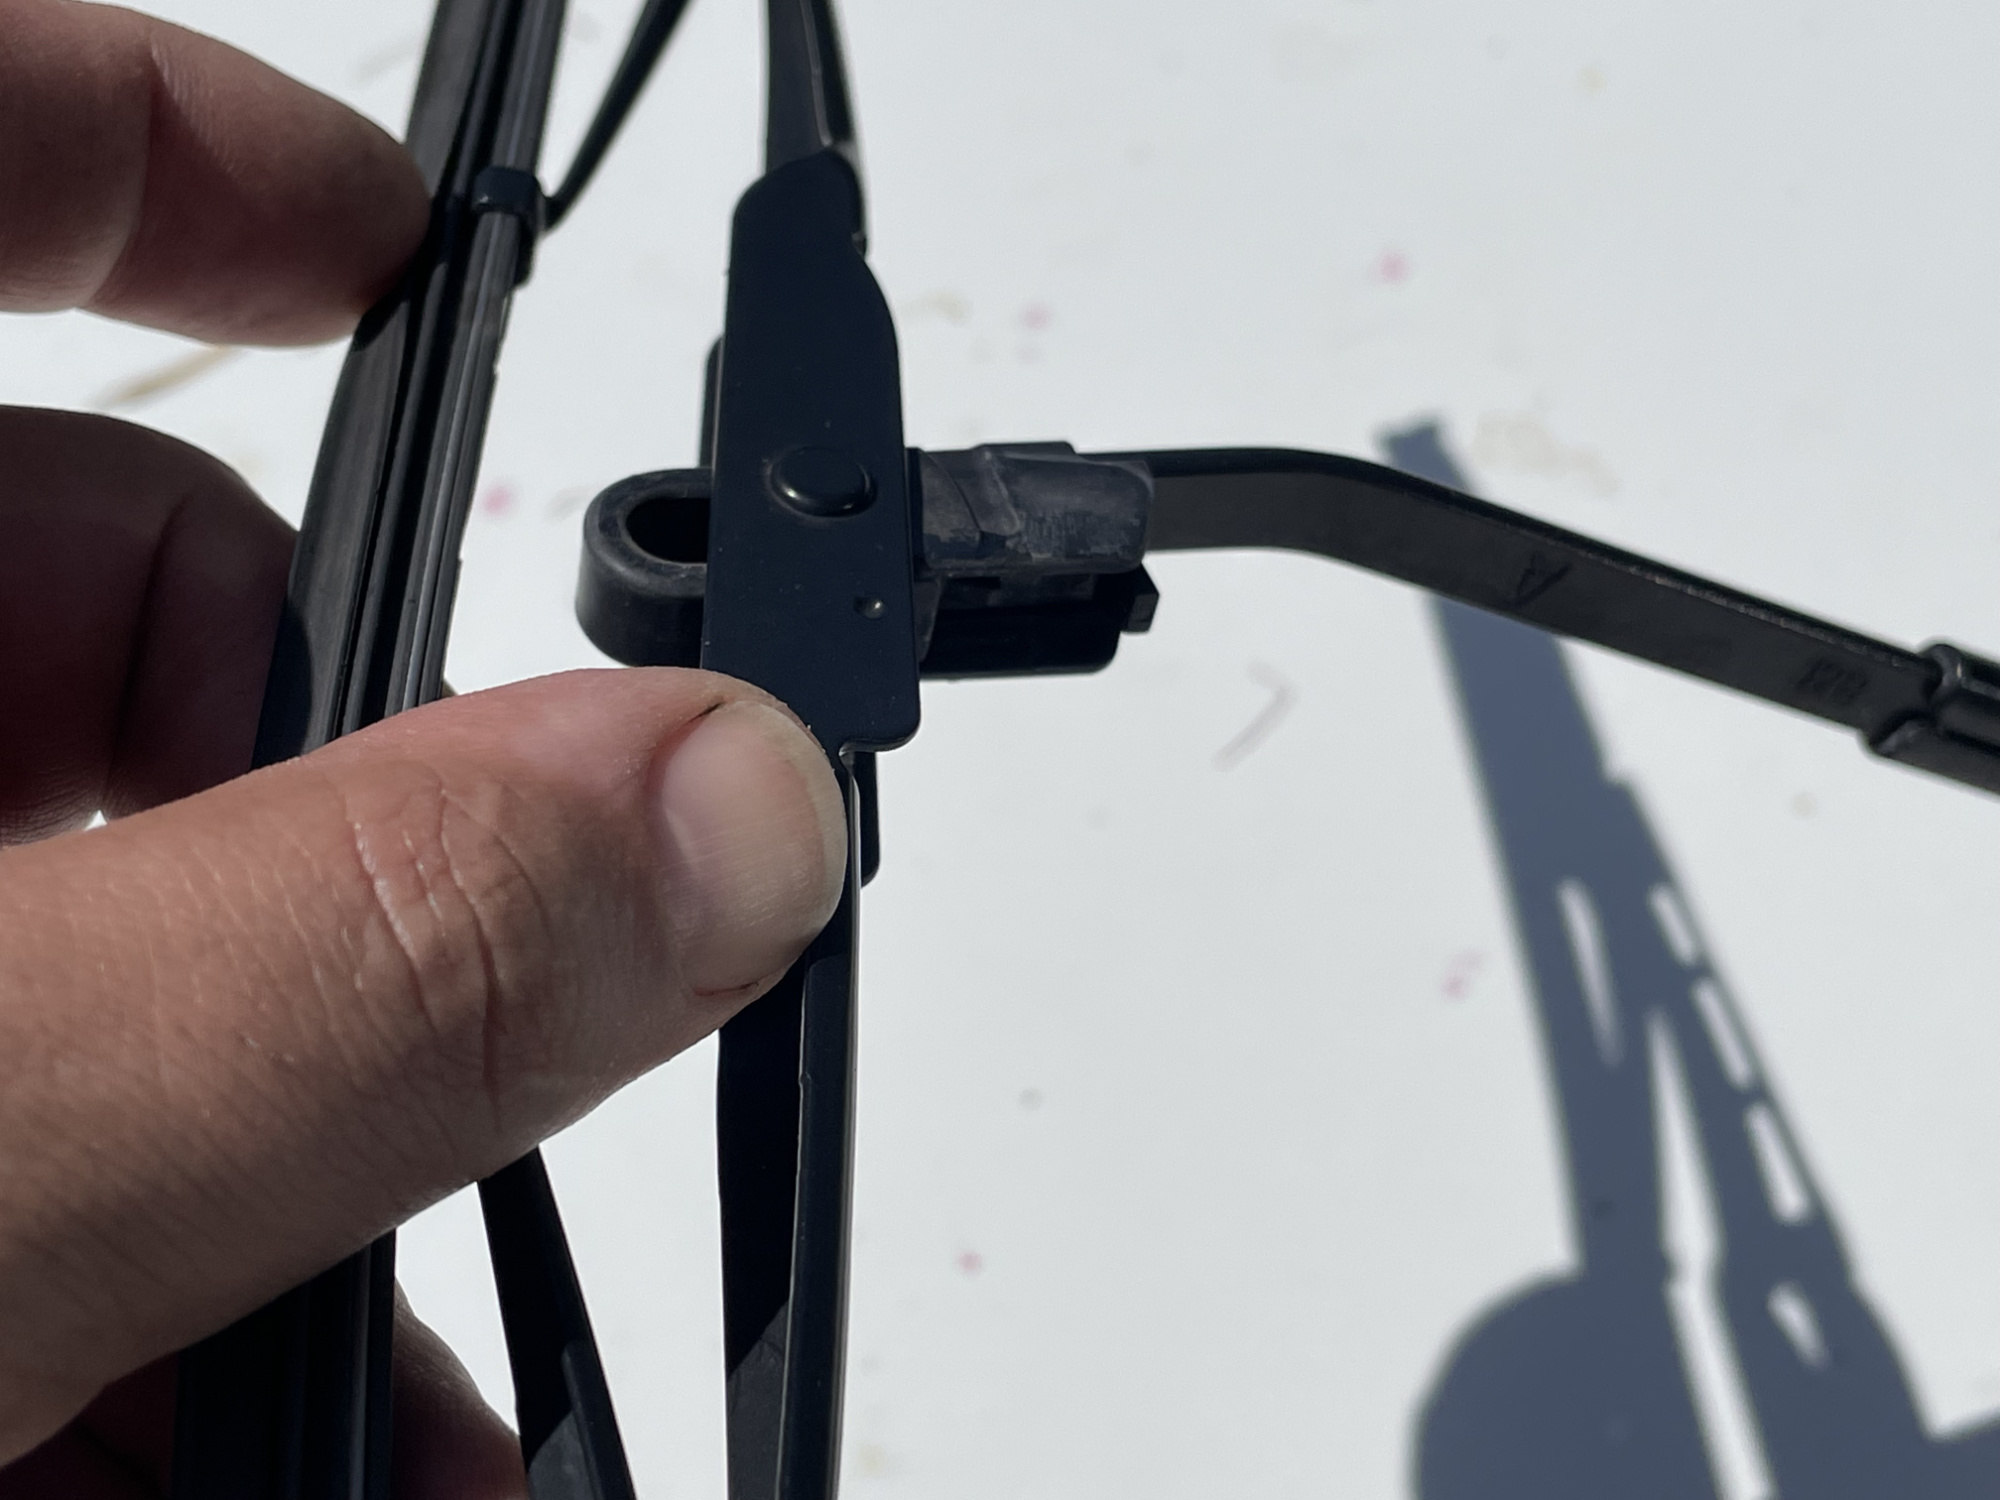
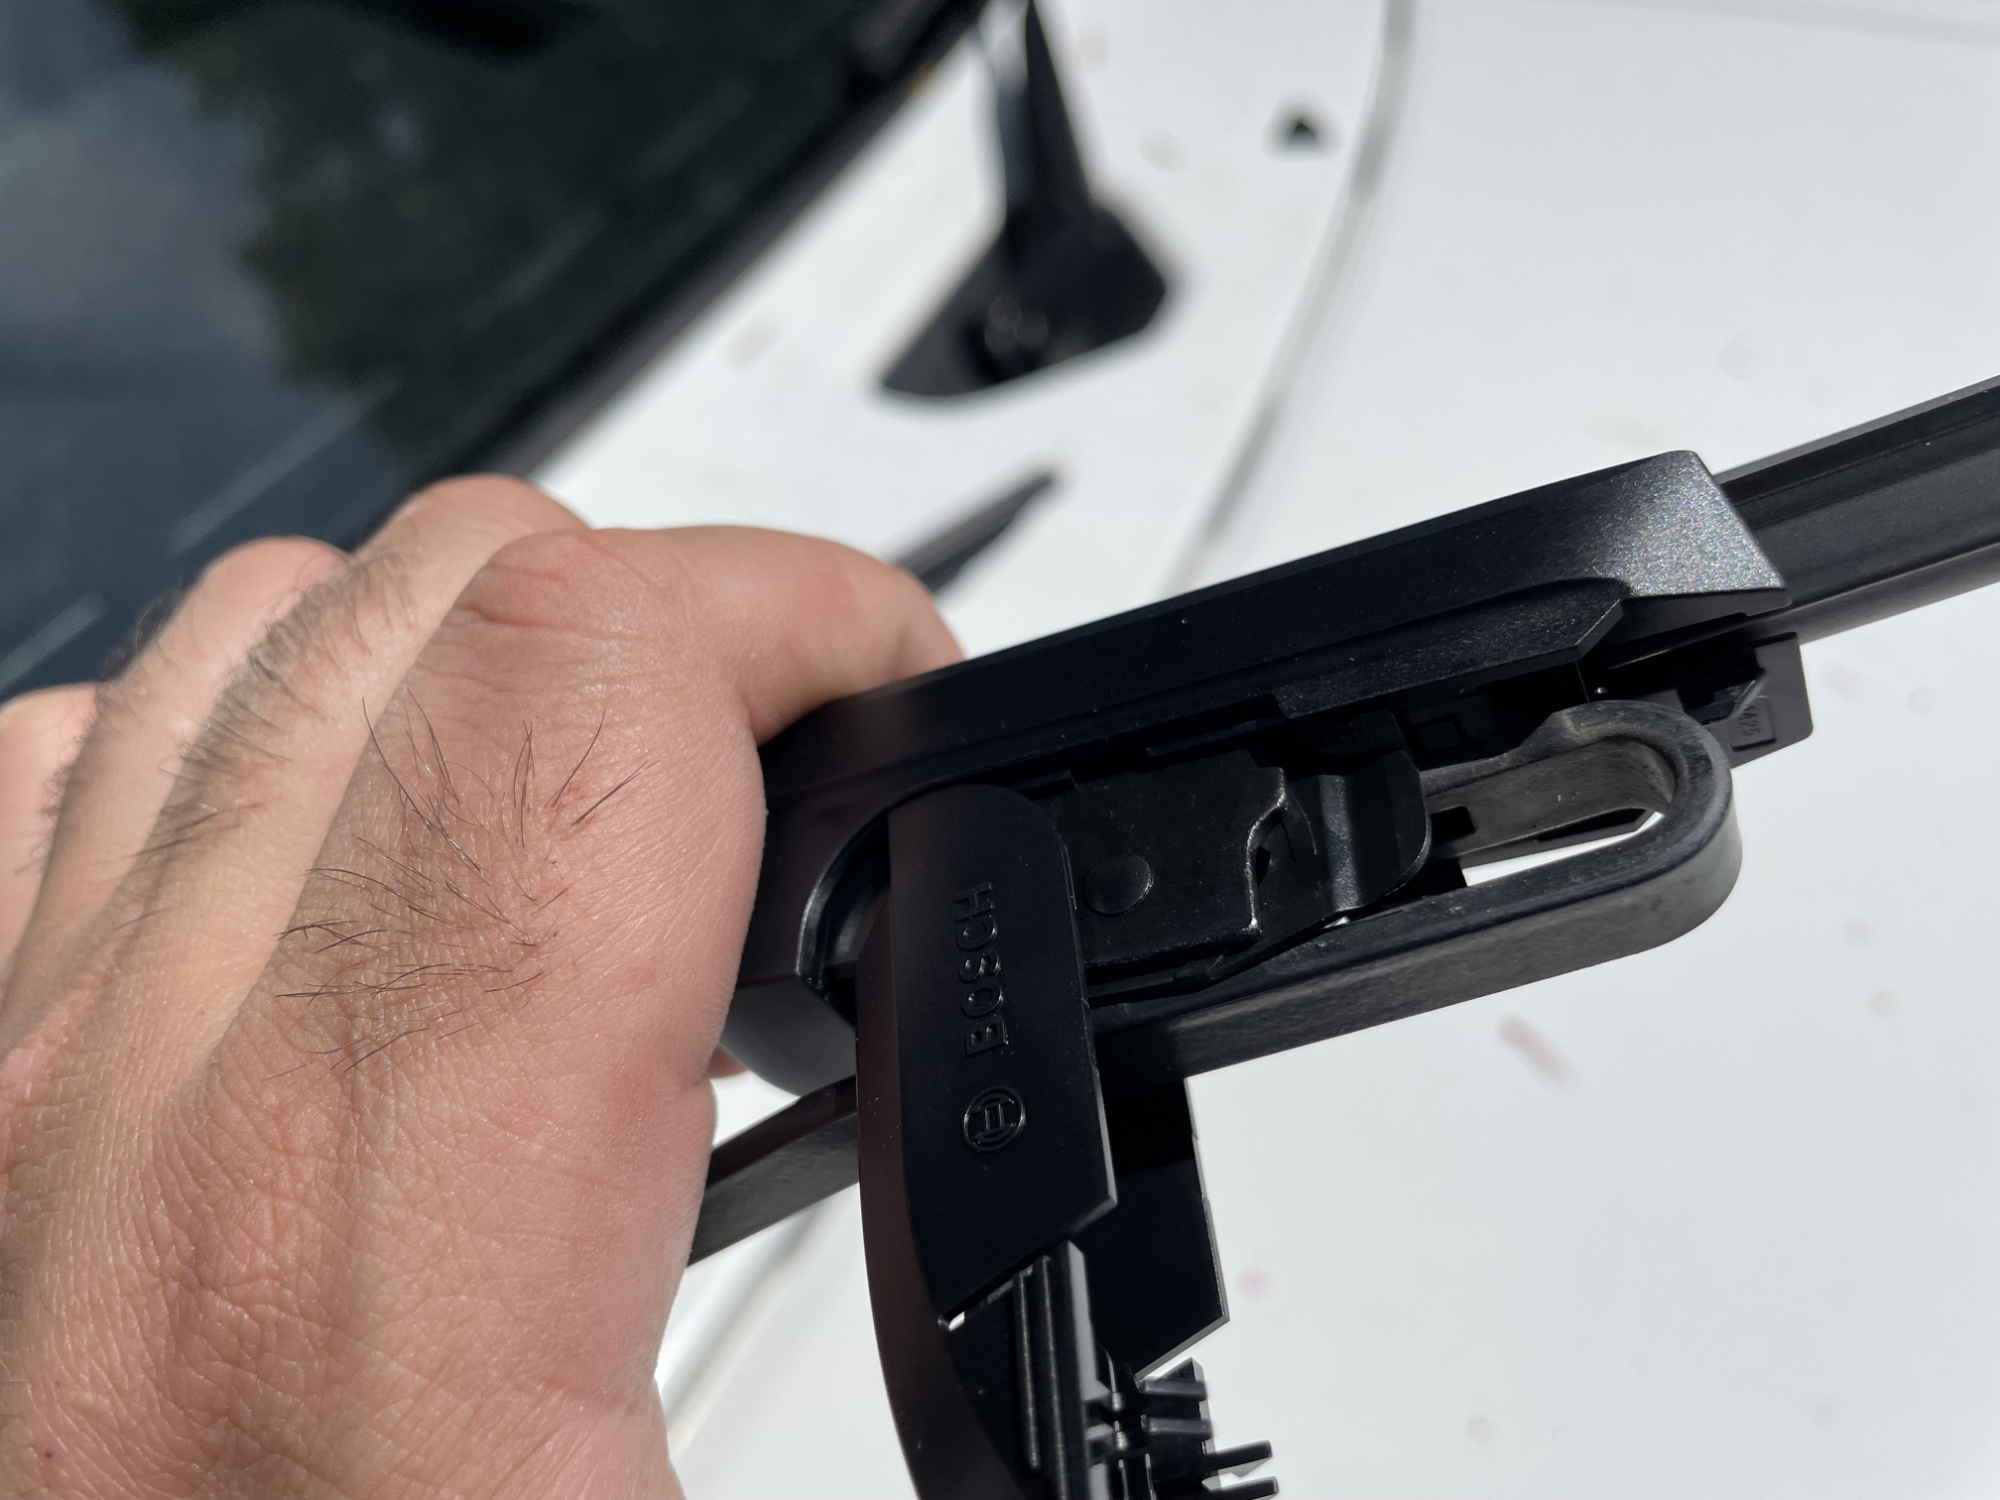
The alternative, though more expensive route, is to replace the entire wiper arm. With ‘upgraded’ wiper blades that work a bit differently this is a necessary step.
There is a little dimple in the arms to stop the blades rotating too far.
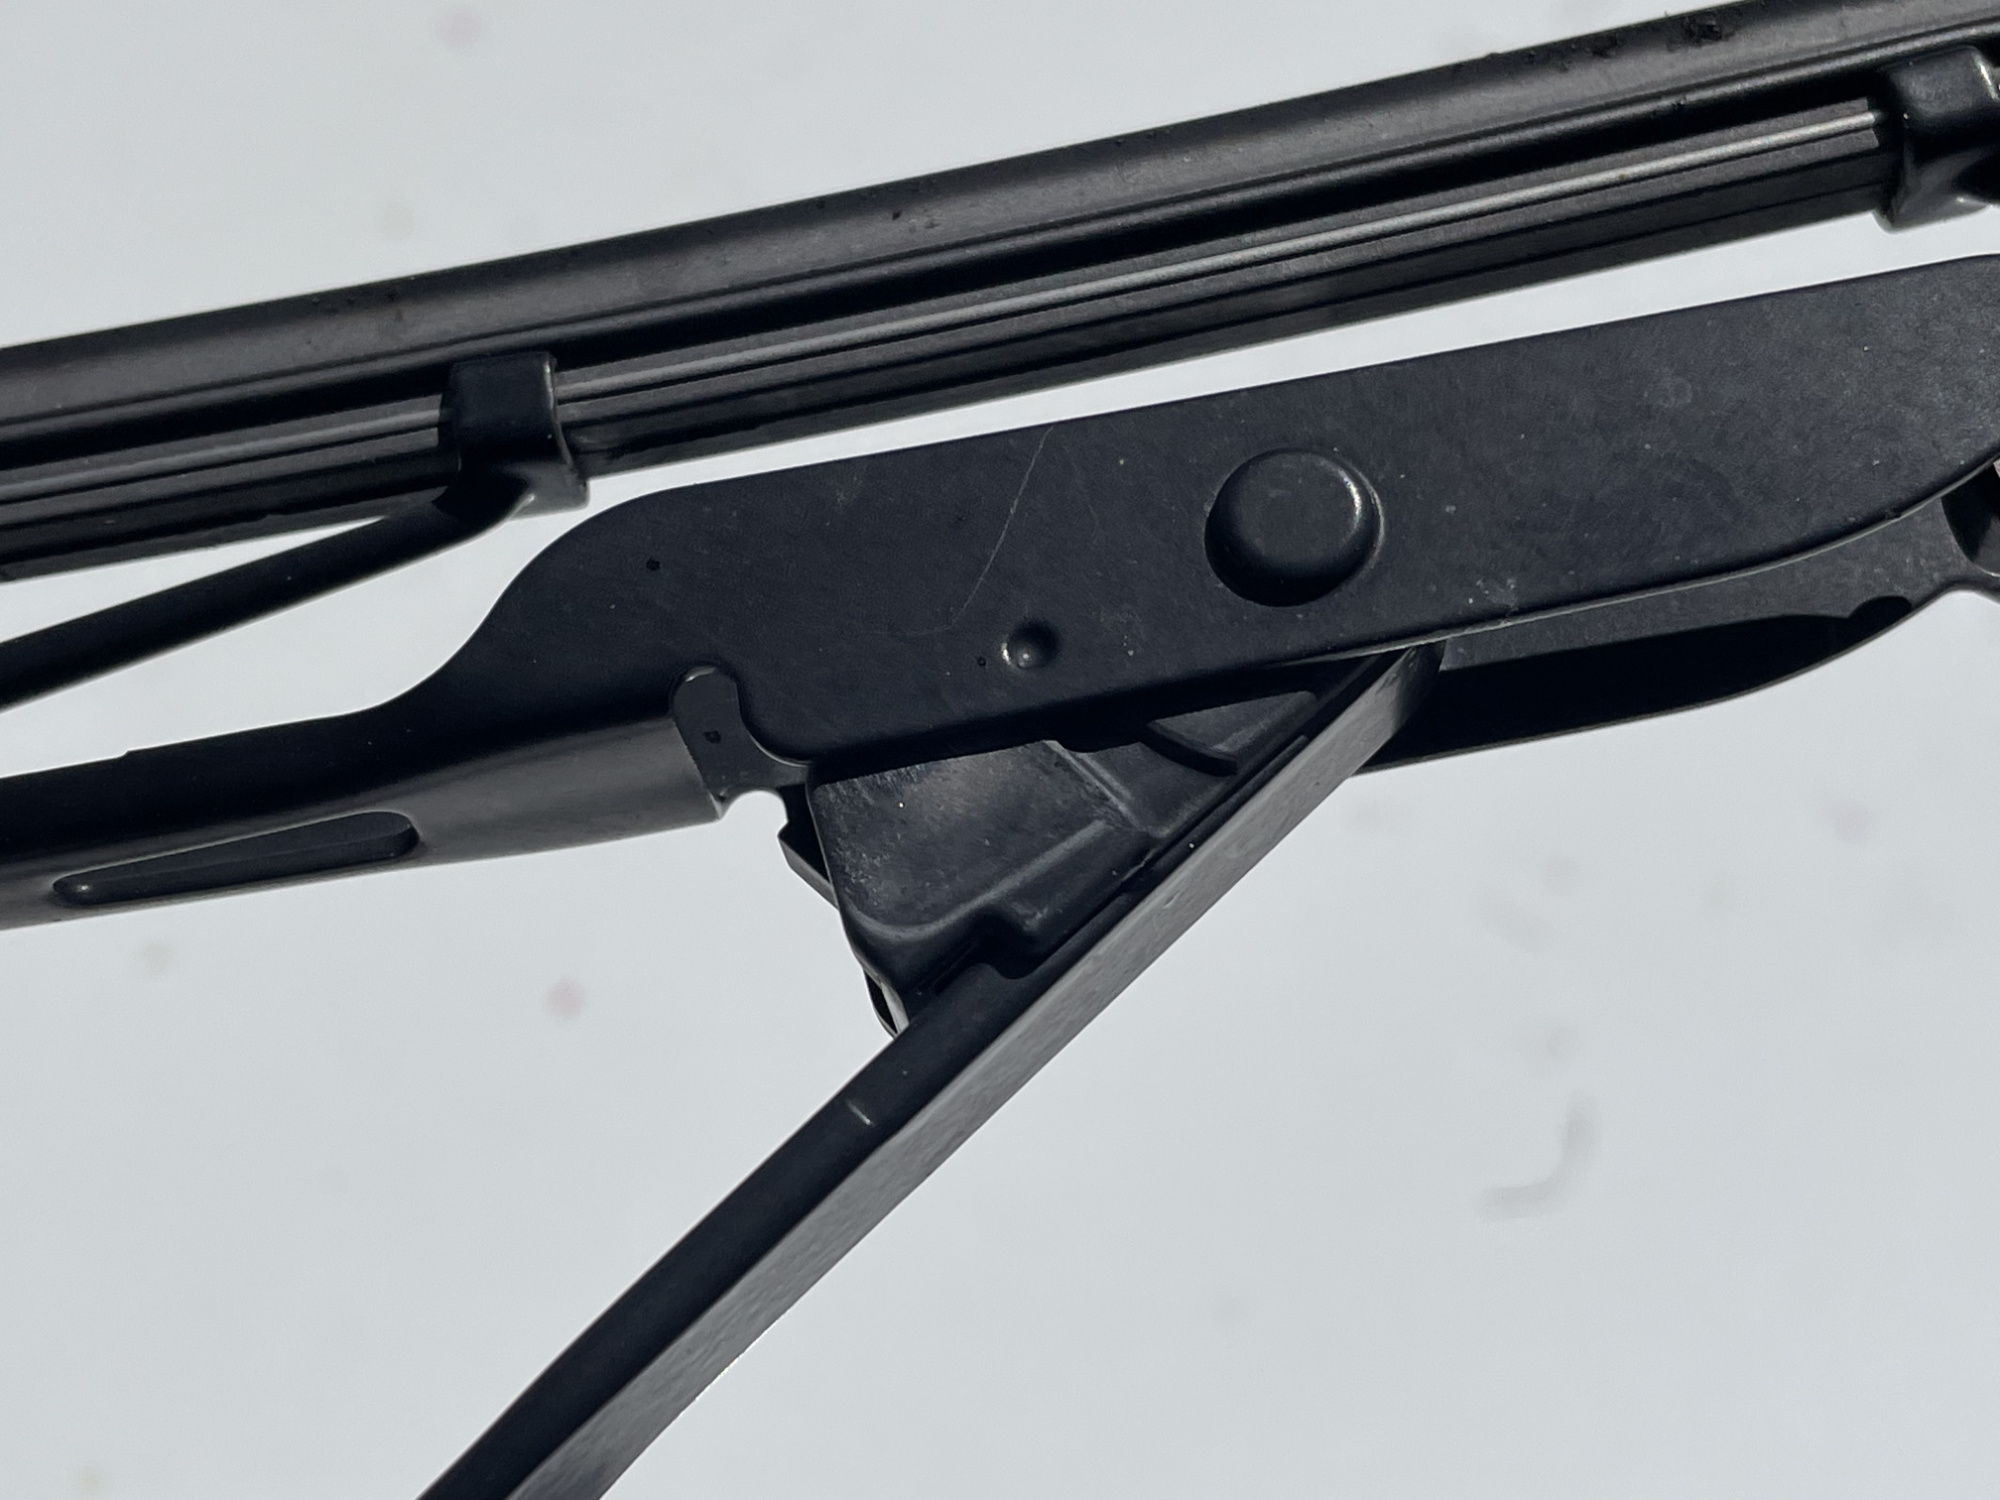
You basically need to push it past this stop and rotate the head further in order to access the clip.
There is a little clip that you can push down to release the wiper head from the arm. You sort of push this down and move the wiper to what would be the right in this picture.
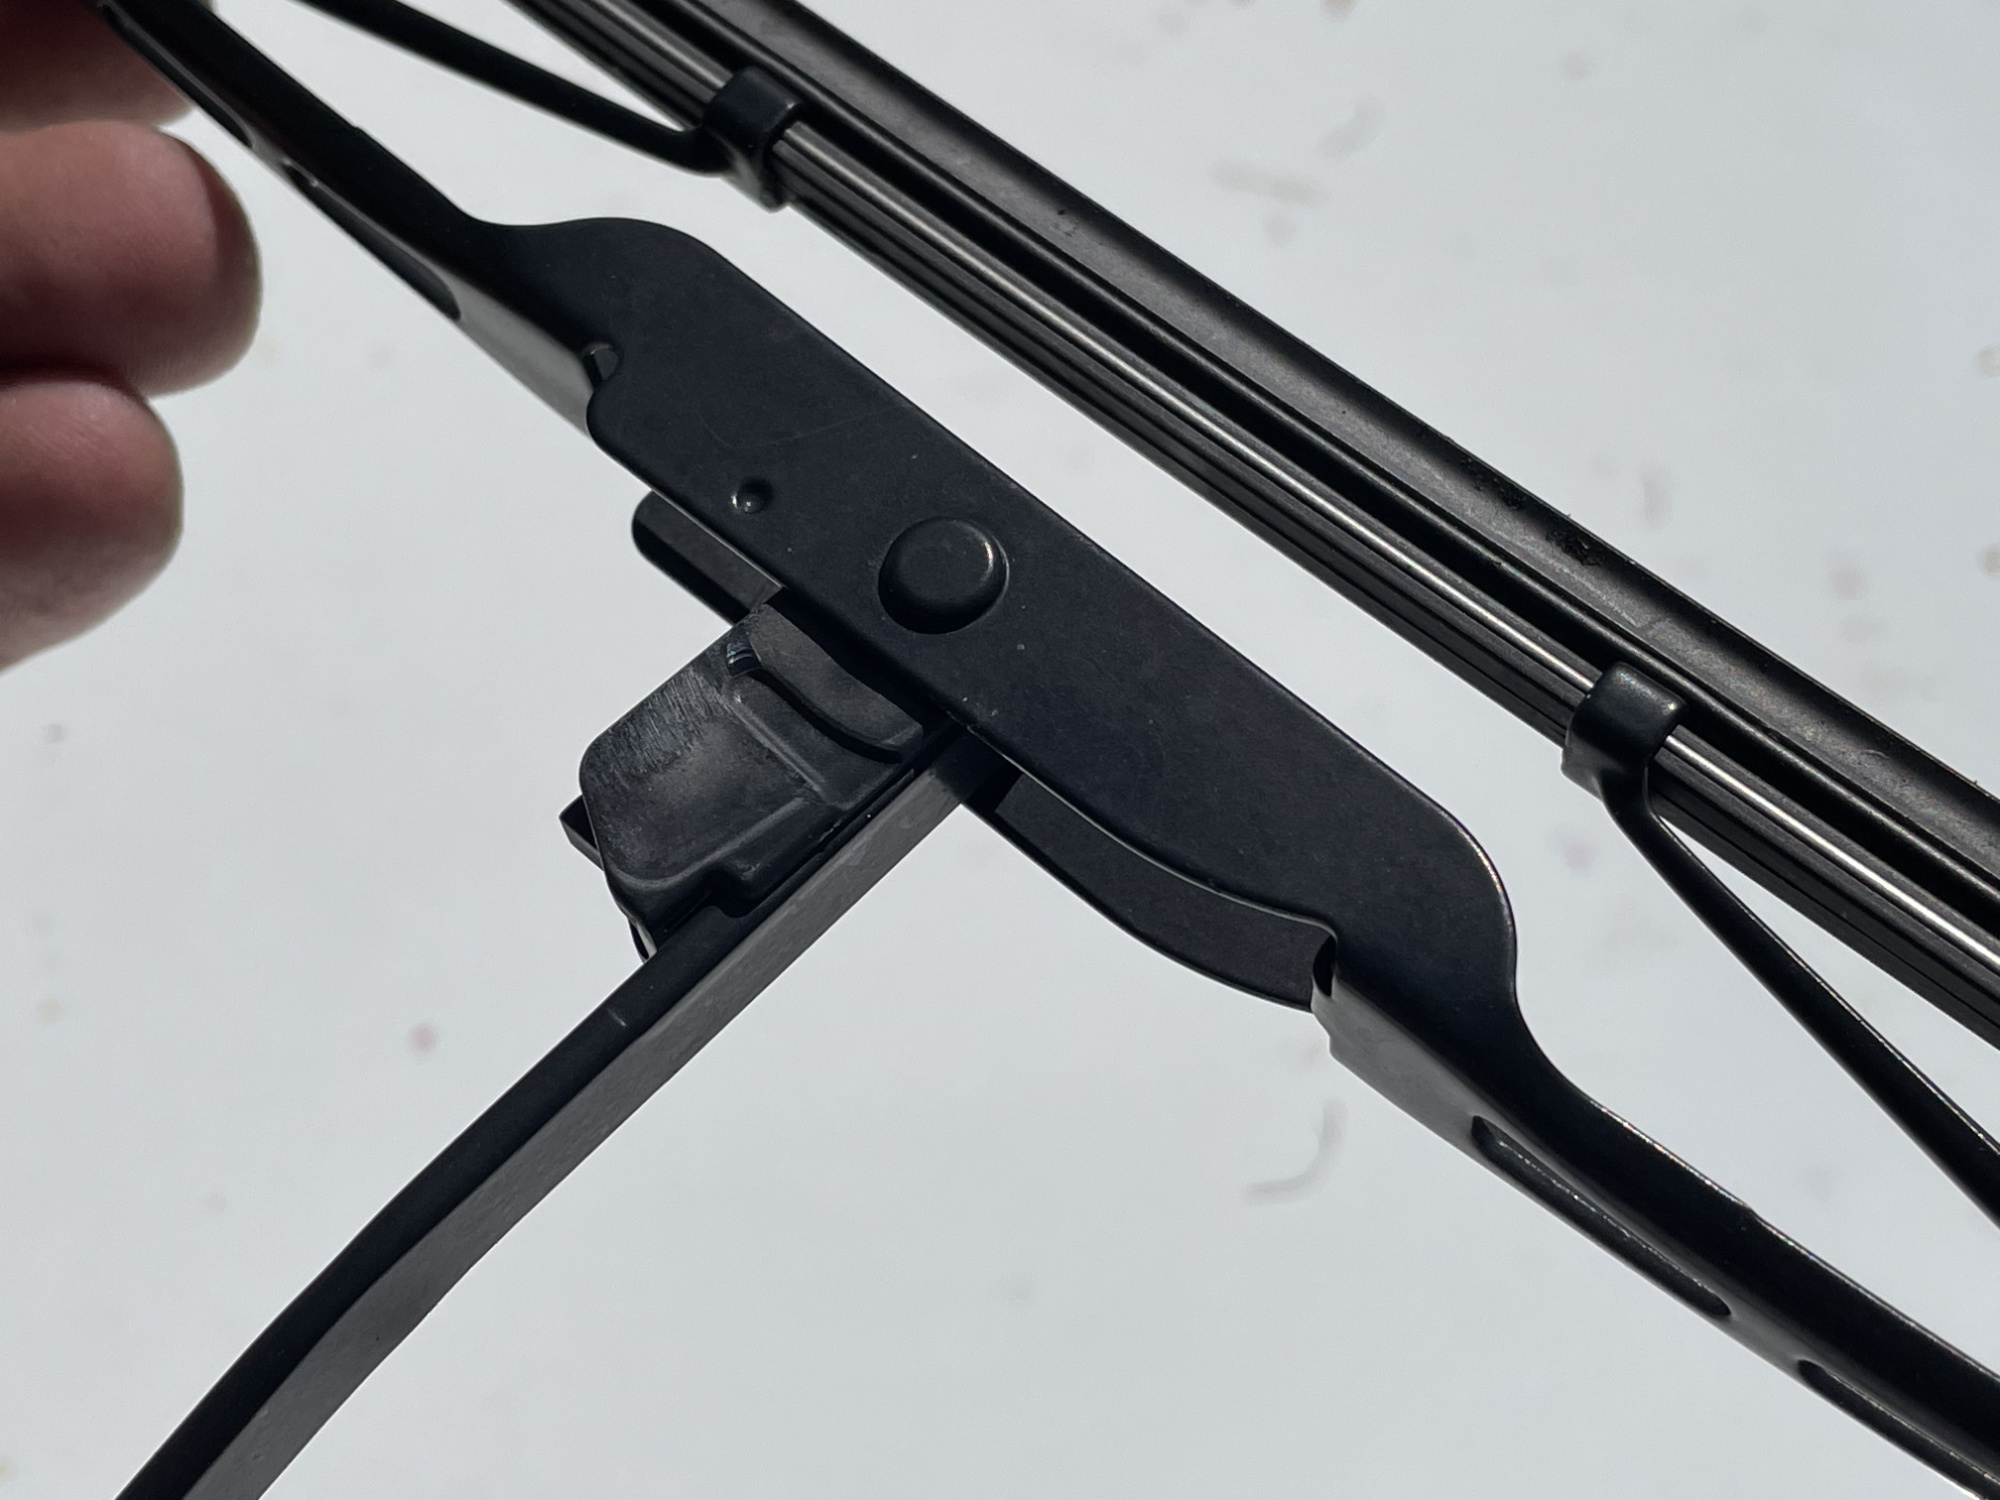
Here it is half slid out, which gives you an idea of the hooked shape of the end of the wiper arm that you’re getting it out from.
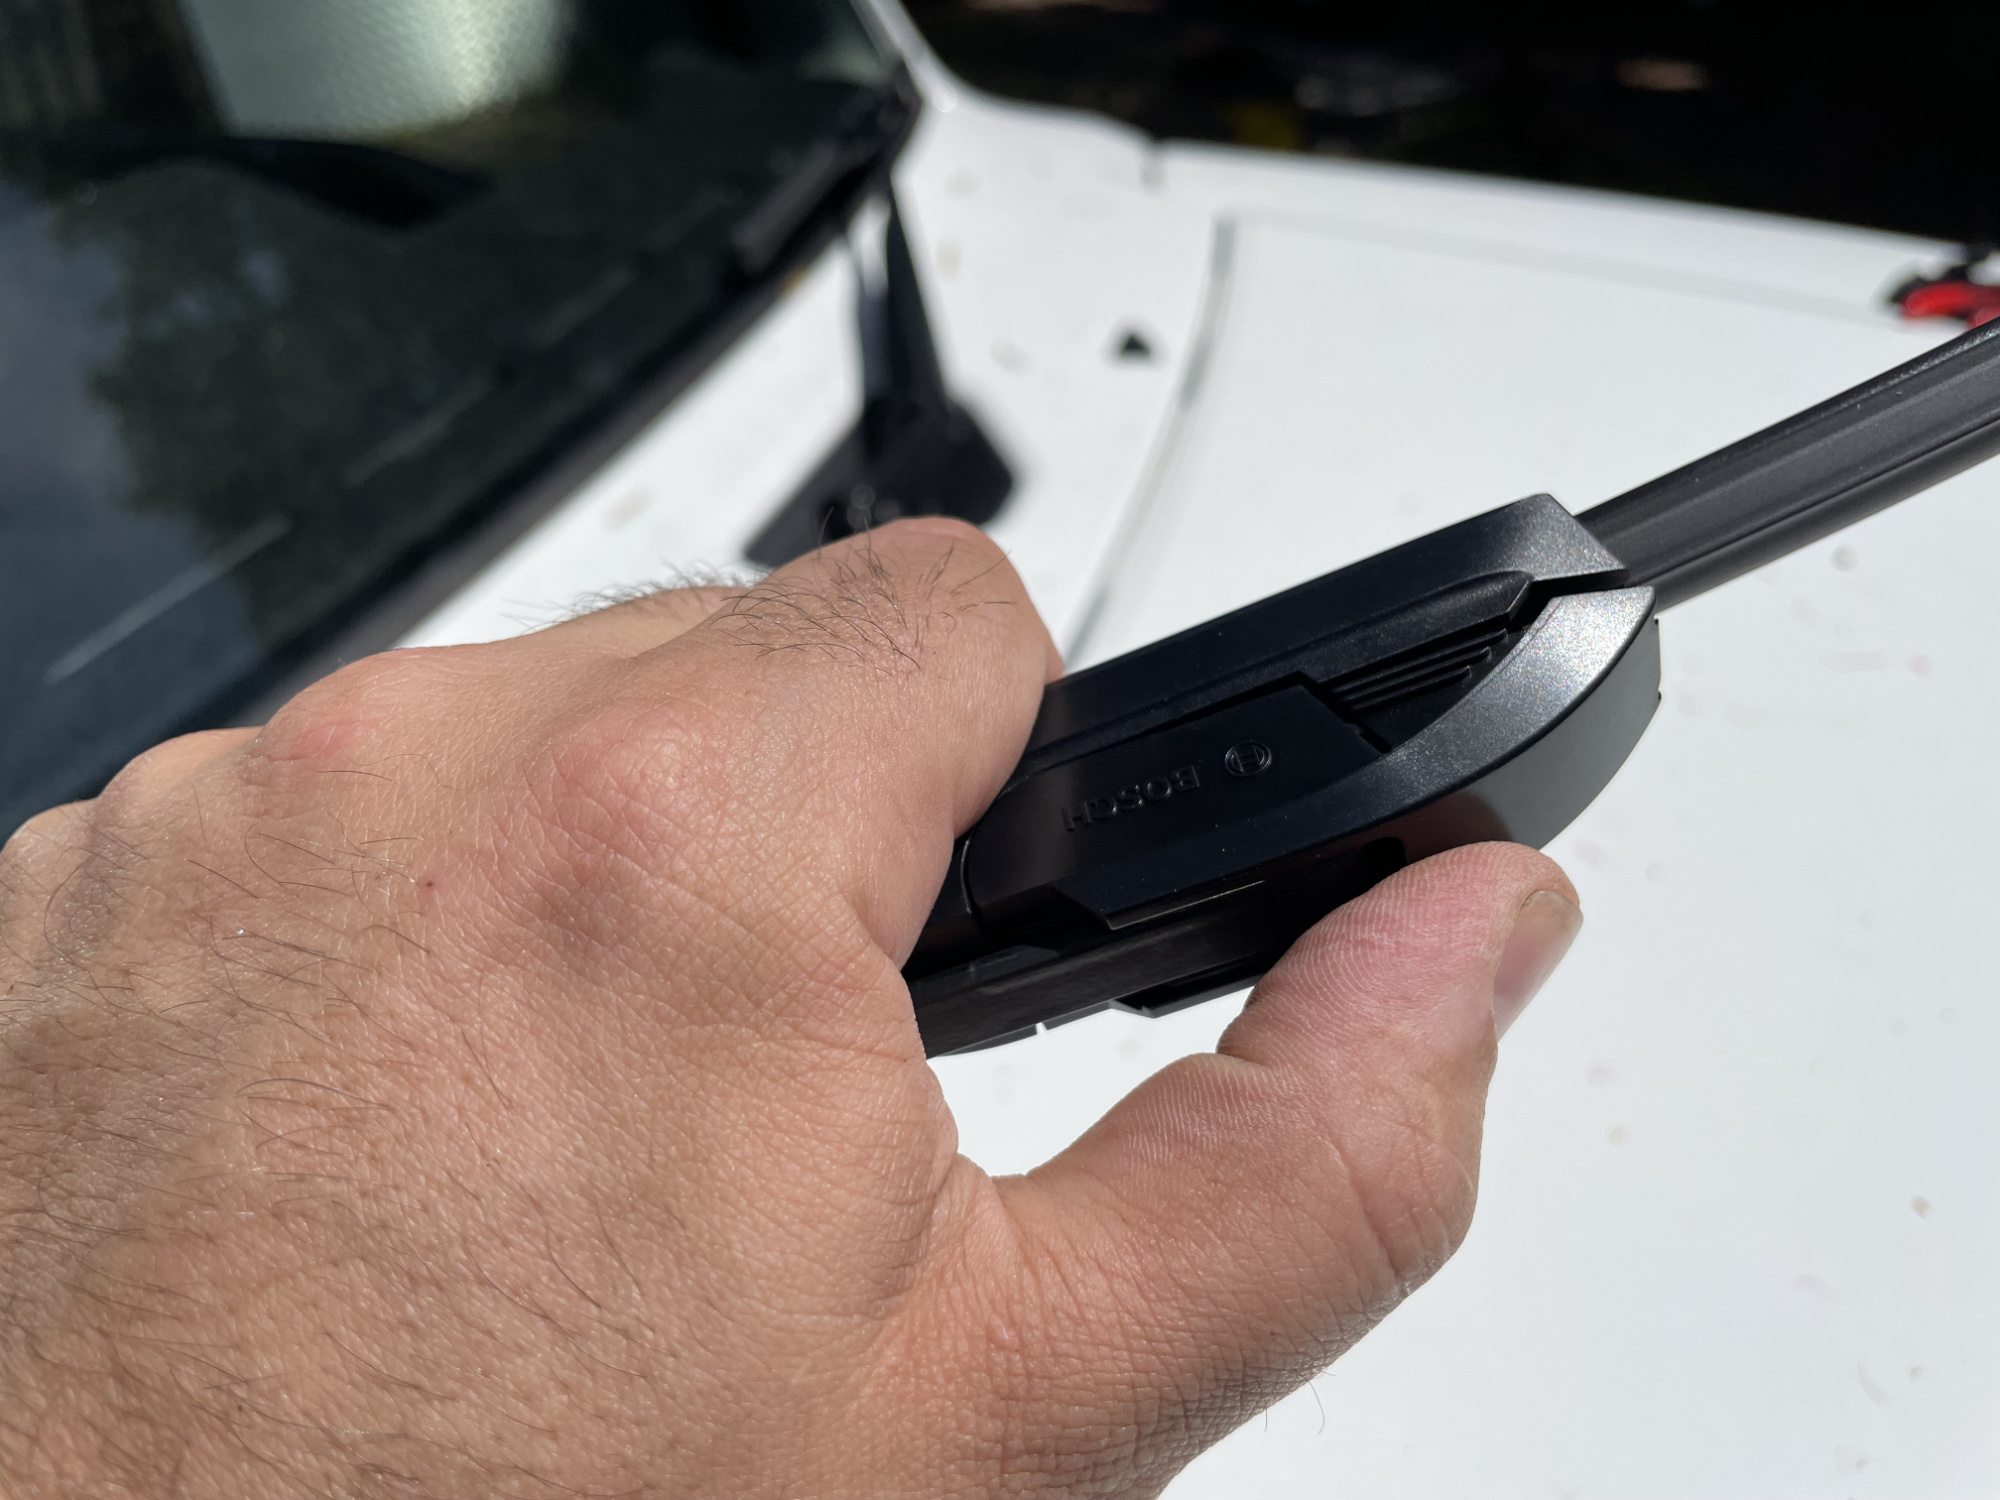
The aerotwin blades have a little latch part on their clip, which you need to lift up to expose the actual bit that hooks into the end of the wiper arm.
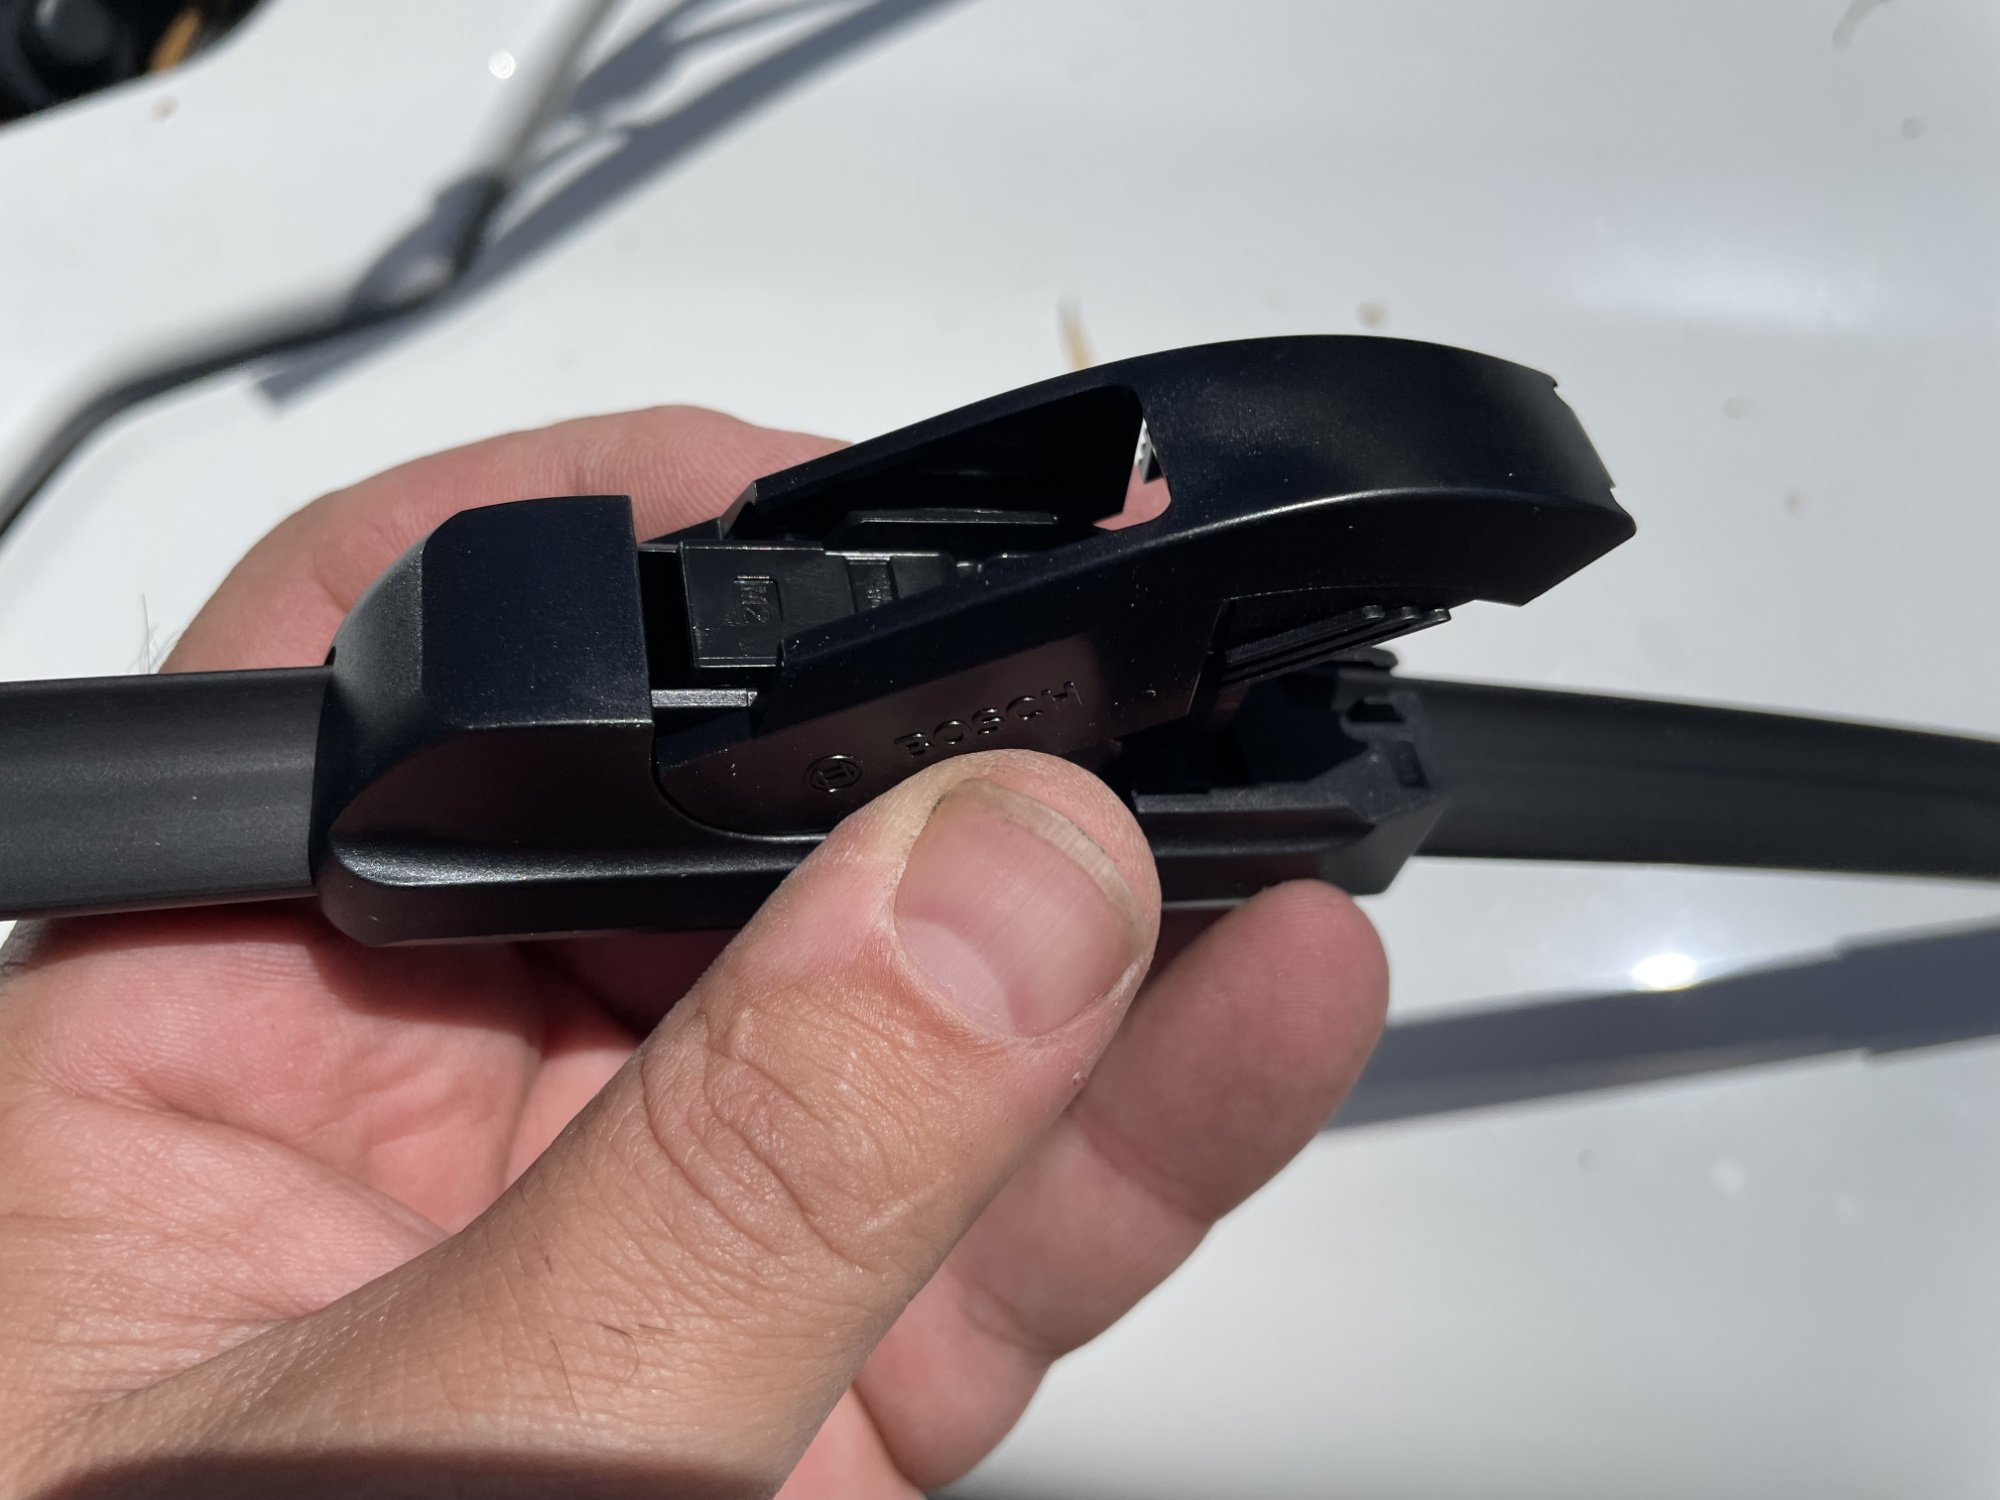
You need to push the hooked part of the wiper arm through the gap between this retaining clip and the other part of the latch of the wiper arm.
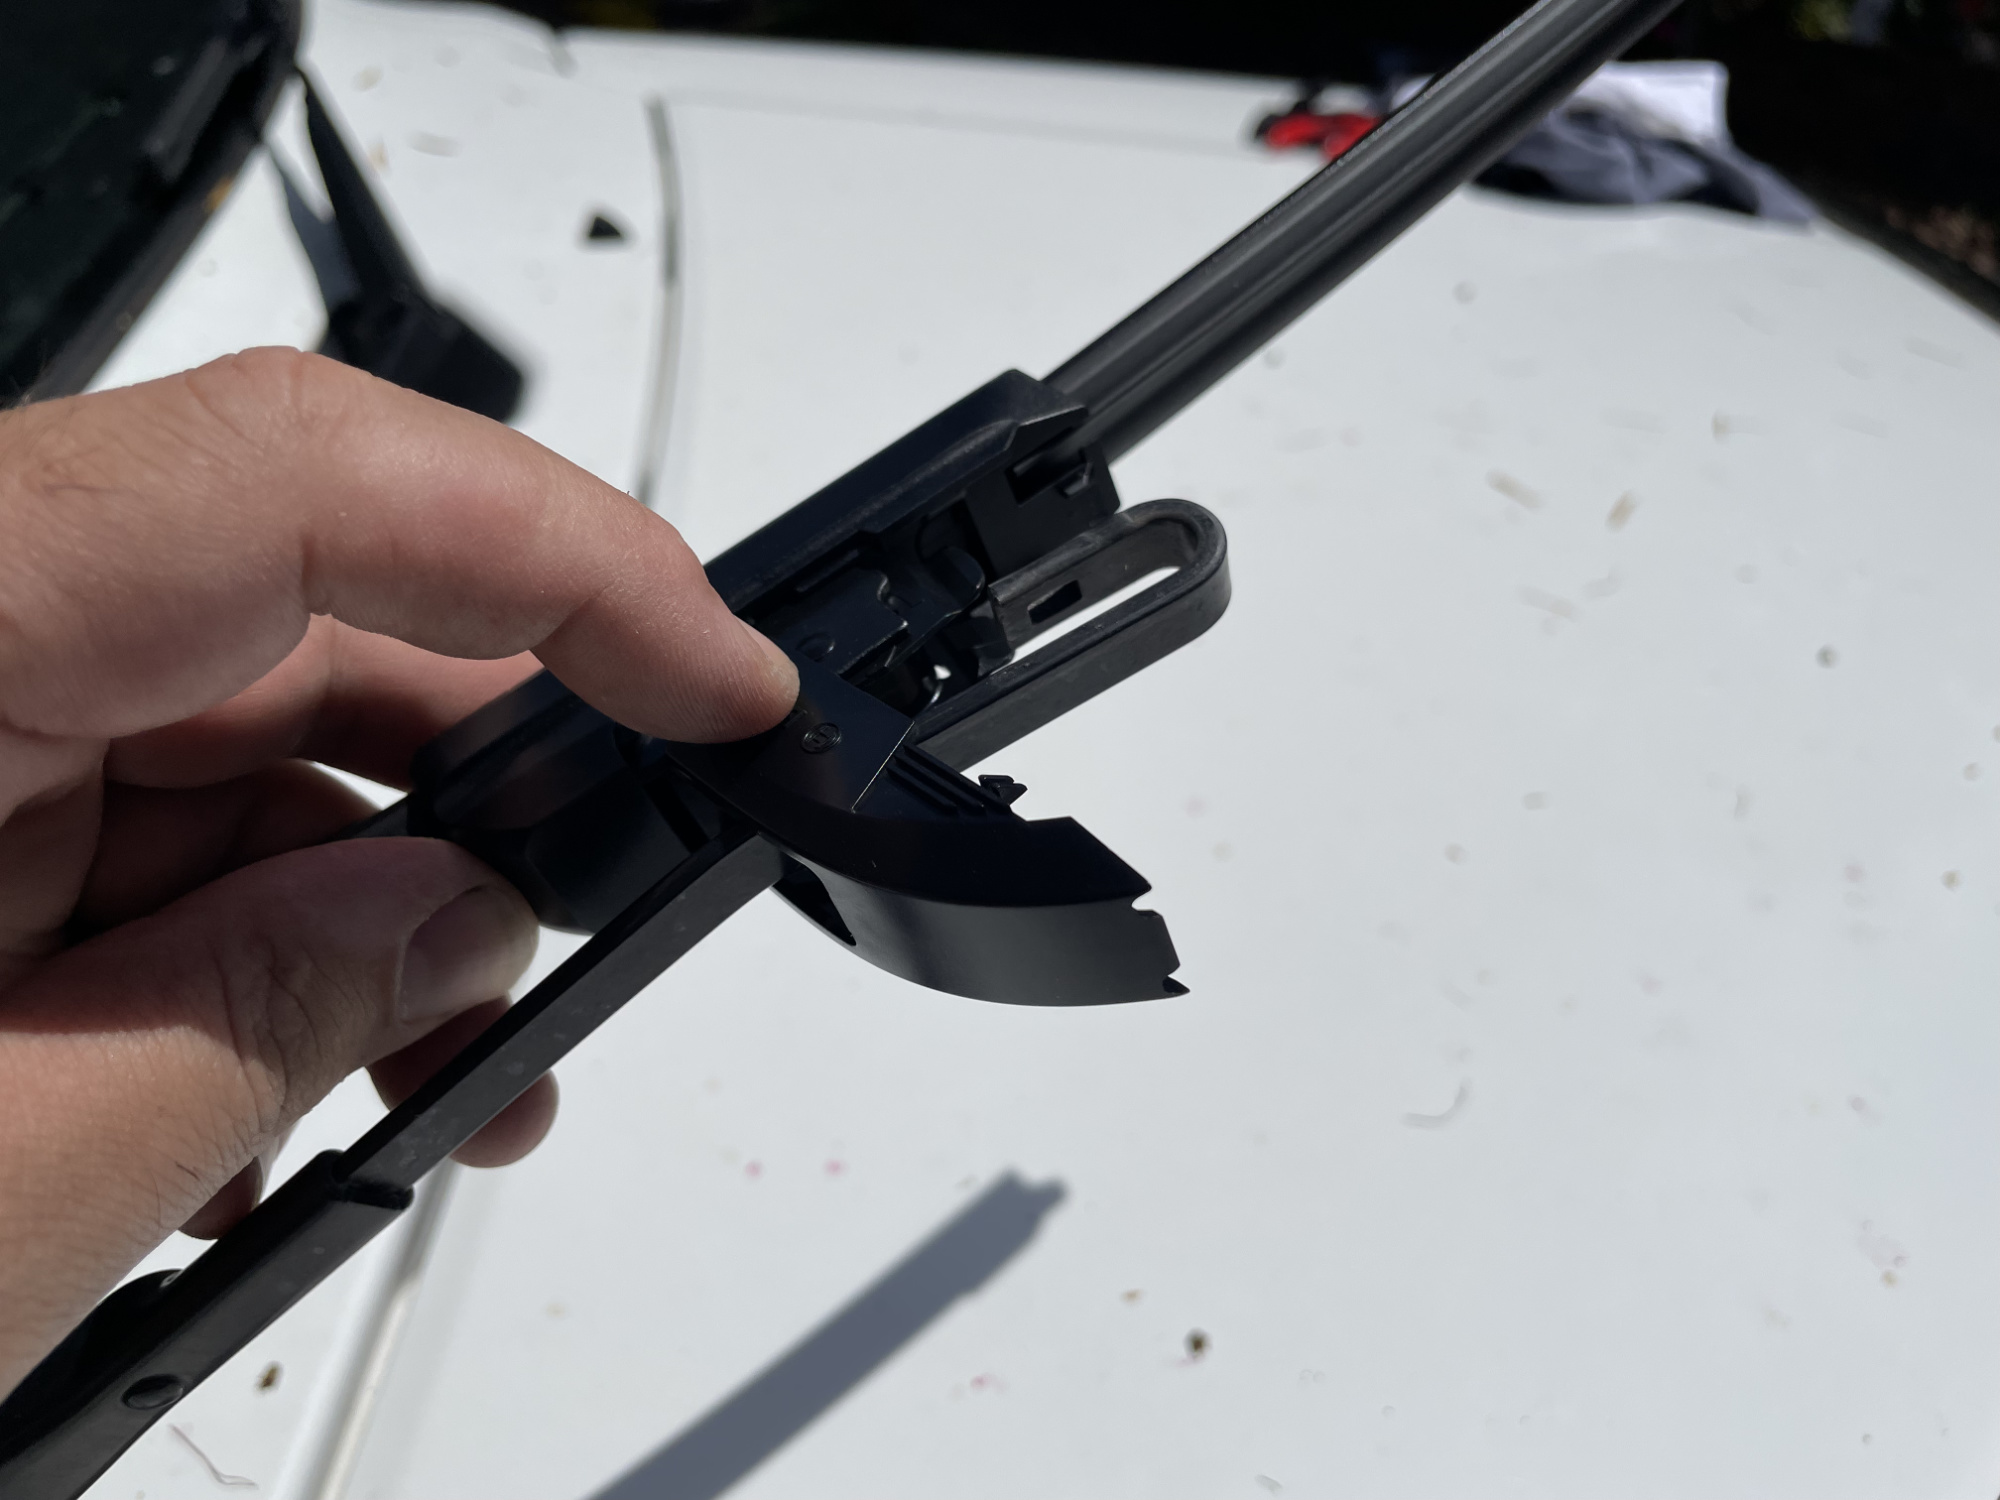
Then you engage the wiper head clip into the end of the wiper arm; in this below photo basically you’re pushing the wiper blade up to the right to go into the hooked end.
Now push down on the secondary clasp and everything will lock in.
Place the wipers down onto the screen and this job is done.
With harsh sun meaning wipers deteriorate quickly I like to change mine just before the wetter months start i.e. in May every year. This means when you need them you have good wipers, but they aren’t breaking down in harsh sunlight without being used, wasting their best months.