
JB74 rear wheel bearing change
Finally revised with my own photos! This is based on the official procedure but is my own interpretation of the requirements to do it.
It’s not necessarily hugely hard but the drum brake disassembly and reassembly can be a bit daunting. The bearings and their retainers also get cut off the axle and new ones pressed on, so there’s a slight barrier to entry there. You can tap the bearings on with a hammer and a piece of pipe but it’s a lot harder and takes a lot longer; a small shop press is wise and a taller and larger one is way less annoying to do the job with.
Sections
- Things you’ll need
- Genuine versus aftermarket / Gen3 versus Gen4 bearings
- Diagnosing a bad bearing
- Removing axle
- Removing old bearings
- Removing axle seal, seal protector and axle housing sealant
- Fitting new bearings and seals
- Refitting axle to the car
- Buttoning up the last things
Things you’ll need
- Wheel bearing, retainer ring, axle seal, axle seal protector (parts listed below).
- Silicone sealant: official spec is Threebond 1215
- General tool kit with some spanners and sockets
- Needle nose pliers to remove the majority of springs and vise grips to help with grabbing a few things
- Axle stands
- Differential oil: see specs here
- Brake fluid & a way to bleed the rear brakes
- Grease
- Slide hammer or a way to pull the axle out
- A set of drum brake pliers is a highly recommended to make it easier to refit the giant brake spring
- Hammer and some way to protect the end of the axle when you tap it back in
- A way to remove old bearings and retaining collar/ABS tone ring e.g. angle grinder and cold chisel, or a bearing/gear puller
- A way to remove the axle seal e.g. a seal puller, internal blind bearing puller, or a drill and some 40+ mm long self tapping screws
- A way to refit bearings (e.g. press, or a long piece of pipe) and seals (e.g. seal driver or PVC pipe)
Genuine versus aftermarket / gen3 versus gen4
A common question is if the gen3 bearings are the same as the gen4 bearings, or if there’s any difference with aftermarket and genuine bearings or bearing kits.
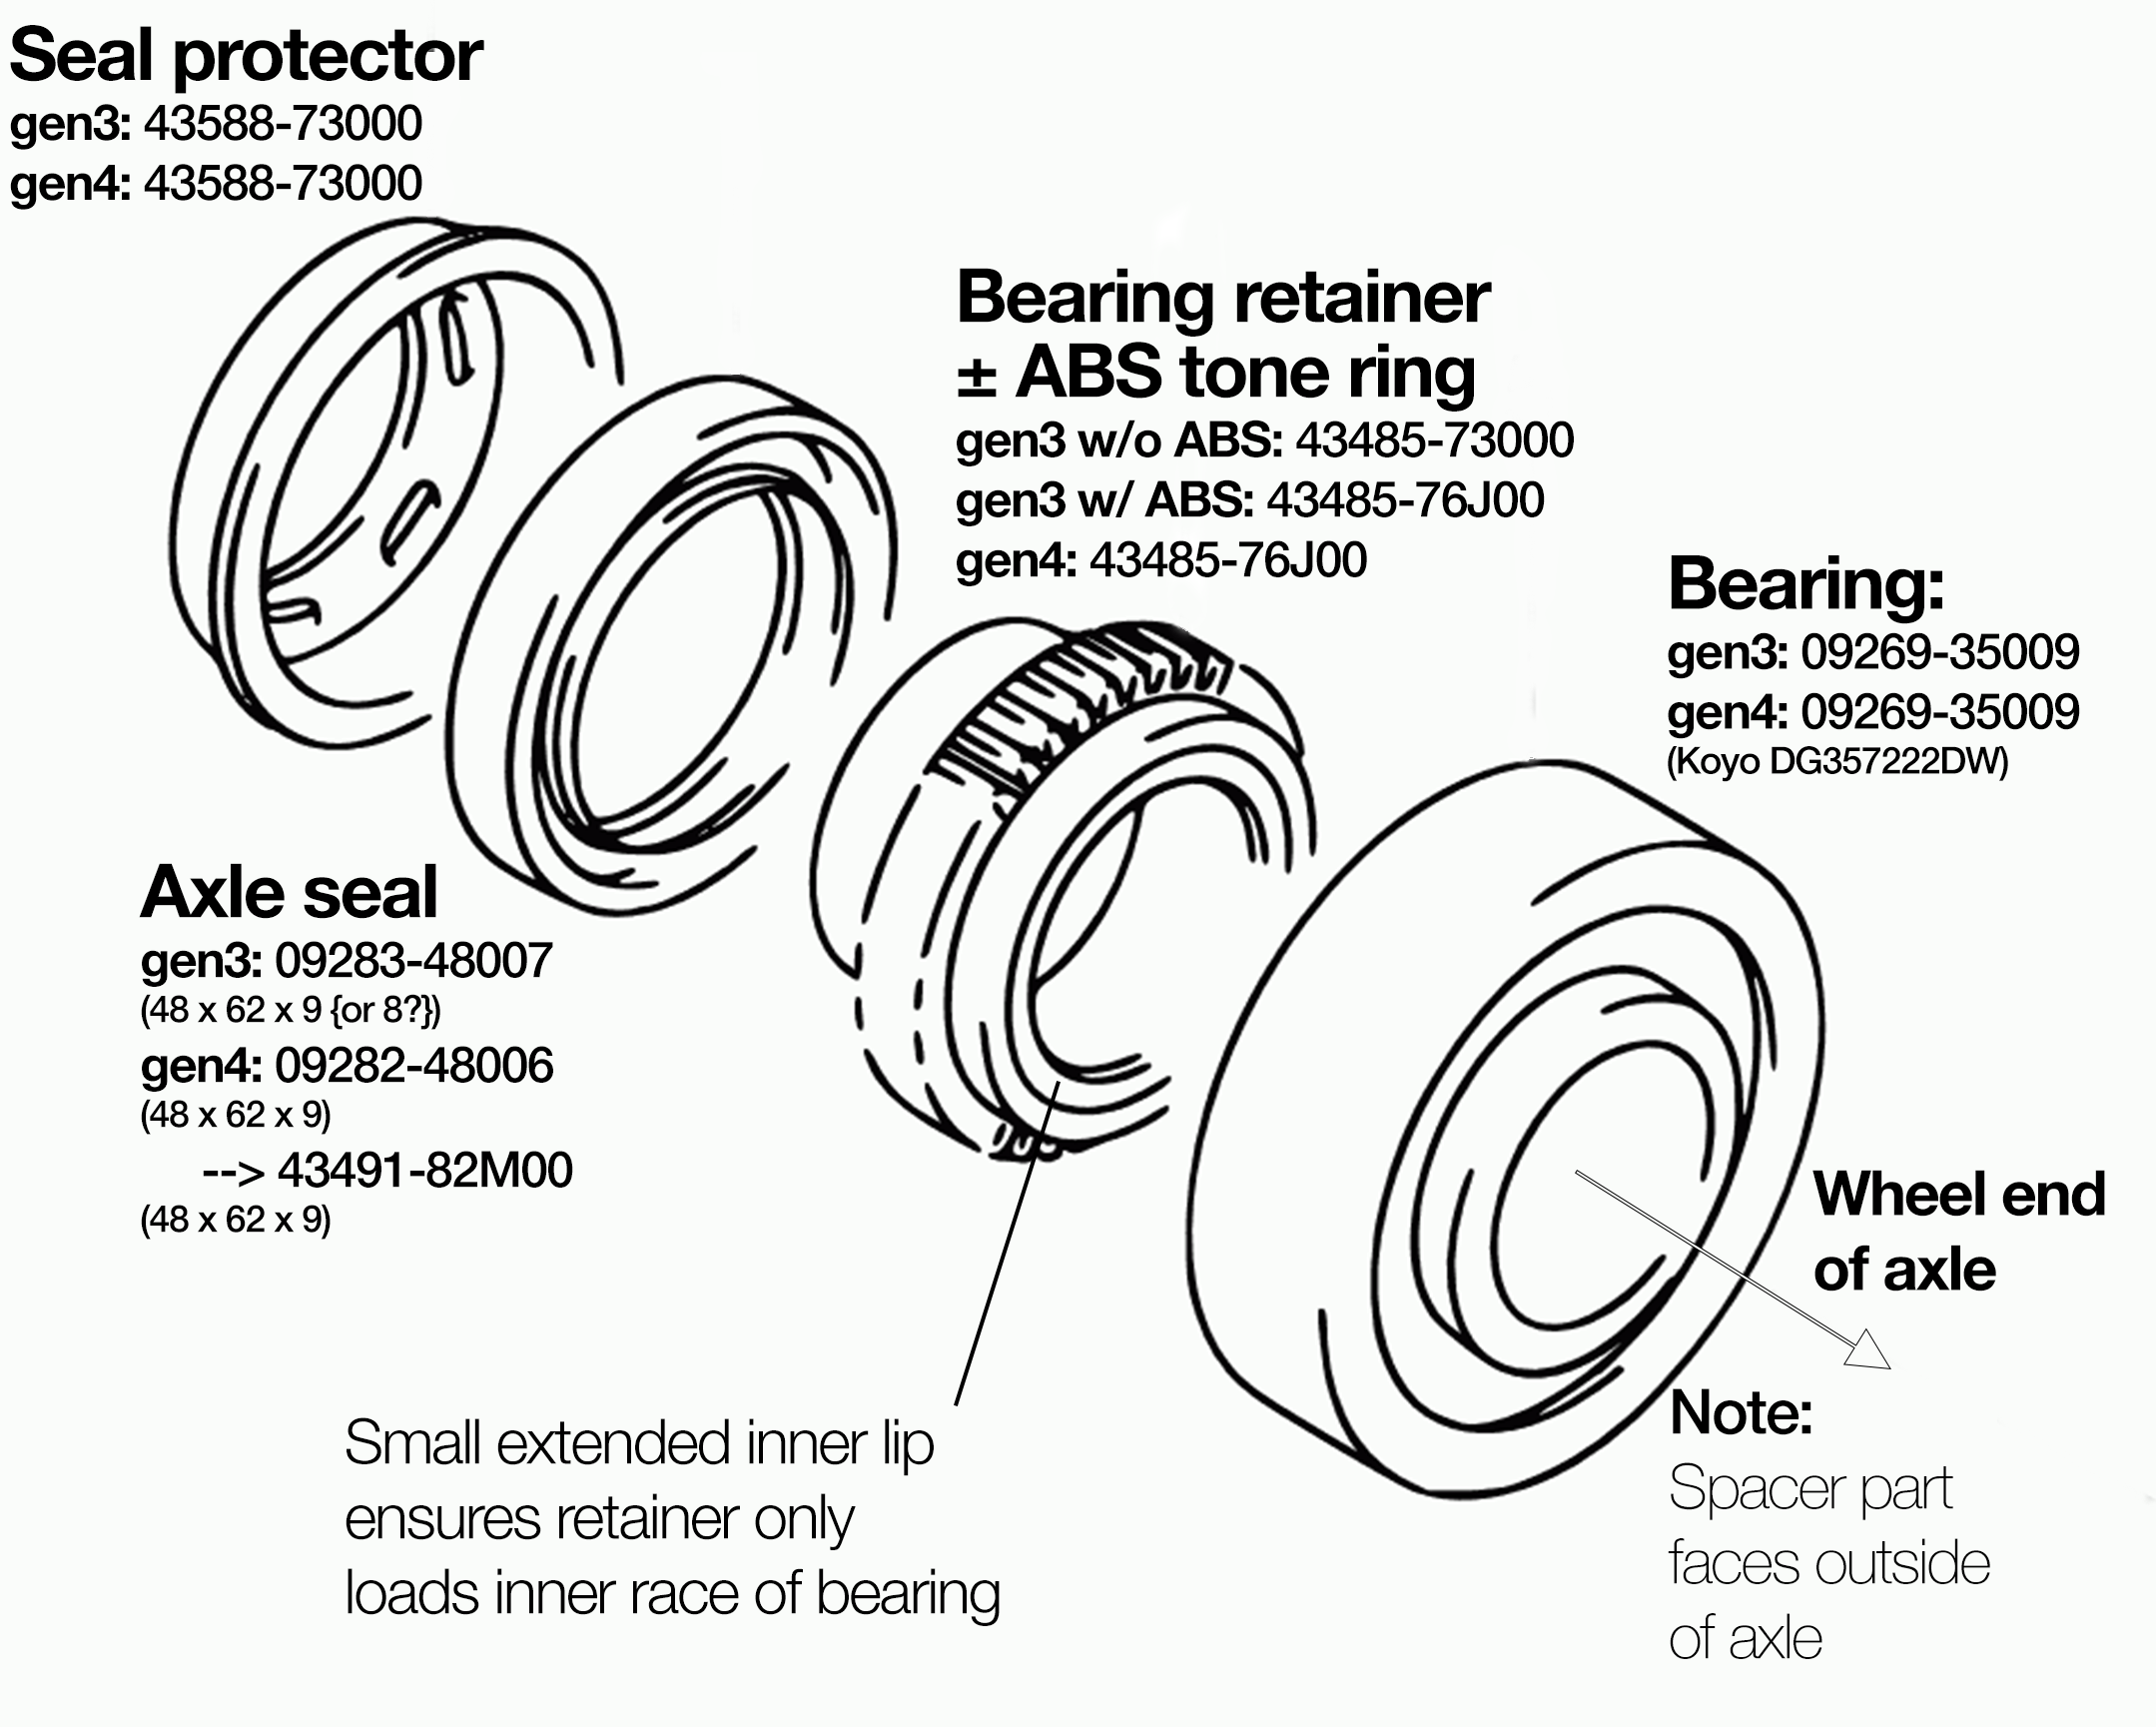
After examining a bunch of parts diagrams, there appears to be little to no difference:
- Bearings are the same part number (09269-35009; which is Koyo DG357222DW)
- Retainers/ABS tone rings are the same part # as gen3 ABS parts (43485-76J00)
- Axle seals are different part numbers (and gen4 superseeded from original parts diagram) but dimensions are reported to be the same +/- 1mm thickness on some gen3 parts diagrams (09283-48007 vs. 09282-48006 superseeded to 43491-82M00)
- Seal protectors are the same part numbers (43588-73000)
Some of these parts are shared with other Suzukis beyond Jimnys e.g. Suzuki Carrys, but I didn’t dive very deep into this.
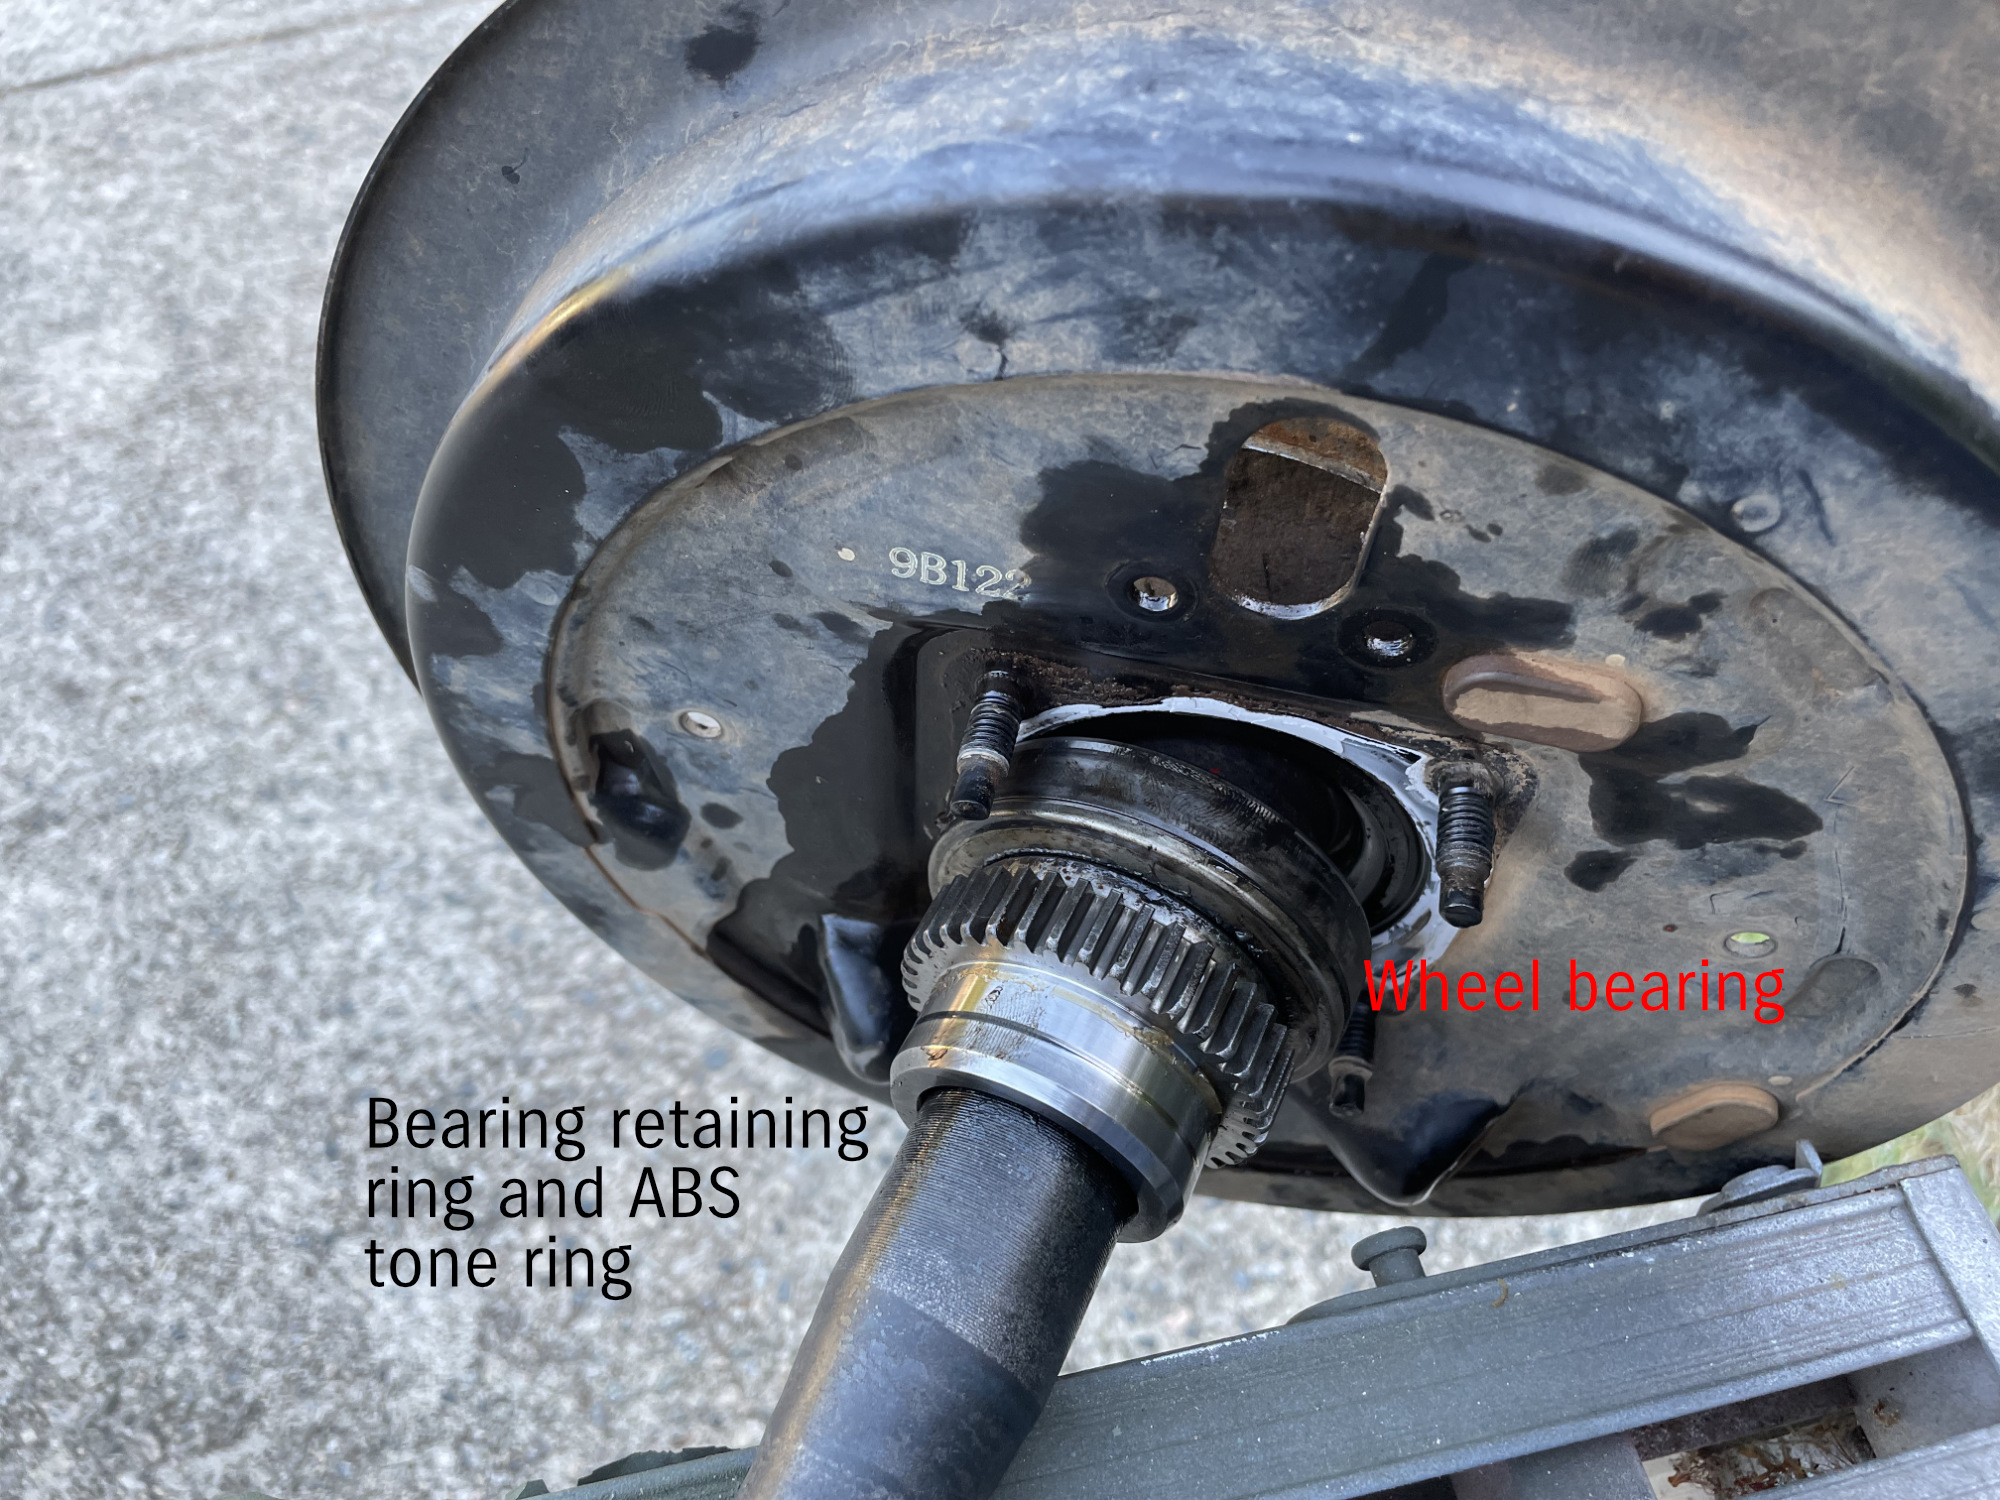
The bearings themselves are interesting in that they are almost 6200 series metric deep groove ball bearings. A 6207 bearing is 35mm ID, 72mm OD, and 17mm thick; the Jimny wheel bearing has another 5mm of the inner race protruding out one side. This sets the bearing position along the axle to correctly fit in the housing. The Jimny wheel bearing is also steel seal on the diff side of the bearing and then a rubber seal on the wheel side of the bearing. The protruding inner race, plus the seal differences, means this is not a bearing you will find on a generic bearing shelf, although it is made by Koyo in Japan (as stated above, their OE part # is DG357222DW).
As you have to grind the bearing retainer off the axle to remove it, you require one to replace your bearing. This might be a difference with generic kits rather than genuine kits, as there are a number of specific features to the bearing retainer that make it a bit more complex than a simple spacer:
- The ABS tone ring presumably needs the same number of teeth to correctly work; there are 38 on the genuine retainer. This would need to match what the car is expecting not just for side to side comparisons but also front to back wheel speed comparisons for ESP/TC reasons.
- The tone ring end of the retainer has a 0.44mm protrusion, which ensures that the retainer only loads the inner race of the bearing without touching the metal seal. The distance from the inner race to the seal might also vary with non-Koyo bearings so might be worth investigating deeper
- The inner diameters vary. The diff/axle end of the retainer has an ID of ~35.10mm, whereas the ABS tone ring/wheel end is 34.90mm. This means that the press fit is only on half of the retainer (and critically – on the bearing end of the retainer).
- The outer diameter of the axle/diff end of the retainer fits inside the axle seal, so you need to make sure this matches the seal. The factory retainer measures exactly 48.00mm on my micrometer.
Factory parts
I bought a factory set of bearings, which included getting whatever parts have been superseeded according to the latest internal parts diagrams. The following is what I was supplied:
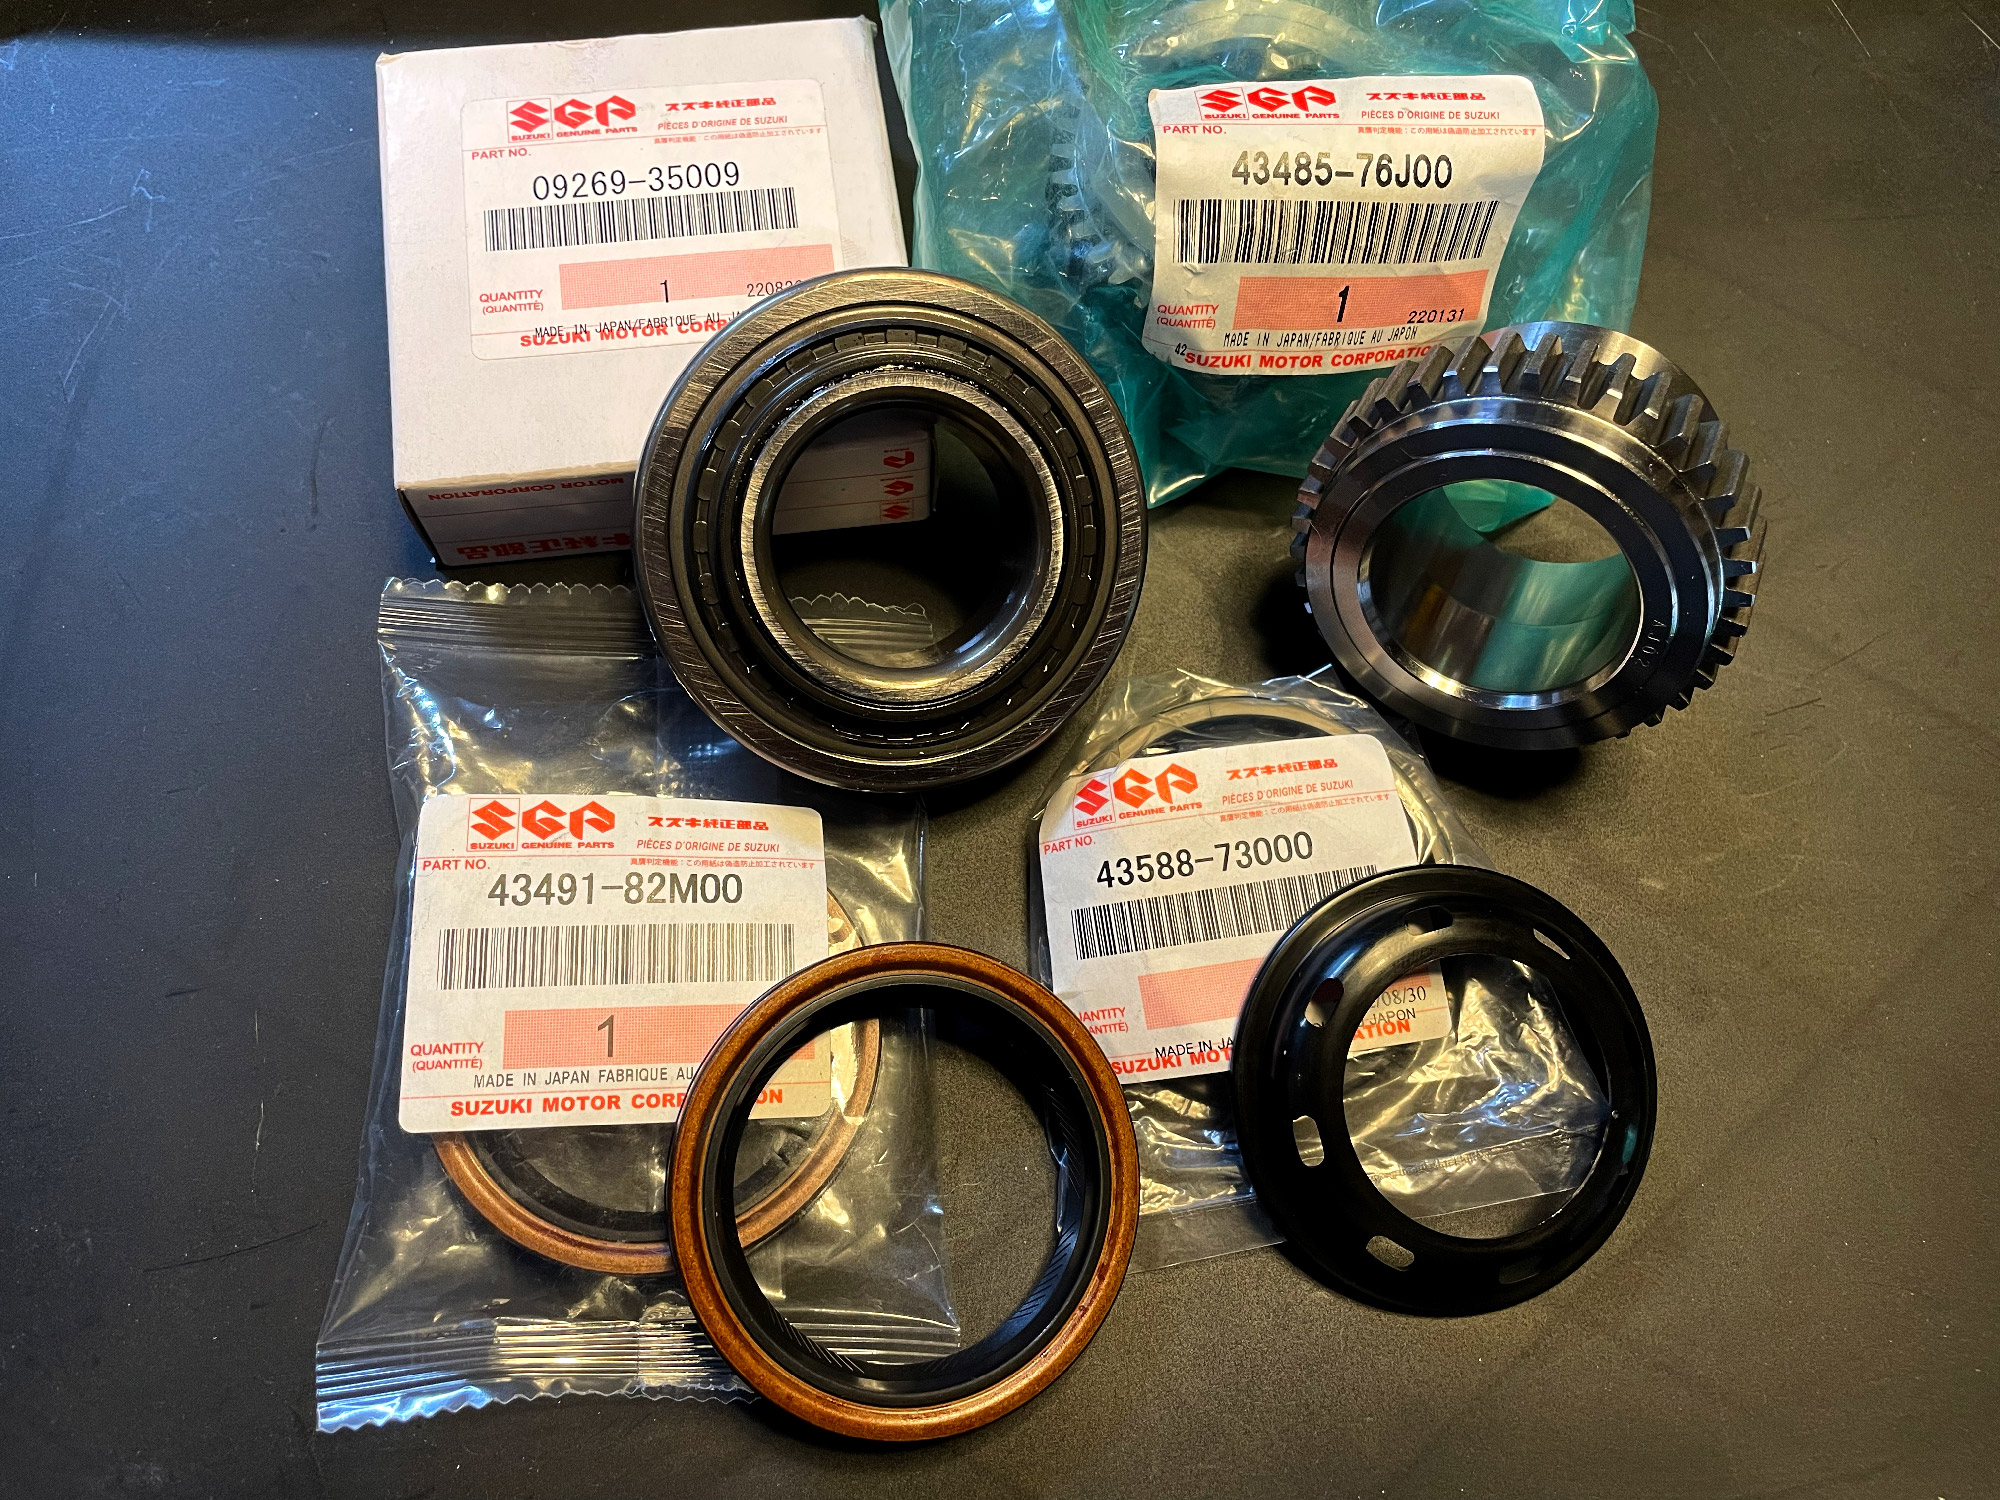
You potentially do not need the seal protector, but the other 3 parts are definitely needed. The axle seal is the only part that comes up with a different part number to a gen3 bearing set, and potentially is overall the same dimensions as a gen3 seal. Note that this seal is on the inside of the axle housing, so isn’t involved in mud/dirt/water getting into the bearing.
Potentially it is cheaper to source the genuine bearings direct from Koyo. They are ~$150 retail per bearing through Suzuki and maybe about $65 each through Koyo. If you’re on a budget but worried about non-genuine bearings, this would be the route I would go if you have the time to wait for one to come through a Koyo retailer.
Aftermarket set
I’ve bought a few aftermarket sets for comparison. A couple of things:
- Some reasonably priced ones include genuine Koyo bearings, which mean the bearing is absolutely equivalent to the factory Suzuki ones
- Seals vary a bit in quality and all were the thinner gen3 spec seal. They work just fine in a JB74
- ABS tone rings also were pretty reasonable in terms of tolerance on their ID and OD, but did vary a bit in length. I’d still be happy to run them though.
- None of the aftermarket sets seemed to come with the seal protector.
I’d probably look for sets with Koyo bearings; the off-brand ones do not seem to last well and the Koyo bearings are not expensive. Other than that they’re certainly a much cheaper way to get the bearings fixed.
Diagnosing a bad bearing
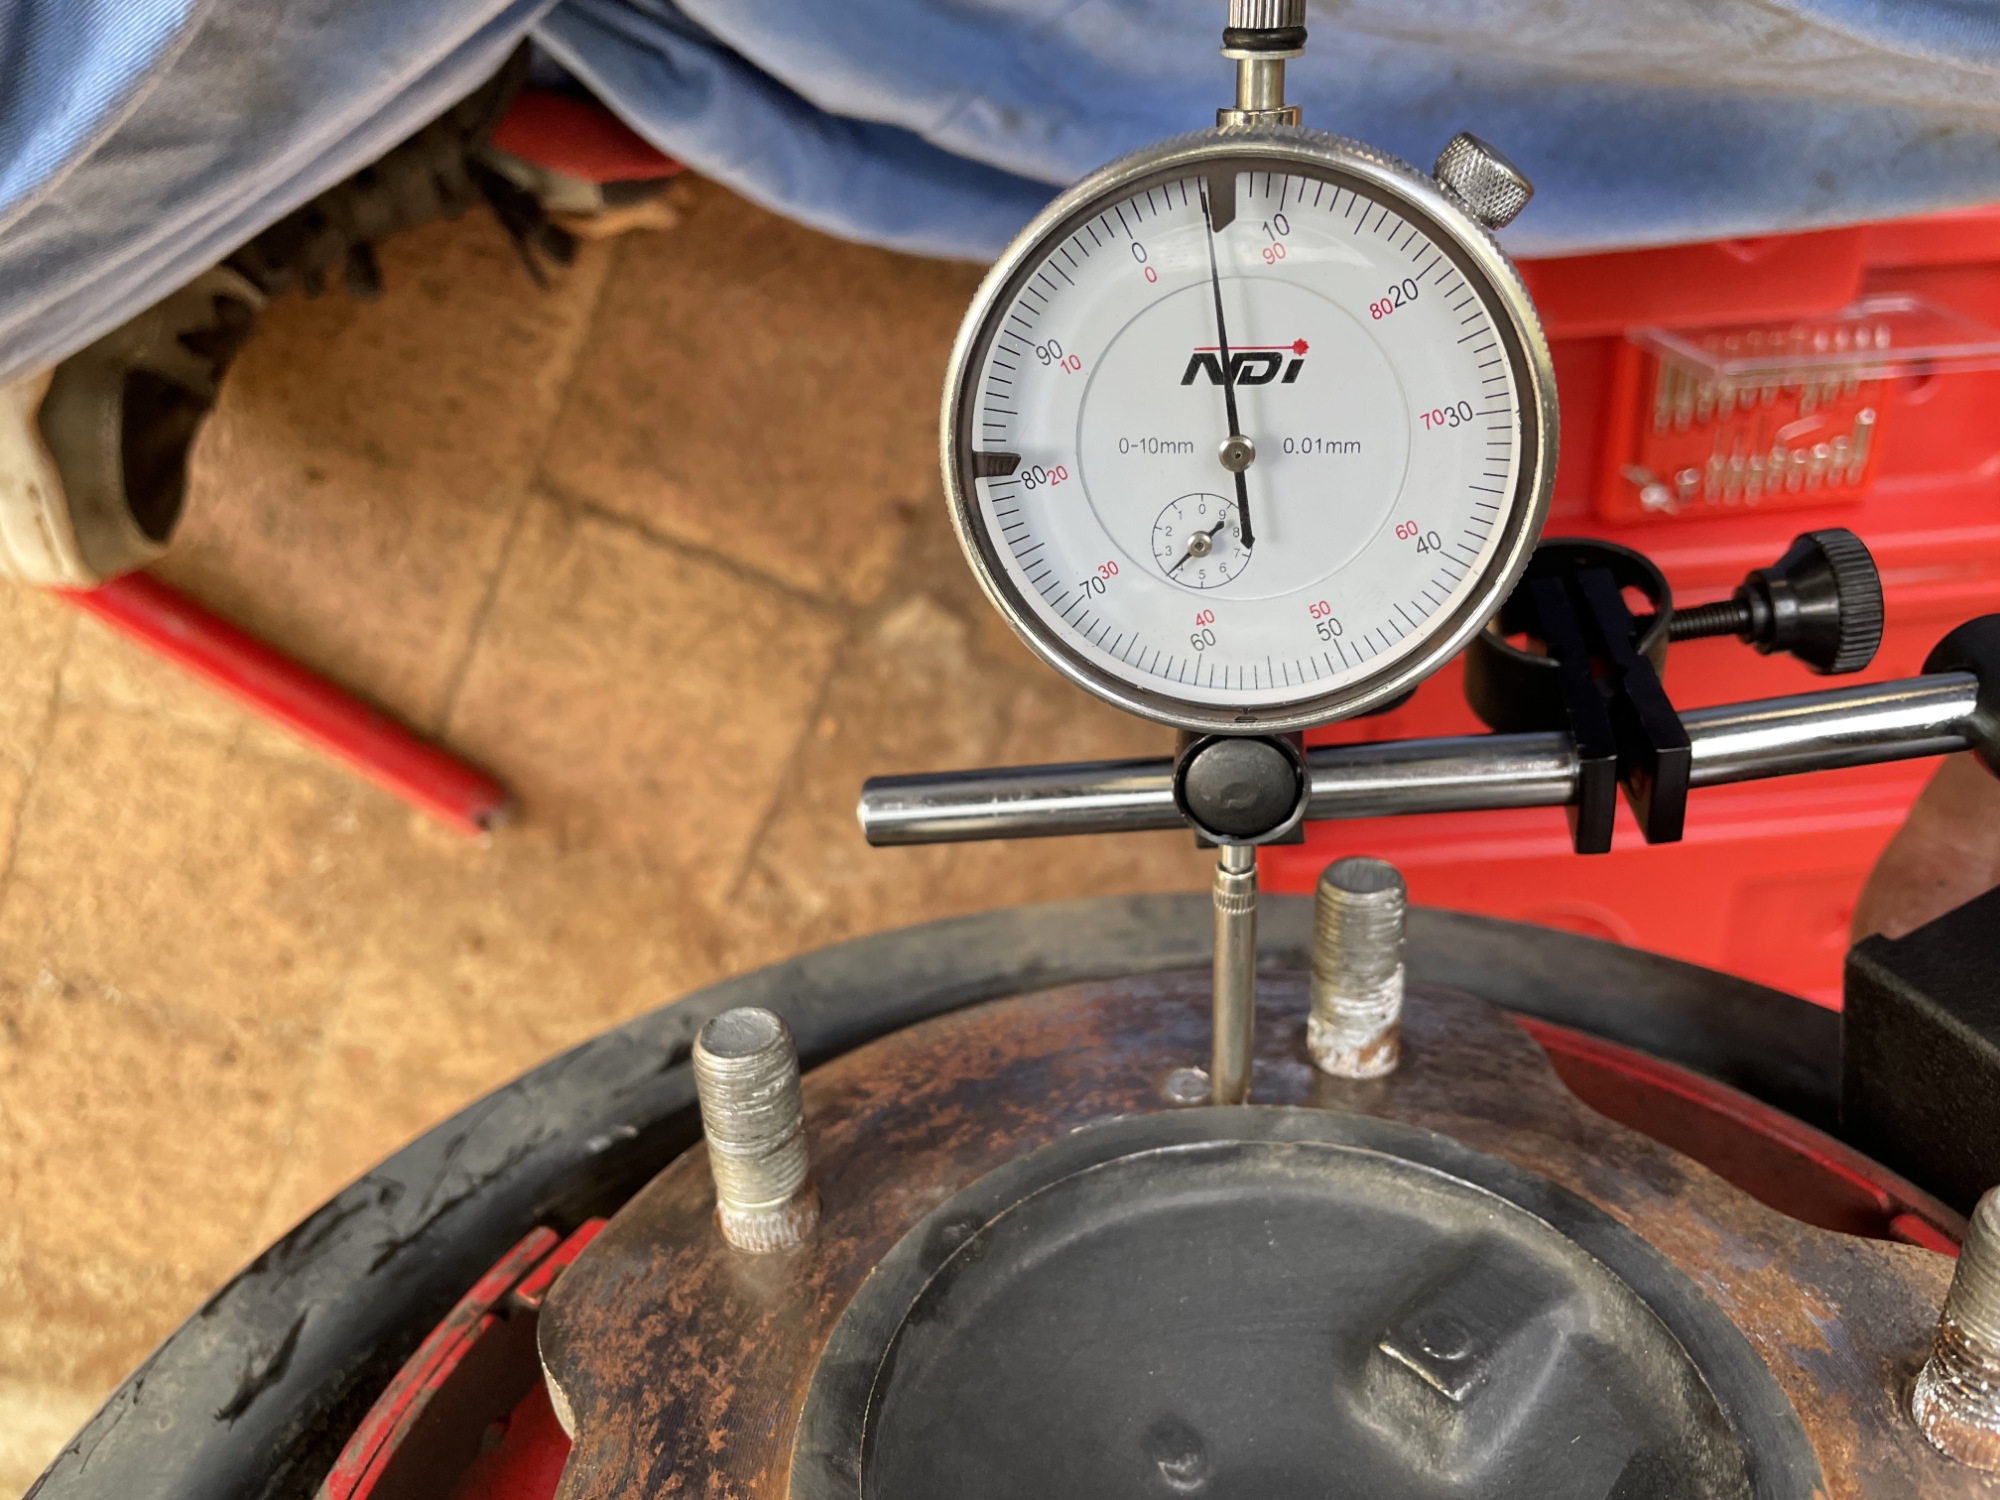
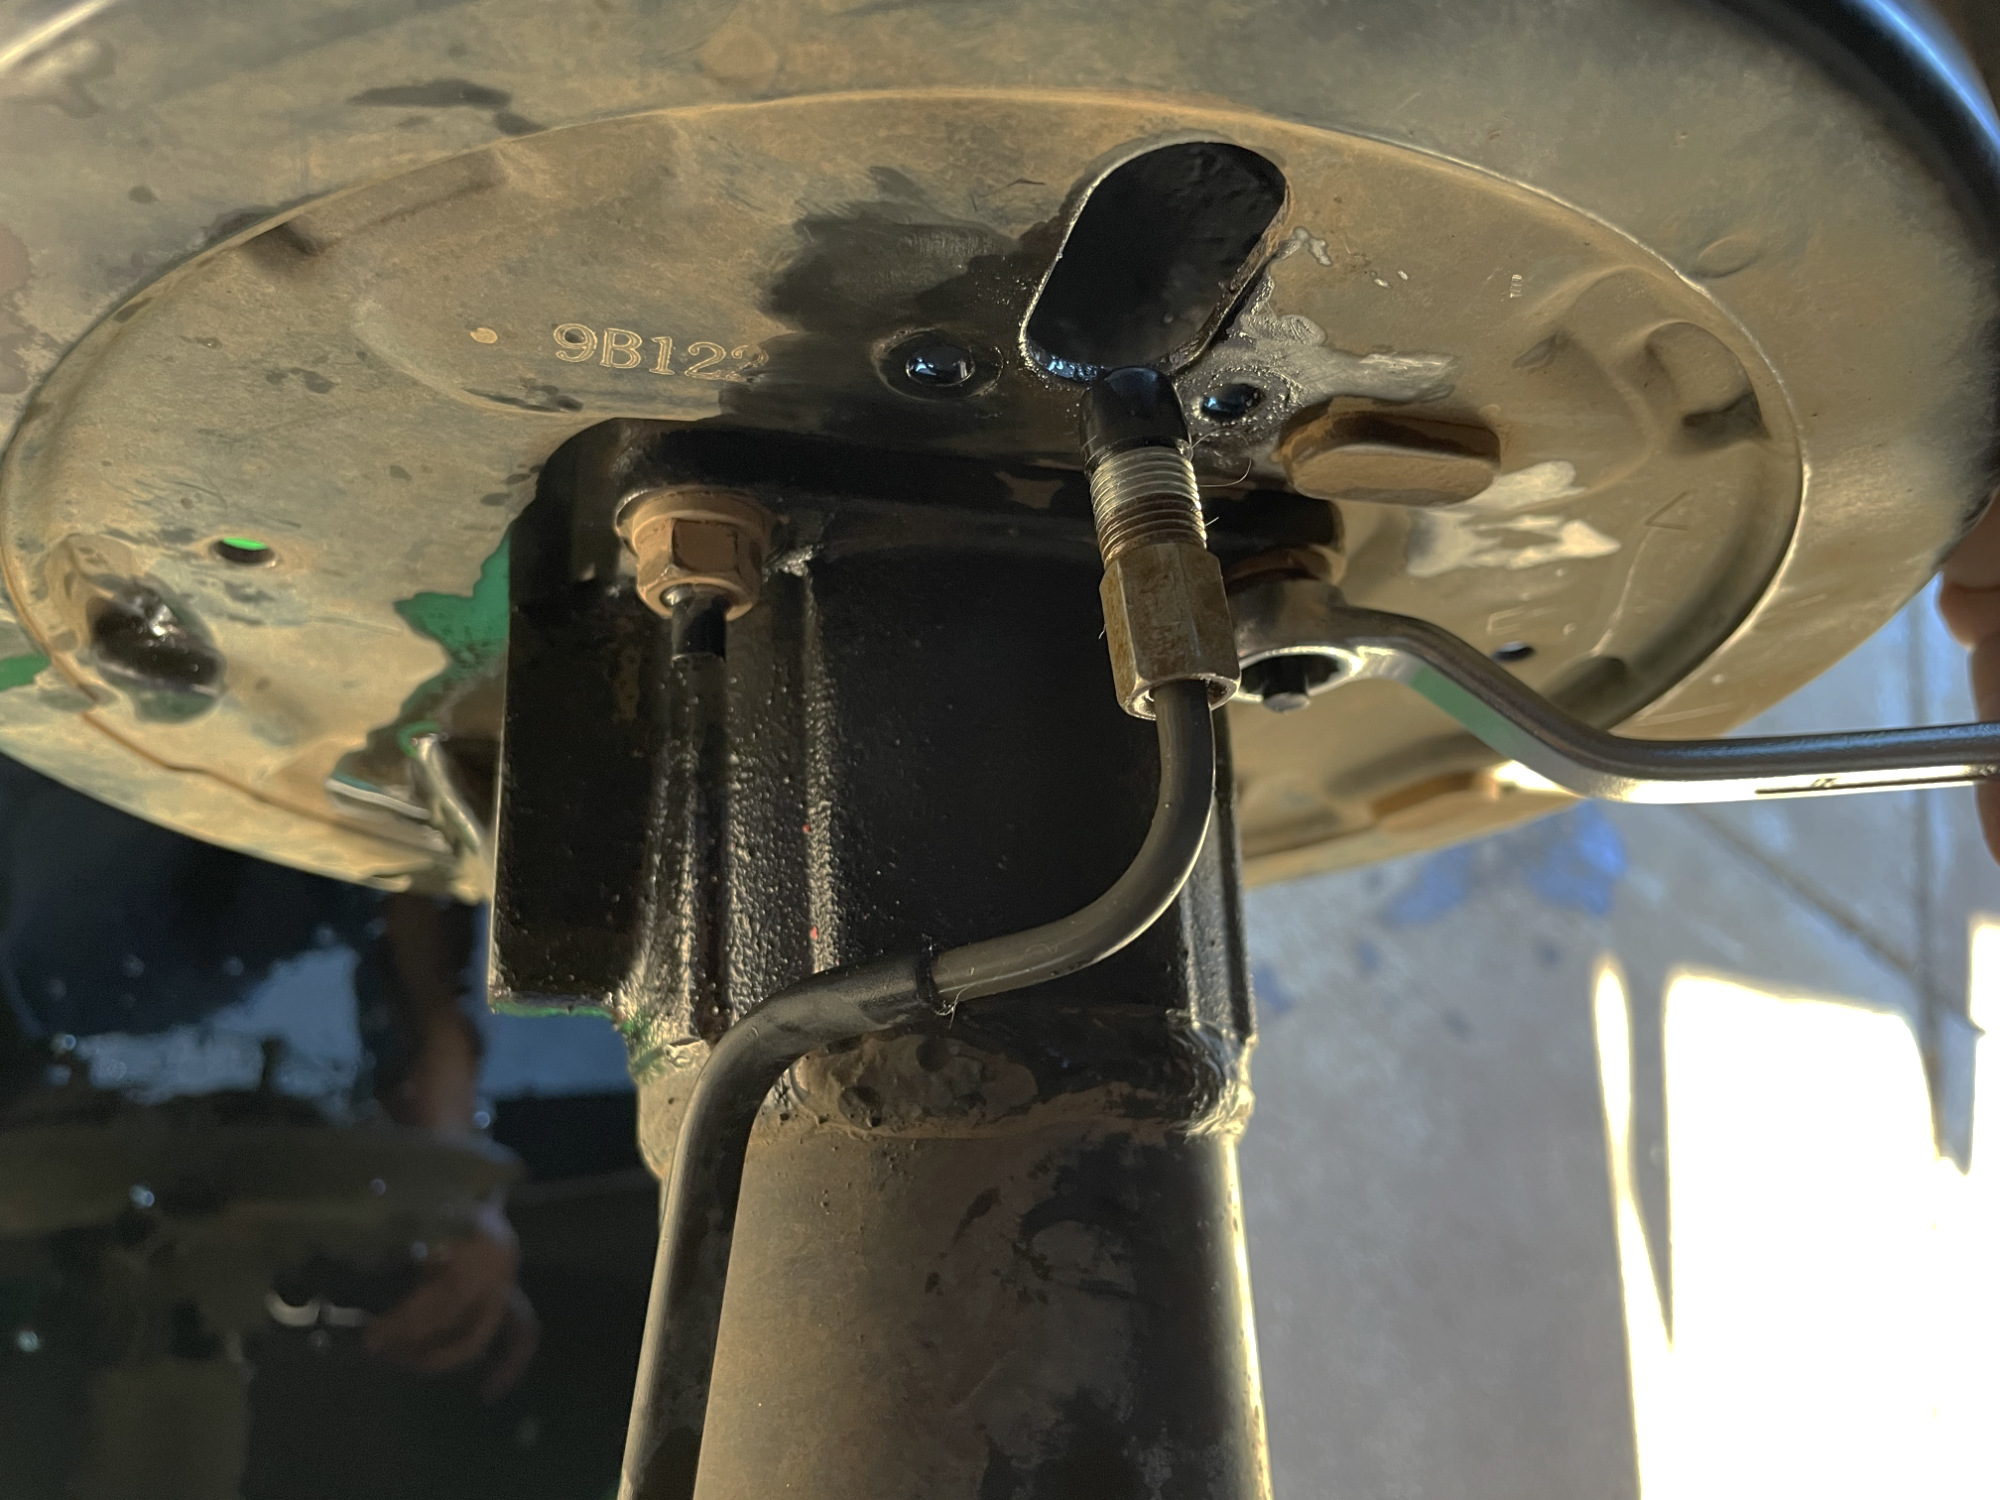
The official procedure to diagnose a bad wheel bearing is to measure the end float at the axle, with the rear brake drum taken off. If the axle can move in and out more than 0.8mm then the bearing requires replacement.
Here is the axle pushed all the way in…
… and then pulled all the way out against the bearing.
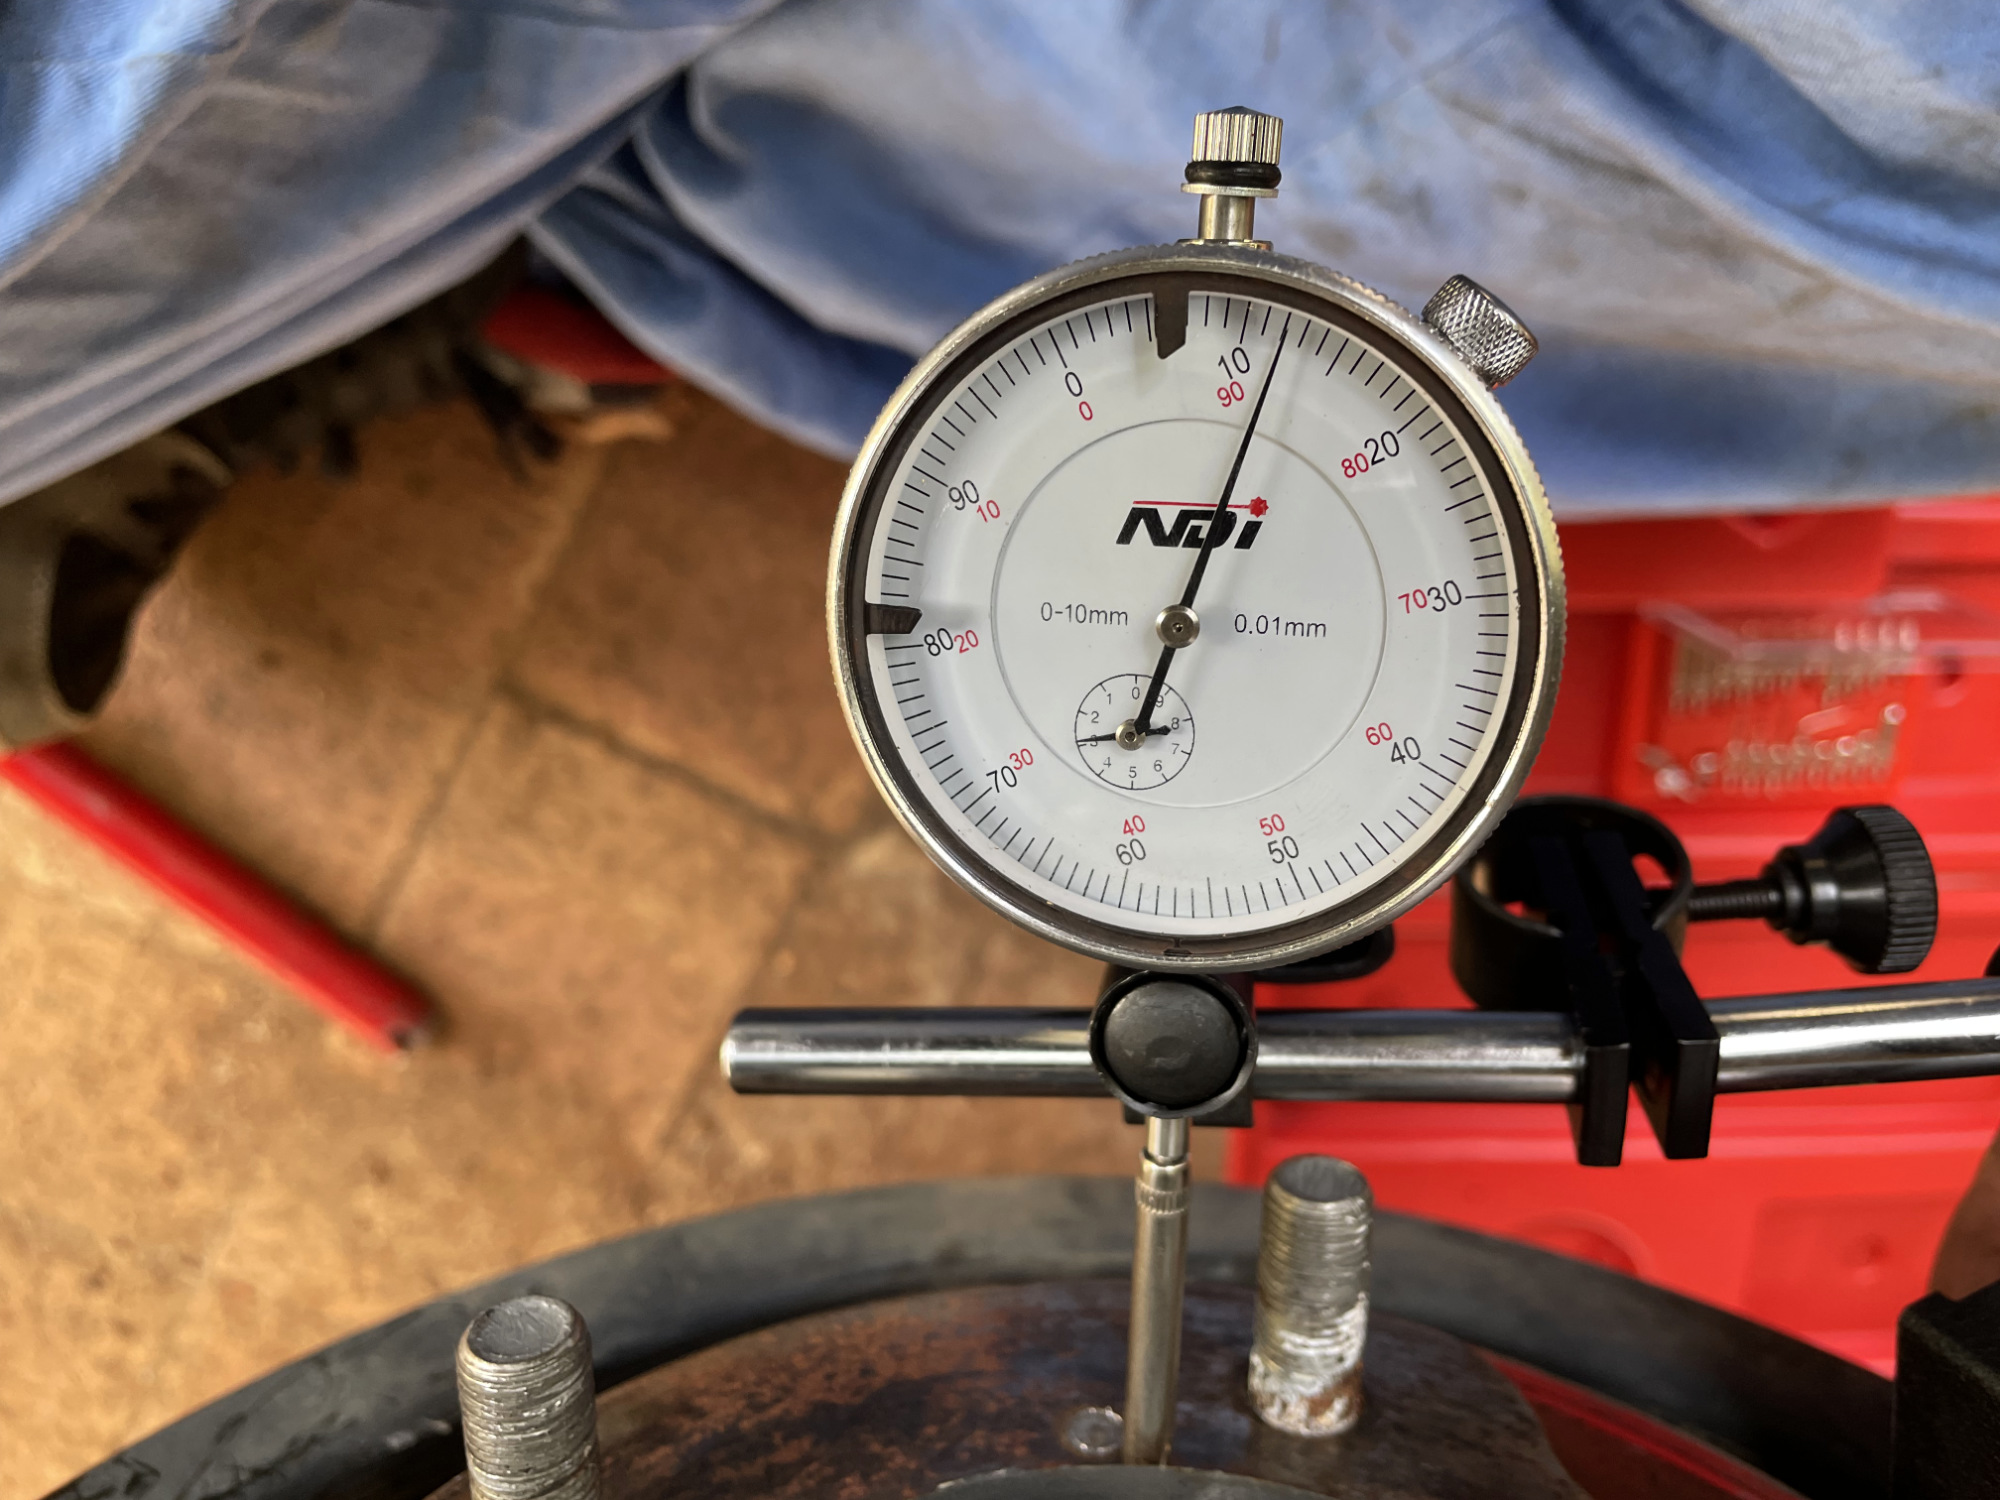
Not everyone is familiar with reading a dial gauge, but that’s just over 1mm of difference between one position and the other so this bearing is toast.
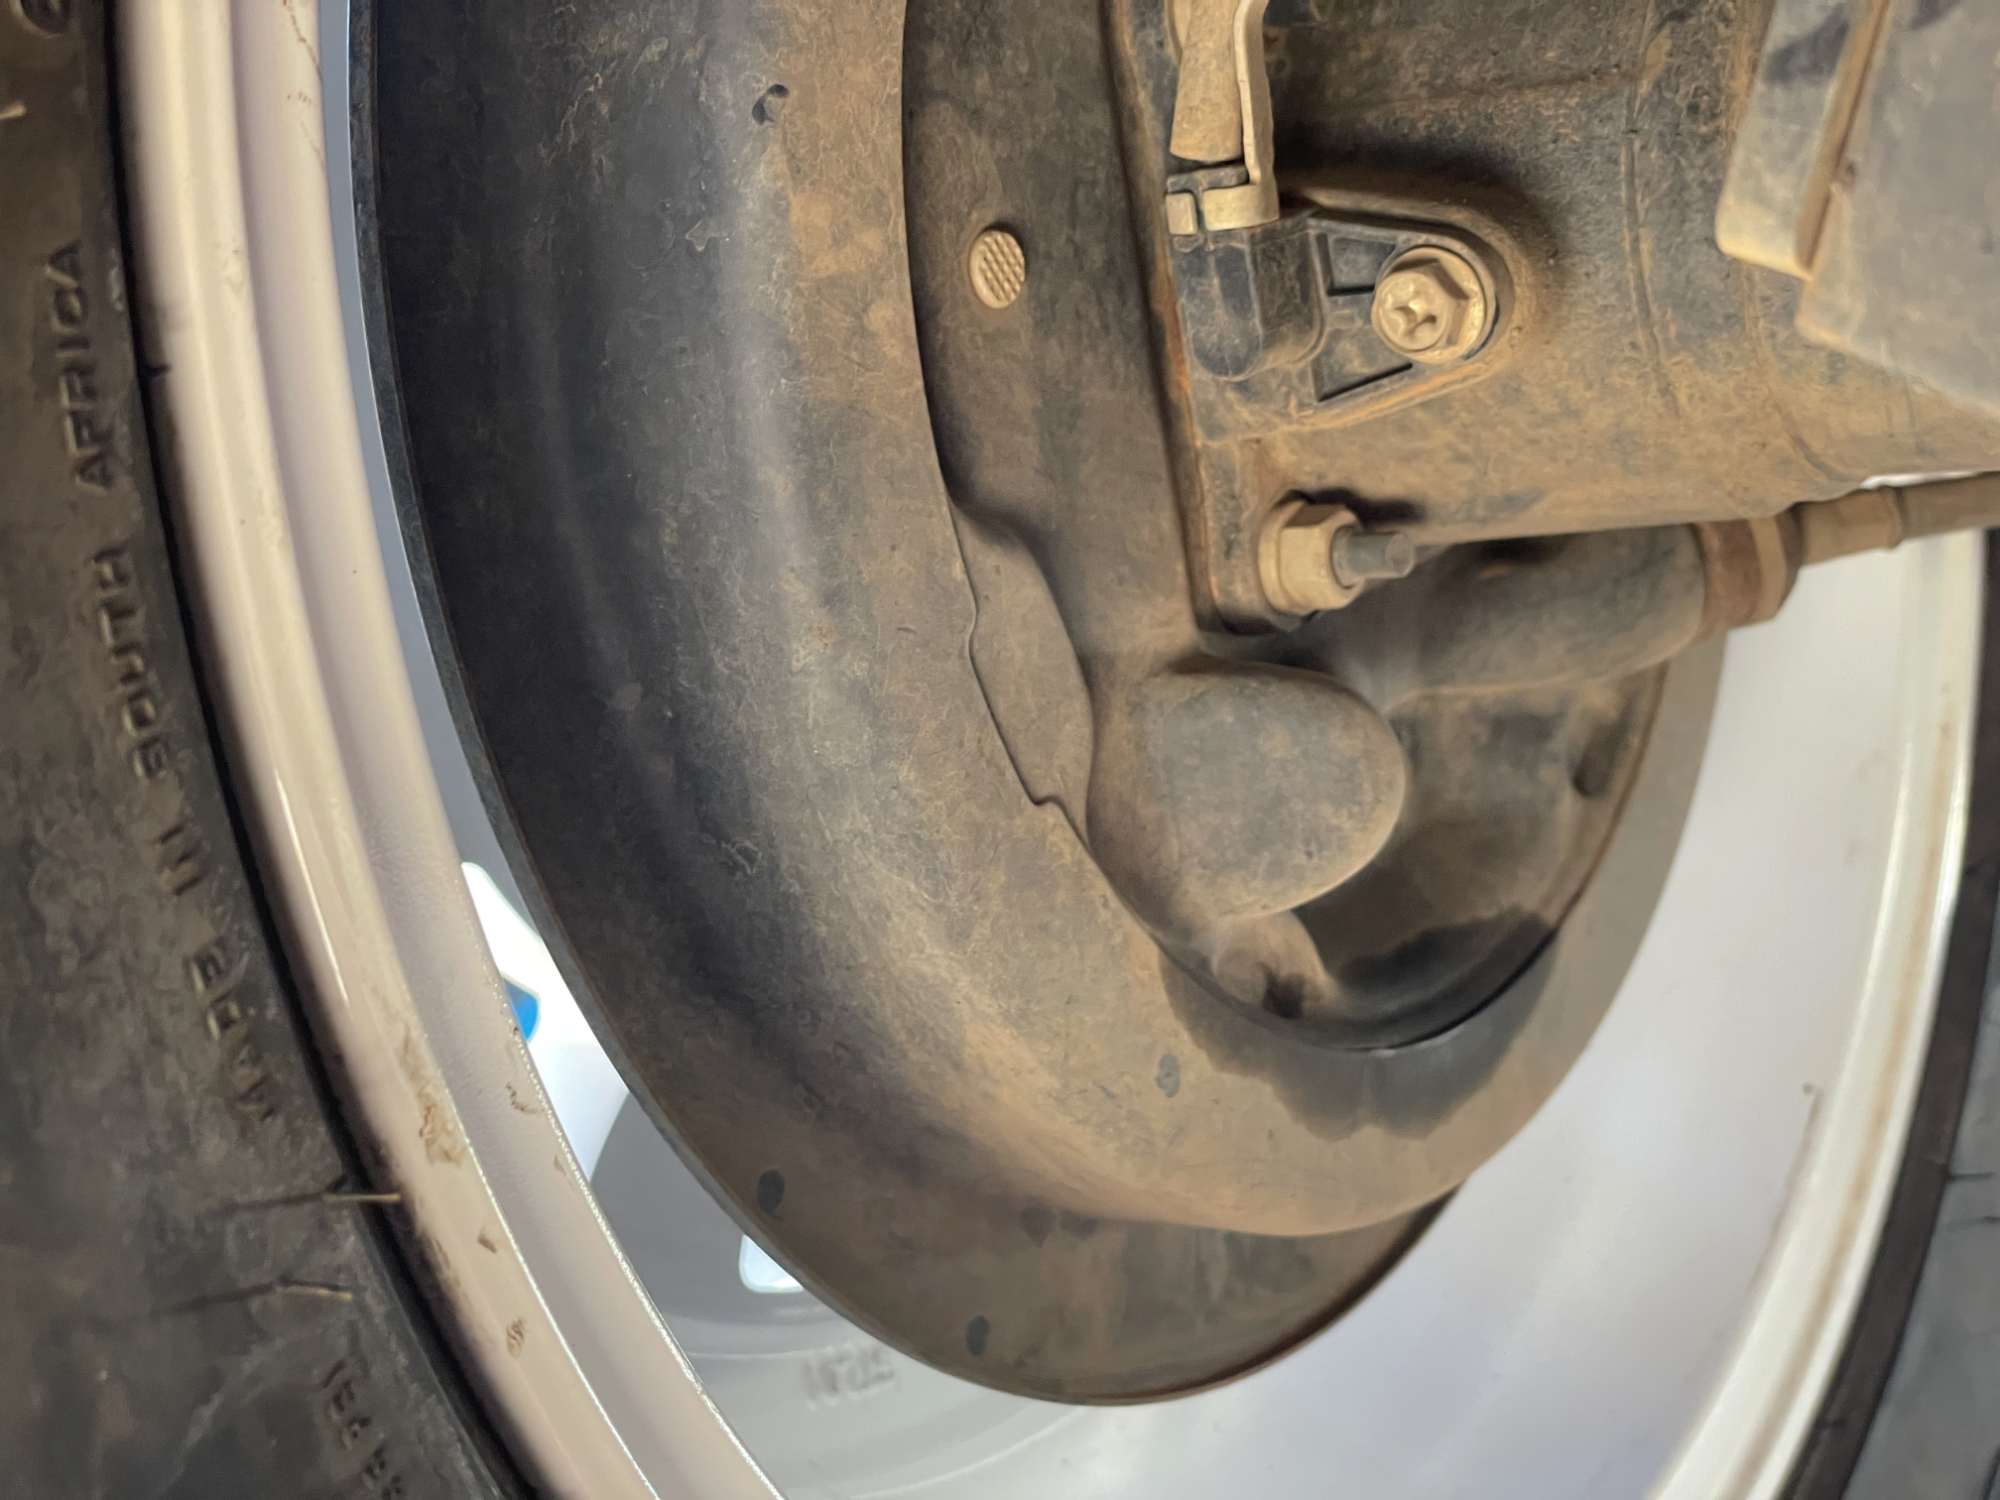
Usually when a bearing is bad, you can also diagnose it by seeing if the rear wheel has play. This is best done with the handbrake off, though if it’s really bad you’ll still feel it with the handbrake on. Grab the wheel at the top and bottom, or at the front and back, and see if you can move the entire thing. It’ll wiggle noticeably if the bearing is bad.
This following example is definitely worn out, but essentially you shouldn’t perceive too much wiggle on a car with the wheel still attached, brakes still assembled etc.
As an additional check, rotating the rear wheel with the car in neutral & the handbrake off can reveal a bad bearing as it might feel quite crunchy. This is the hardest thing to check/feel and also the hardest to illustrate here, but it can often be easier to feel it rather than see movement if the bearing is mostly making a whining noise rather than a clunking noise.
Another sign is to look for any signatures of worn rear brakes: often this is a handbrake that won’t adjust very well or won’t hold the car. The play on the bearing means the drum ends up differently spaced to the brake shoes, so as the brake adjusts up but one runs out of adjustment, you will find one side needs to be pulled more than the other. This manifsets itself as a ’tilt’ to the handbrake balance bar, which should be no more than 15º off perpendicular to the cable from the handbrake lever. While this isn’t diagnostic of just a wheel bearing (your brakes might have worn out on one side from lots of 4wding, or, your brakes have been stuck on from mud and stuff in the brake), it is worth investigating and going deeper than just replacing the brakes.
A final thing you might see with a badly failed bearing is the axle seal will start leaking and so you’ll have diff oil all down the back of the brakes. Once they get this bad, you’re not far away from the entire assembling yeeting itself out of there, though – and when that happens the wheel and the axle are going to go for a merry wander down the road.
While it is true that an axle seal could fail without the wheel bearing itself failing, generally they go hand in hand. It’s a false economy to pull the entire axle out and just replace the axle seal: you have done almost all of the work to replace the bearings, so you should definitely just do it when you’re in there.
Removing axle
Start by lifting the car up and supporting it on stands. Can be supported by the chassis or the axle housing; you will be pulling hard on the axle housing later on, but supporting it there means you don’t have to lift it as high.
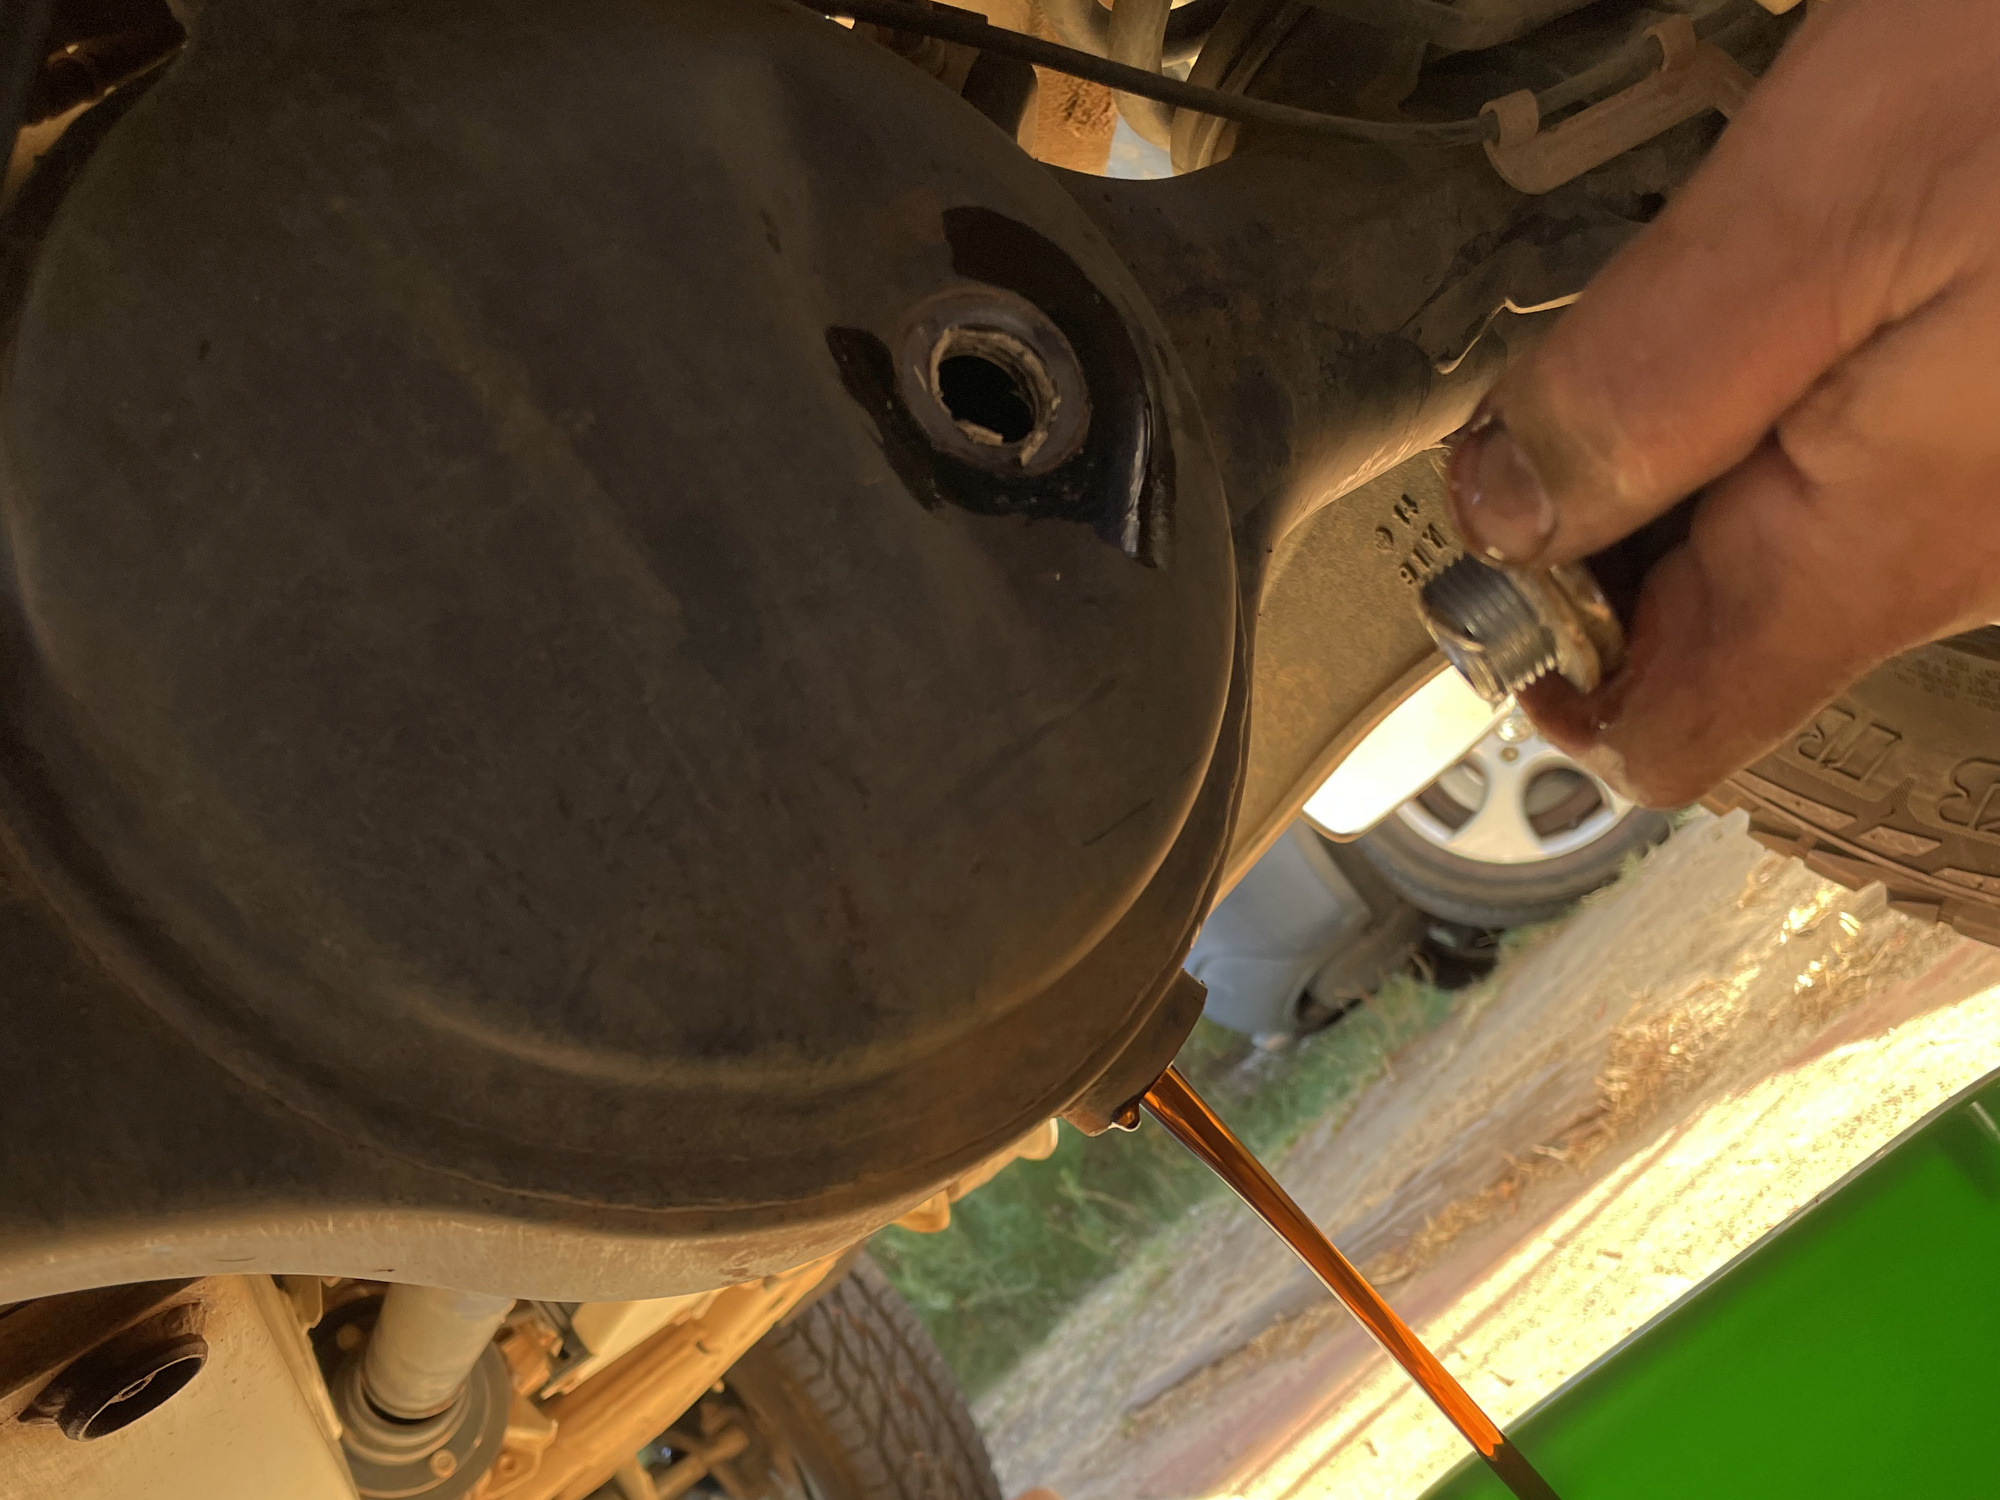
Drain the differential oil. To make sure you don’t have a problem when it comes to refilling, first remove the fill point on the differential and then undo the diff drain plug.
Remove the rear wheel.
Next up we’re going to remove the brakes. If you want more details then my rear brake shoe change article is better, but I’ve reproduced some key points in the hope it’ll help.
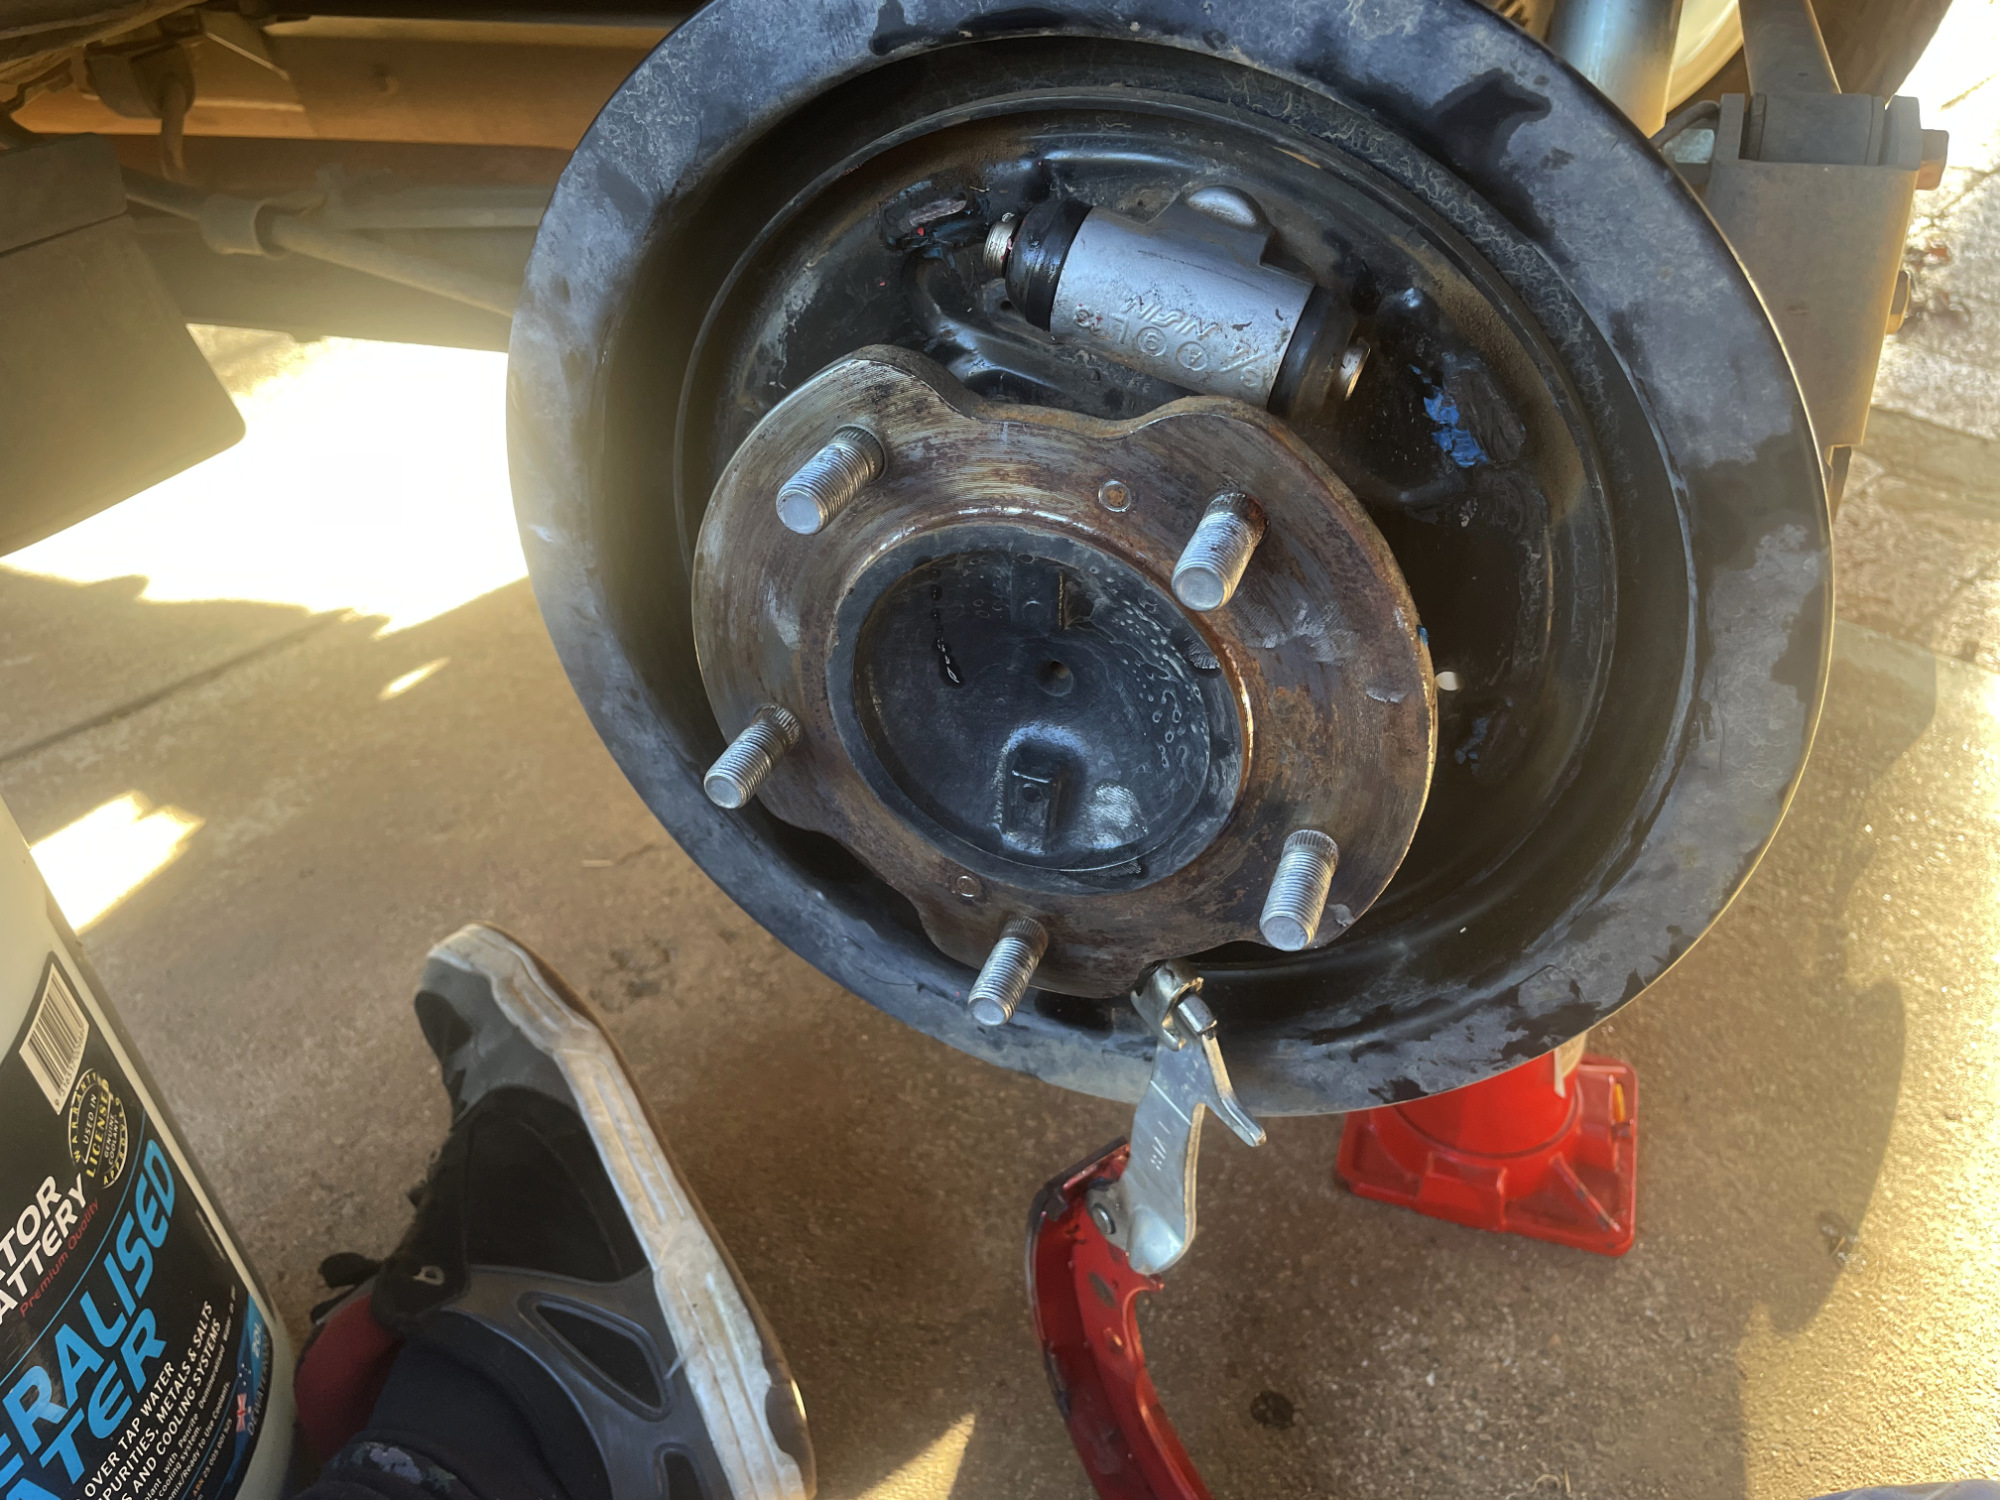
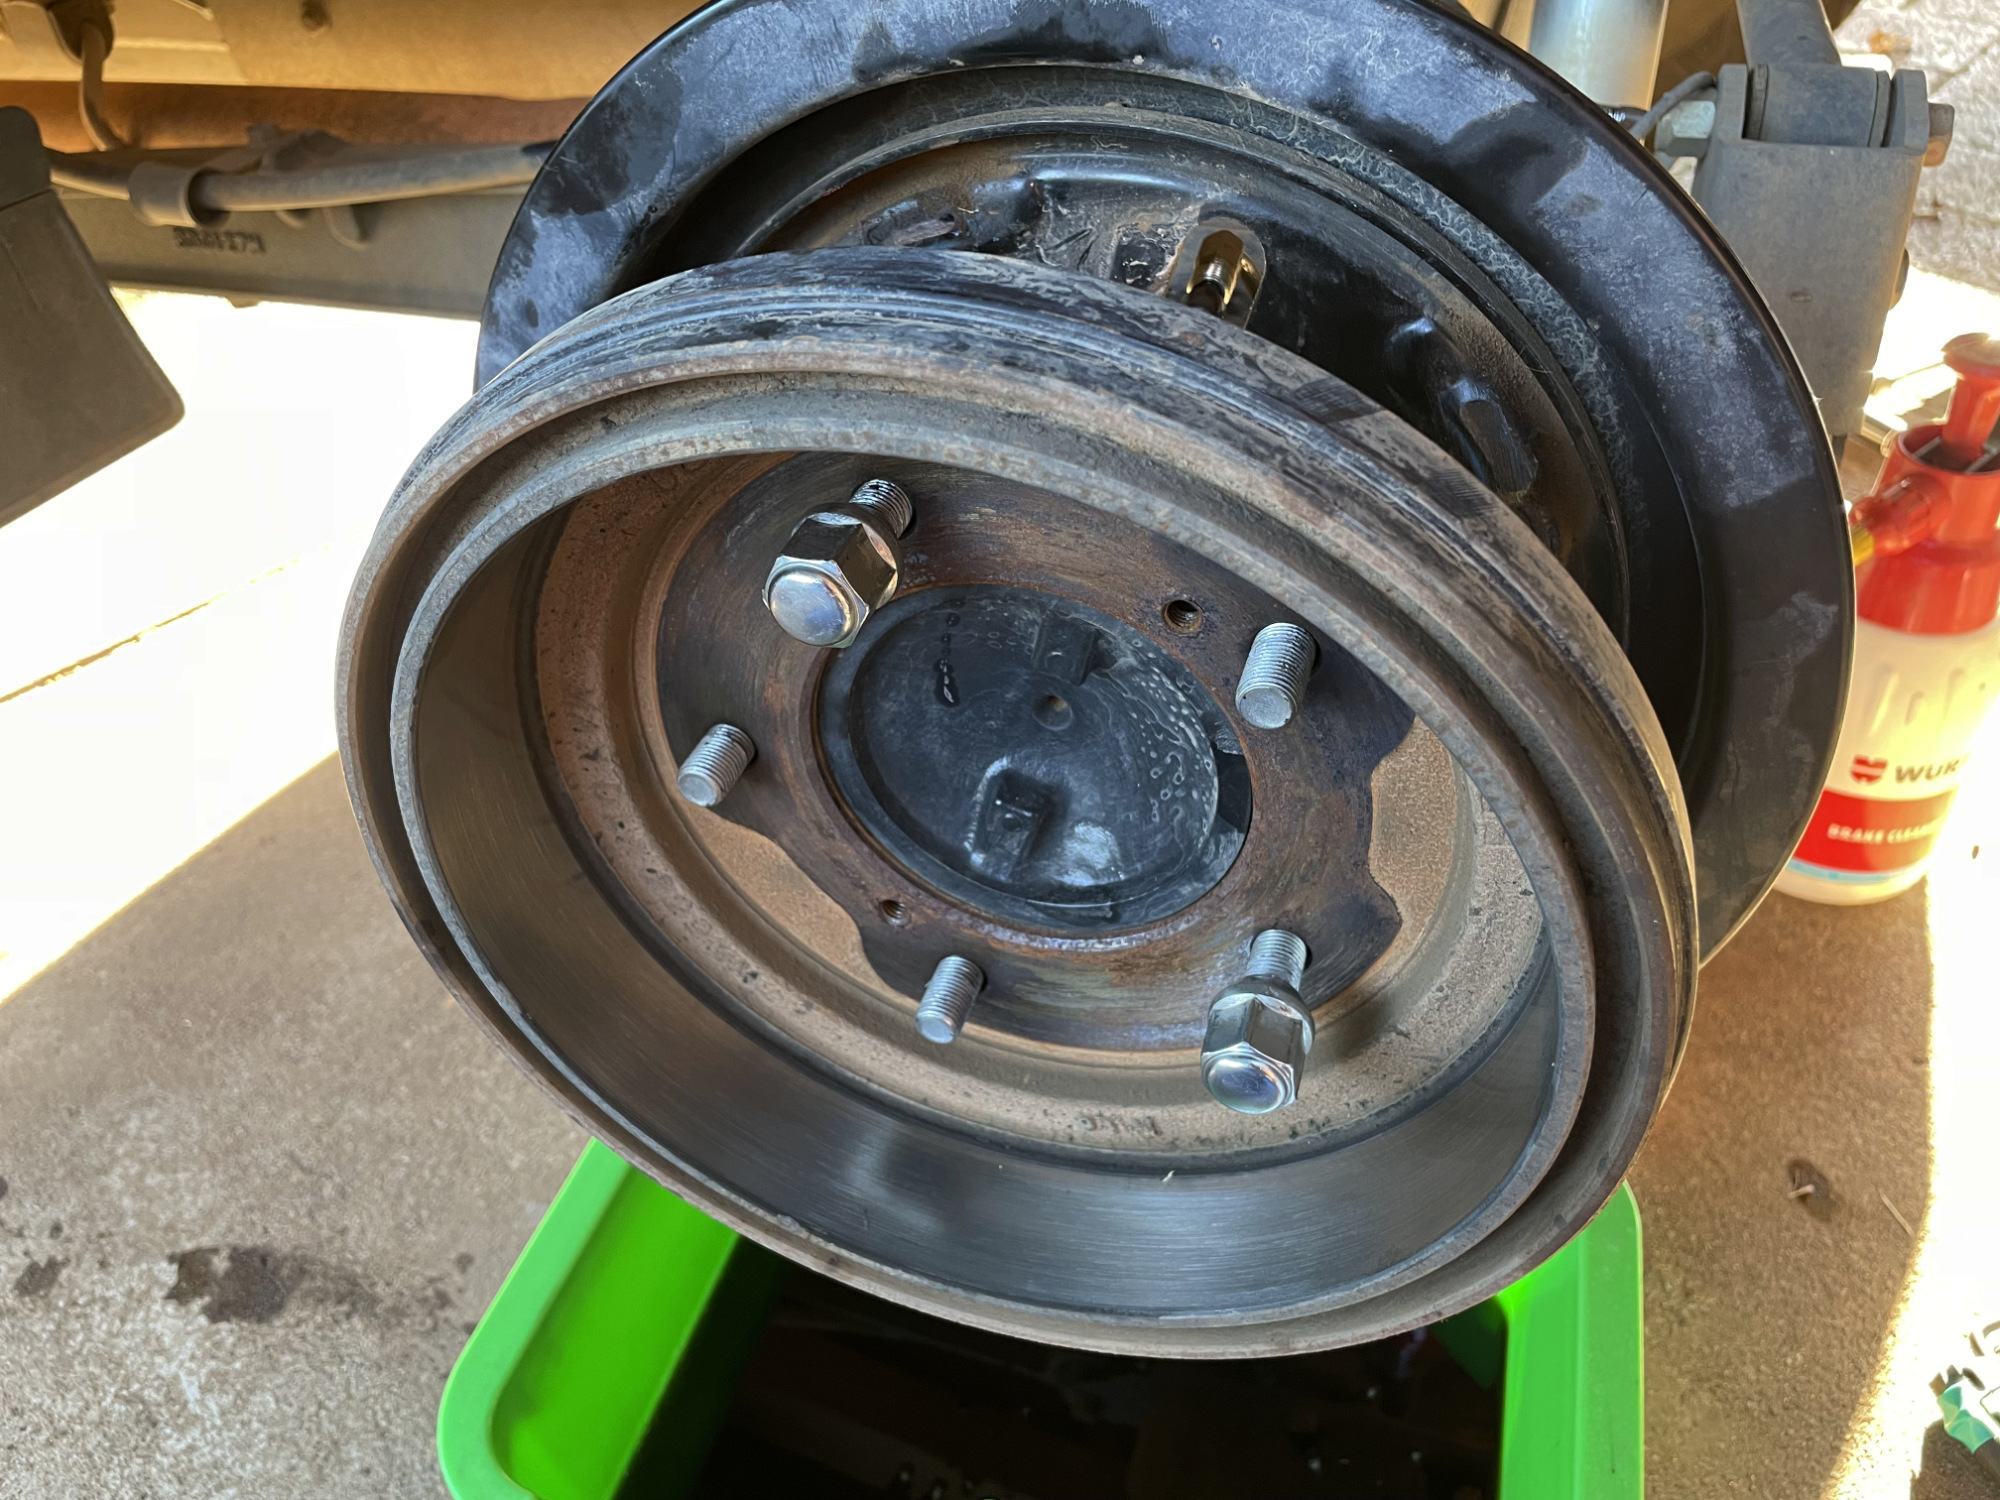
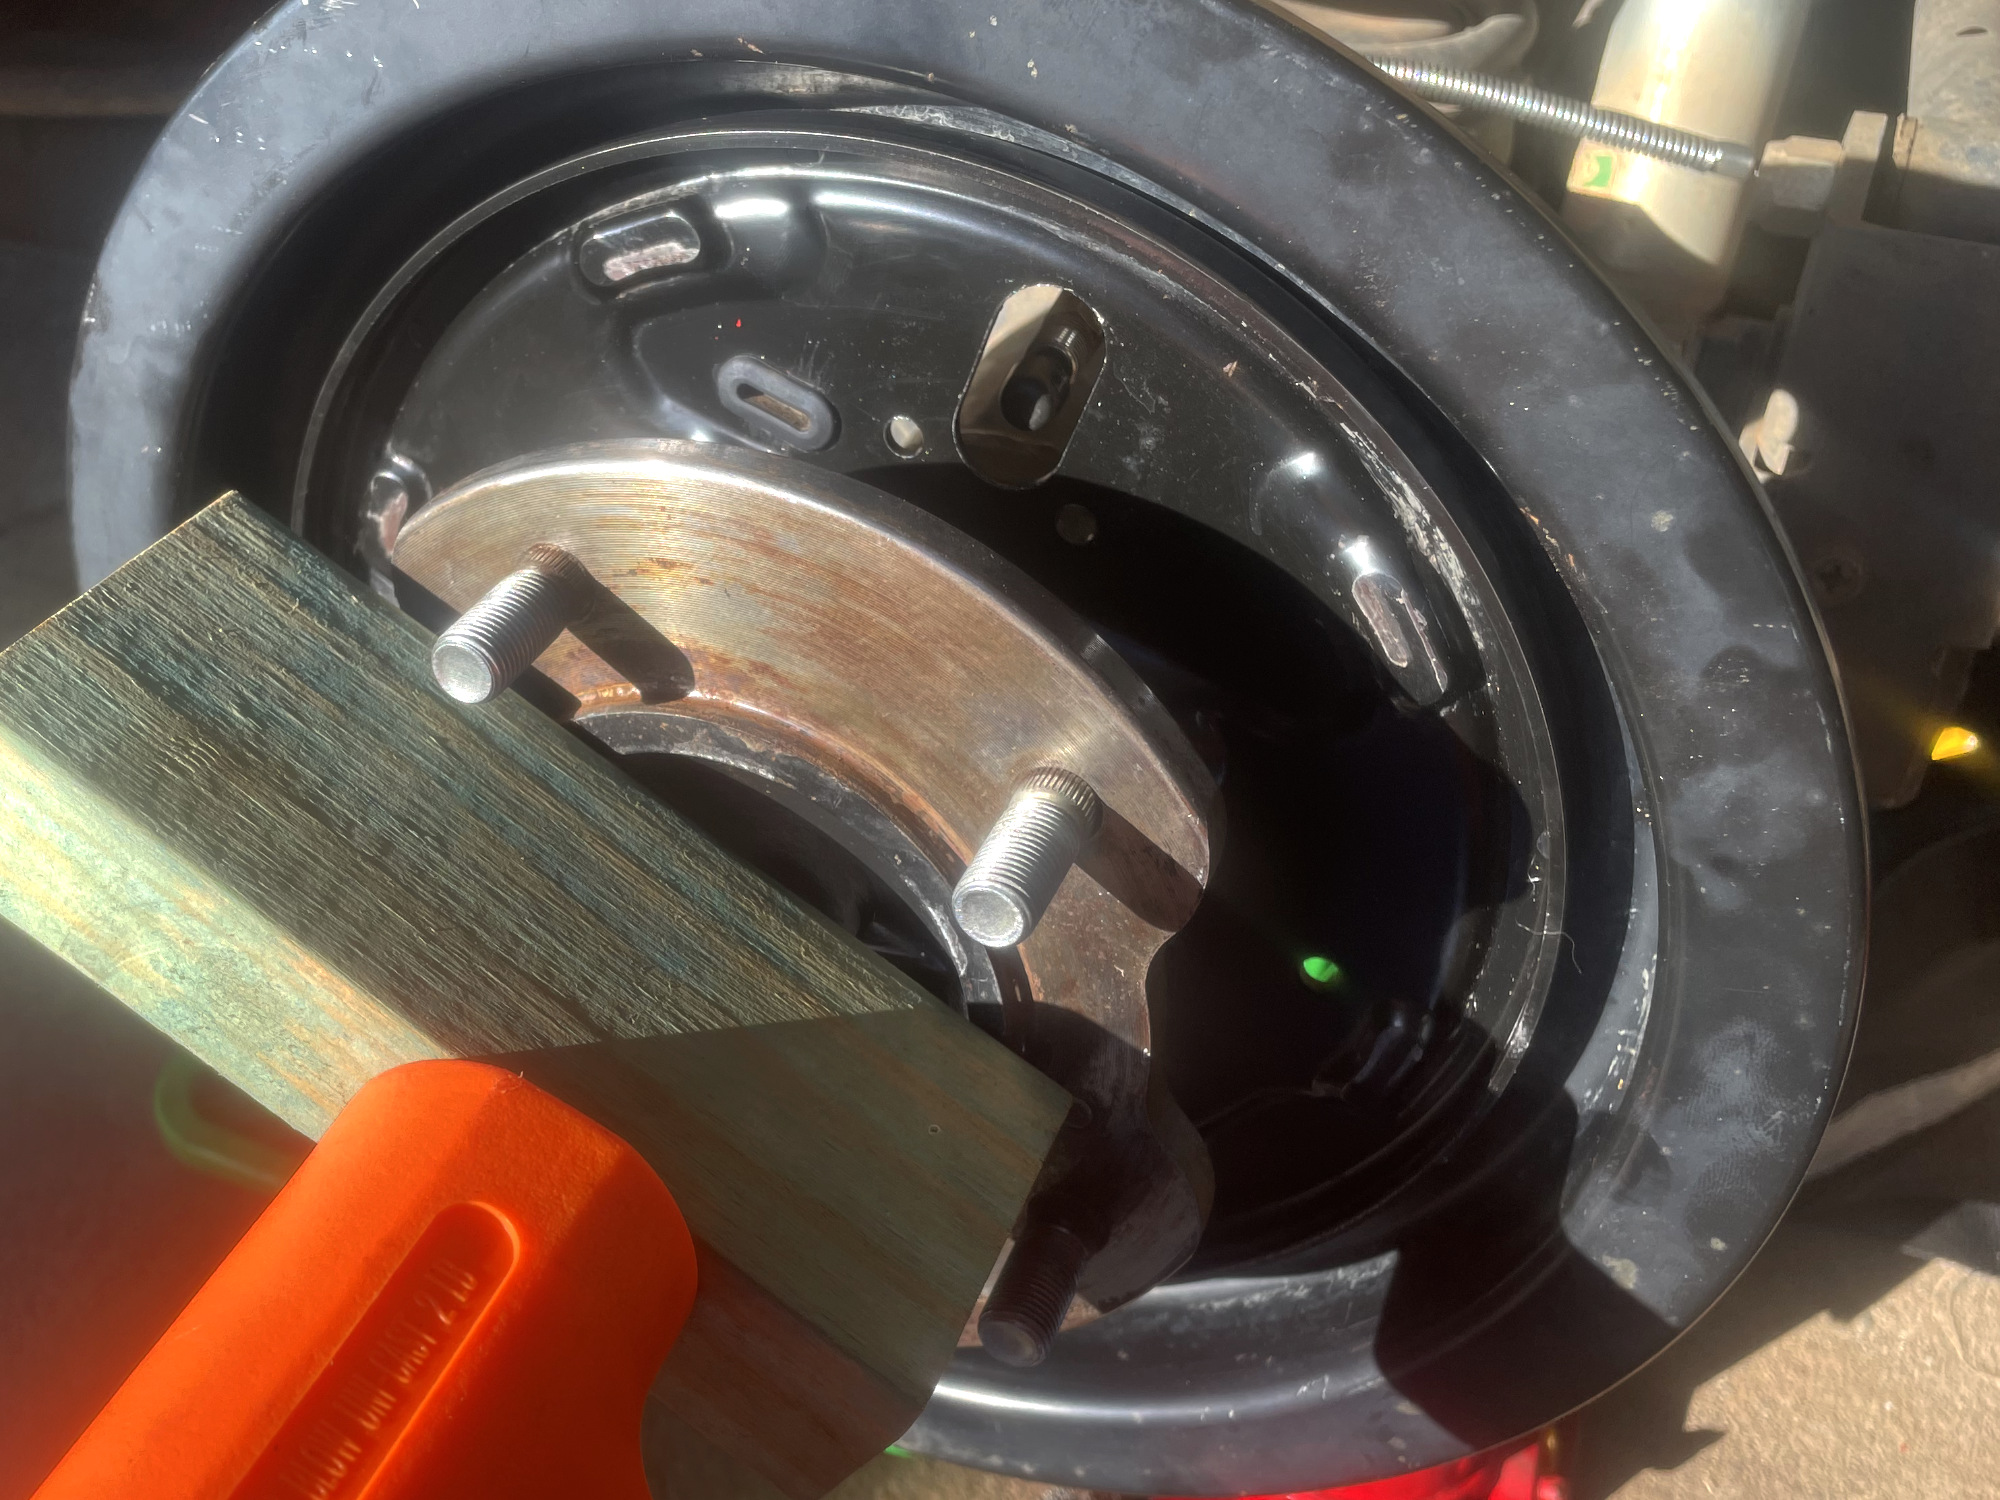
First off we remove the brake drum. When these are a bit stubborn, there are M8 threads you can use to wind in some bolts to pull the drum off the car.
With the drum removed you’re ready to start tackling the method to dismantle the rear brakes.
First part I tackle is to undo the lower spring between the two shoes.
Easily done with a pair of needle nosed pliers.
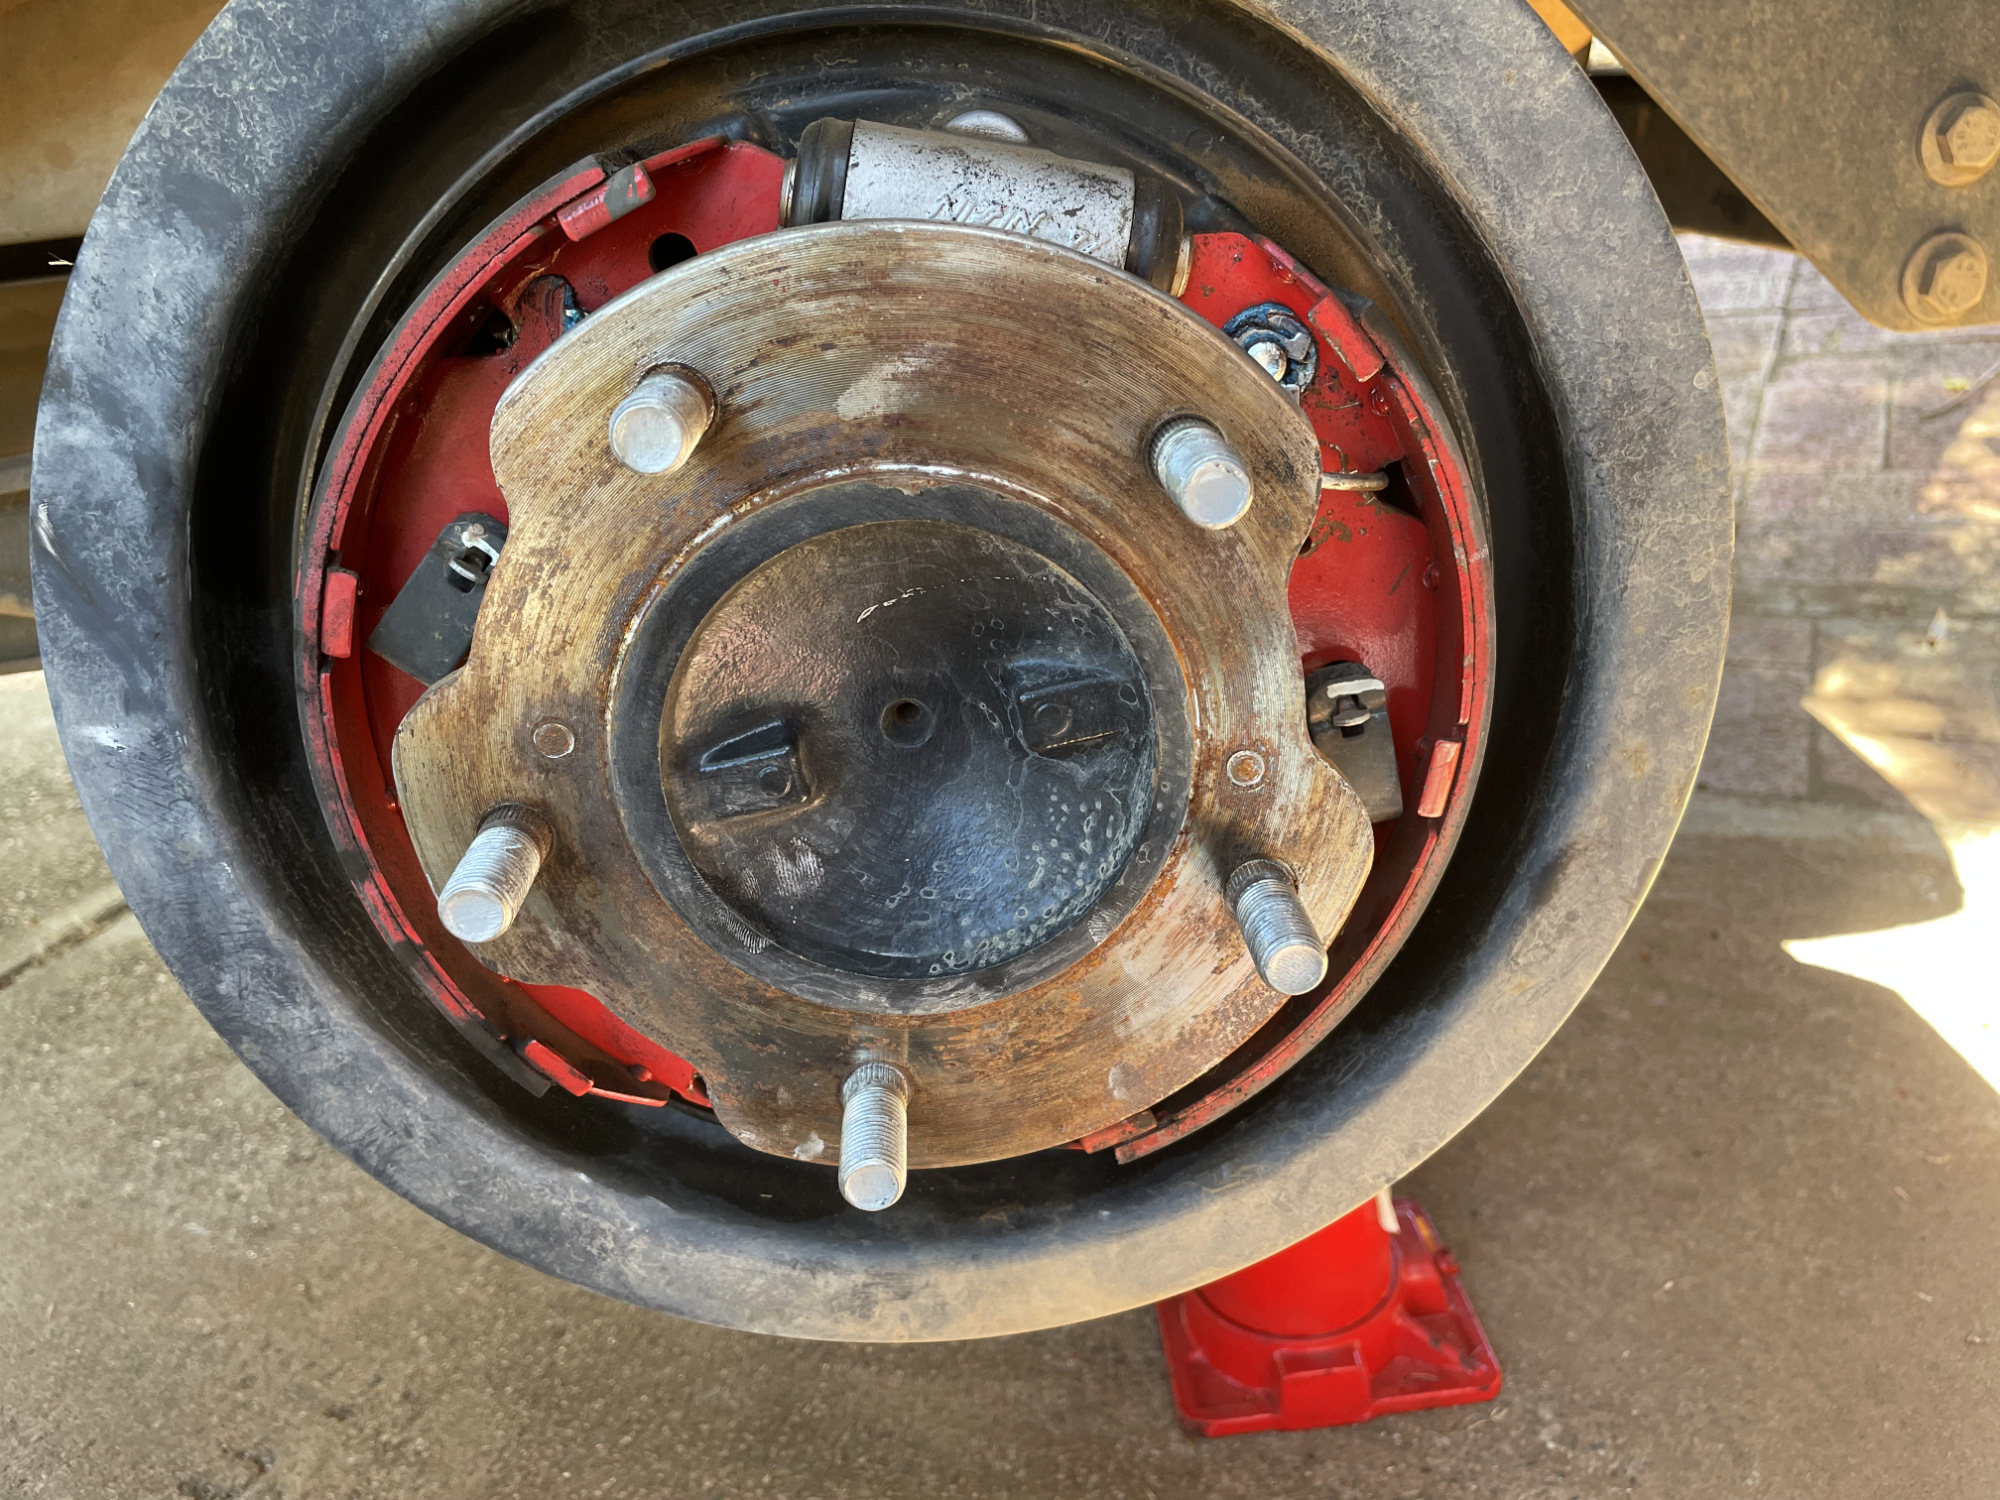
The next thing to get are the two retaining clips, one per shoe.
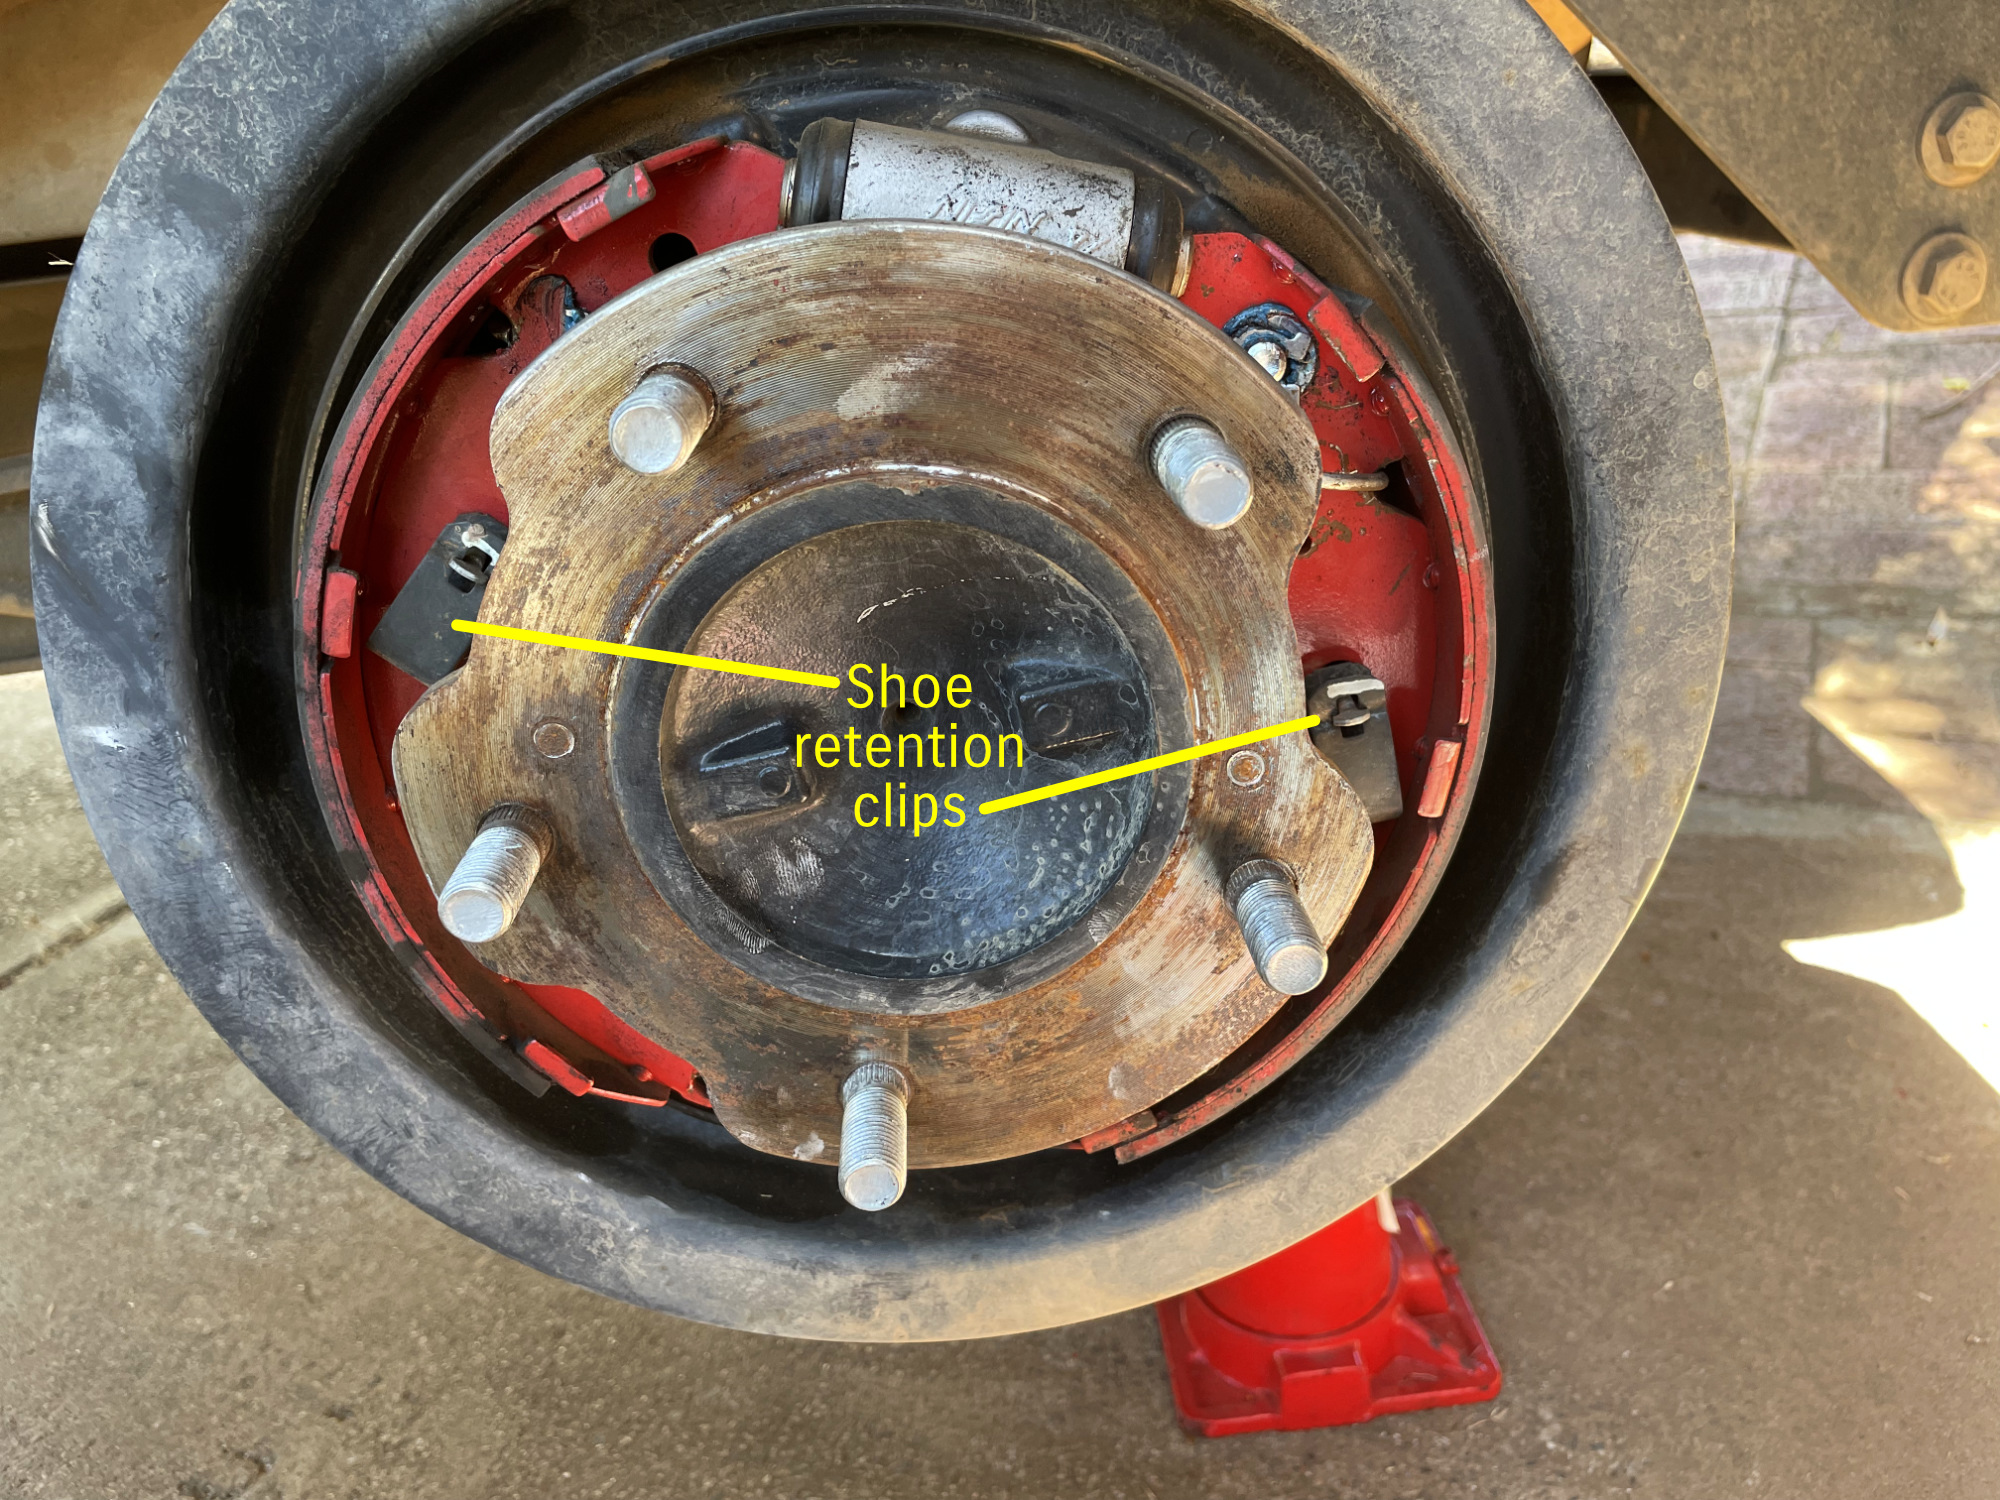
With these it’s a bit hard to photograph when you’re doing it, but you push in on the indented part of the clip with some pliers and at the back of the drum you twist the thing that looks like a waffle-headed nail which is the actual pin that has a deformed tip that holds into the clips. Then just release the tension on the
Next up the brake adjuster tension spring needs to be removed. This is on the leading shoe and comes down from the adjuster to a hole in the brake shoe.
The next thing is you can kinda lift the shoes up from the bottom a bit and essentially disengage the rear brake upper spring which is super, super strong. You’ll have a lot of fun putting that back on when you finish this job, but it’s pretty easy to take apart along with the adjuster.
You’ll be left with the rearmost shoe hanging down as it is still attached to its relevant handbrake cable.
You just need to take up the tension on the handbrake cable to allow you enough room to push the shoe’s handbrake lever a bit ‘up’ the cable and then you can slide the cable out of the channel.

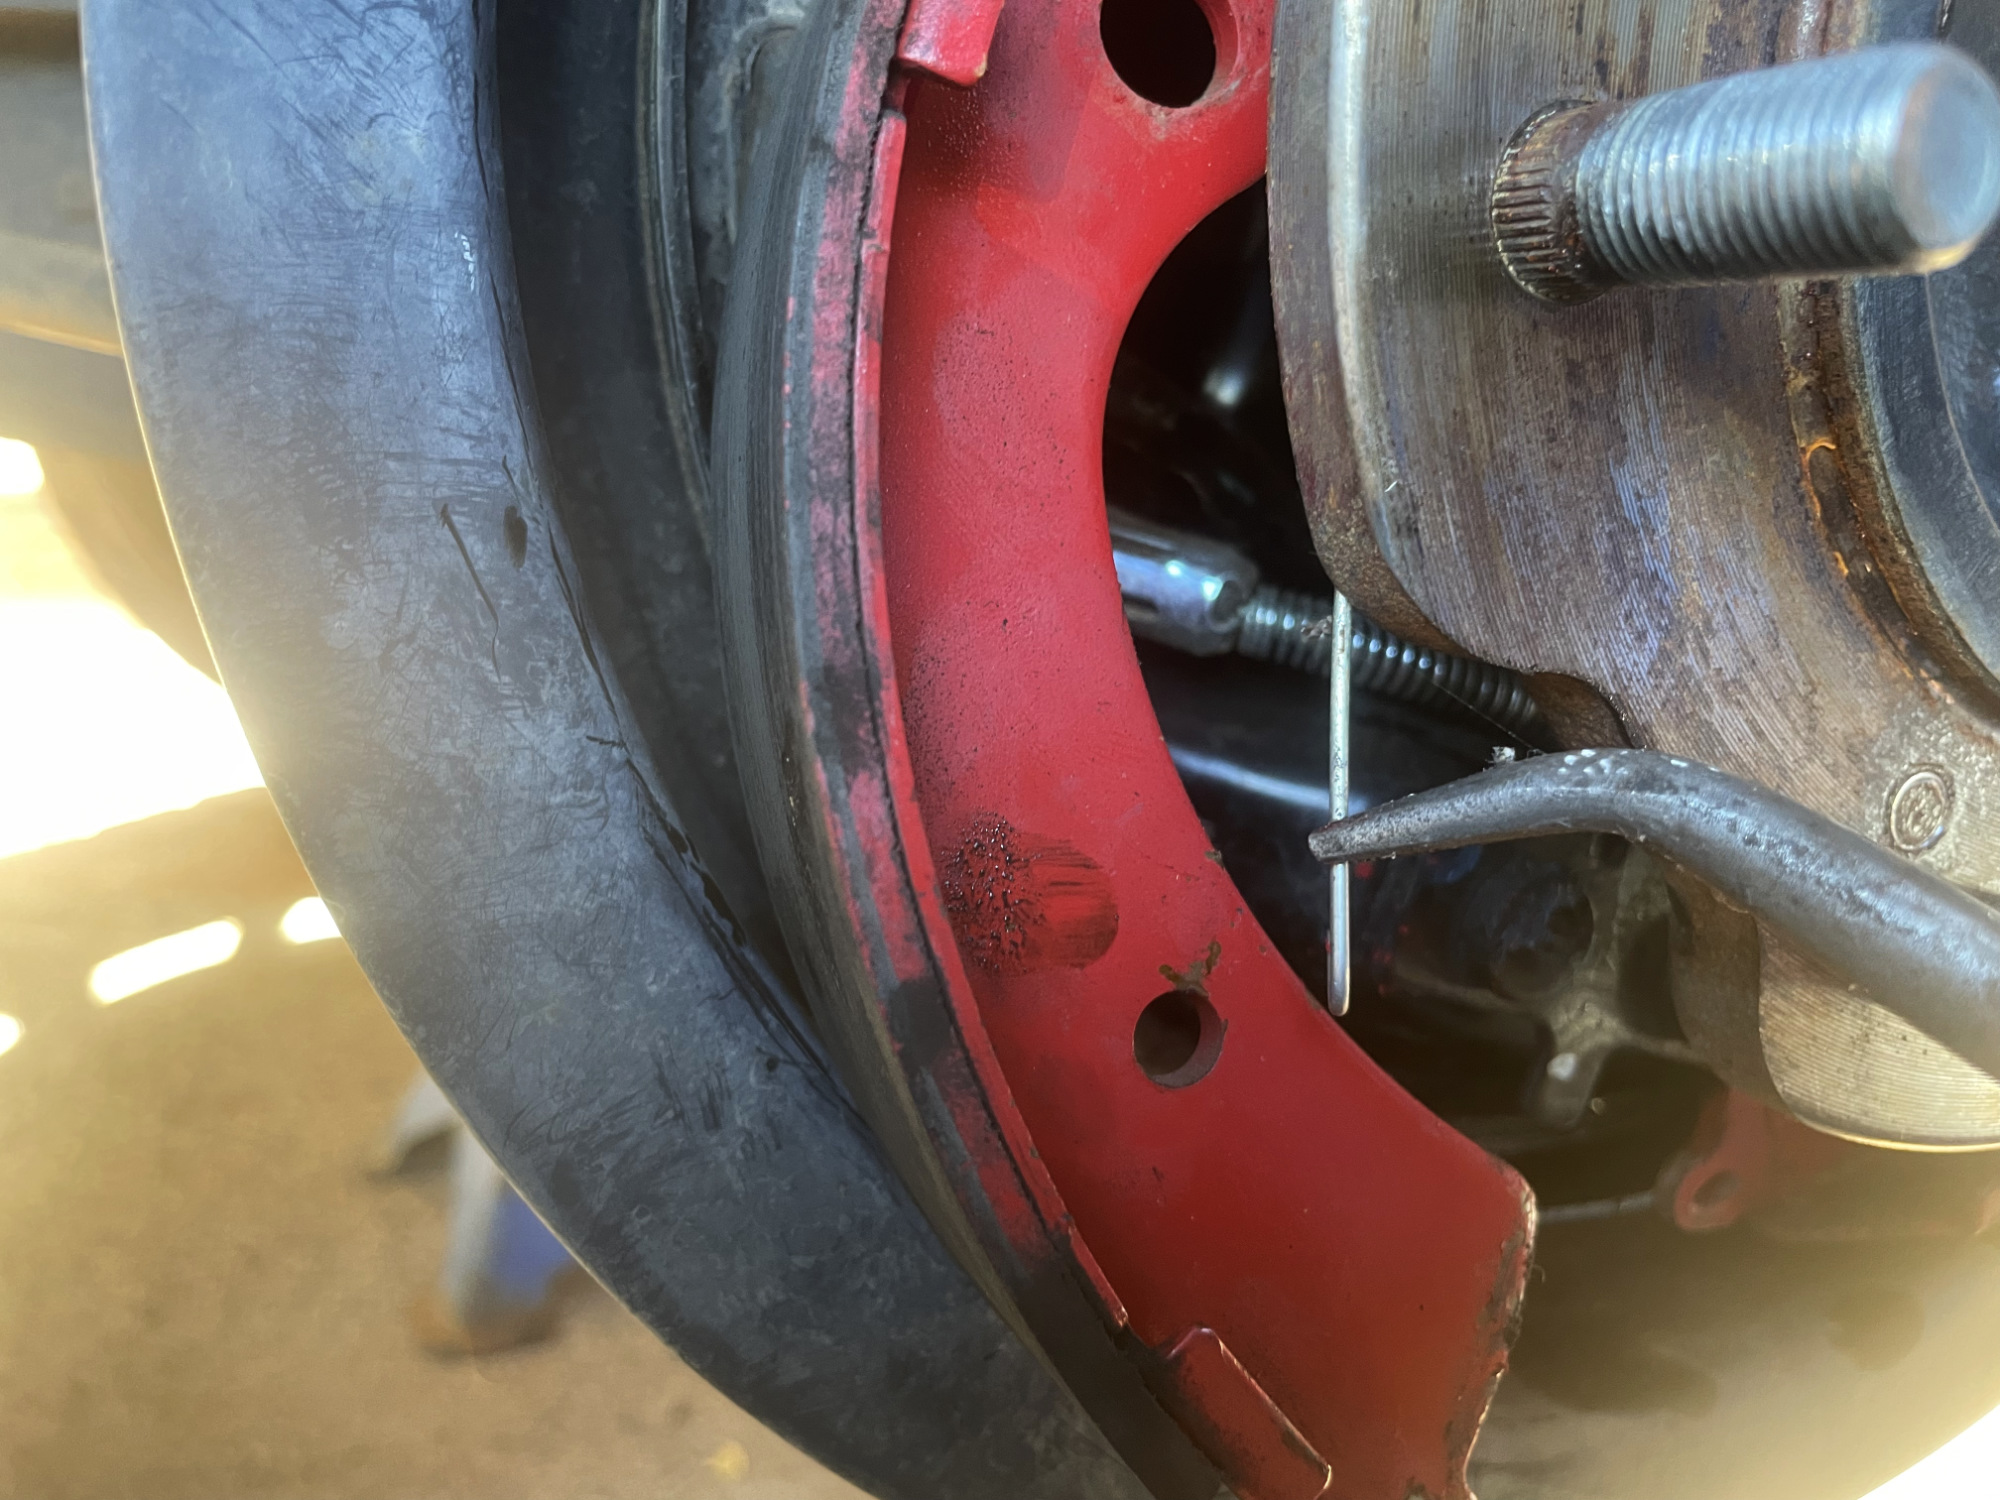
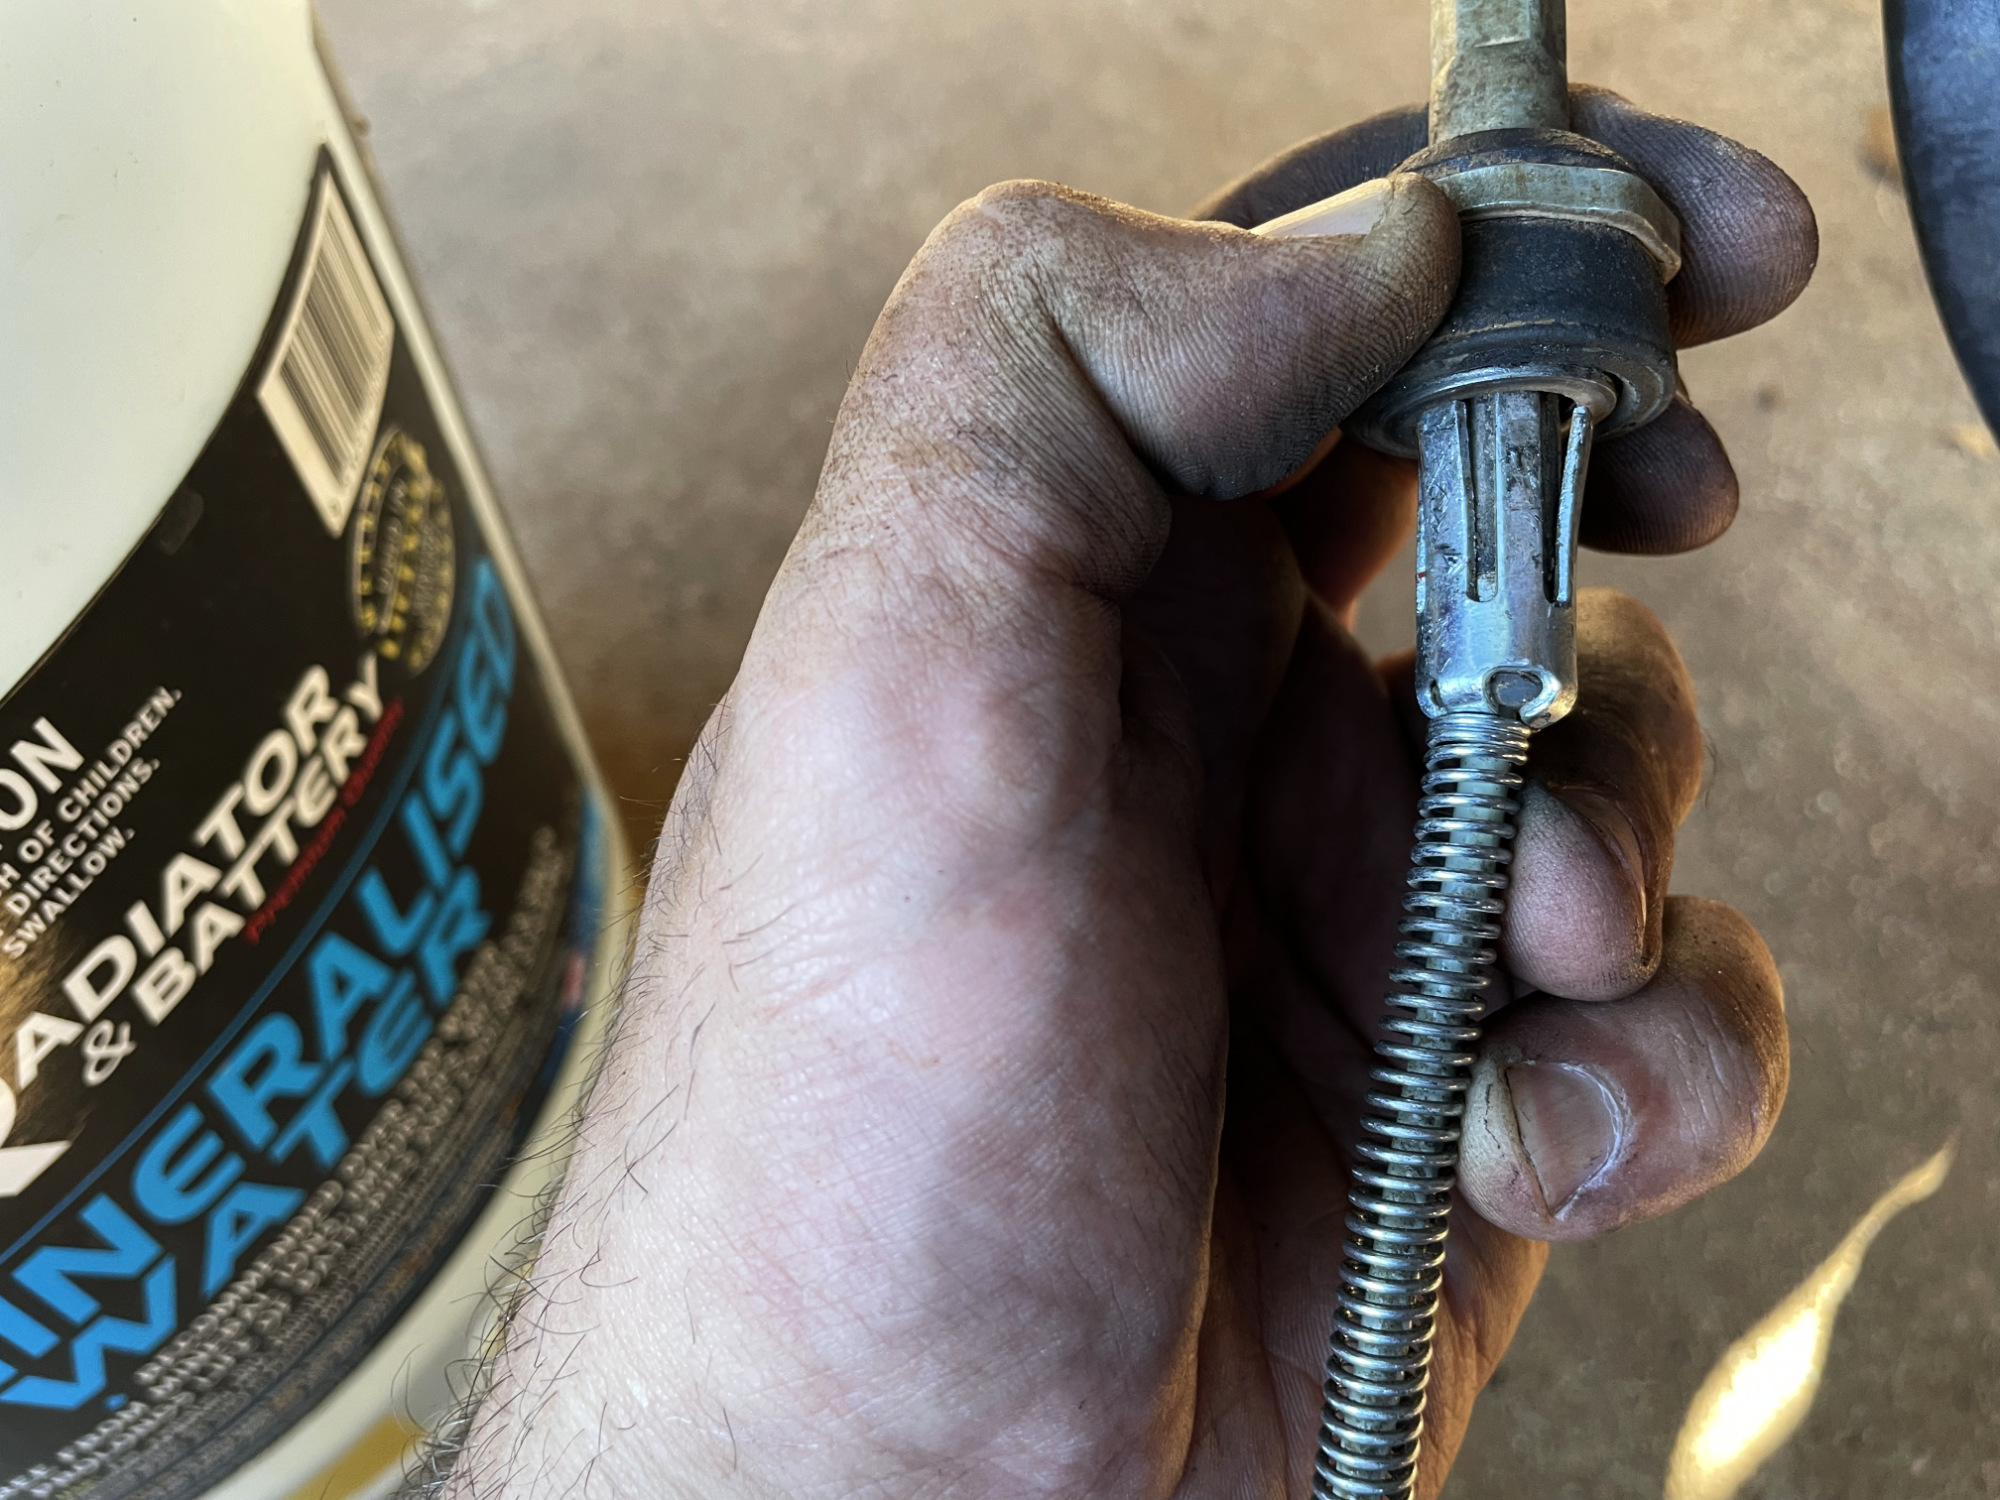
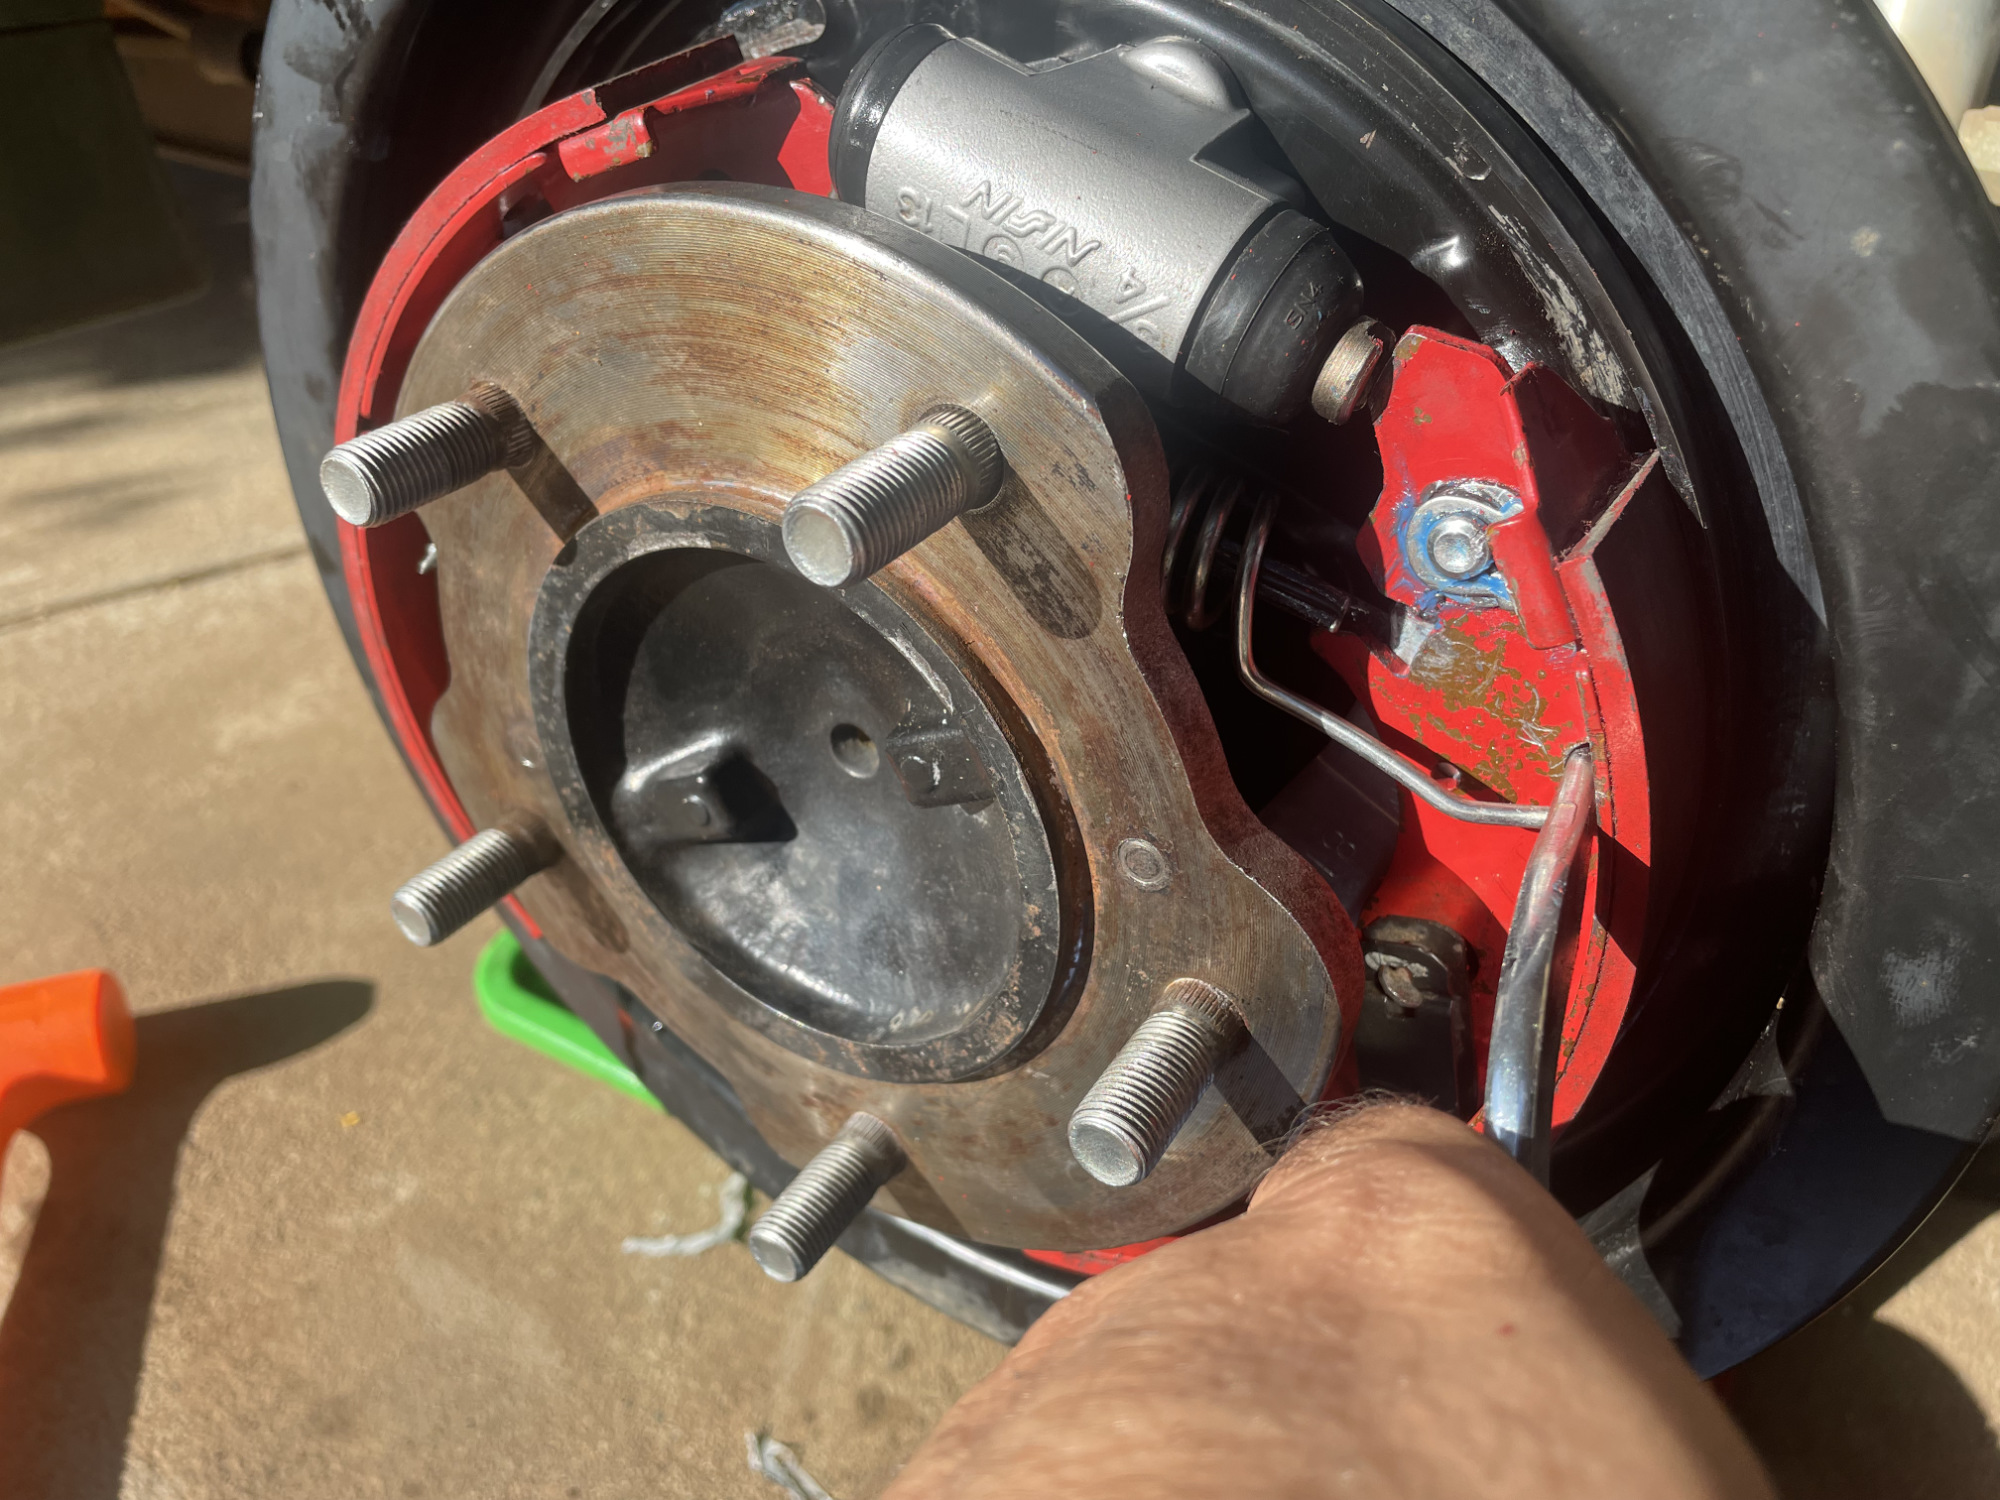
Now you get your first fun task: disconnecting the handbrake cable from the brake backing plate. Oooo boy this can be fun.
The handbrake cable outer is retained into the brake backing plate essentially by some metal that expands when pushed through the hole and there are a few legs that spring outwards and don’t allow the cable to be pulled back through.
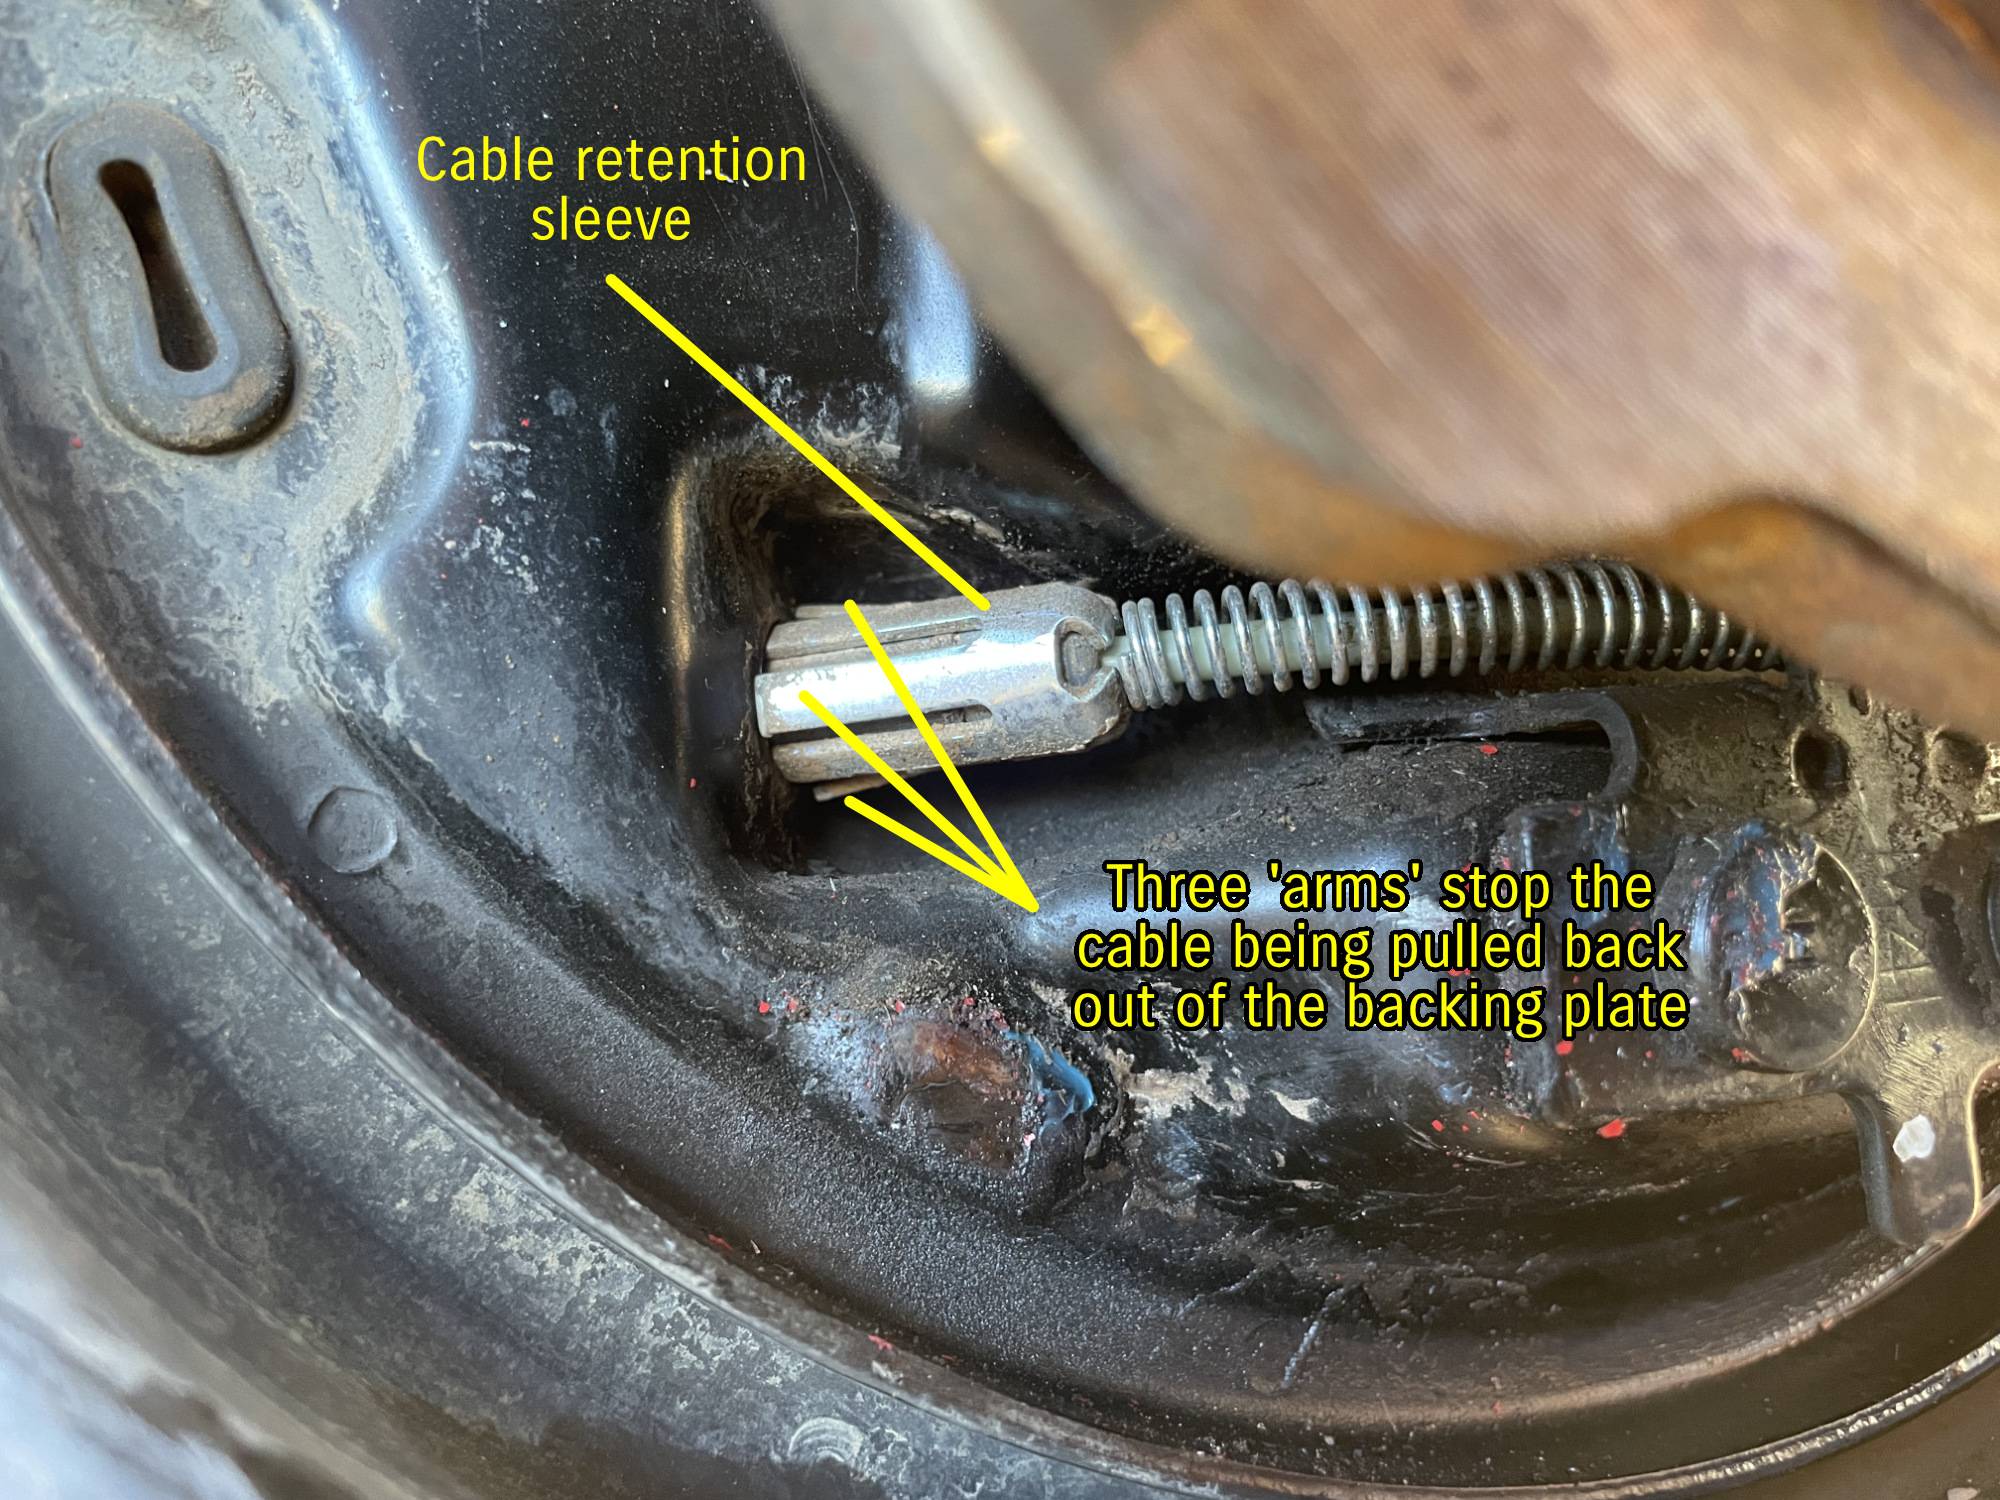
I always find these super frustrating to remove. I use long needle nose pliers to push one of the arms down and just get it out back through the hole, then do another, and then finally the last one. If you have too much tension on the cable or it’s too off centre you’ll never get the last arm to push down, and if you’re not far enough out with it then one of the original arms will pop back out when you get the last one down.
It’s just frustrating, but you will get there. I’ve written 3 on these images, I honestly can never remember if there are 3 or 4. Whatever, you’ll know when you’re done because the cable will come out of the backing plate.
Once the cable is removed you get much more of an idea of why it’s a bit of a prick to release. This also helps people a lot understand what they’re up against with releasing this cable.
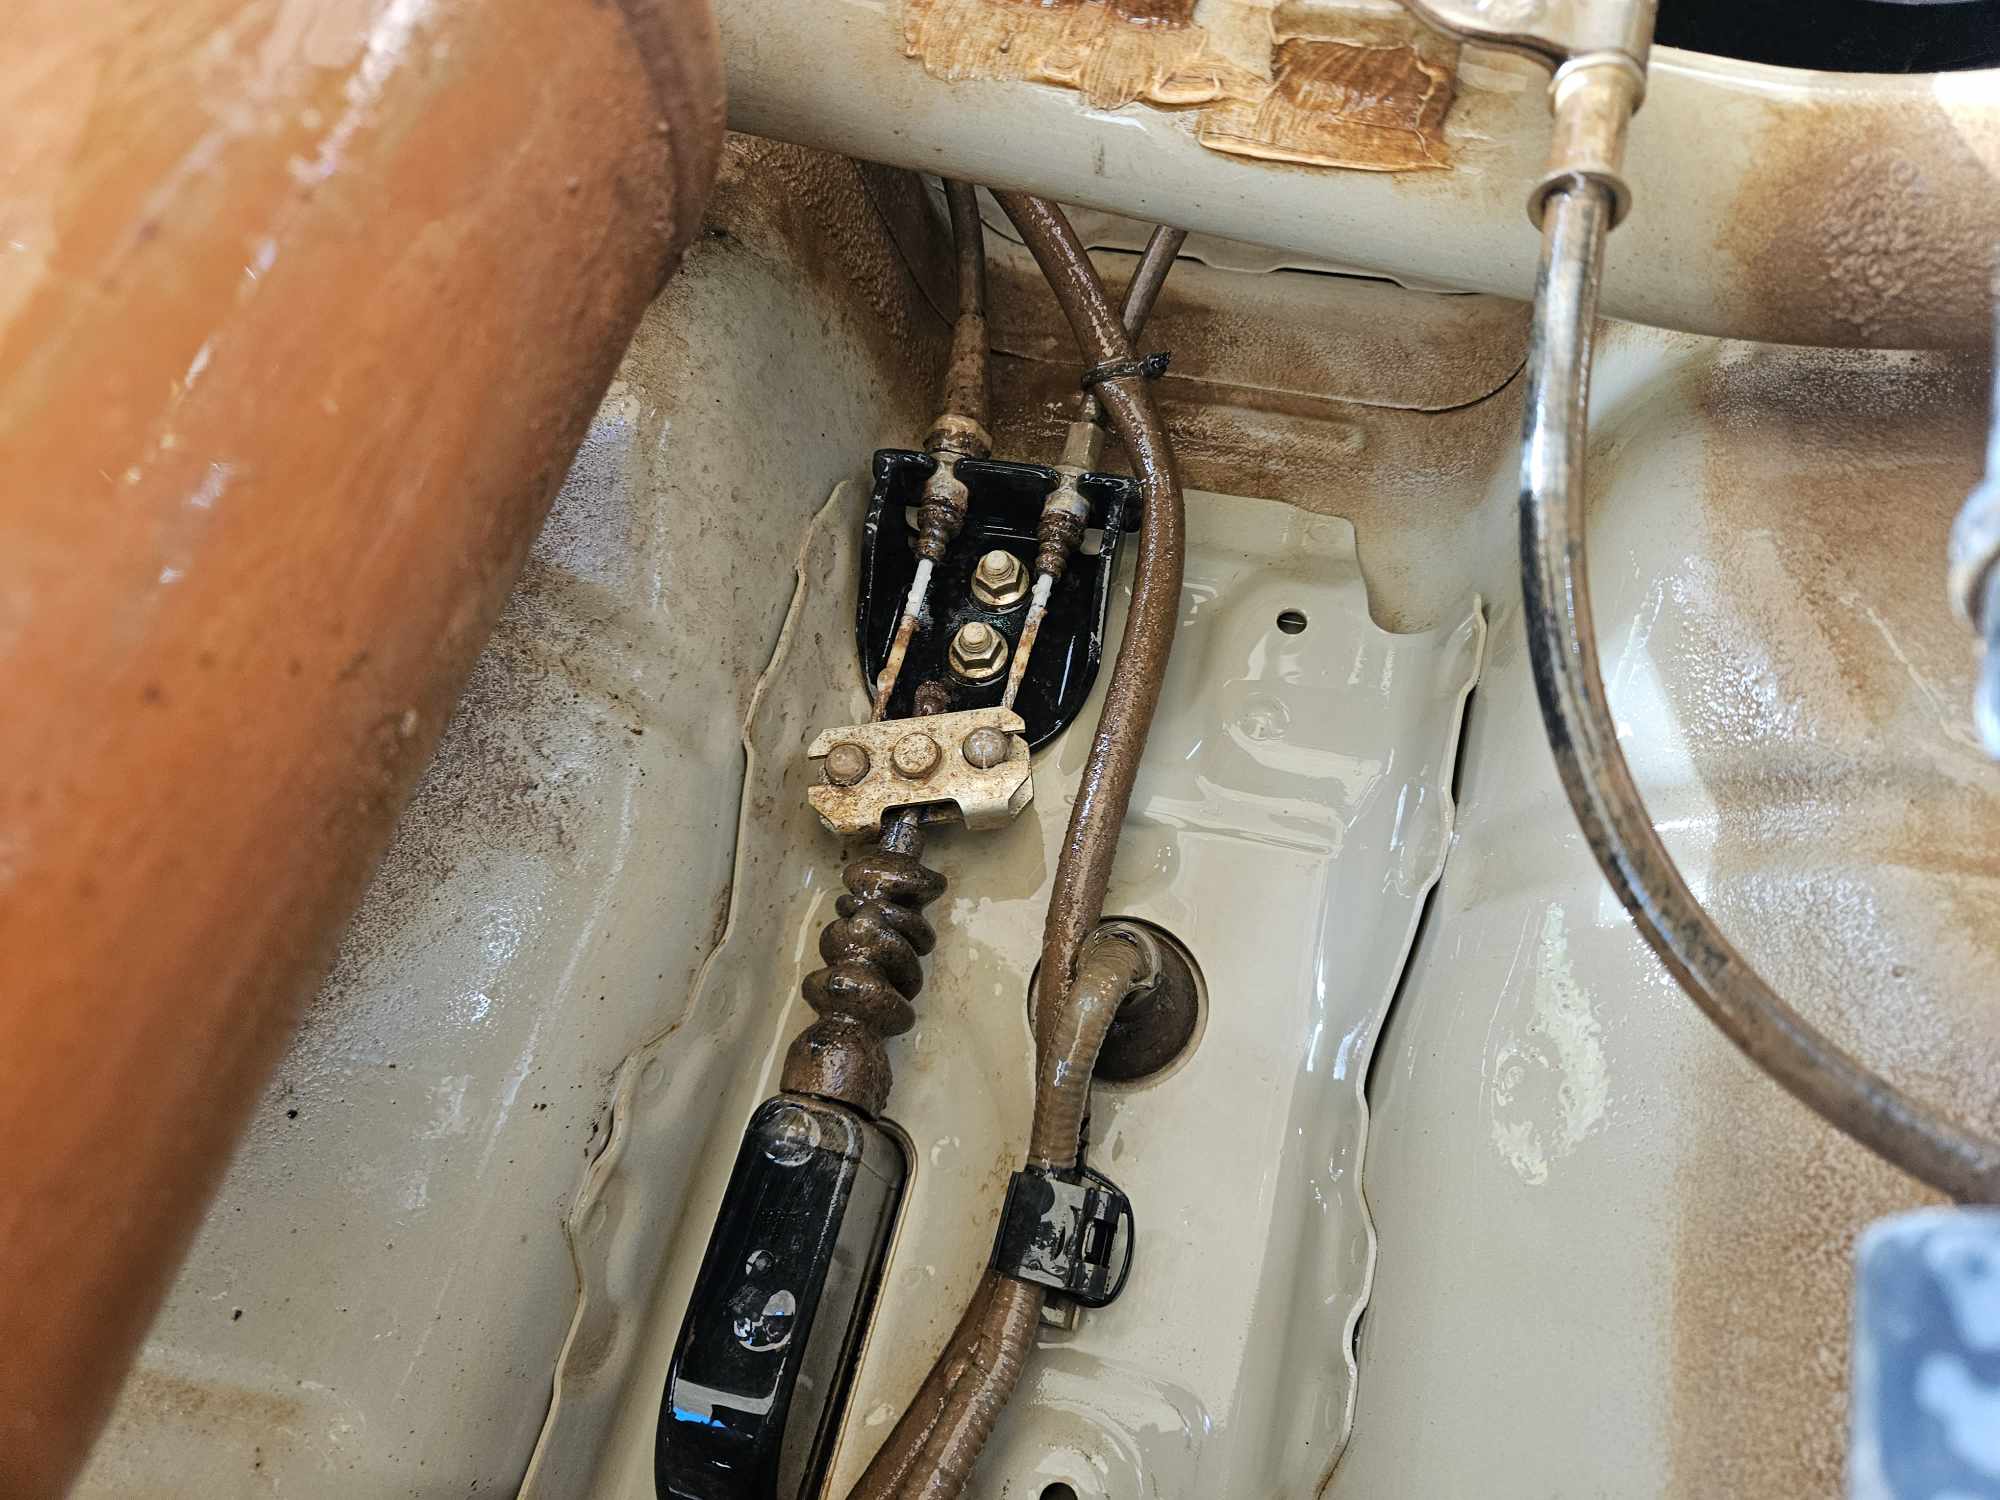
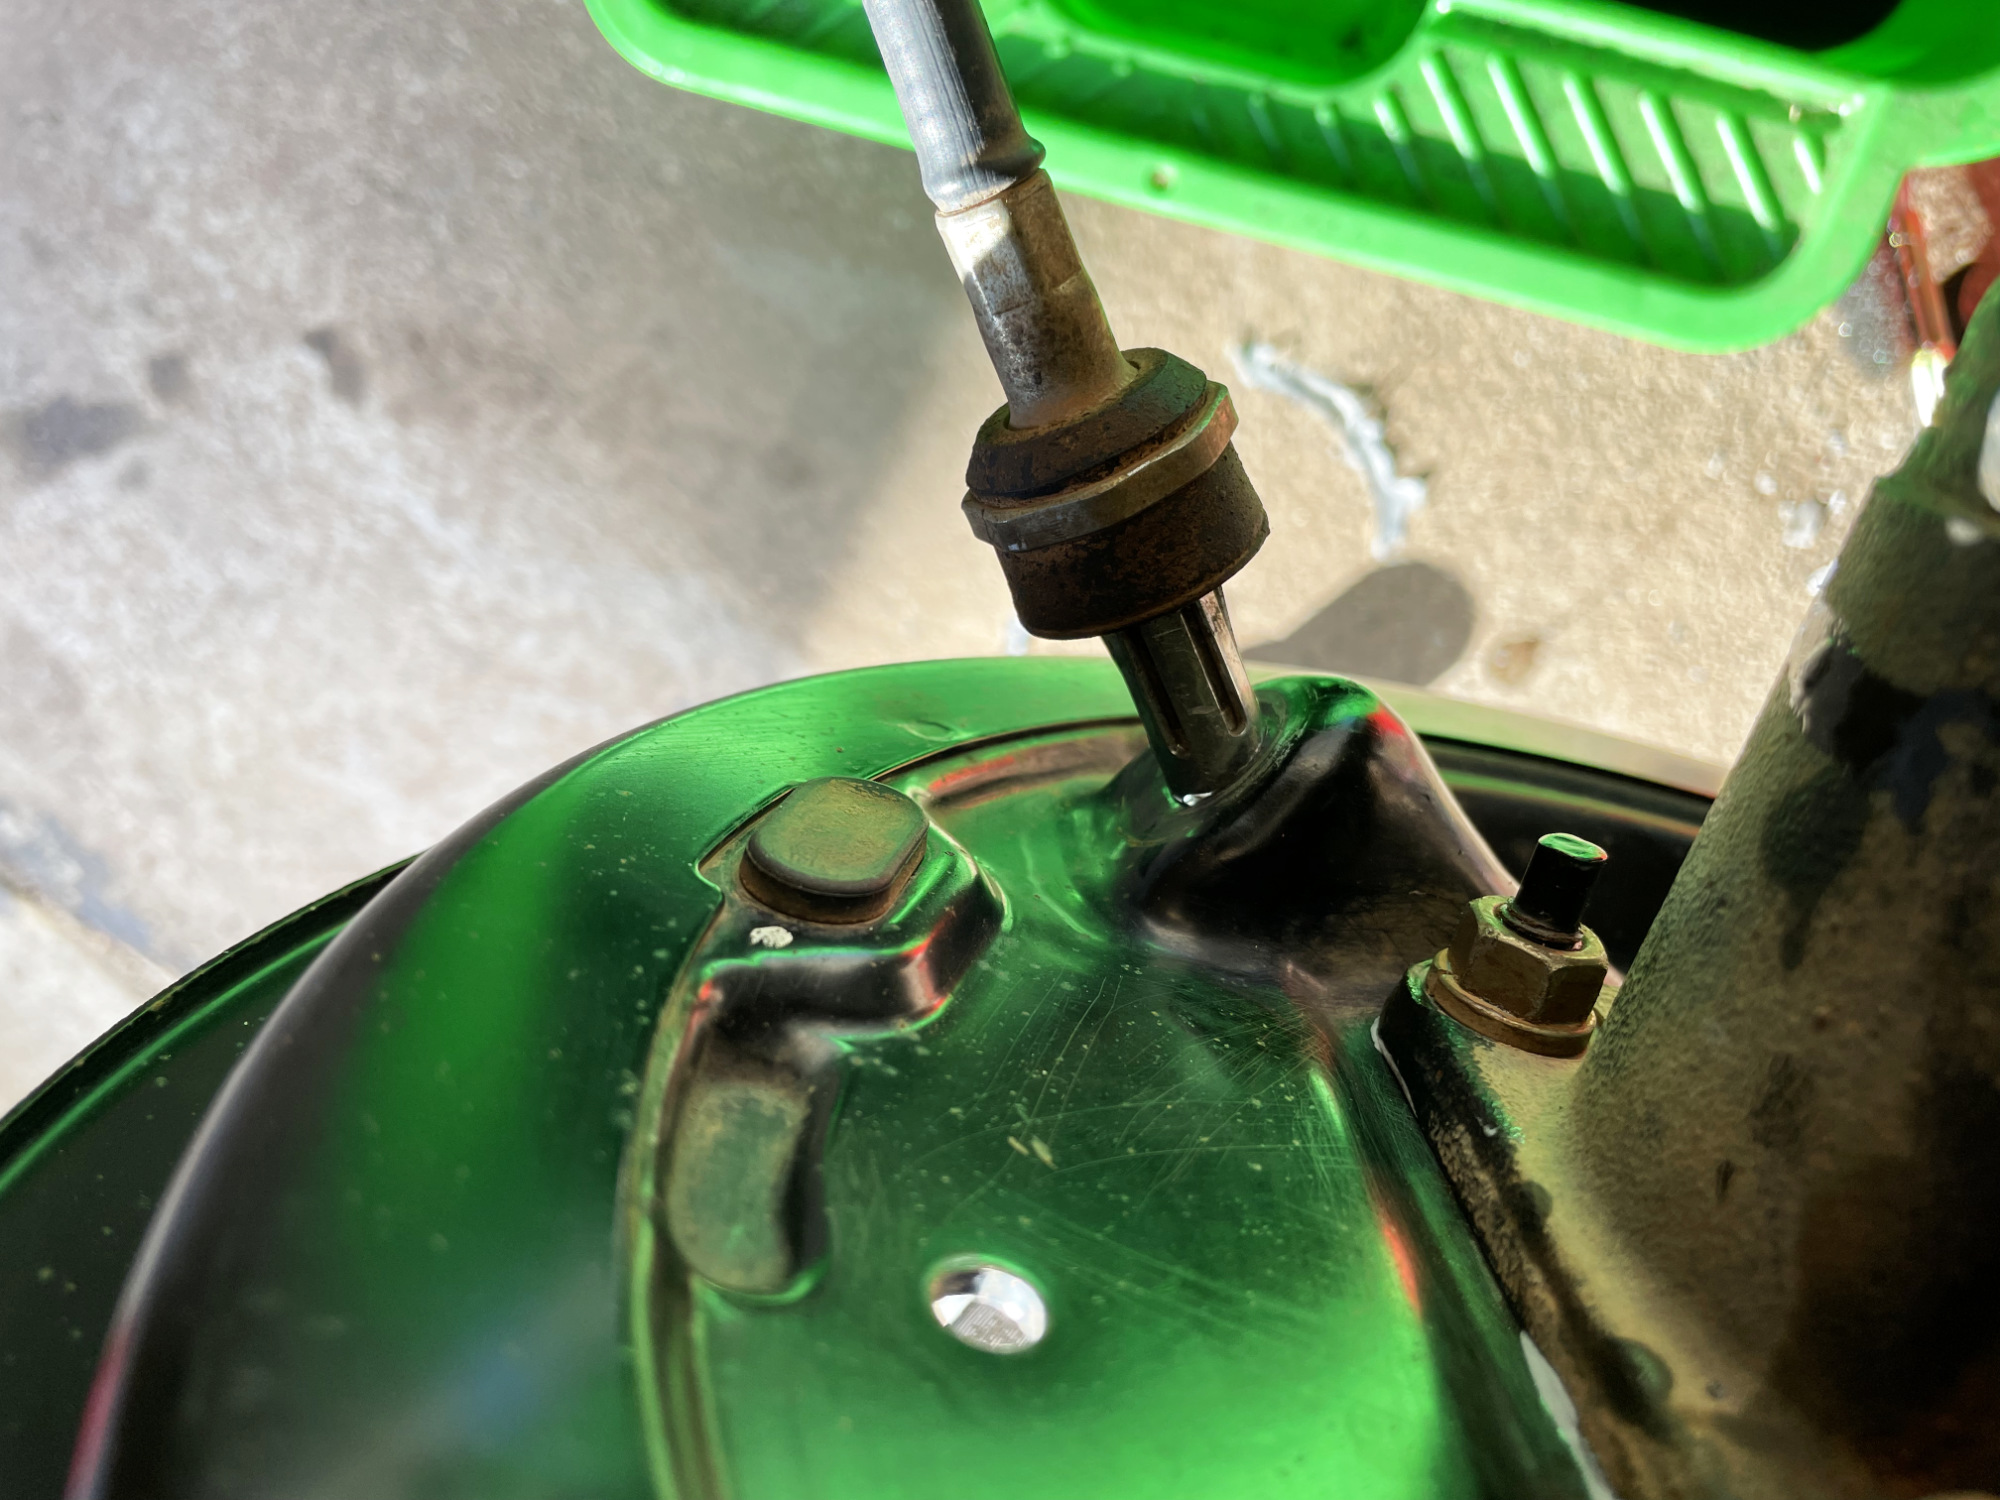
Almost there. Couple more things to go. First off you need to whip off the ABS sensor from the axle. It’s a bad time to damage this which is easy to do when you’re extracting the axle seal.
The sensors can be a bit tricky to extract. I find I give them a small twist clockwise and then anticlockwise as I pull on the body of the sensor with my hand. The o-rings expand a bit with exposure to diff oil and that’s why they end up a bit tight.

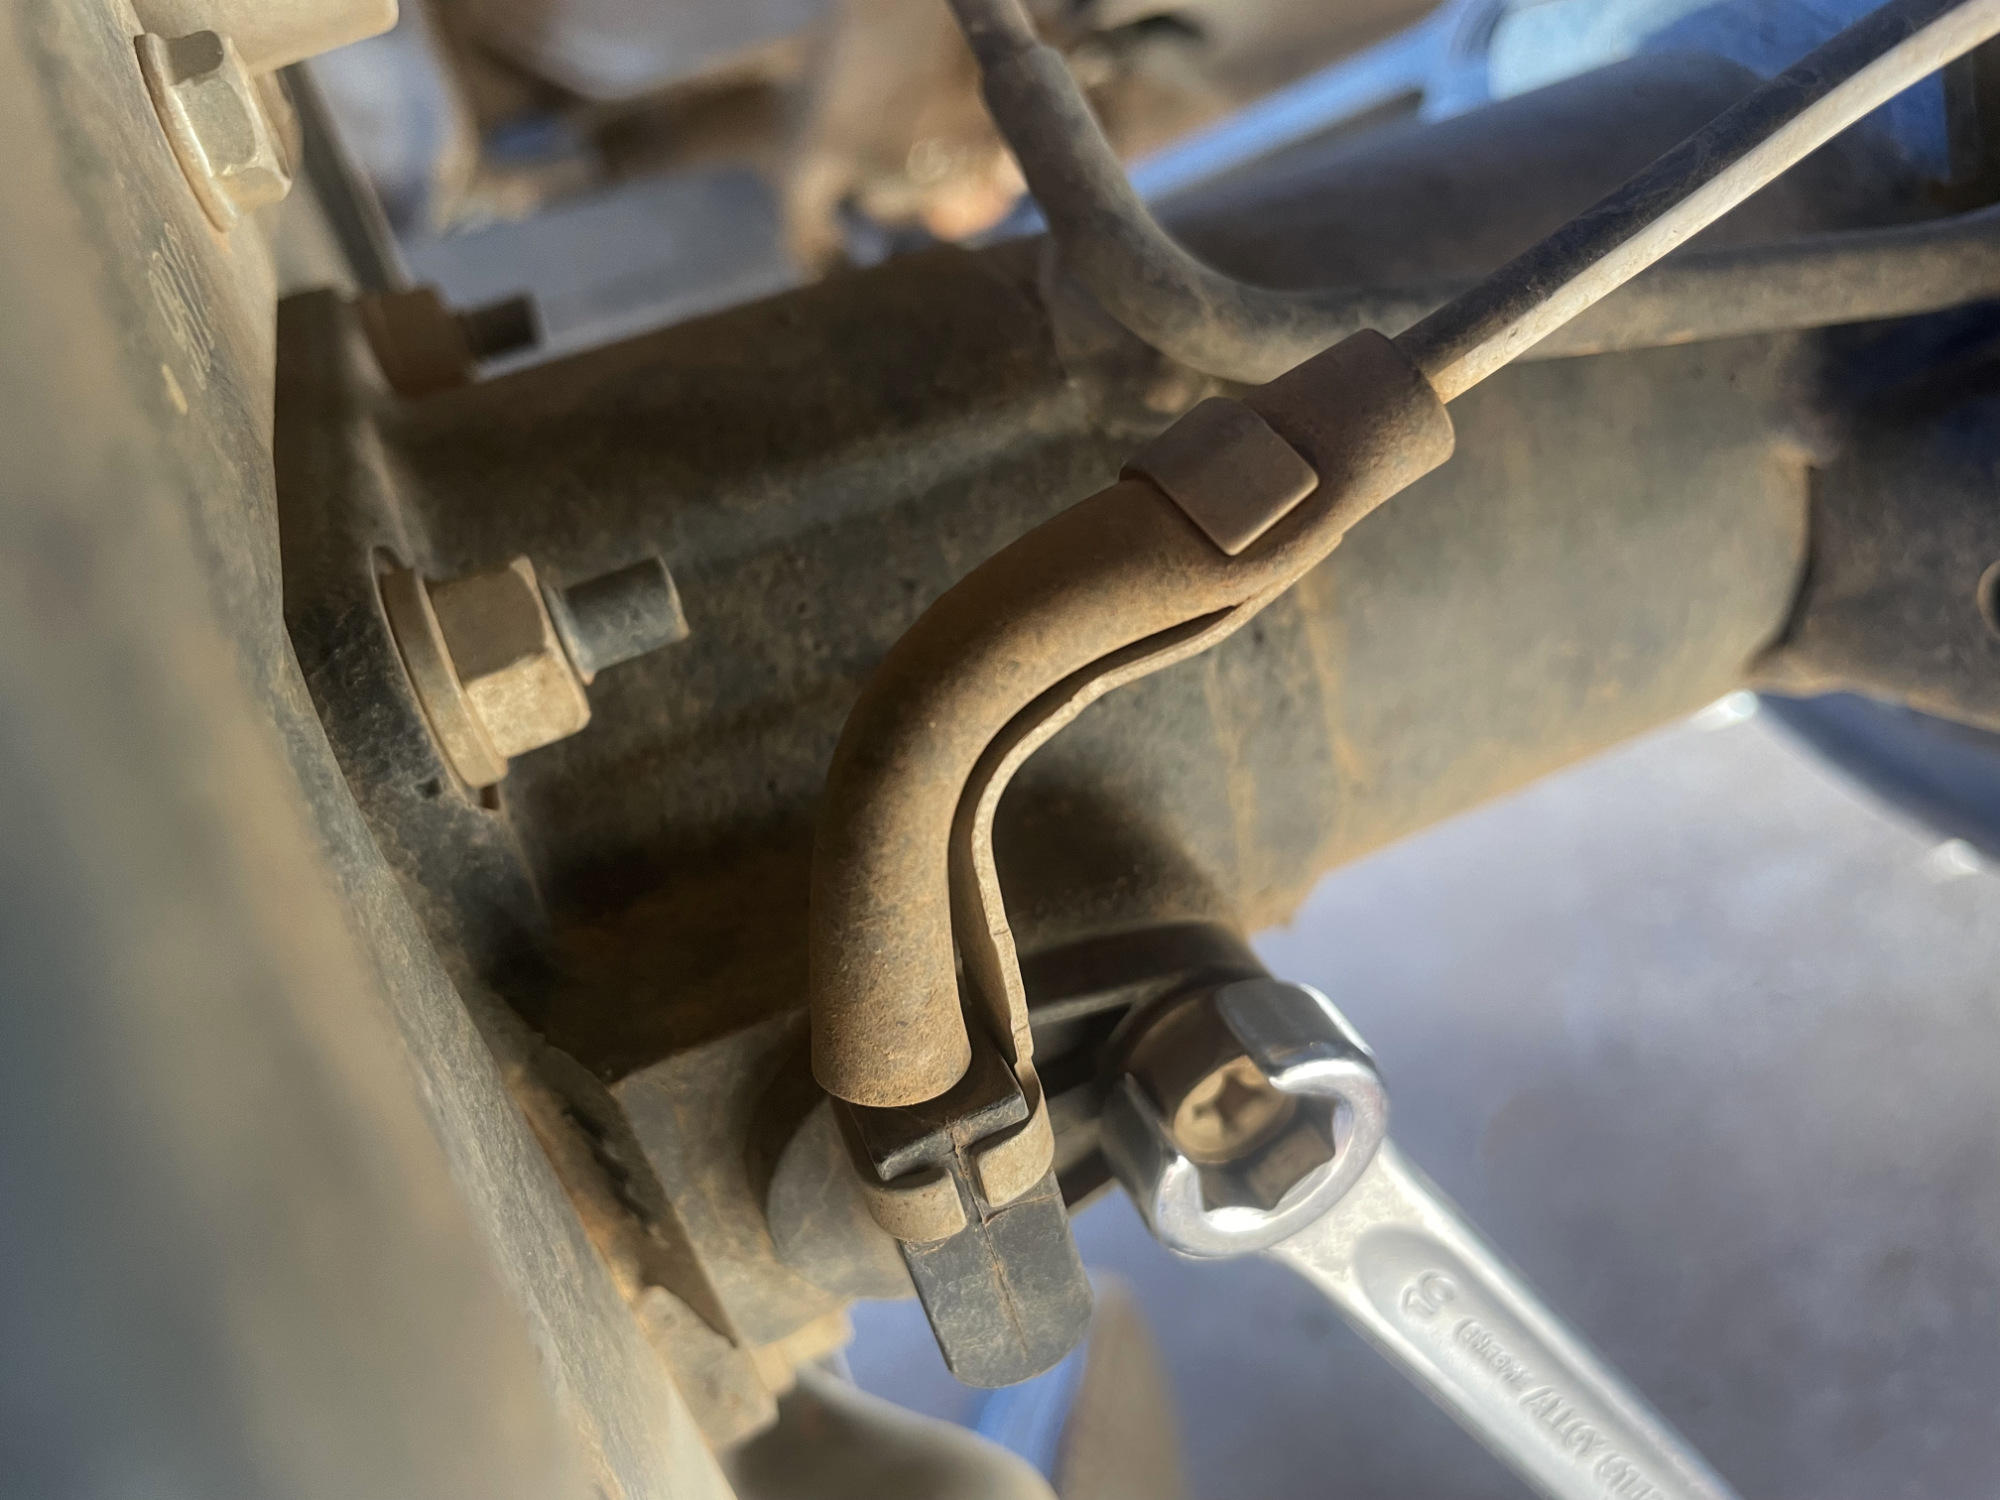
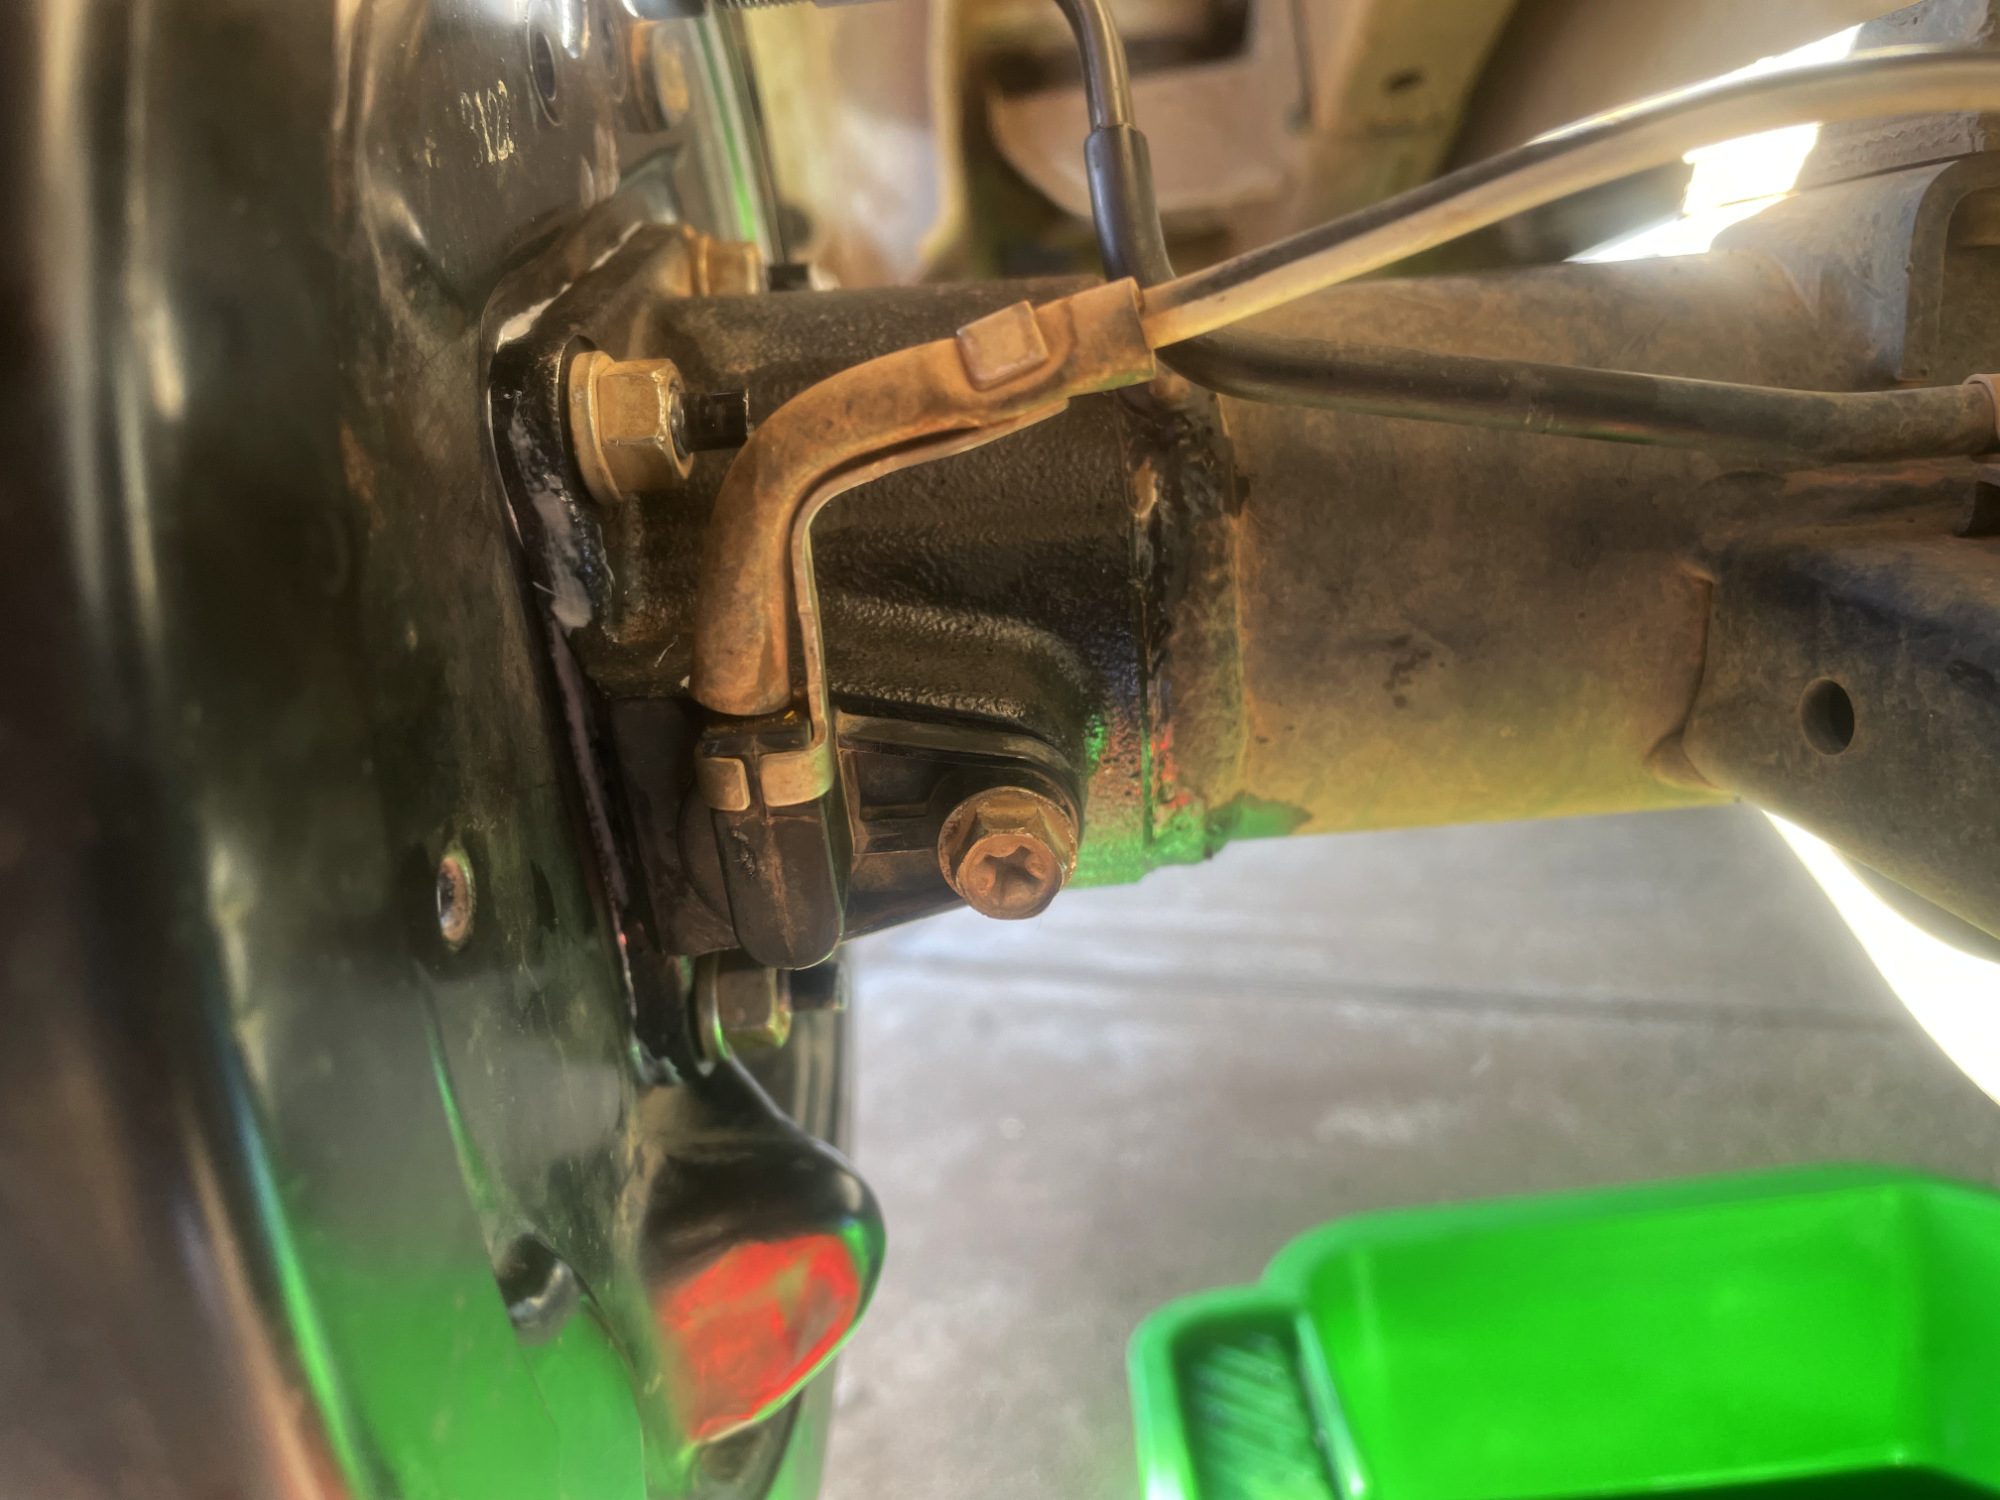
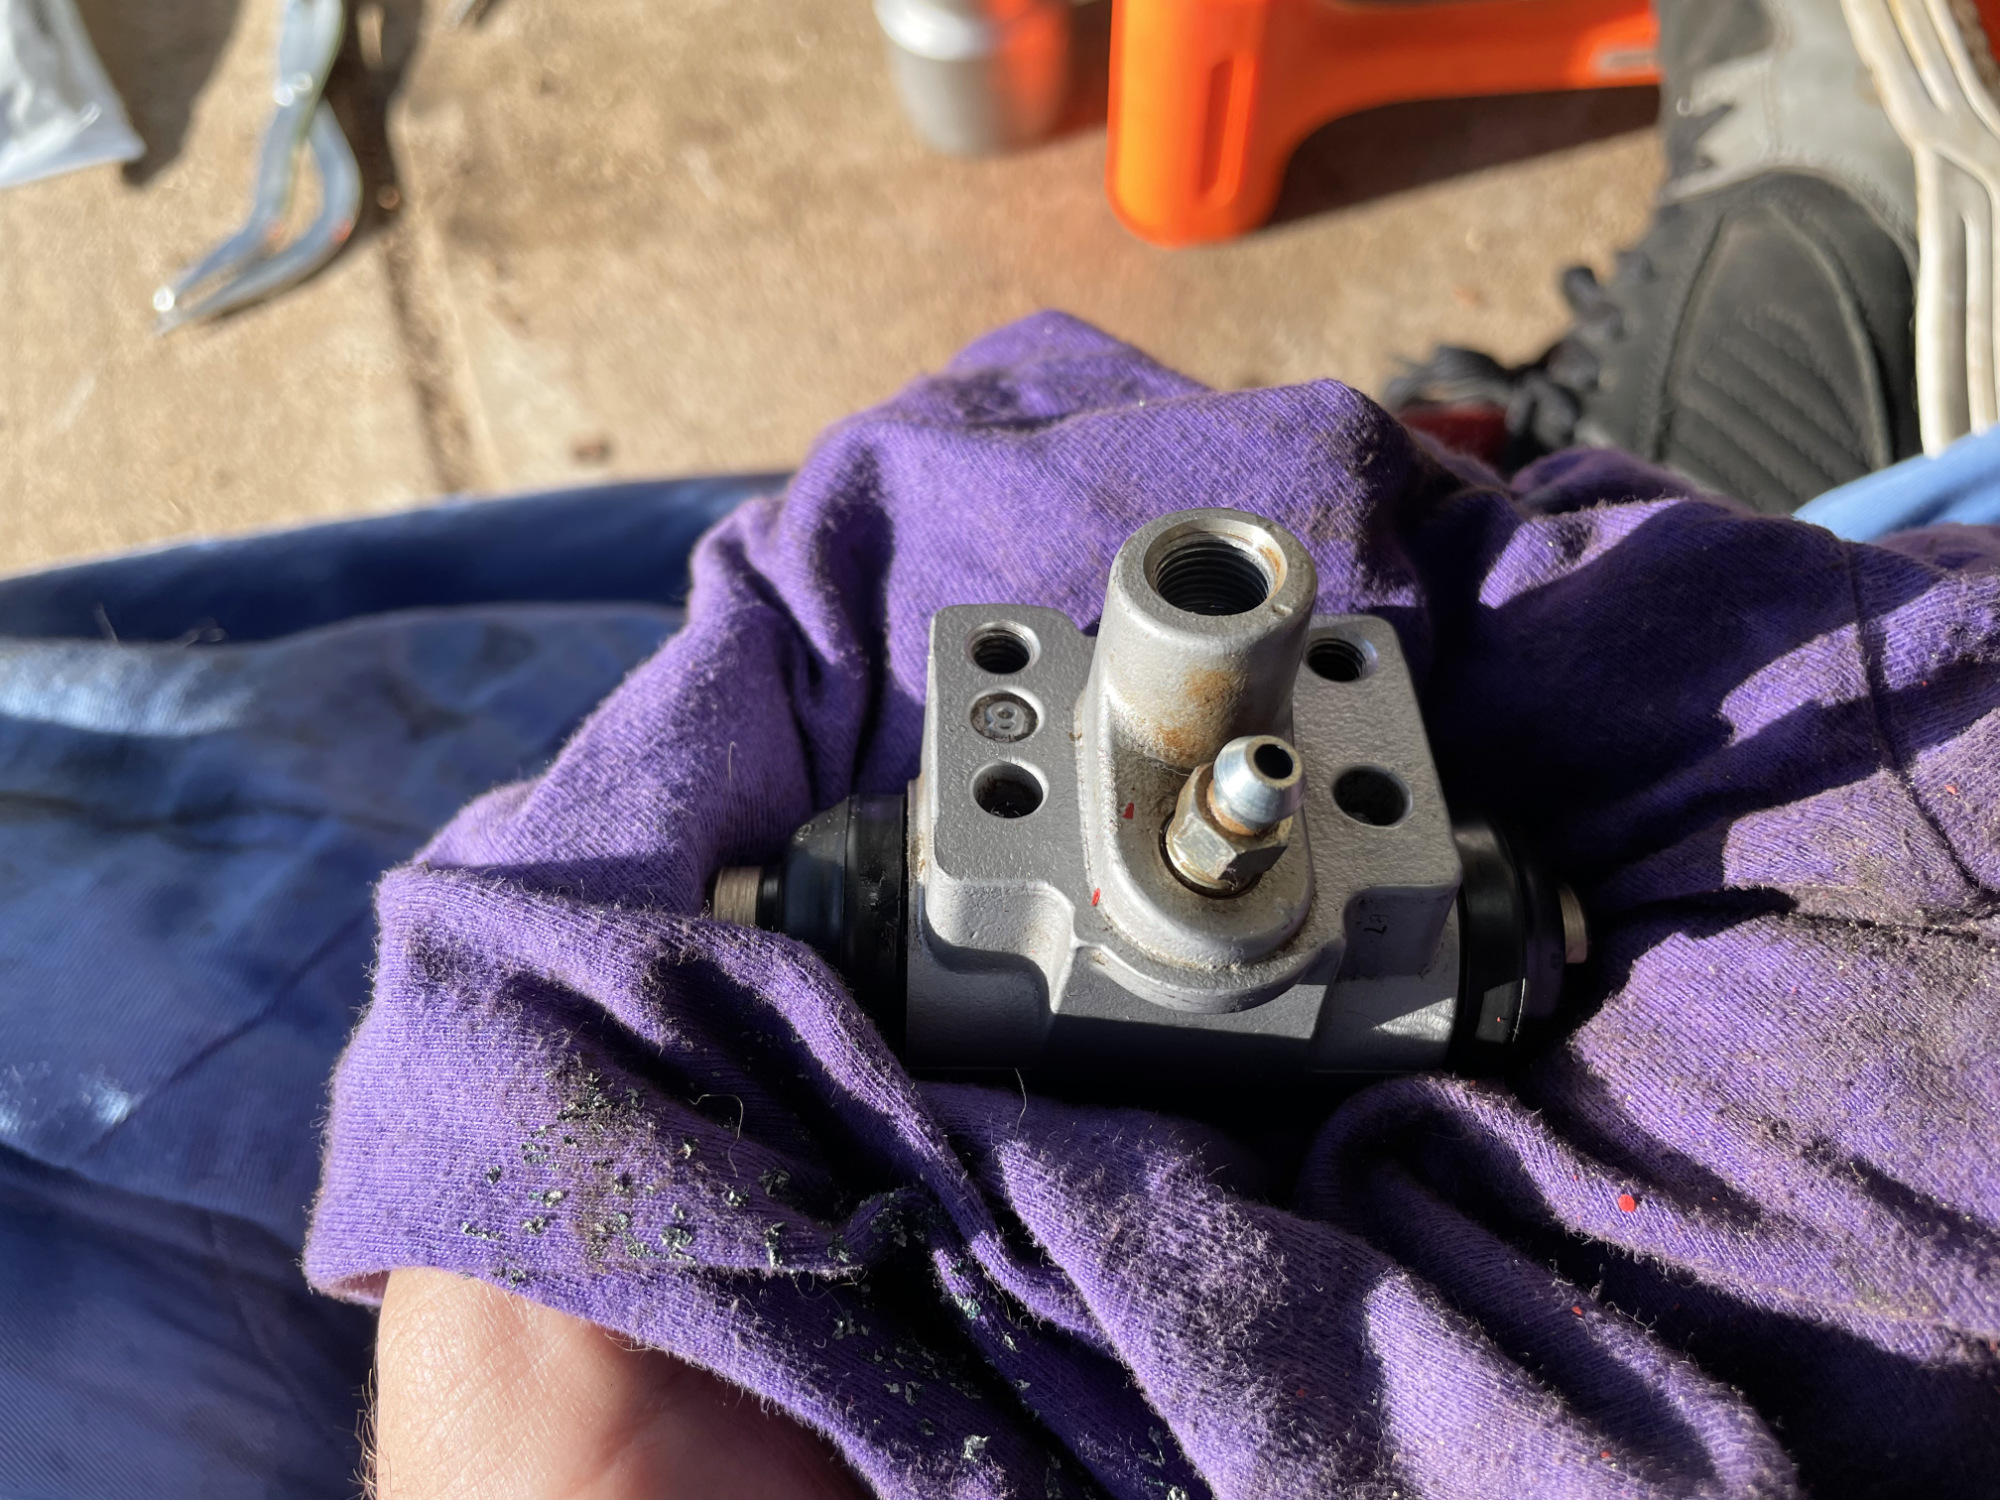
The other thing you have to do is to undo the brake pipe and remove the rear wheel cylinder.
First thing to do is to take off the bleed nipple cover and put it somewhere safe: these make an excellent plug for the brake line!
Undo the brake line into the rear wheel cylinder using an appropriate flare nut spanner.
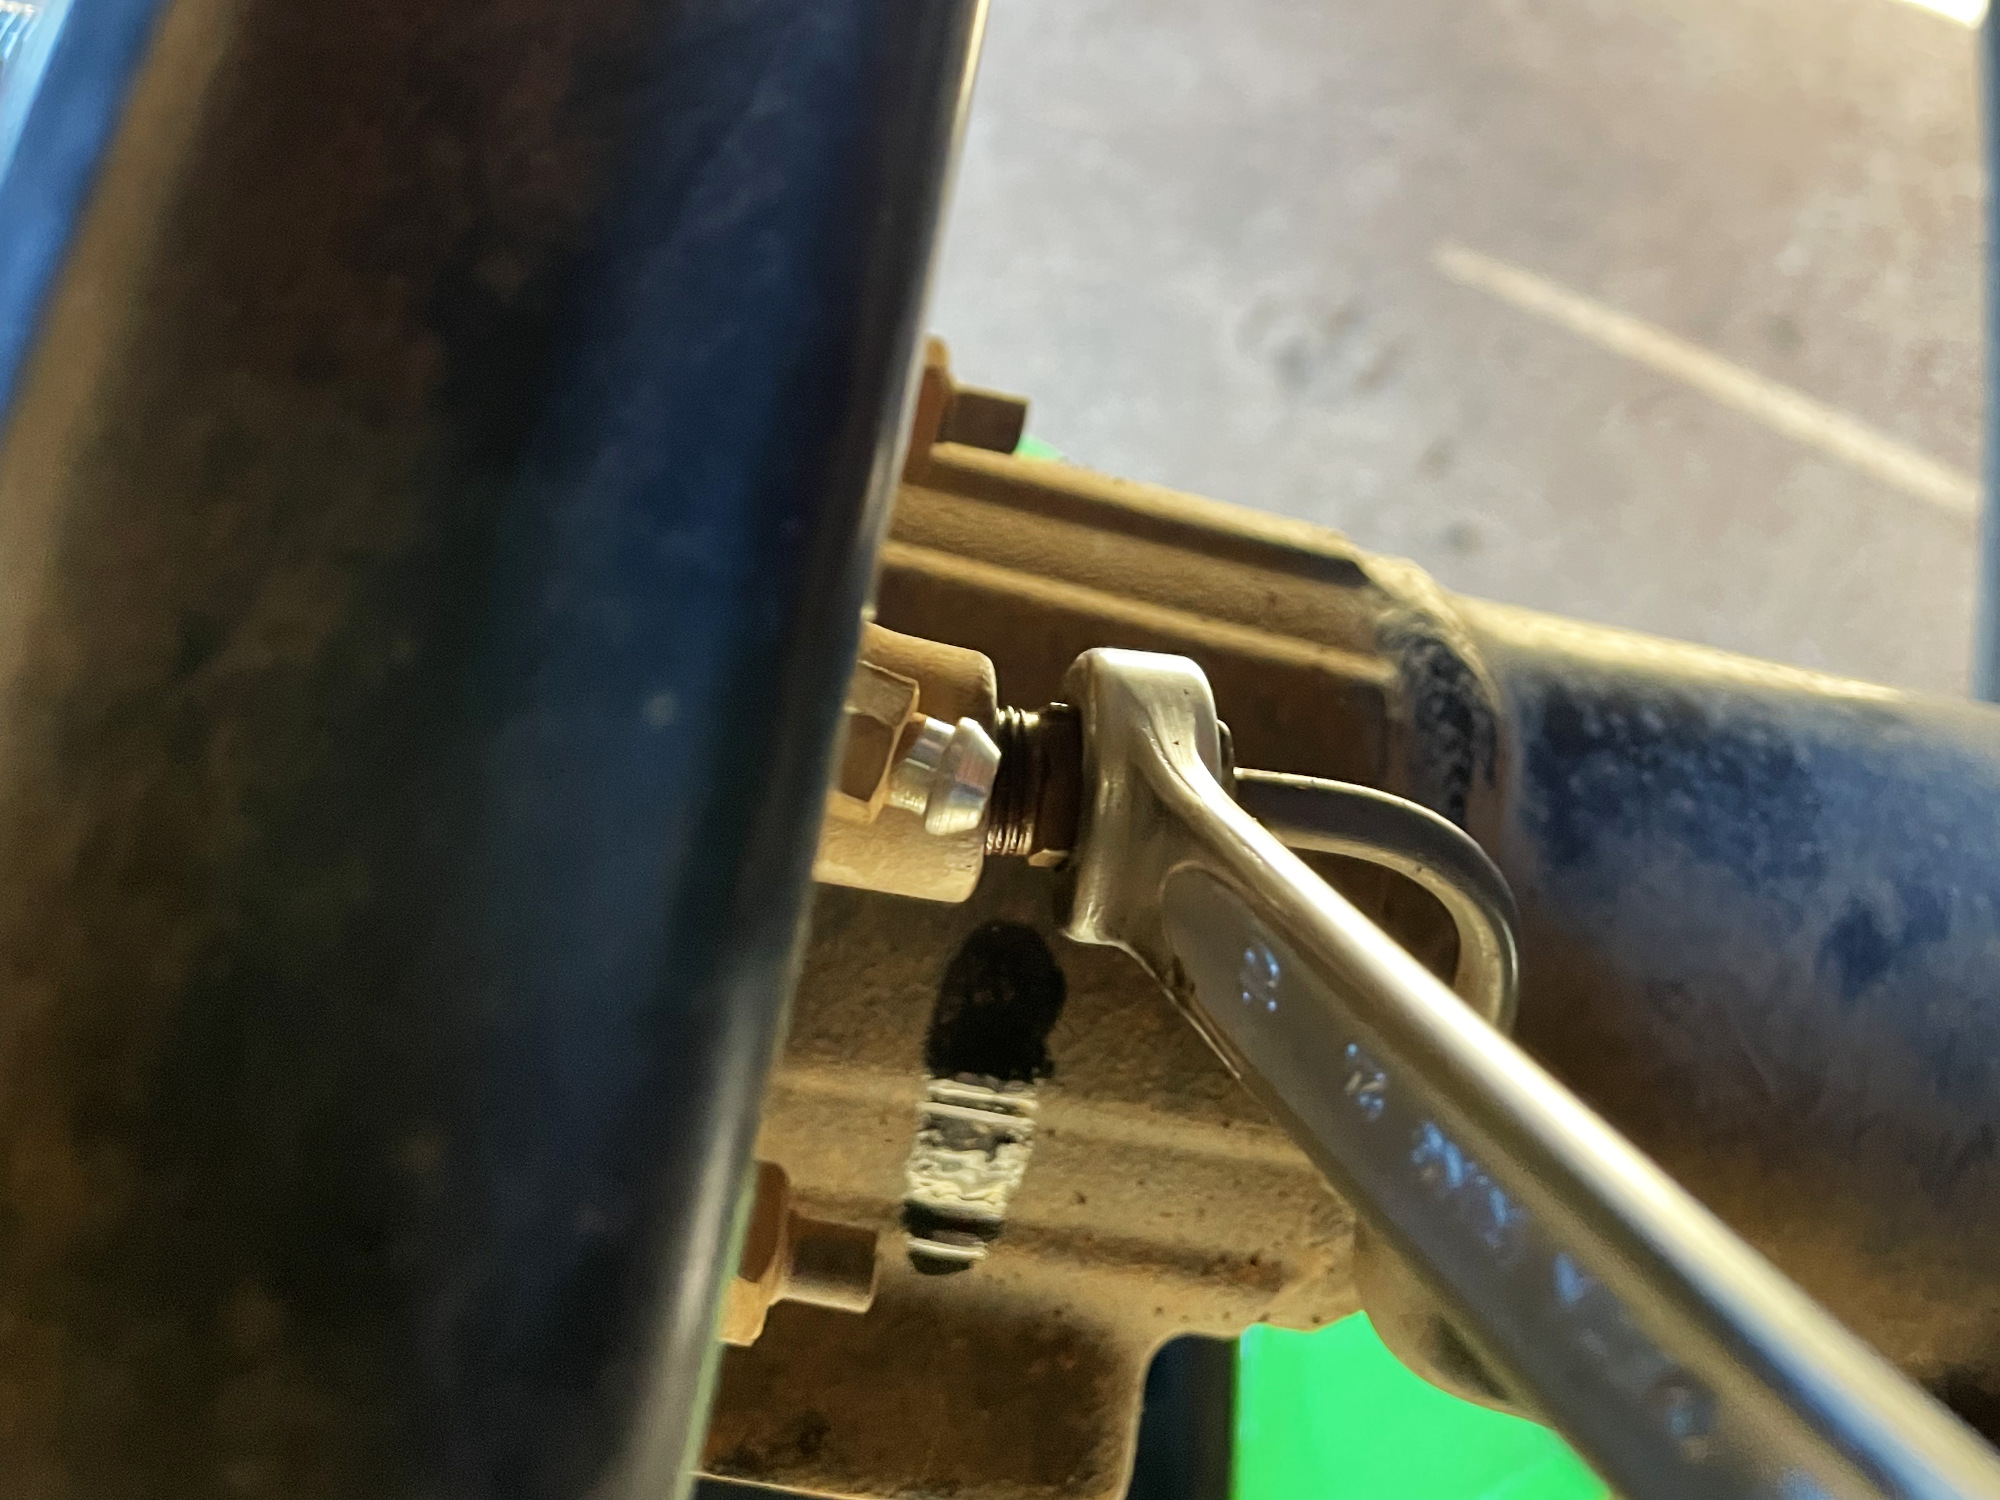
This will leak a bit of brake fluid, but nothing you can’t handle once stuff is undone.
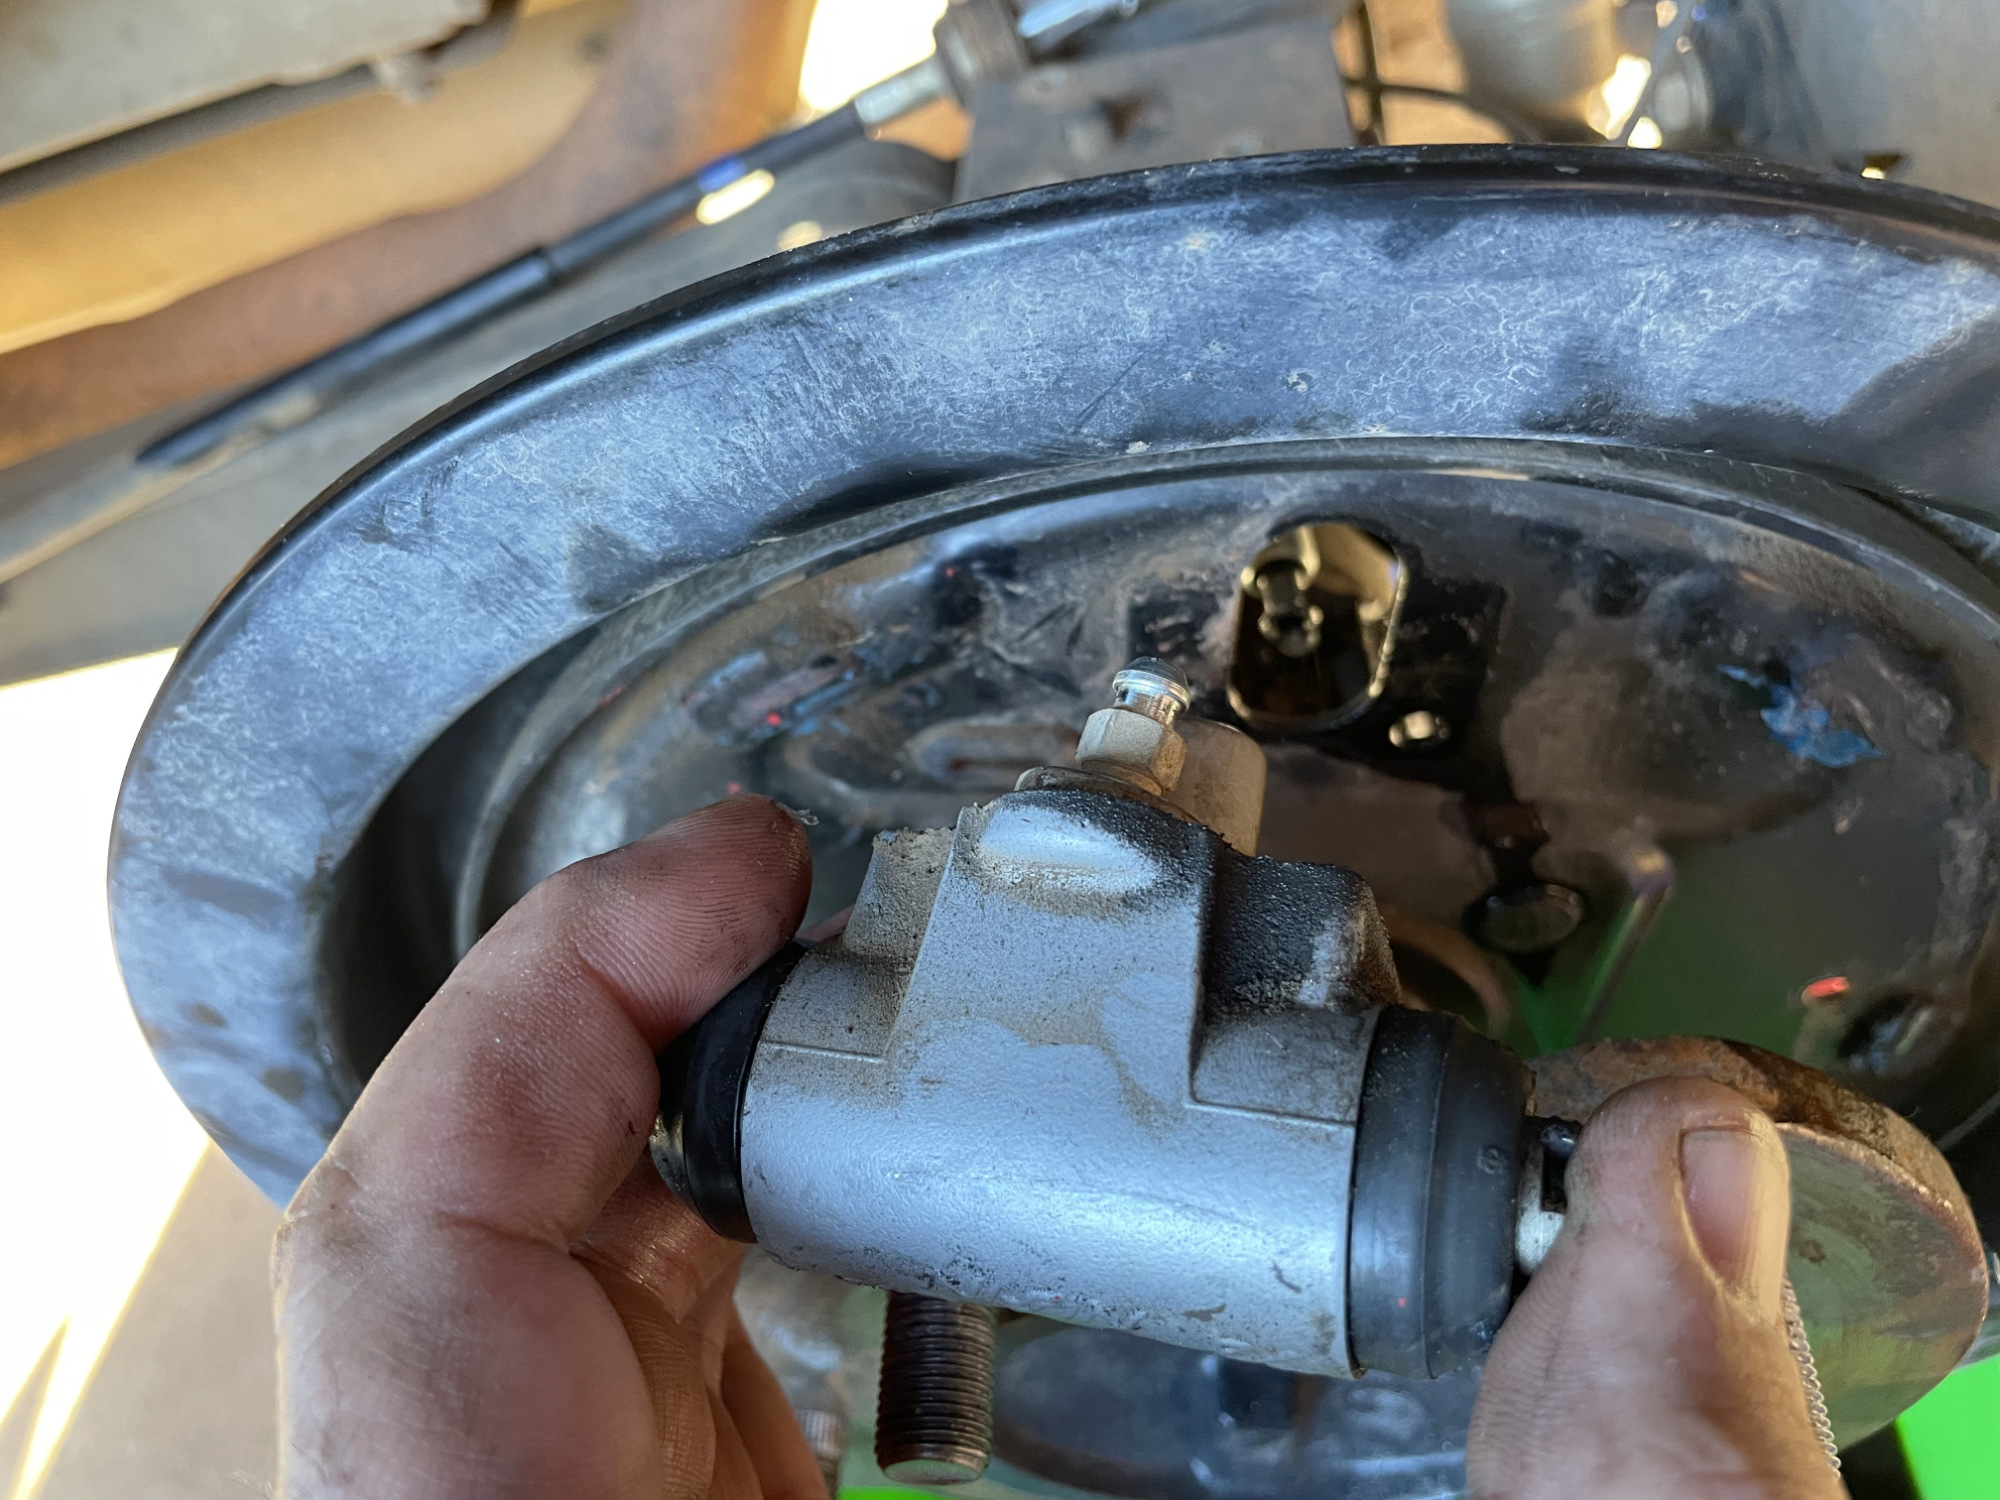
Undo the two bolts holding the rear wheel cylinder to the brake backing plate.
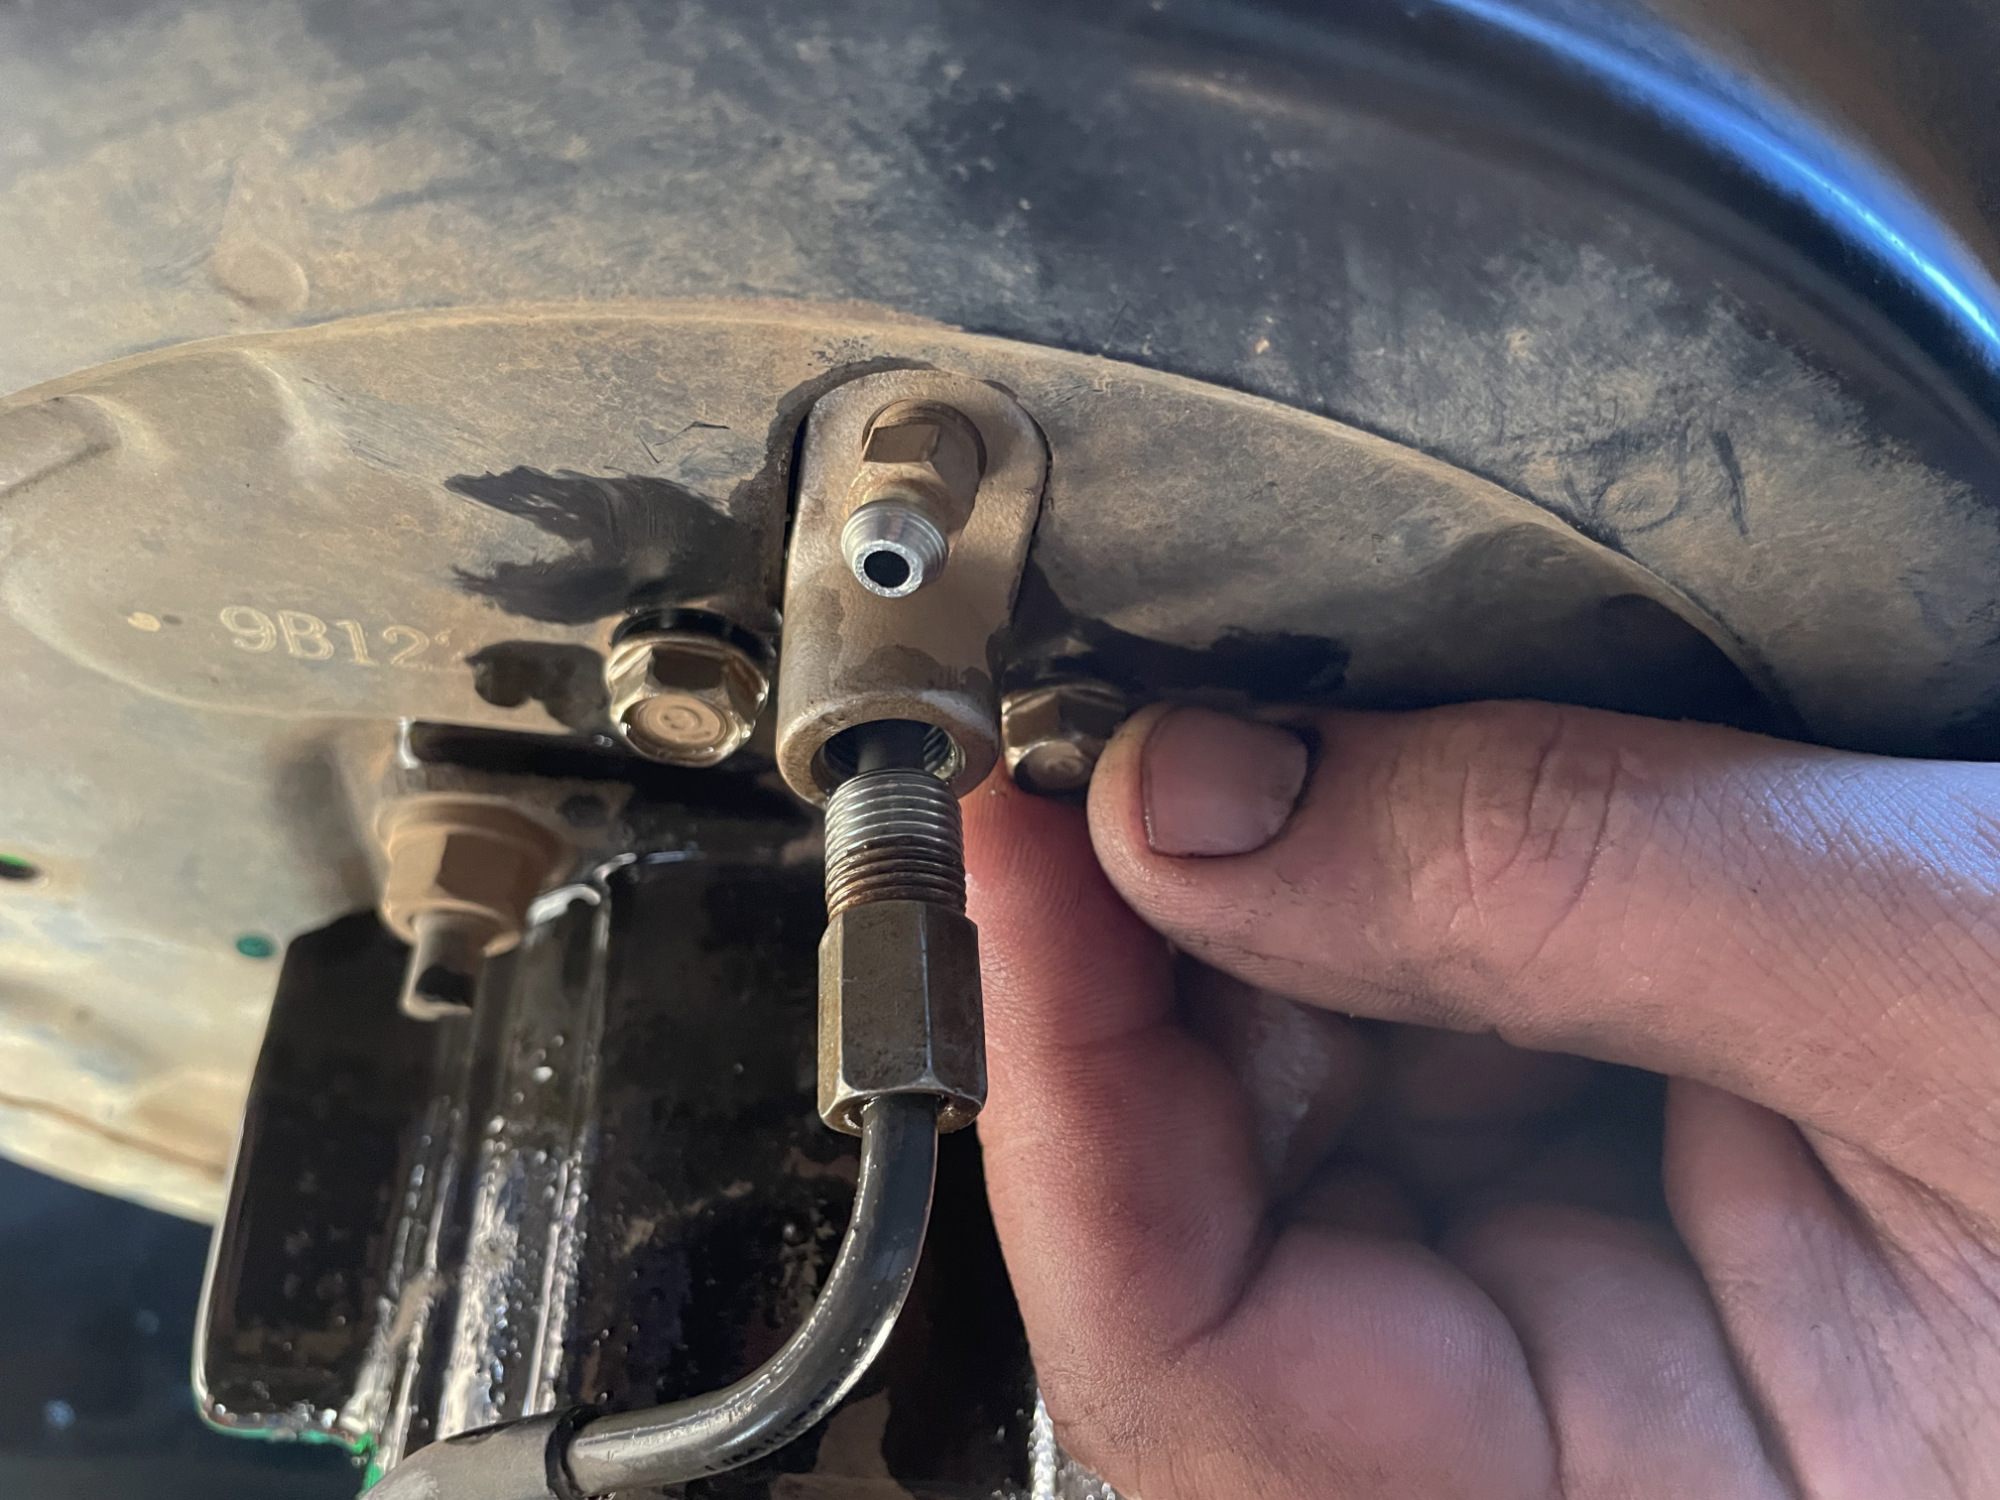
Remove the wheel cylinder from the car.
Now cap off the brake line using the rear brake bleed nipple cover you removed earlier.
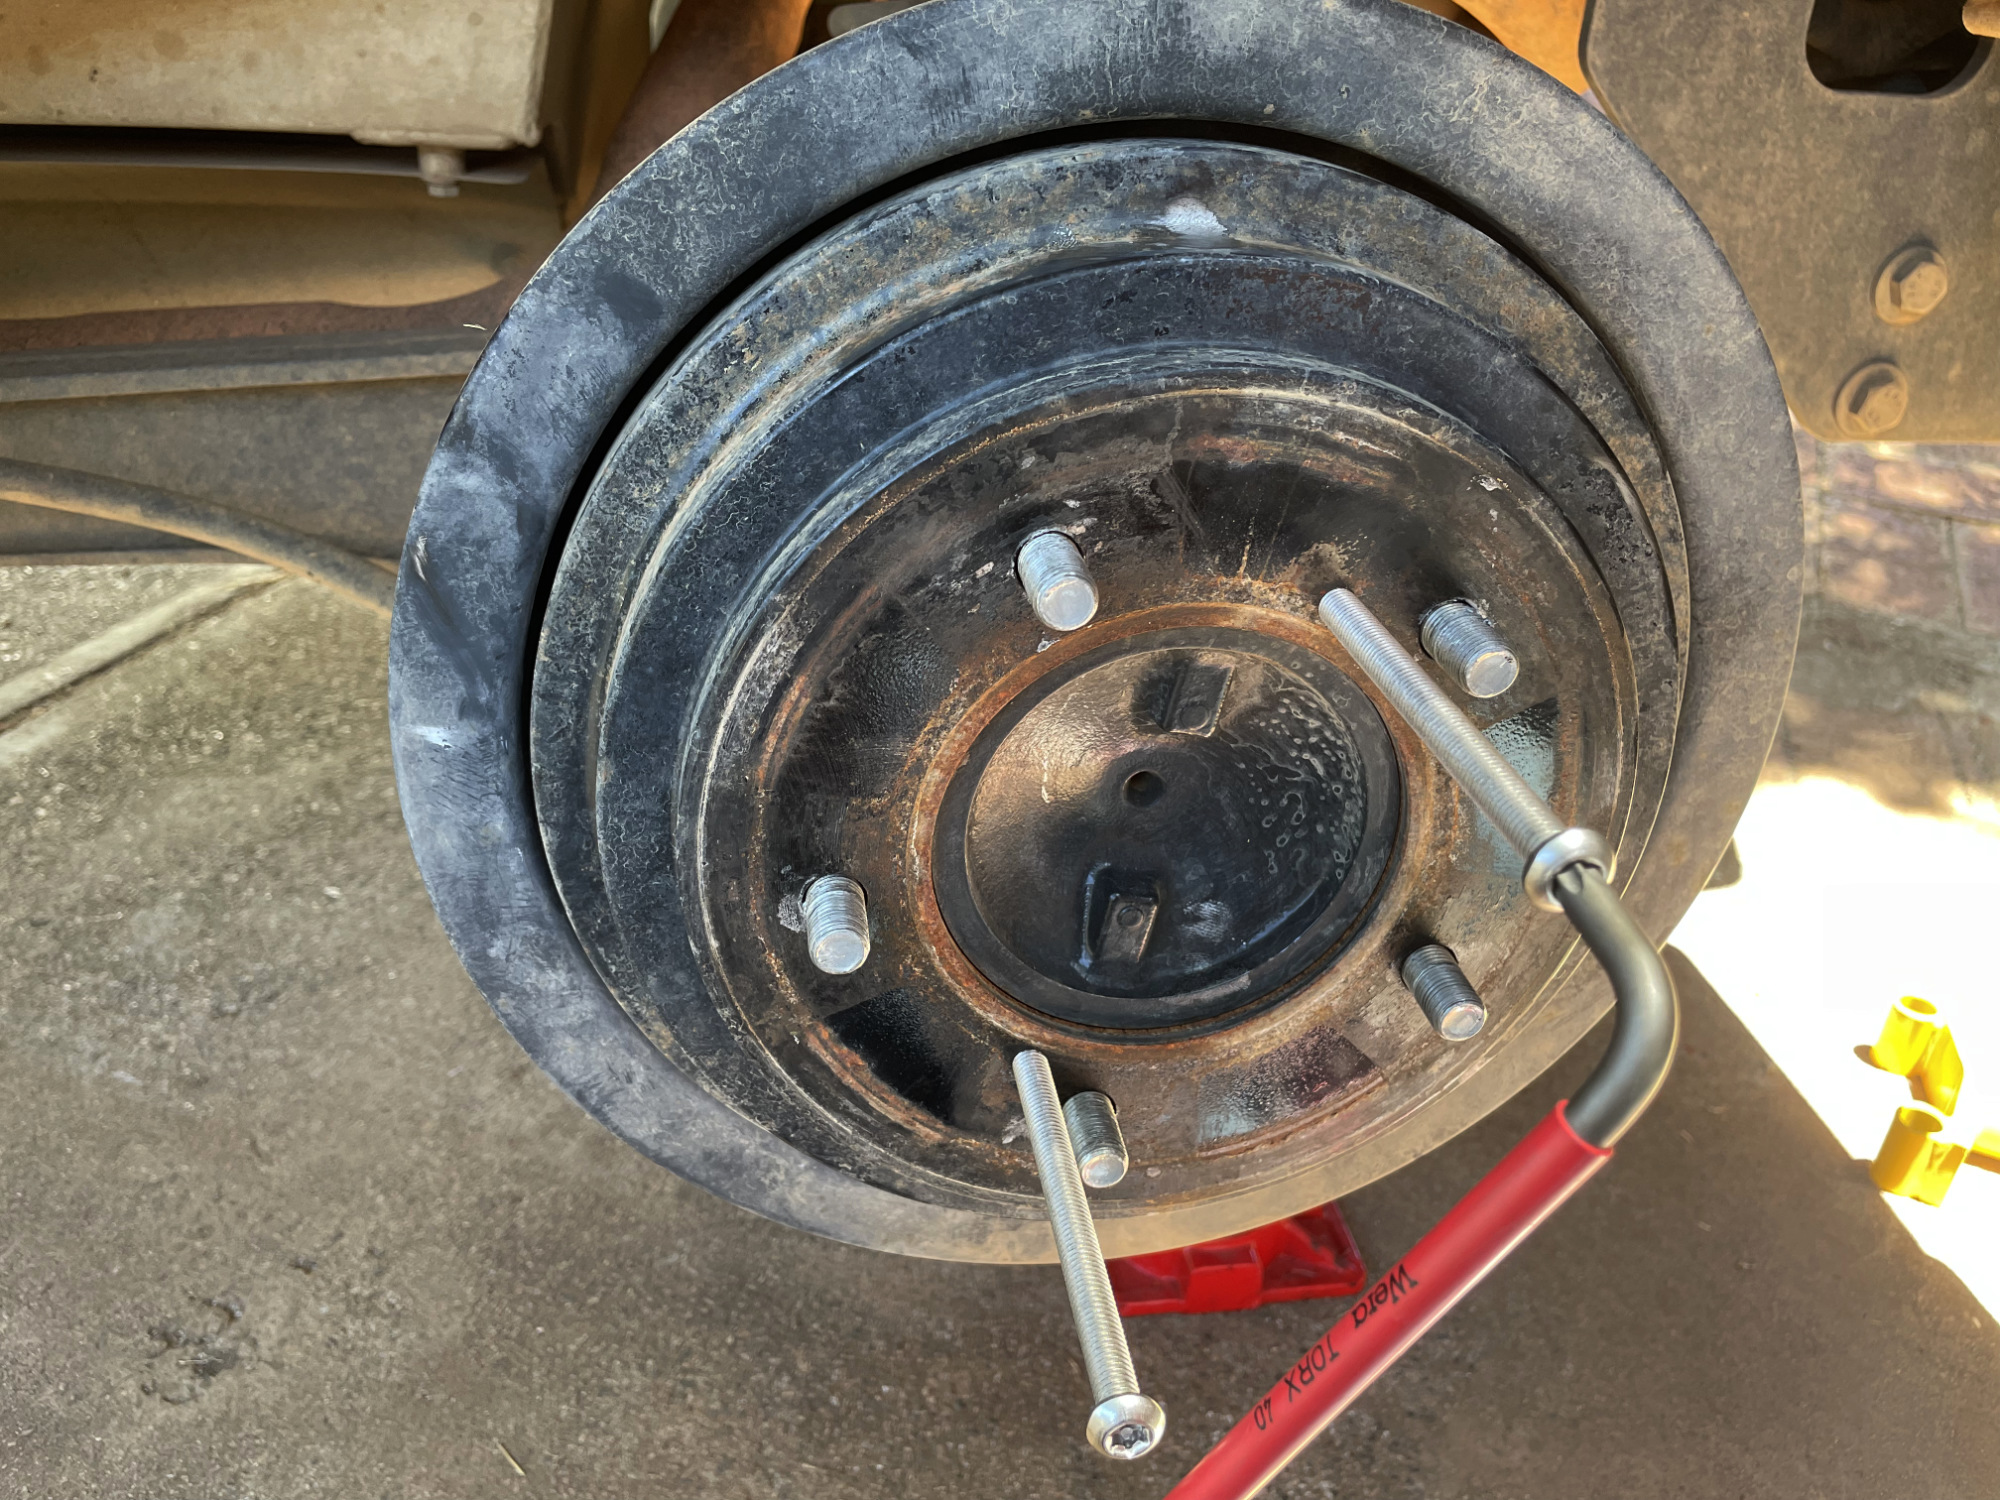
The final preparation step is to undo the brake backing plate nuts. There are 4 of them to undo, nothing too difficult.
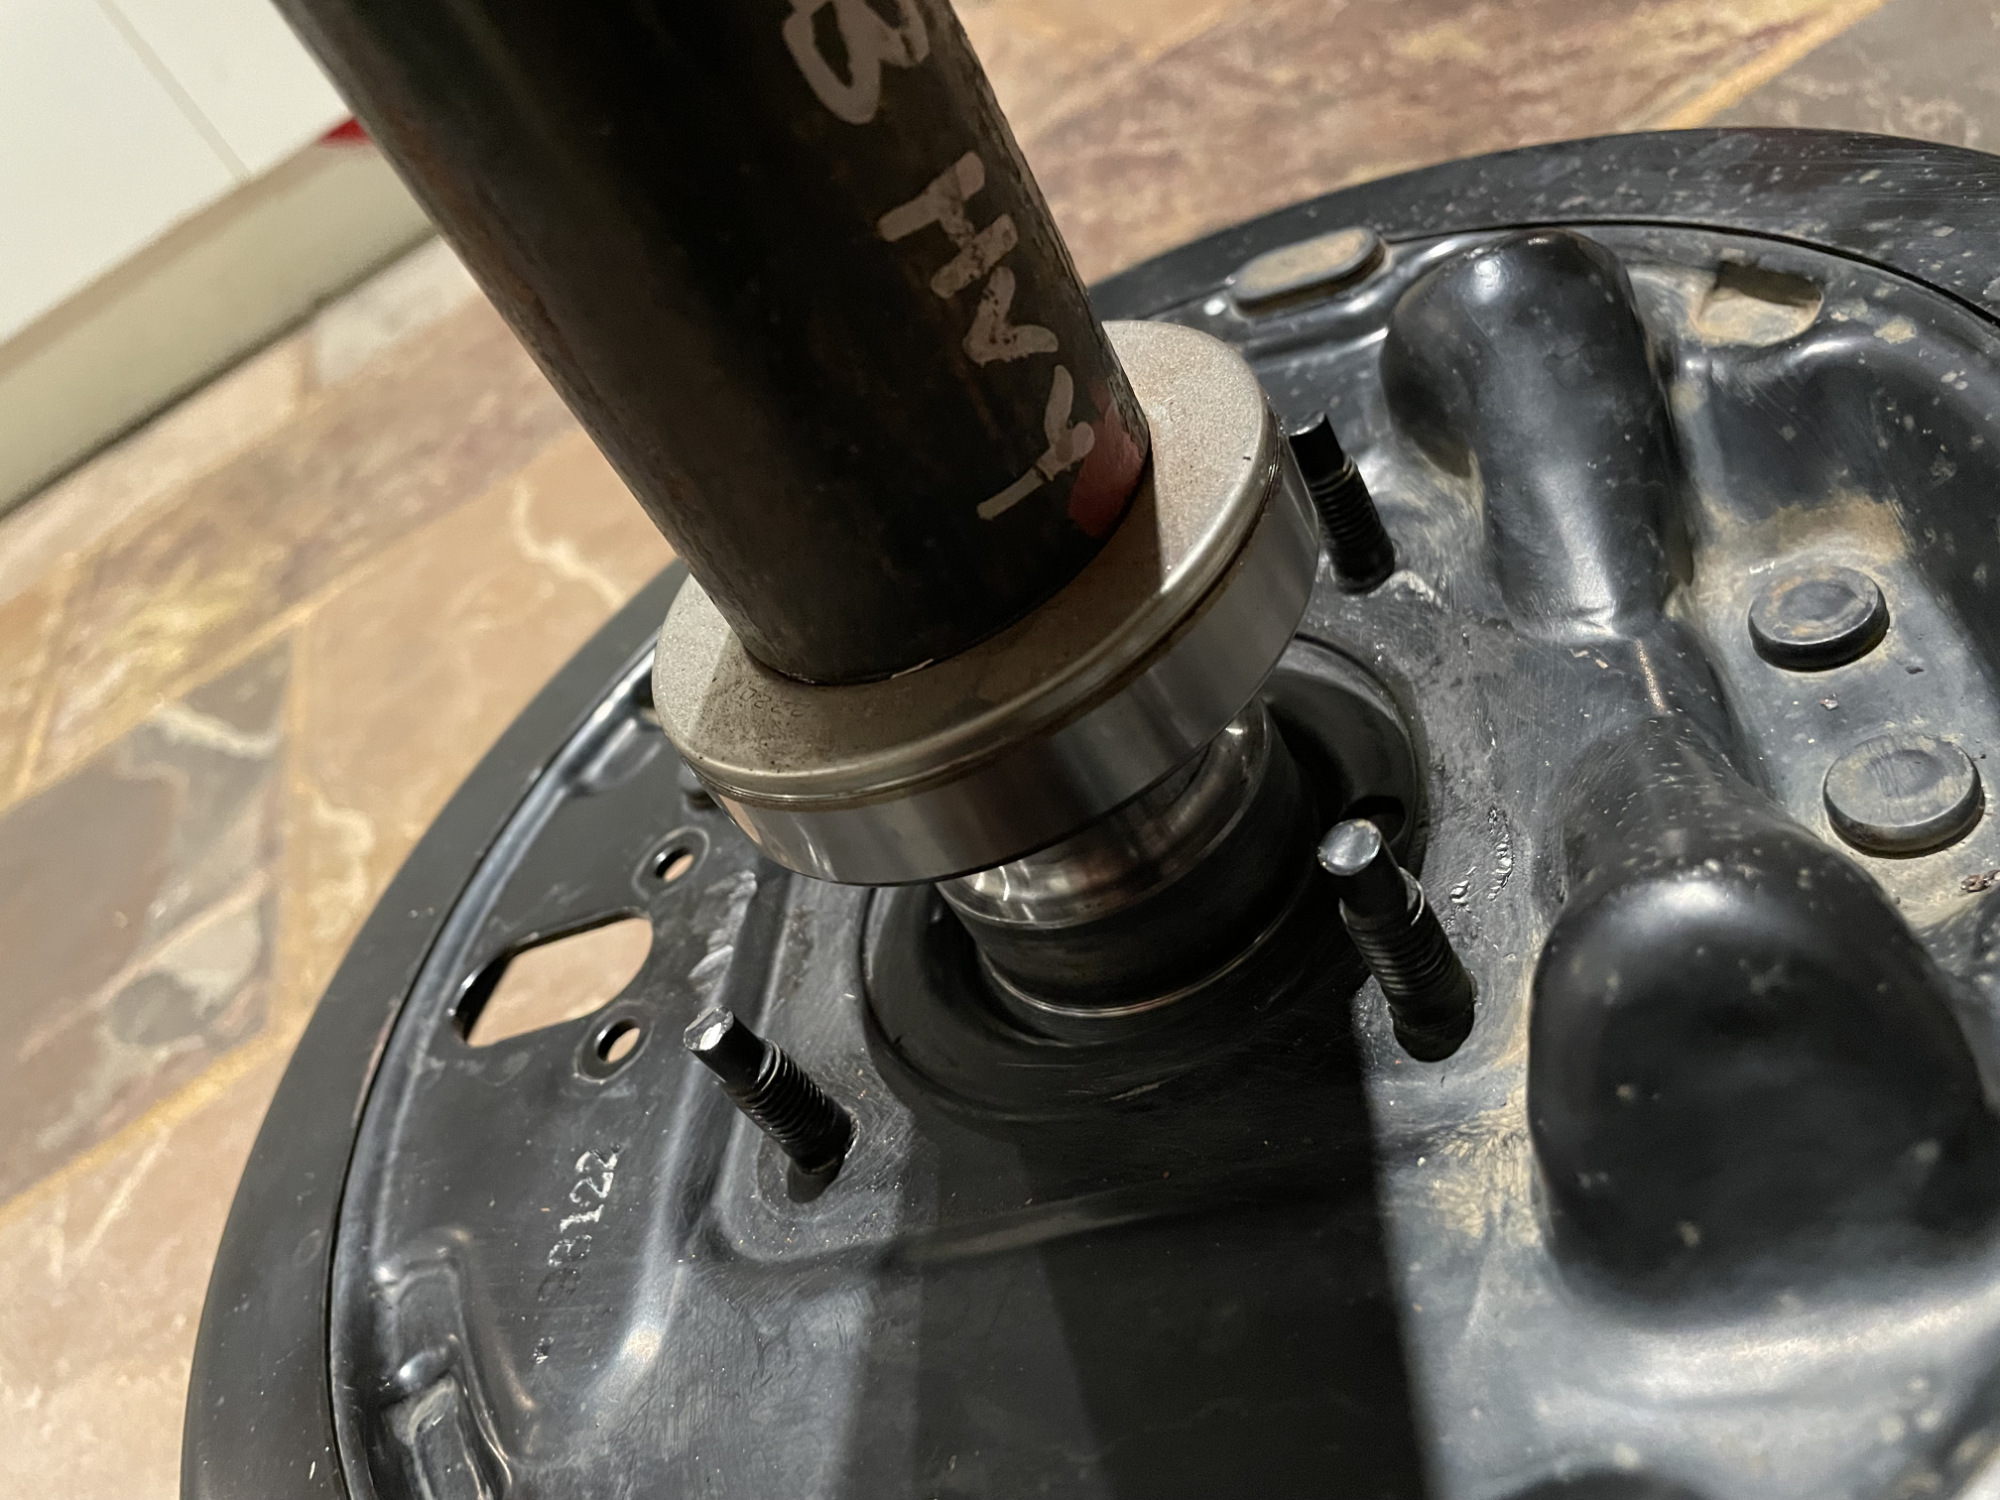
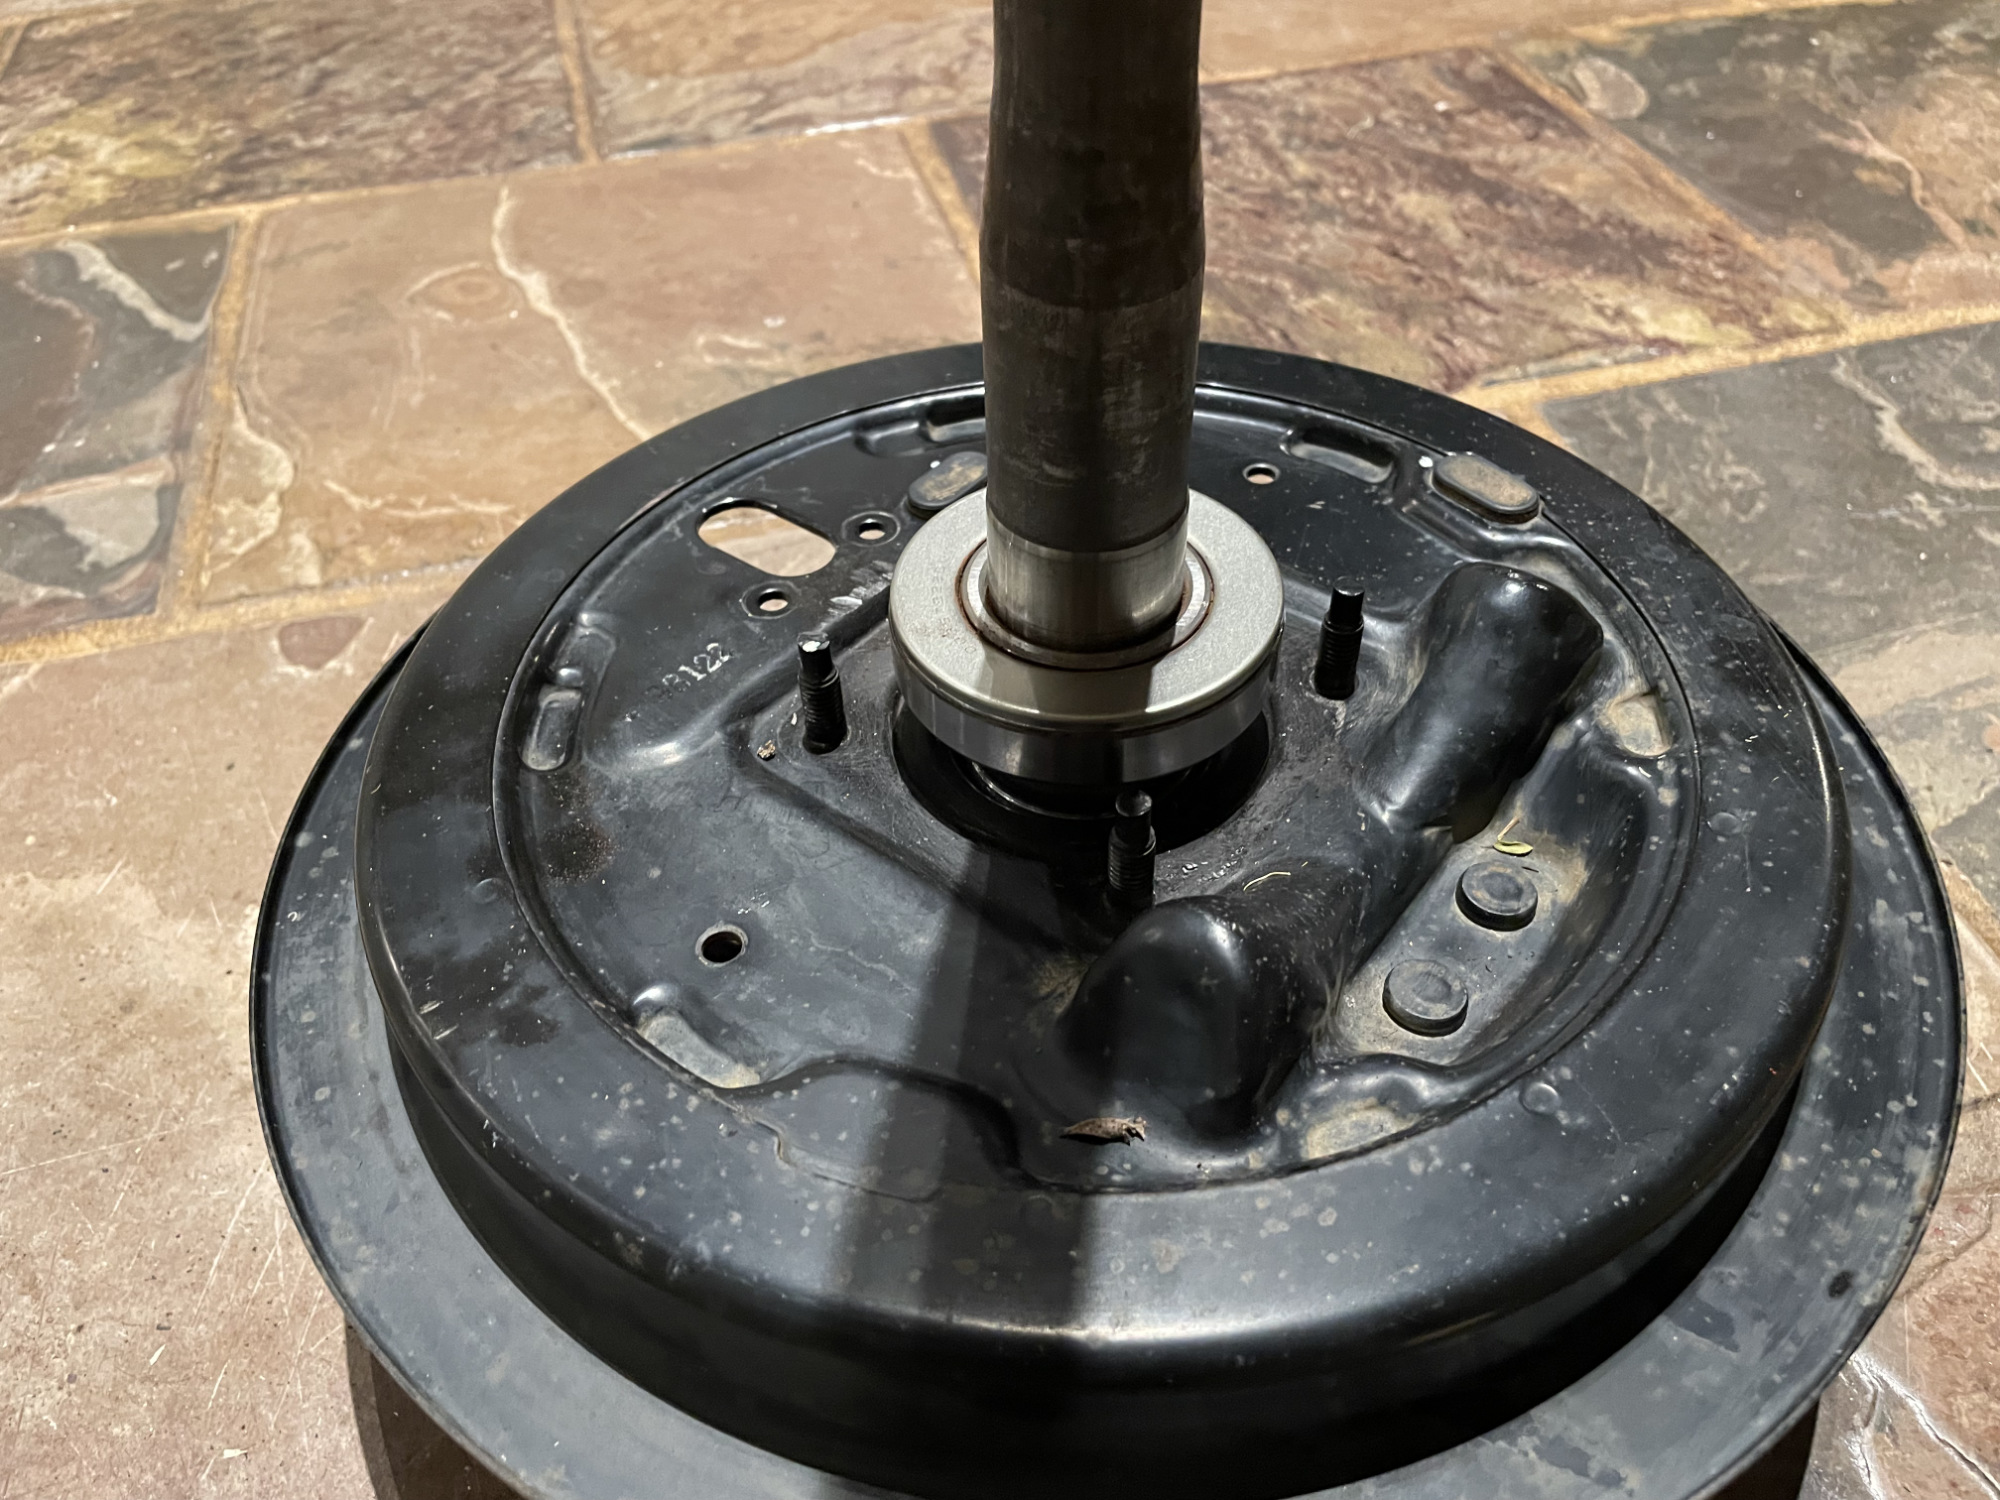
Now’s time to pull out the axle. This can take some force because there is sealant holding the backing plate to the axle housing. The bearings can be pretty tight in the housing, too.
The method if you’re stuck and on the side of the road is to flip a drum over and use a couple of wheel nuts to partially retain it on the axle and use the drum as your slide hammer. Basically slide it all the way onto the axle, and then sharply pull it straight outwards towards the partially screwed on wheel nuts.
This takes a long time to get the axle to budge but if you’re stuck in the bush then it can be done.
It’s far, far easier using a slide hammer though.
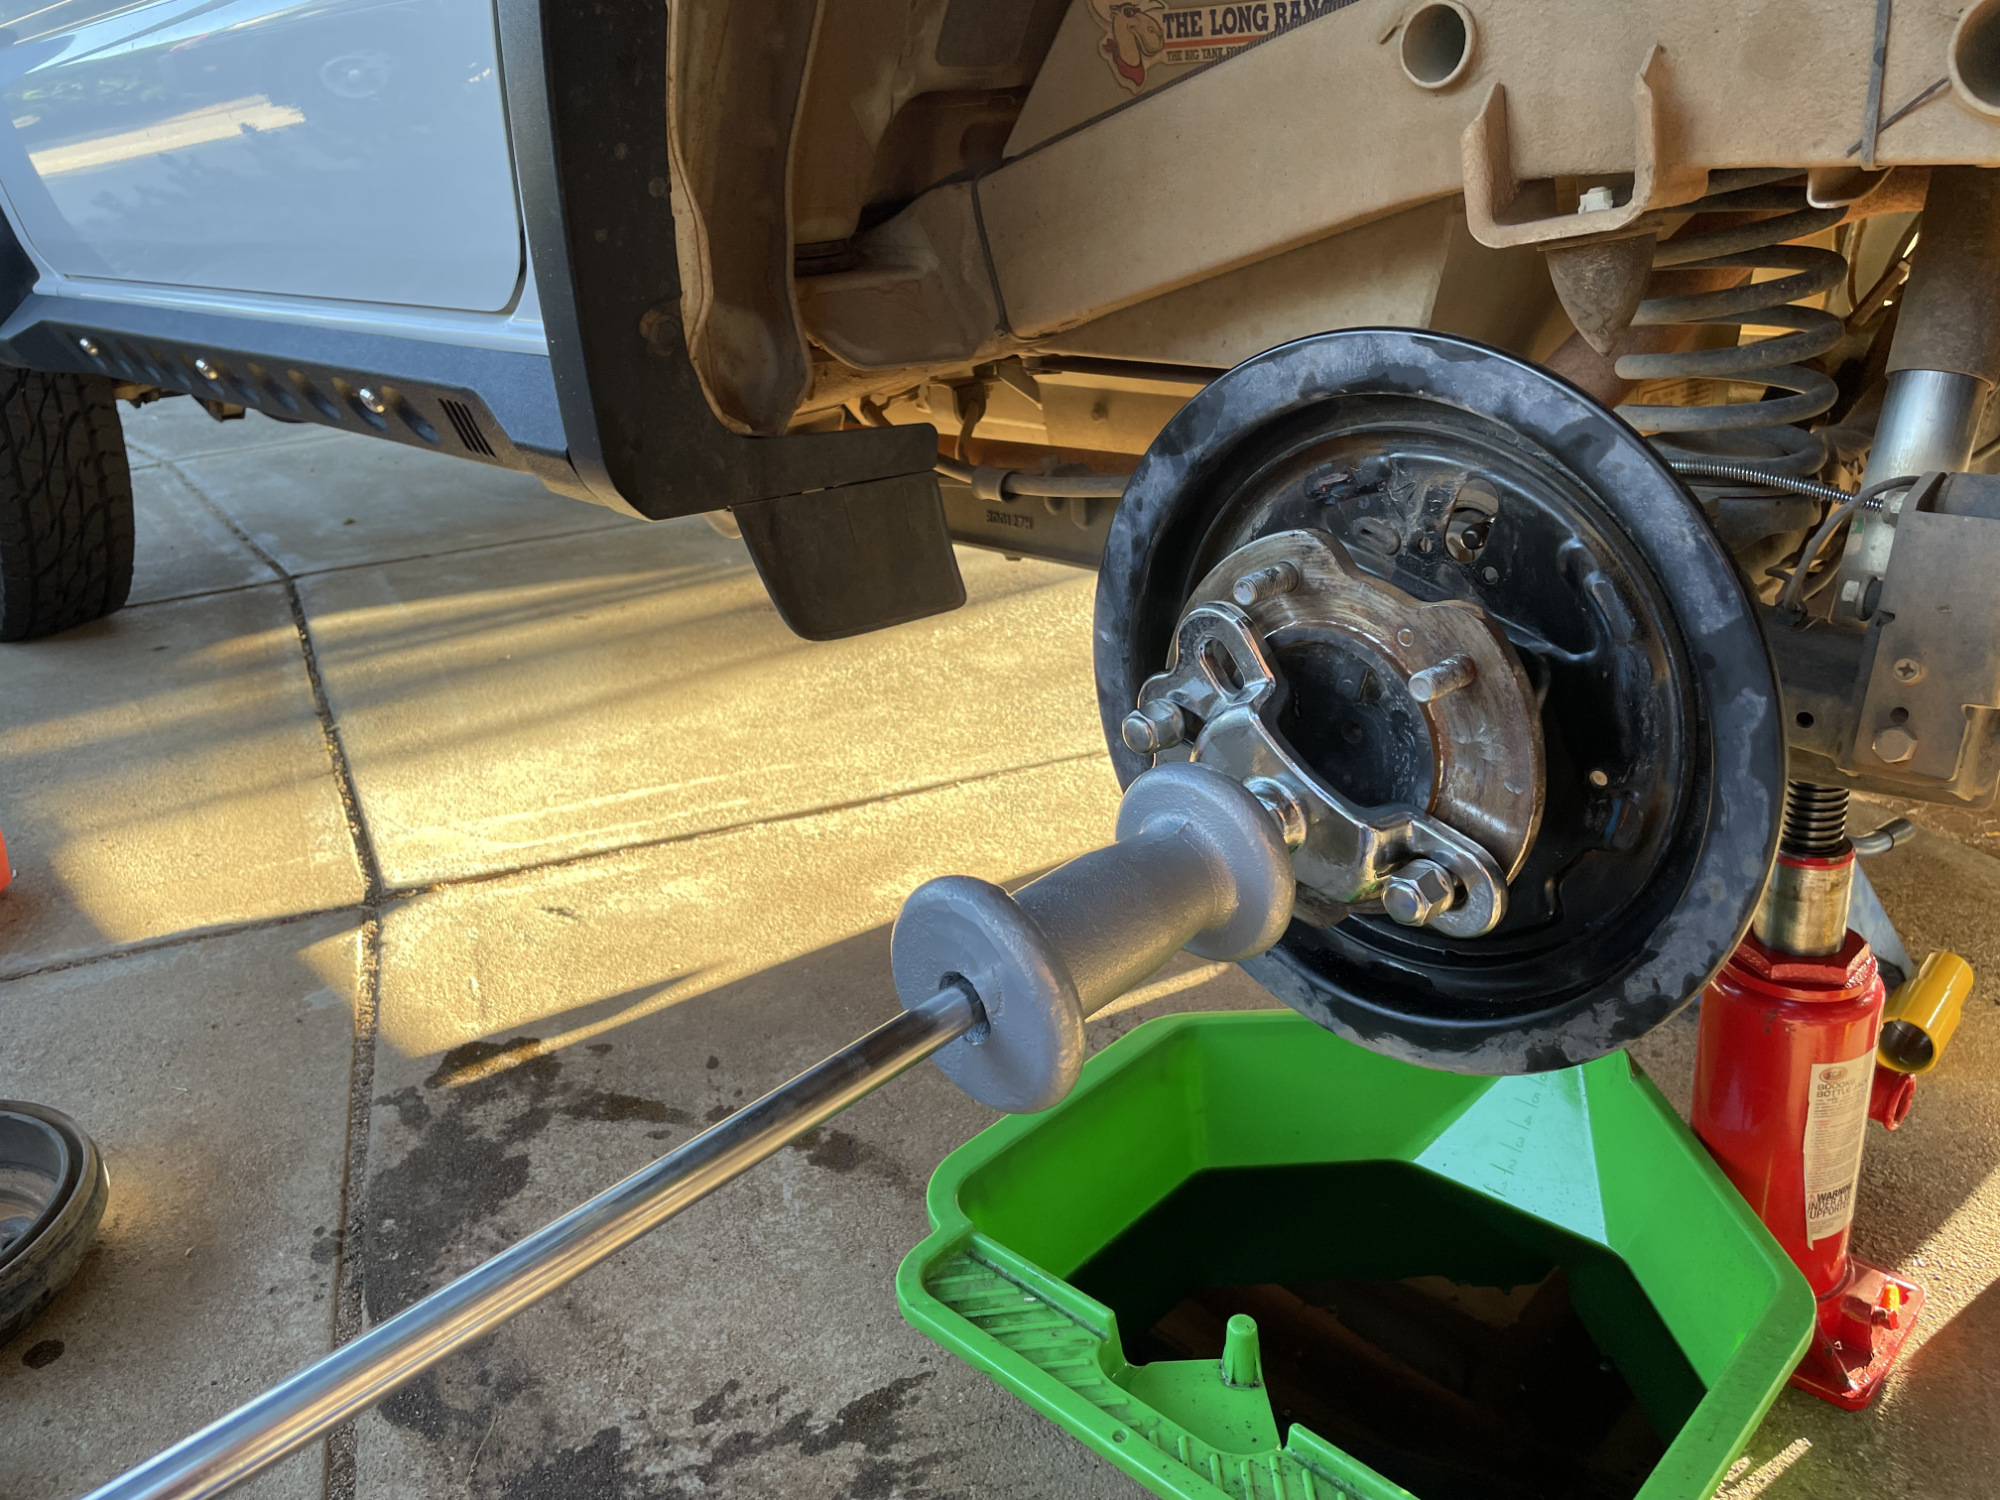
Axle comes out usually with a couple of good blows, though sometimes they can be pretty damned tight.
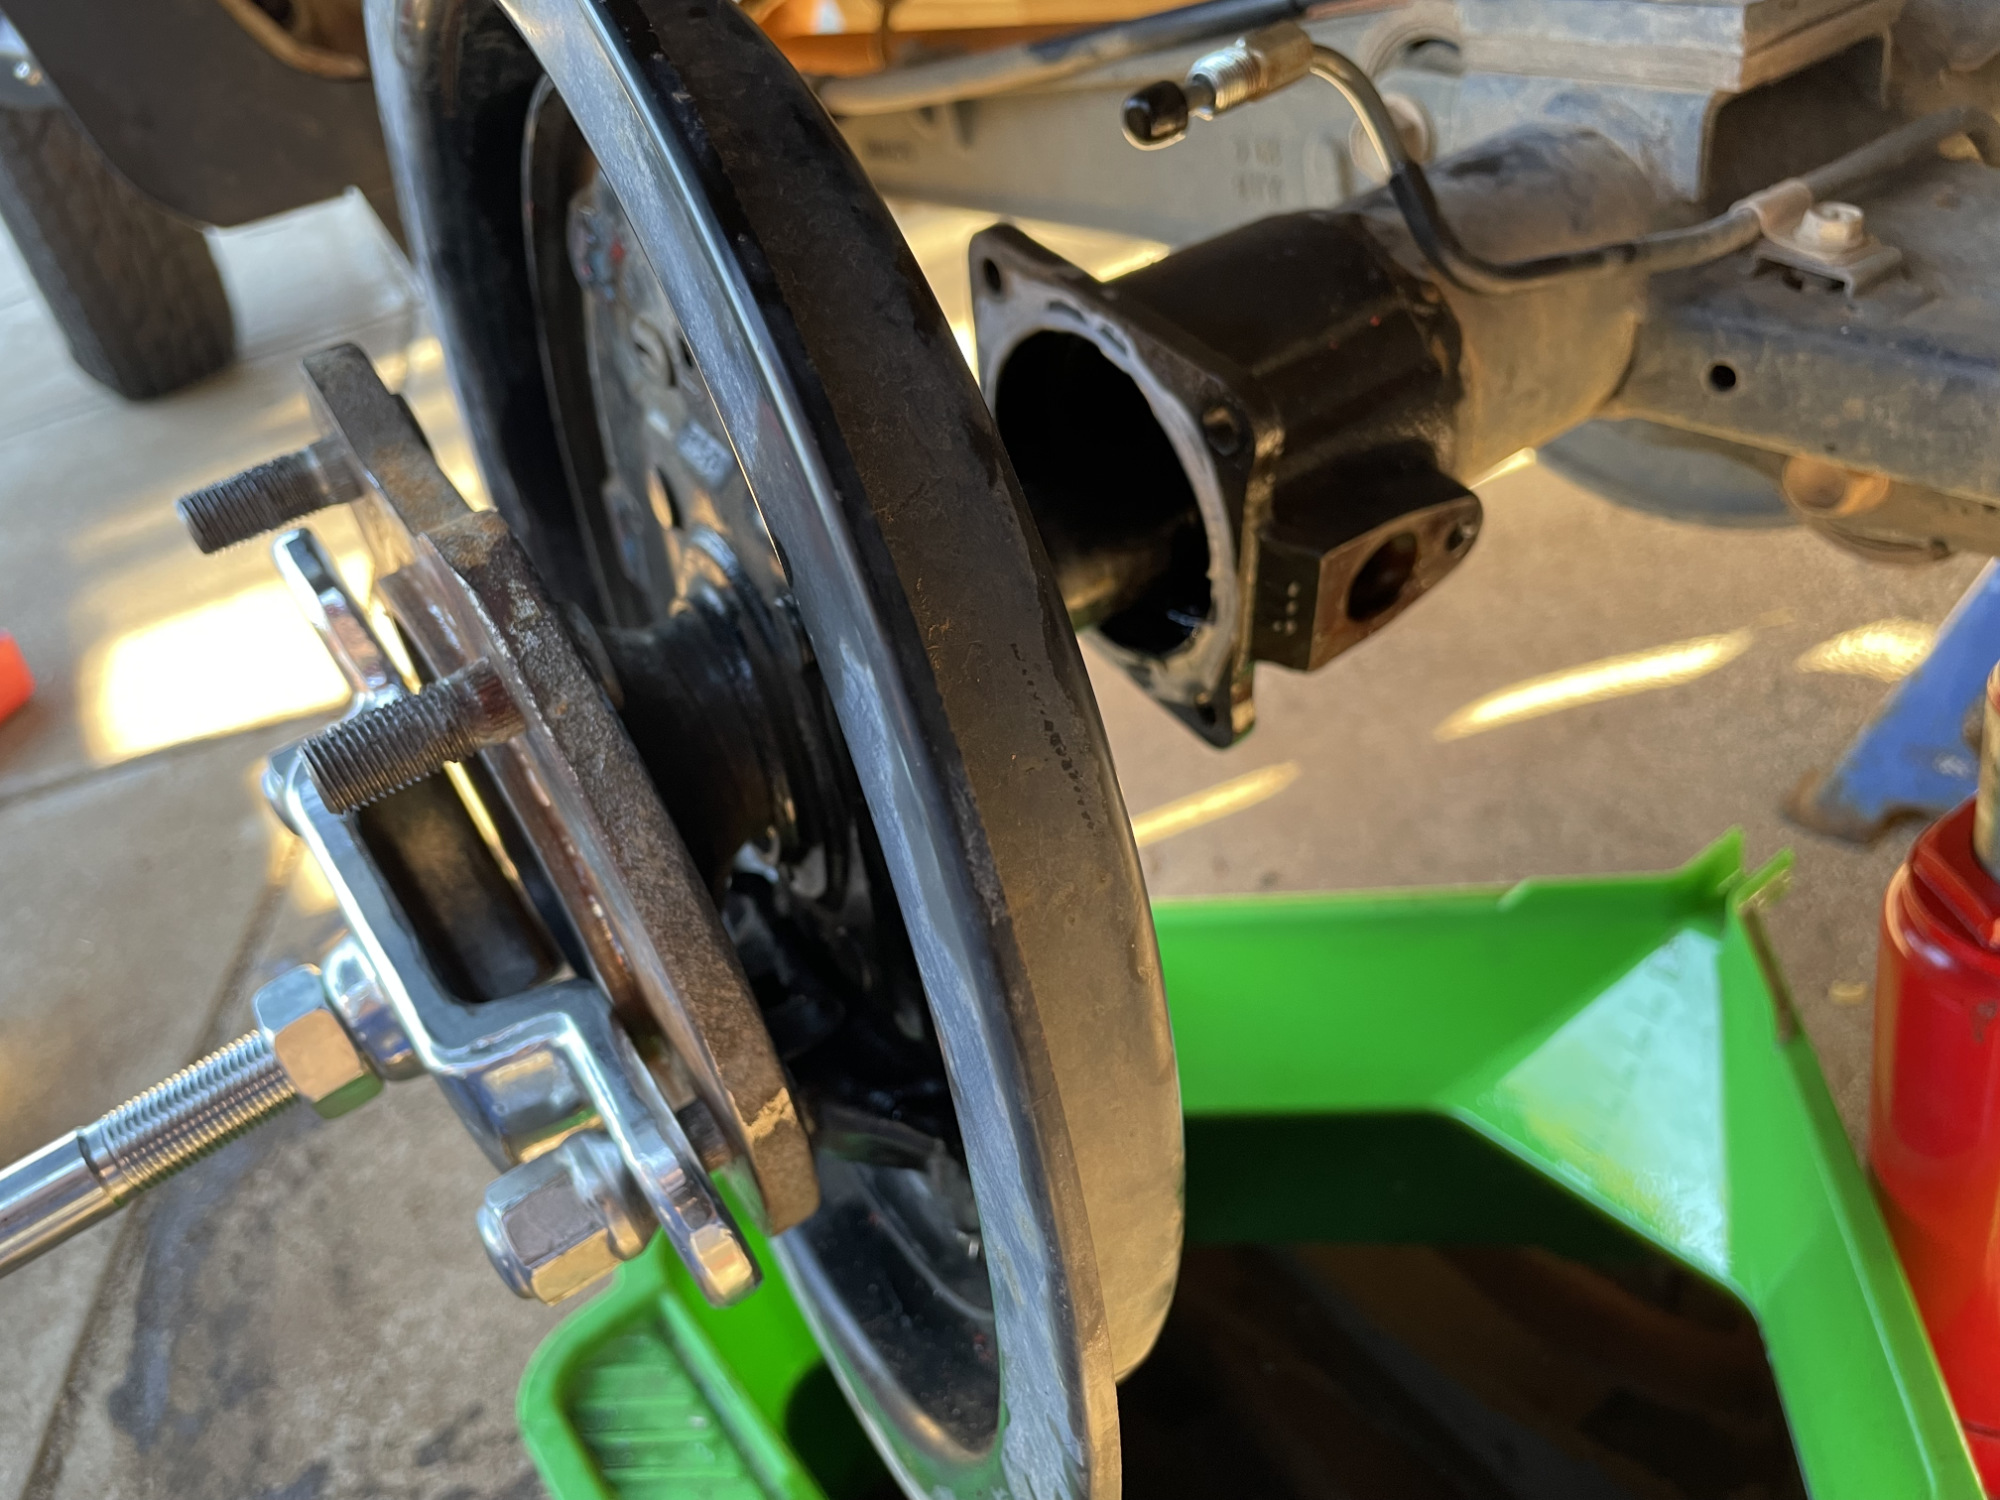
Note: if you are reading this because you’re removing the axles for something like a rear locker installation then be careful with the axle onto the axle seal. I knew this seal was ruined so the axle is against the seal for this photo. If you ever want to reuse the seal then you need to support it as you withdraw the axle so you do not damage the seal.
Removing old bearings
Removing the old bearings can be a bit of a challenge. Violence is needed and there’s not really a shortcut.
The bearing retaining ring is also the ABS sender and there is no easy way to pull it. Some people have succeeded but there’s limited space and most rebuild kits include the retainer. Plus, given it is a press fit, there is a likelihood that upon removing it will have deformed enough that it will no longer properly retain the bearing, and if that happens then the wheel, brake, and the axle will exit the vehicle when you’re driving. So just follow what Suzuki tell you and cut the damn retainer/ABS tone ring off.
I start by using a cutoff wheel on an angle grinder to cut into the retainer along a parallel cut to the long axis of the axle.
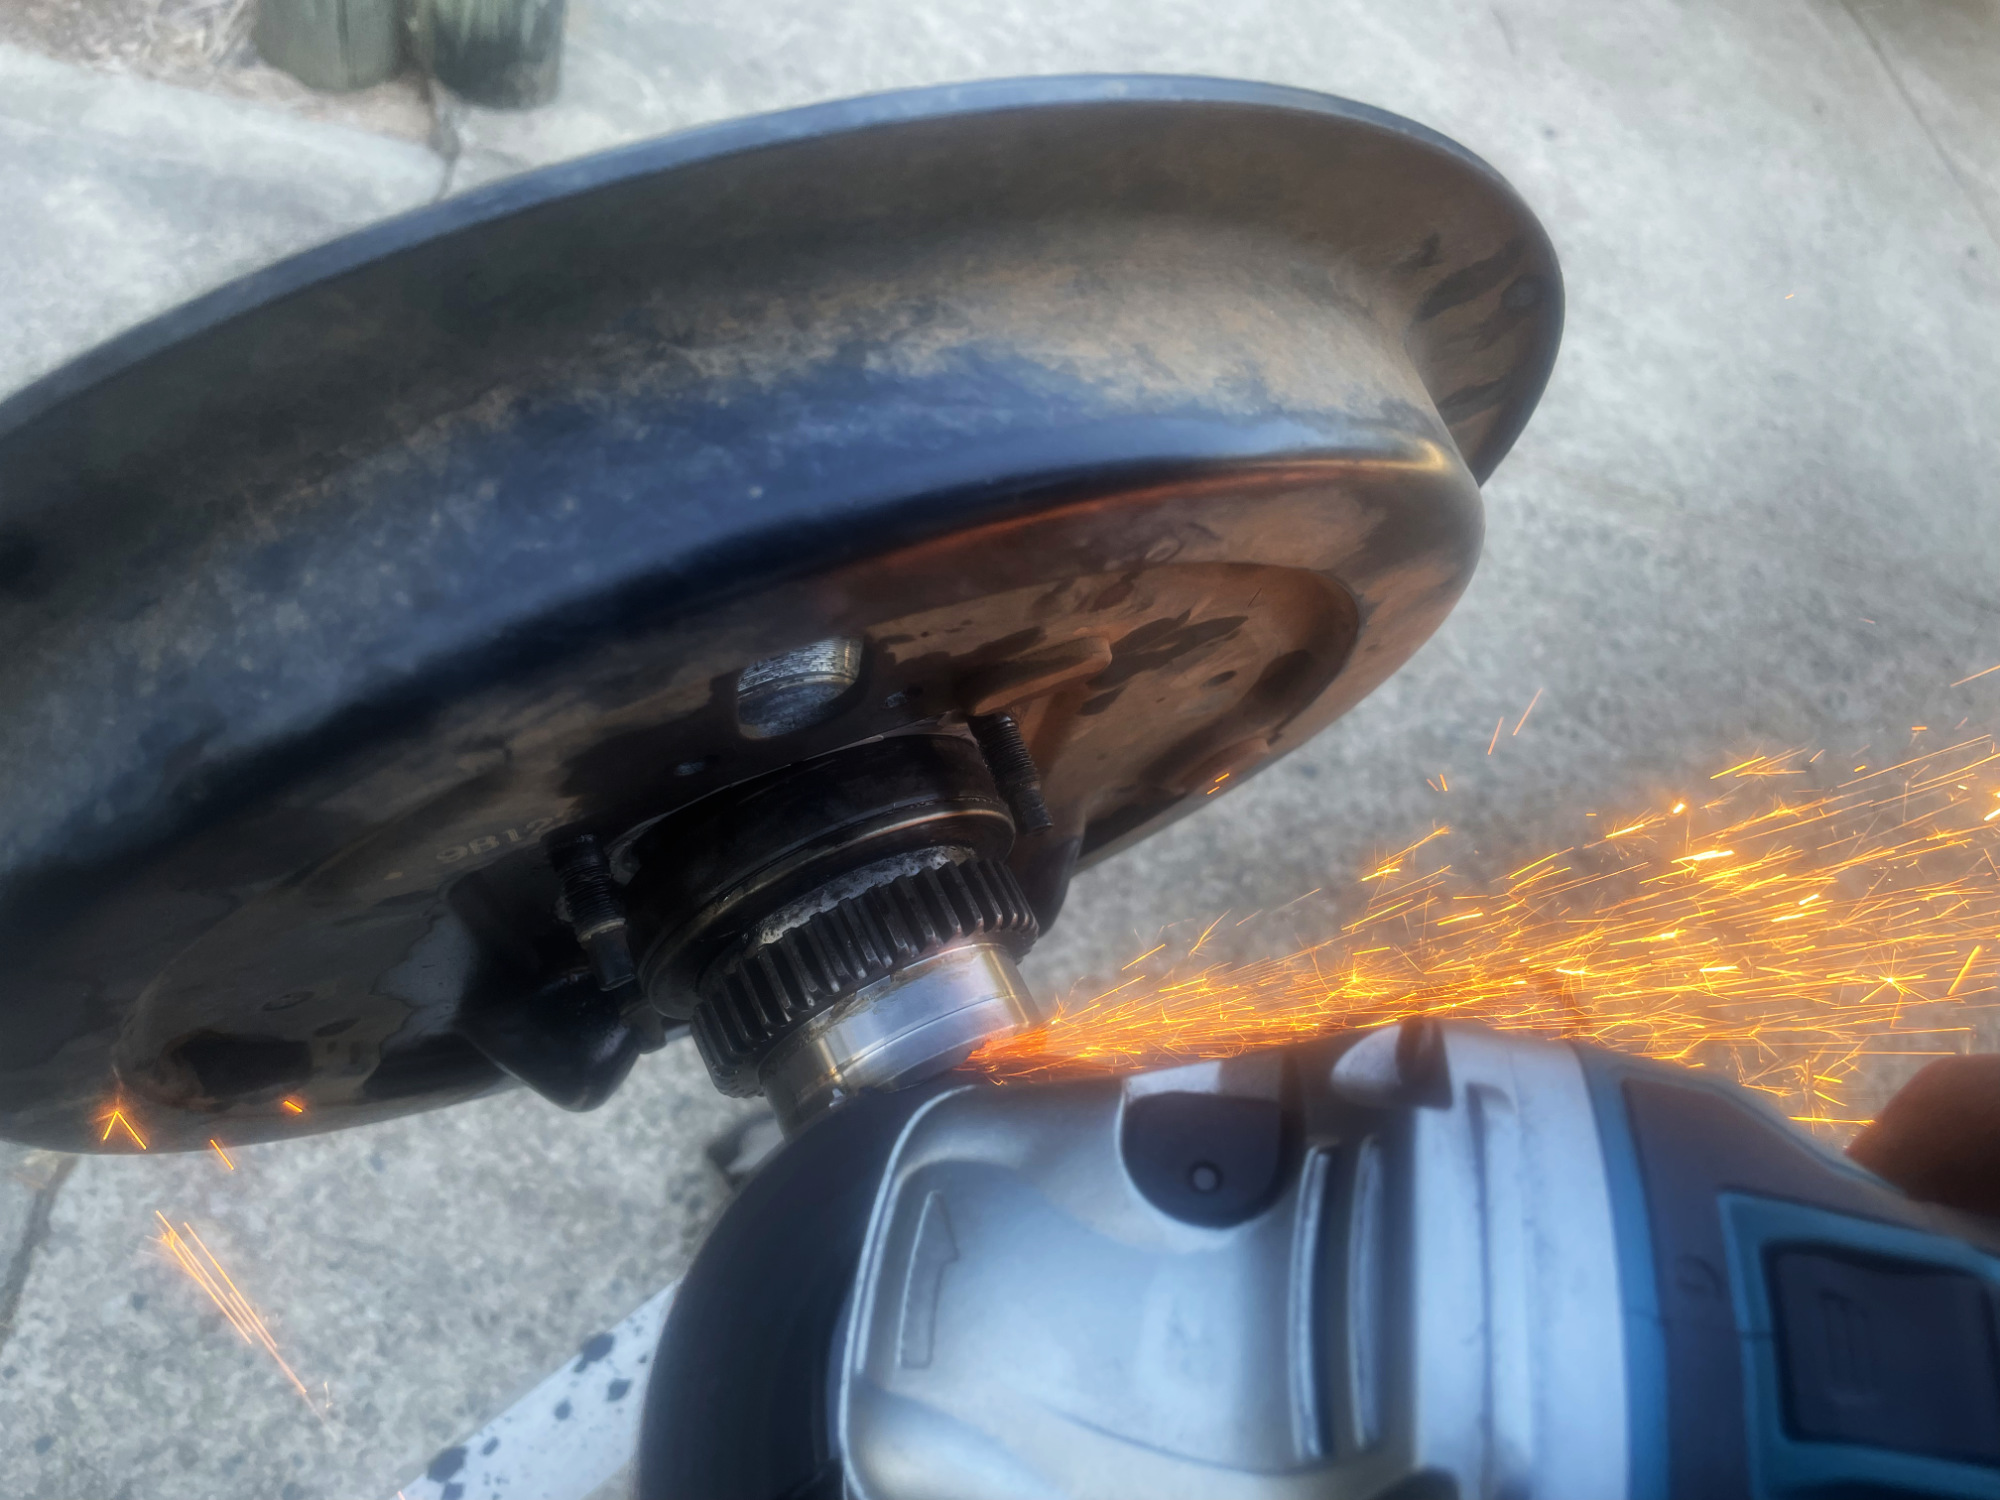
I usually do this in a couple of passes because it means I sneak up on the axle rather than accidentally cutting into it. Here it is after the first cut and after commencing a little bit into the 2nd cut closer to the axle.
What’s good about this method is when you get the retainer thin enough you will notice some hot spots forming on the thinnest parts, which is a good sign you’re close to the axle. You’ve got about 6mm wall thickness on the thin part of the retainer and about 9.5 mm on the thicker part.
At this point I switch over to using a grinding disc rather than a cutting one and work my way till the retainer is super thin over the axle. A cold chisel then can be used to crack the retainer where it is thin and then walk the retainer off the axle once it has lost its press fit hold.
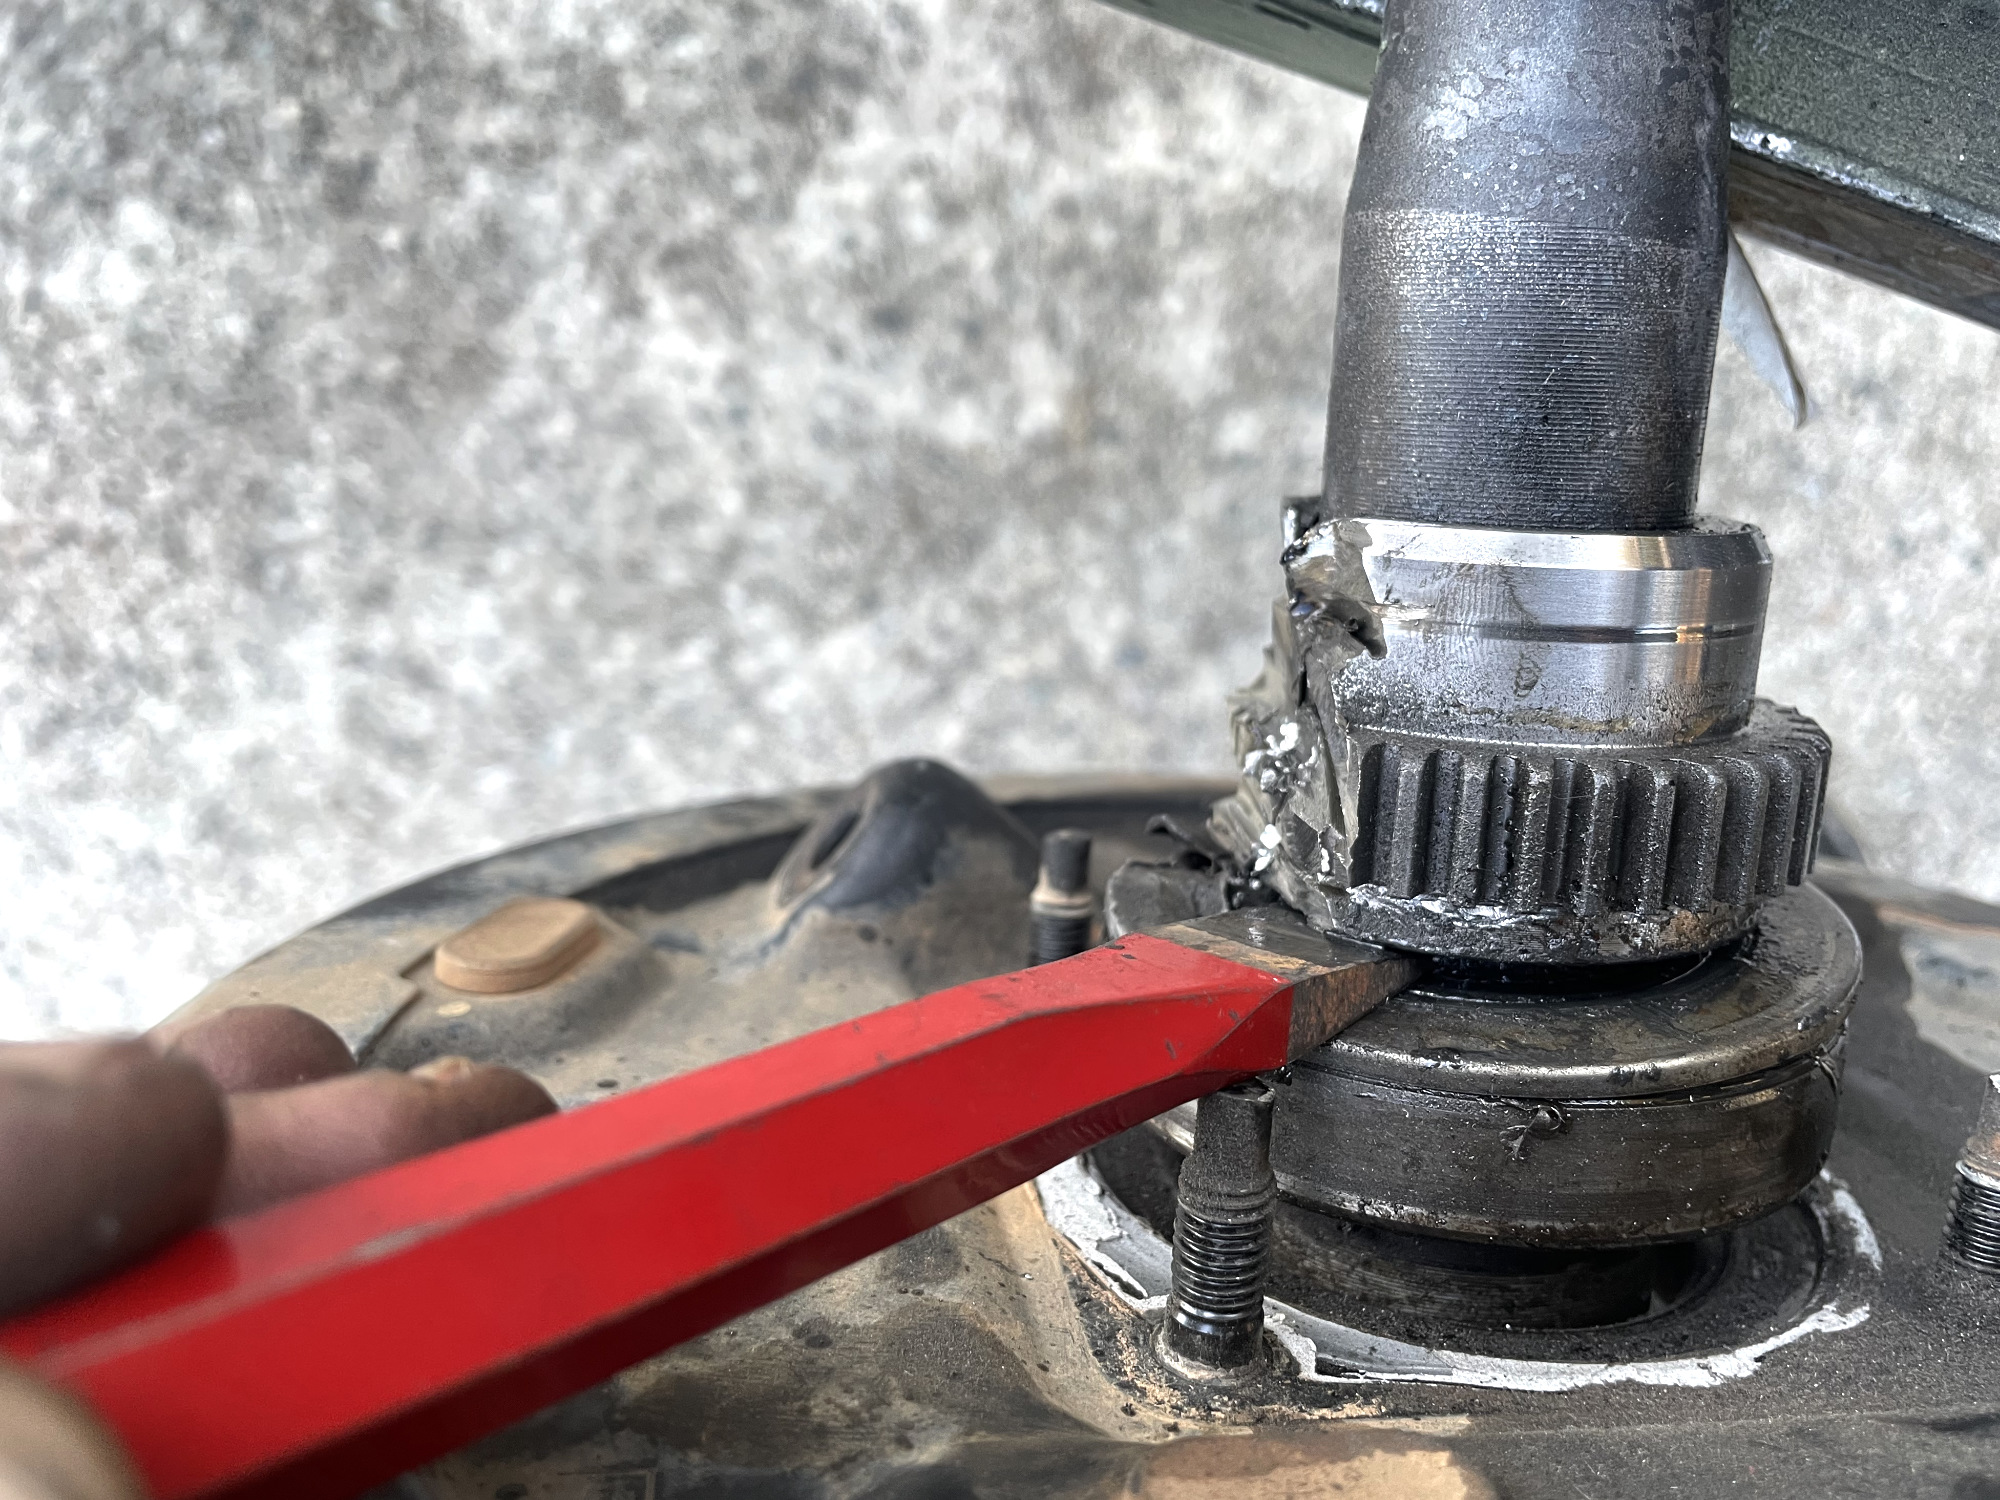
My advice here is just to take it slow and work it off carefully. While a nick into the axle probably isn’t the end of the world, it isn’t ideal especially with modified ones where you might put extra torque through the axle (e.g. via deep reduction gears, or forced induction).
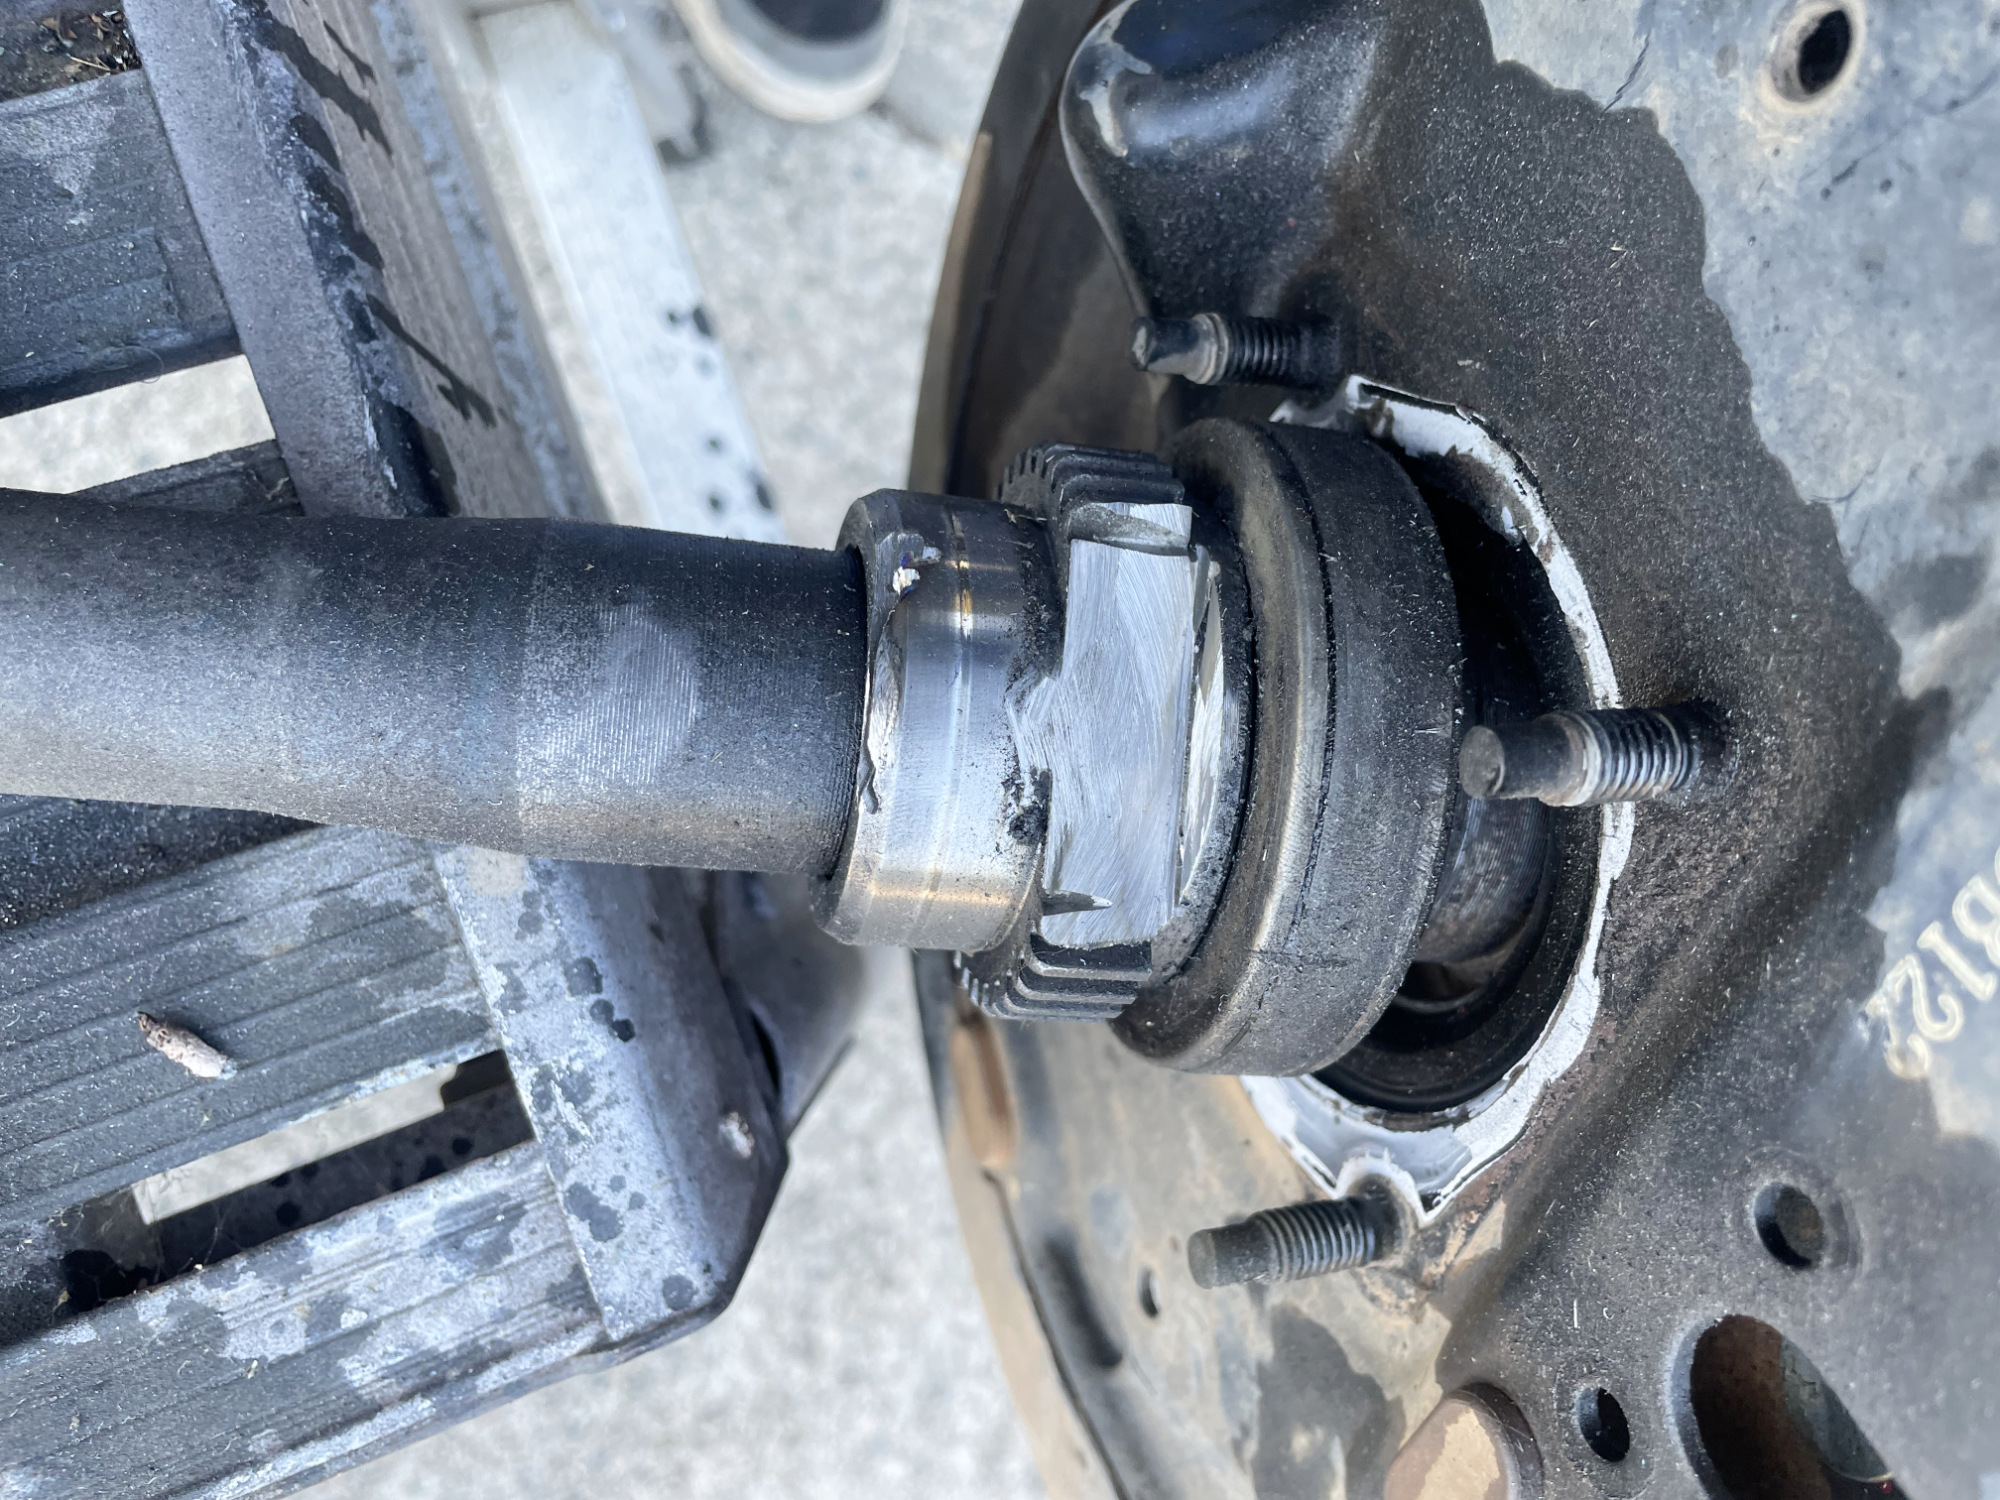
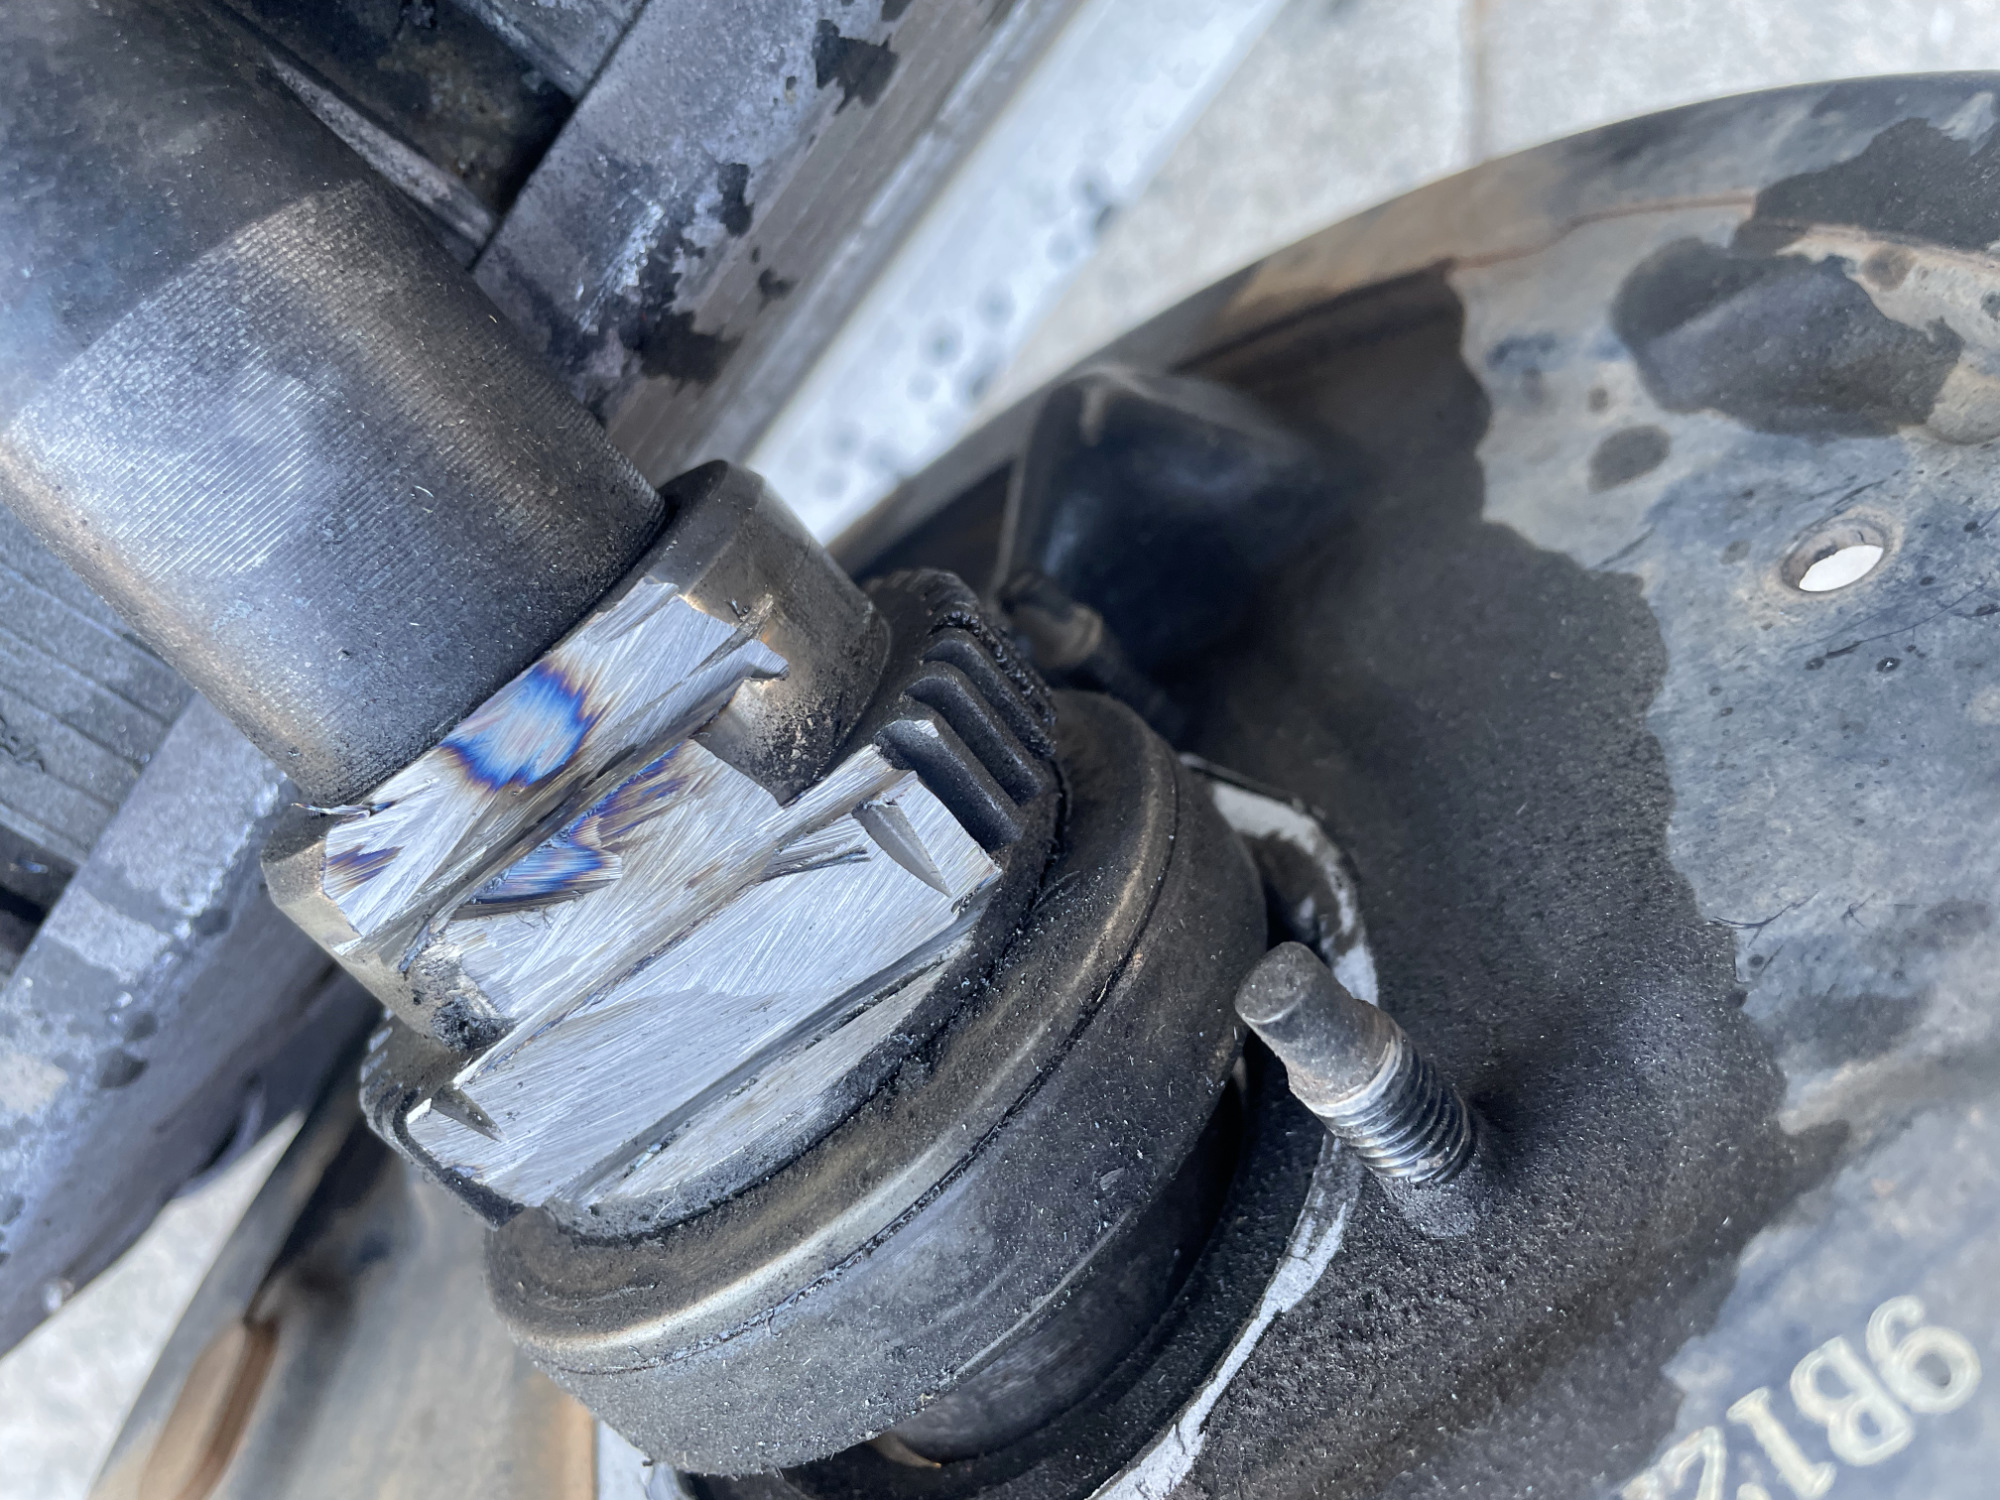
The official method once the retainer is off is to pull the bearing off the axle using a long puller, but you can also grind into the bearing with an angle grinder (again being careful to not nick the axle with the grinder) and then break it with a cold chisel.
Since I don’t really have an appropriate puller I just cut into the bearing and extract it that way.
No easy way to cut into the bearing either, again just take your time. I use a smallish cutoff wheel (usually a partially worn out one) and get some angled cuts into the bearing so I can break off the outer race, remove the balls and then work on the inner wheel bearing race.
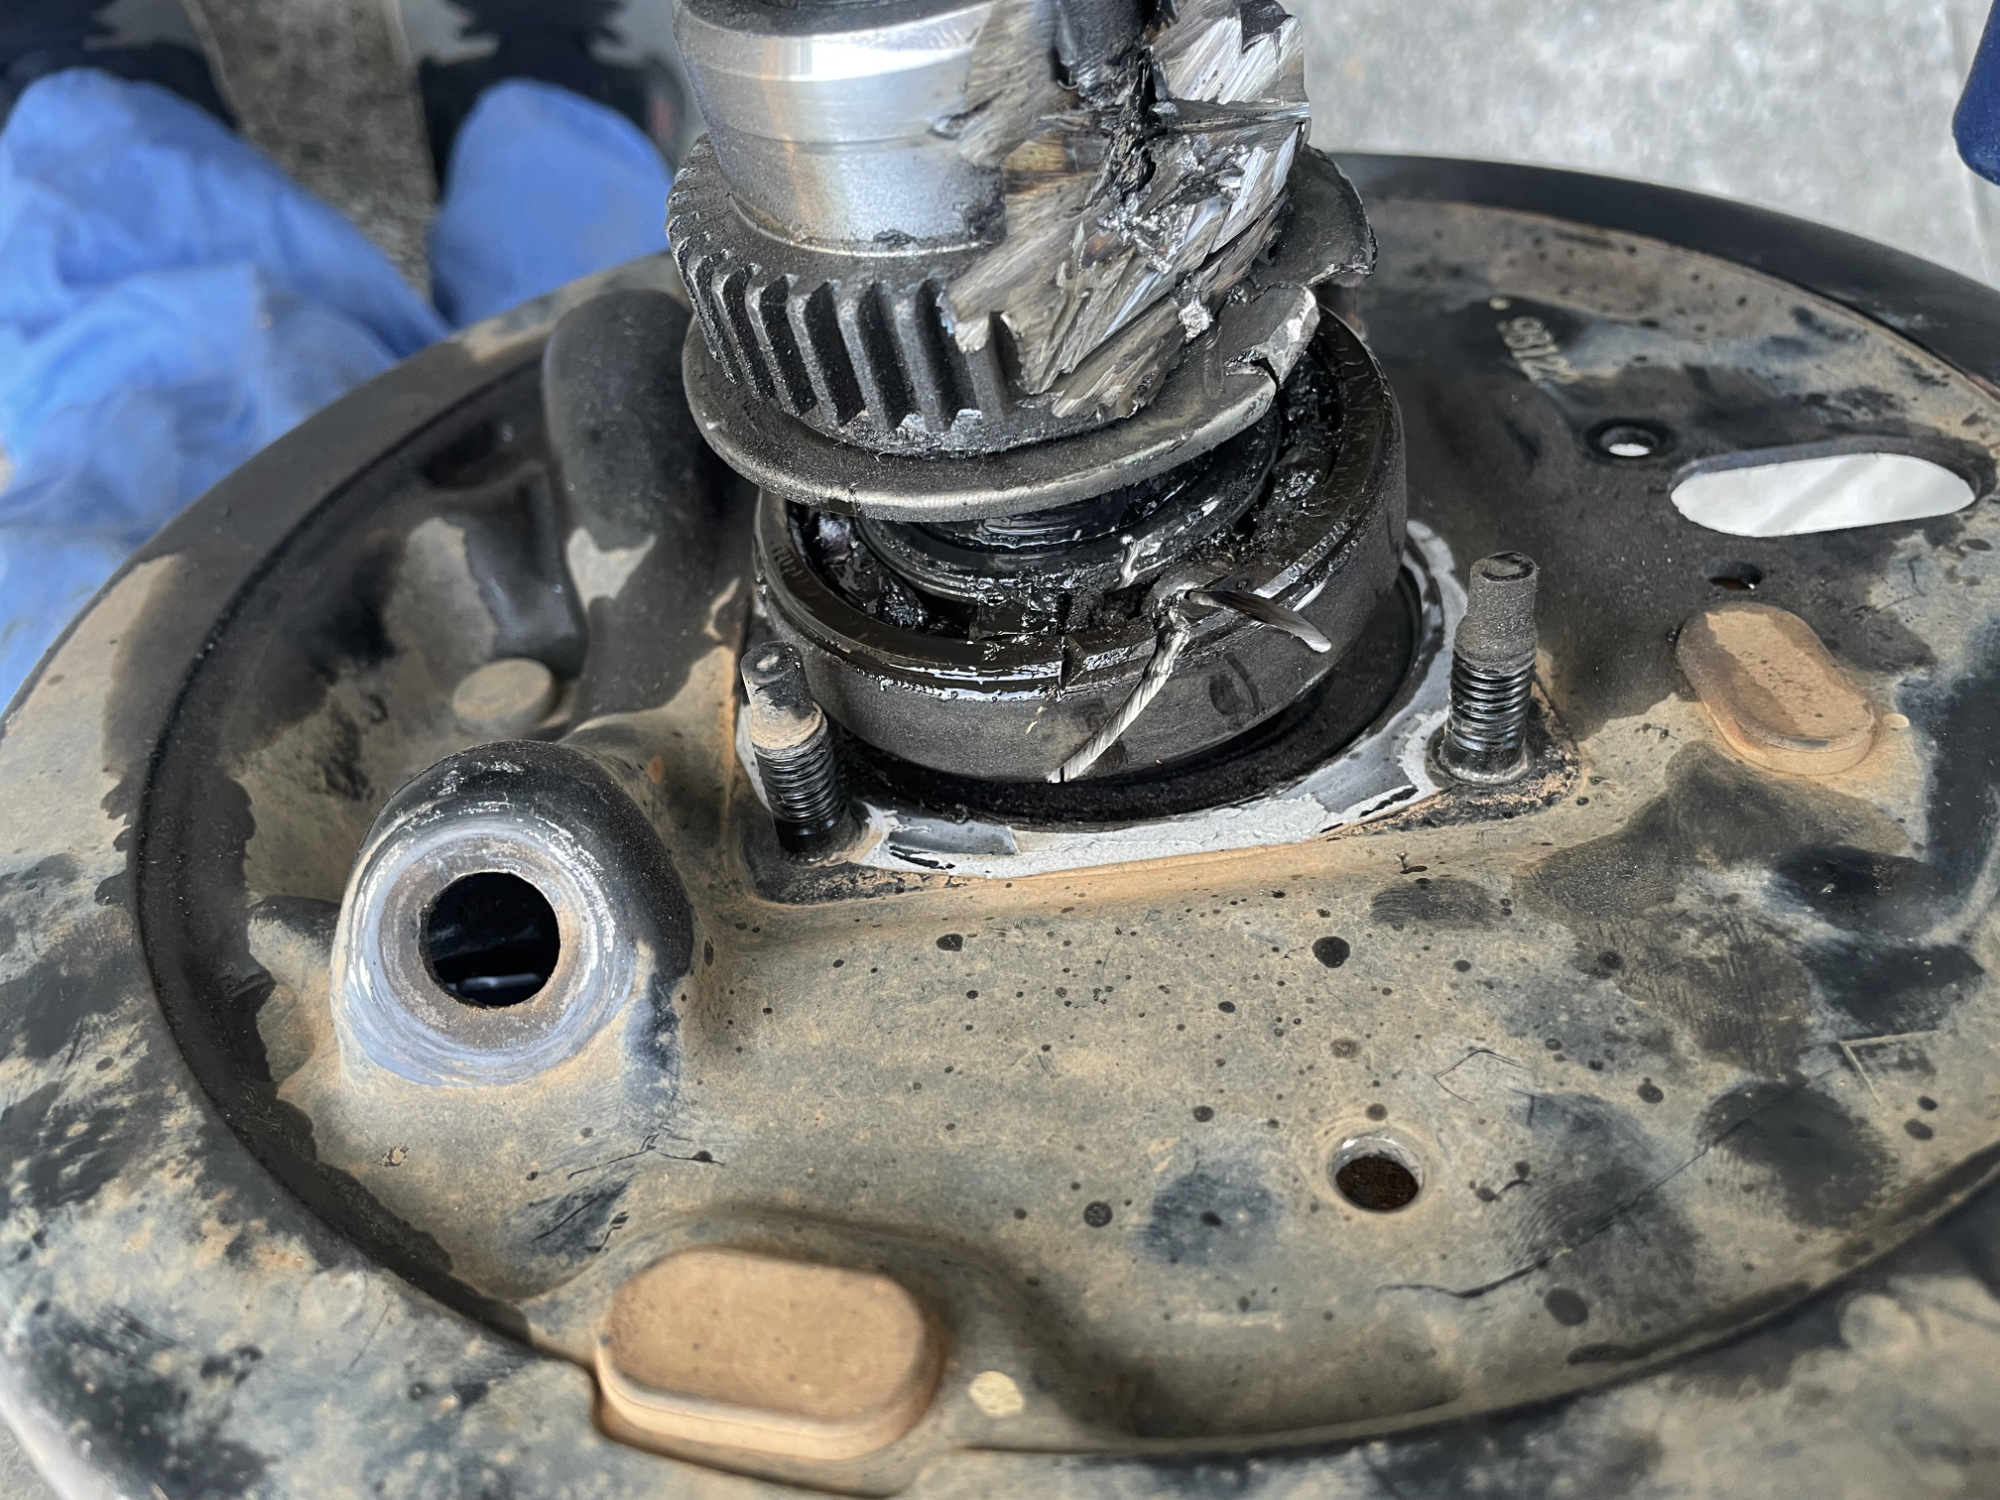
Once you’ve got it down to an inner bearing race only it’s pretty easy to walk it off with a cold chisel, using the brake cylinder hole in the backing plate to get a better angle on the inner race.
Note if you’re doing this you want to support the axle end onto something soft like wood to ensure you don’t deform the end of the axle.
Removing axle seal, seal protector and axle housing sealant
The first thing you have to do to prep for reinstallation is clean up the axle housing and get seals out.
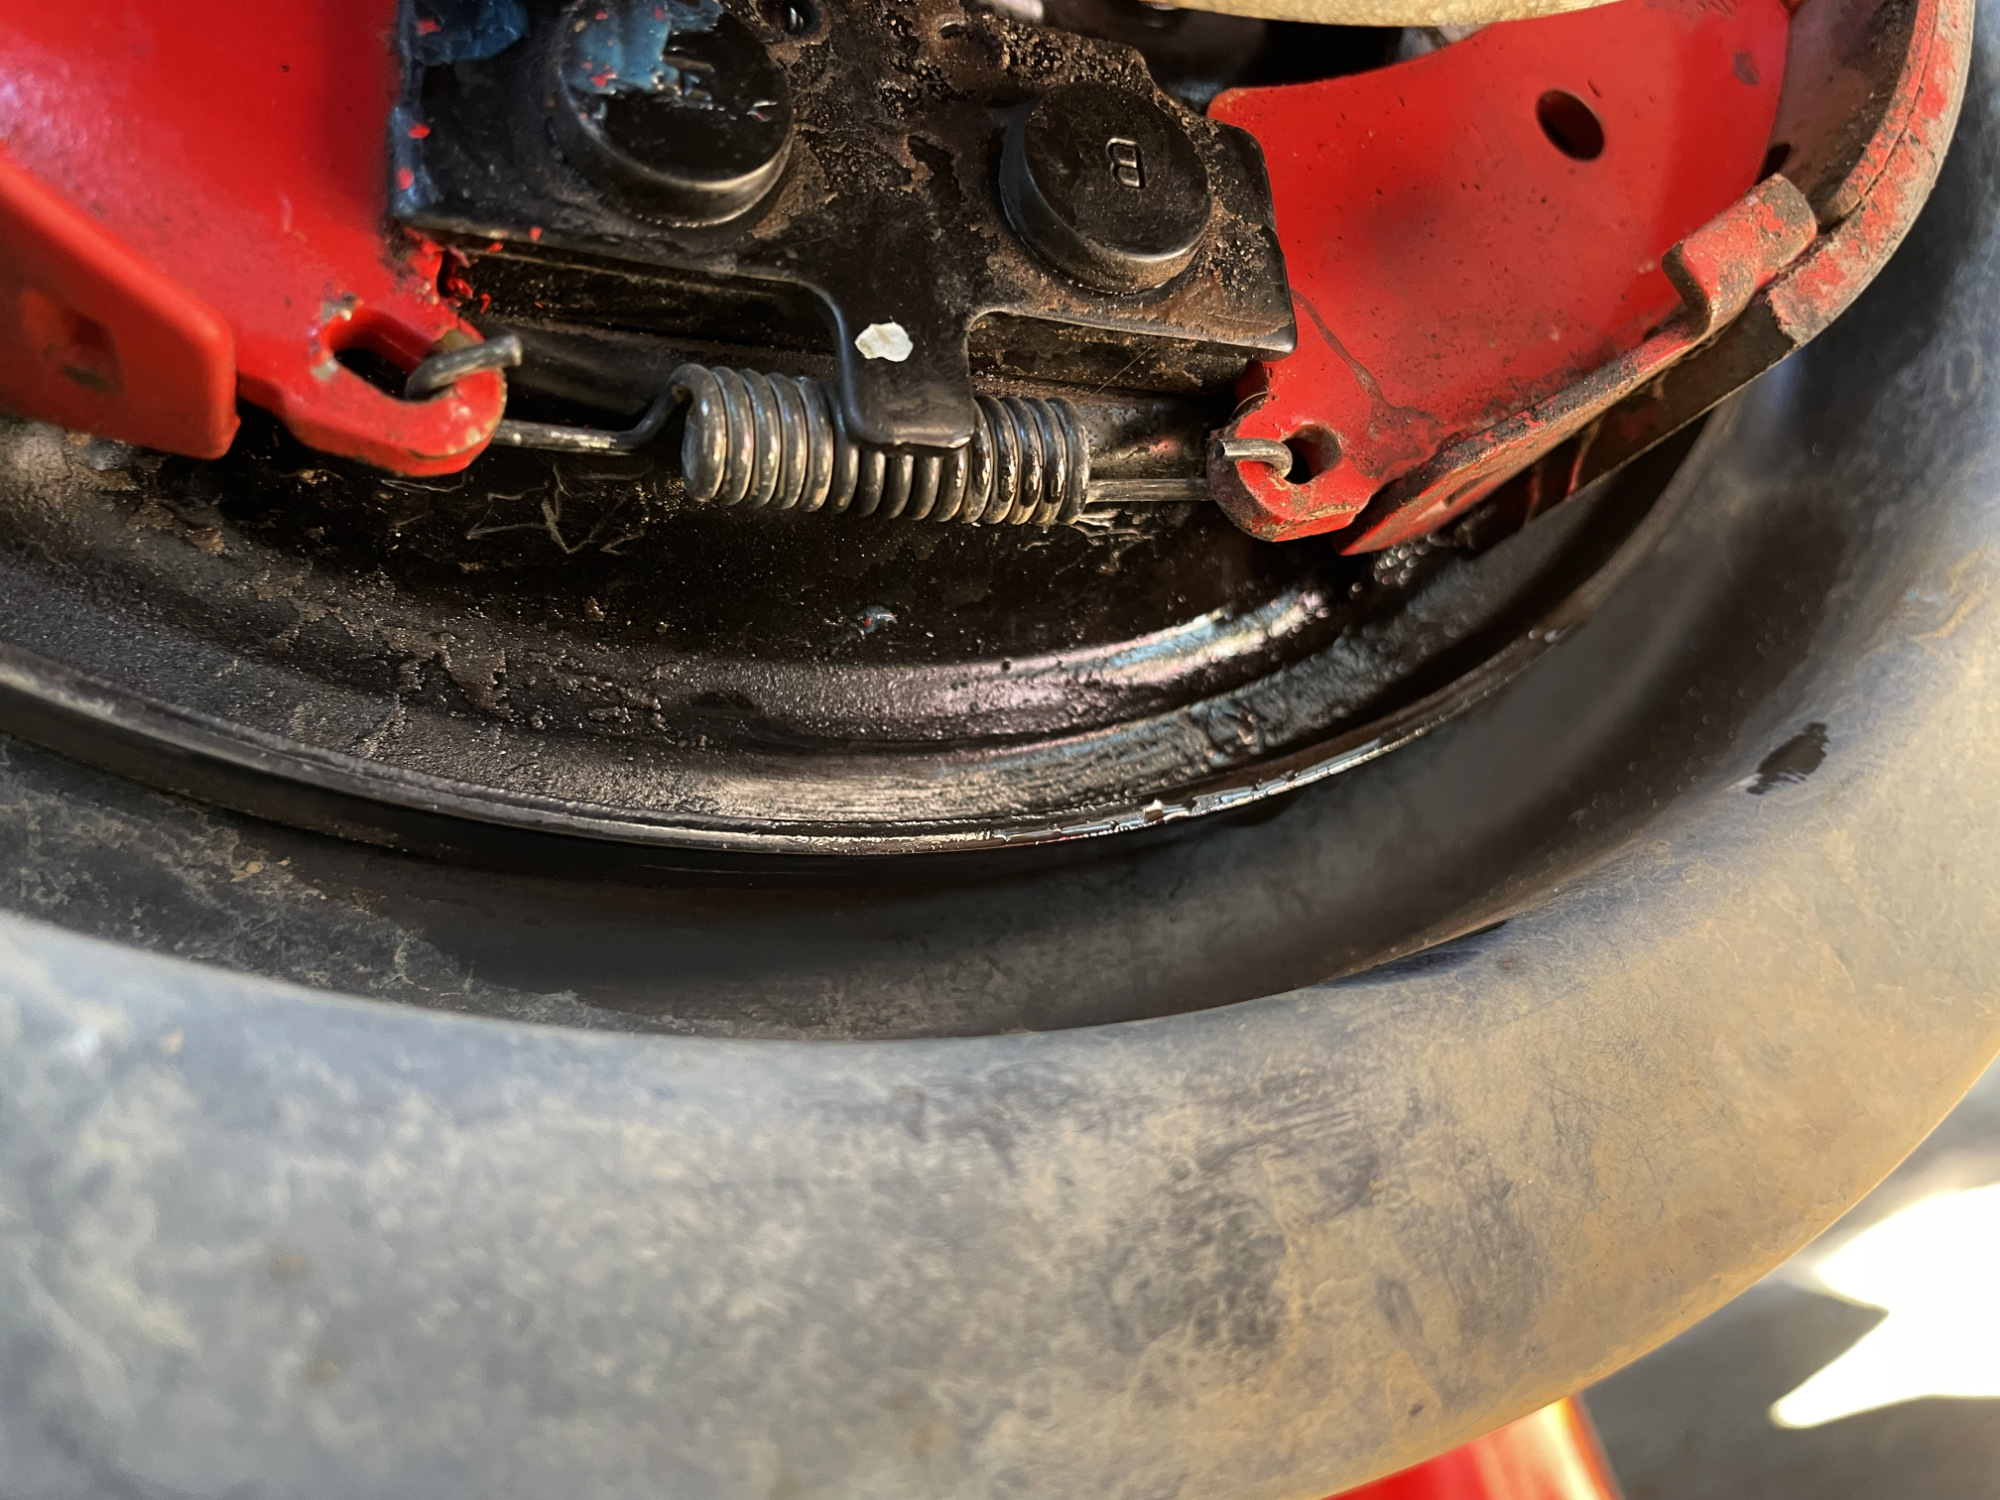
I start with the sealant around the end of the axle housing.
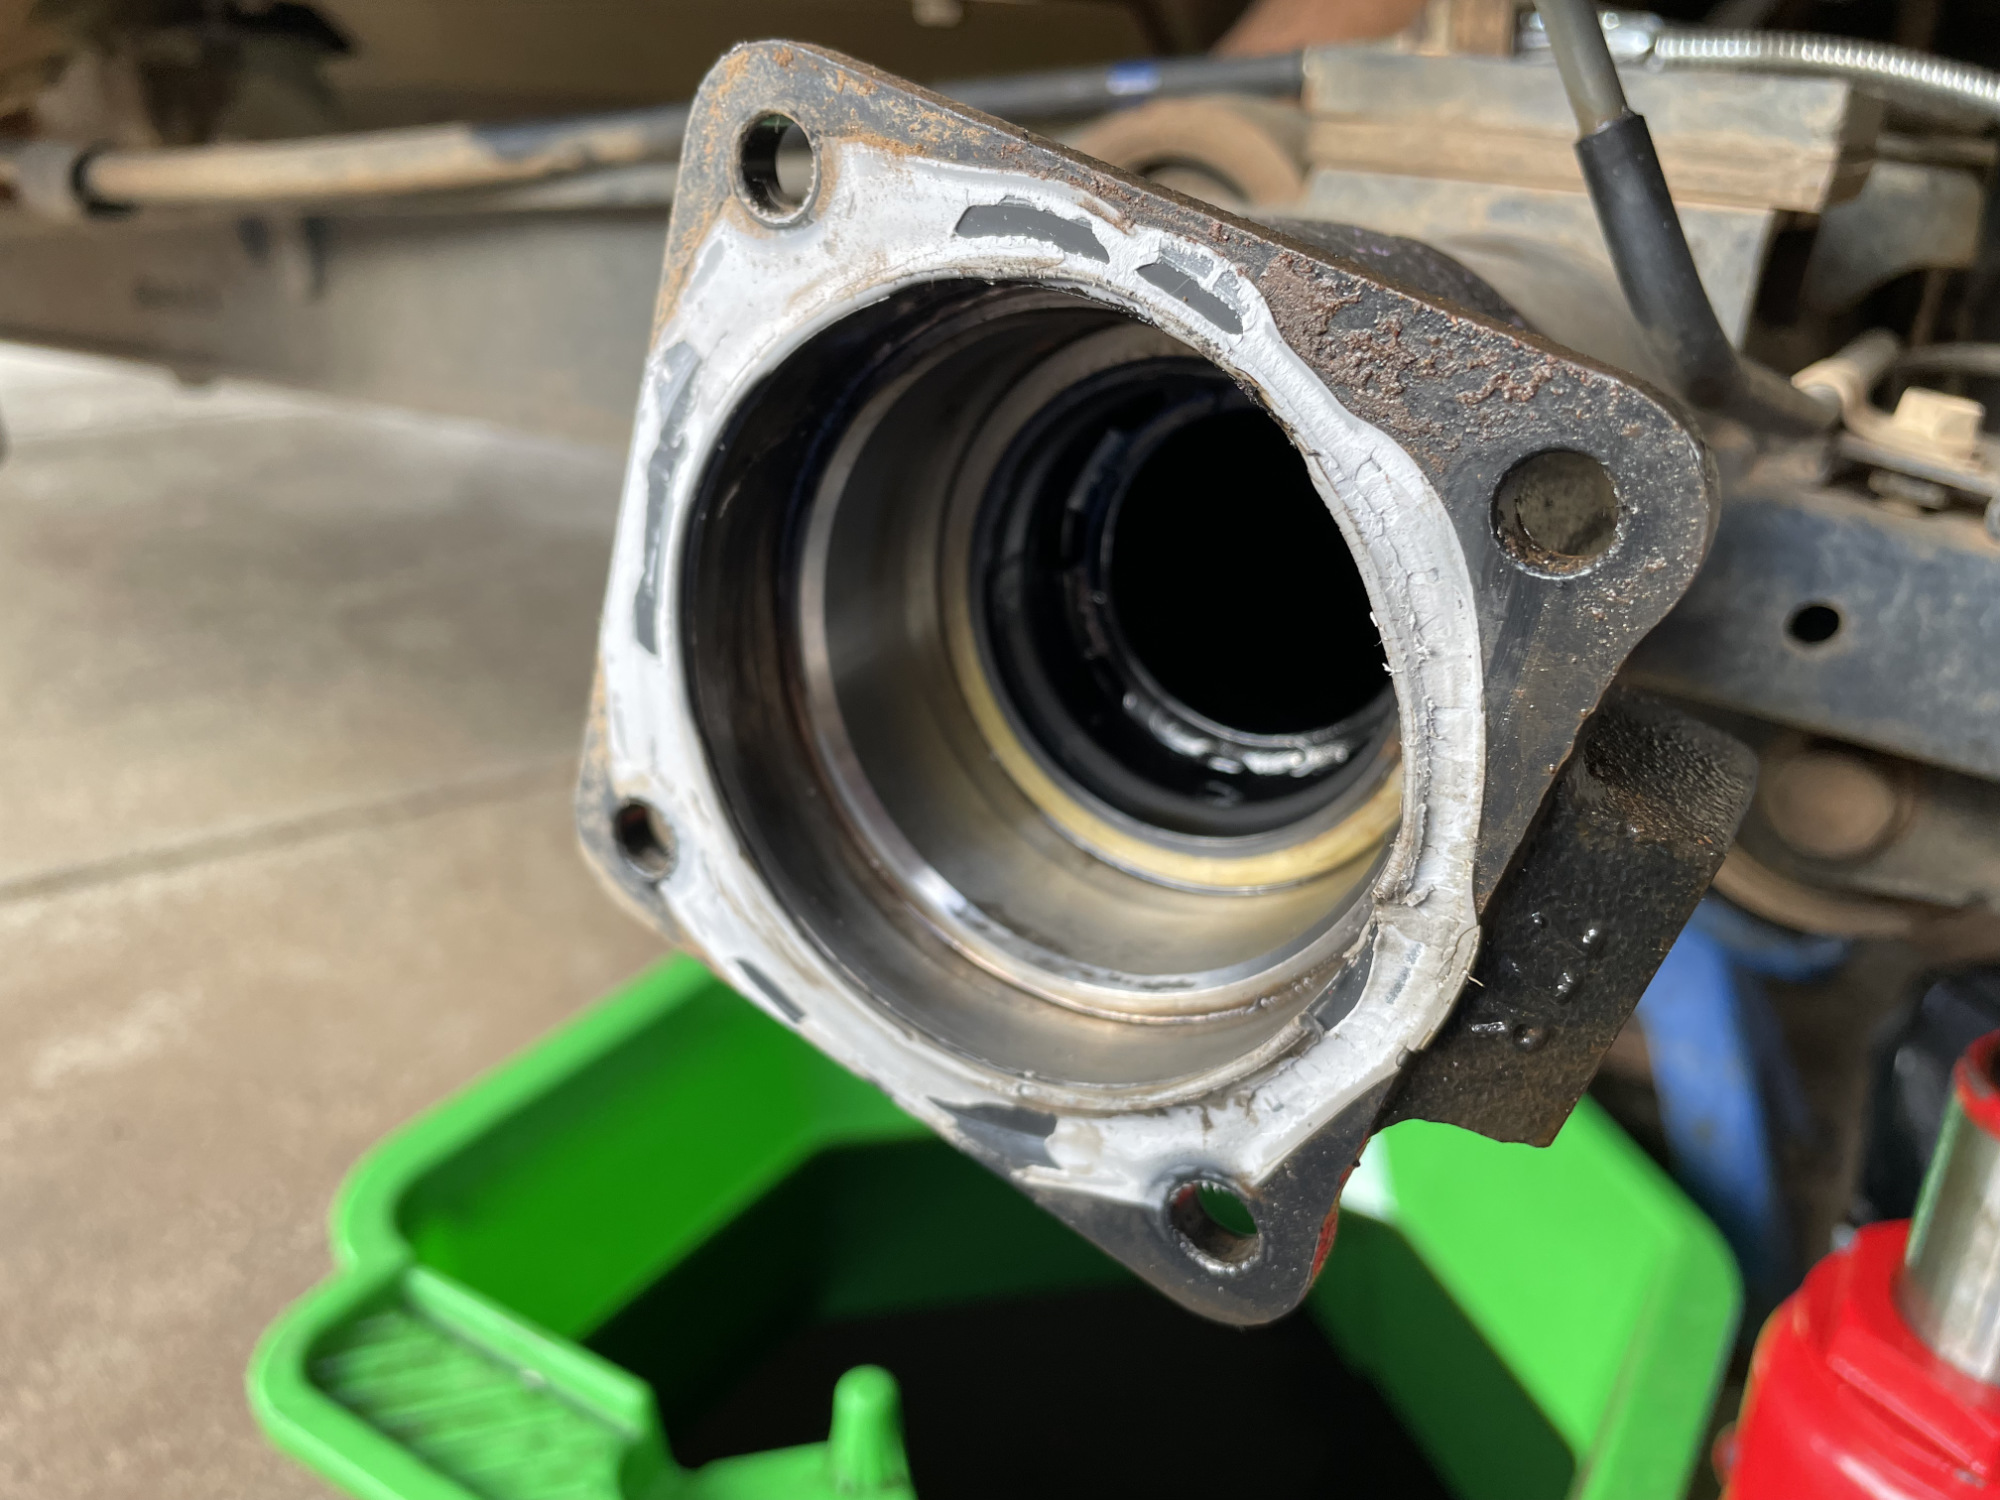
Use something to scrape the sealant off and you’re basically done.
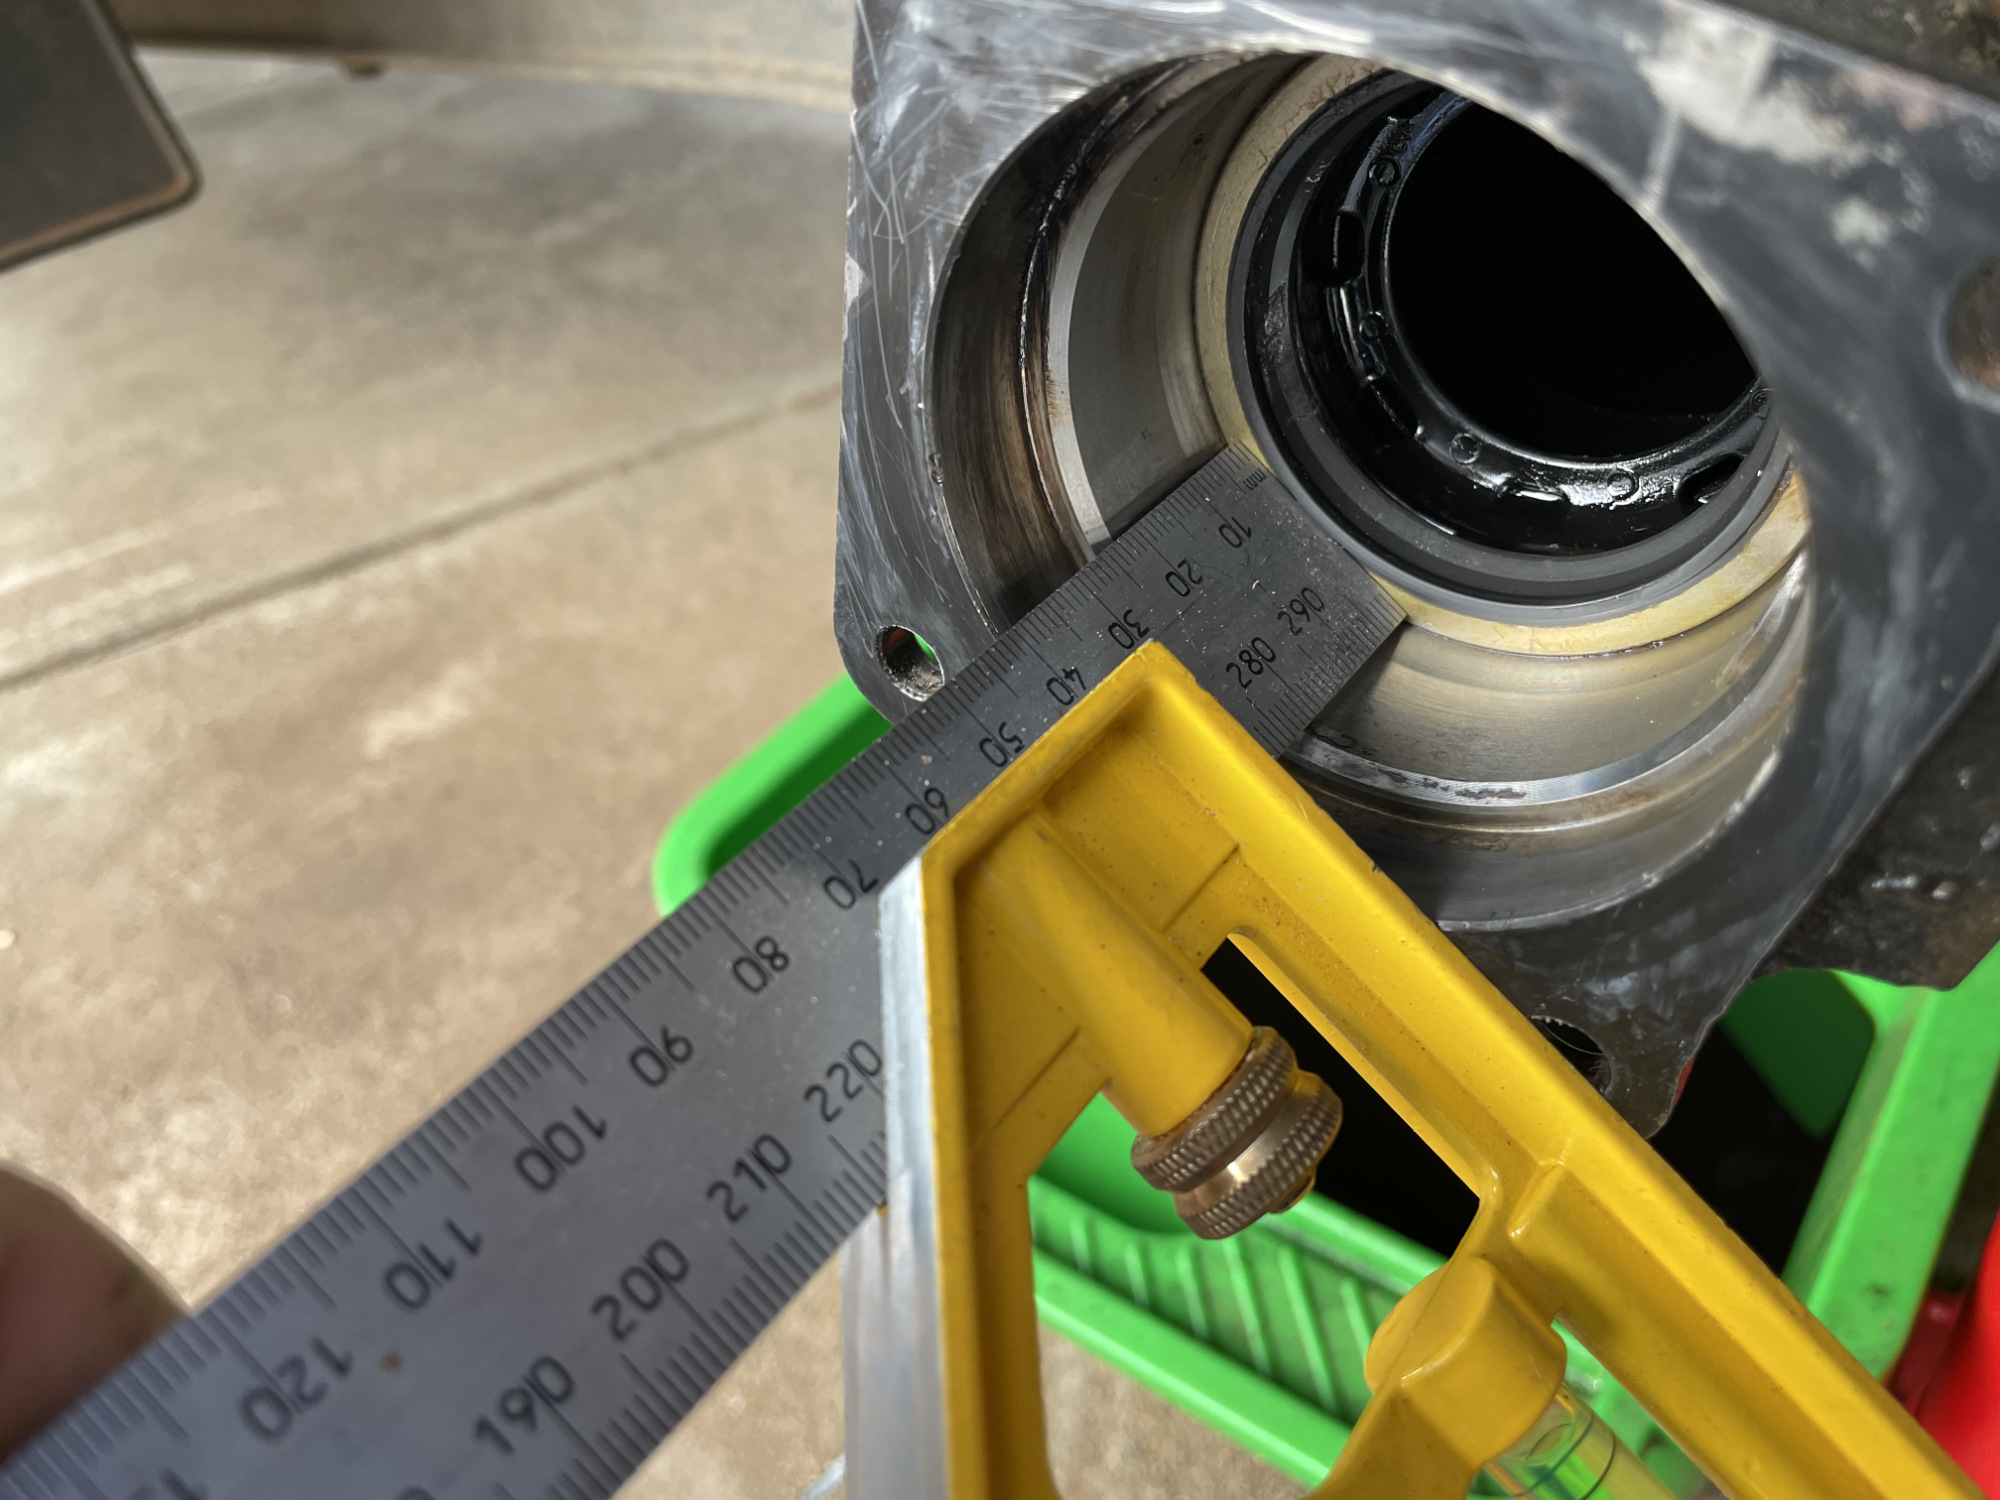
Next thing to do is to verify the depth of the seal to replicate it. If you put the seal in too deep then it won’t properly seal against the ABS ring/bearing retainer, and if it’s too shallow it will rub against the ABS tone ring itself. It’s also good to know the depth to make sure the seal goes in straight when you replace it.
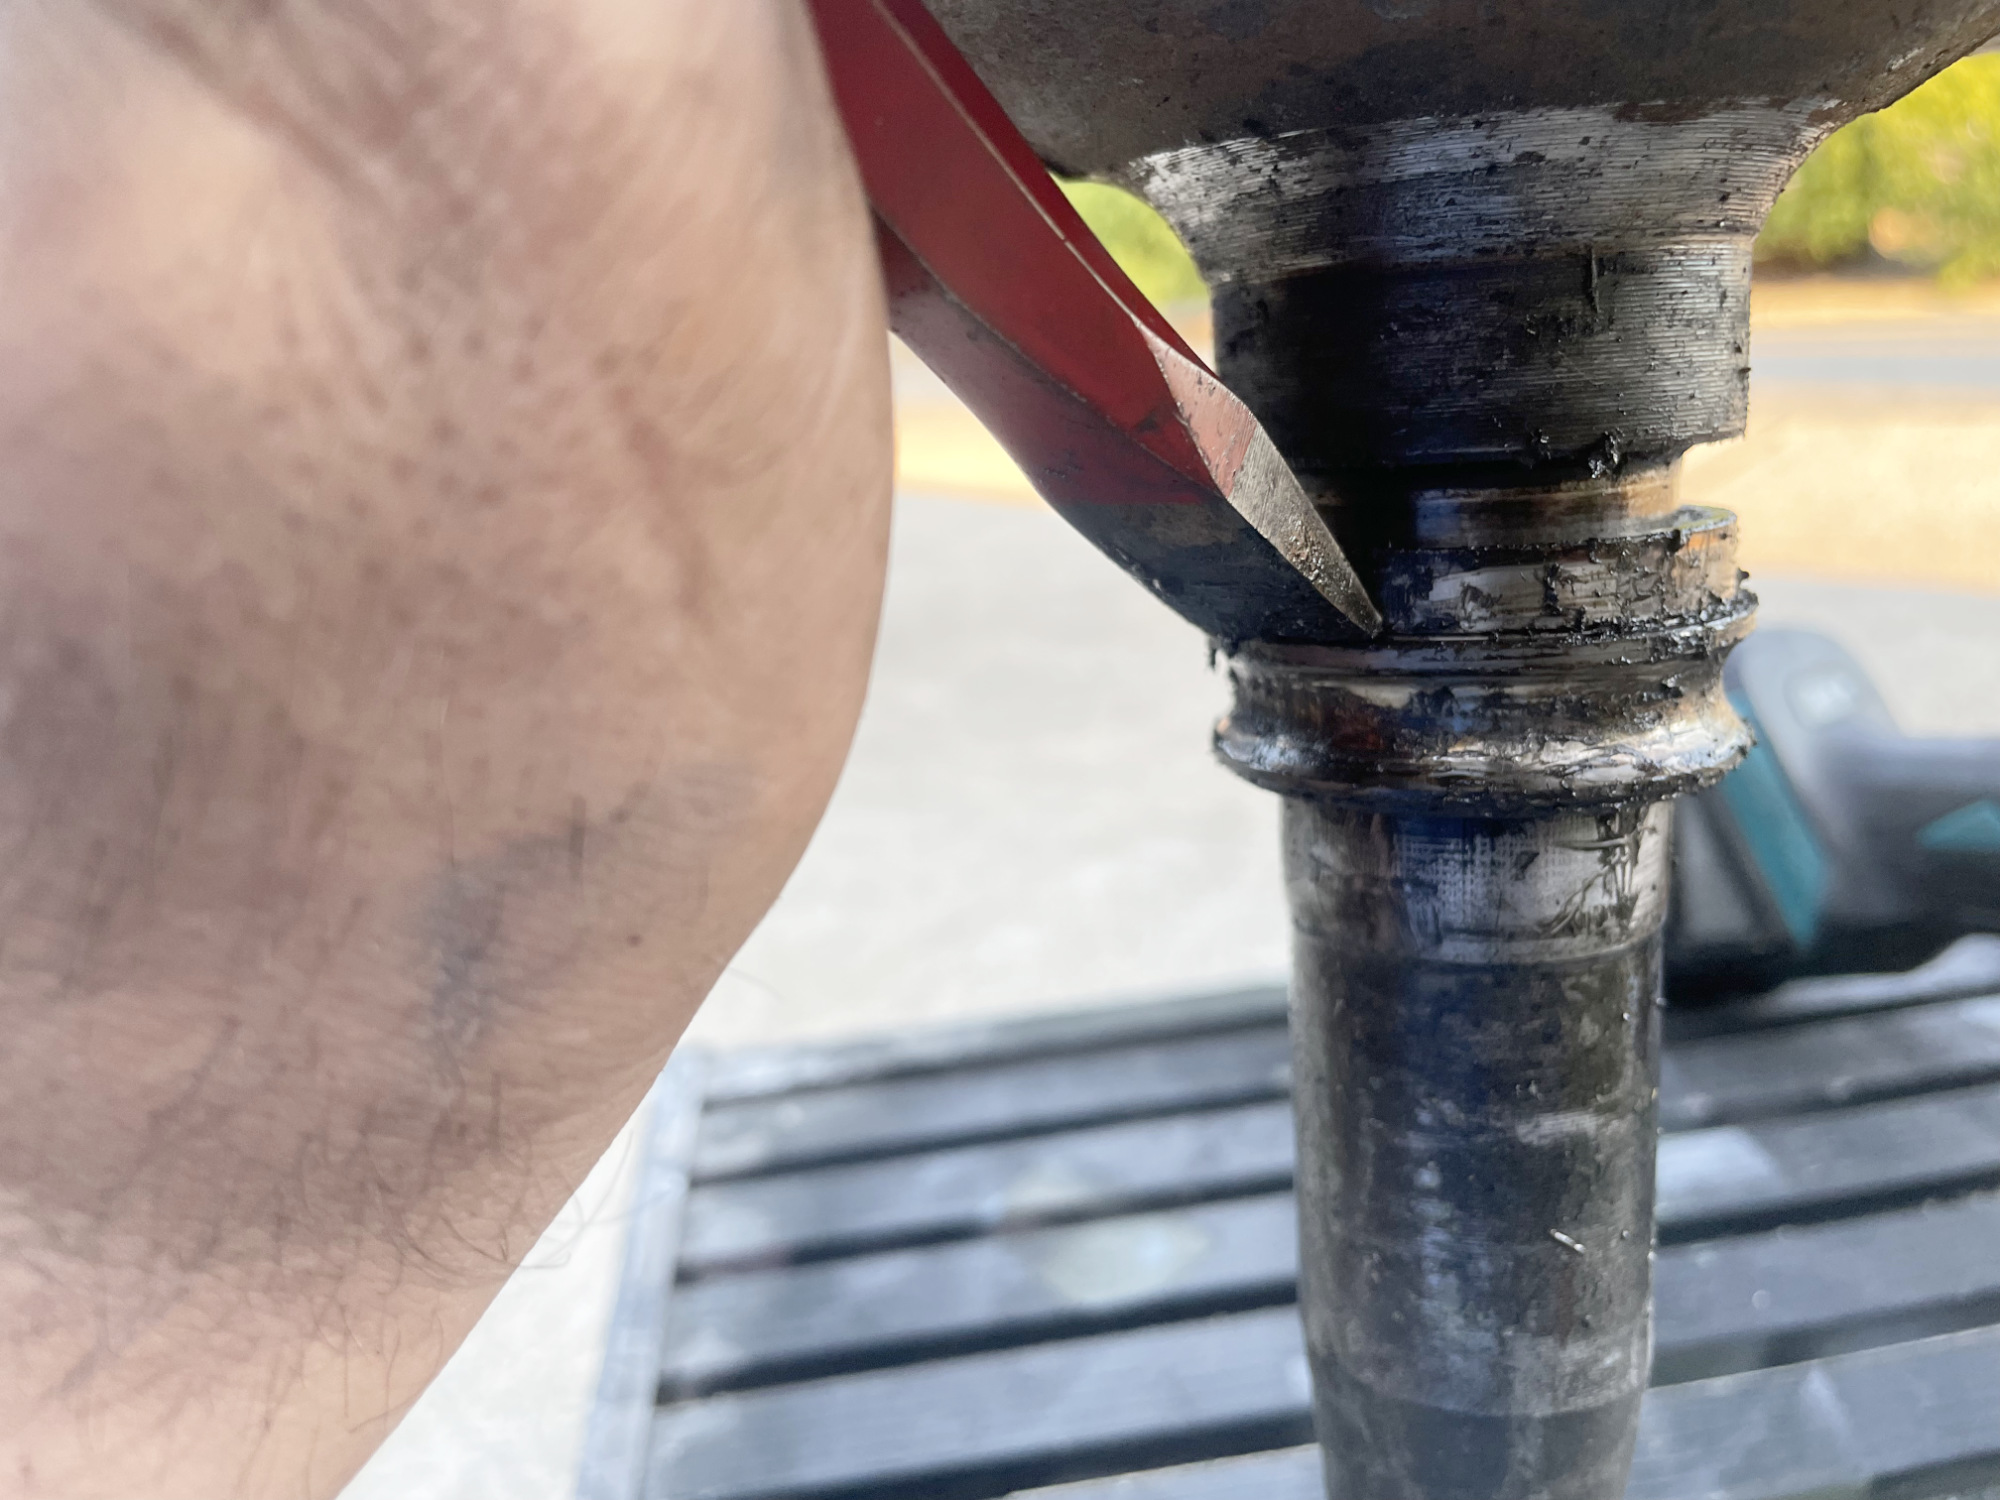
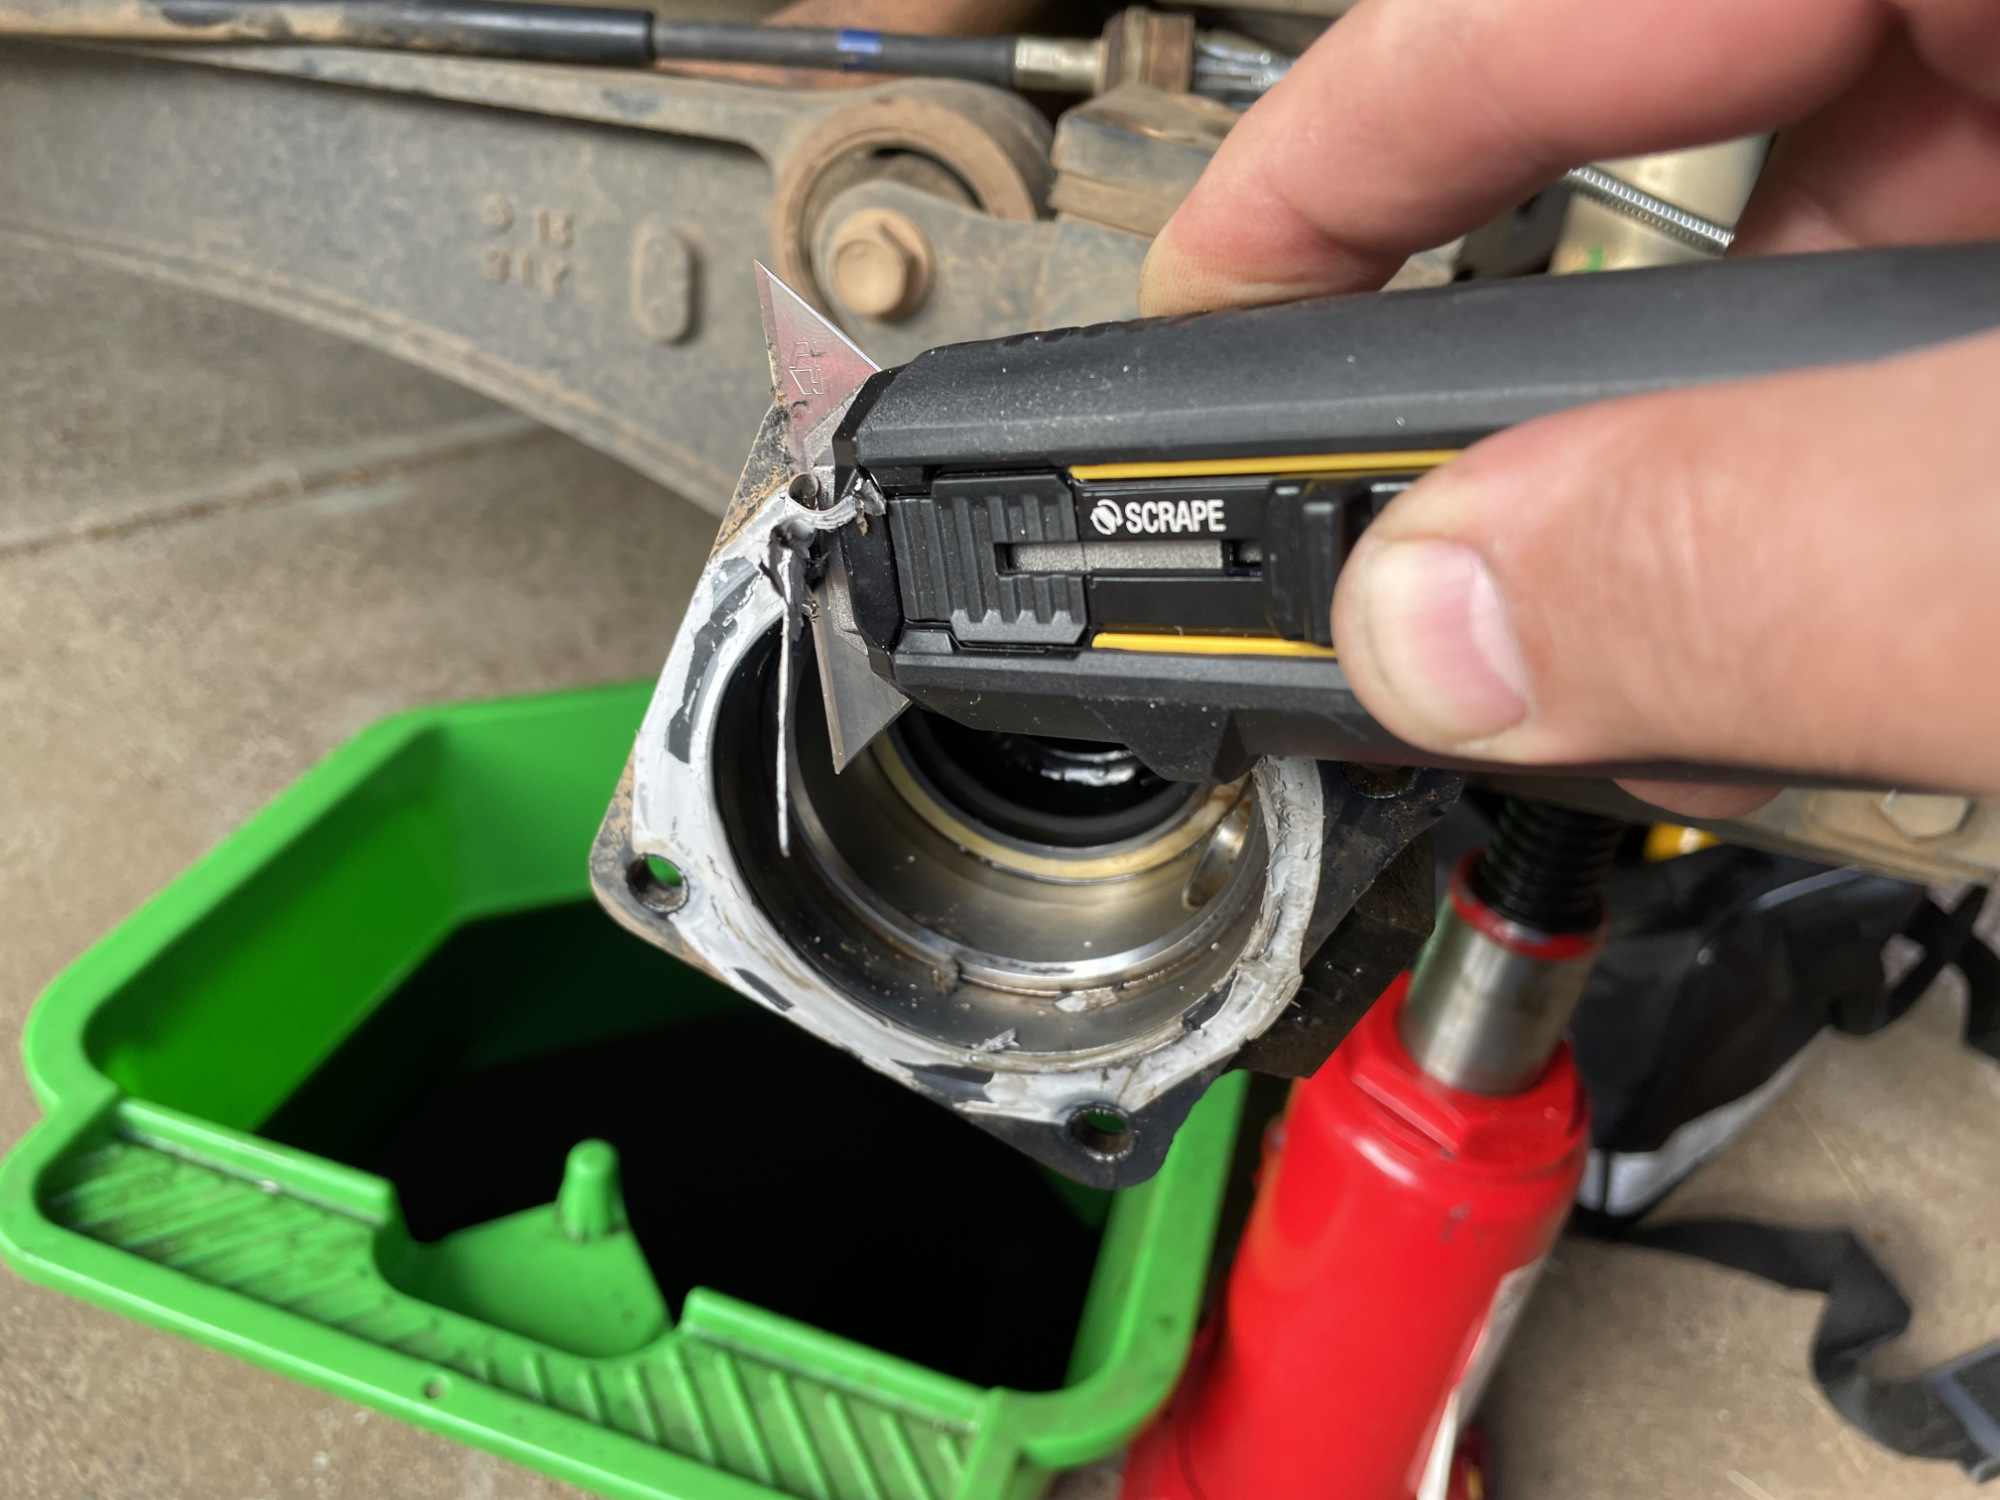
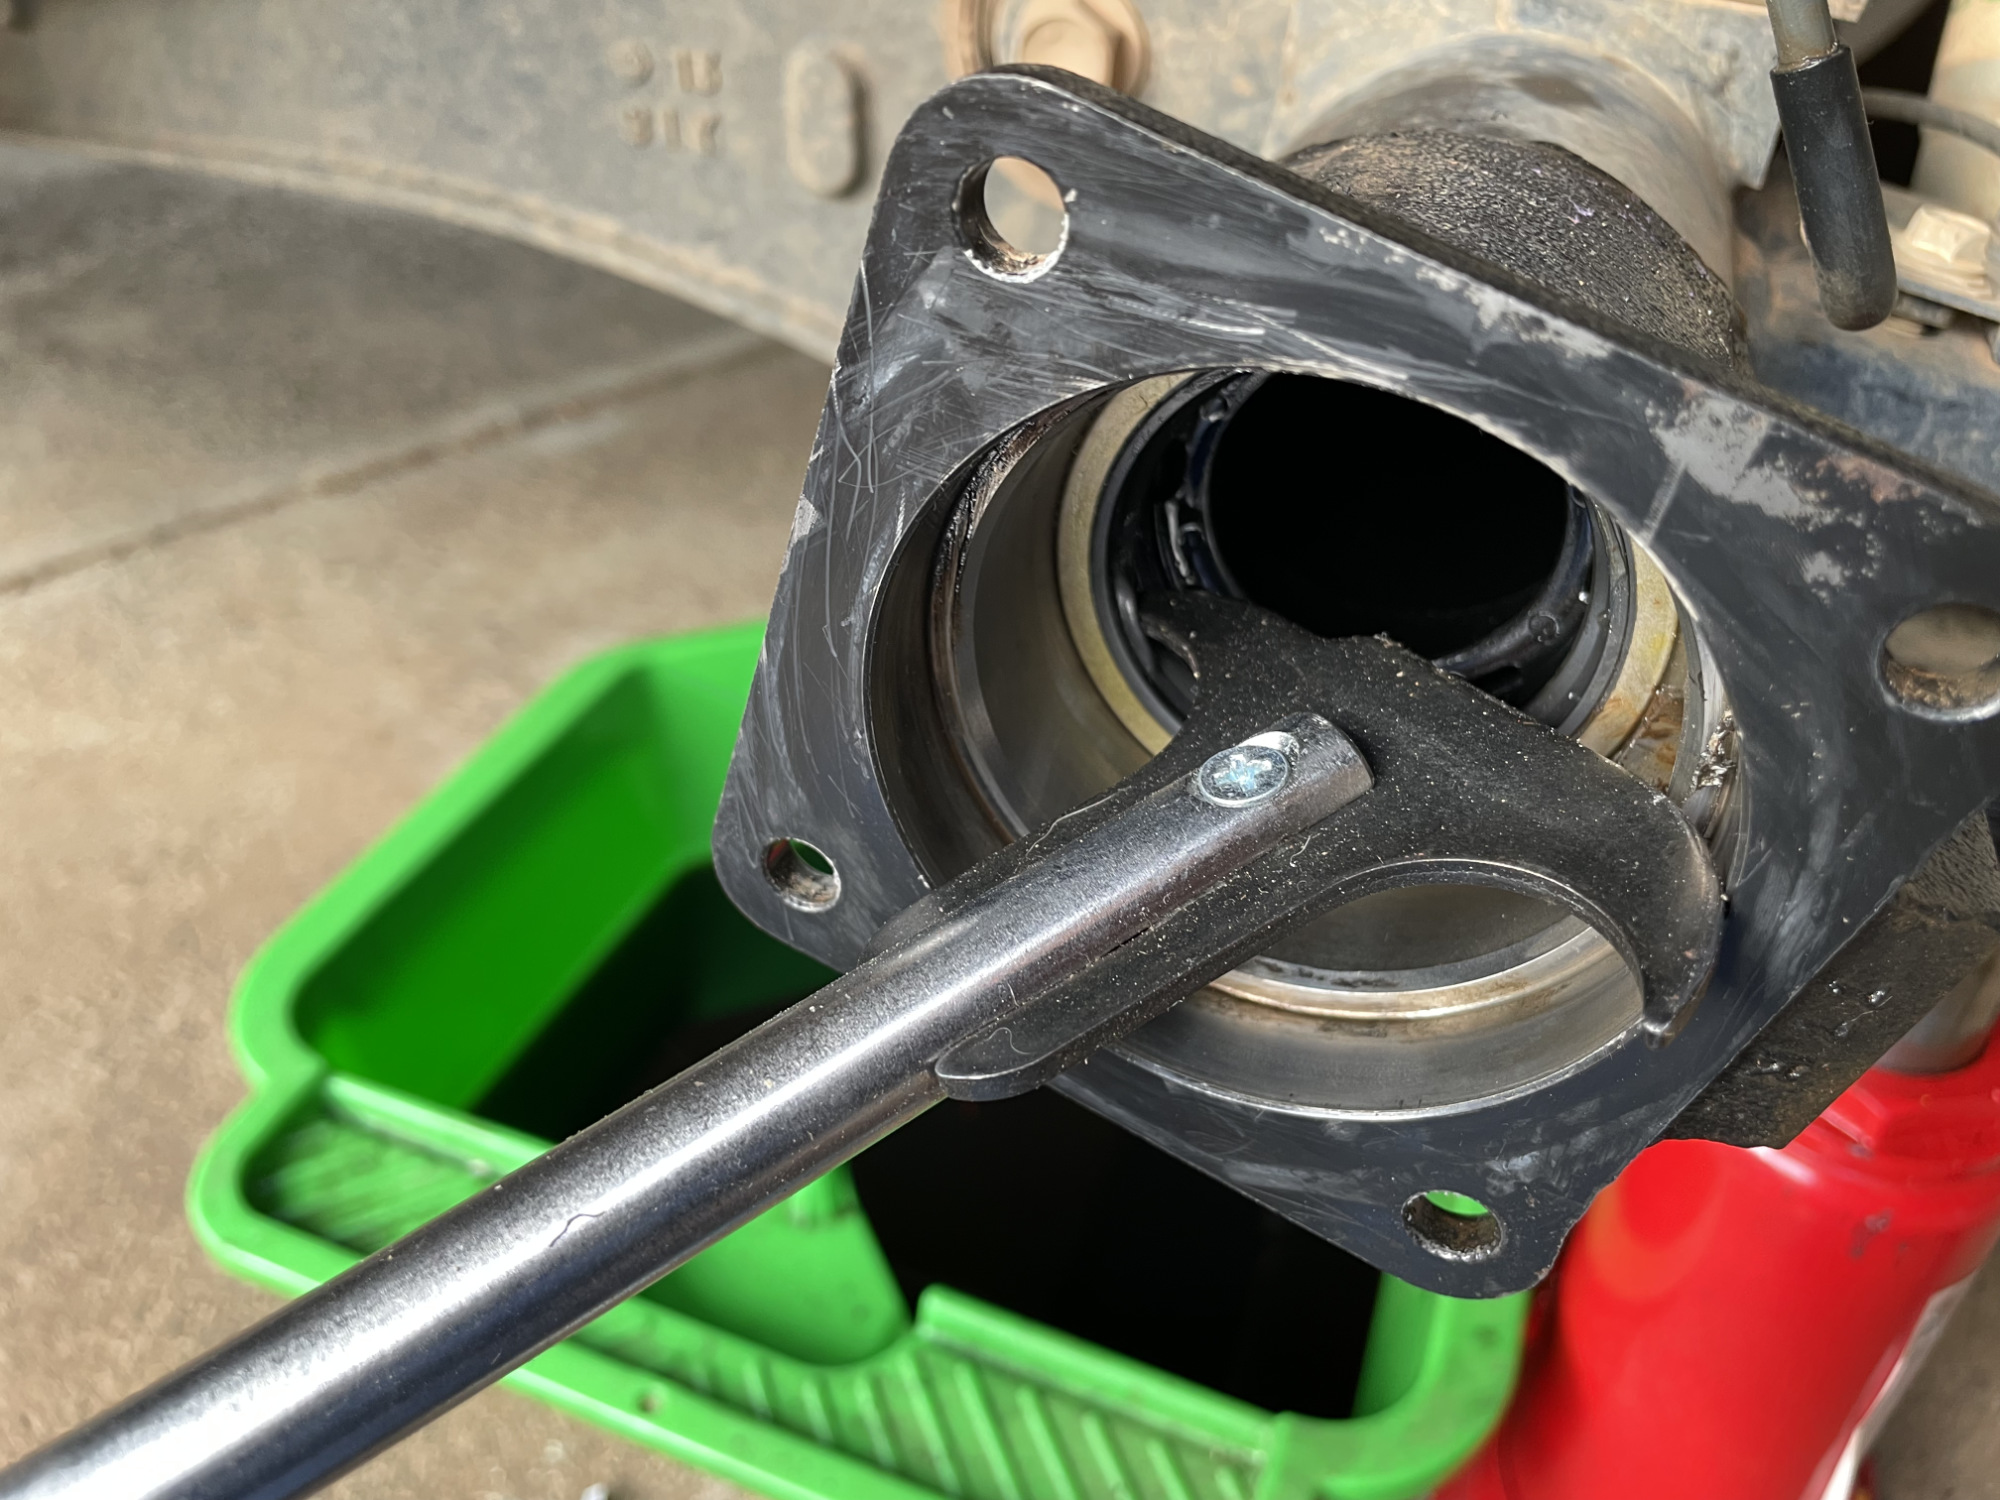
Now comes the next bit of fun: getting the seal out.
You can use a basic seal puller, though you do have to be careful not to damage the axle housing too much using these. A bit of a mark can be dealt with purely because of the sealant used around the end of the axle housing, but don’t completely munt it.
I actually find the easiest method is to drill a couple of pilot holes into the seal, and then drive some screws into the seal and pull it out using the screws.
My photo of using the screws didn’t turn out, but imagine putting in some reasonable length self tapping screws into those holes and then pulling out with a set of vise grips onto the screws.
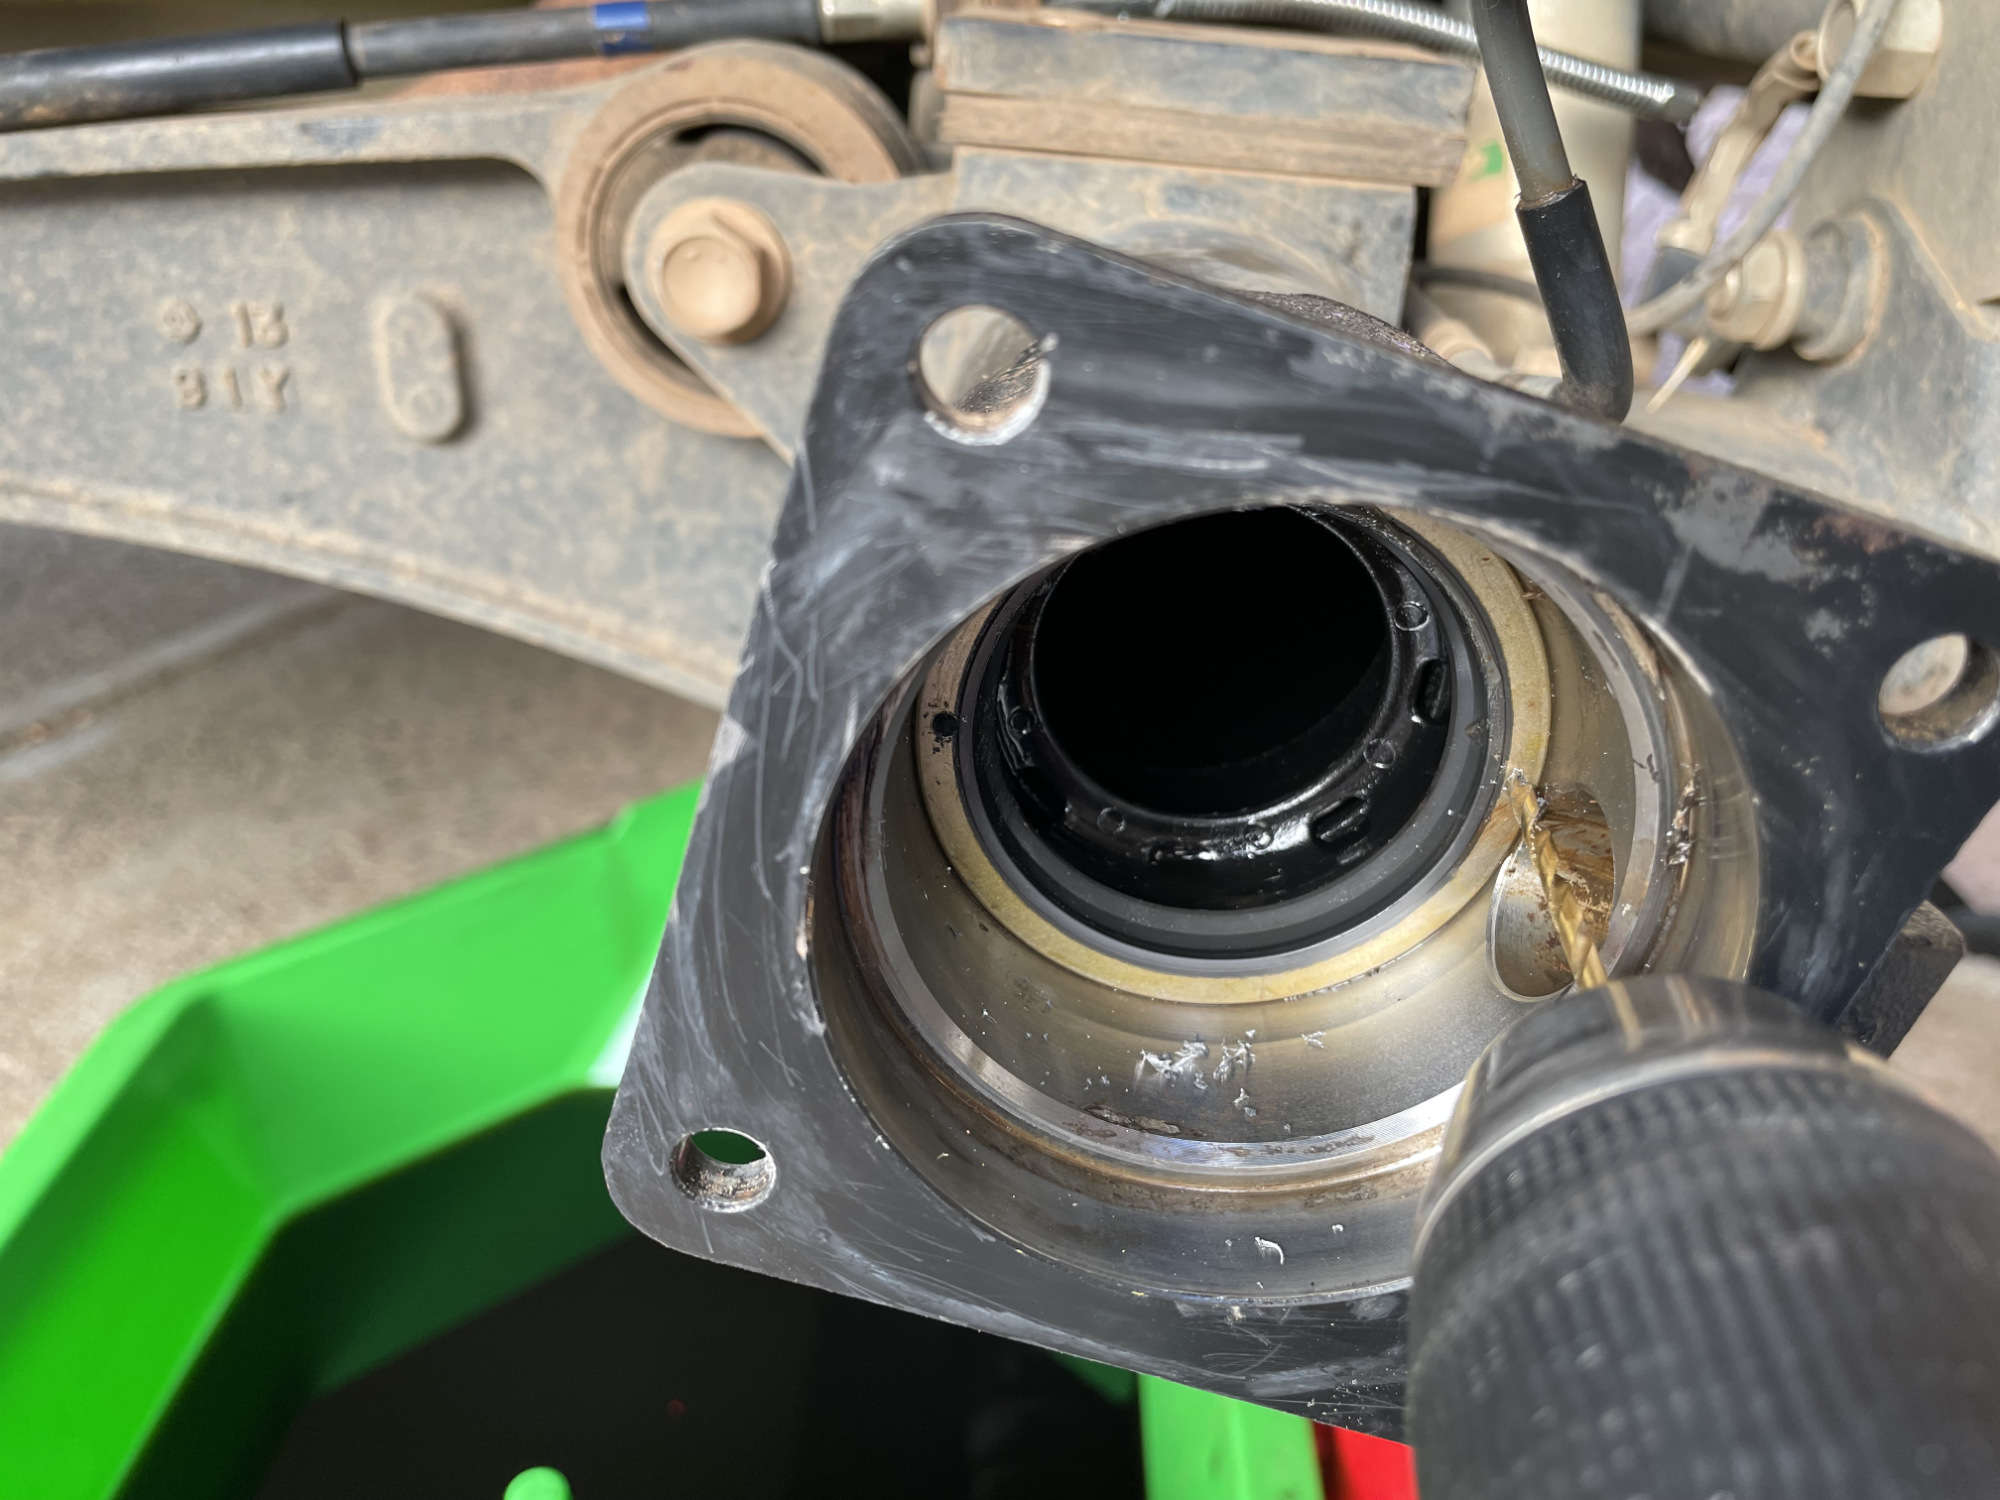
Note the axle seal isn’t really any good for reuse after this.
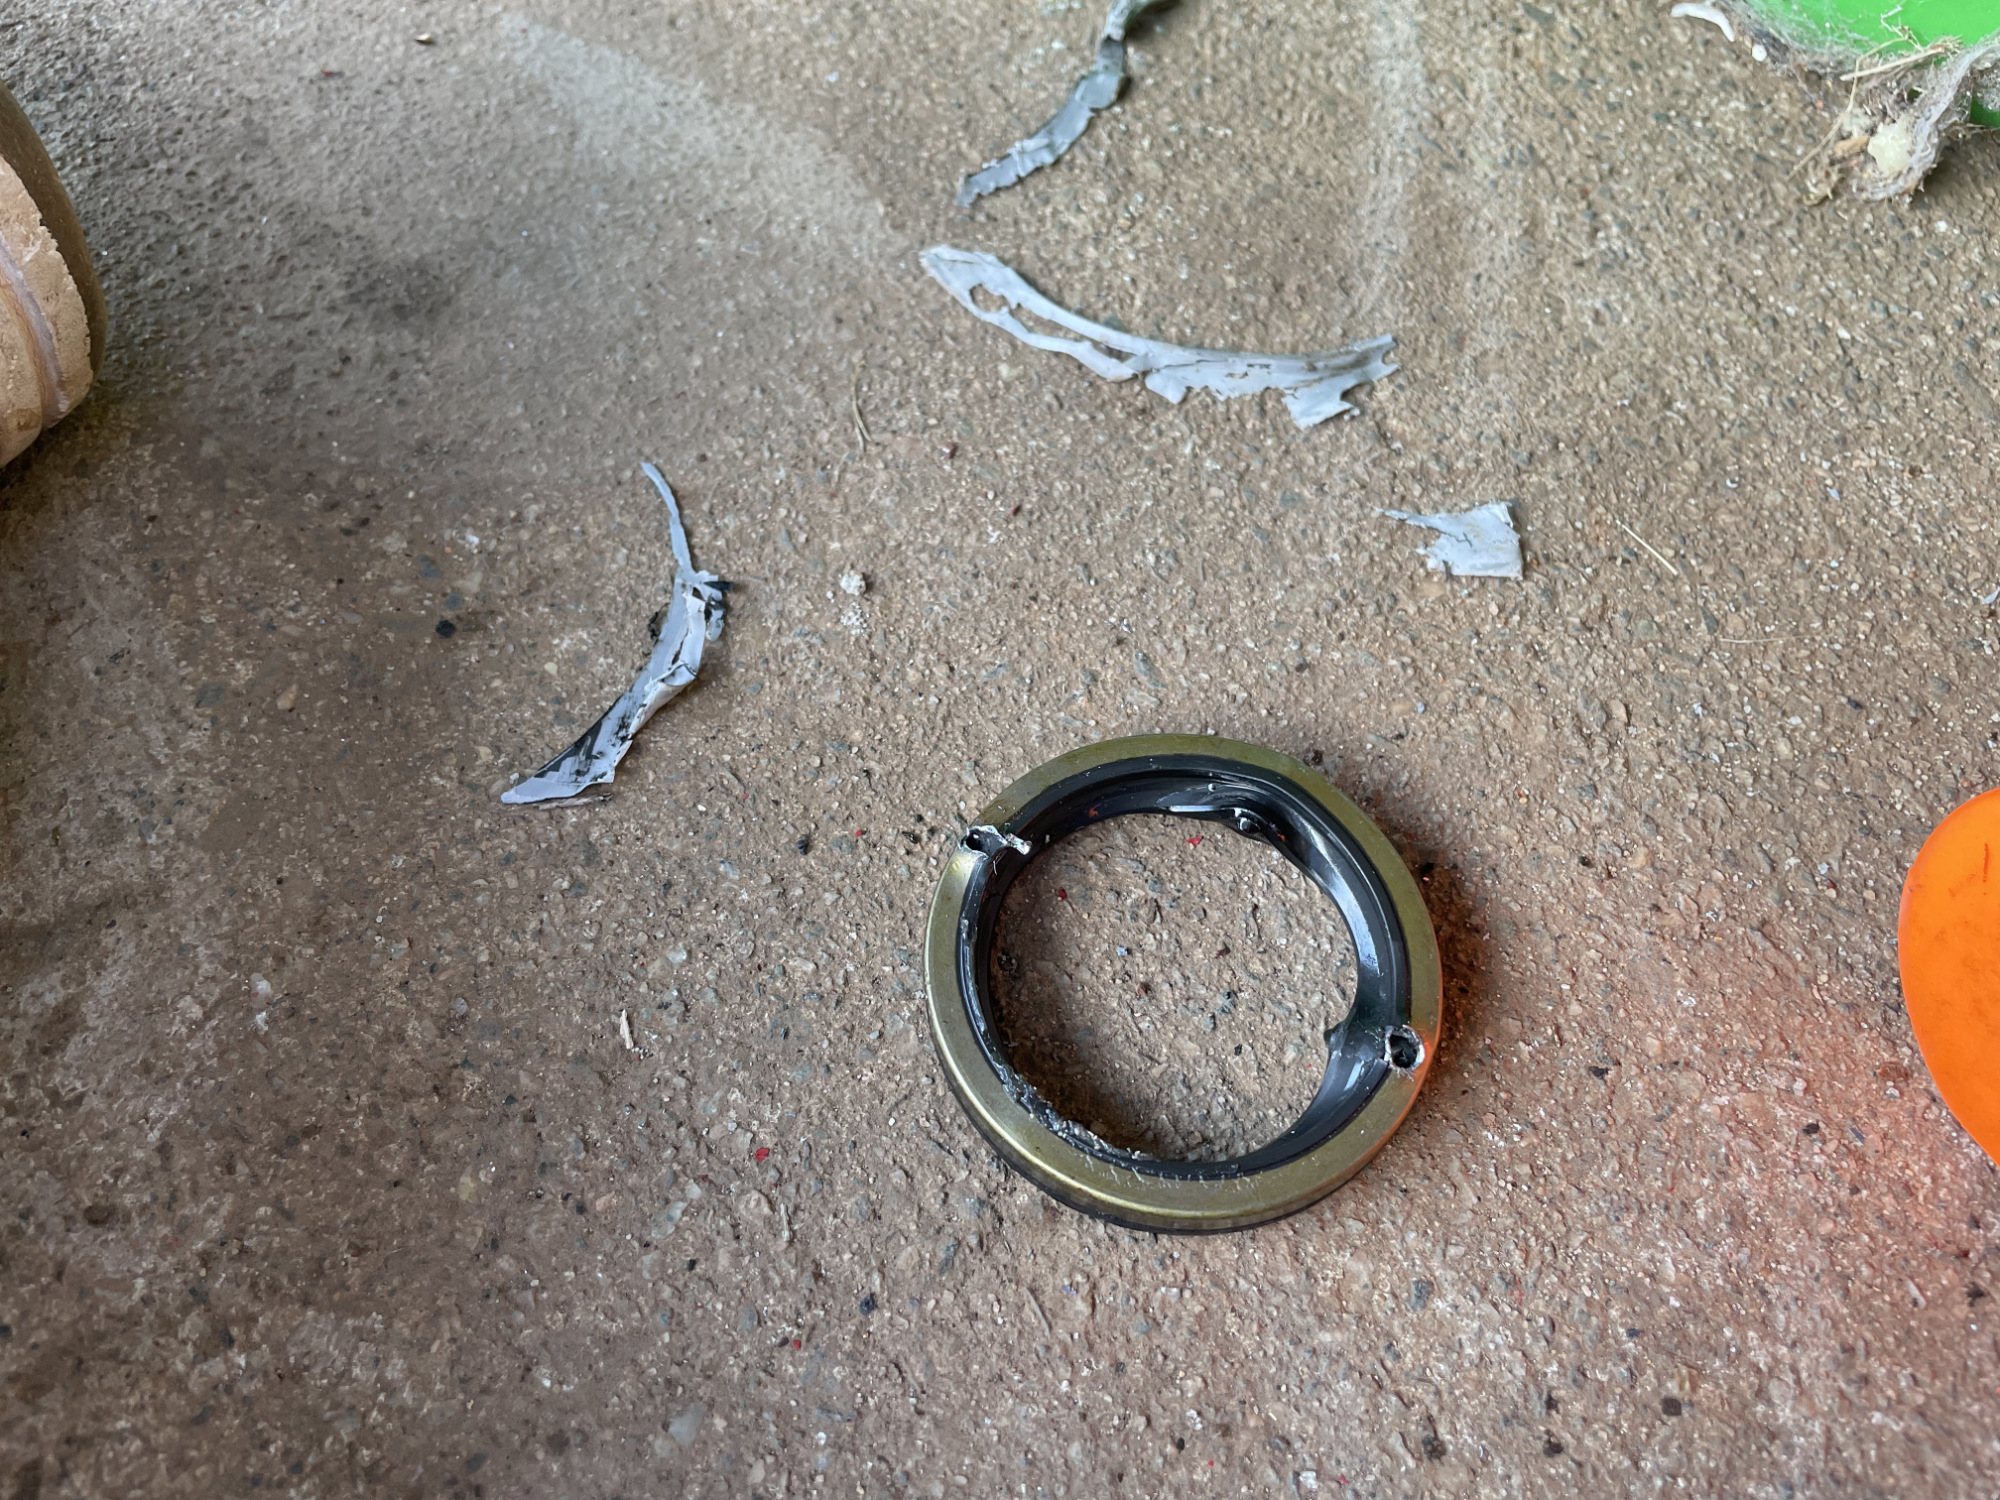
The seal protector that sits behind the axle seal is so undramatic to remove that I have zero photos of removing it (or installing a new one) so just imagine what that looks like and you’ll be set.
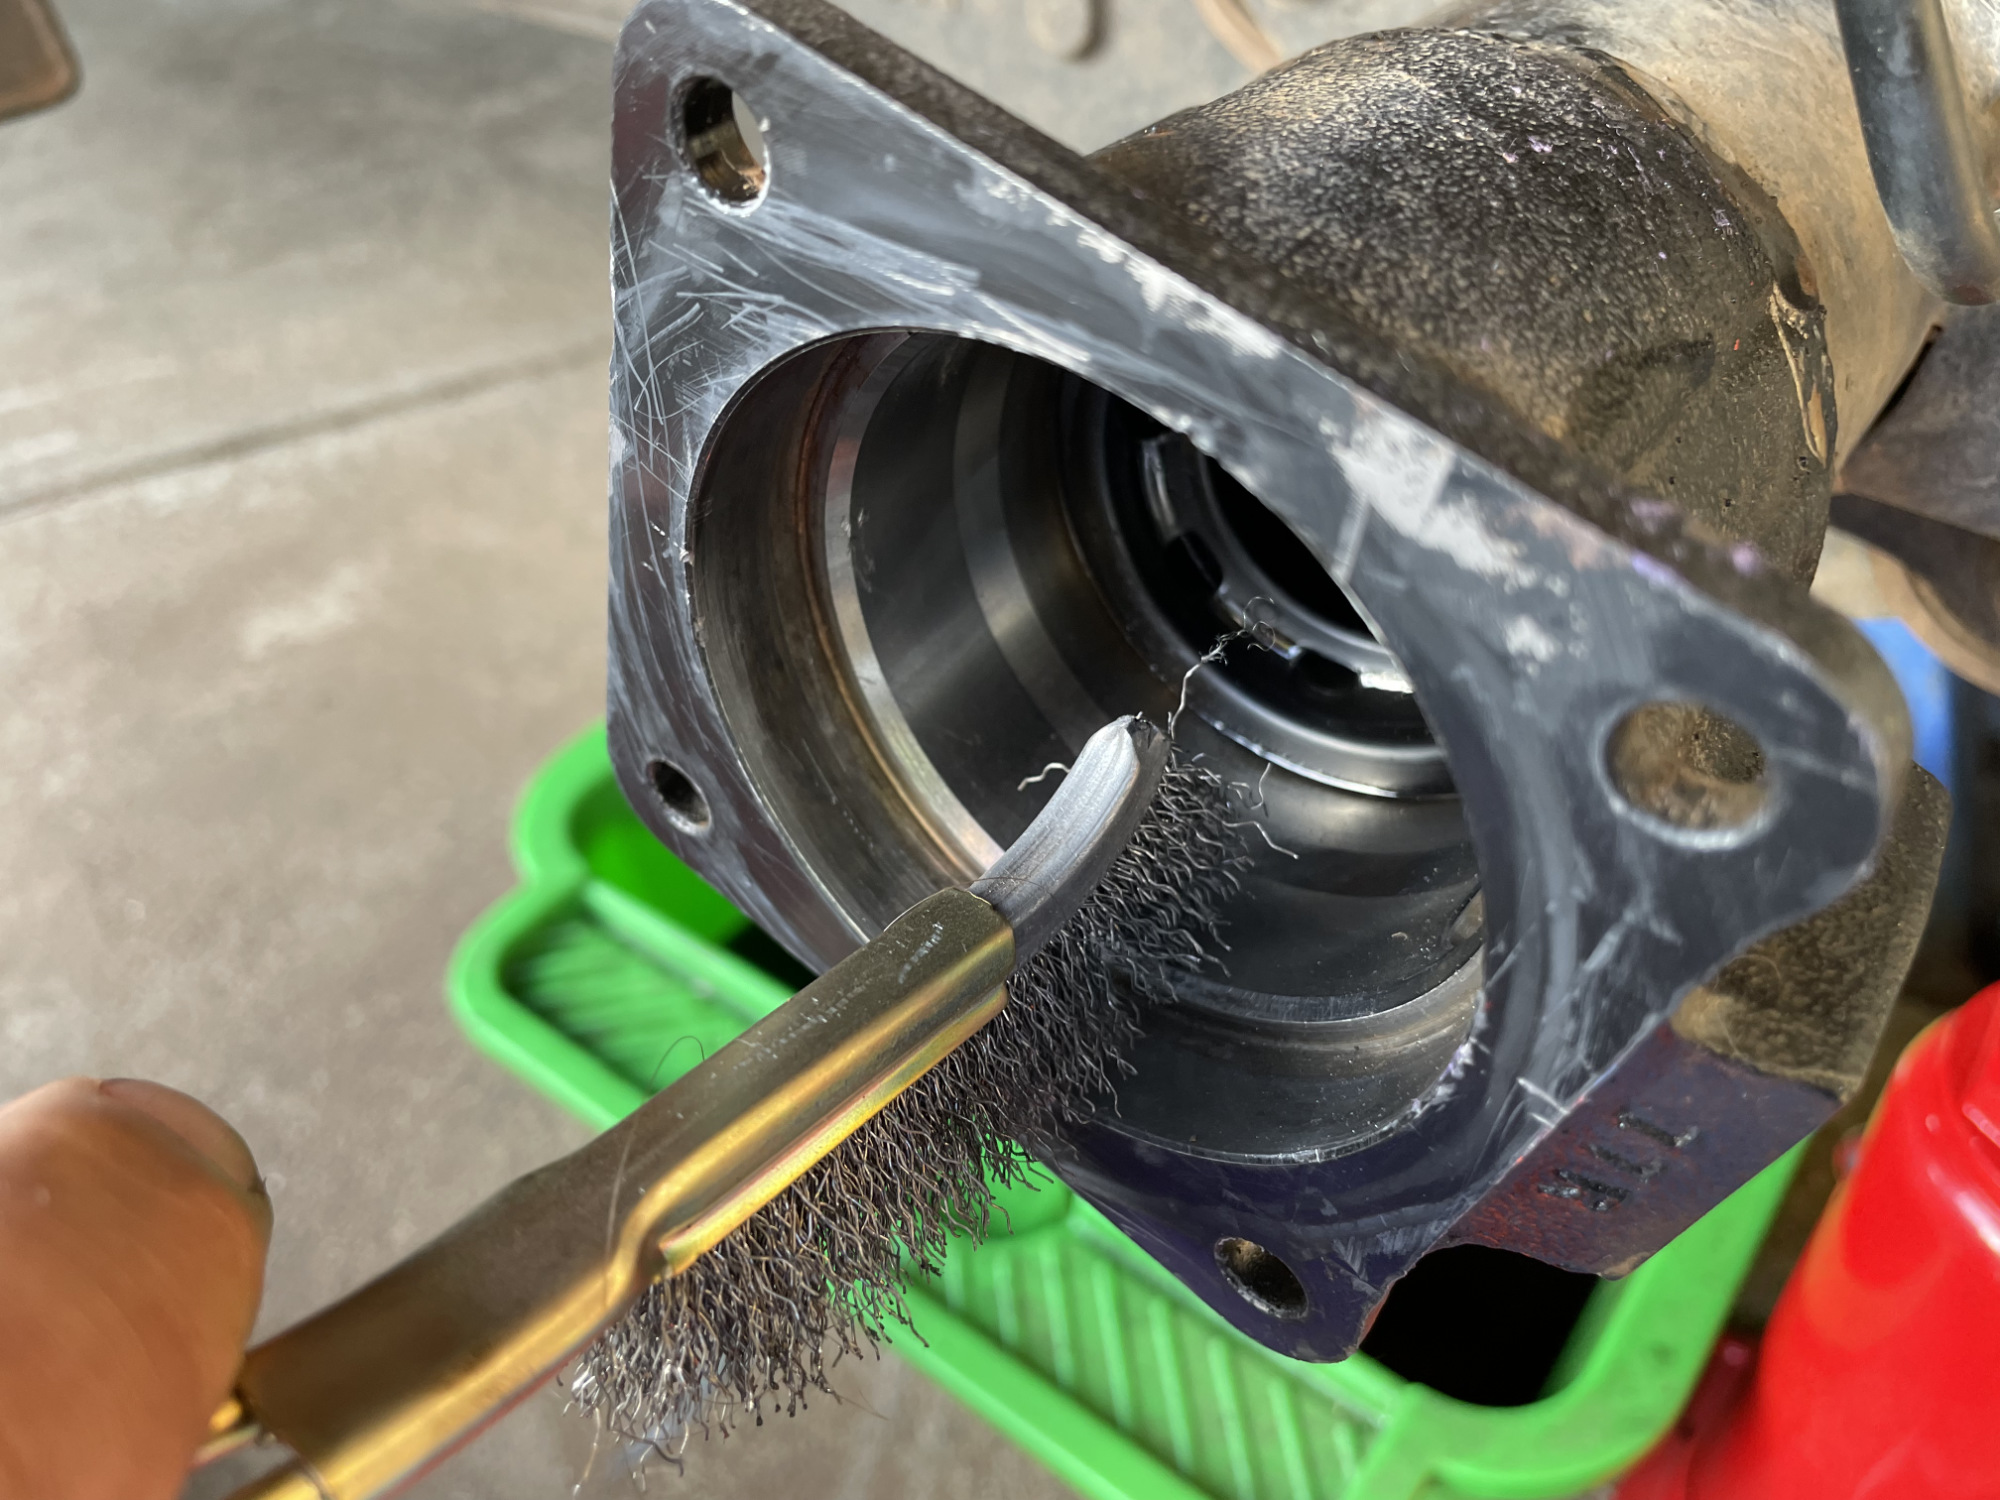
The final thing I do is a bit of tidying up with a couple of wire brushes to make sure all mating surfaces and things are clean, and a bit of a cleanup using brake cleaner.

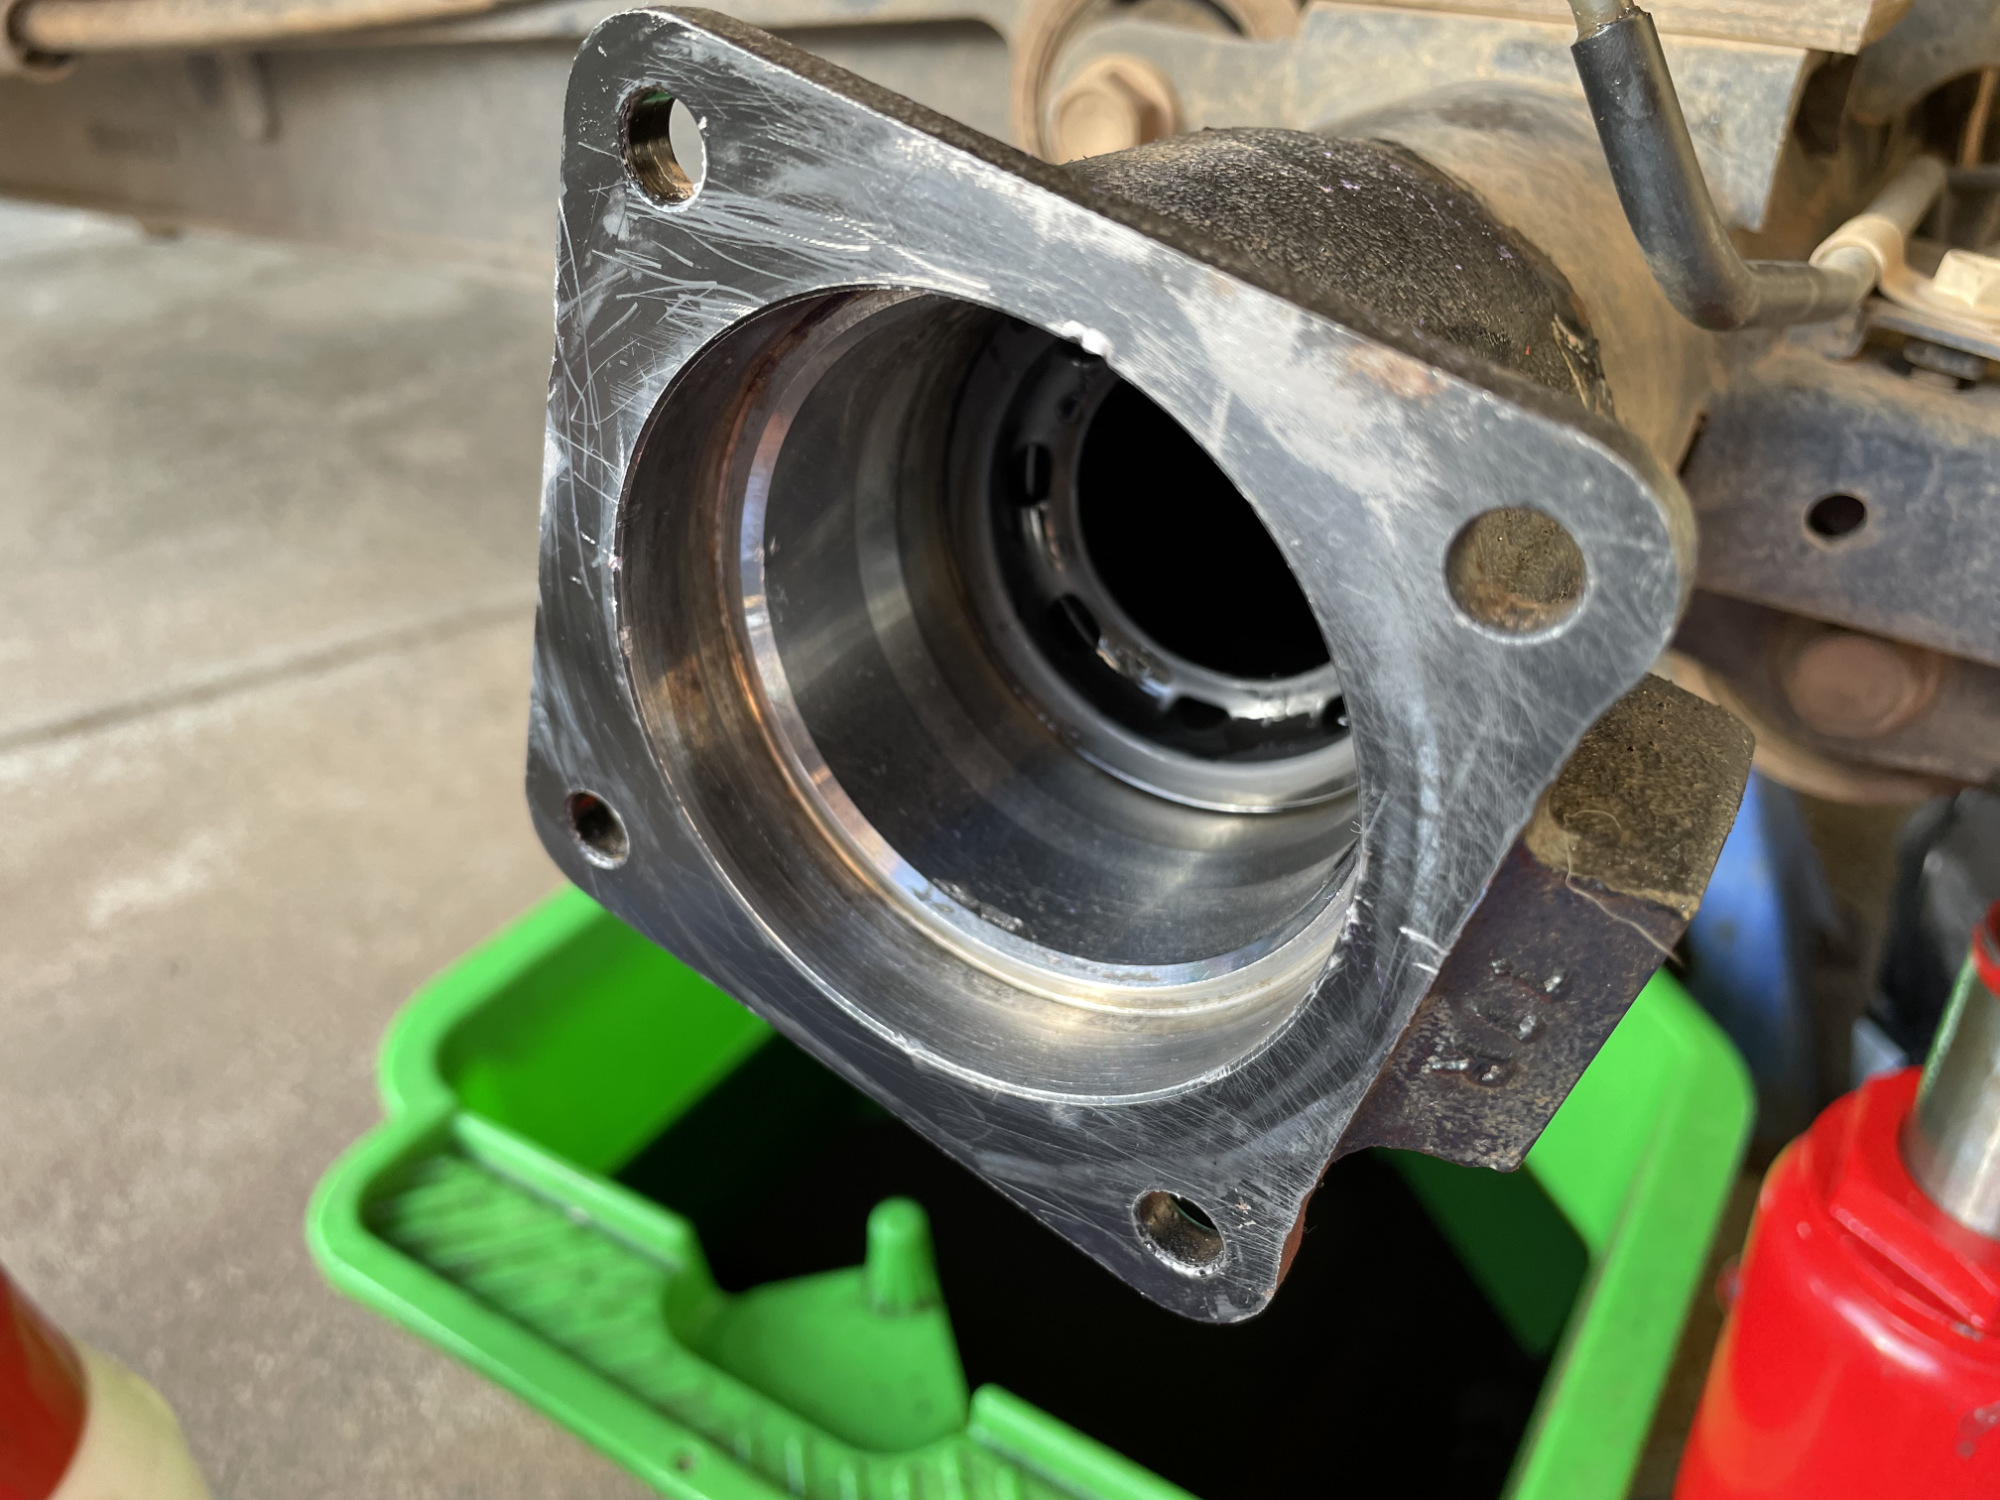
With it all done and the new axle seal protector installed we’re ready for the main part of re-installation.
Fitting new bearing to the axle
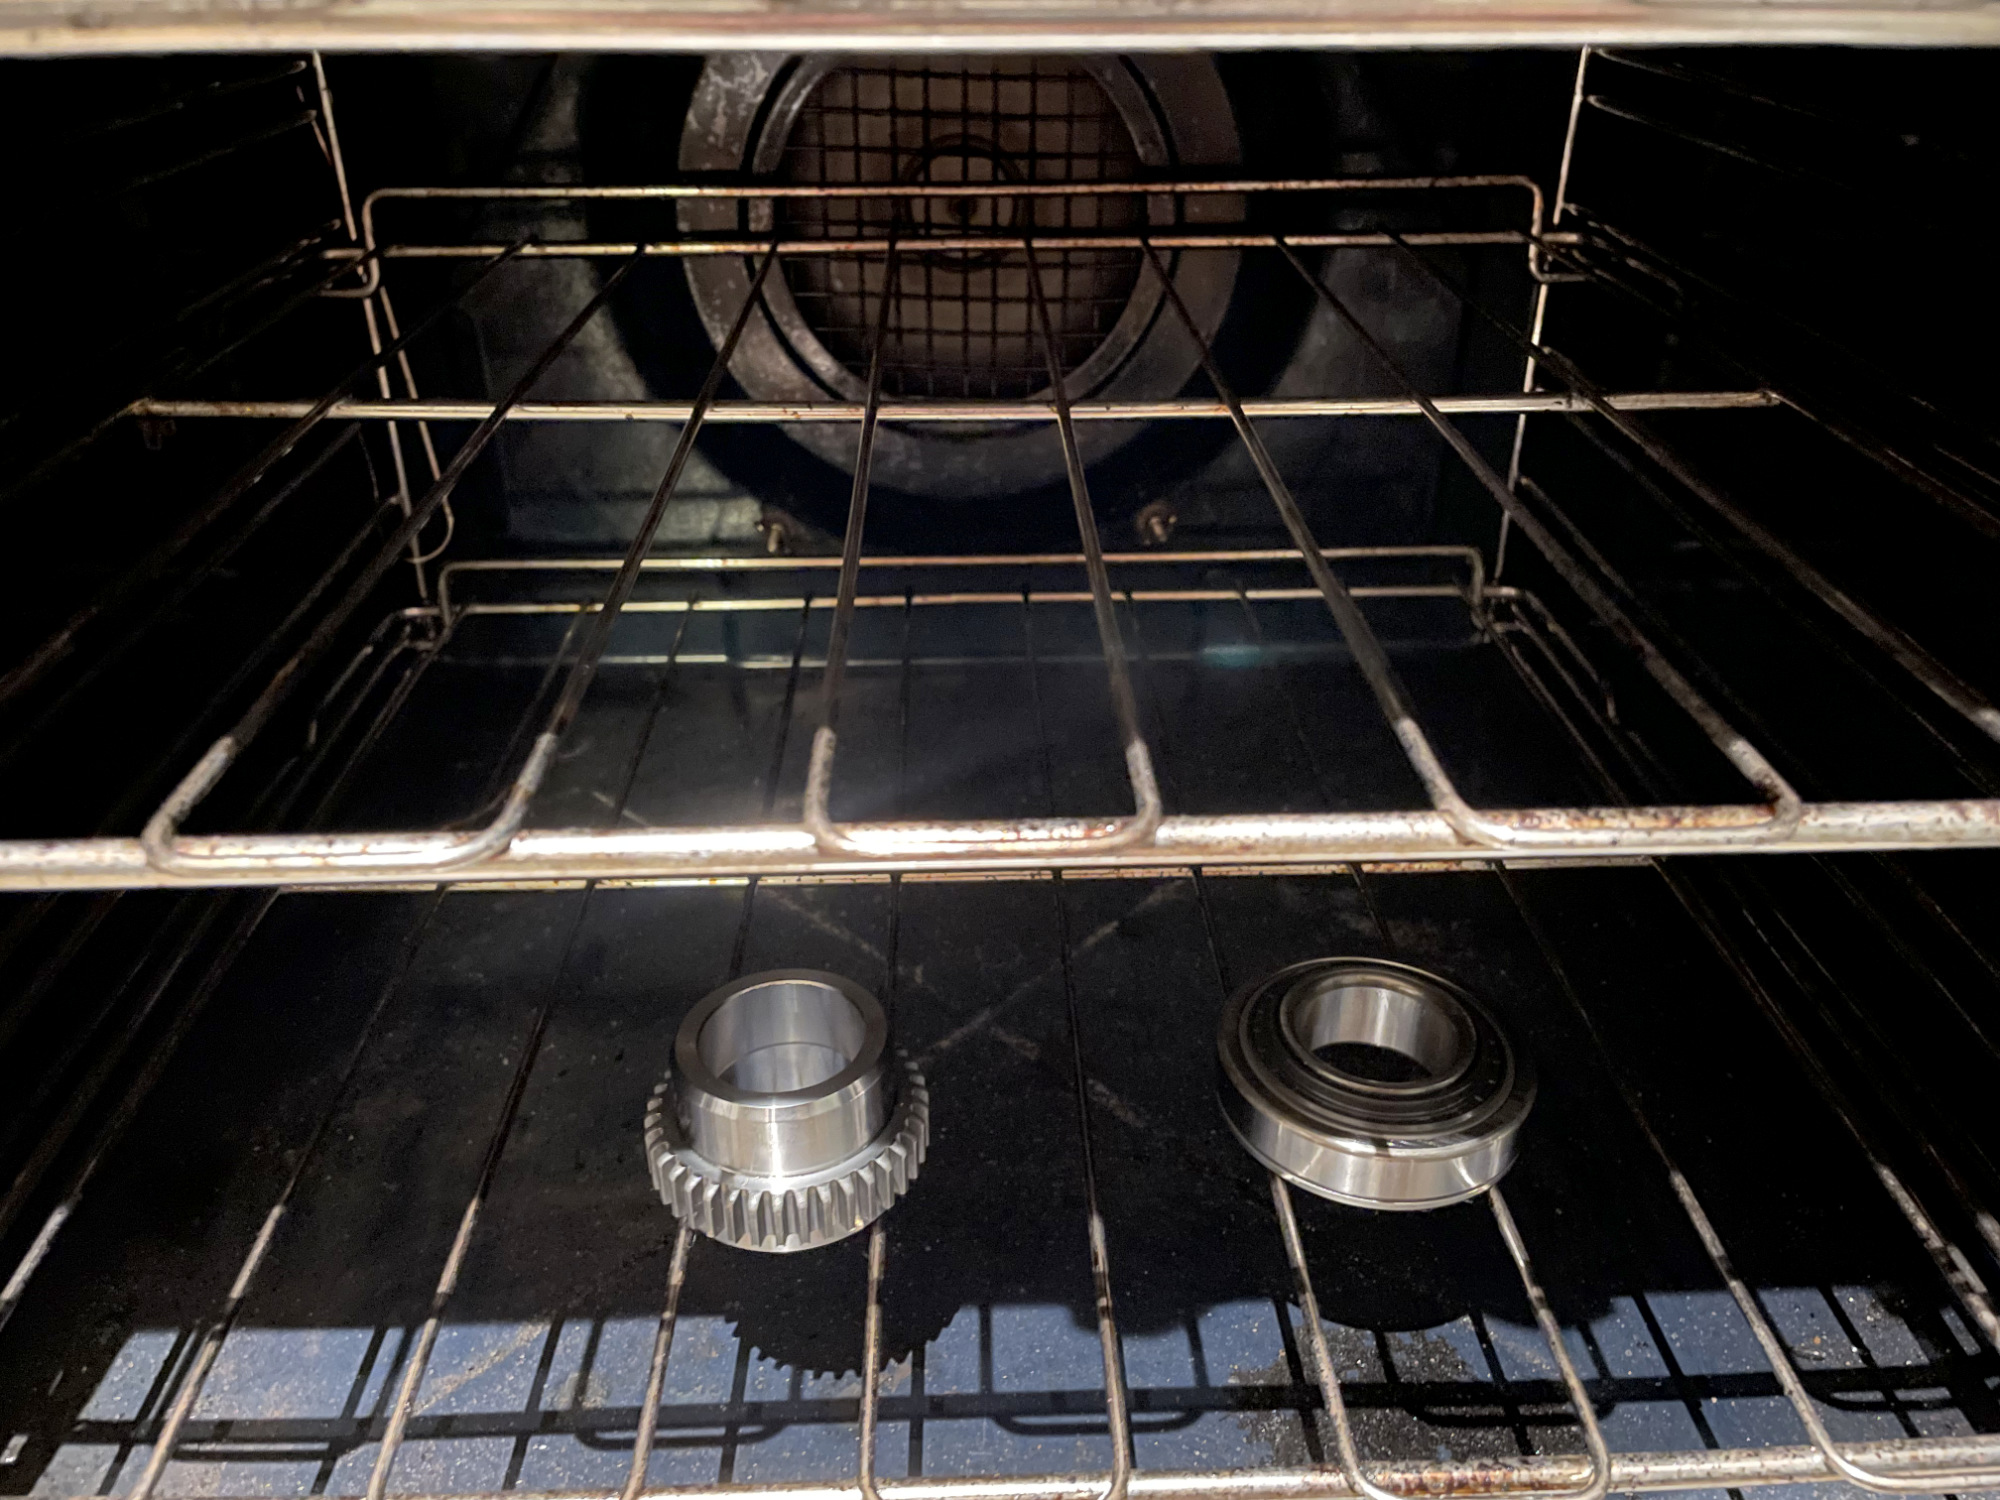
Fitting officially requires a press. To make this job easier on yourself you can heat the bearing and the retaining ring up in the oven and cool the axle with some freezer spray or ice packs to use thermal expansion/contraction to help.
A huge warning first: MAKE SURE YOU HAVE THE BACKING PLATE ON THE AXLE BEFORE YOU FIT THE BEARING AND ITS RETAINER.
If you are lucky the bearing will just drop straight on the axle. I am not that lucky and it did not.
If you have just the right diameter metal pipe so that only the inner race is touched by the pipe then you can use this to drive the bearing on. The required diameter of the pipe to push on the bearing and the bearing retainer is:
- At least 35mm internal diameter, ideally 35.5mm
- Ideal wall thickness around 4mm
- A little under 46mm external diameter so it doesn’t press on the bearing seal, if not a little smaller
It will take a few hammers blows but you can do it this way.
Note tapping it on with a hammer does require you to be very diligent to make sure it is going on straight. If I was going to do a few of these I’d make up a proper bearing driver using an old bearing and its inner race. It’d give you more room for error than finding a pipe exactly the right size to match the OD of the inner bearing race.
The better way to do it is to hold a press conference.
They only need about 1T of force to press on so a hydraulic press is the way to go here. No need to heat the bearing up to do this either, that’s strictly a “I have to get this on using a pipe and force” sort of a thing.
Because I only have a small press, I need to hold the press higher up using some saw horses and keep the brake backing plate on an angle as it doesn’t fit between the uprights of my tiny press.
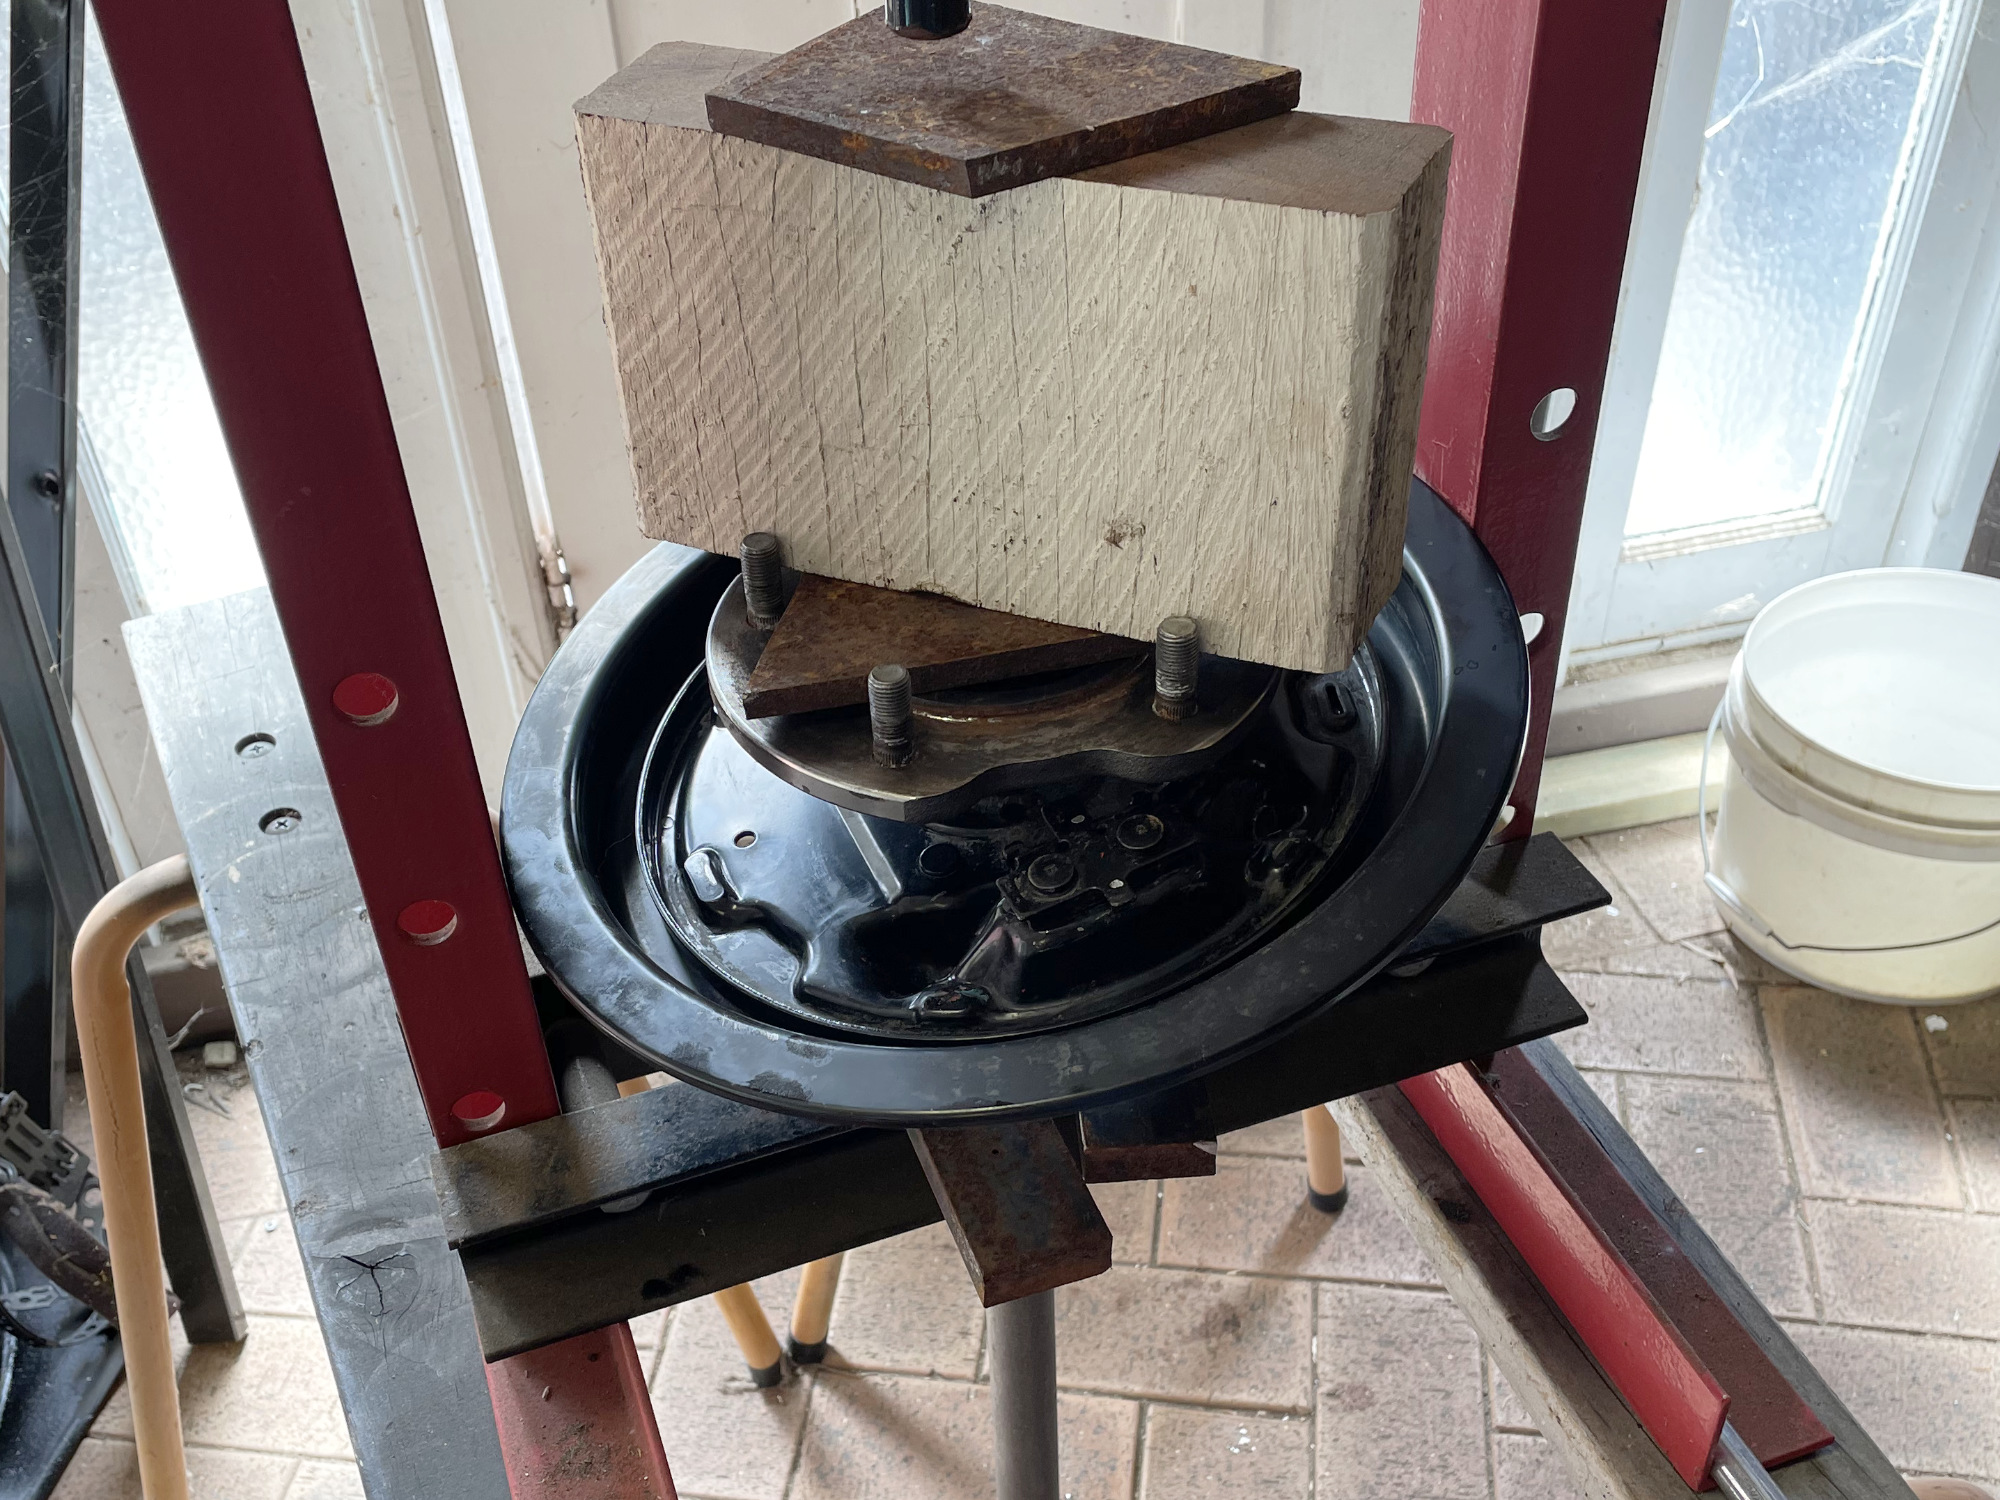
To support the bearing in this arrangement I actually use a cut down non ABS retaining ring from a bearing kit. Then using two metal plates underneath and just the right arrangement of pushing on top I can get the bearing to press on pretty neatly, albeit a bit awkwardly in the setup.
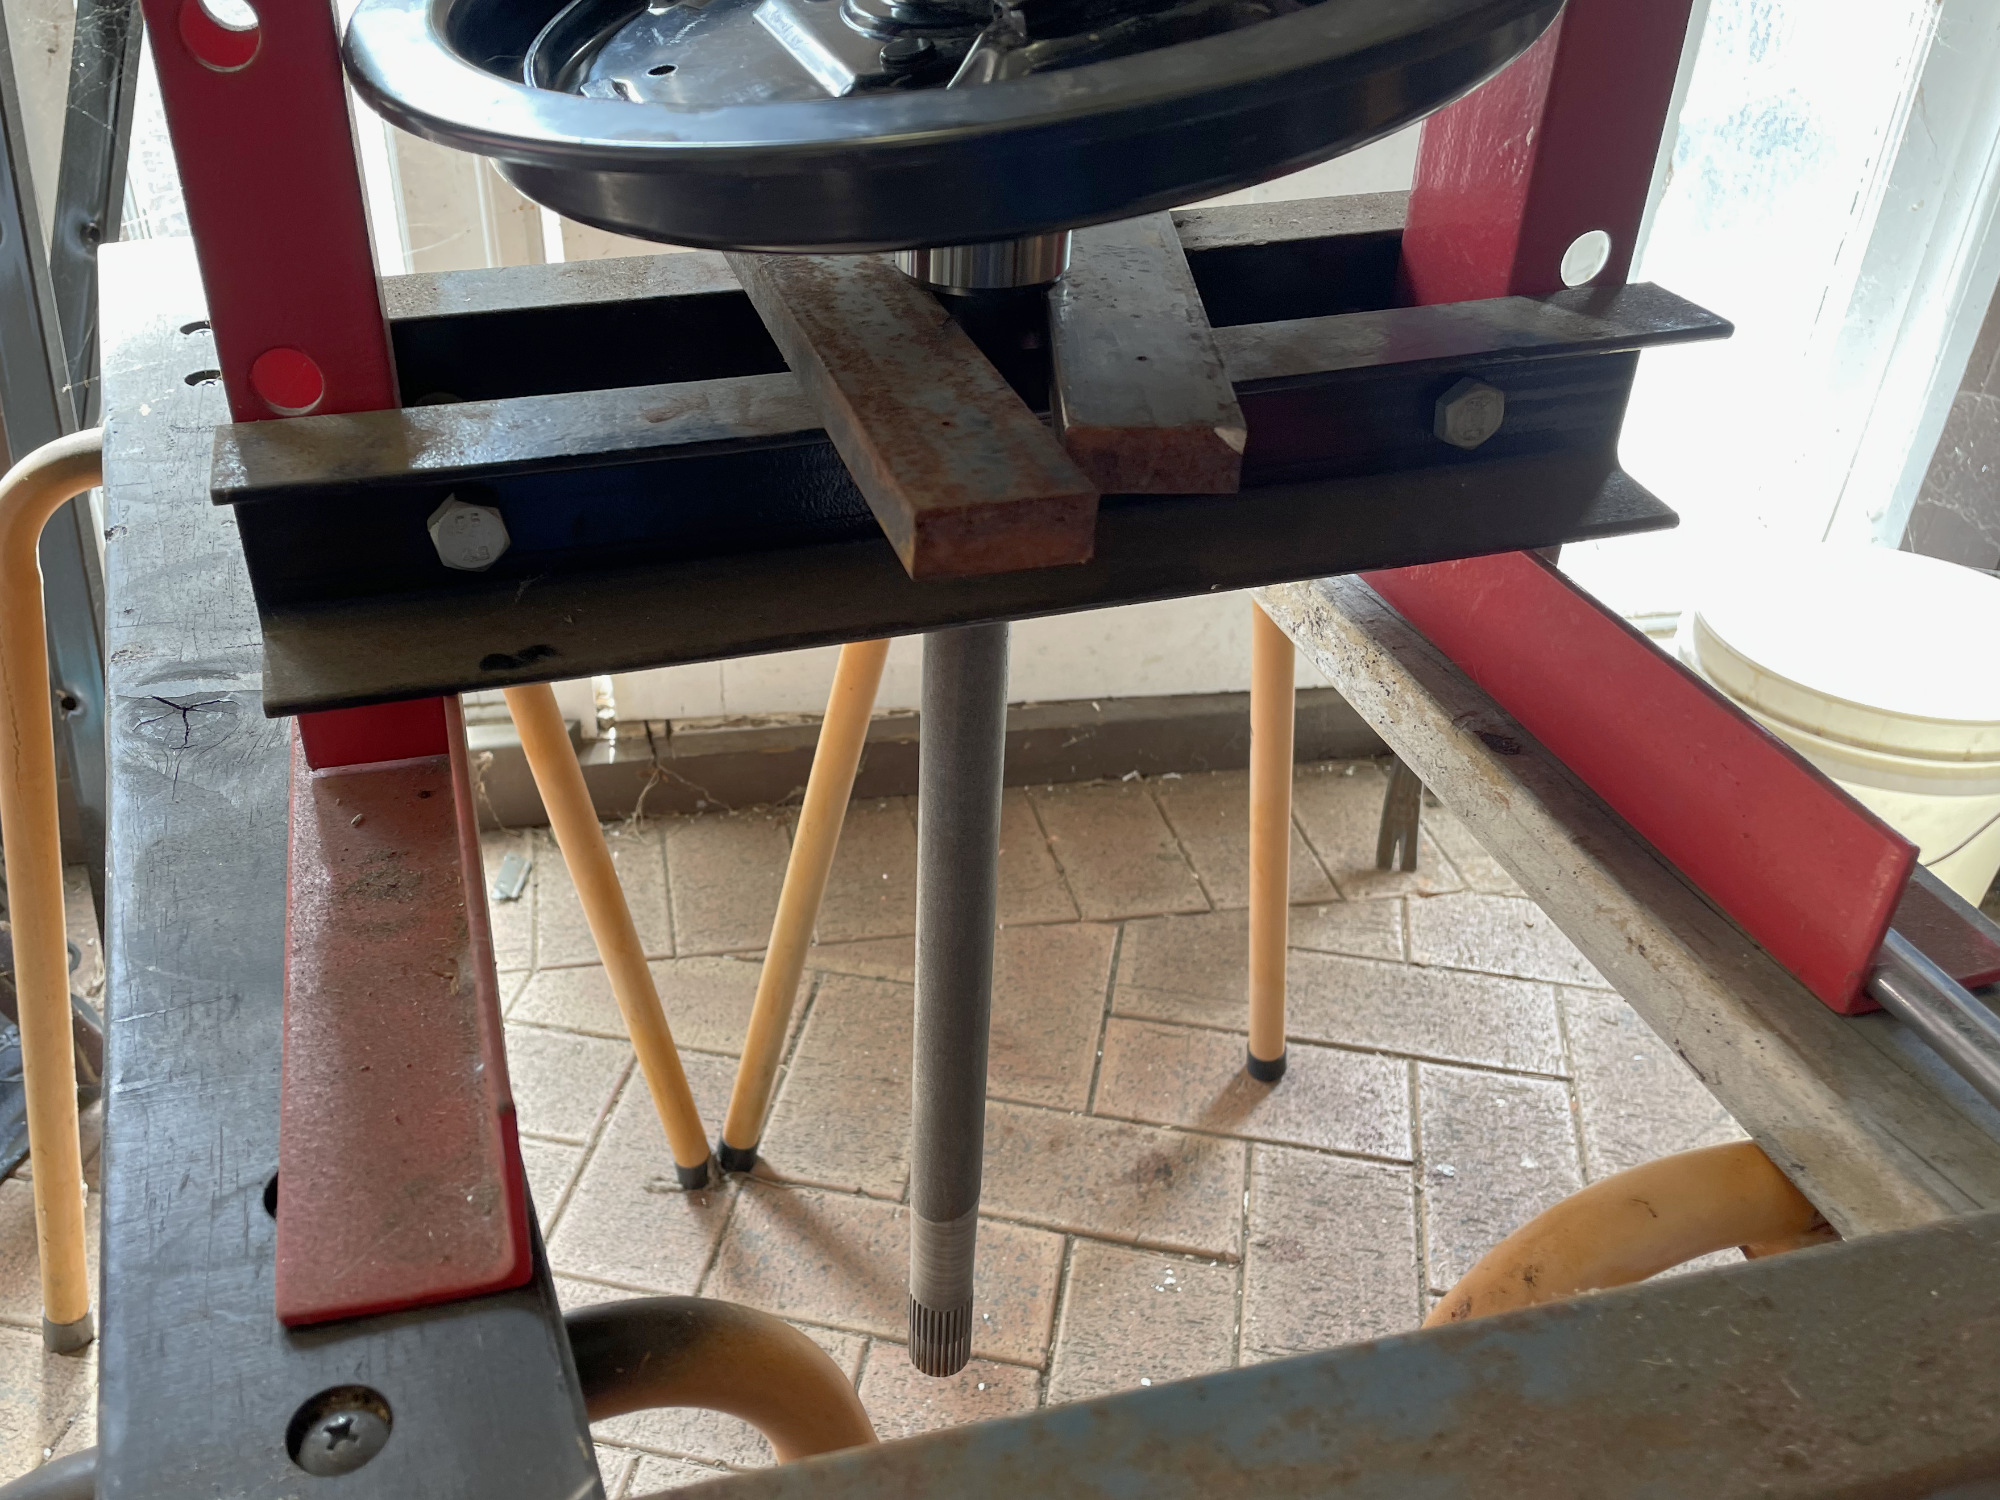
I’m mostly including these pics not as a definite “how to do this” but a “you can make this work even with a pretty small press”.
With a couple of groans it presses on pretty nicely, though if you are doing it with a small press like this note the requirement to keep the backing plate on an angle. It’s super easy to bend the backing plate doing this which makes a hideous noise when you refit the wheel and go for a drive.
Refitting axle to the car
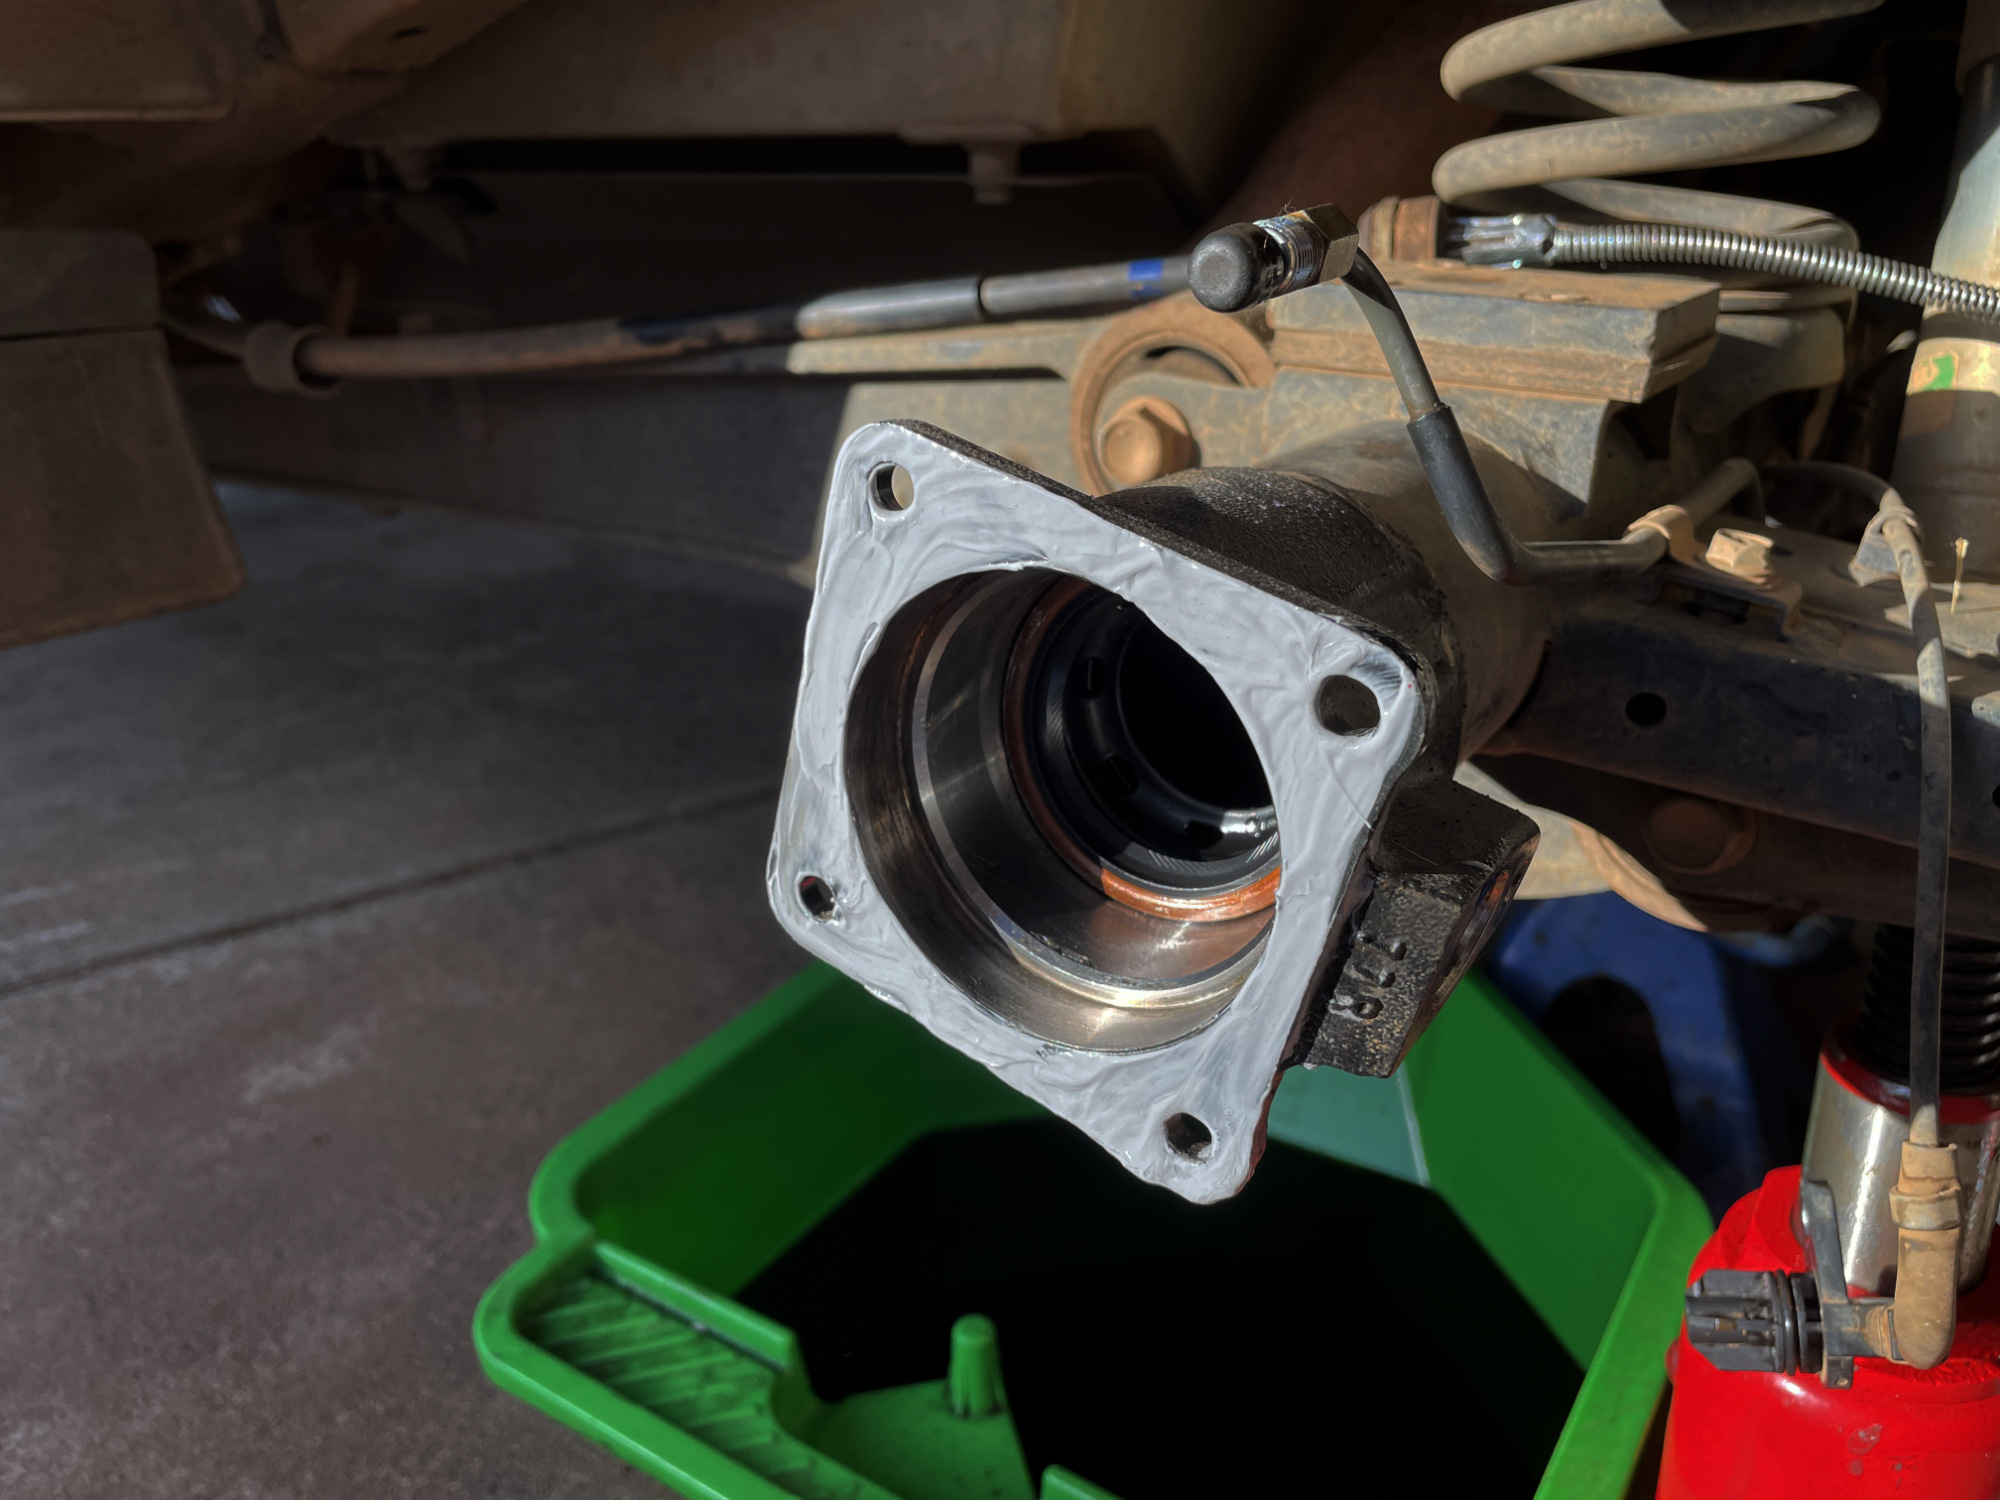
Now’s the time you drive the axle seal into the axle housing, noting that you want to make sure the axle seal protector is still at the back.
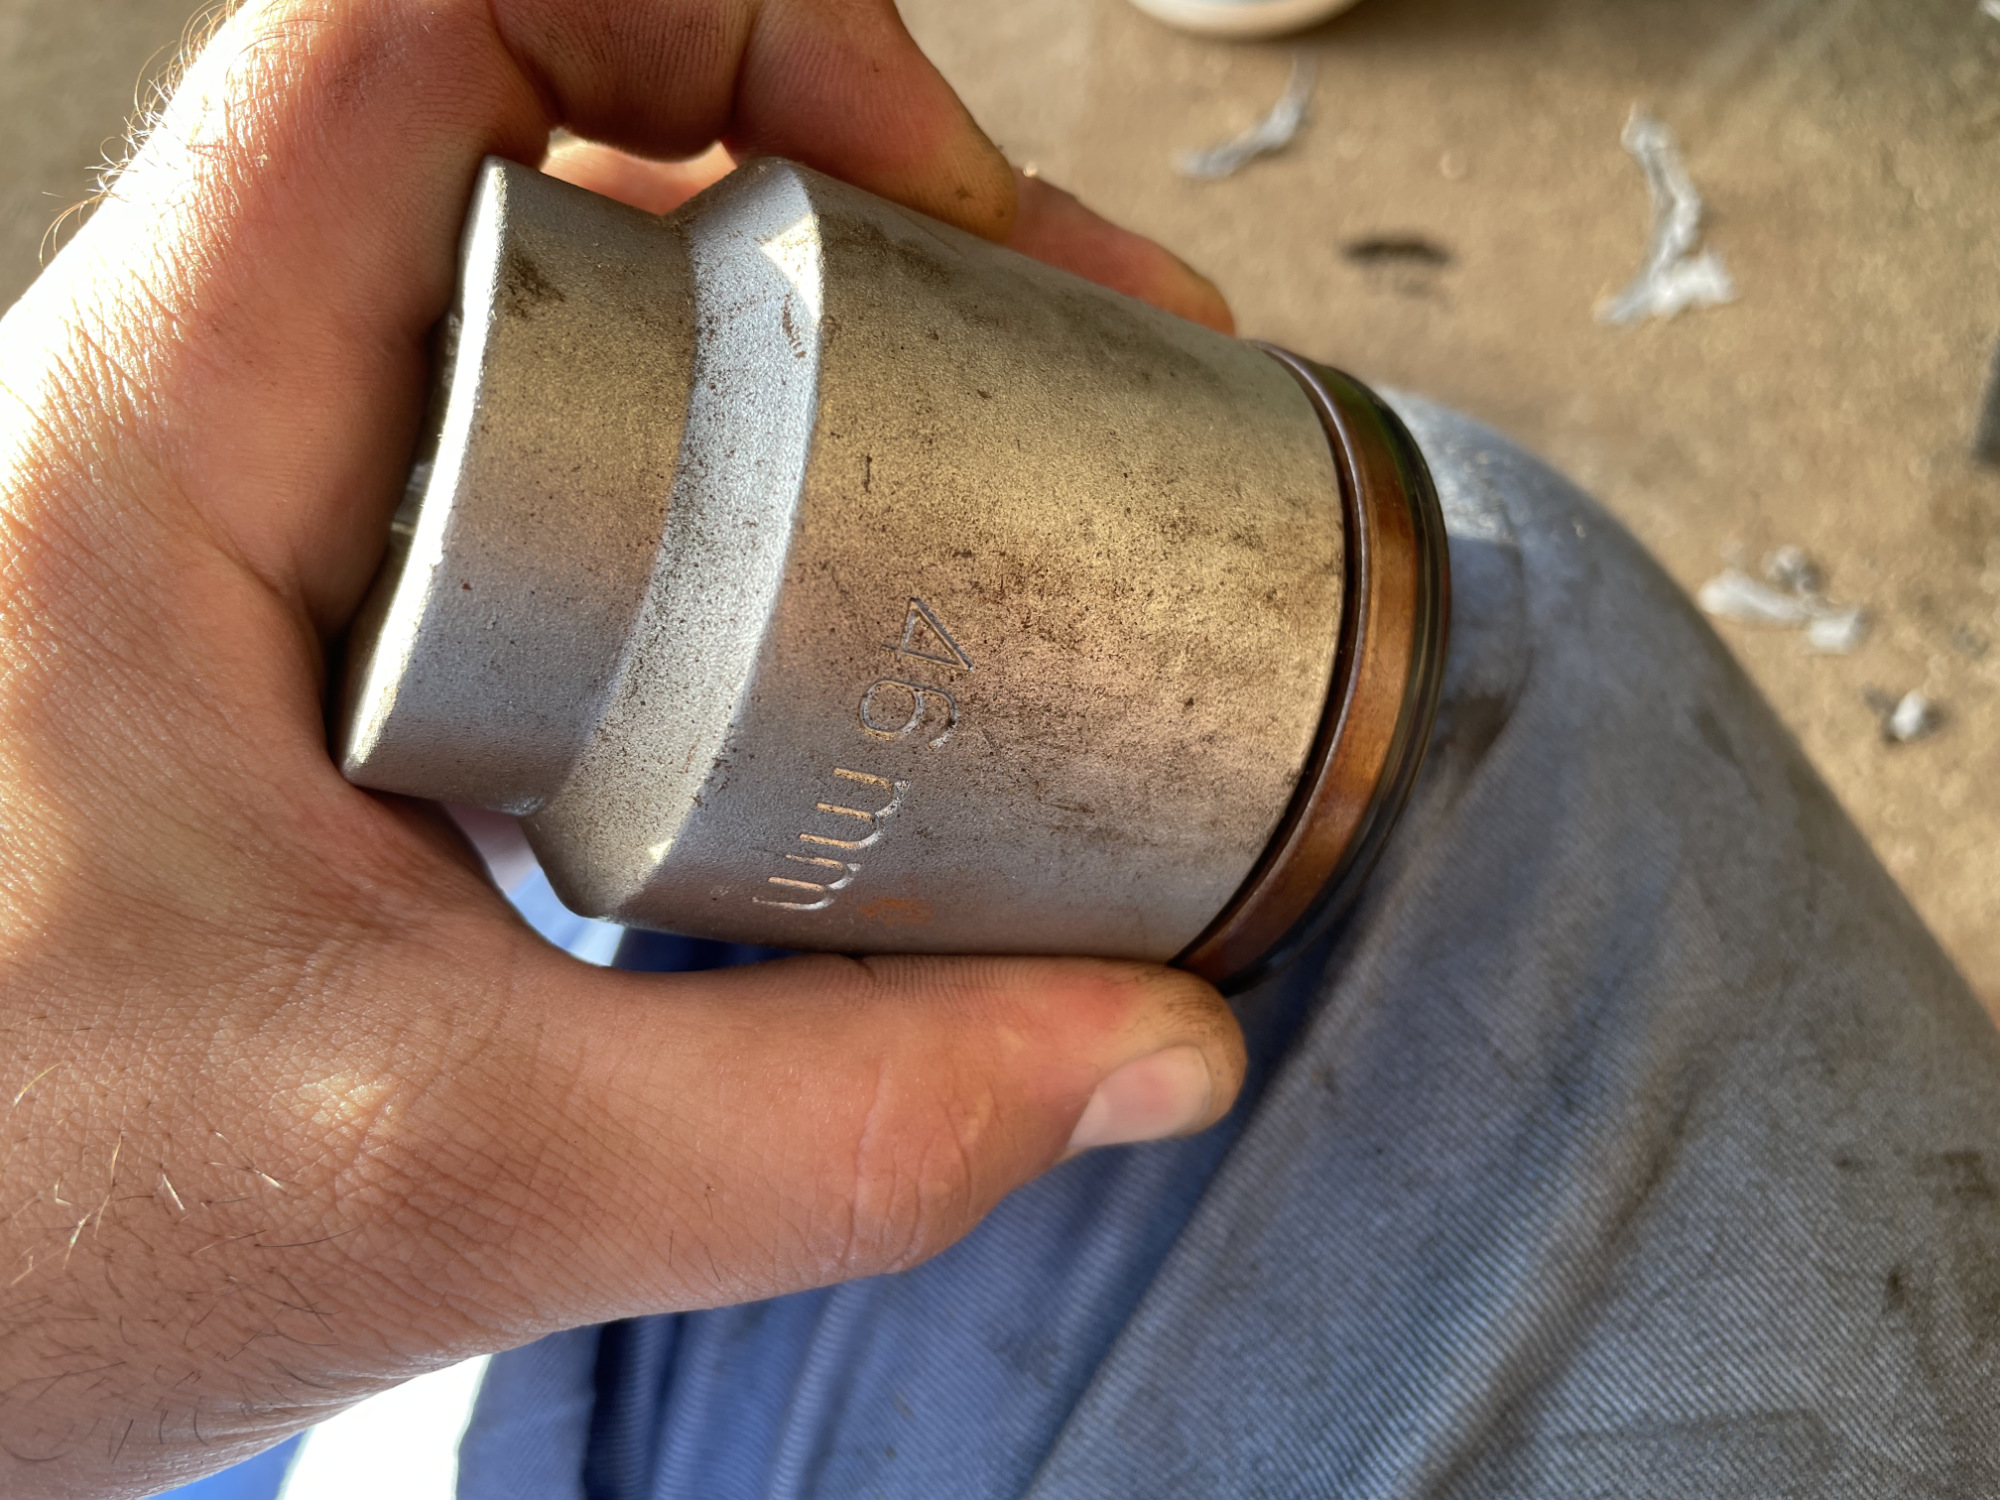
There are lots of options to use as a seal driver; I happen to have a 3/4″ and 1″ drive socket set that offers a 46mm socket exactly the right size to work as a seal driver. PVC plumbing pipe can work really well too.
You need to tap the seal into the axle housing keeping the seal straight.
The outer face of the seal should be between 35.7 and 36.7mm in from the face of the axle housing – but check this against your measurements before you removed the old seal, too. Also note that it might be another mm deeper with the old style generation 3 seals included in some kits.

Apply sealant to the axle housing face all around the mating face. I find it quite hard to get an even bead out of the Threebond tubes, so I just smear it very thinly all around. (This following pic looks like there’s more there than there actually is).
Grease up the lip of the axle seal, and carefully slide the axle in. You need to rotate it a little and also work to keep it centred into the diff and line up with the splines in the diff centre, and you also need to make sure that the studs for the brake backing plate line up with the axle housing holes, too. Doing this basically blind and balancing a heavy axle from one end is quite fun.
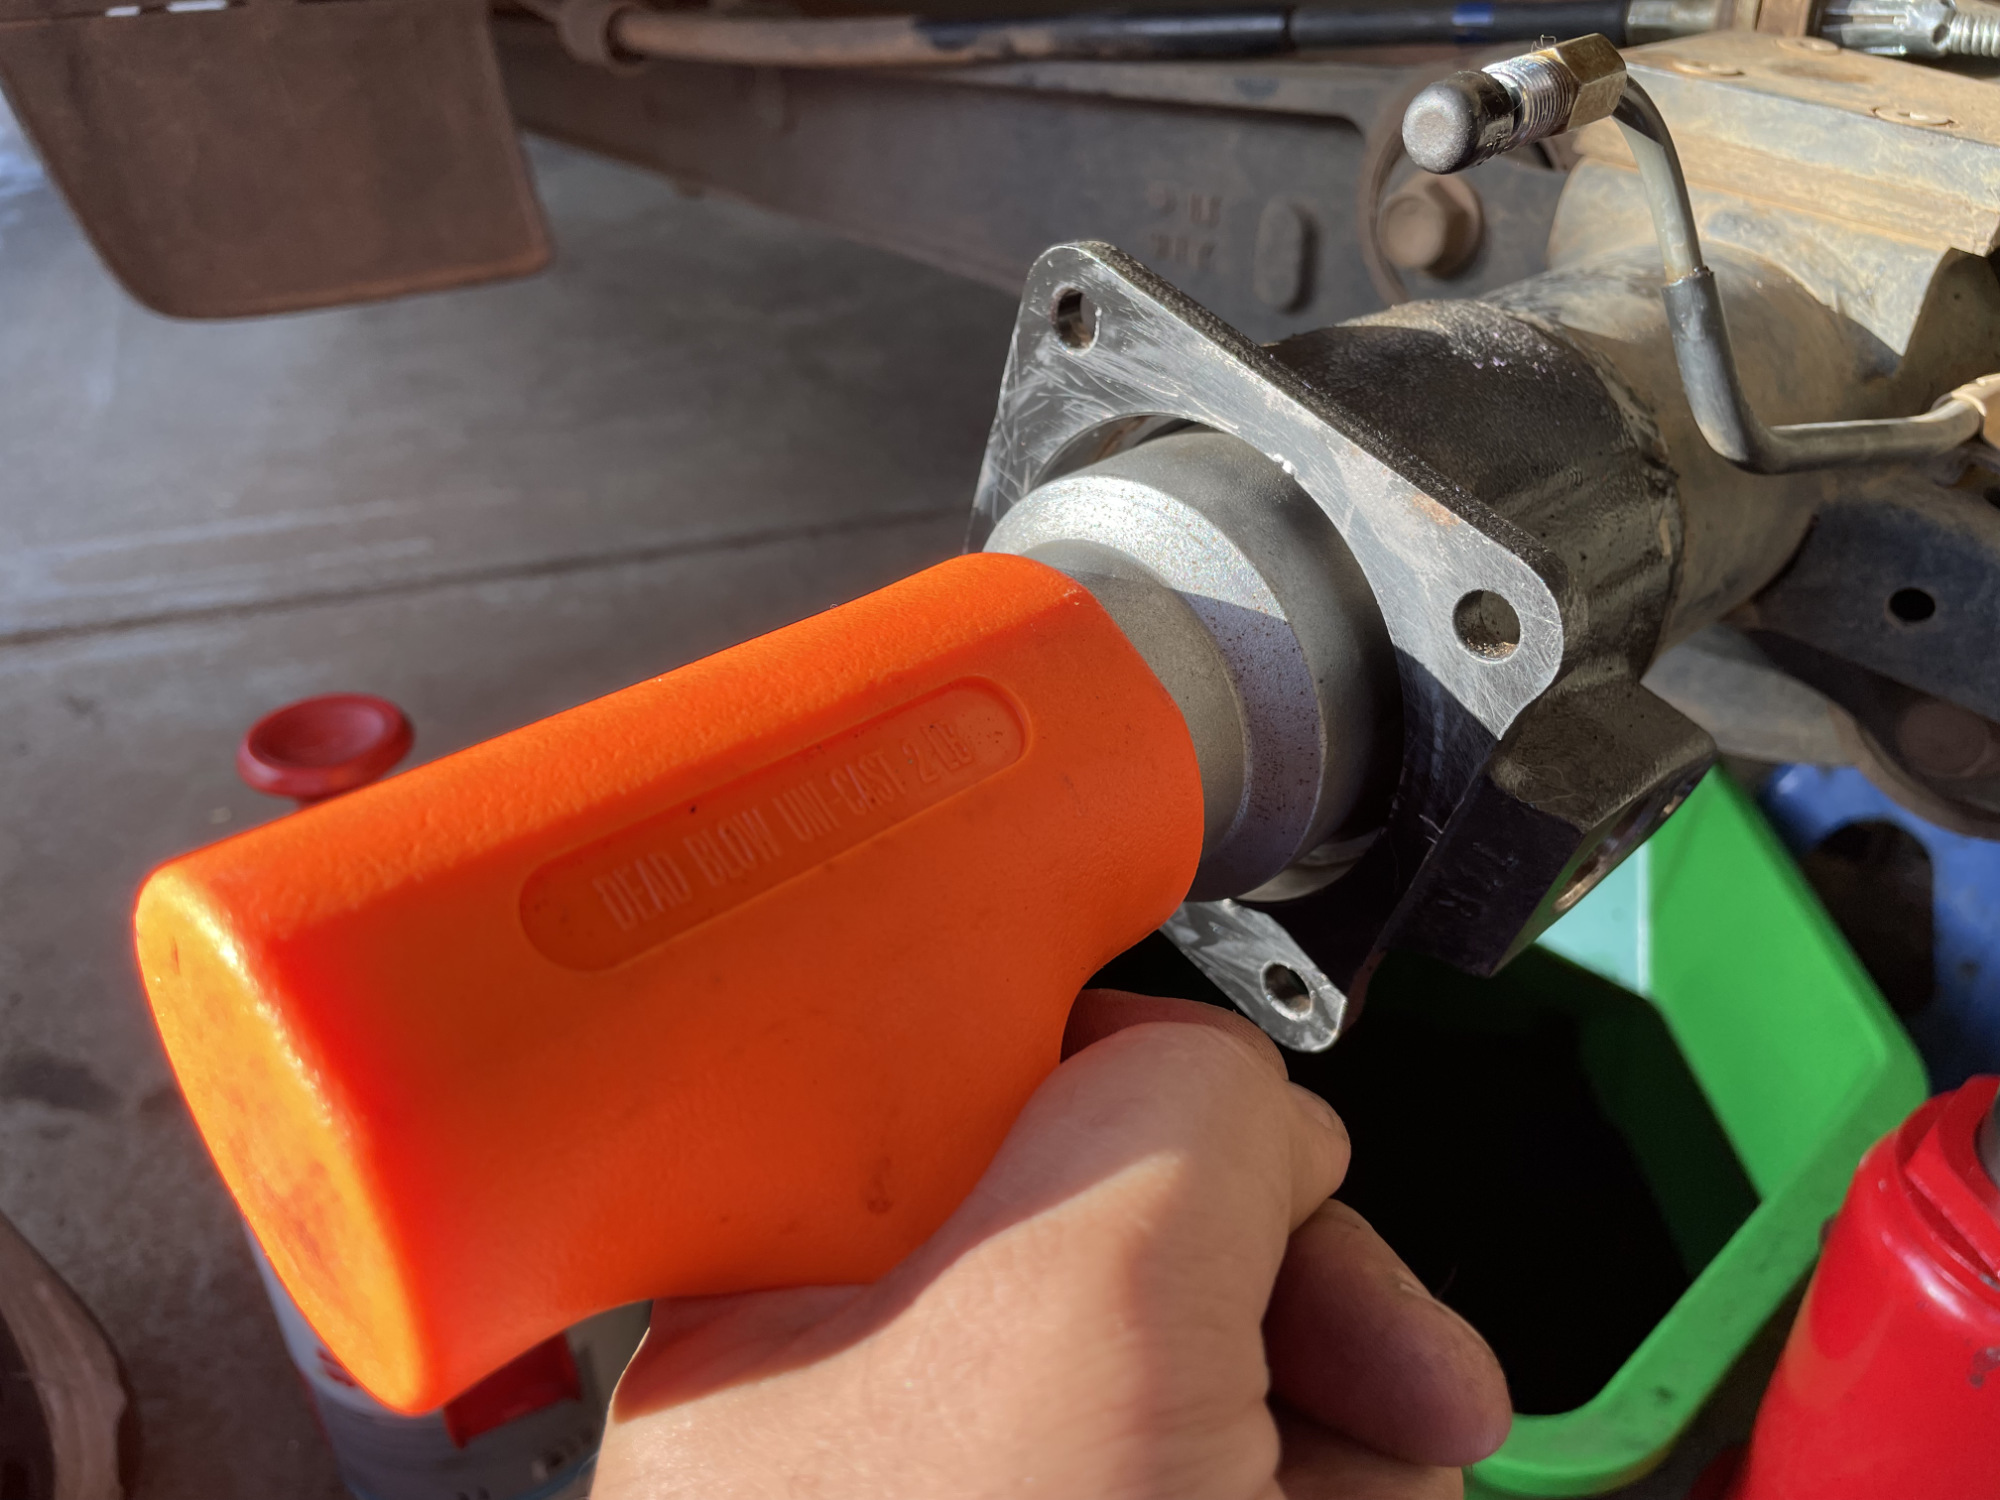
Once stuff is aligned then you can drive the axle and bearing back into the housing using a hammer. Best to protect the end of the axle with a piece of wood or something soft when you do this.
Buttoning up the last things
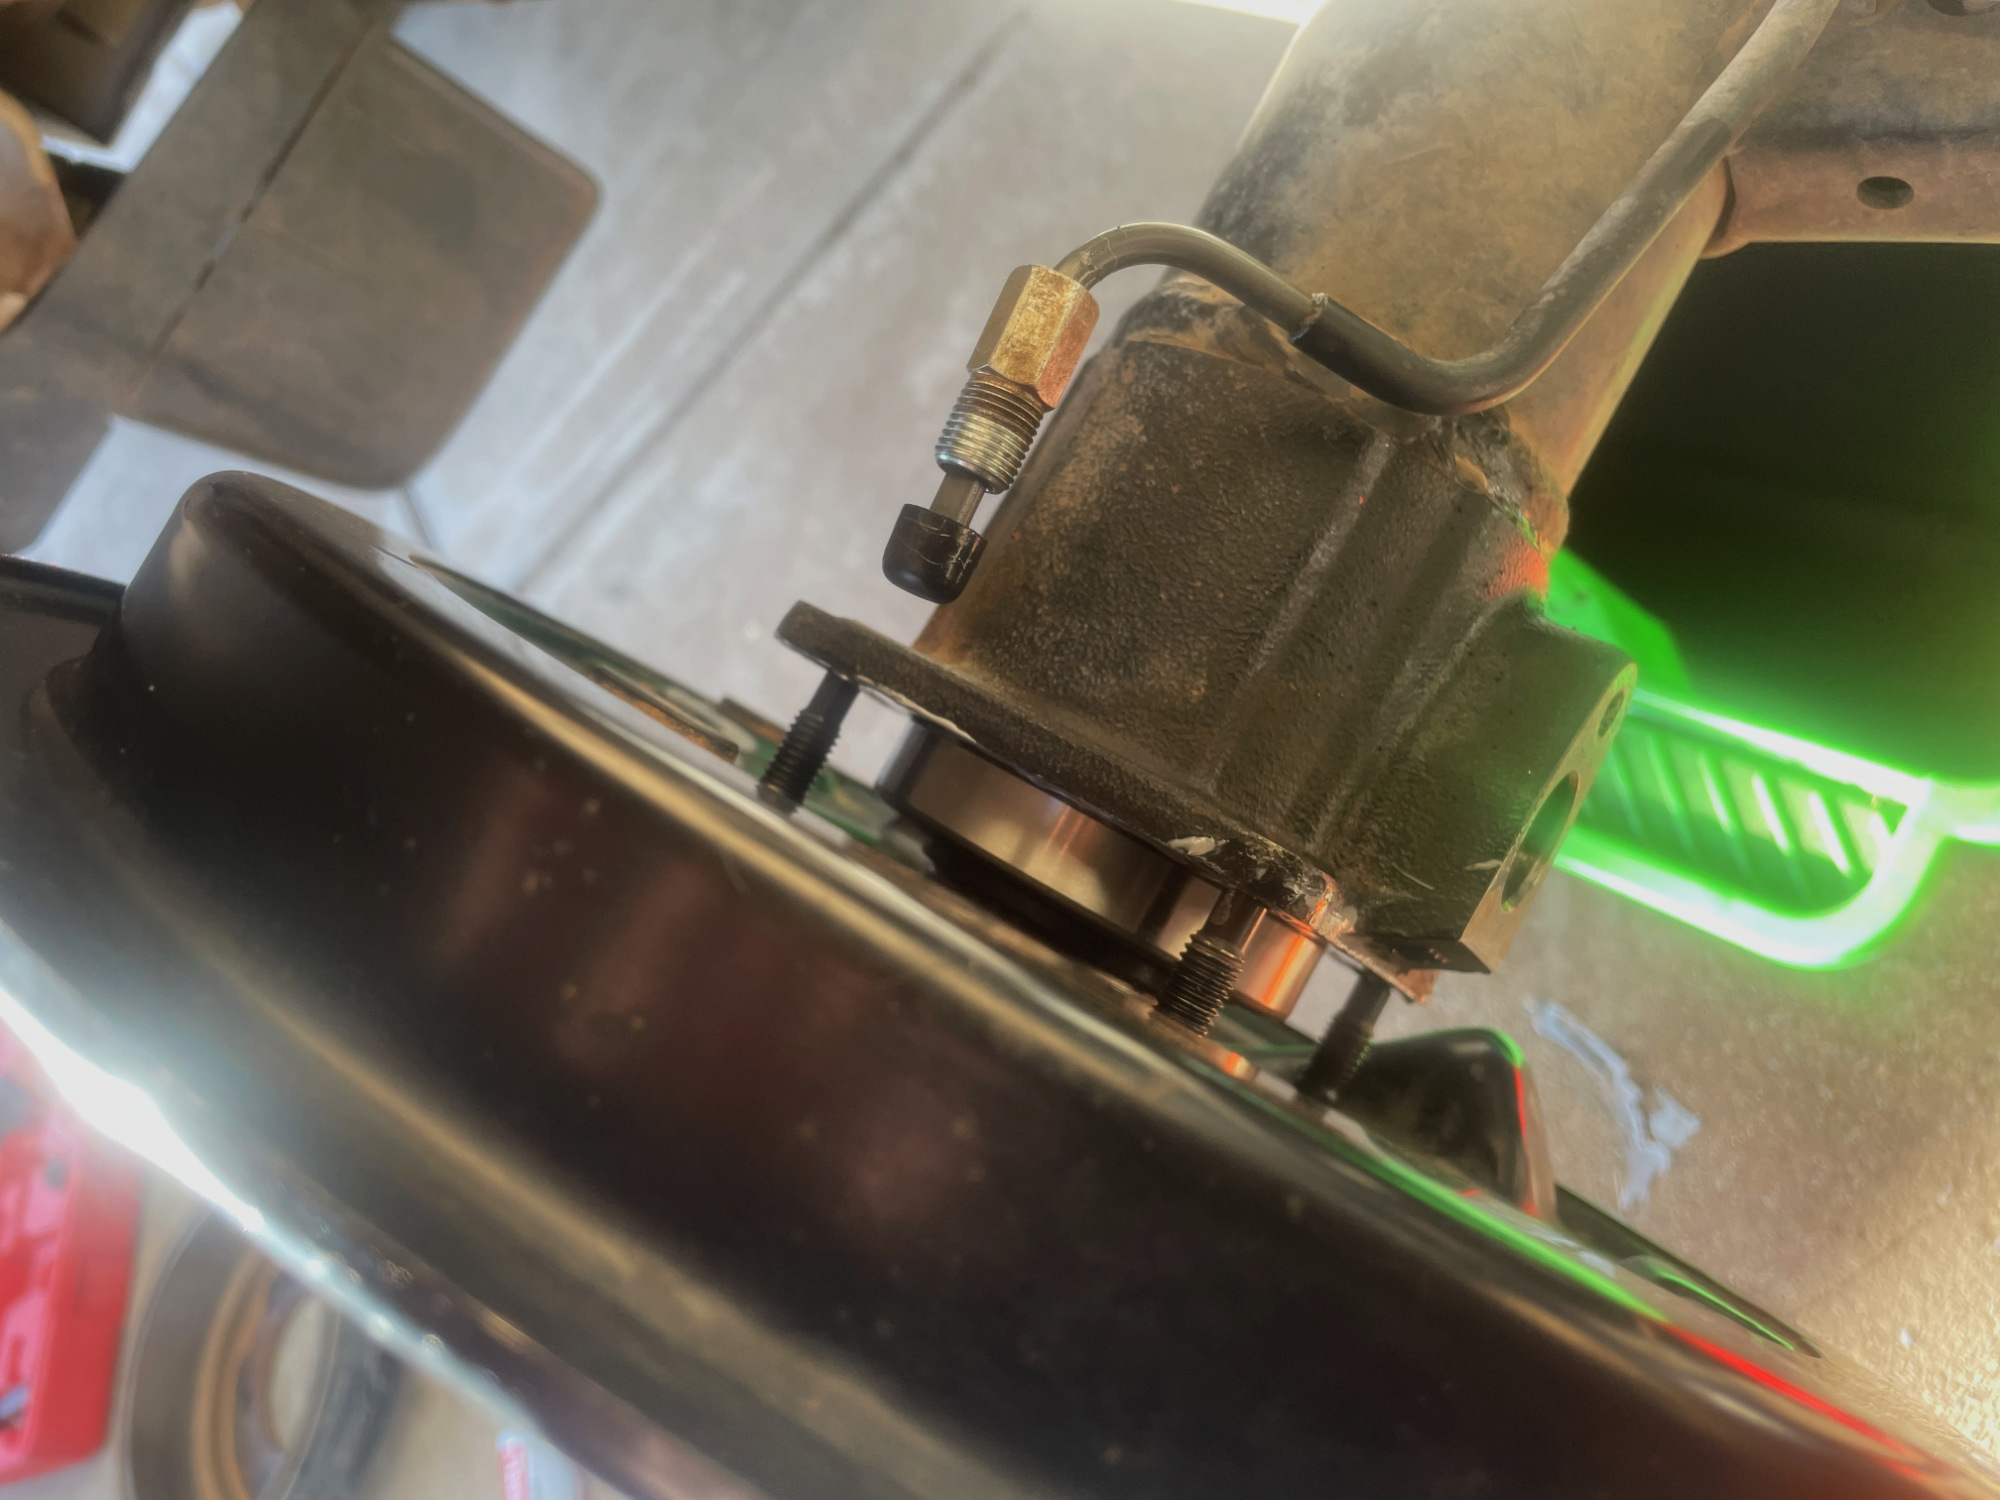
First up is to tighten brake backing plate nuts up to 27 Nm, which will start the process of curing the sealant between the backing plate and the axle housing. Refit the ABS sensor (factory torque setting: 8.8 Nm) and you’ve ticked off the first job on the rebuild.
Most of the rear brake is covered by putting things back together in my rear brake article, but some key elements.
Handbrake cable is quite easy to push back into the backing plate and the locking fingers will just snap into place when it is seated. Just make sure it’s fully seated and can’t be pulled back out once you’ve pushed it through.
Once the handbrake cable is through the backing plate, fit it to the trailing drum arm through the slot in the arm.
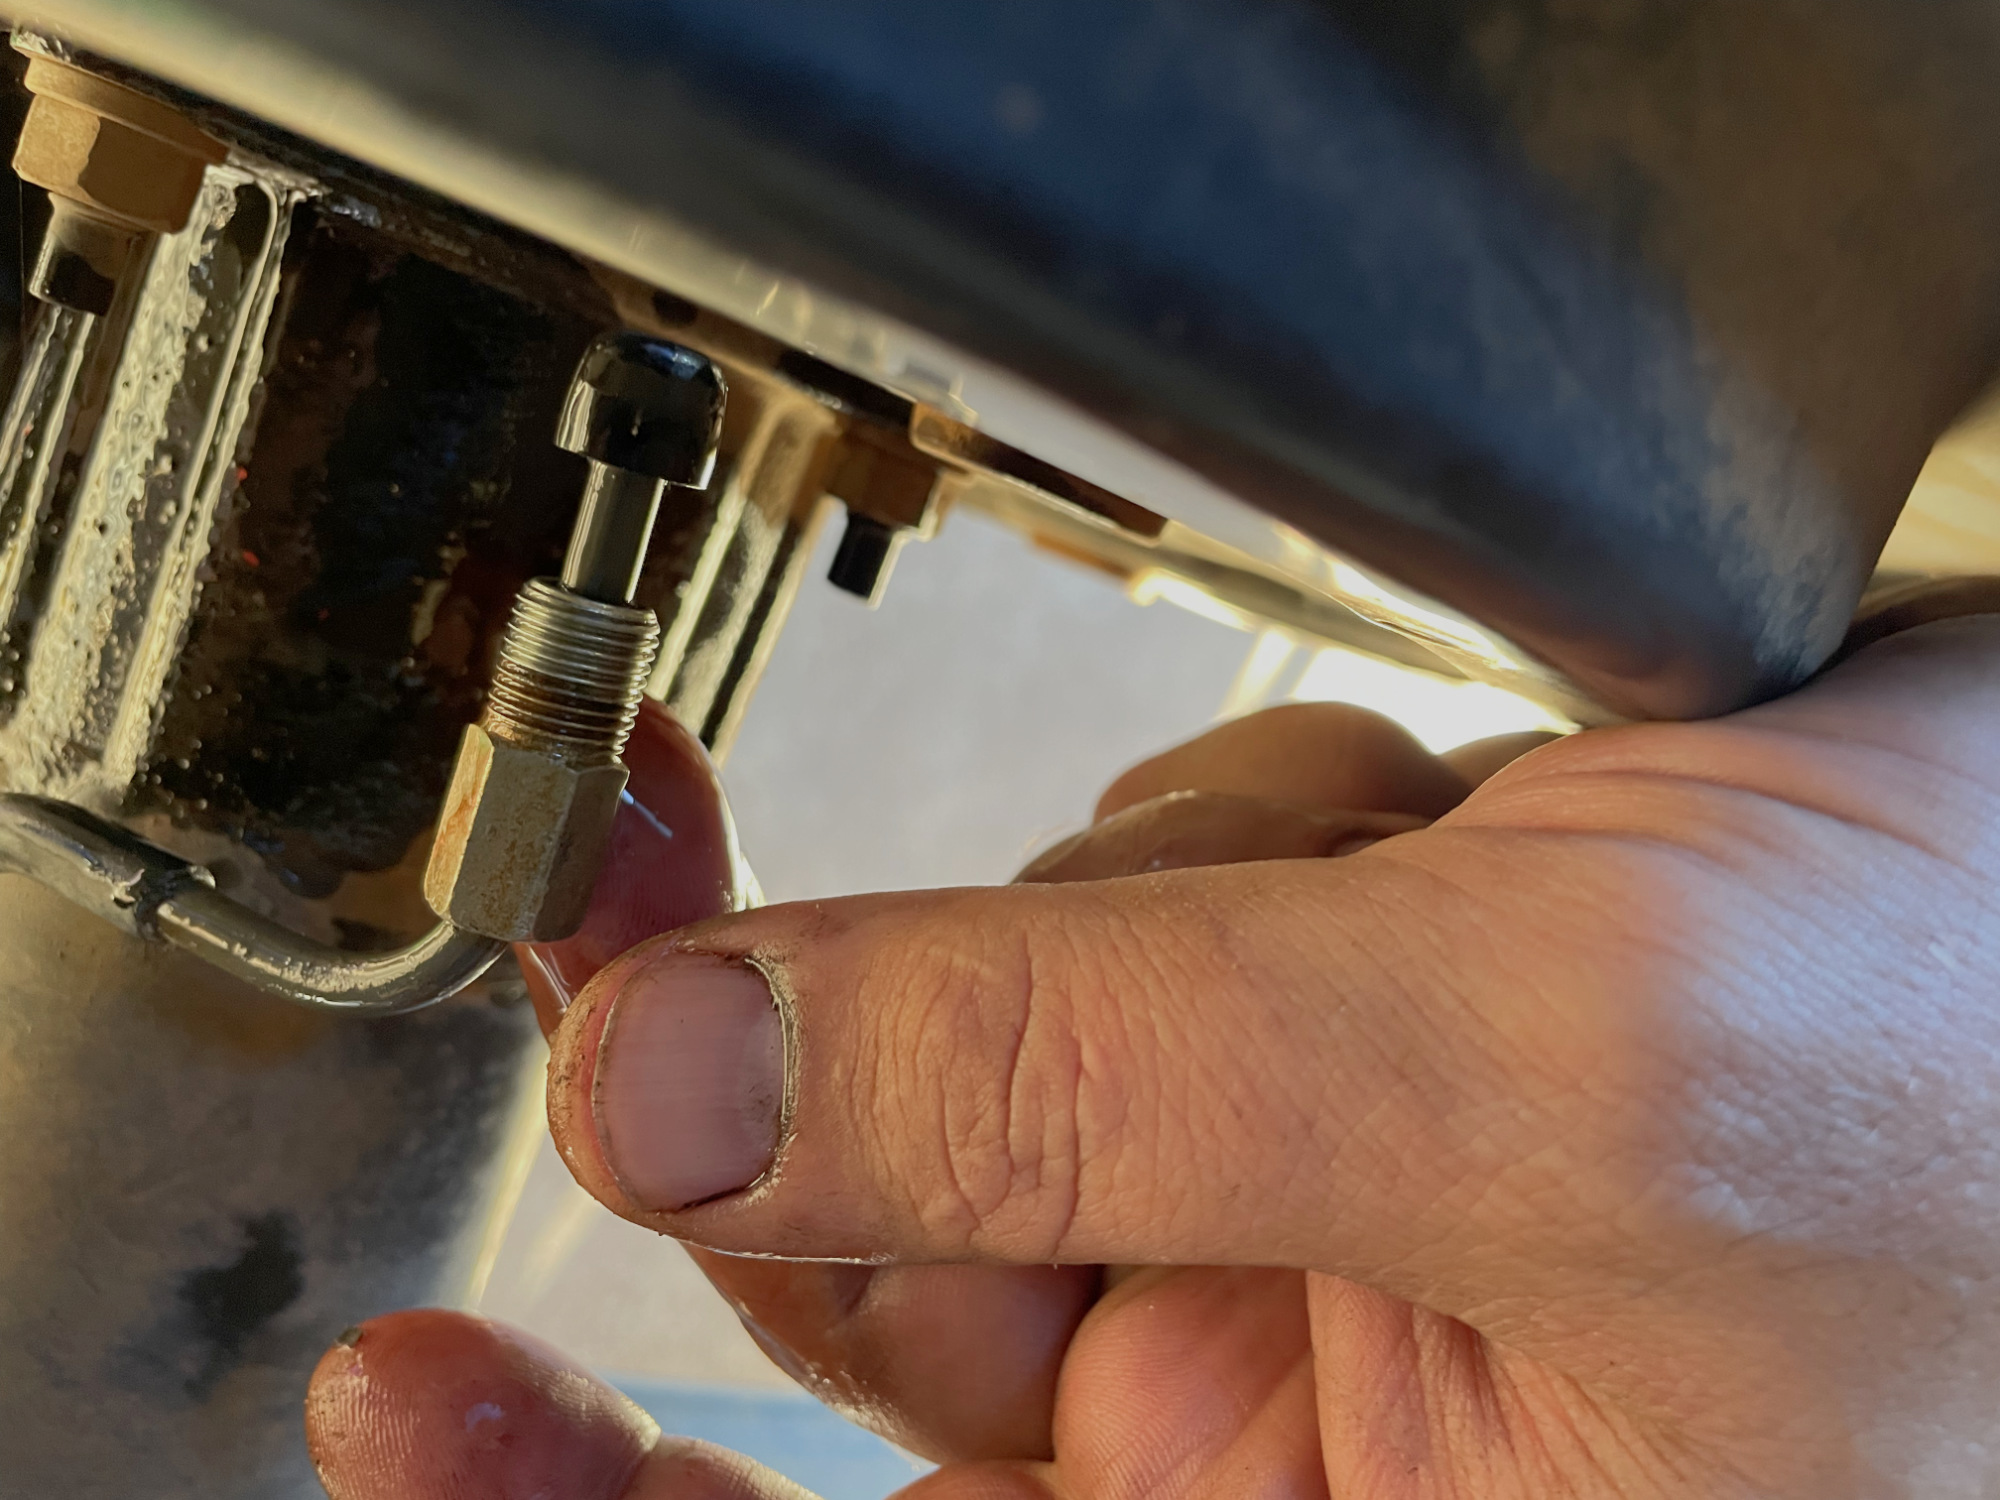
Clean up the rear brake wheel cylinder in prep for refitting.
Fit the brake hose to the wheel cylinder (16 Nm if you have a crows-foot torque wrench adapter, gudentight if you don’t), and do up the wheel cylinder bolts to 9 Nm torque.

Now we refit the brake components. Most stuff here is straightforwards but getting the strong upper spring in place is very much a test of patience and willpower.
What I do is I use the shoe retaining clips to hold them roughly in place, and then I put the spring tip onto the ratchet mechanism on the sliding channel. Basically like this pic shows (with the leading shoe off the car).

You then use the pointy part of a set of drum brake pliers to engage through the spring end and point the tip into the hole on the other shoe that it has to go into. You have no idea how much it sucked to take this photo.
The first time you do this you’ll be cursing and carrying on and you’ll fail a bunch of time and it’ll feel like it takes hours and all of your strength. The more you do it the quicker you get it done, but there’s still the same level of effort and swearing no matter your level of experience.
Oh, and it’s super easly in pulling on the spring to accidentally push the wheel cylinder too far one way, in which case one of the pistons will pop out and brake fluid goes everywhere. Pretty easy to put the cylinder back together, it’s just something to be alert for (and gets brake fluid everywhere).
The rest of it is relatively straightforwards brake reassembly.
You’ll then need to bleed the brakes. Not hard, but a pressure or vacuum bleeder makes this job a lot easier.
Now you just need to refill the differential with oil, adjust handbrake, refit the wheels and loosely fit wheel nuts, get the car on the ground, tigthen wheel nuts to 100 Nm each and go for a drive in your newly fixed Jimny!