
Jimny mechanical workshops
This is a record of the Jimny owners of WA mechanical workshops.
- Car mechanical basics
- Servicing
- Modifying
Car mechanical basics
First run: 21 Jan 2024
- What’s what under the bonnet and under the car
- Basic checks under the bonnet
- Some useful basic tools you should have with you
- Using the tools that come with the car
- Accessing the toolkit: removing luggage box and carpet base
- Loosening wheel nuts with the supplied wrench
- Jacking points: dimples in the radius arm
- Supporting the car before getting underneath it
- Tyres: Pressures, changing and plugging tyres
- A moment for tyre pressures
- Taking the rear spare off the door safely
- Tyre rotation stuff
- Plugging tyres
- Refitting a tyre onto the car: tightening up in a cross pattern
- Fixing another issue: jump starting
- Post trip maintenance, checks and car cleaning
- Focus on the underbody first and foremost
- Engine bay just in case you need to spot something wrong
- Digging deeper: wheels off clean of brakes and suspension
- Checking for issues
- Increased maintenance for 4wding
- Diff oil changes
- Transmission/transfer case oil changes
- Brake fluid
What’s what under the bonnet and under the car
We’ll start with a couple of pictures of under the bonnet, first off standing on the drivers side and looking in.
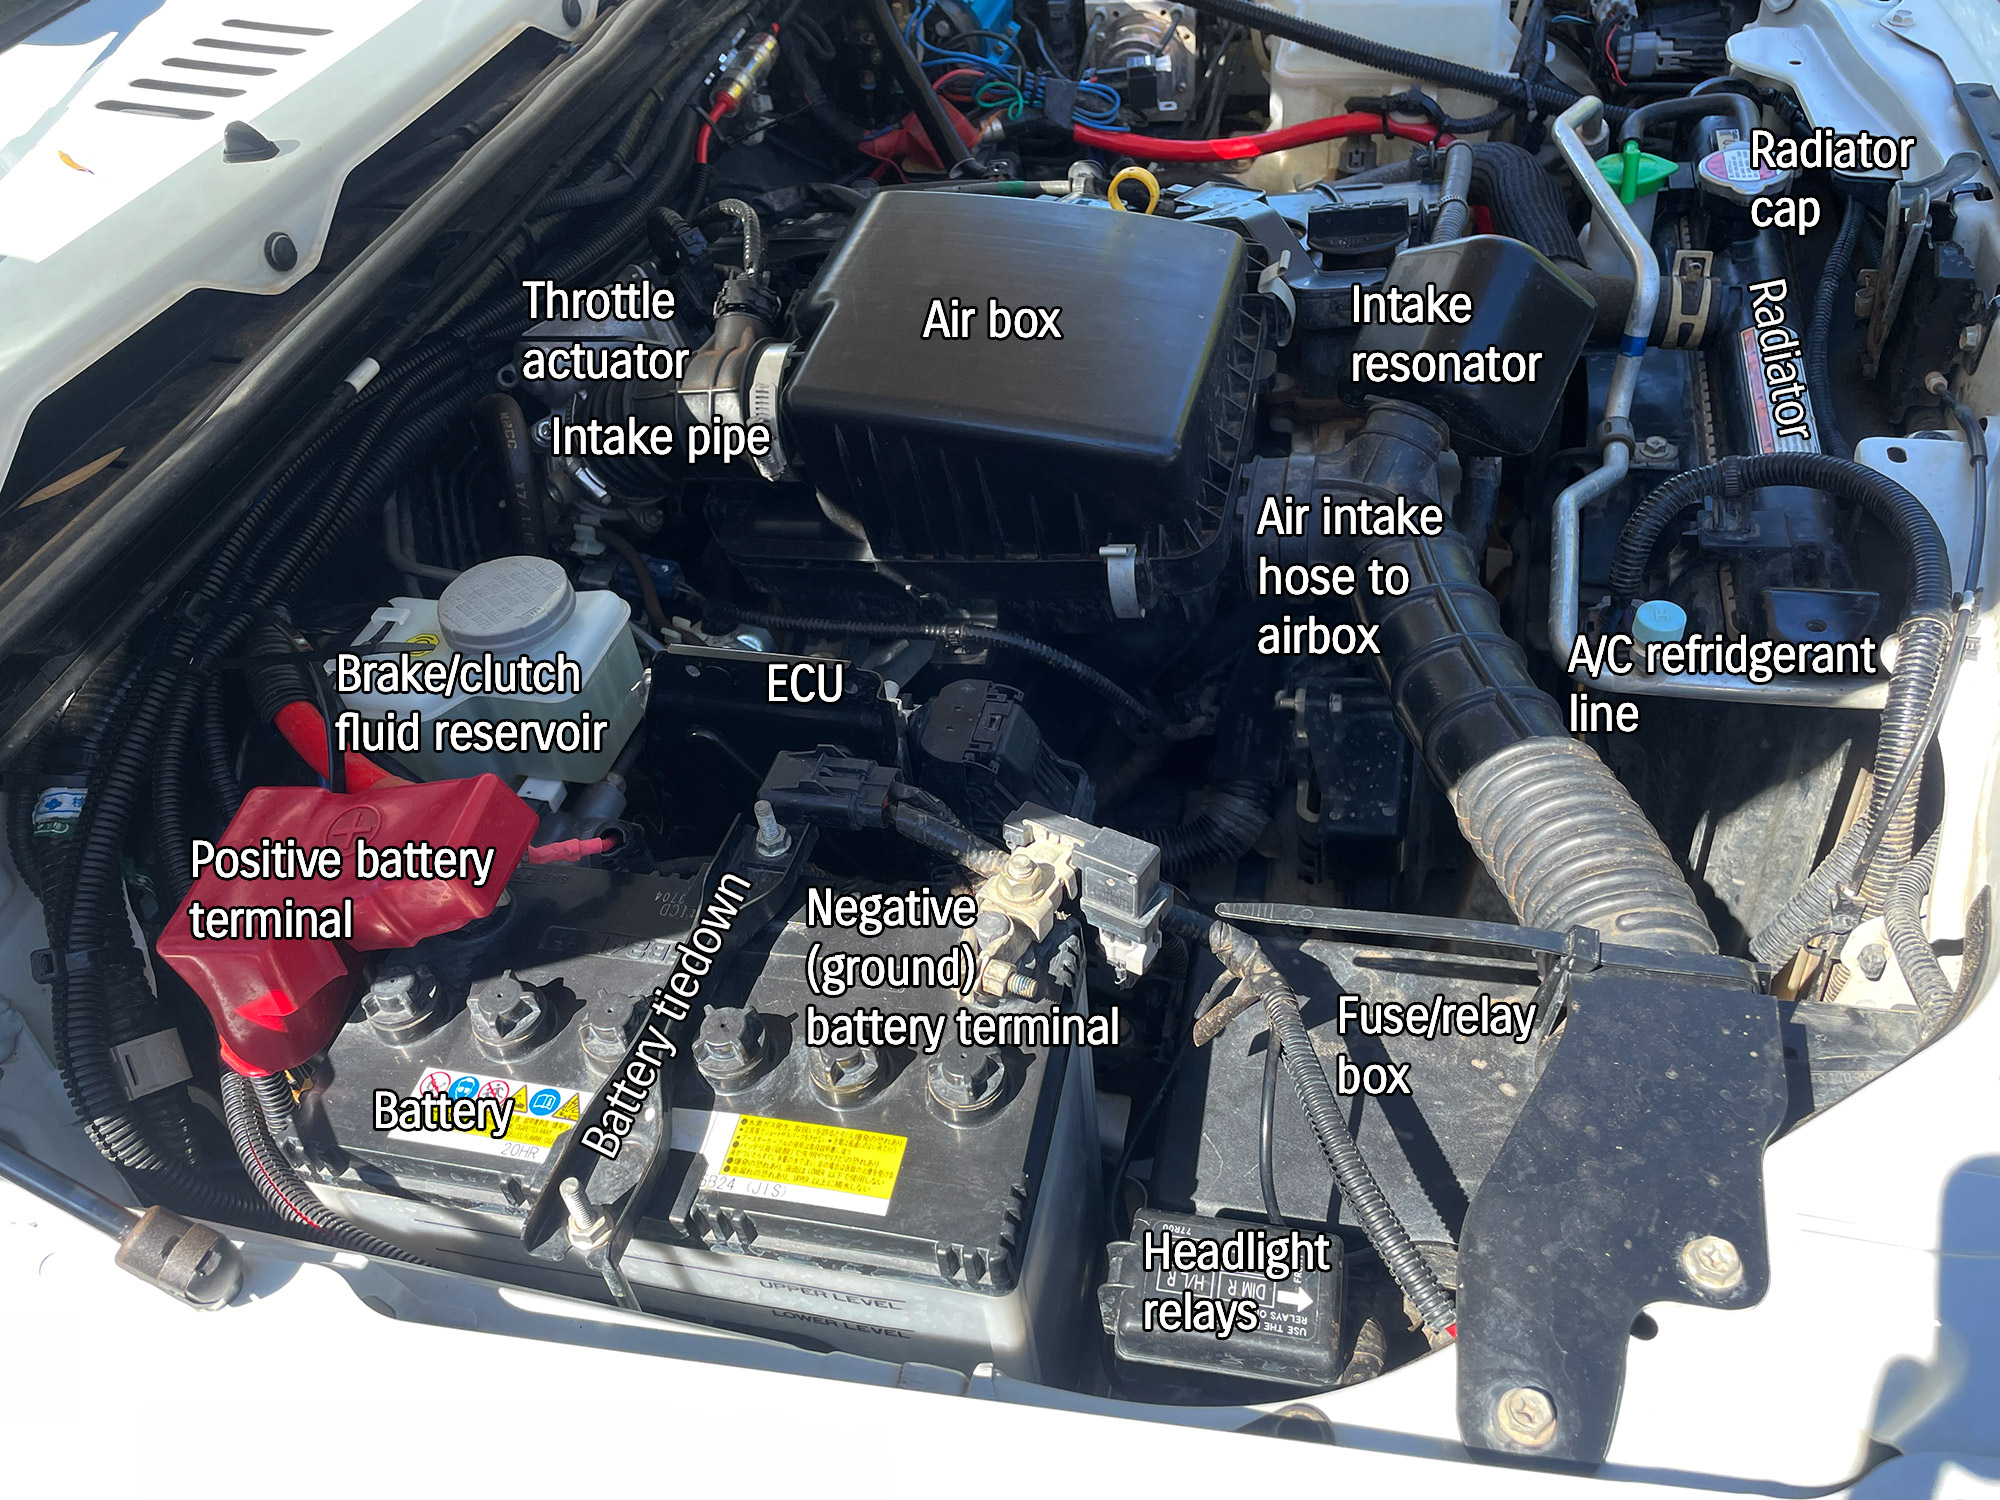
Next up standing at the front of the car looking down and into the engine bay.
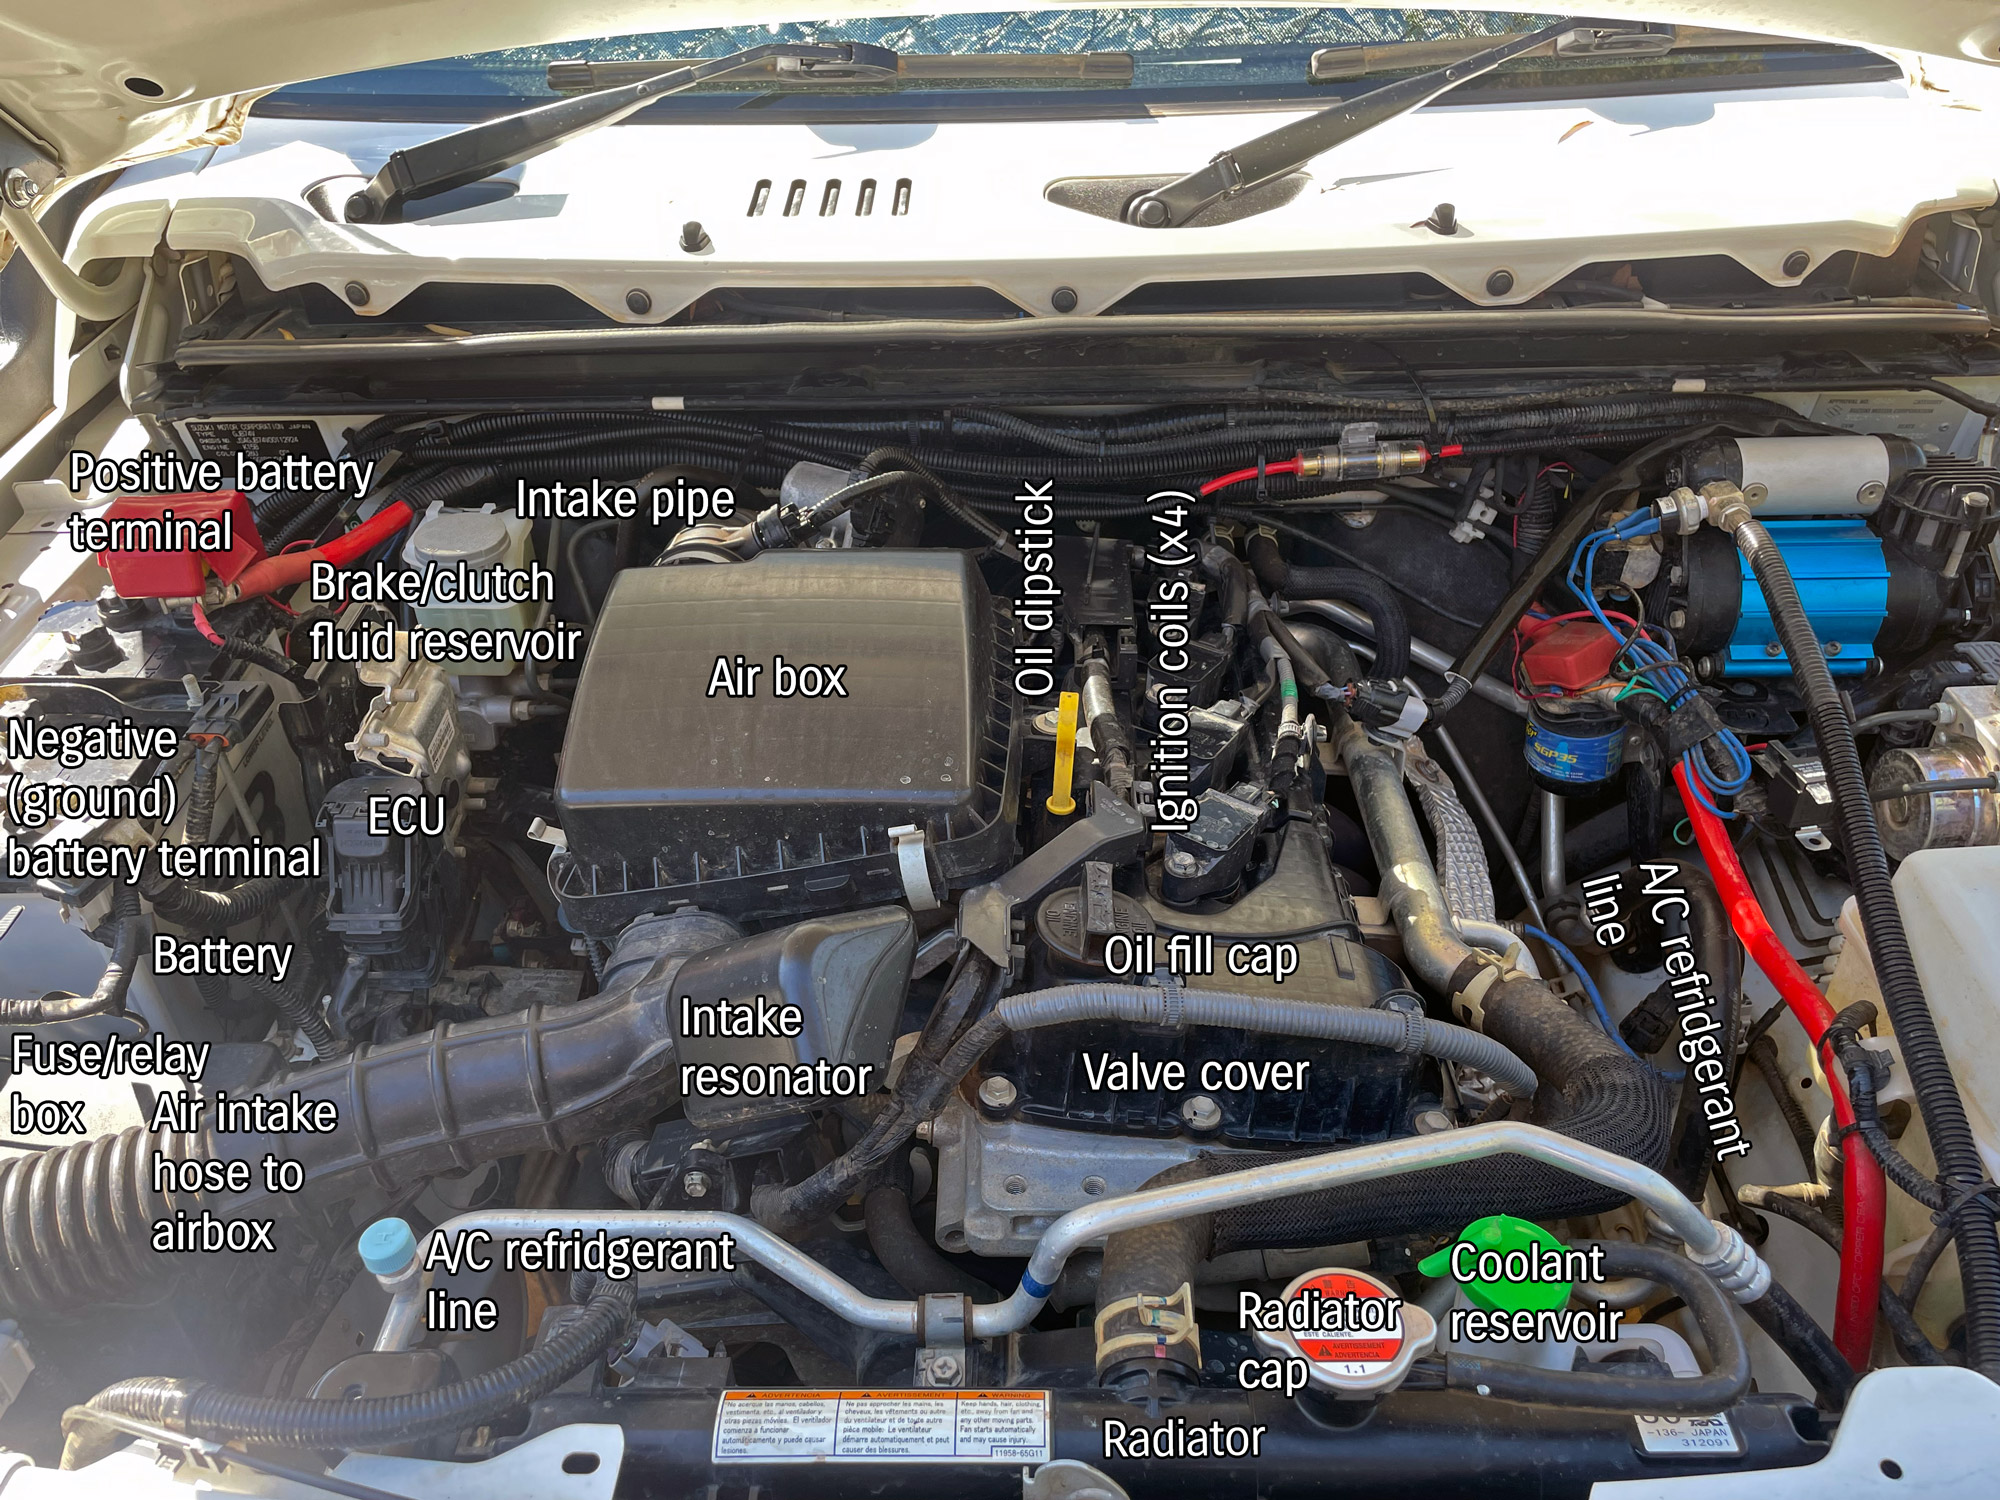
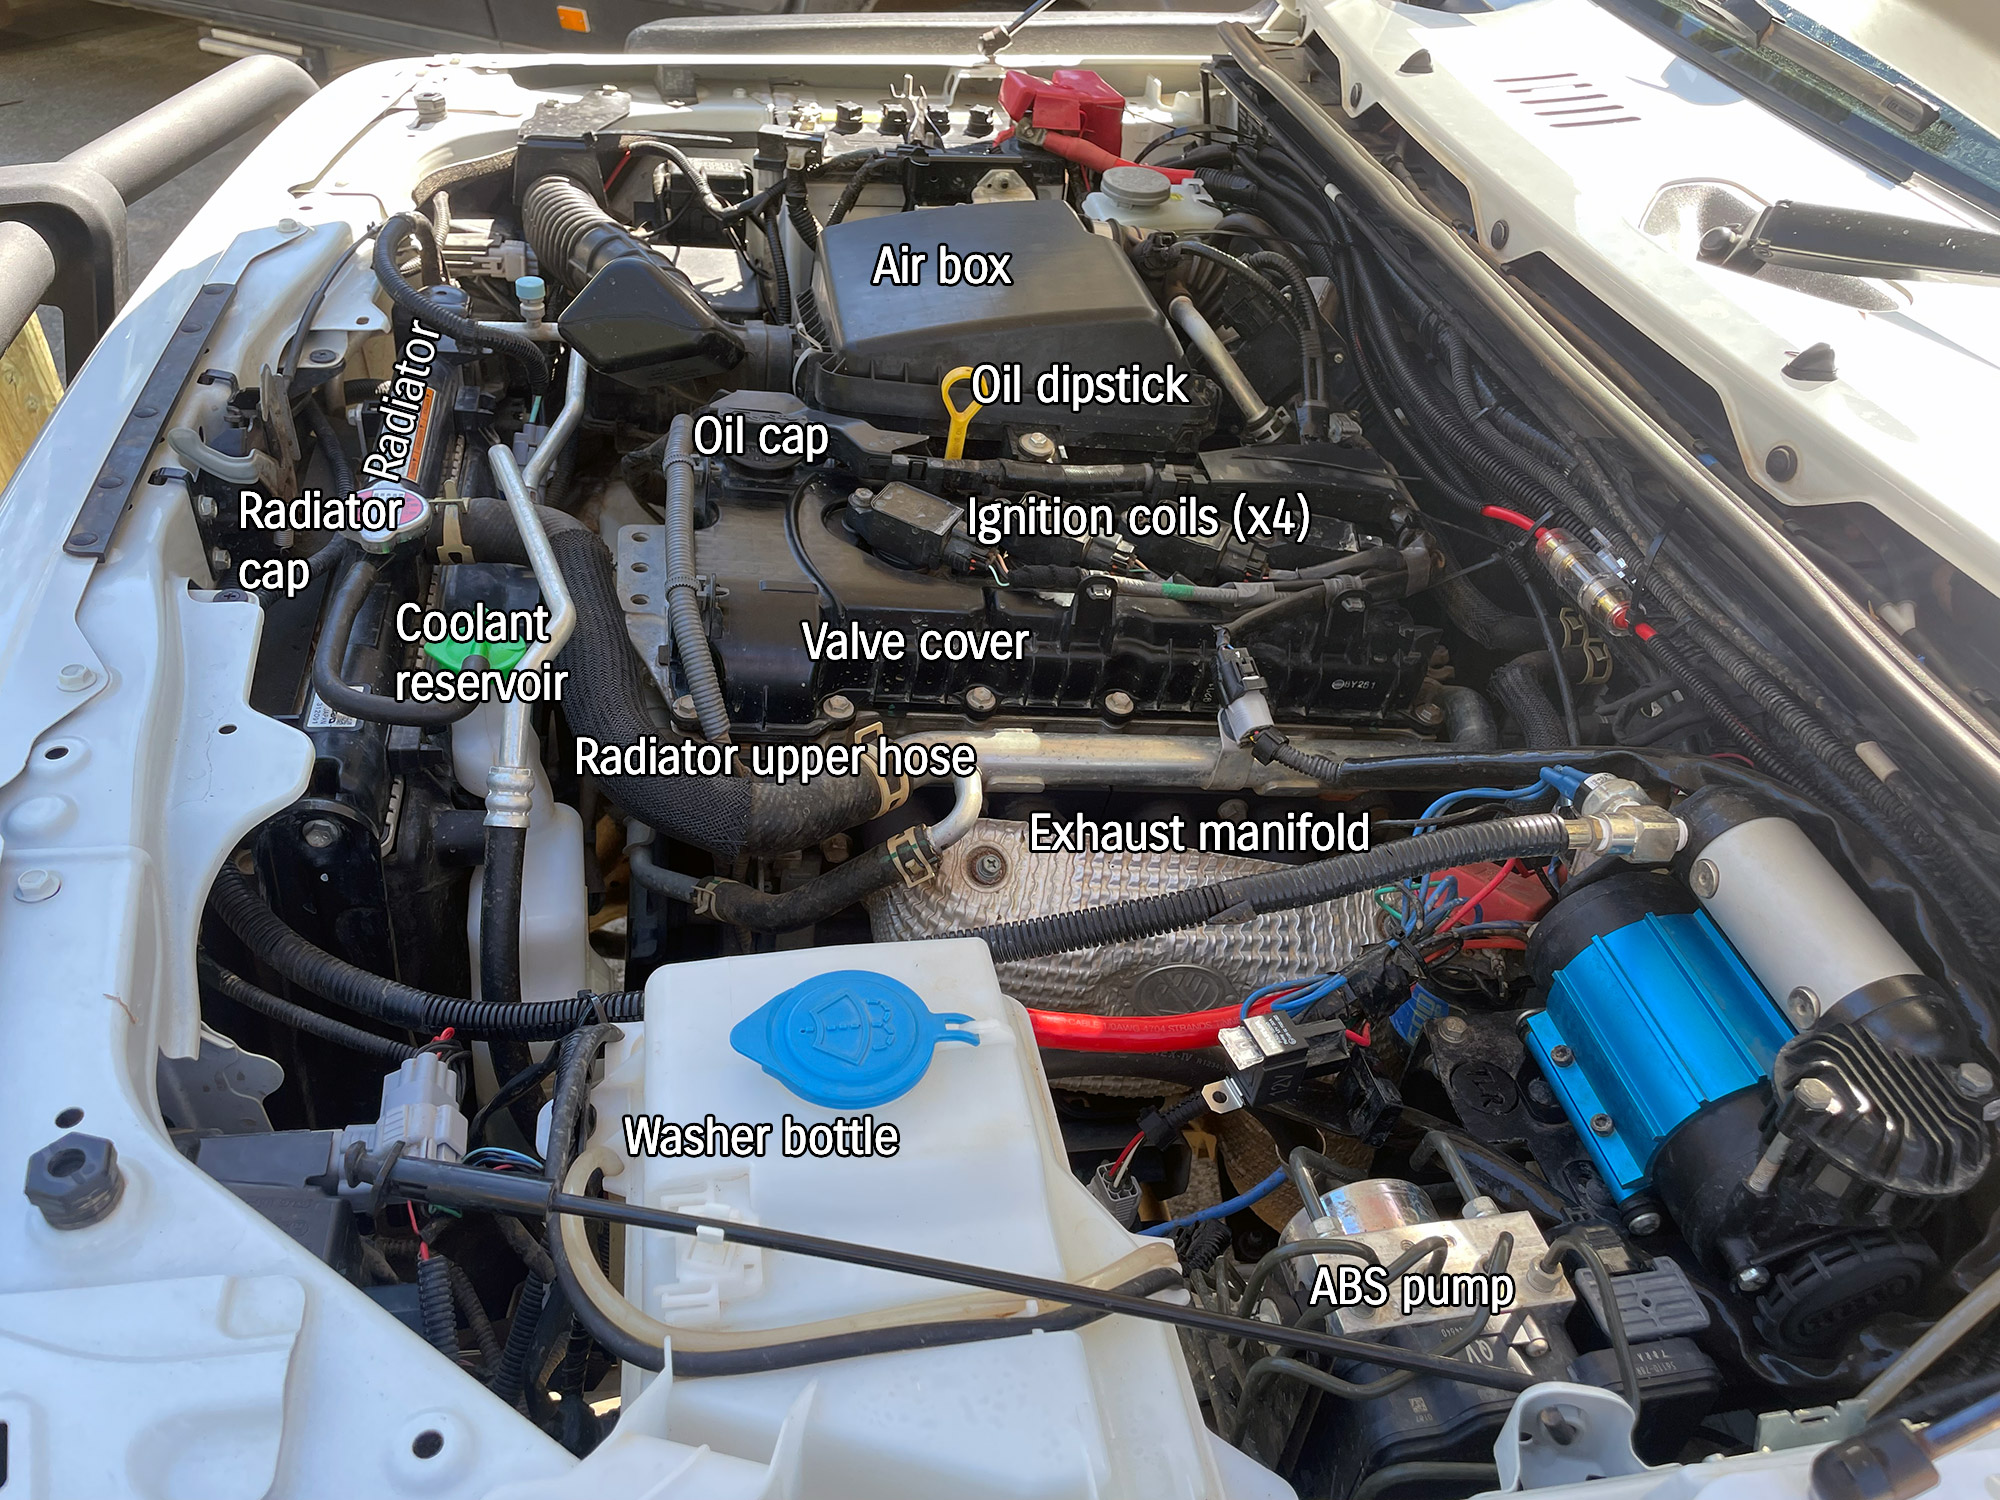
And finally the same view but in from the passenger’s side.
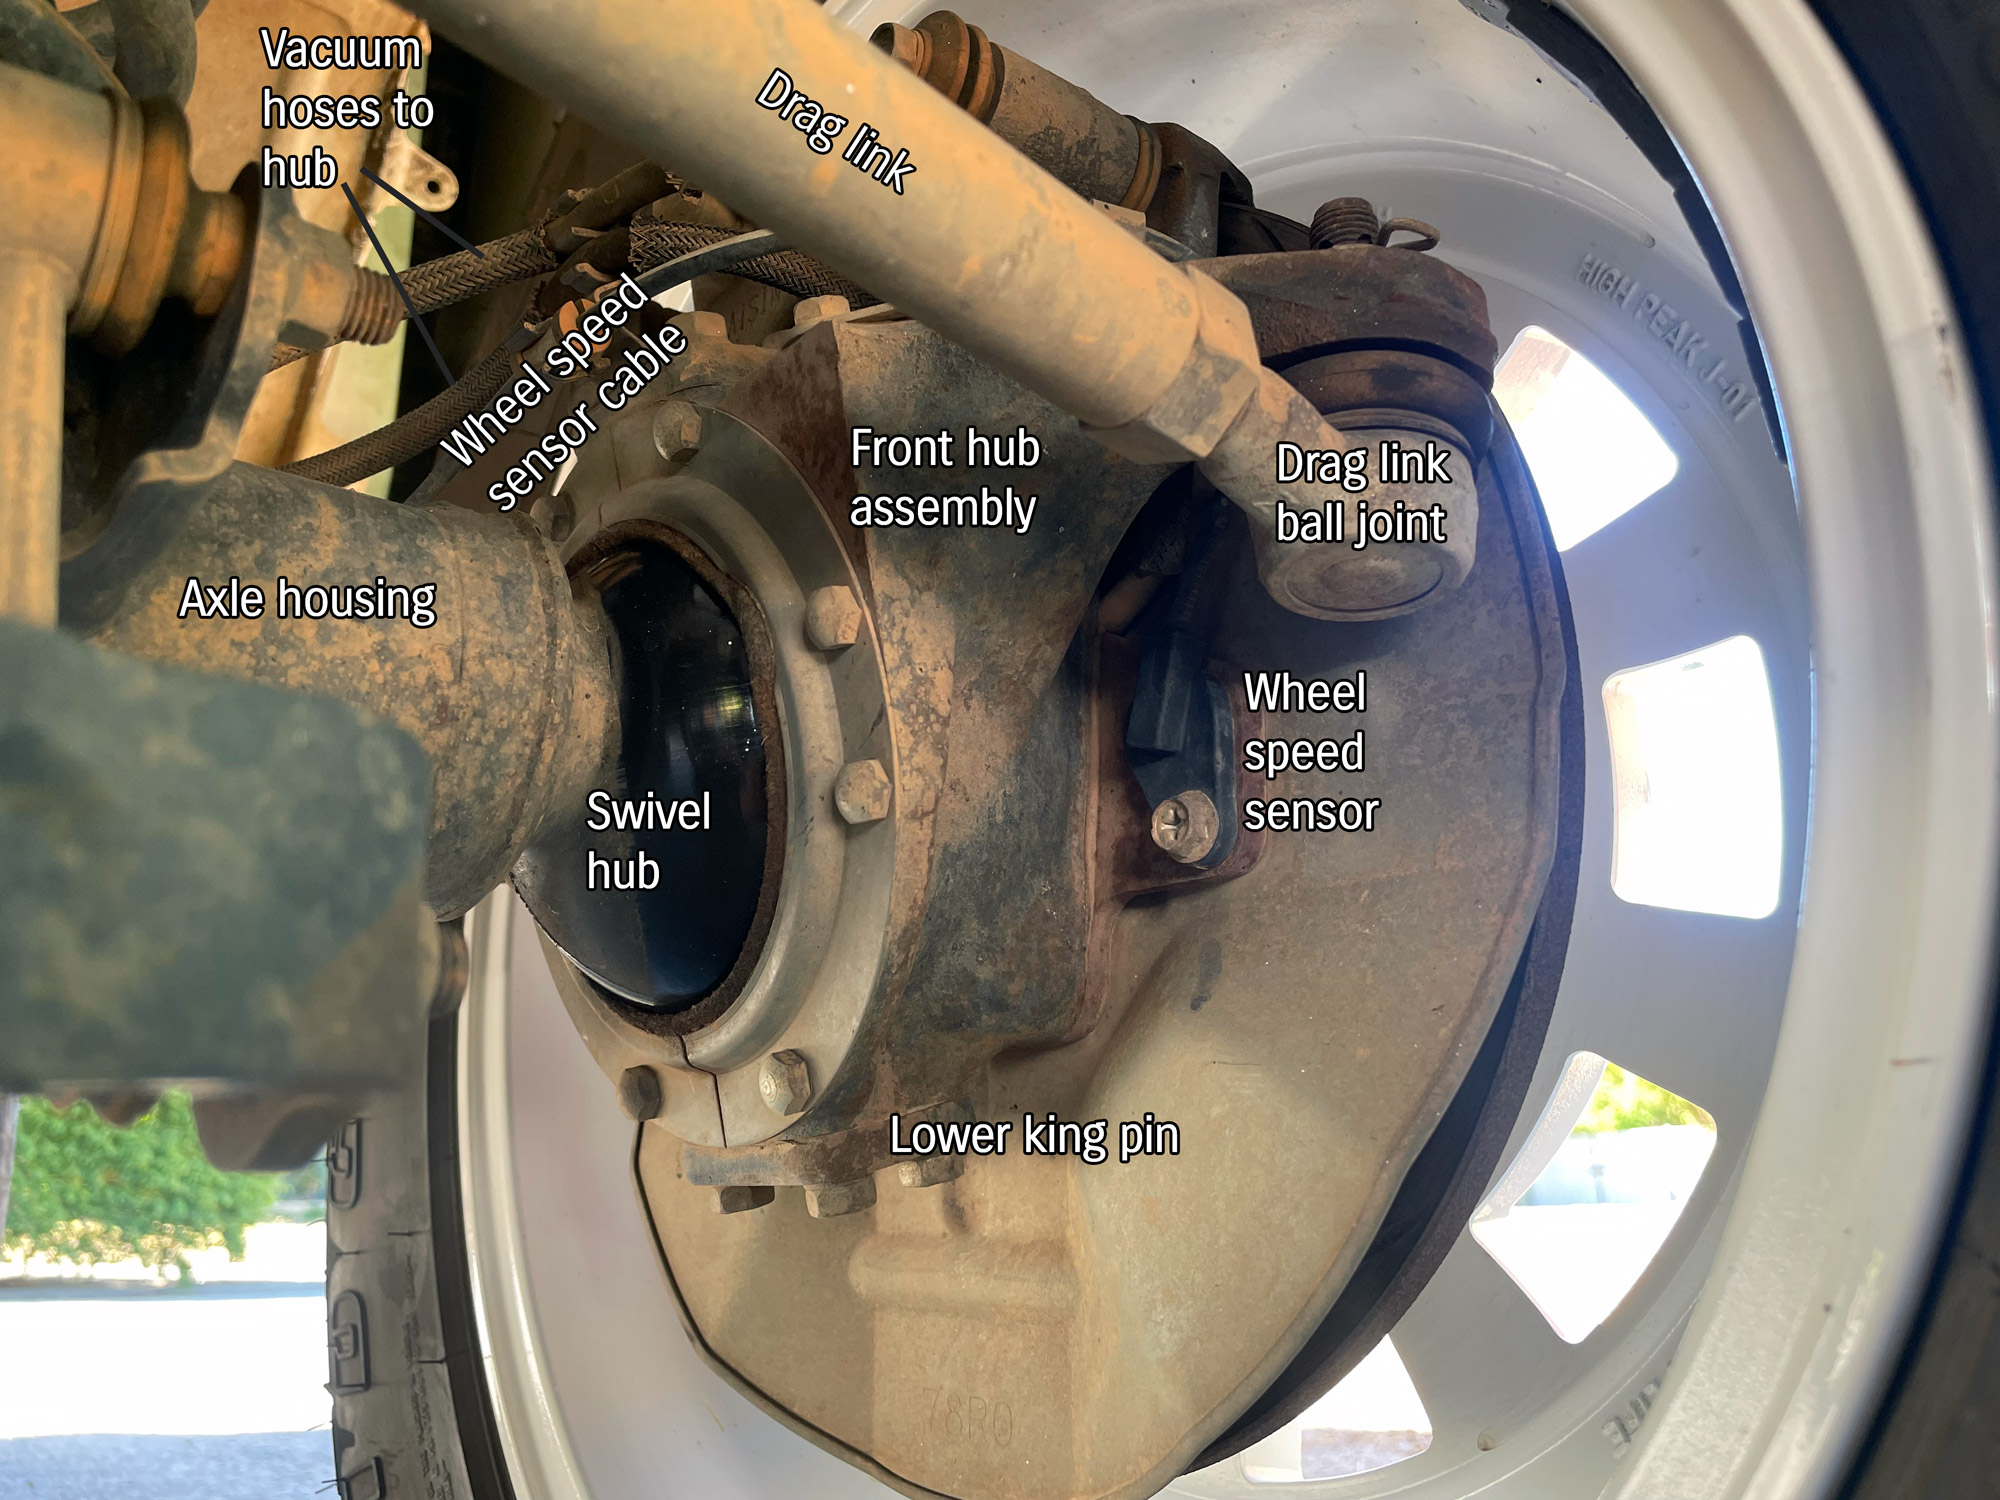
Now for some front end stuff.
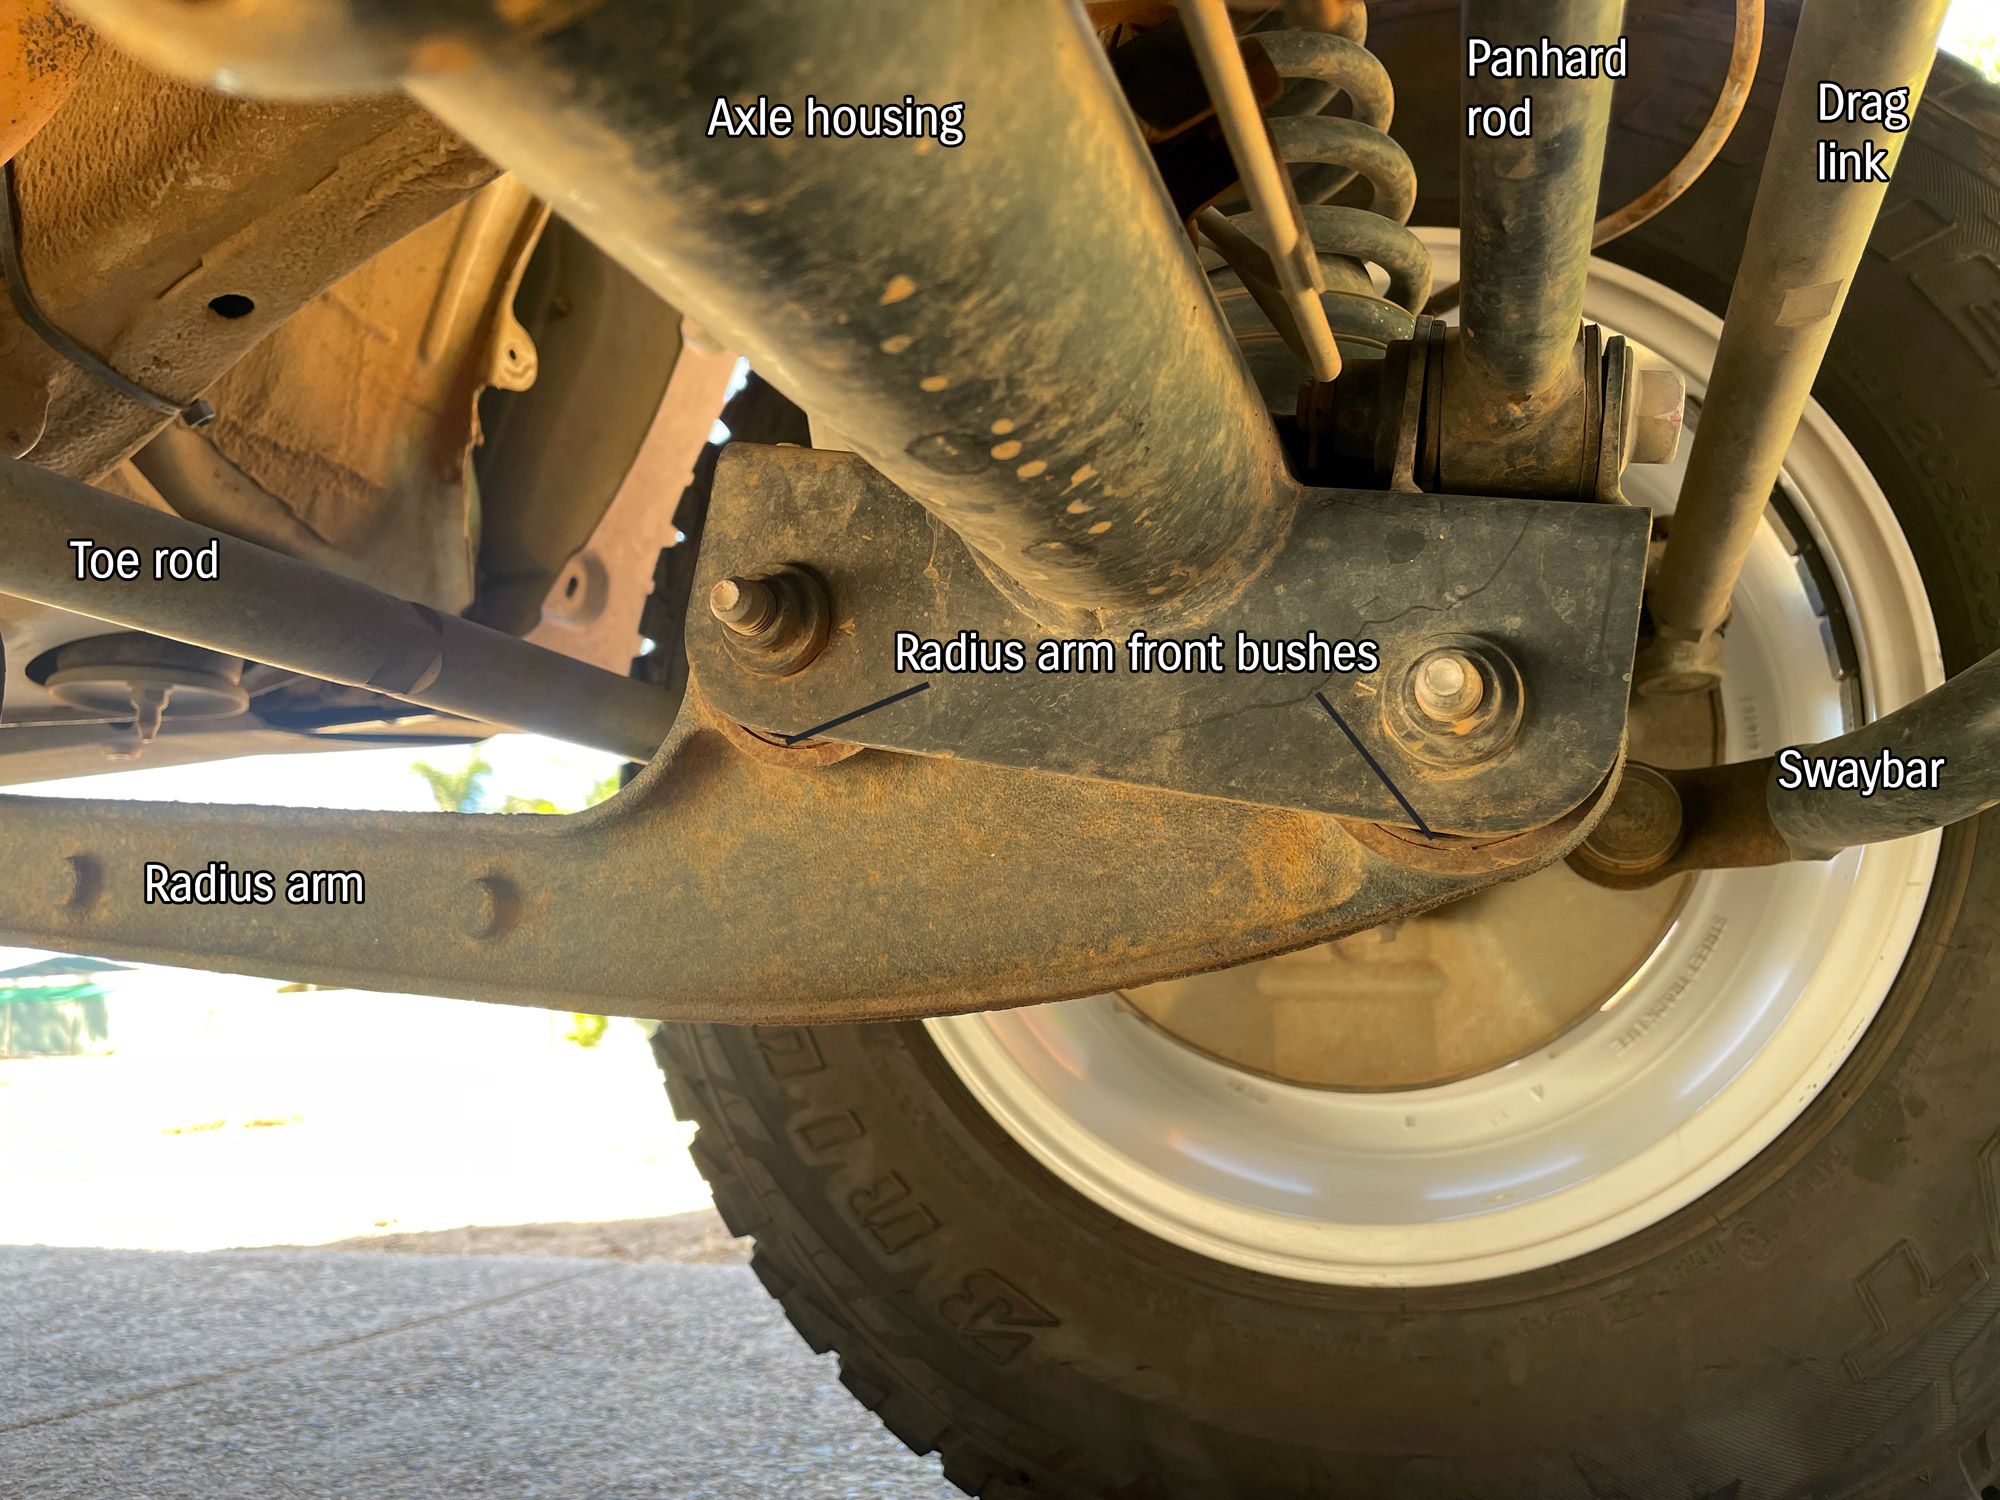
This is the front wheel hub assembly from the back, showing things like the swivel hub (allows the front wheels to turn for steering) and the end of the drag link (which is what transmits steering from the steering box down to the left-hand wheel).
One of the things people ask about with suspension lifts is ‘caster correction’ – this is a function of how the steering axis changes as the suspension moves up and down. It is not adjustable per se, but can be changed by changing the radius arms or at least fitting offset bushes to the radius arms. Here’s a detailed shot of a stock radius arm and bush arrangement.
Basic checks under the bonnet
There’s a few basic checks making sure you familiarise yourself with under the bonnet:
Brake fluid level
Shine a torch into the reservoir and make sure it’s above minimum and below maximum. Also make sure it isn’t dirty and weird looking
Engine oil level
With the engine off and the car on level ground, pull the dipstick and clean it off. Put it back in, leave it a few seconds and pull it back out to check the engine oil level.
Coolant level
Again using a torch, shine it in and see that the fluid is above minimum and below maximum. If this is a bit low just top it up with distilled water. You’d only worry about replacing it with actual coolant if it’s often losing water and then you’d still want to work out why first.
Battery terminal tightness
Just make sure the terminals don’t noticably wiggle to the touch. Easy for them to vibrate loose a little.
Washer fluid level
Like all the other fluid reservoirs, this is easiest checked with a torch but should be also quite easy to see to the eye. Make sure it’s not too low, and if so top it up with either water or washer fluid.
Air filter
2 clips (4 on later cars) and the lid opens. See if there’s any dust on the upper (clean) side of the filter and the upper lid to the filter housing. Remove filter and see if it’s excessively dirty either in the base of the filter housing or on the filter itself.
None of these things need tools, but we’ll touch on the tools that are worth having next up.
Some useful basic tools you should have with you
This is in addition to the factory stuff.
- Spanners: at least 8, 10, 12, 14, 17, 19 (if fitted aftermarket accessories, also ones to fit these accessories)
- Ratchet: covering the same
- Screwdrivers
- A set of pliers
- Trim removal tool
- A cheap multimeter
- OBD2 reader
- Tape and cable ties
If you struggle undoing the wheel nuts with the factory tyre lever, strongly consider getting a 19mm deep wheel socket and a long breaker bar that suits it e.g. 600mm/24″. This will fit in the rear luggage box and make your life so much easier undoing things: leverage is your friend!
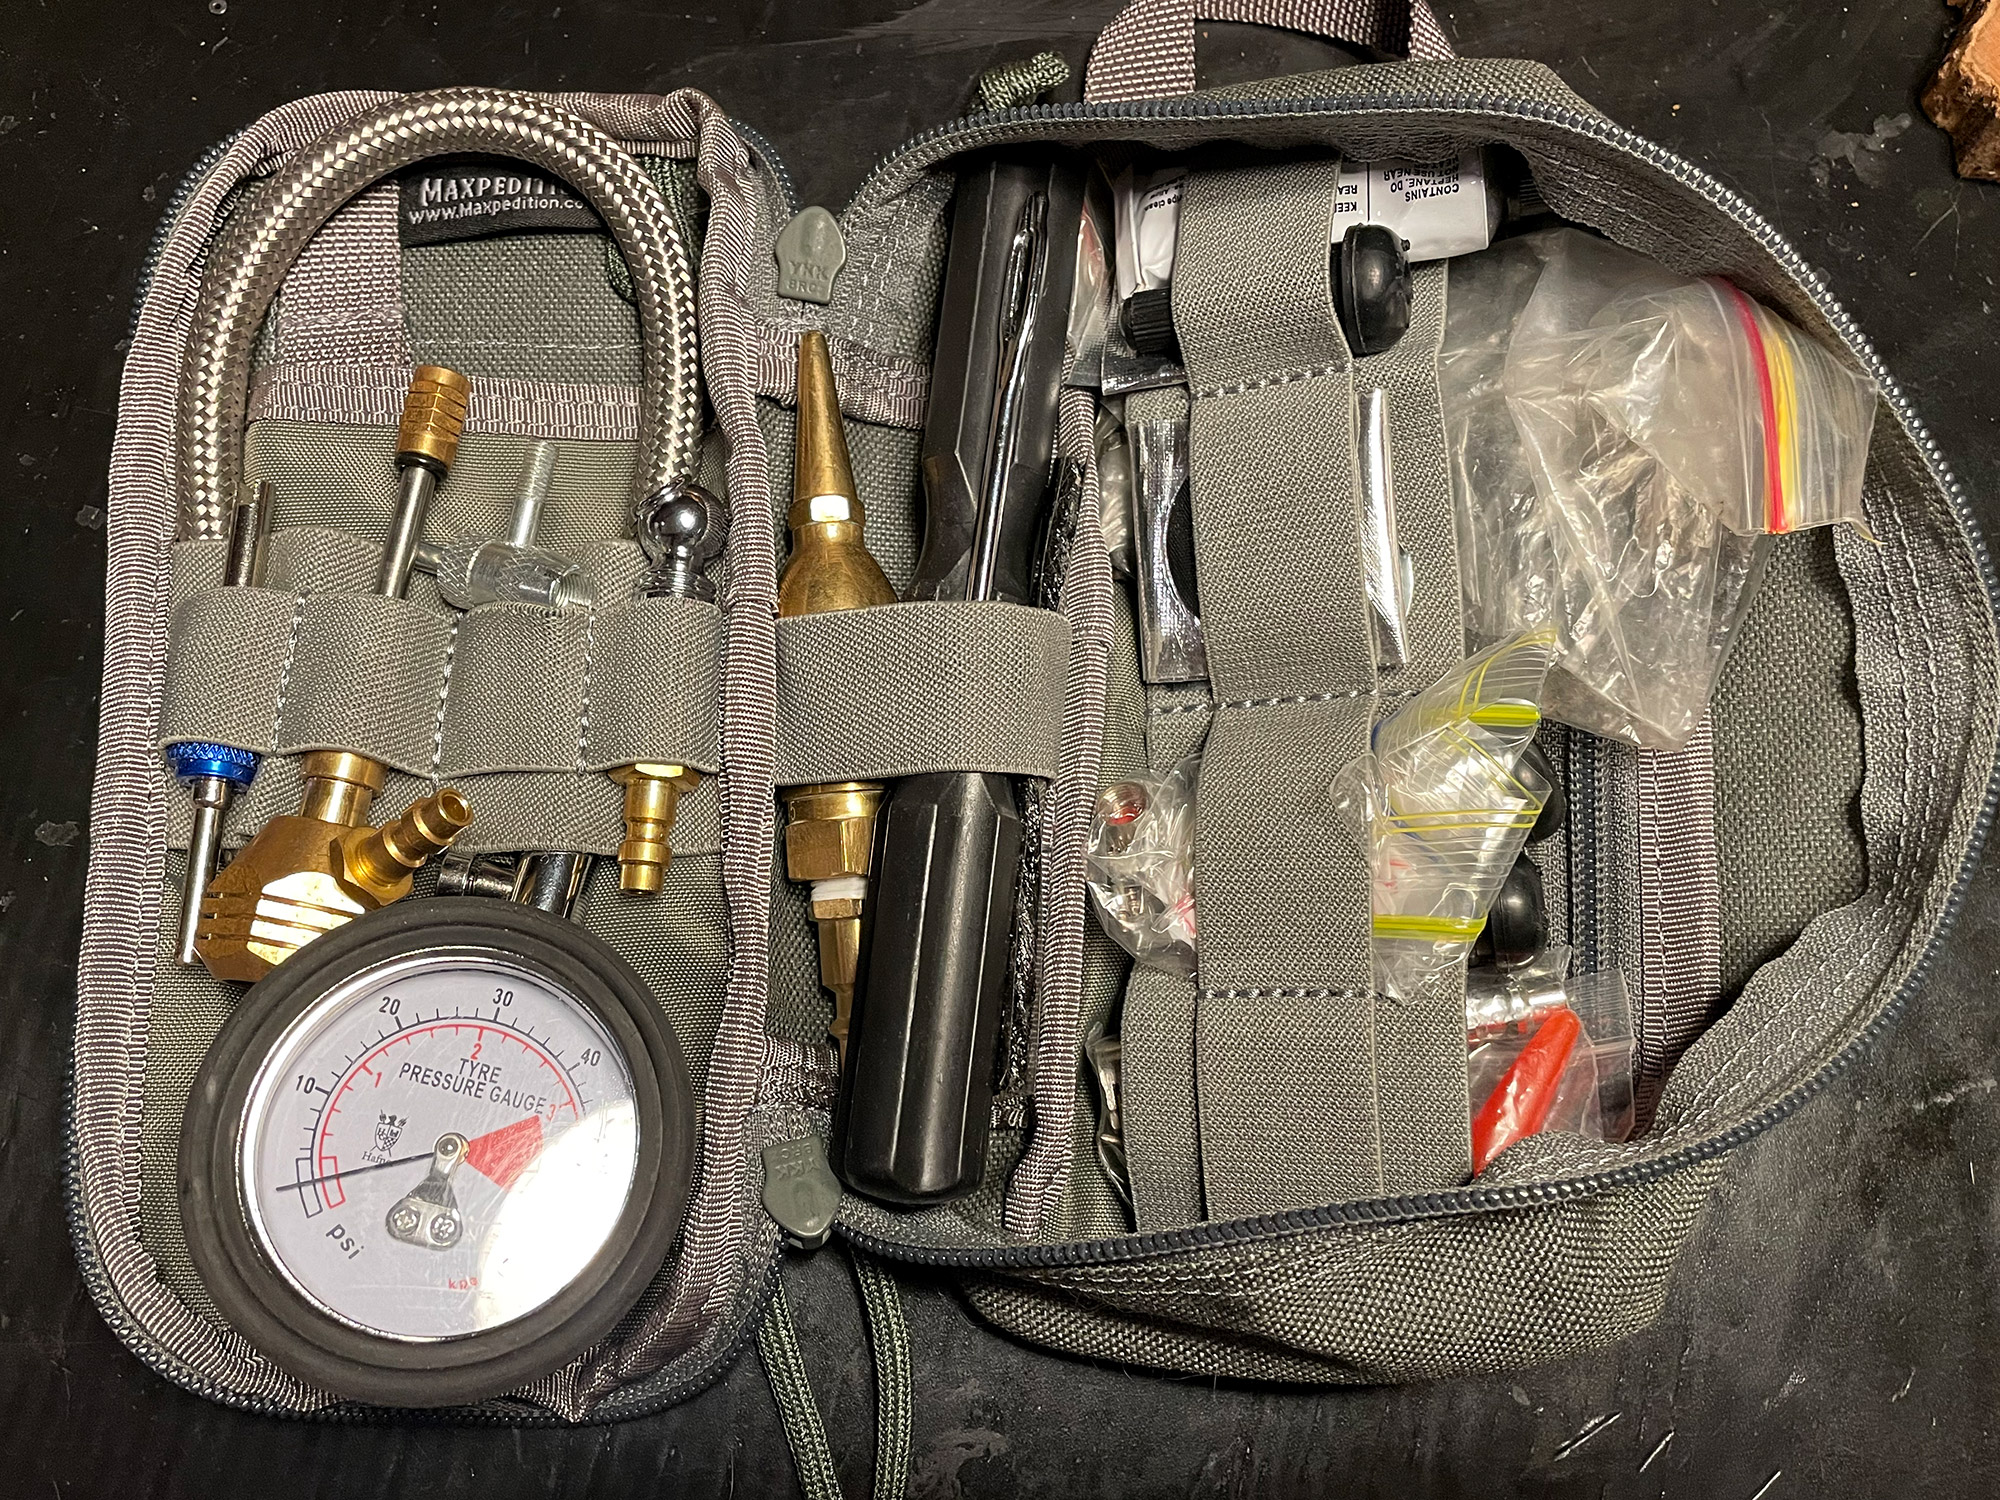
A special kit I keep with me all of the time is my collection of tyre related things. Most of the time I just use the gauge and/or the deflator in this kit but it is good to have everything.
Here’s the kit:
and labelled with what everything is in it:
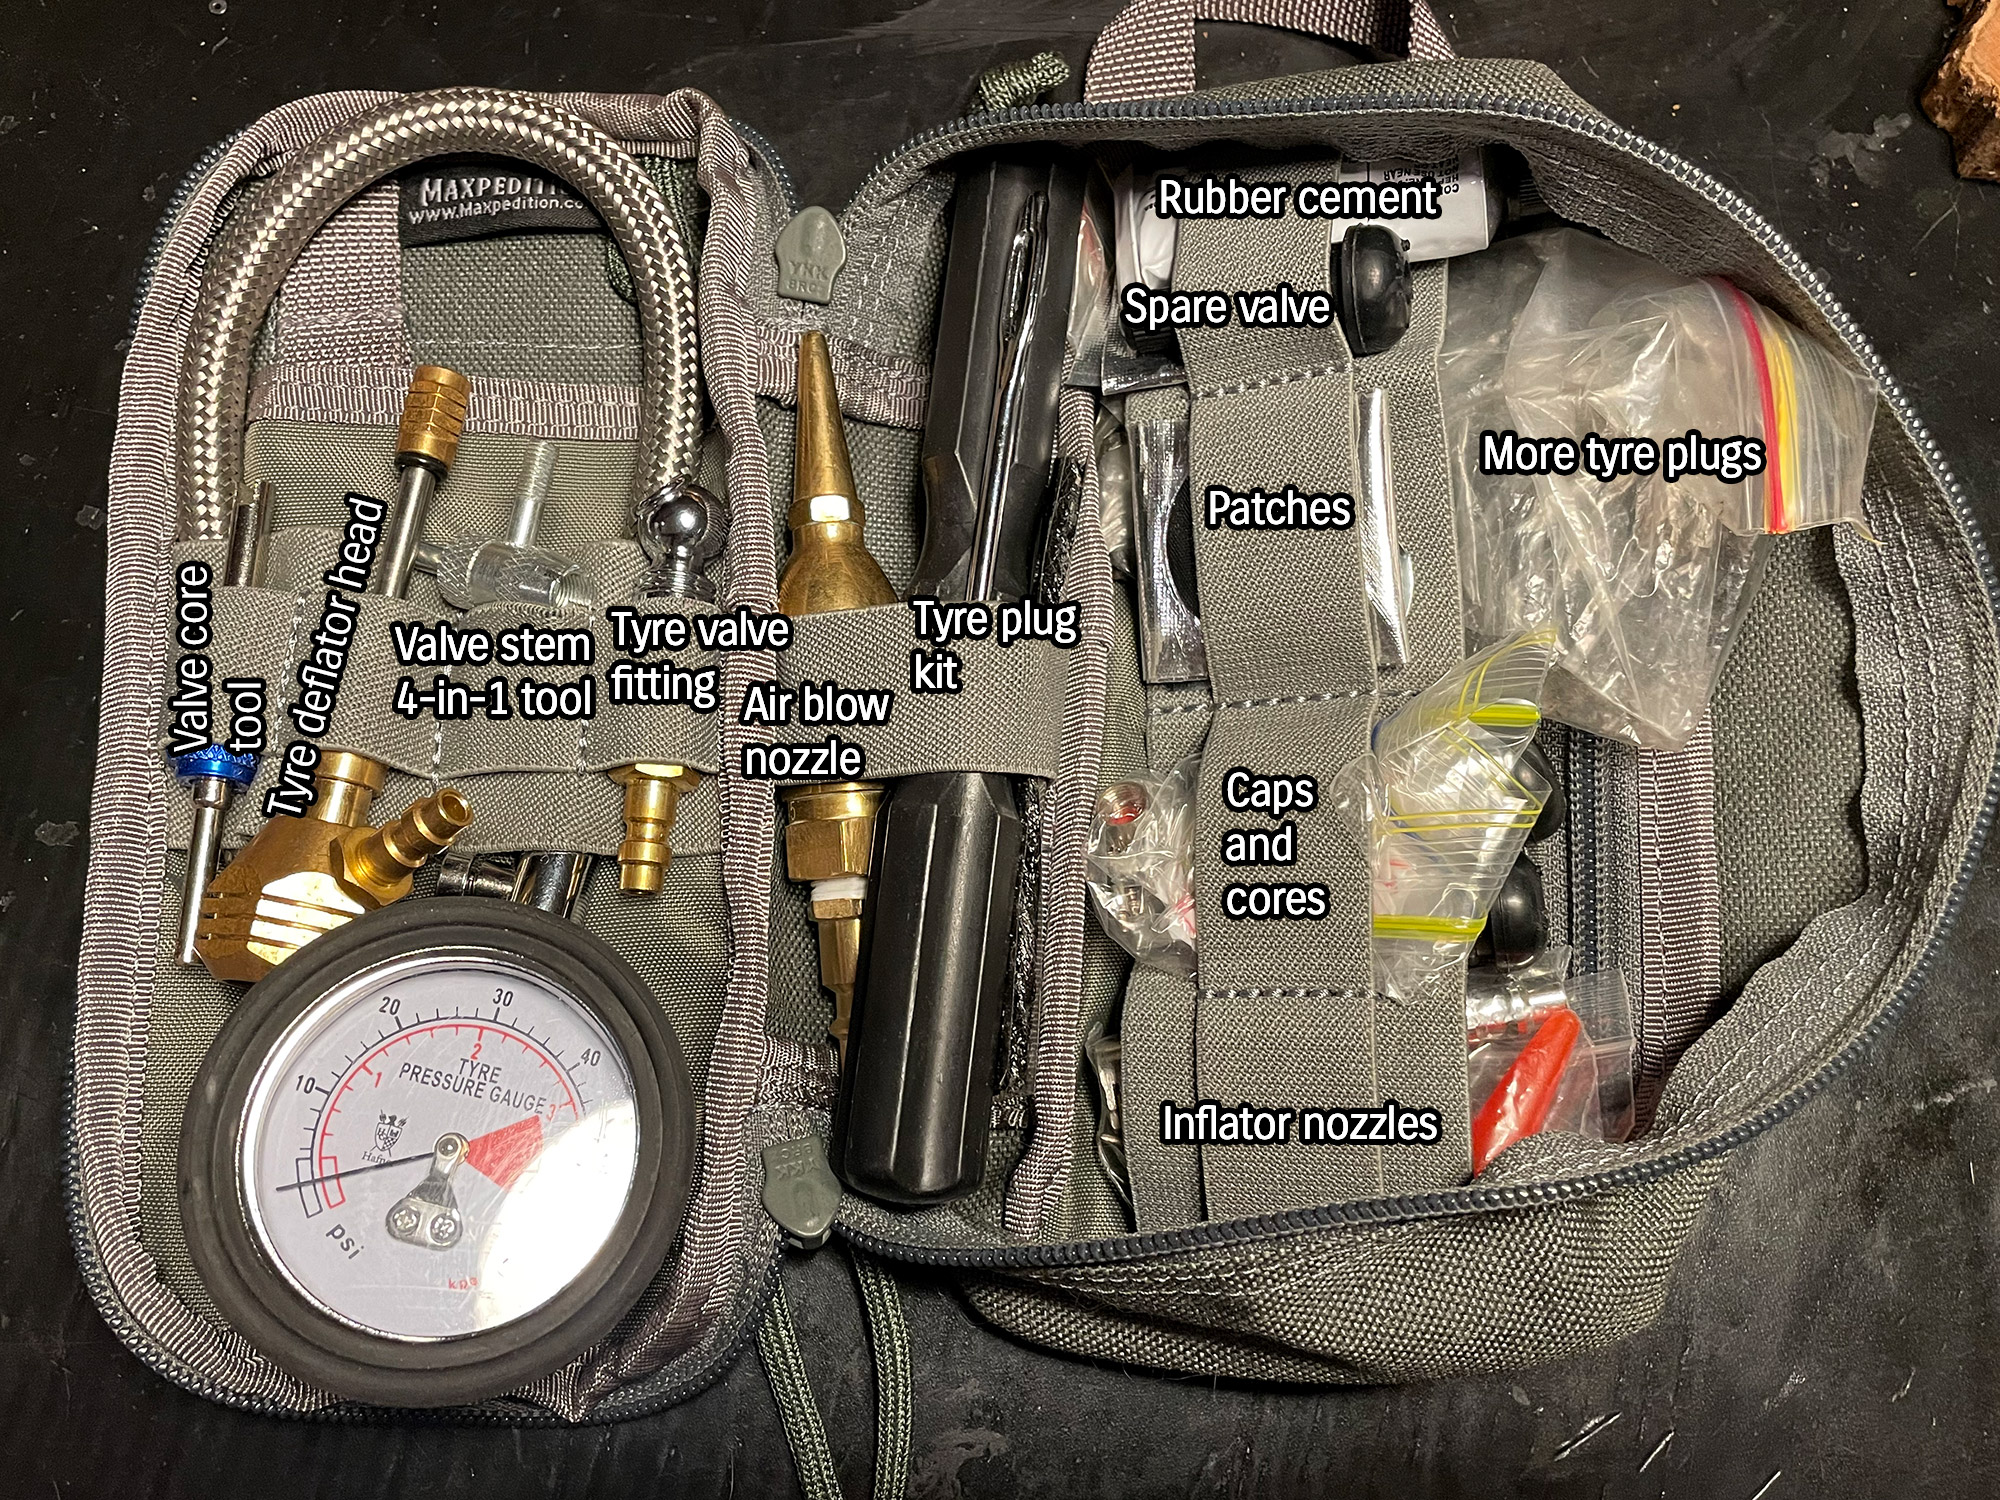
This kit has a couple of bits that are duplicates but I had space so might as well leave them. Most is self explanatory, and you don’t need to carry everything I do, but I would suggest at least:
- Tyre pressure gauge
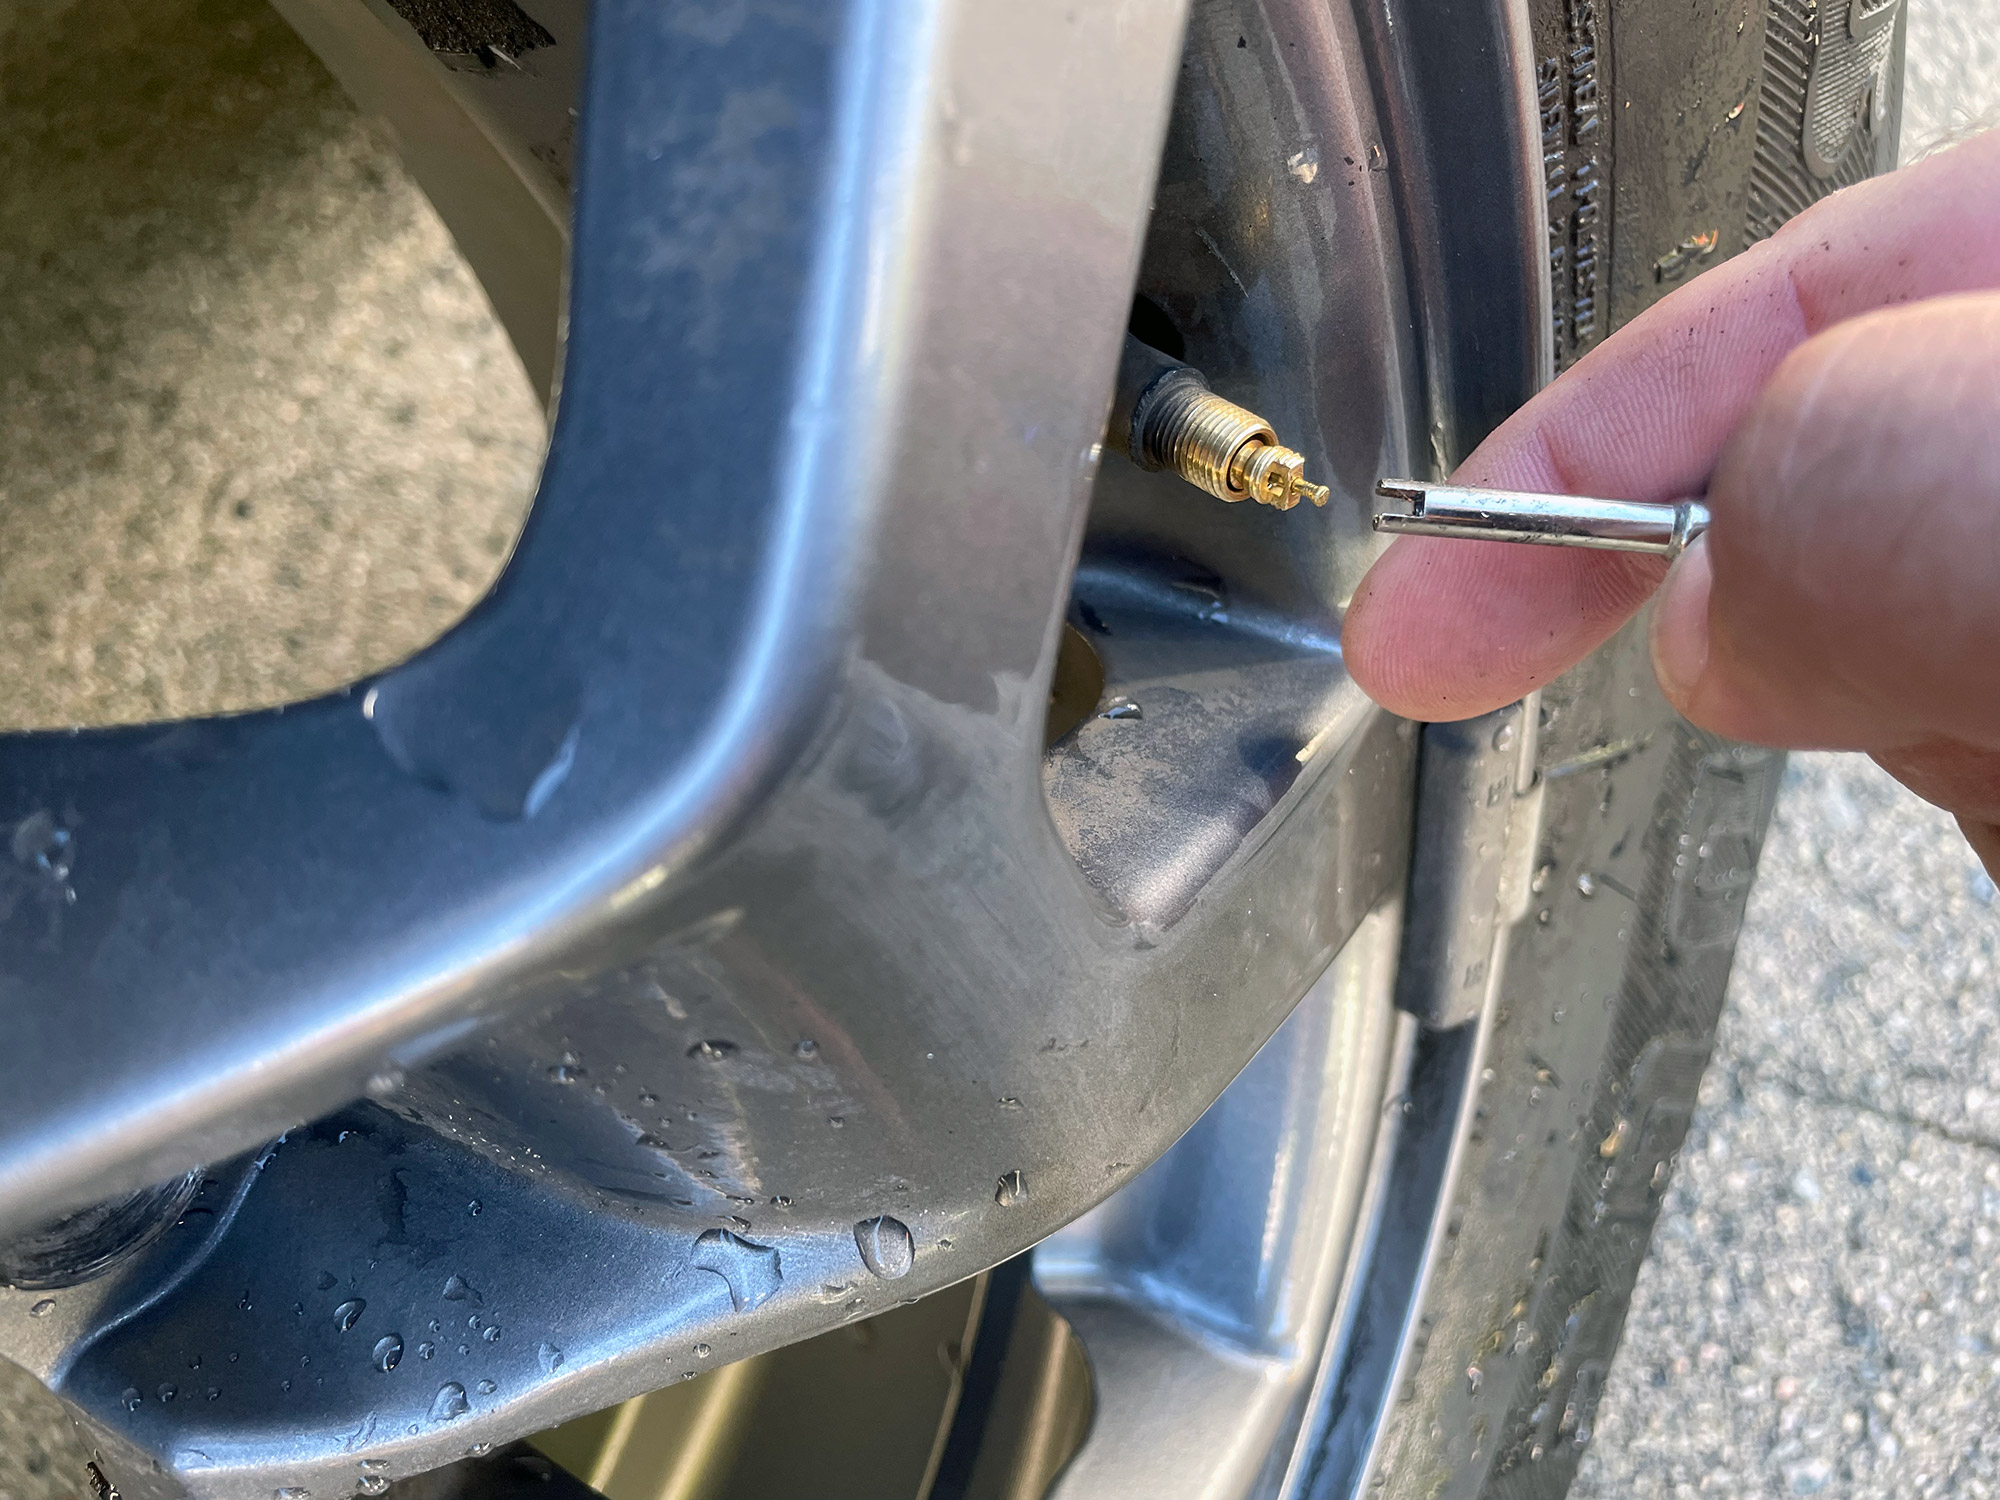
- Valve core tool
- Spare valve cores
- A spare valve
- Tyre plugging kit
We’ll get onto using these things later in this discussion.
Using the tools that come with the car
Accessing the toolkit: removing luggage box and carpet base
This starts by moving whatever you have on top of the lid of the rear storage box (if yours is fitted to the car) and opening the storage box. On each side are slight cutouts which are grab handles to lift the box out.
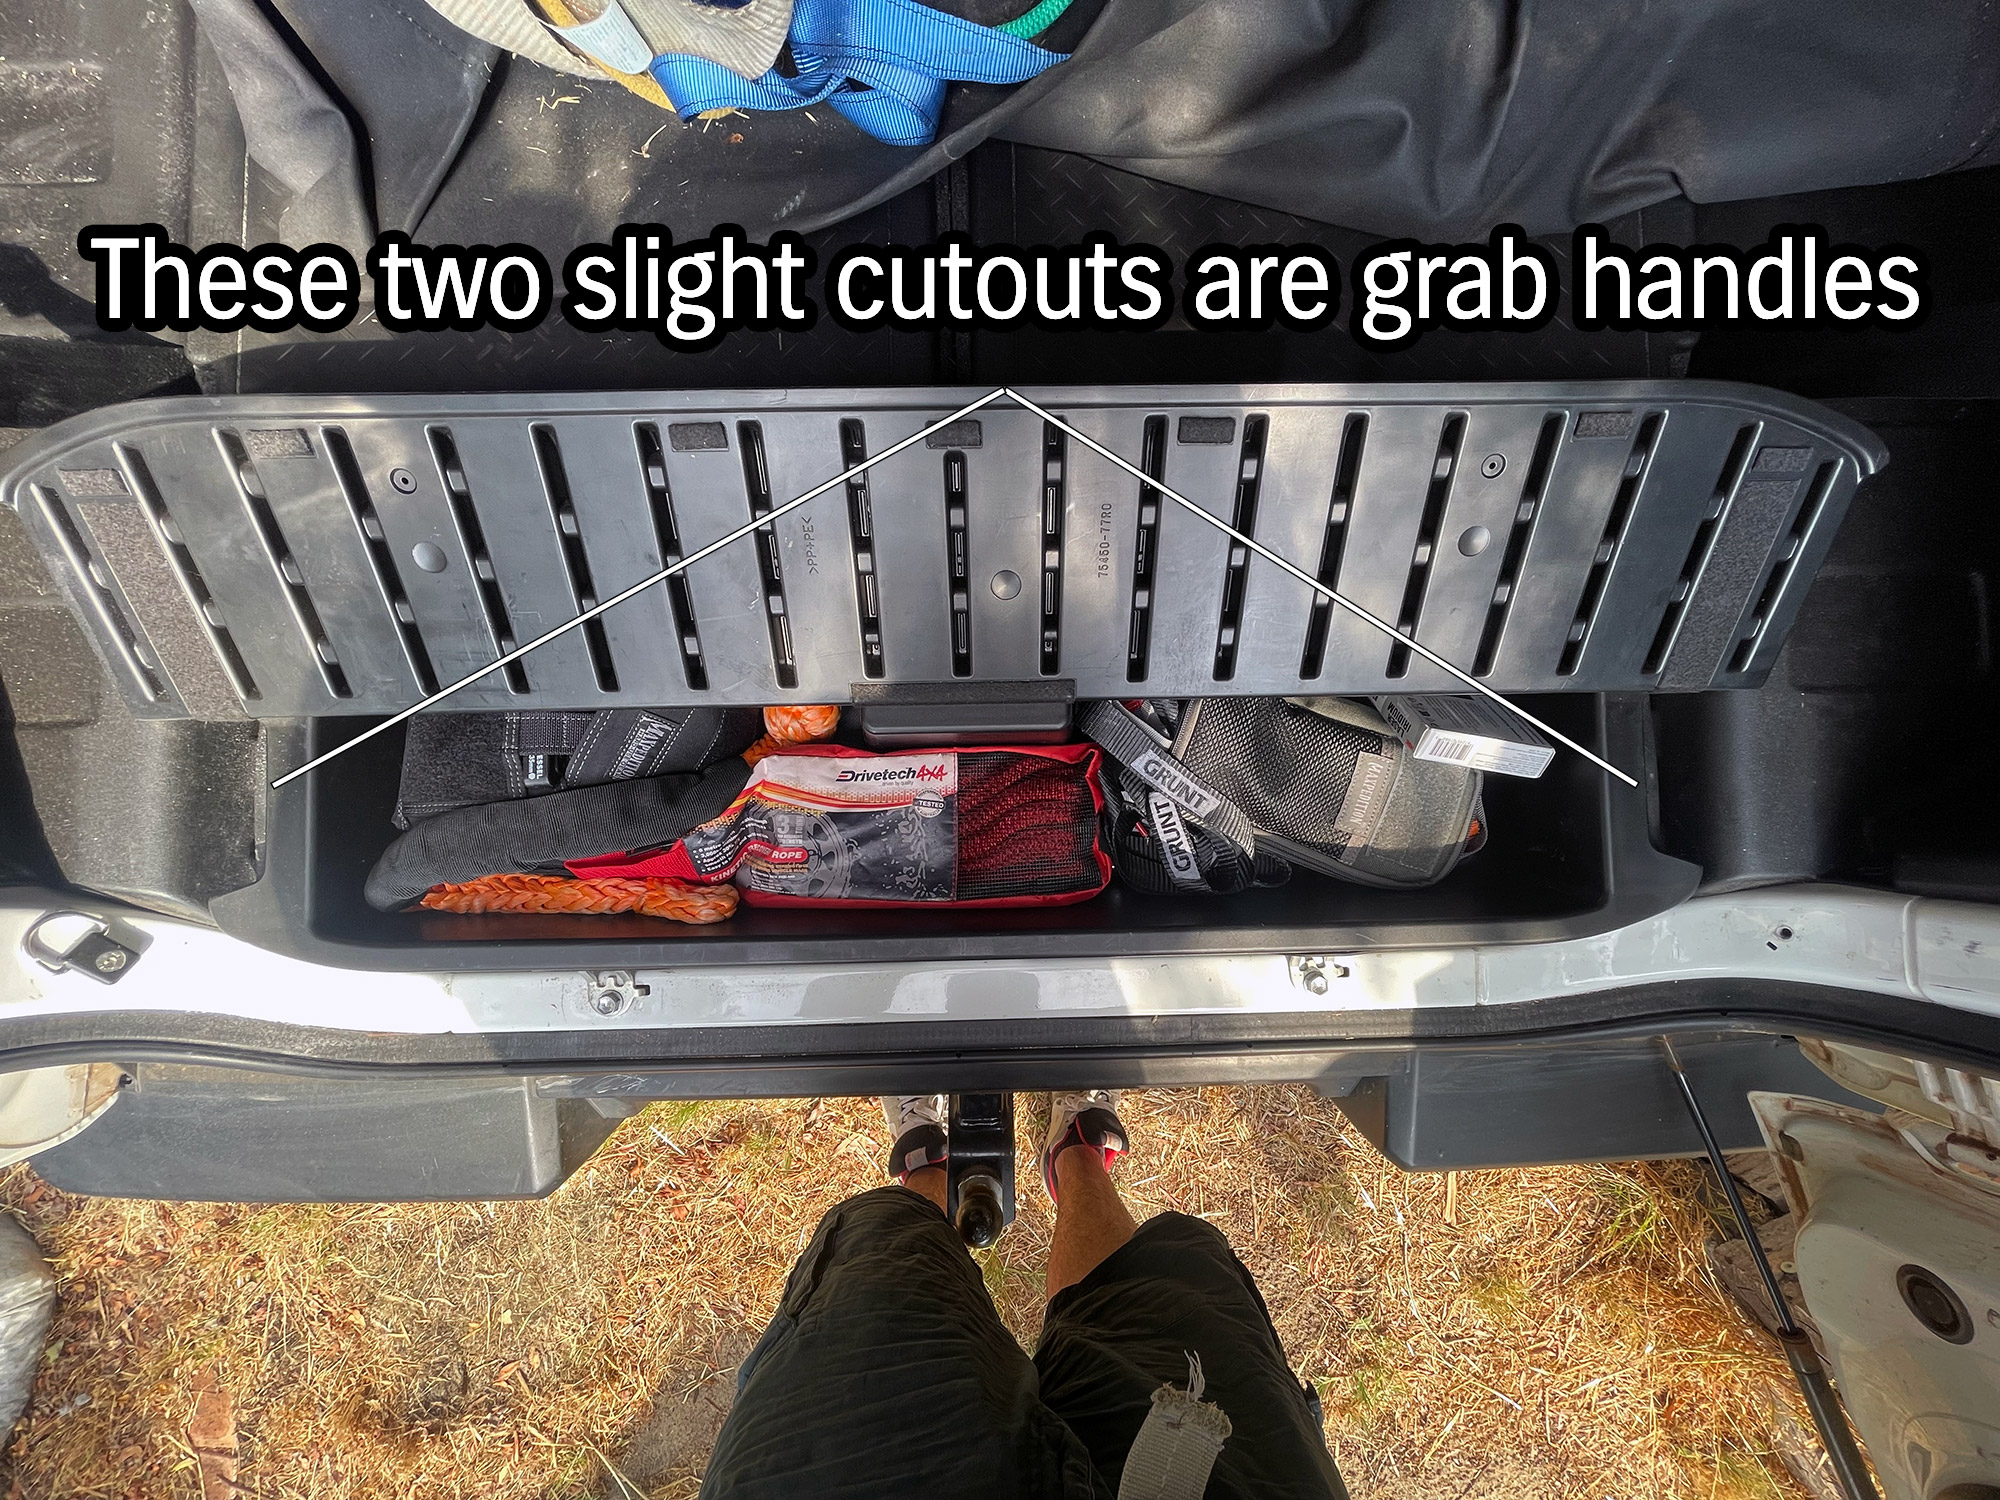
You lift up relatively firmly as the box sits into the plastic trim with a couple of plastic trim clips. Underneath the box once you have lifted it out is a carpeted panel.
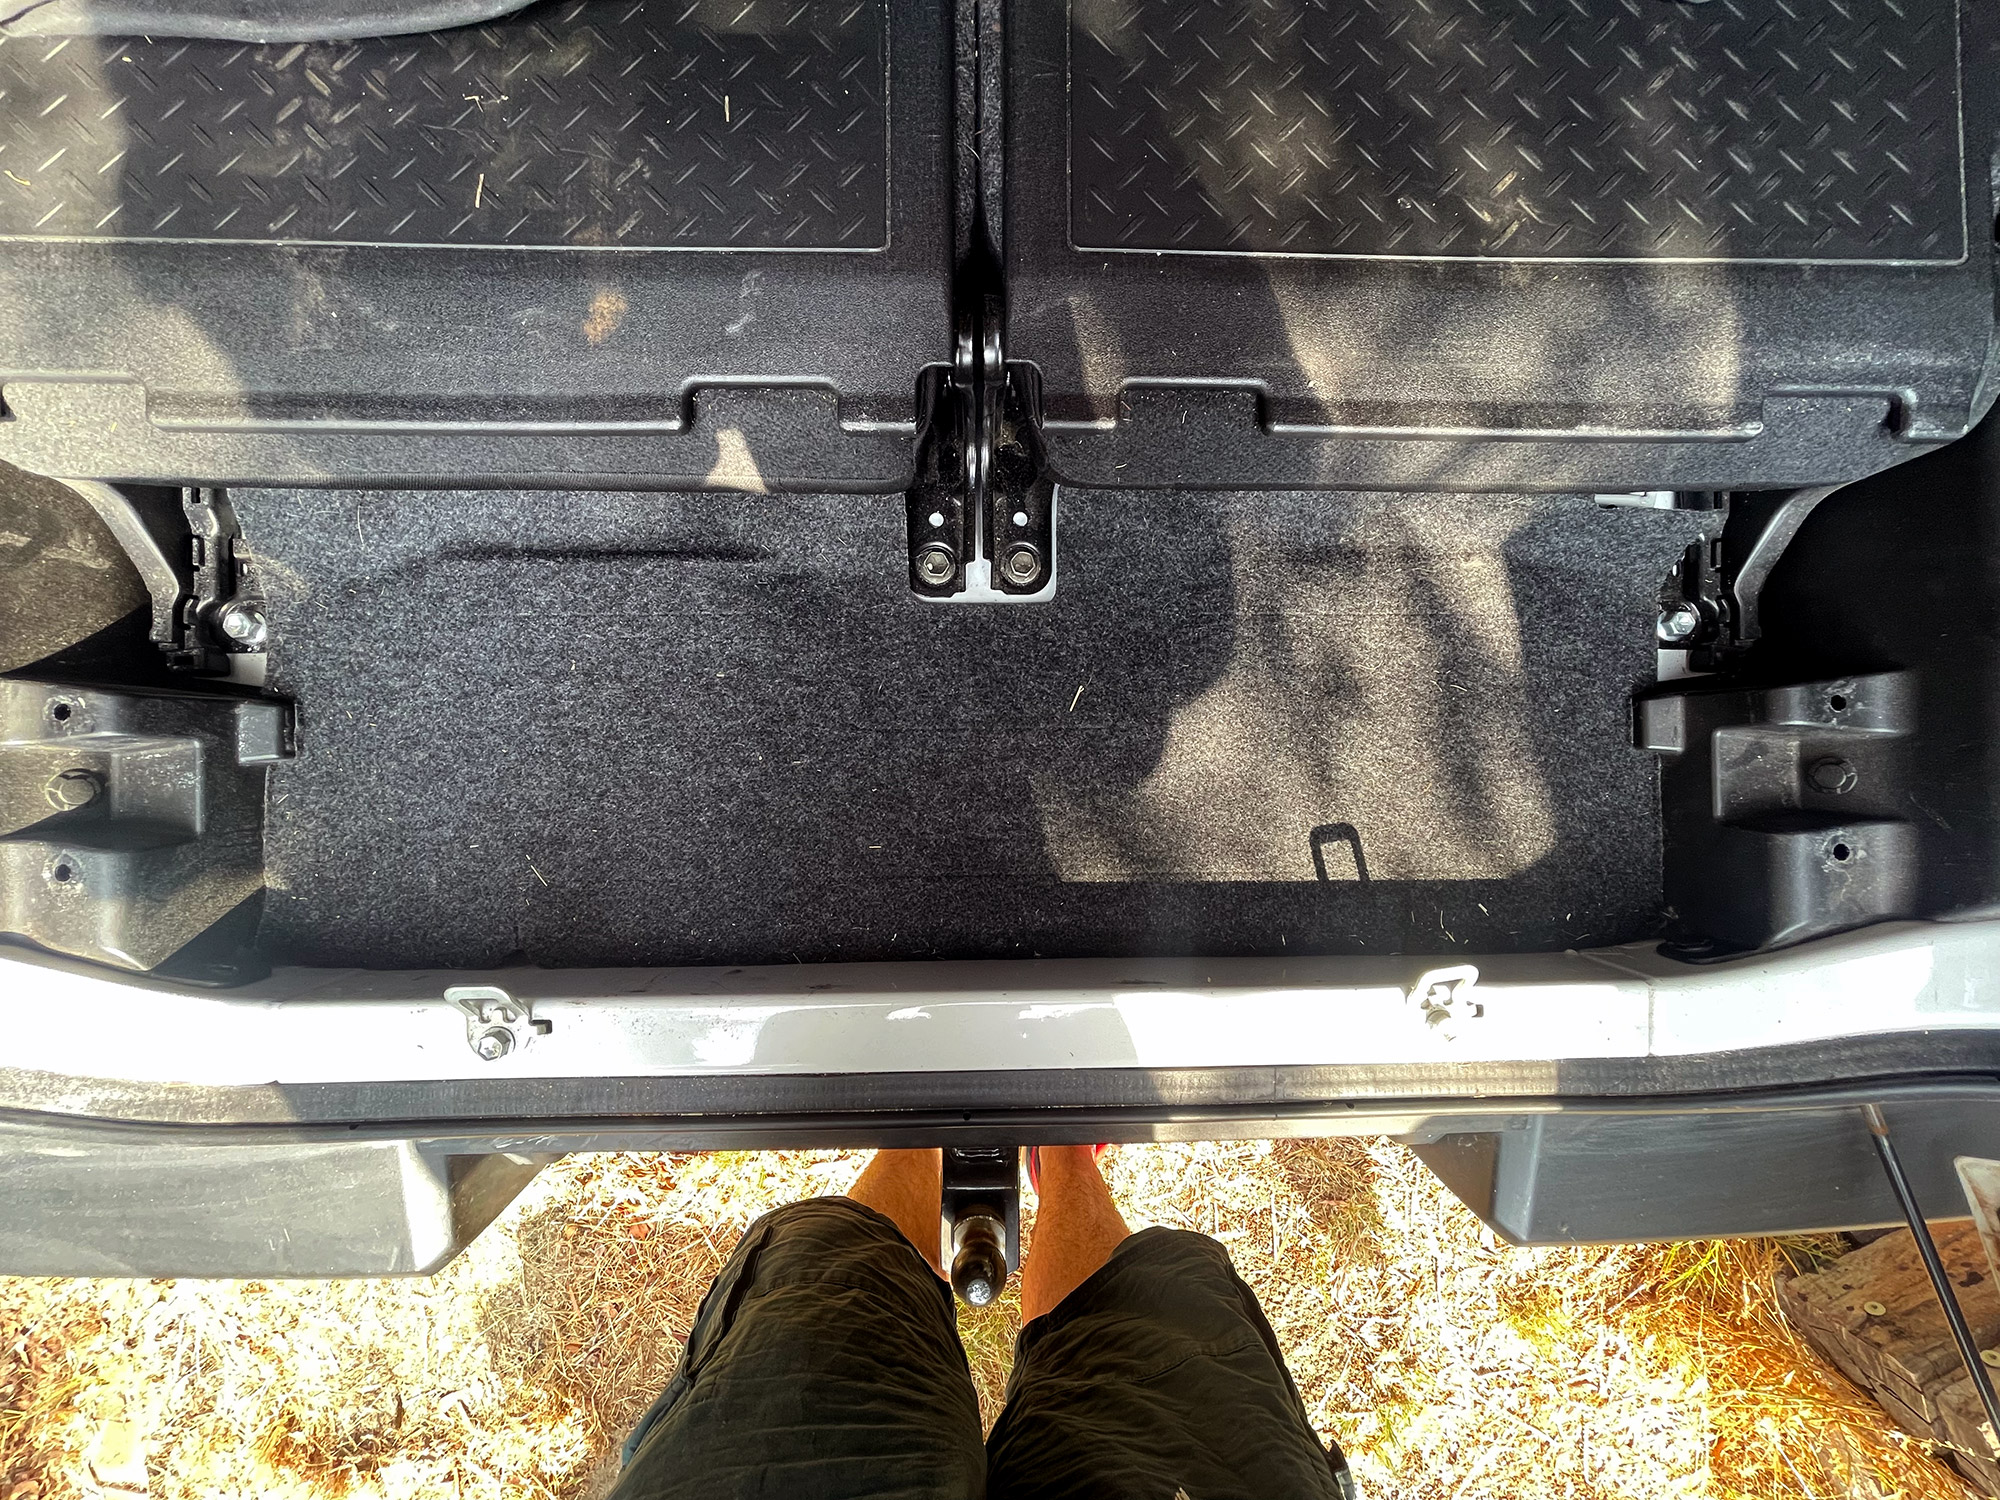
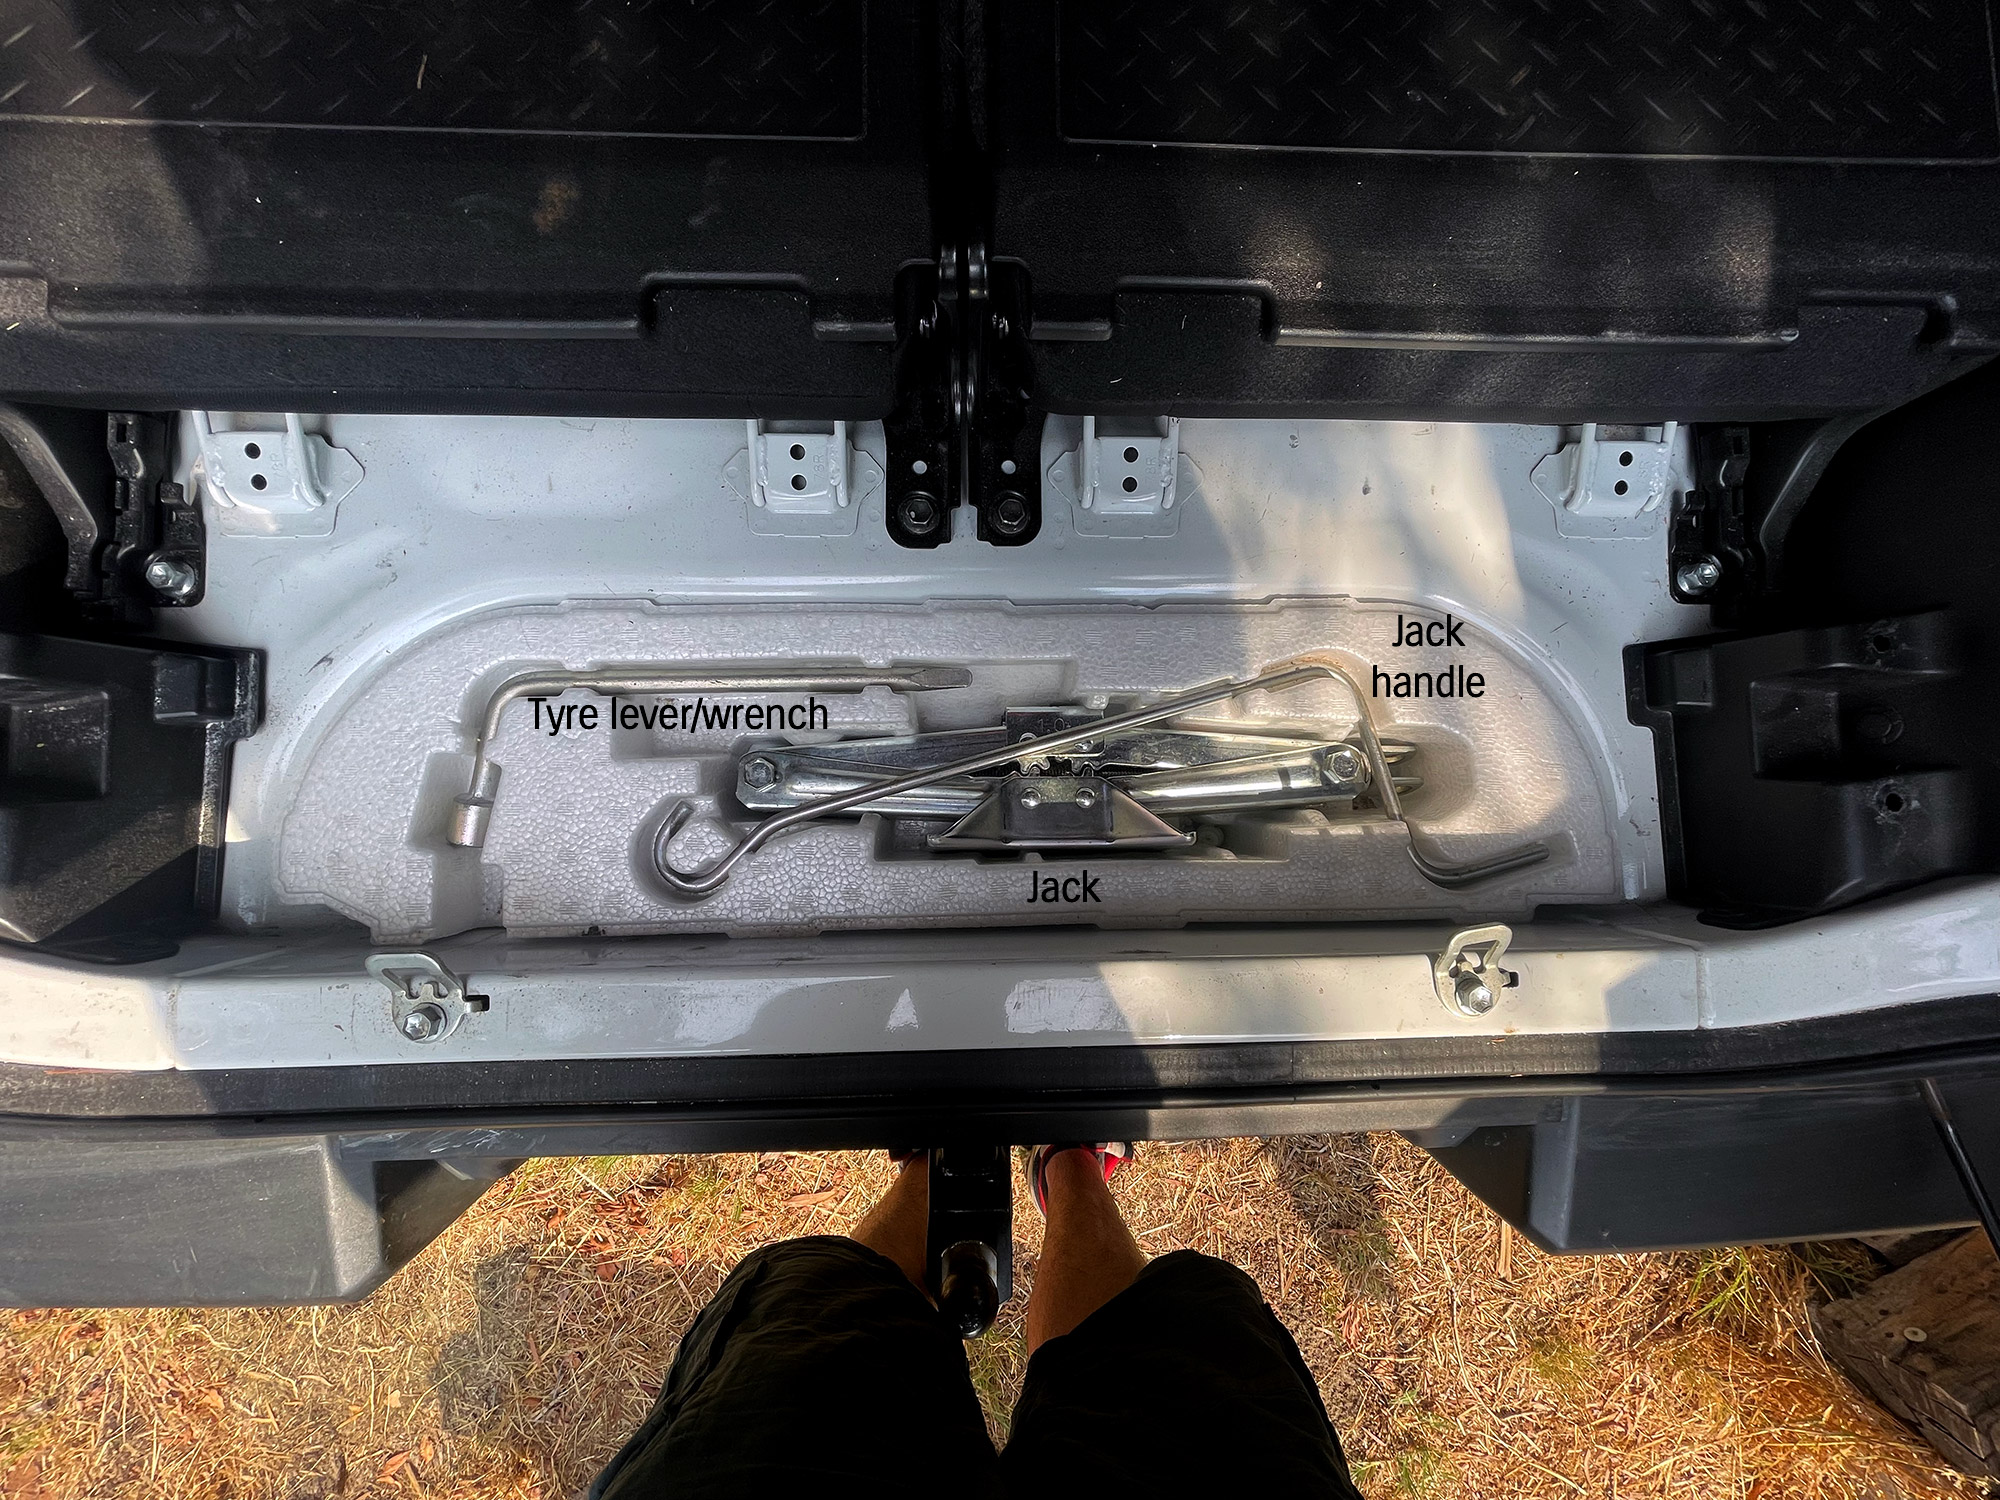
This carpeted piece just lifts up, although sometimes it can be a bit stuck down to the foam the first time you go to remove it. Hiding beneath this carpeted piece is the jack, a handle for the jack, and a tyre lever/wrench to undo wheel nuts.
Loosening wheel nuts with the supplied wrench
Wheel nuts can be tight, even if fastened just correctly by a tyre shop let alone if they’ve unleashed all the ugga-duggas on it, so it helps to use some physics on your side. Because the handle of the factory tyre lever is not very long, the easiest way to do this is position it so you can ‘push’ it down to undo the appropriate nut.
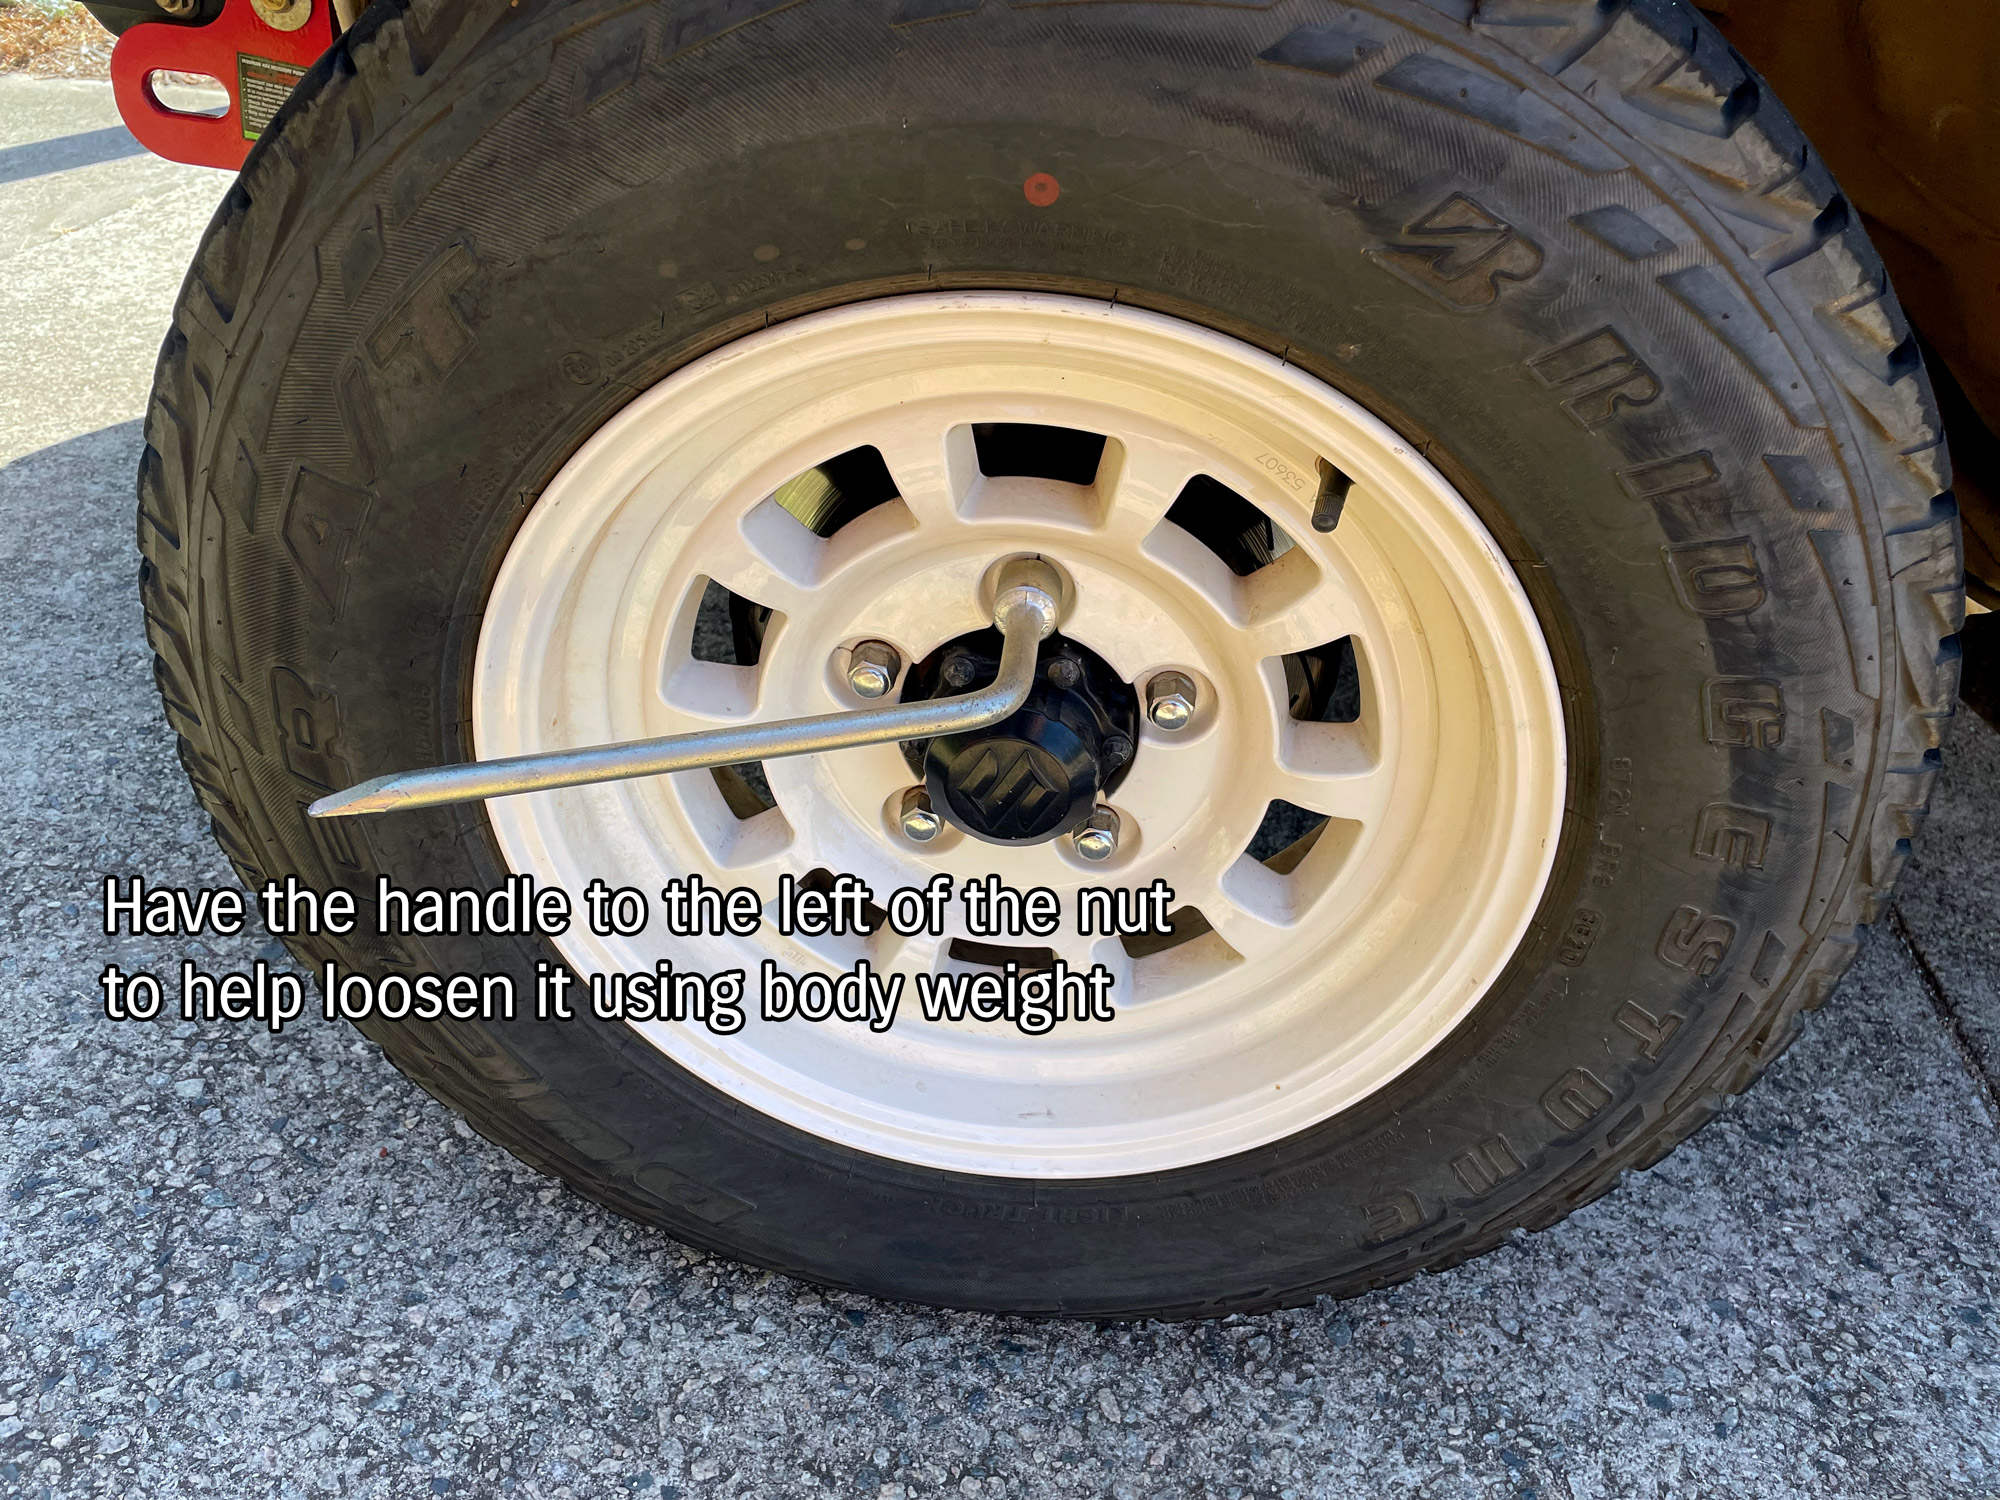
Have the lever as close to parallel to the ground when you do this, support yourself with the car and just step on the end of the tyre lever.
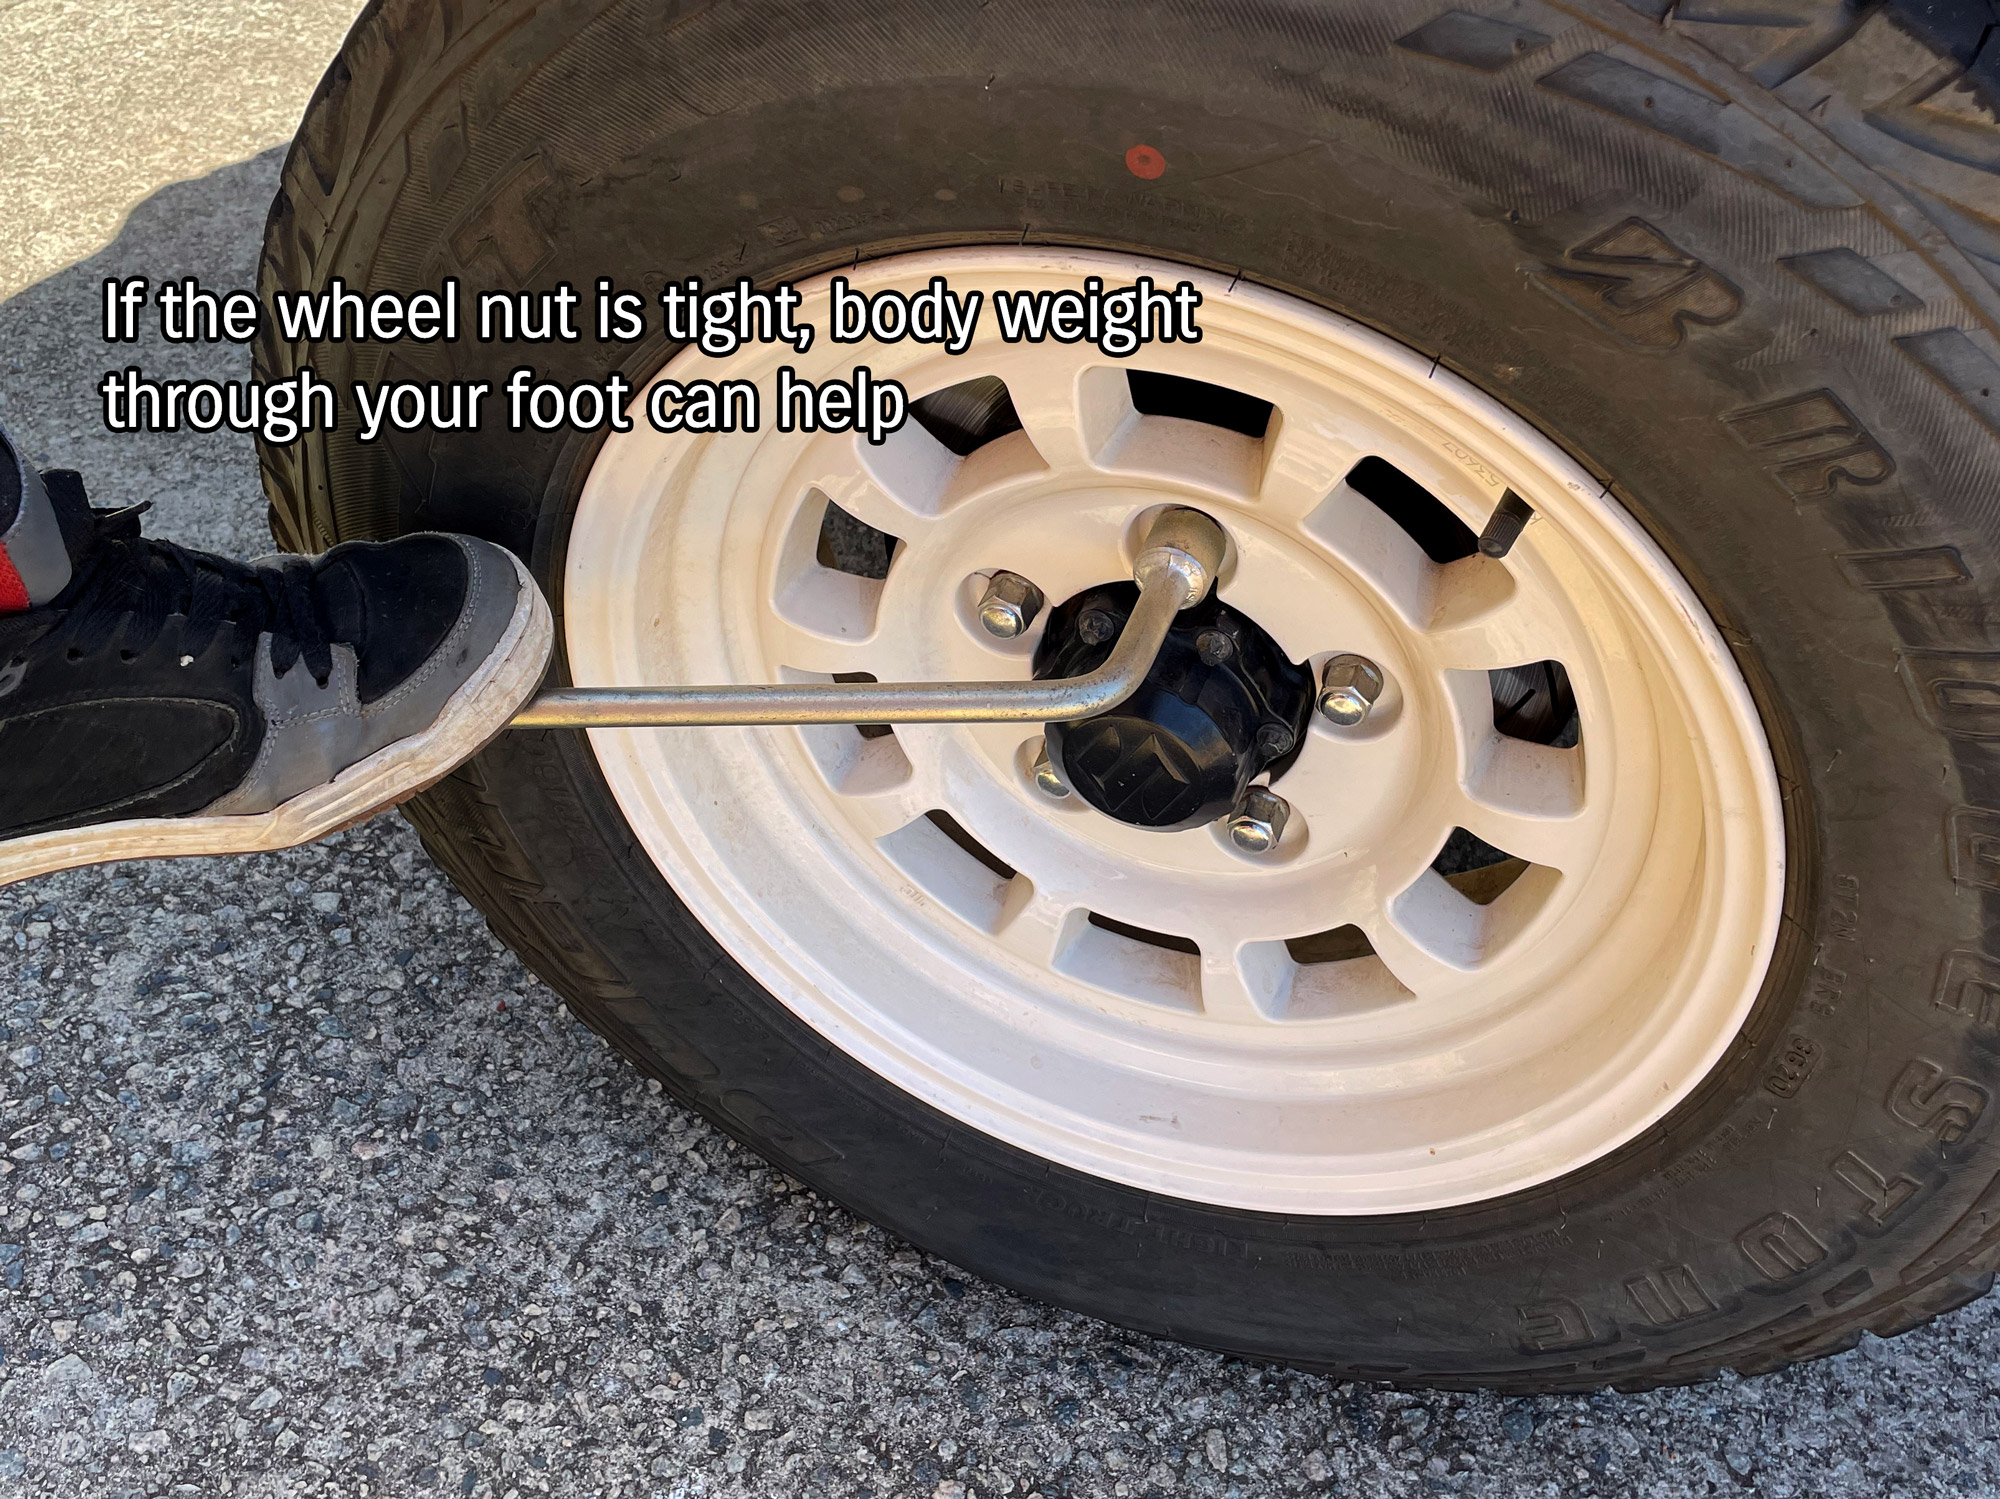
It’s that easy, though take care to make sure you don’t slip off the wrench so support yourself a bit using the car or even someone else to make sure you don’t slip and lose your balance.
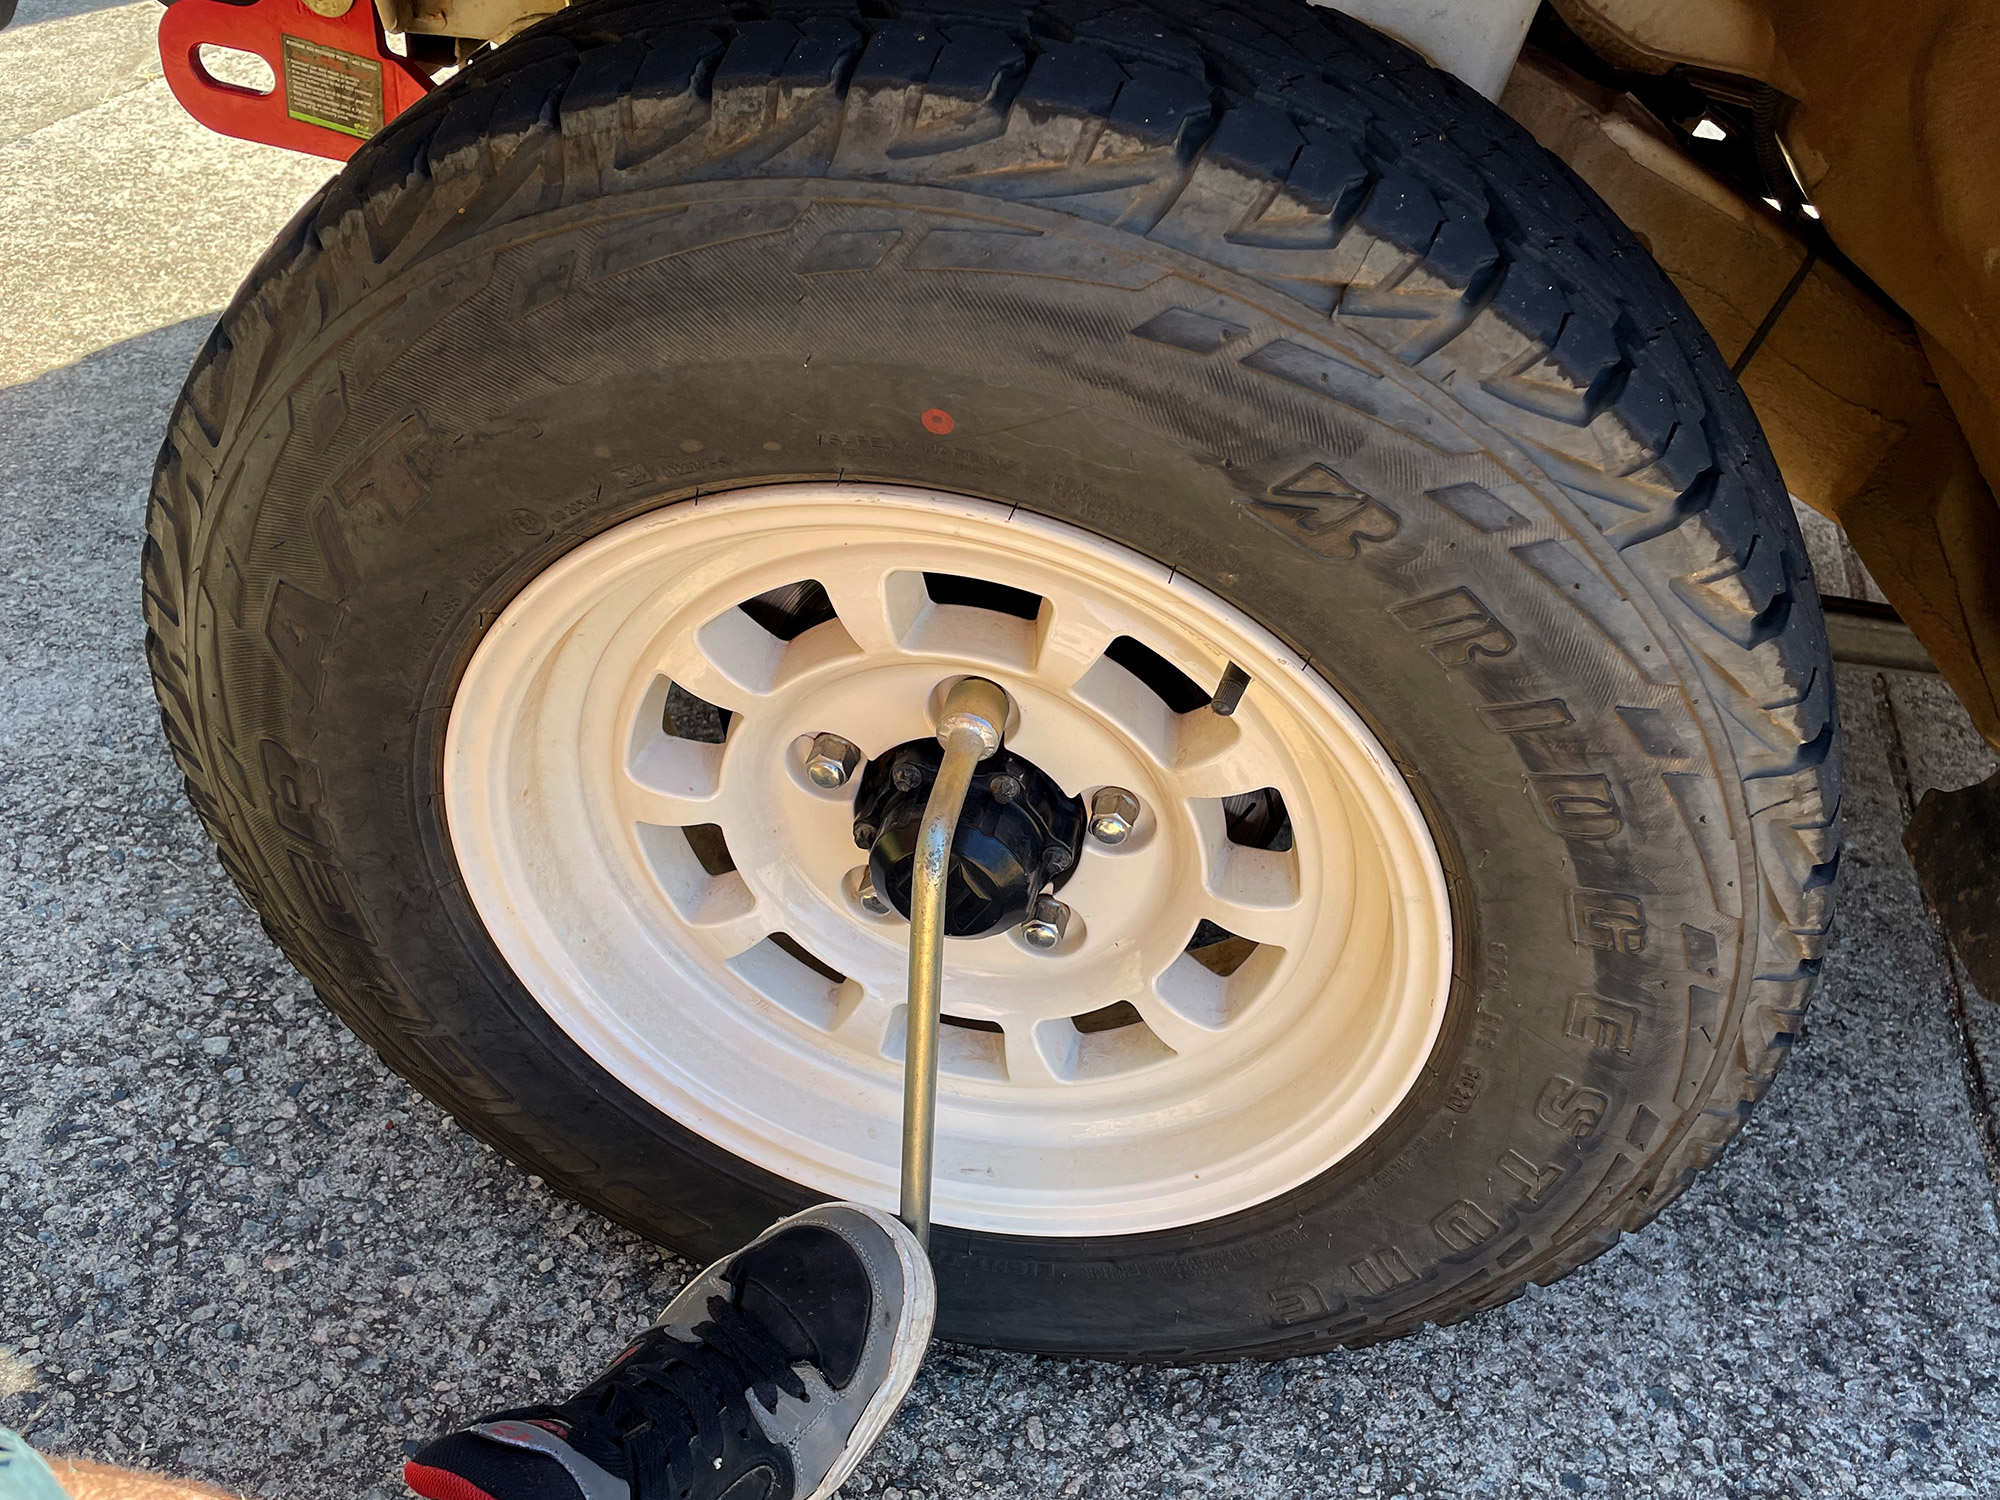
Don’t fully undo the nuts before lifting the car up, but loosen them when the weight of the car is still on the wheel. This stops it spinning and makes it much easier to break the nuts loose.
Jacking points: dimples in the radius arm
The official jacking points for the Jimny are dimples on each of the ‘radius arms’ that head from each axle housing back to the chassis.
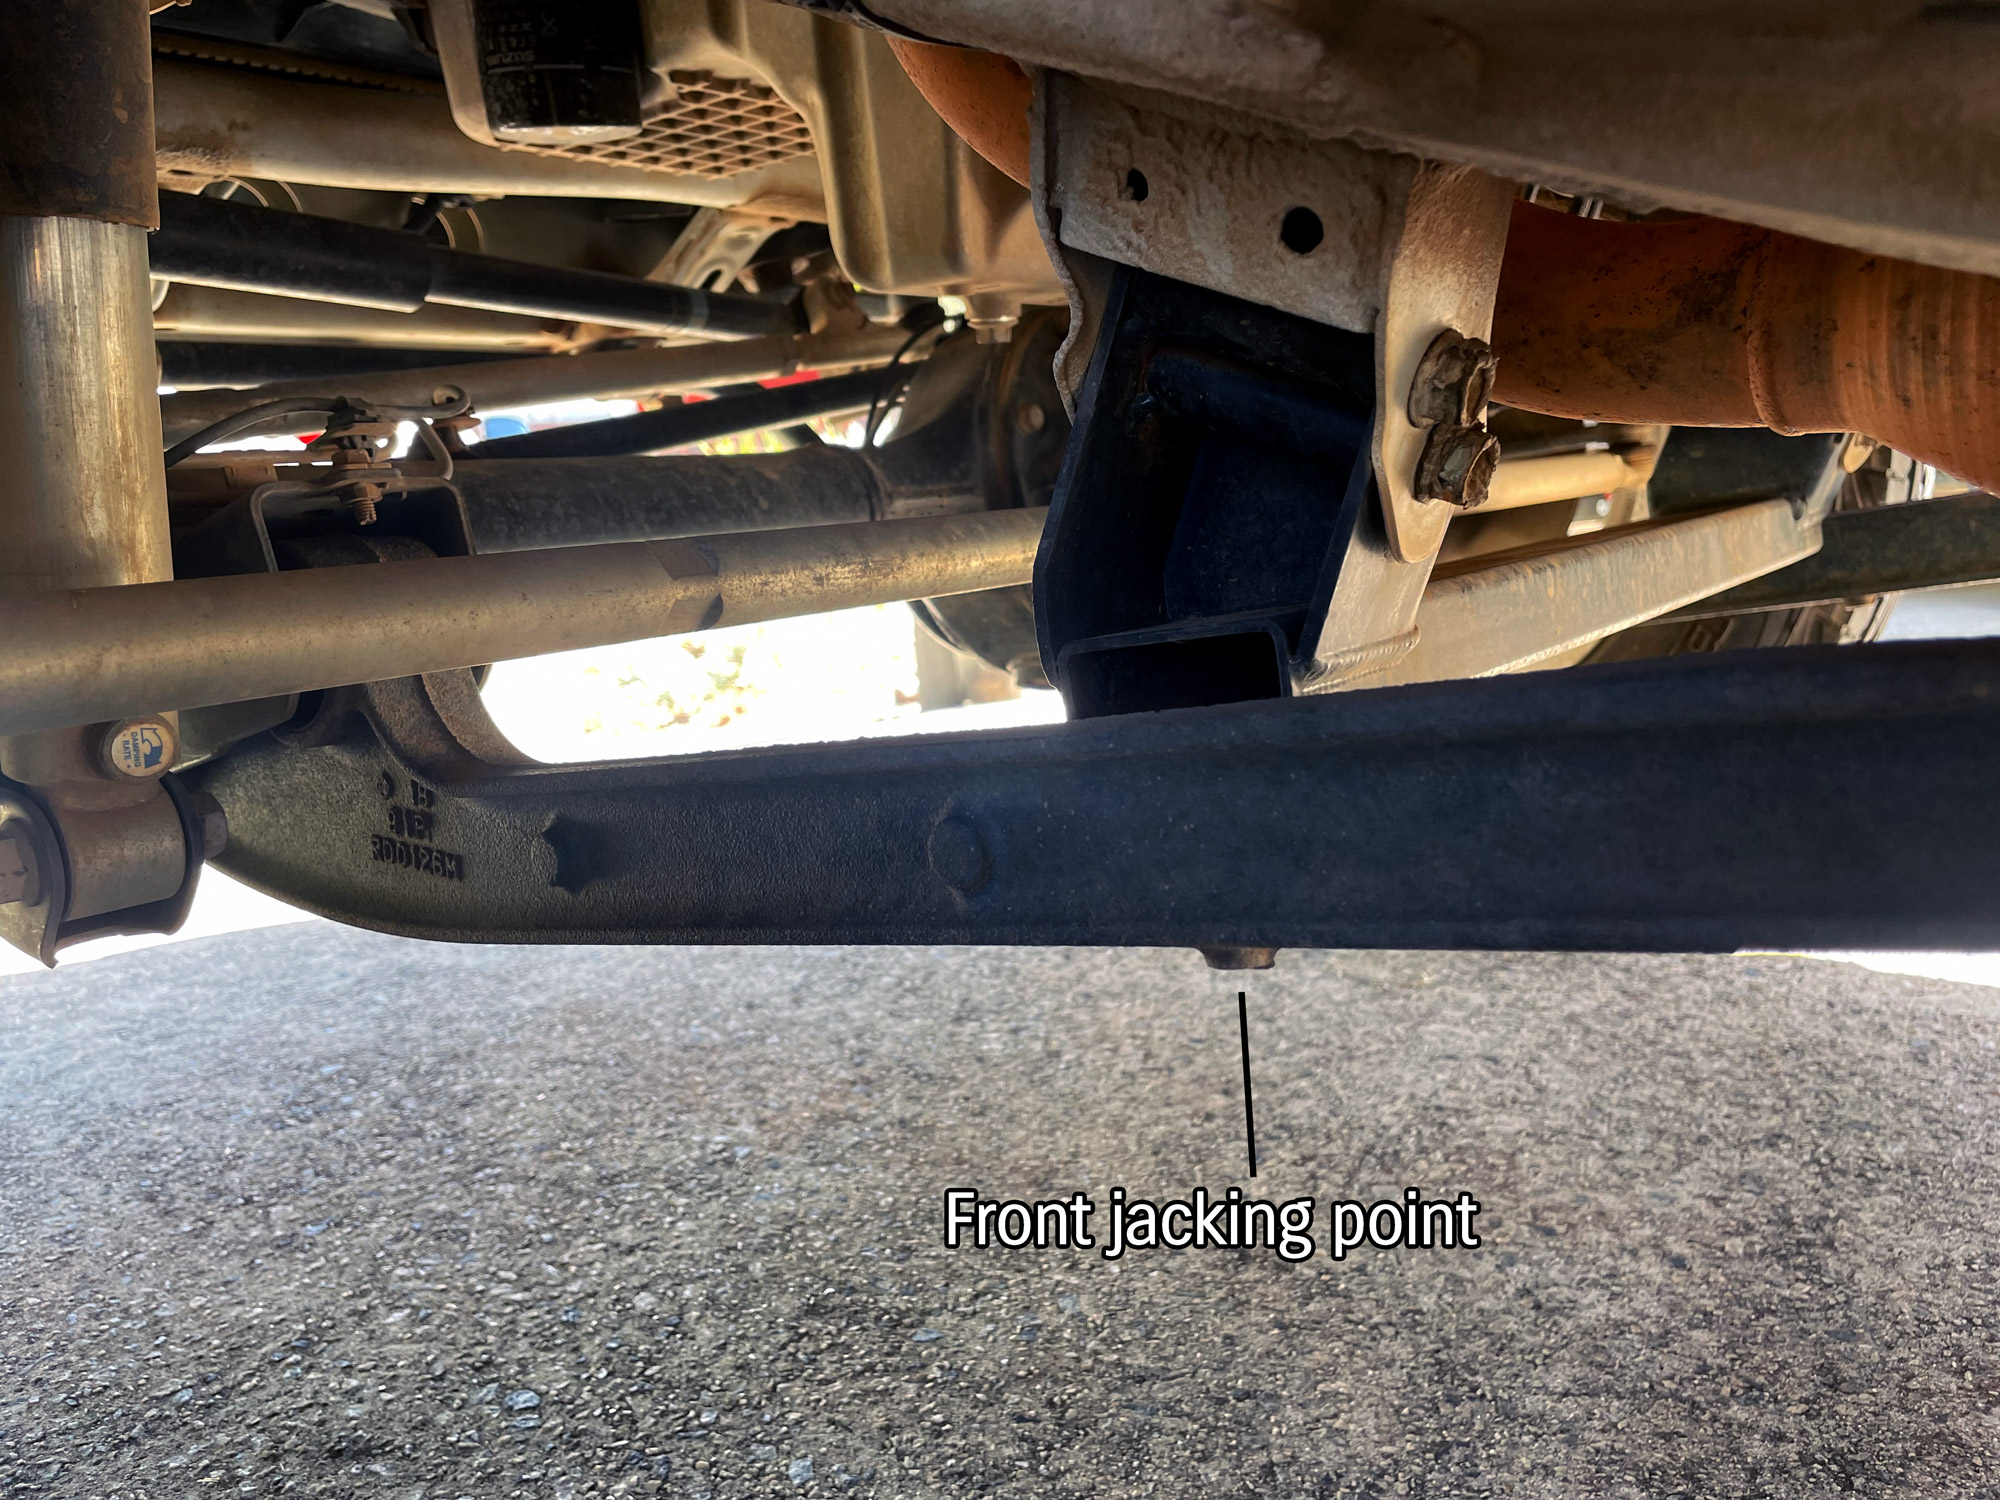
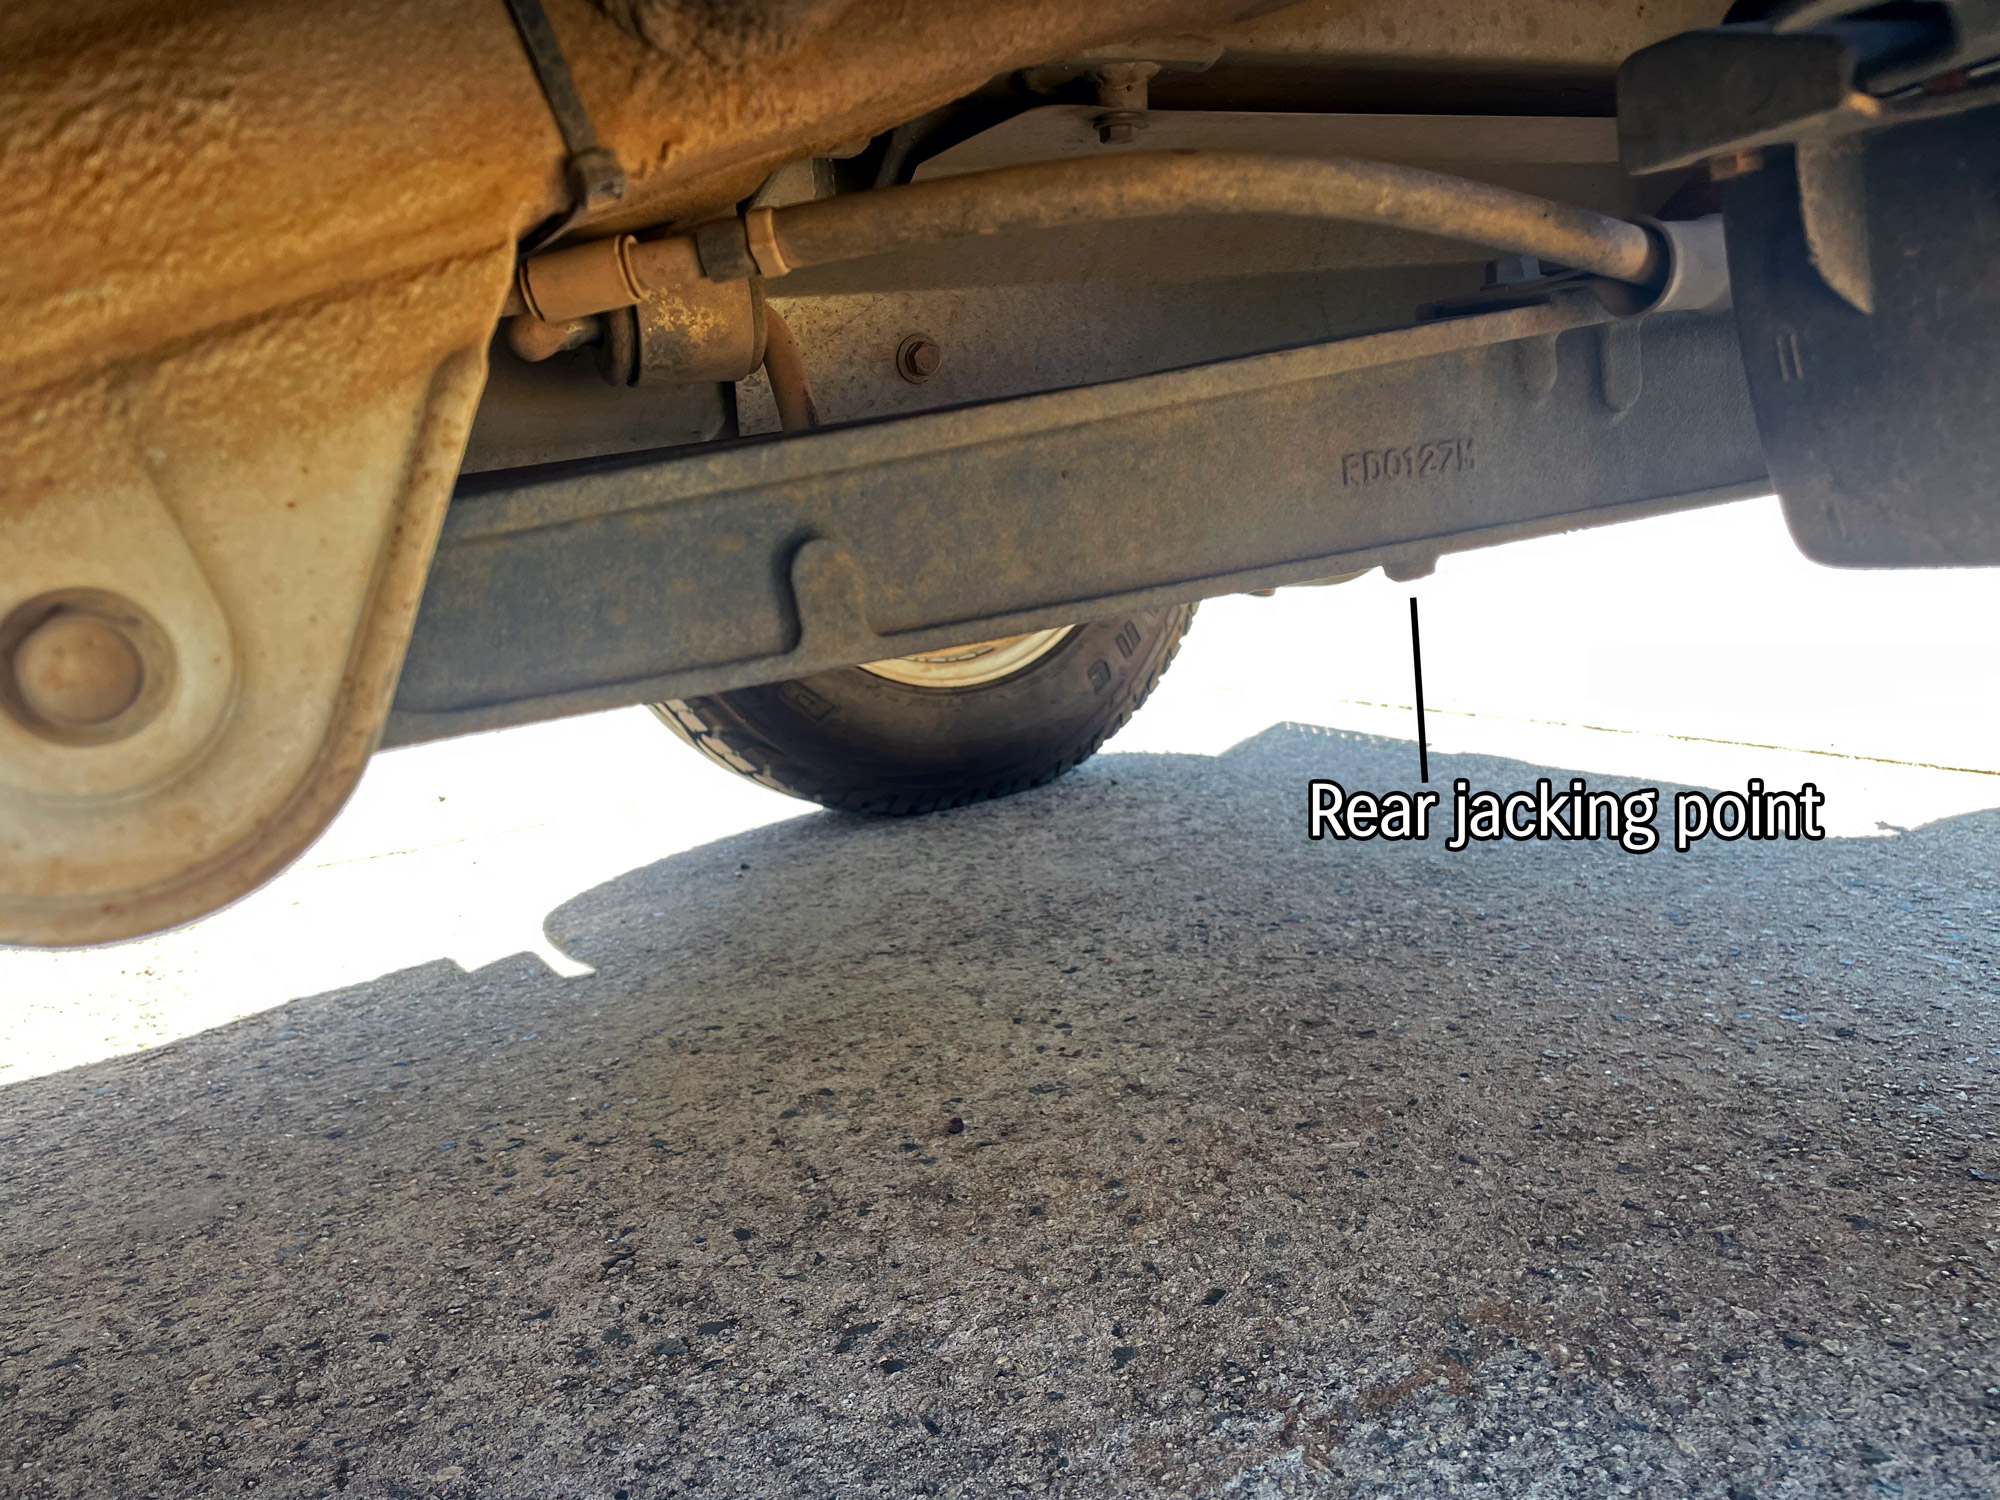
The factory jack has a hole in it to lock onto these to keep them steady.
Something useful to understand here is that lifting this way supports the car on the suspension which means you can lift cars even with a suspension lift. If you jack via the chassis you have to lift the car a lot further as the wheels droop down with the longer suspension.
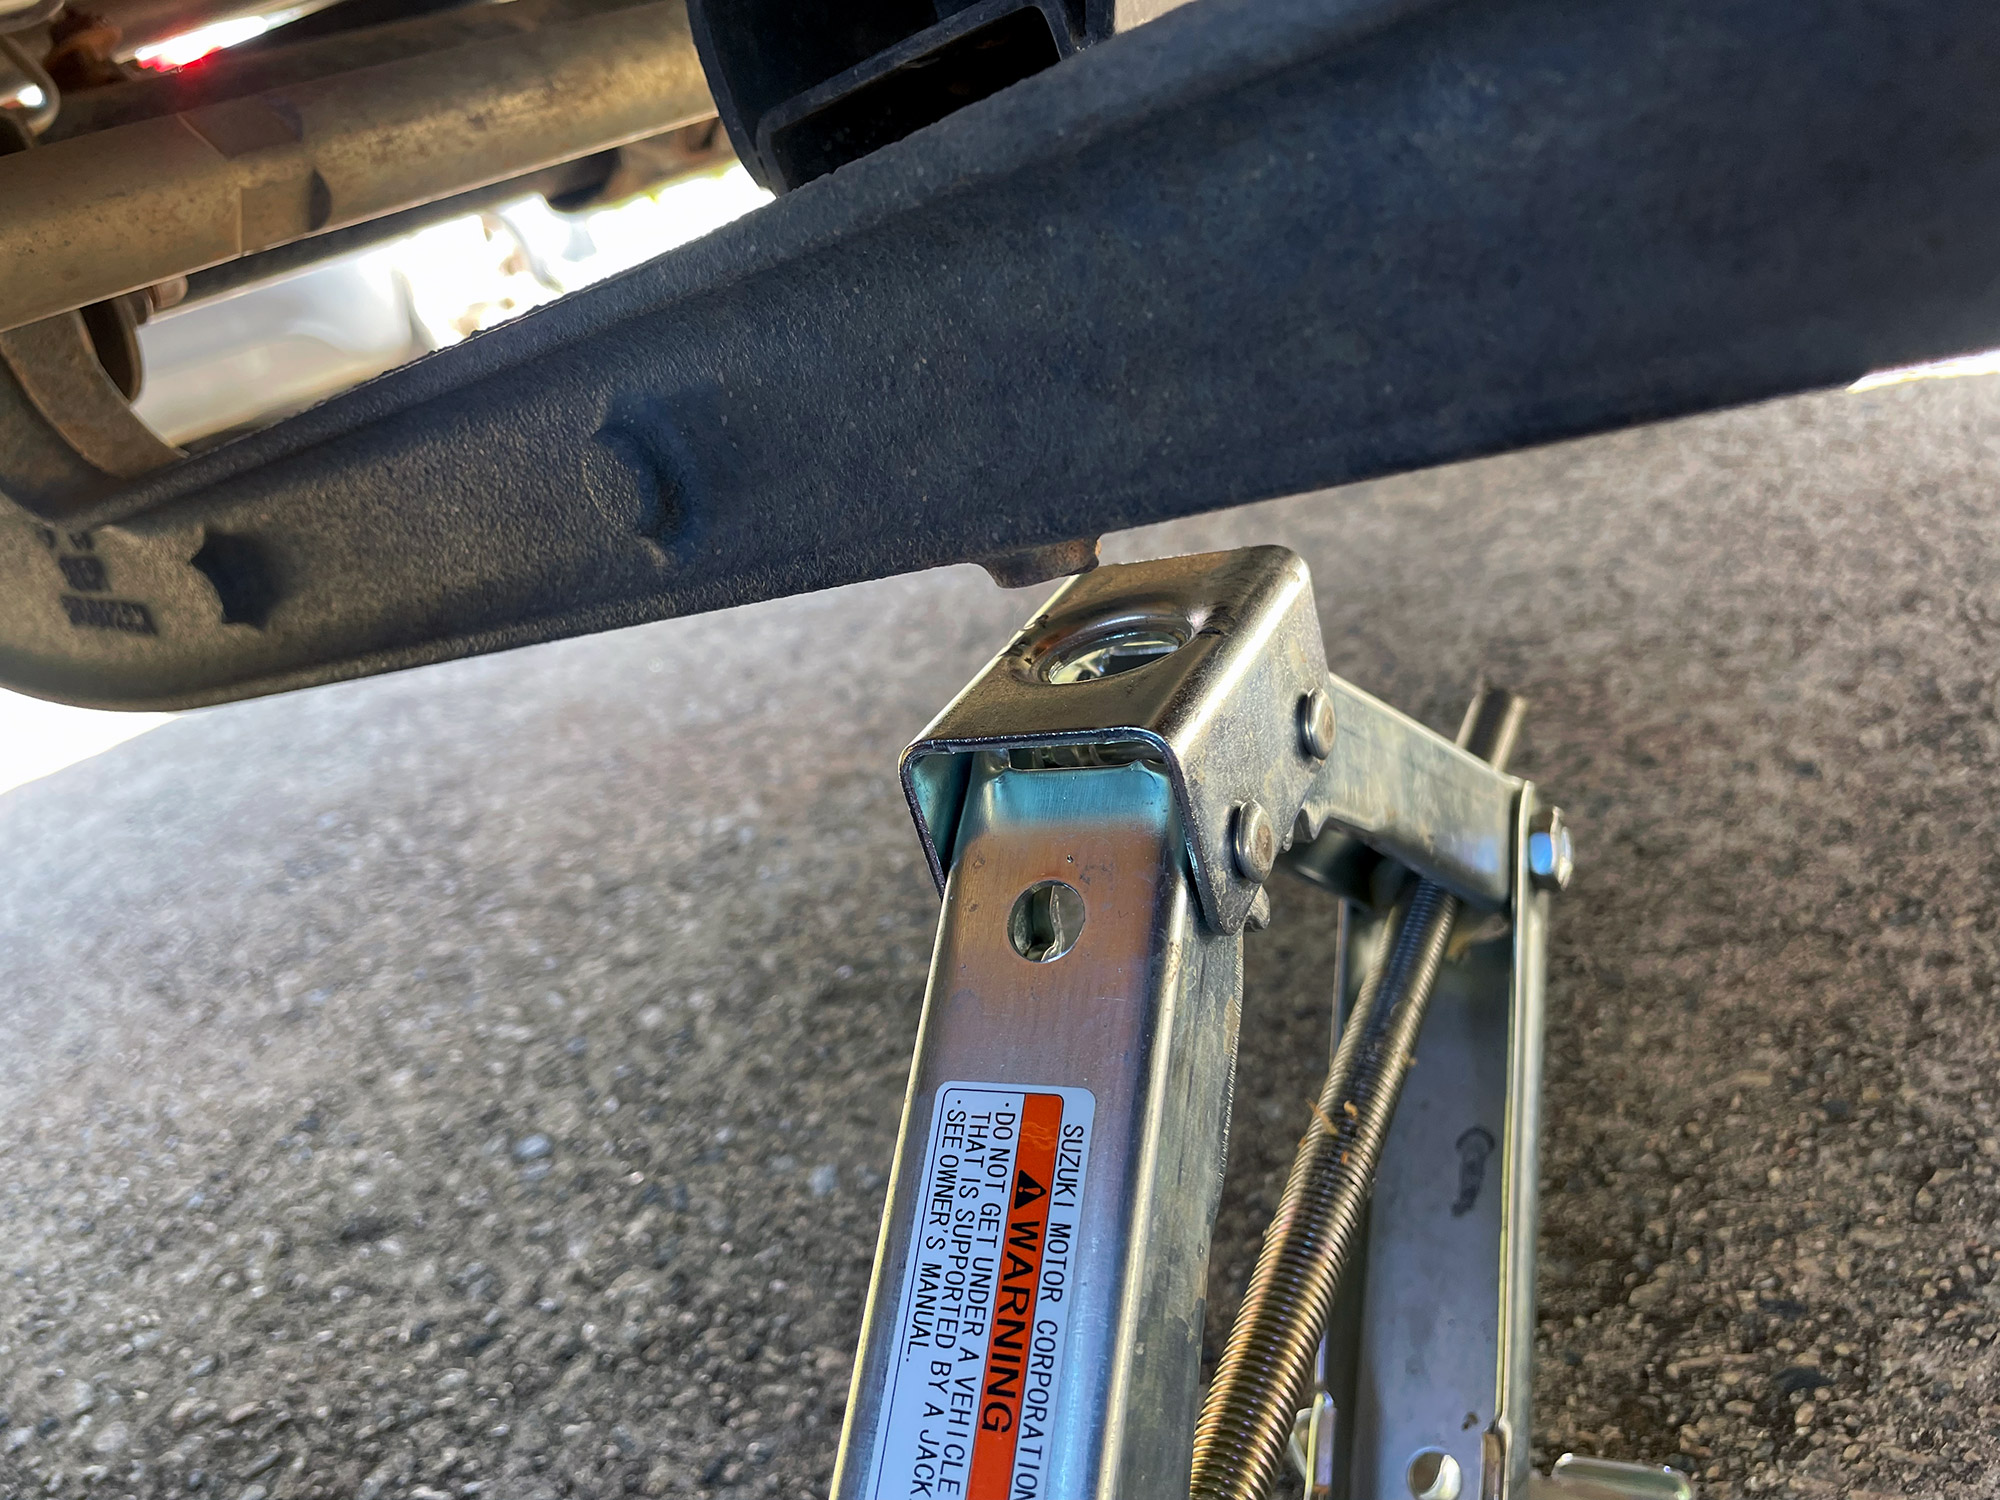
Supporting the car before getting underneath it
If you are going to get underneath the car you need to make sure it is supported by more than just a jack. At home this is where something like axle stands come in. If you locate them under the axle housing then you won’t have to account for suspension droop if wanting the wheels fully off the ground.
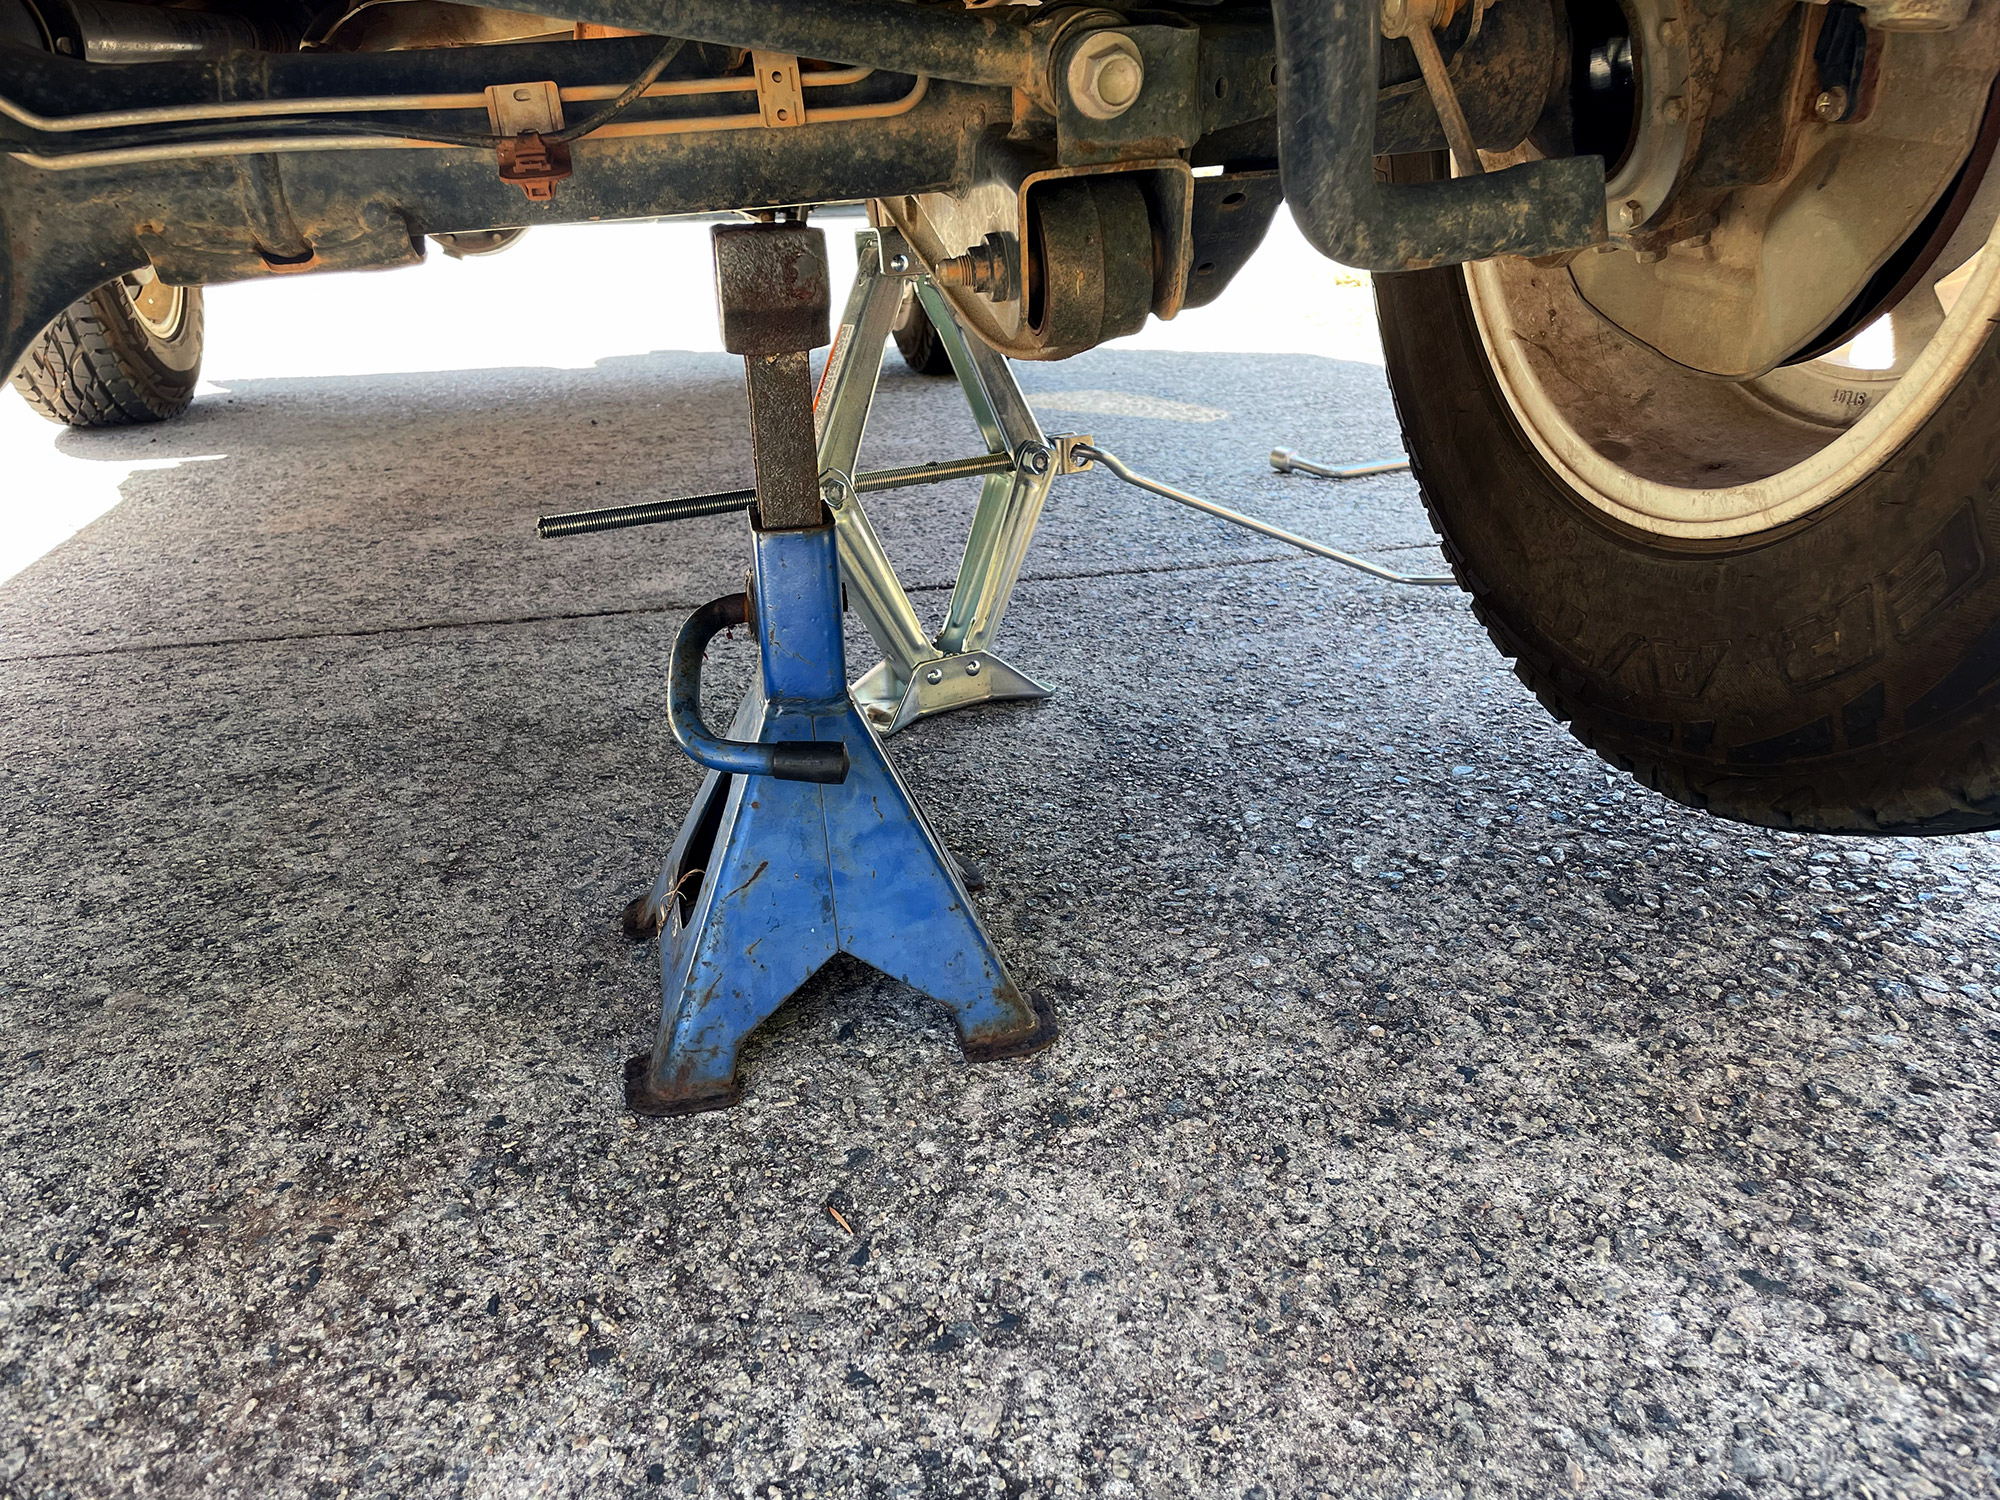
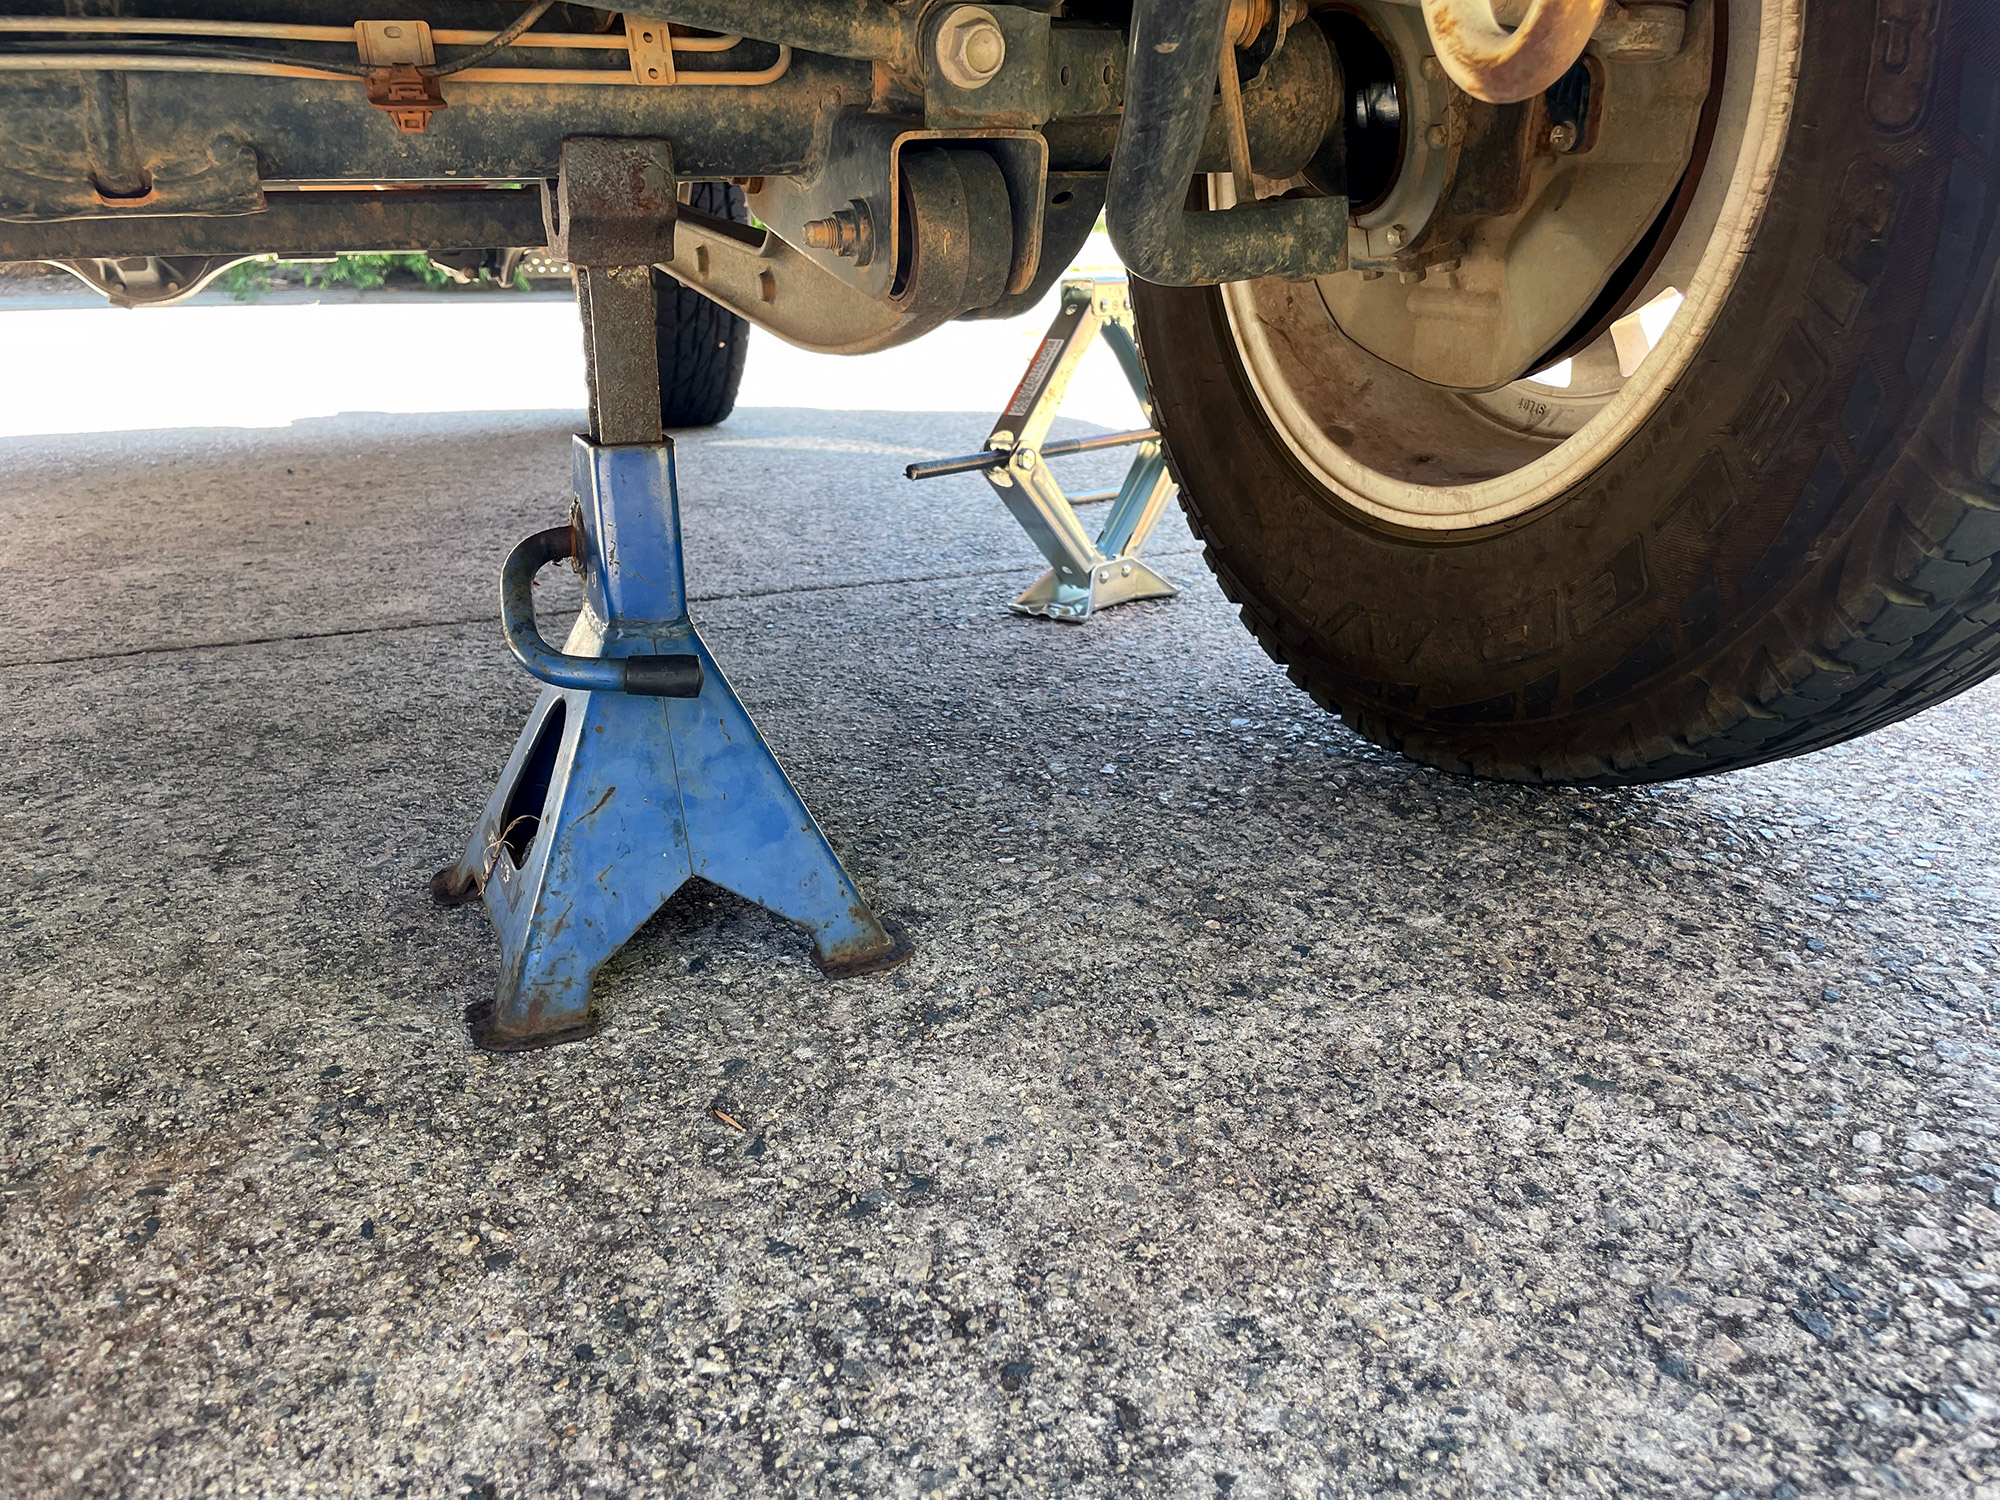
If, on the other hand, you support the car by the chassis you will need it higher off the ground to account for the wheels drooping.
Offroad you probably won’t have a jack/axle stand like I’ve pictured here. Just do whatever you can to support the car safely. Sure, you might need to get under it to repair something to get home, but you won’t get home if you repair it and then get crushed by the car…
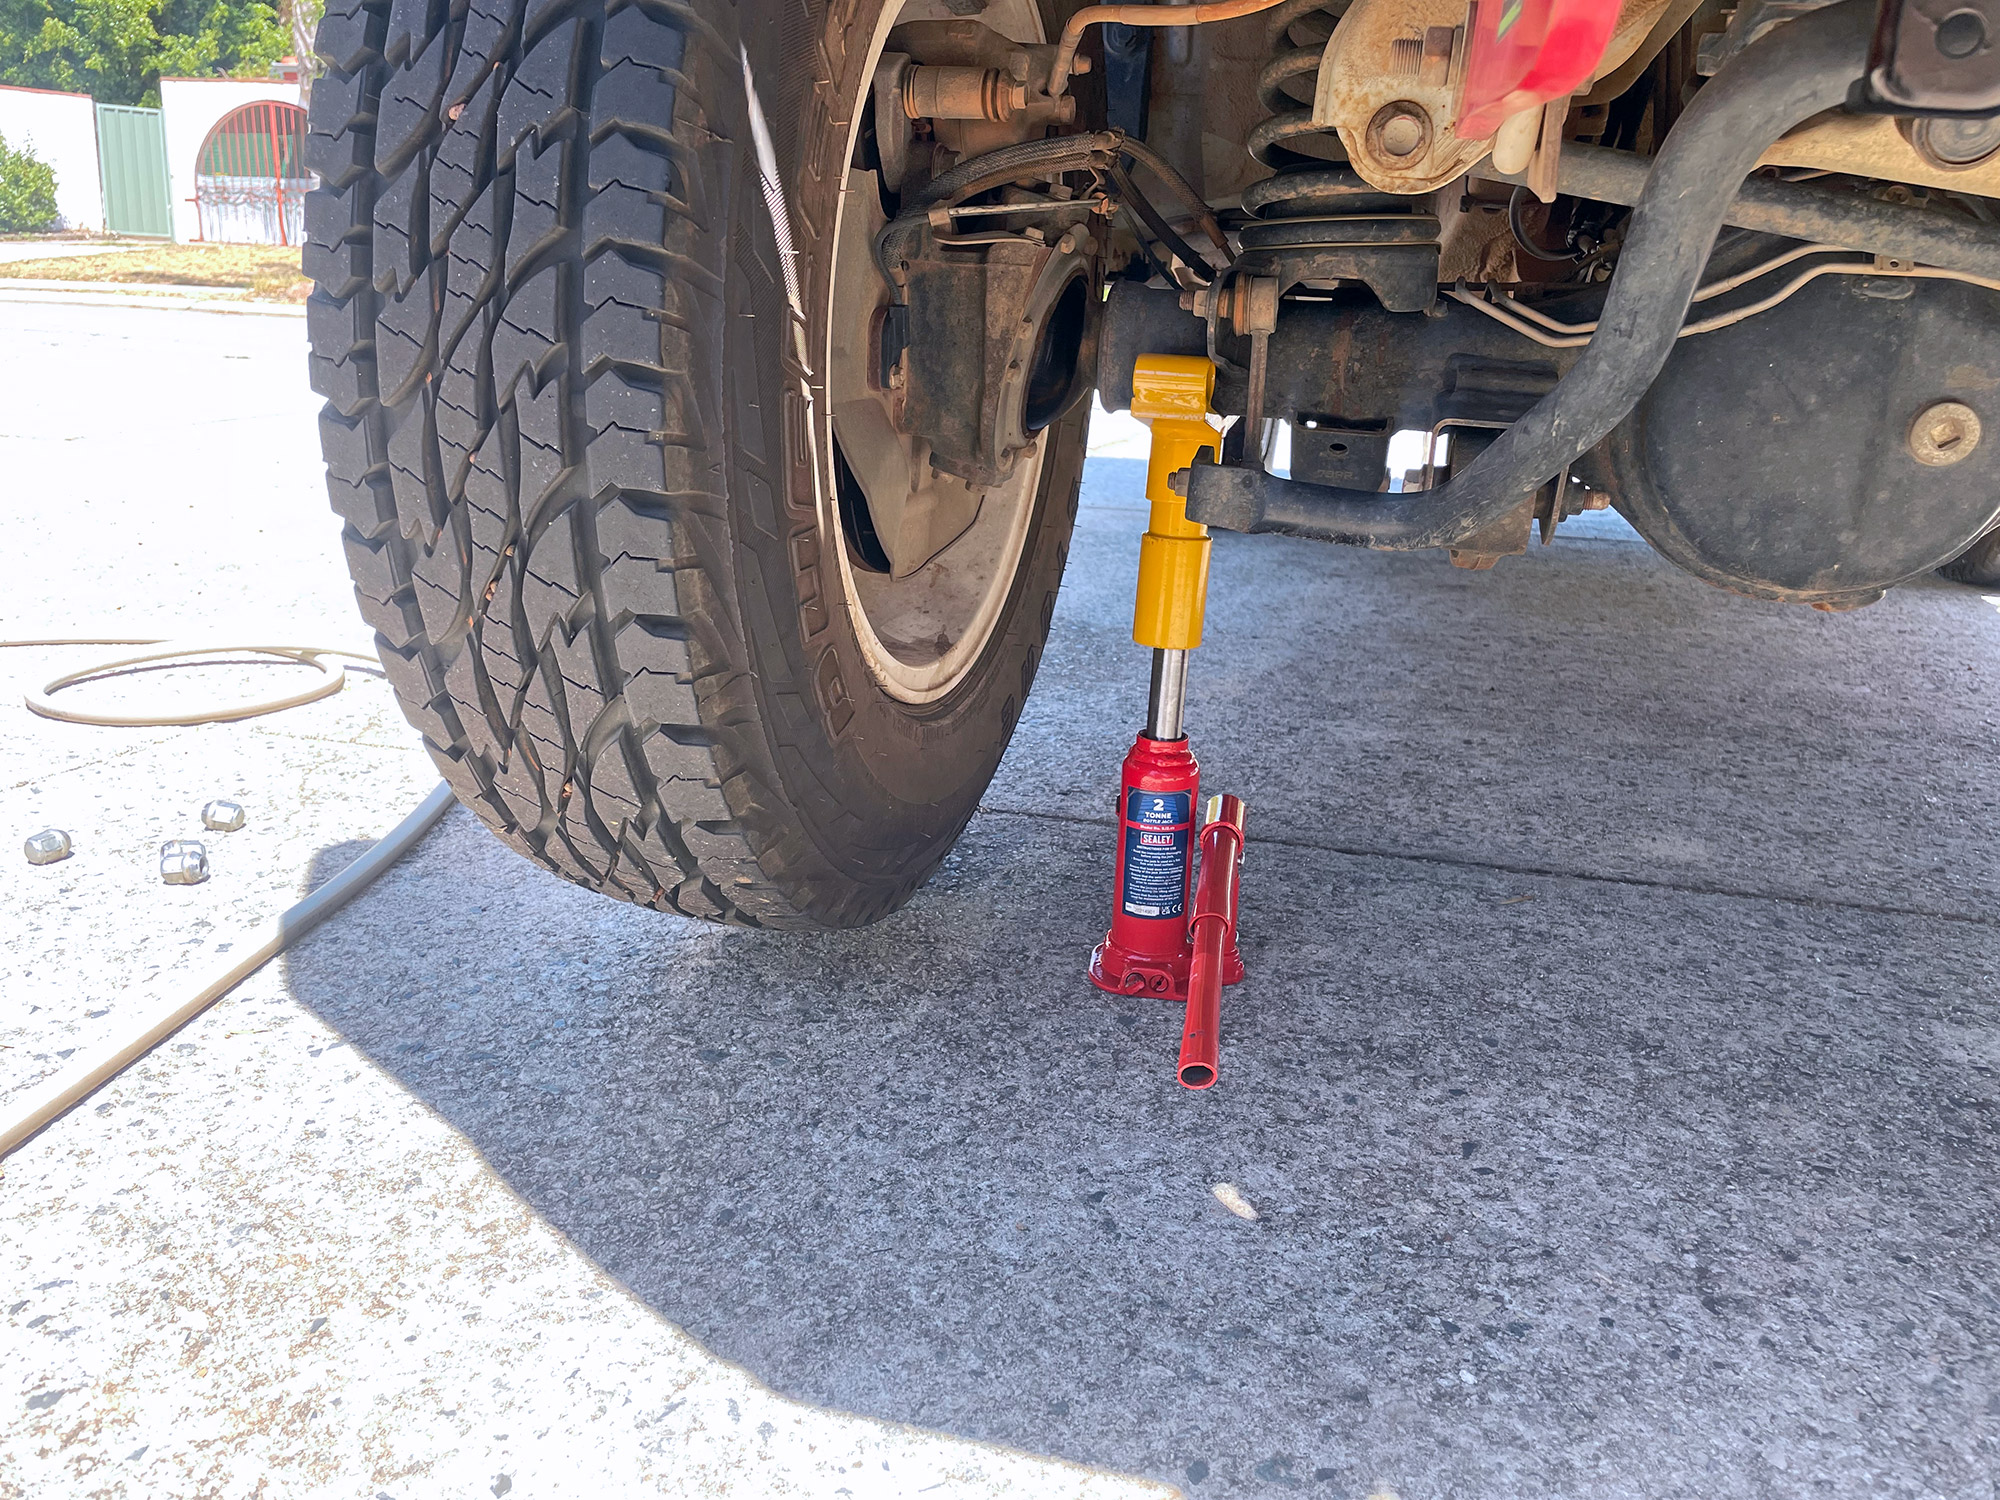
If you have access to a bottle jack these can be a lot easier to lift the car with. I carry a teeny 2 tonne bottle jack in the car most of the time, and use it with some larger Roadsafe adapters to give me secure axle lifting it. These have quite a deep collar on them so even though the bottle jack post is a lot smaller than many jacks they are still very stable.
Tyres: Pressures, changing and plugging tyres
A moment for tyre pressures
Tyre pressures are probably one of the biggest questions asked about Jimnys. A lot of the time it comes down to people, used to other cars with either much more weight or lower profile tyres, wondering why the tyre pressure of a Jimny is recommended at 26 psi front and rear, with the rear only rising to 29 psi for a full load.
Note these are cold pressures, which I will be sticking to for most of this discussion.
First off, the recommended pressures are not a typo. It’s mostly down to the tyres and the weight of the car. The maximum load rating of the stock Jimny tyres is 96, which equates to 710 kg. This maximum weight is at maximum pressure of 44 psi. If all 4 tyres were at this pressure and the weight was distributed equally that would be a maximum weight in the car of 2840 kg! Considerably in excess of the factory GVM of 1435 kg.
If you are worried about tyre pressures, you can reassure yourself that they’re not too low by checking one of the following things:
- Mark the tyre tread with chalk, roll it and see if you see the entire tread pattern. If you do then the pressure is right. If only the centre of the tyre tread is visible then the tyre is overinflated and if only the sides then it is underinflated. This isn’t the most accurate method, though.
- The other option is to see that the tyre isn’t getting excessively hot when driving. Take a drive on a highway for, say, 20-30 minutes noting the cold starting pressure in PSI. Stop somewhere from speed and immediately check your tyre pressures. If they’ve gone up by more than 3-4 psi then you probably have started a bit low in pressure; if not that much then you are ok and certainly not underinflated.
Offroad the confusion also reigns as people recommend tyre pressures for particular terrain type based on much heavier cars. The Jimny is half or less of the weight of most 4wds so it needs about half their pressures.
People get worried about ‘popping a tyre off the bead’ offroad. You see this very, very rarely offroad especially with Jimnys. You see a lot more people struggling as their tyre pressures are too high, though. Worst case if you pop a tyre off the bead… well, that’s what you have a spare for. Swap tyres and when you get to a convenient spot use a compressor and get the deflated tyre back on the bead.
There’s a lot more to this topic, but for the purposes of basics: 26 psi, and maybe go up to 29 psi if you have the car entirely full of gear. Yes, this includes if you have different tyres. Arguments vary but stiffer tyres will need less pressure to flex the same amount, so potentially you need to consider lower pressures for stiffer tyres.
A caveat here is that GVM upgraded vehicles will include a revised pressure rating, but note that the Ironman GVM upgrade only recommends going up 1 psi on the factory Suzuki recommendations.
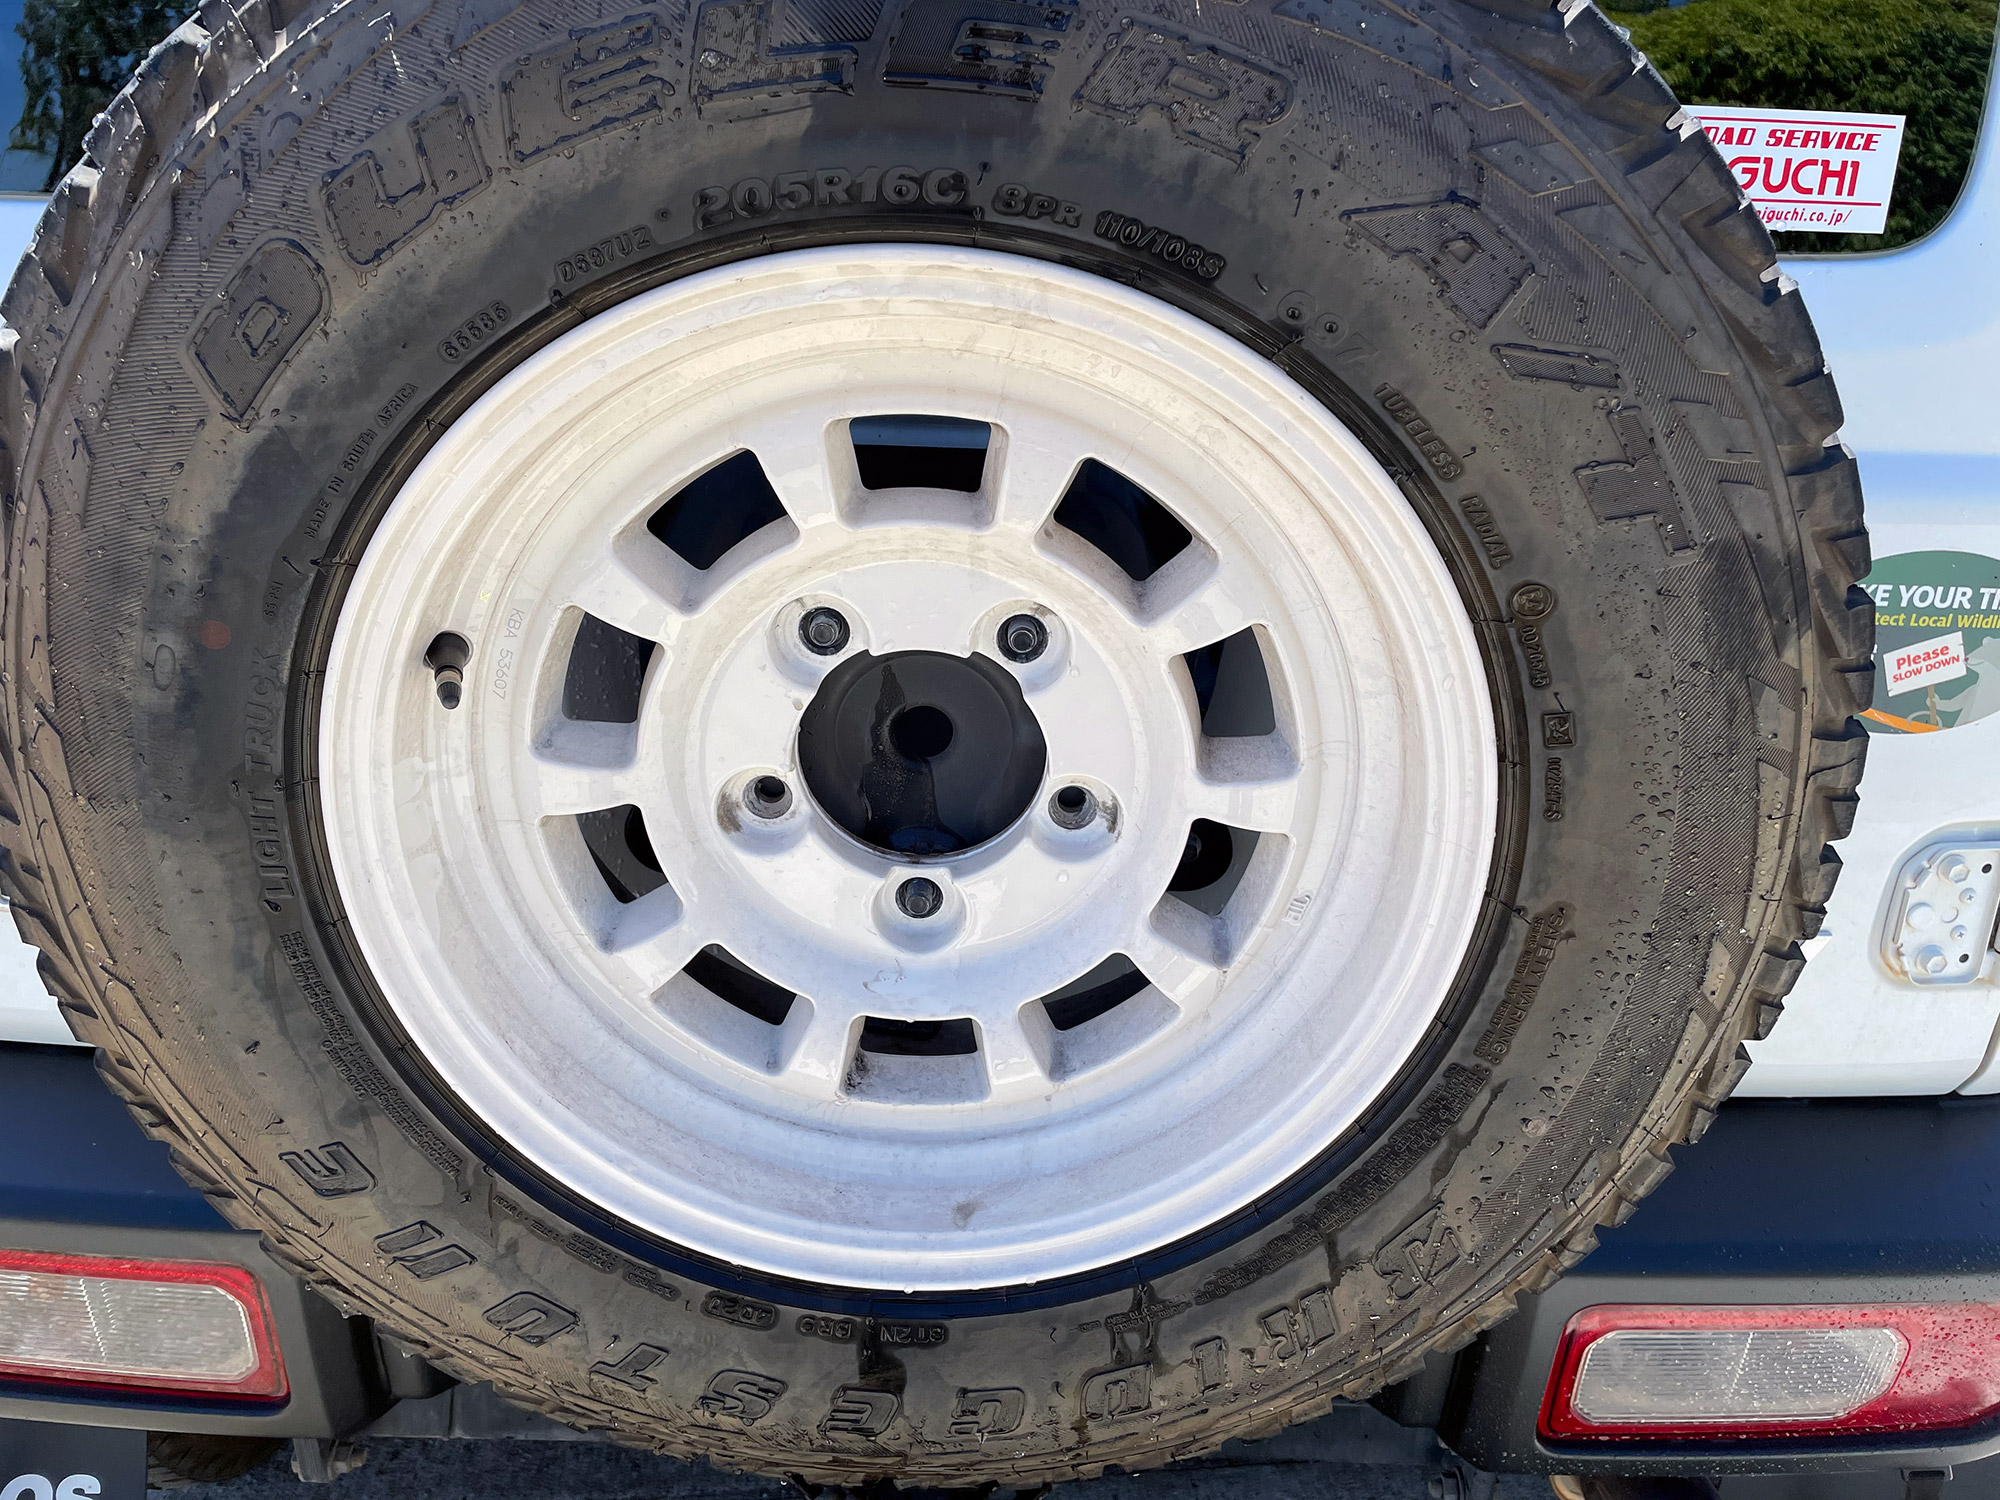
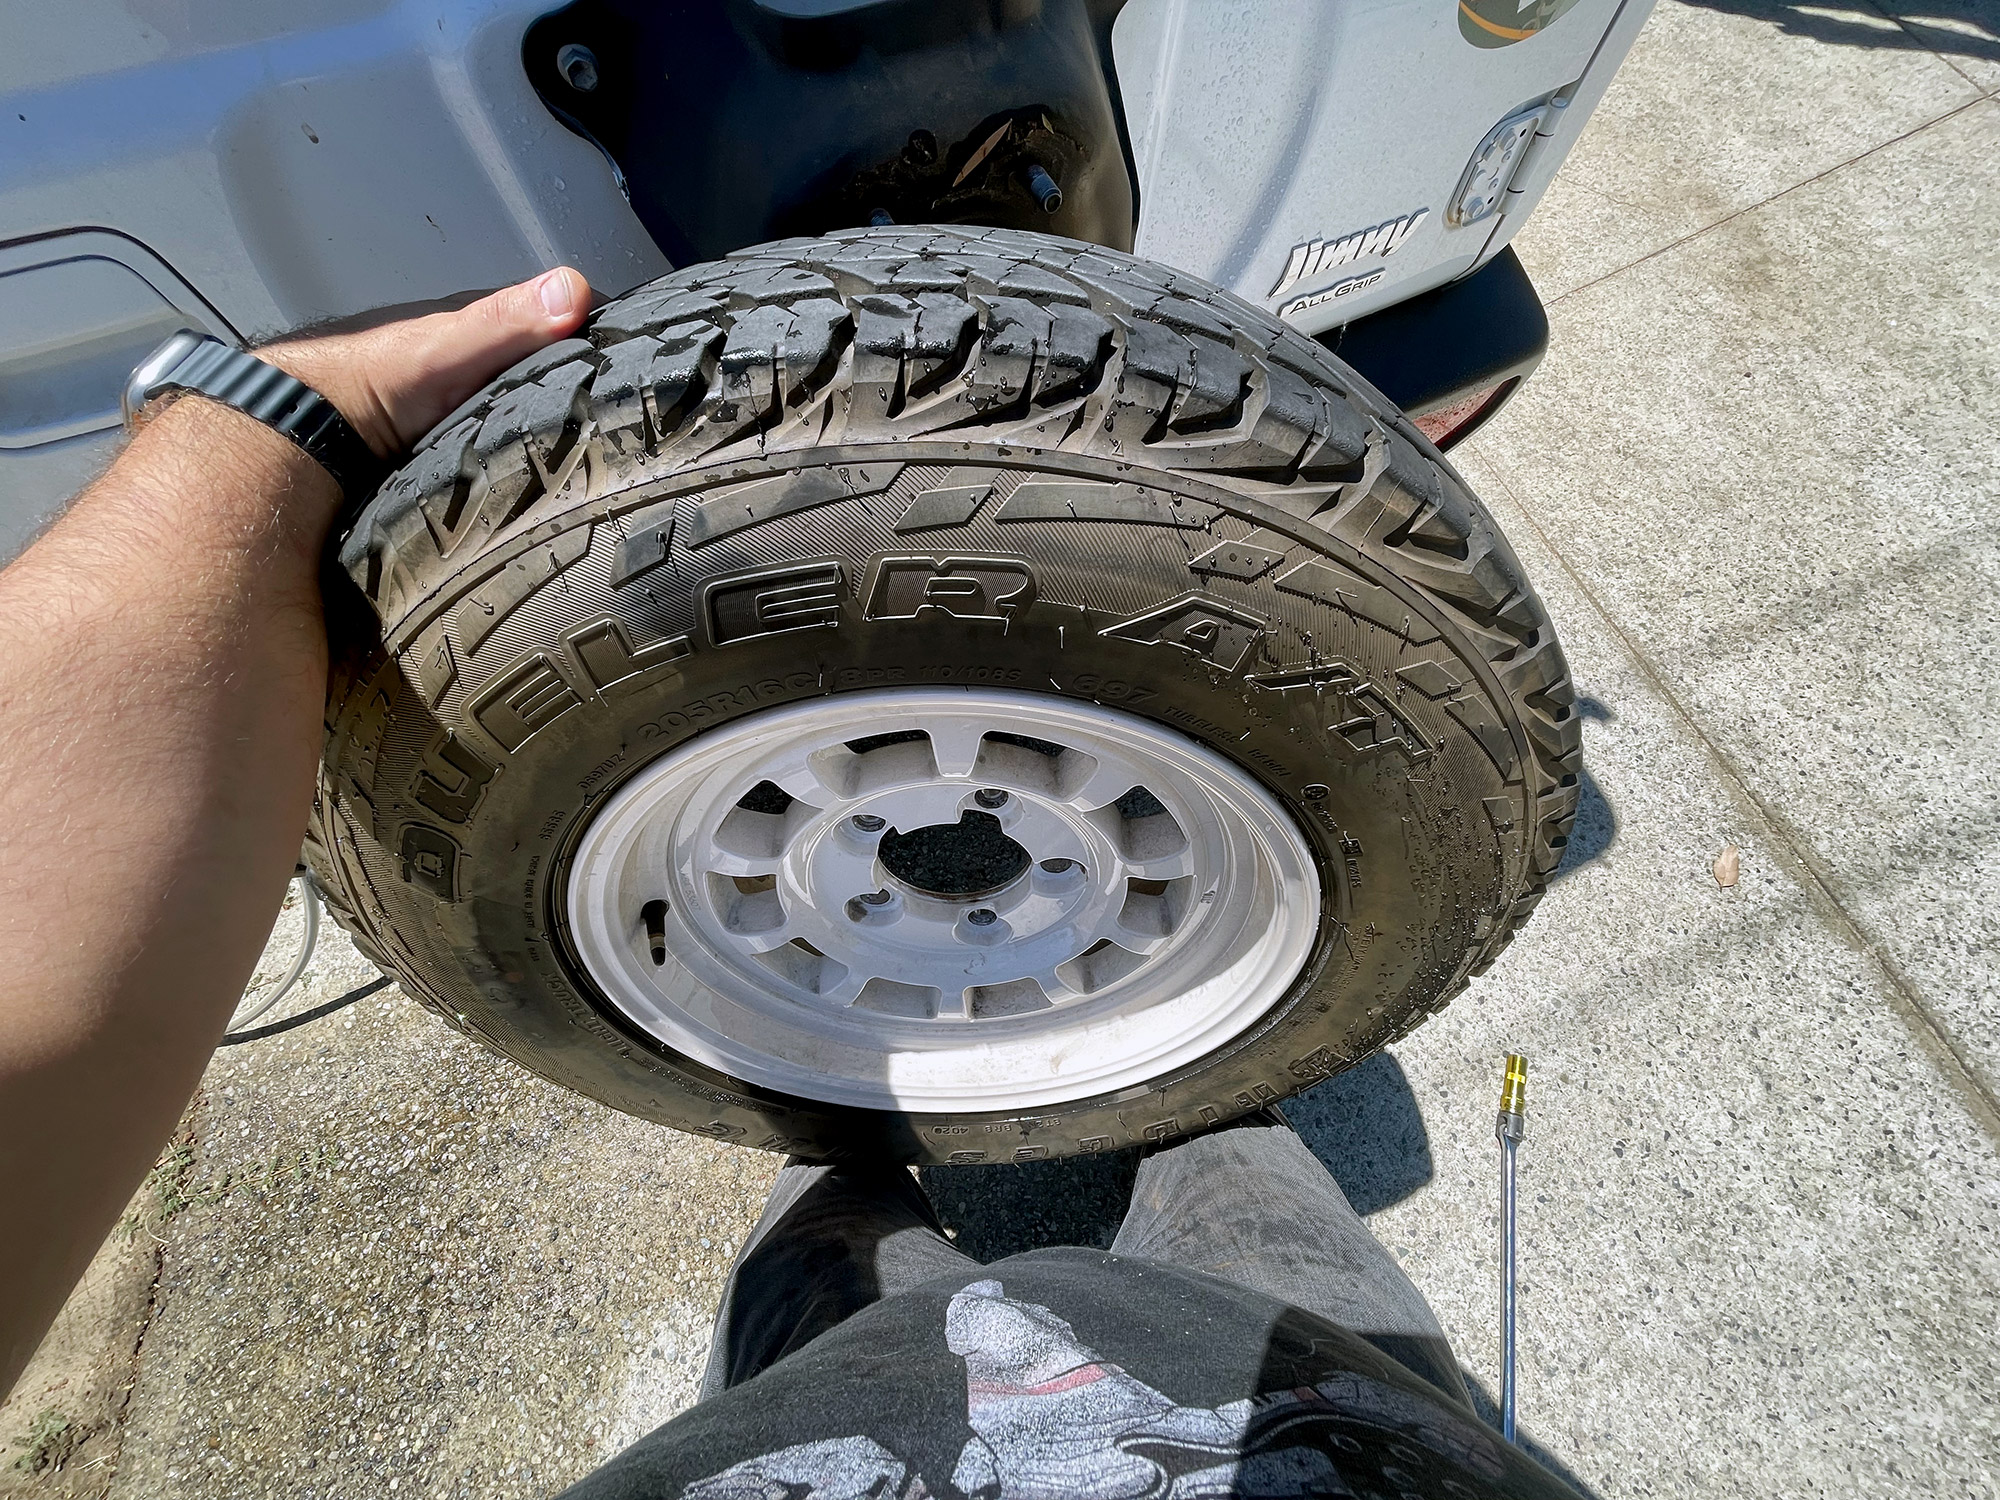
Taking the rear spare off the door safely
This sounds silly to a lot of people but even a small tyre upgrade adds a lot of weight to safely lower down and then lift back up onto the back door. It’s important to have a good lifting technique using your knees rather than your back and be ready to support the weight of the wheel and tyre.
Start with the spare just relaxing and sitting on the studs on the door mount. Note if you have stock wheels and tyres you’ll probably have a black plastic central wheel cover which has a nut in the middle which you undo with the stock tyre lever or a 19mm socket.
You can push against it with your knees/body to support it and help out your arms, which can help with lowering it.
There’s no super easy way to lower it down though, but this can help you get it away from the car, roll it off your legs and let it bounce on the tyre onto the ground.
Tyre rotation stuff
Good time here to think about rotating tyres.
Dealerships can charge quite a bit for this if they regard it as an addon for your service, but it’s a good idea to get your head around it and do it at home. Because of how the Jimny will wear front and rear tyres differently, this can give you a little bit more total tyre life by spreading the wear out. I also like to do a full 5 tyre rotation because that way you’re always making sure the spare is fine every once in a while, versus people who leave it under a spare tyre cover for 3 years and then realise it’s knackered when they need it out bush.
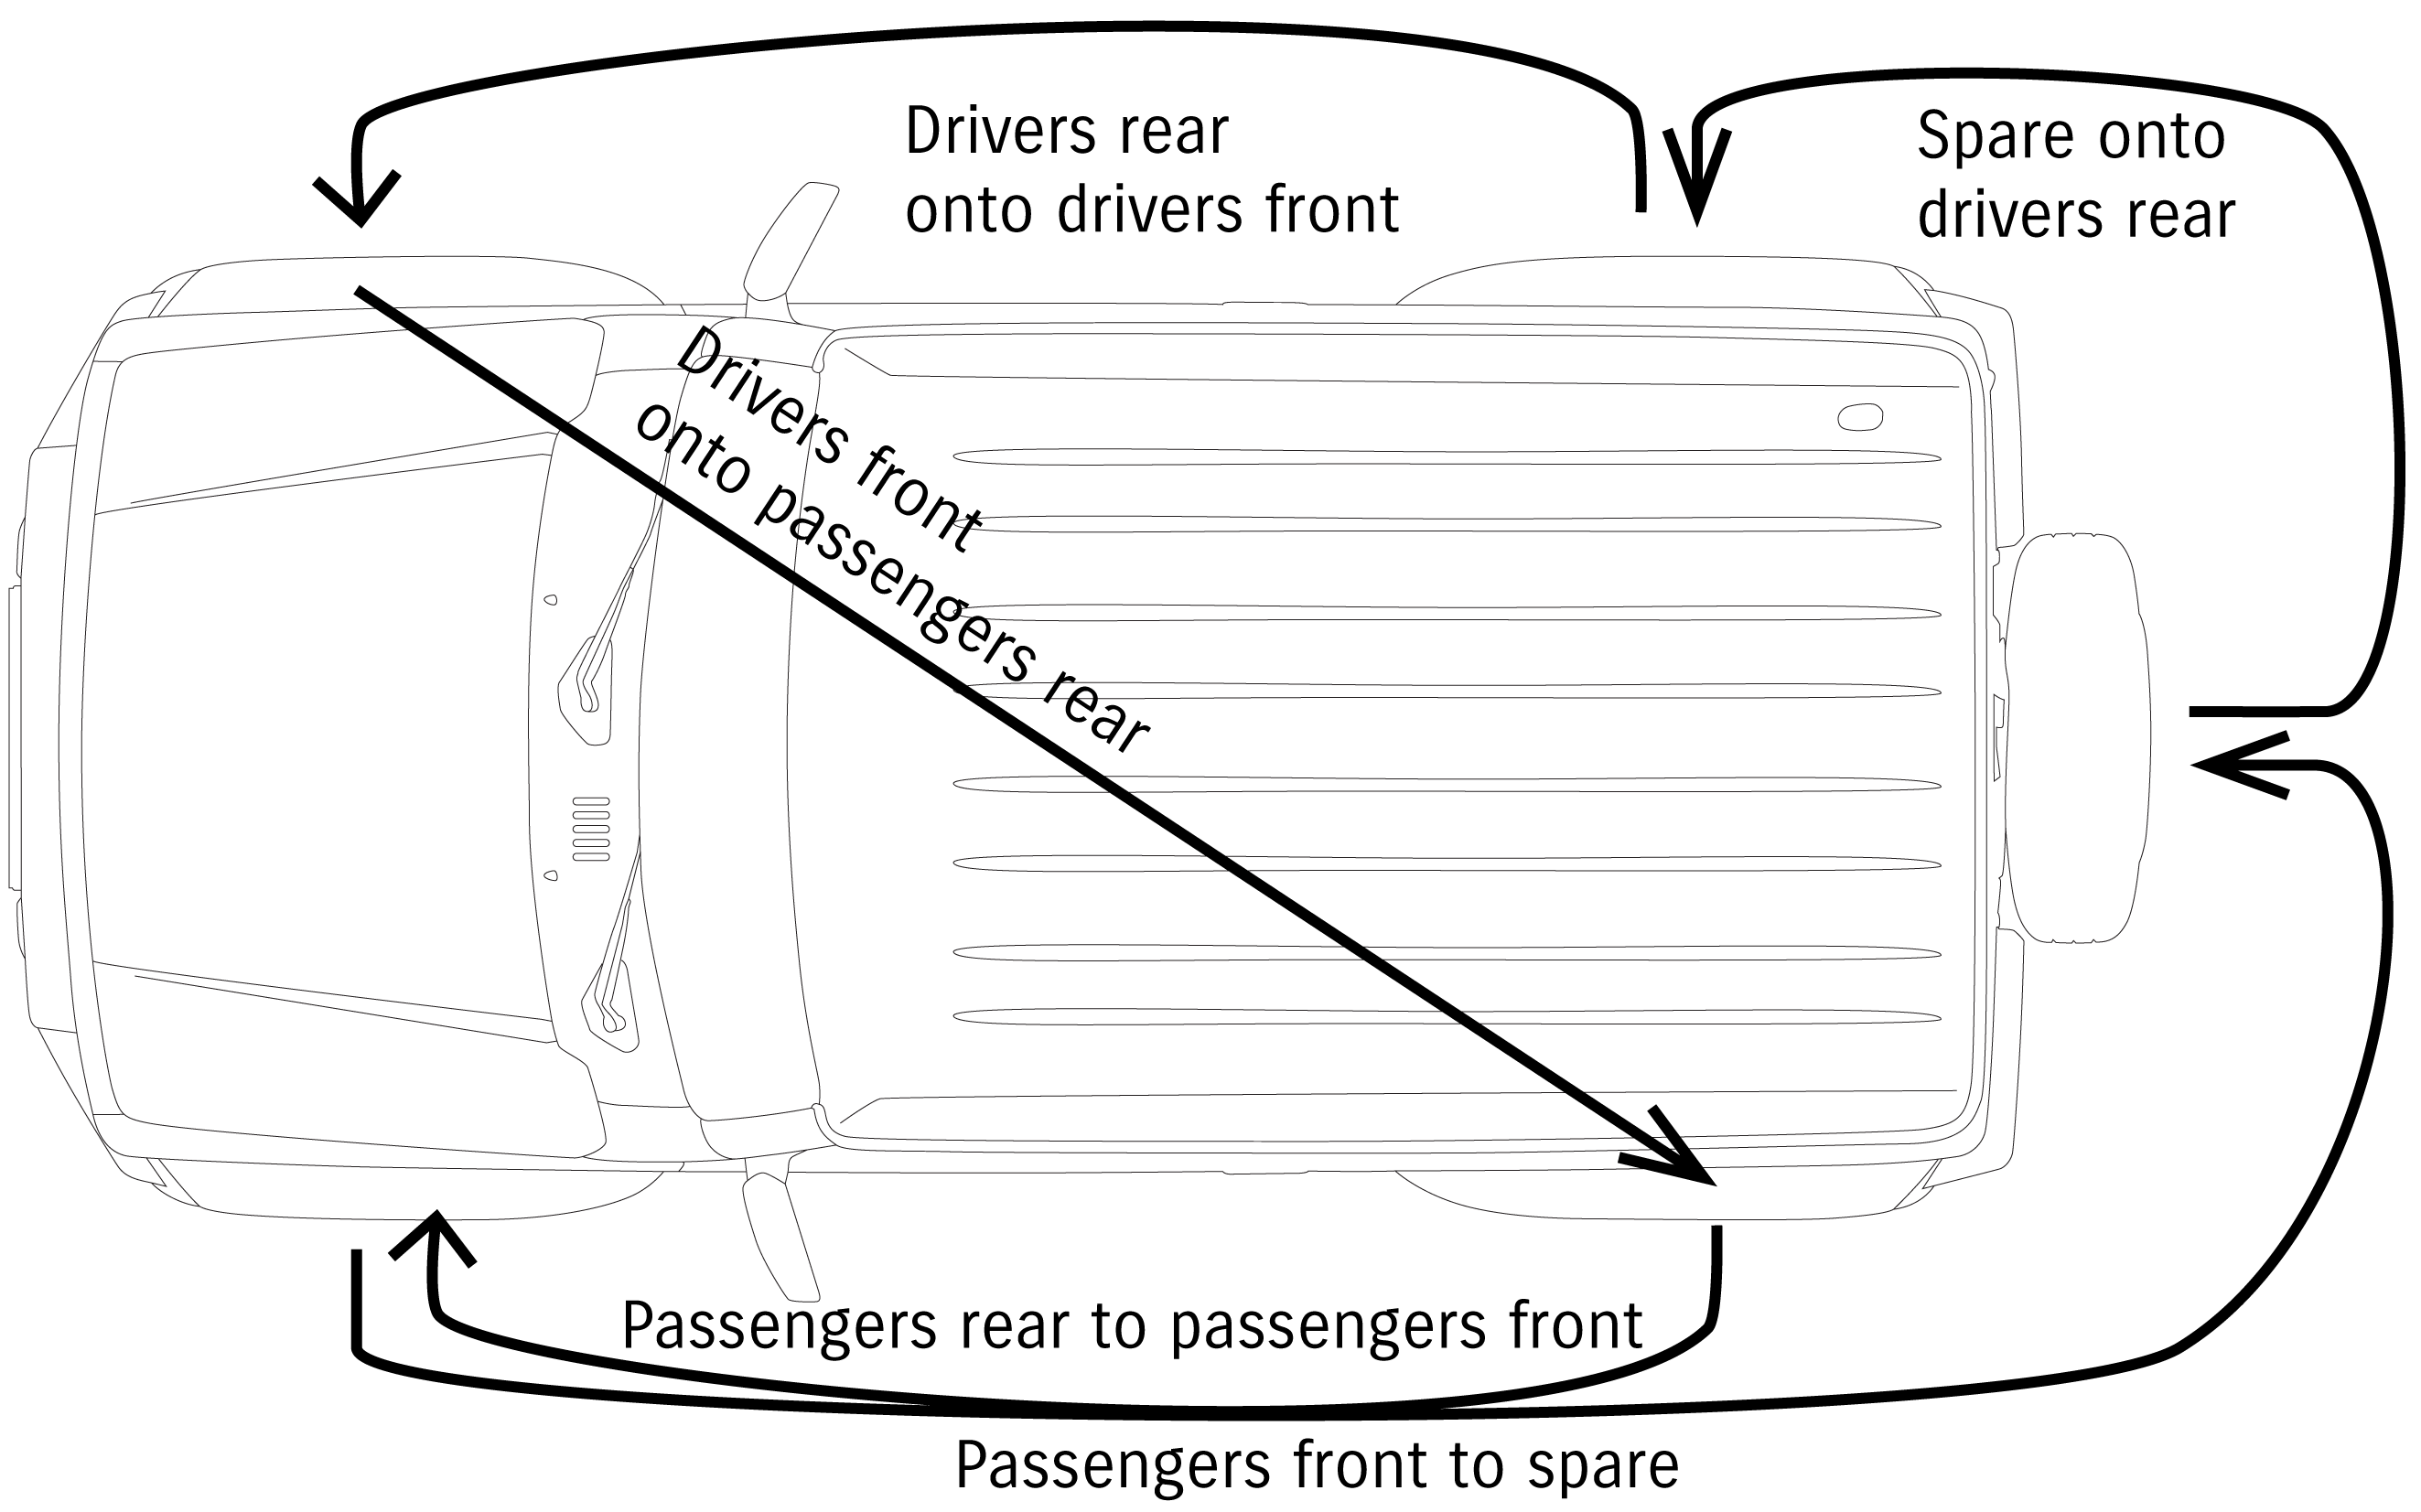
A good order to do this in would be something like this:
- Spare off and put this on the drivers rear
- Drivers rear to drivers front
- Drivers front to passengers rear
- Passenger’s rear to passenger’s front
- Passenger’s front to spare
This will minimise your movement around the car and also jacking, especially if you can jack an entire side at a time.
Intervals suggested on this differ: if you’re pulling off the wheels regularly to deeply clean brakes after lots of mud use then maybe do it every time you do that. I tend to do it roughly every 5000 km but I am not religous about it.
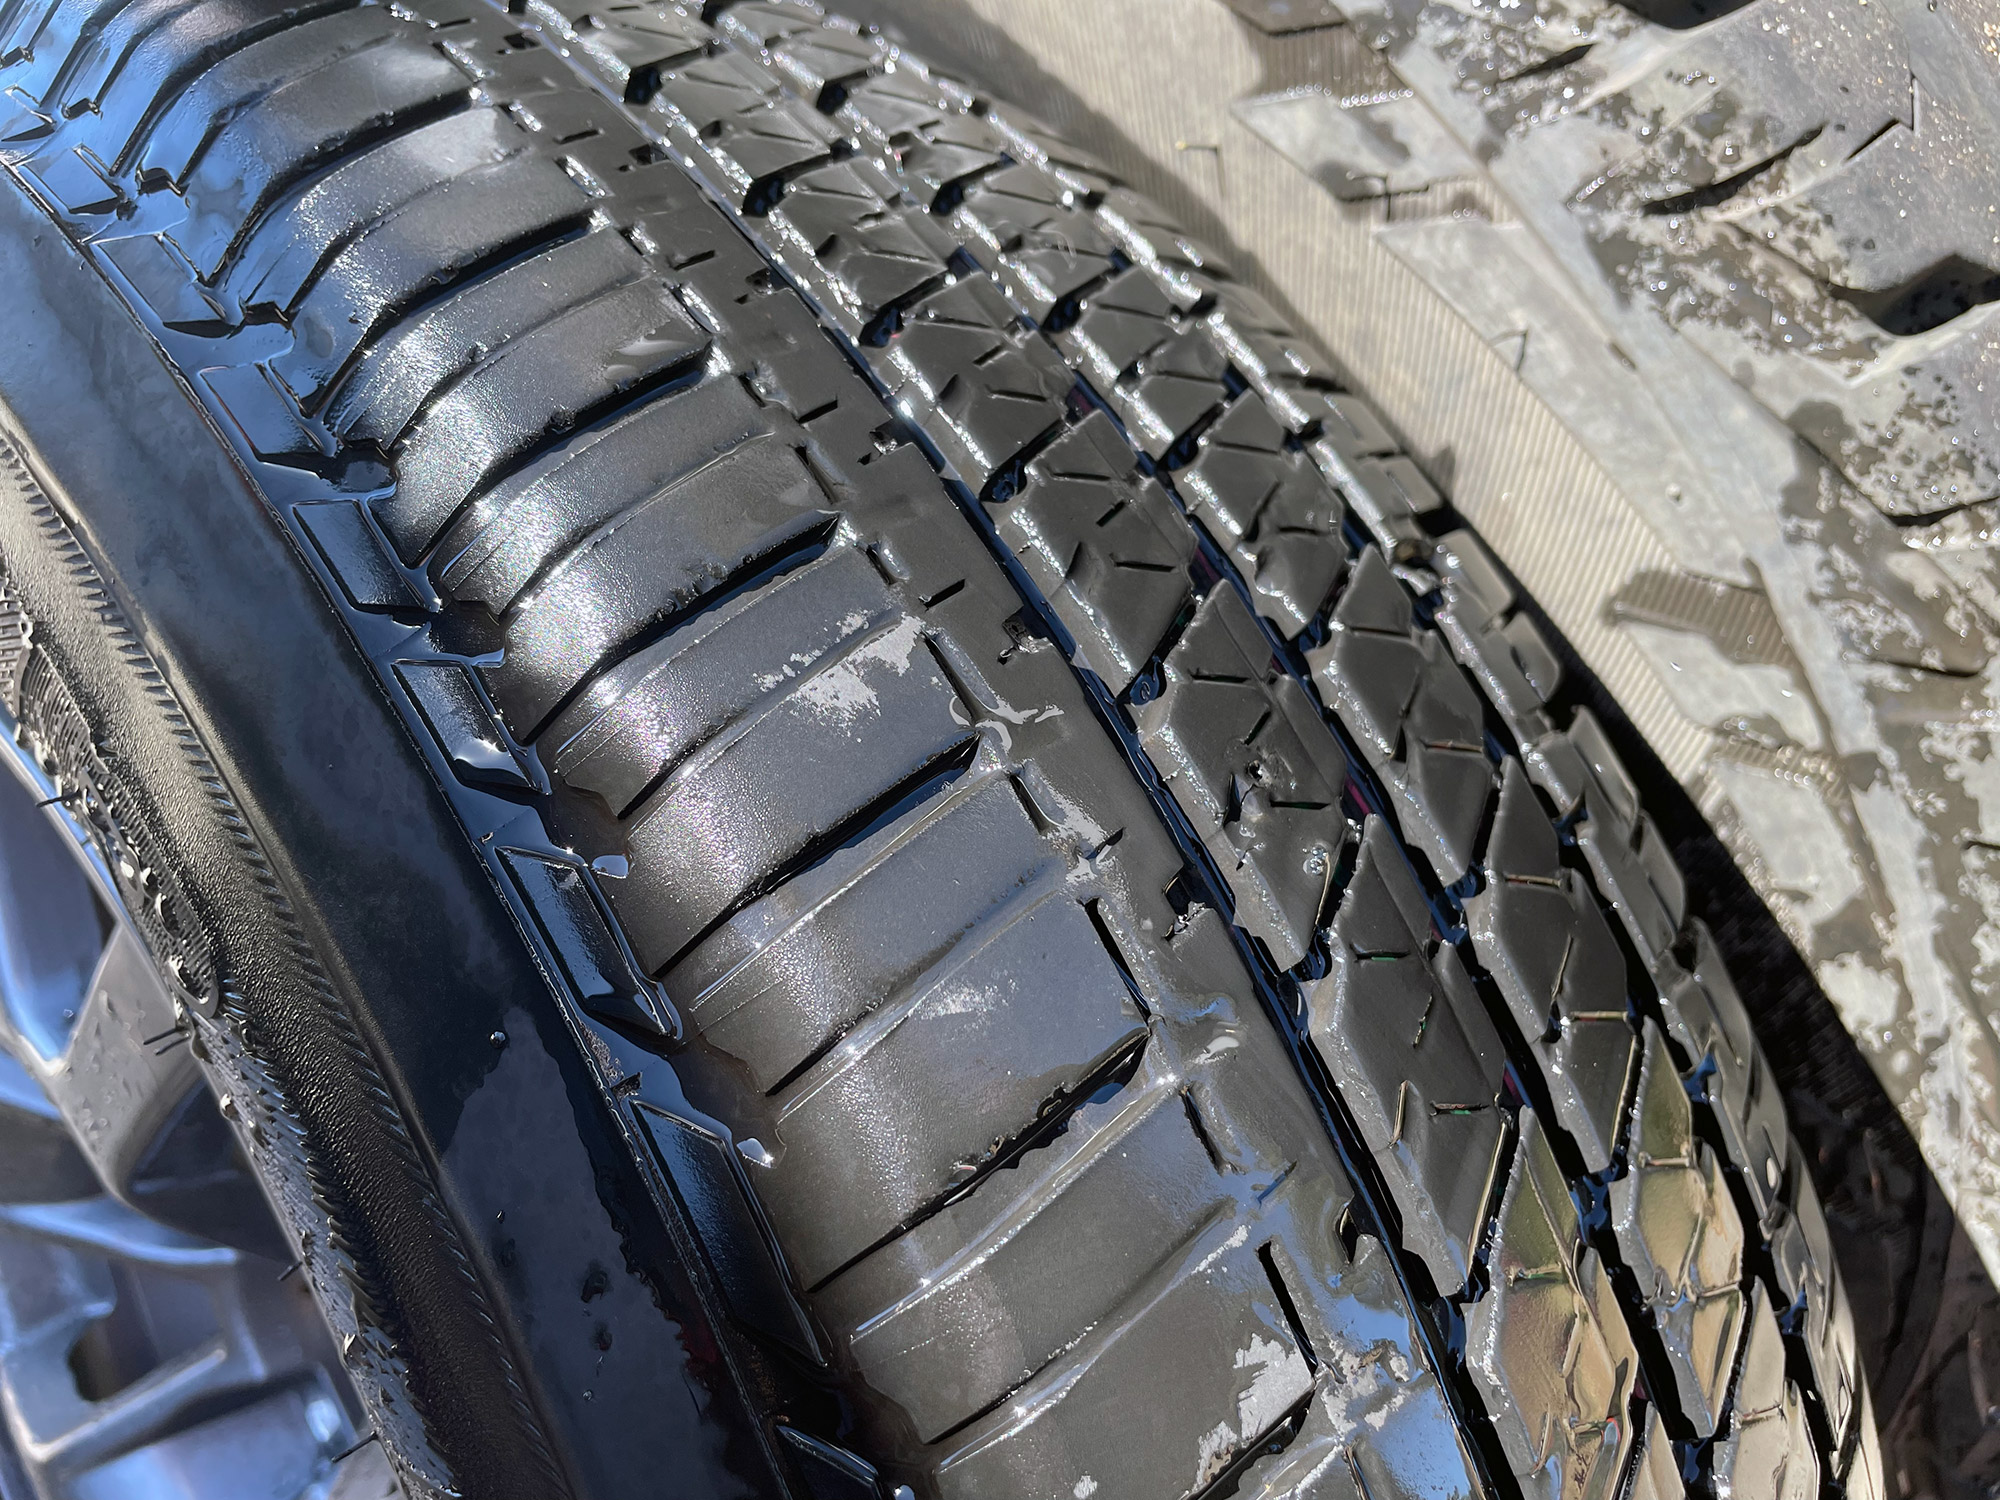
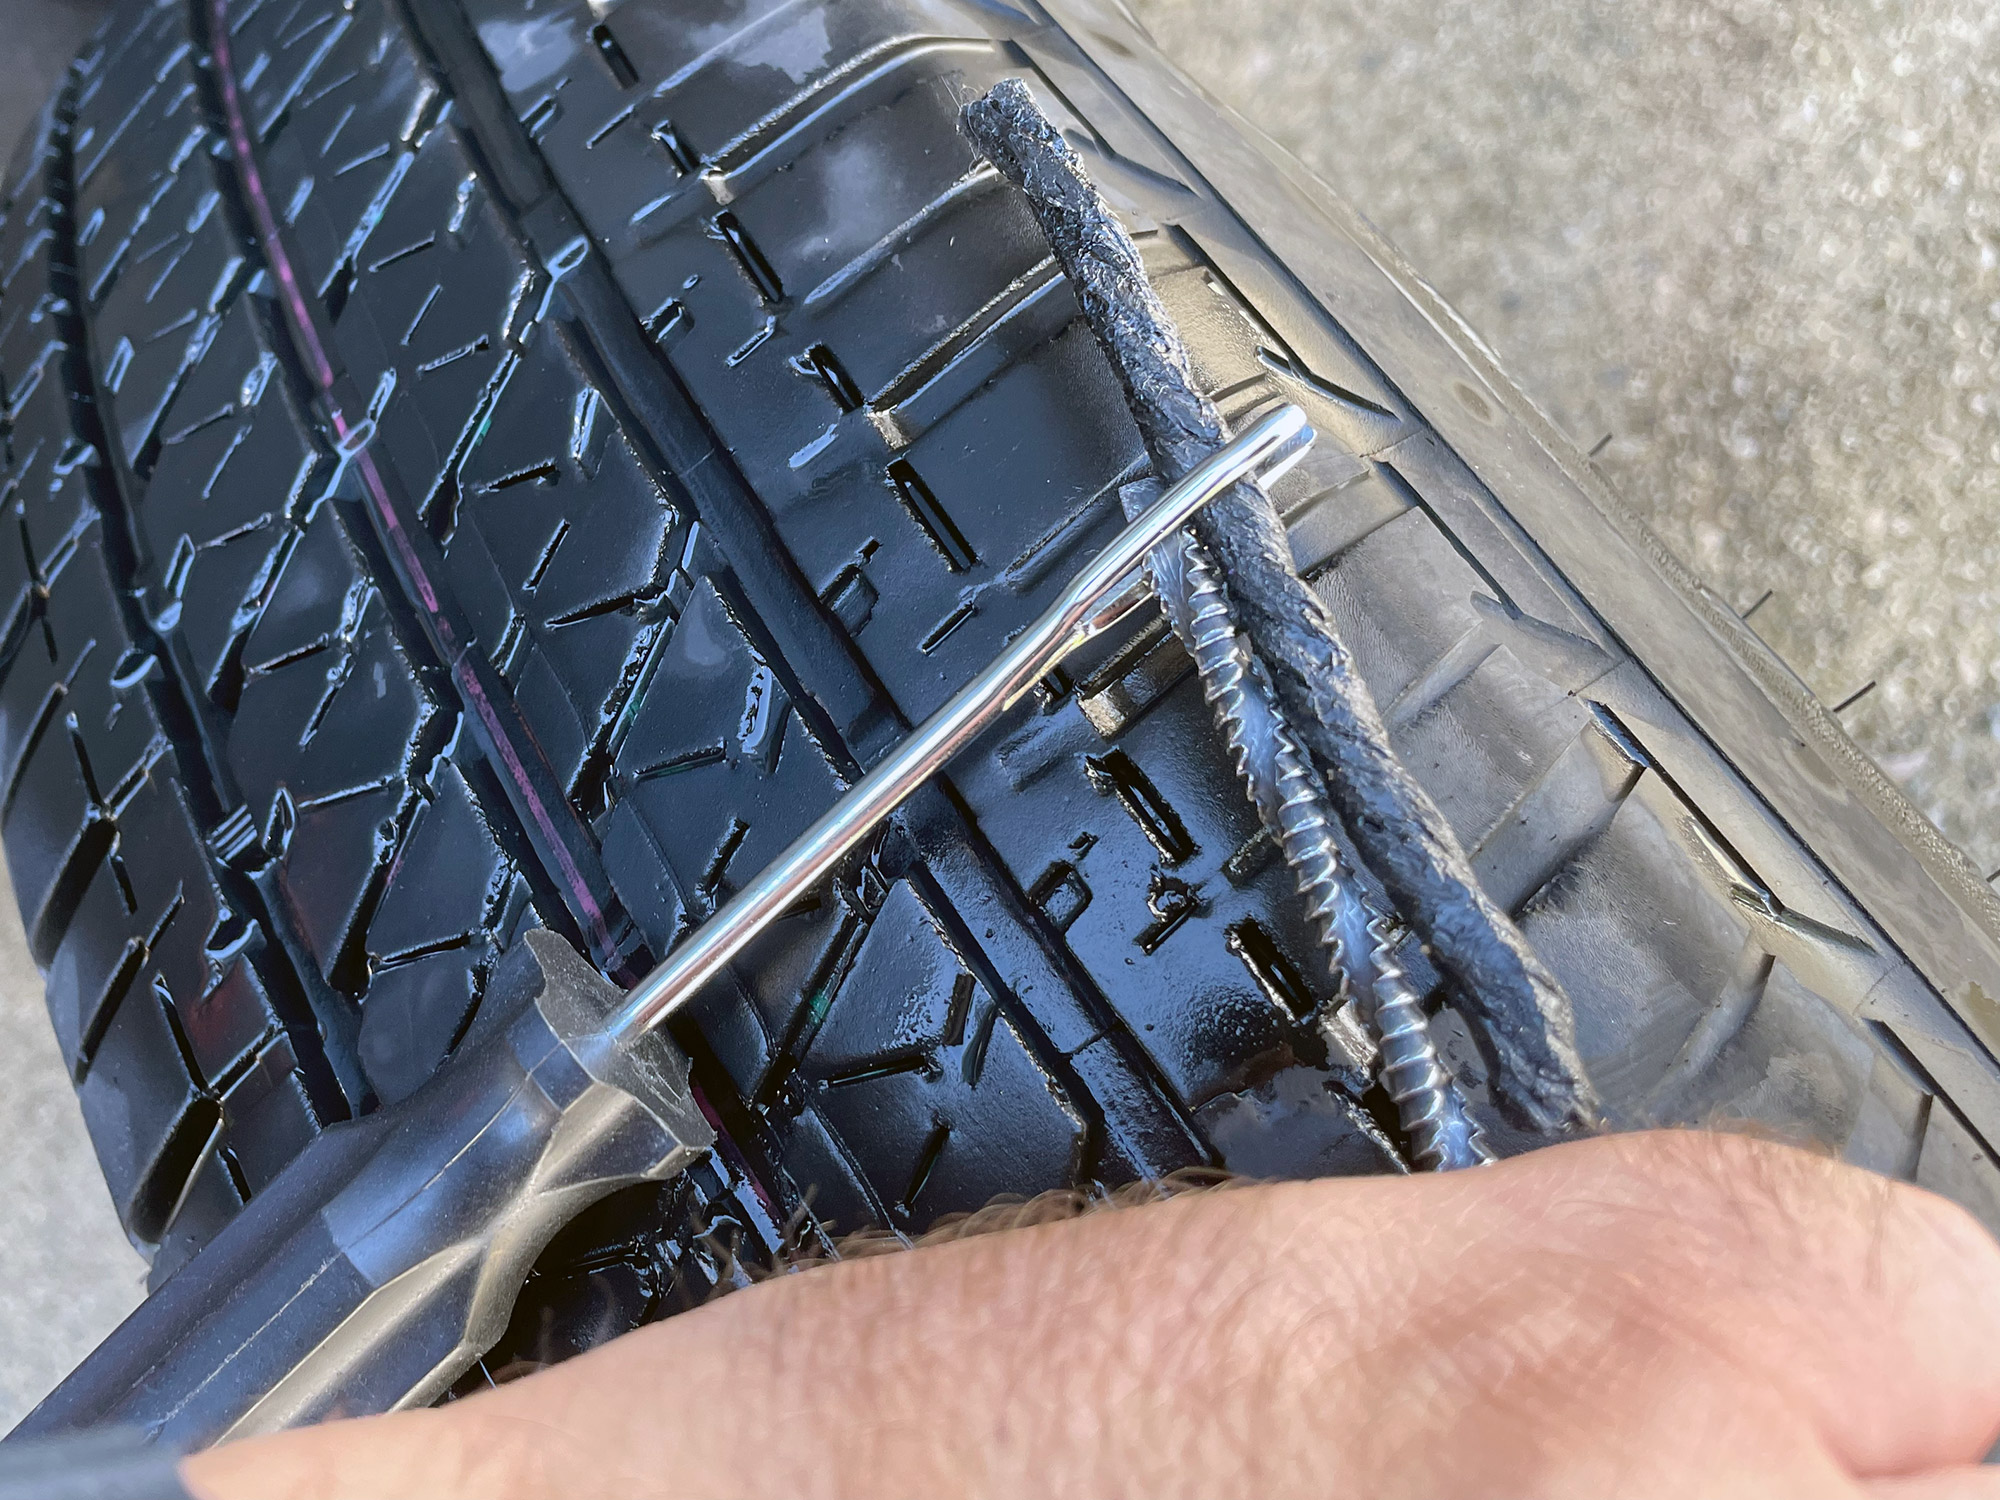
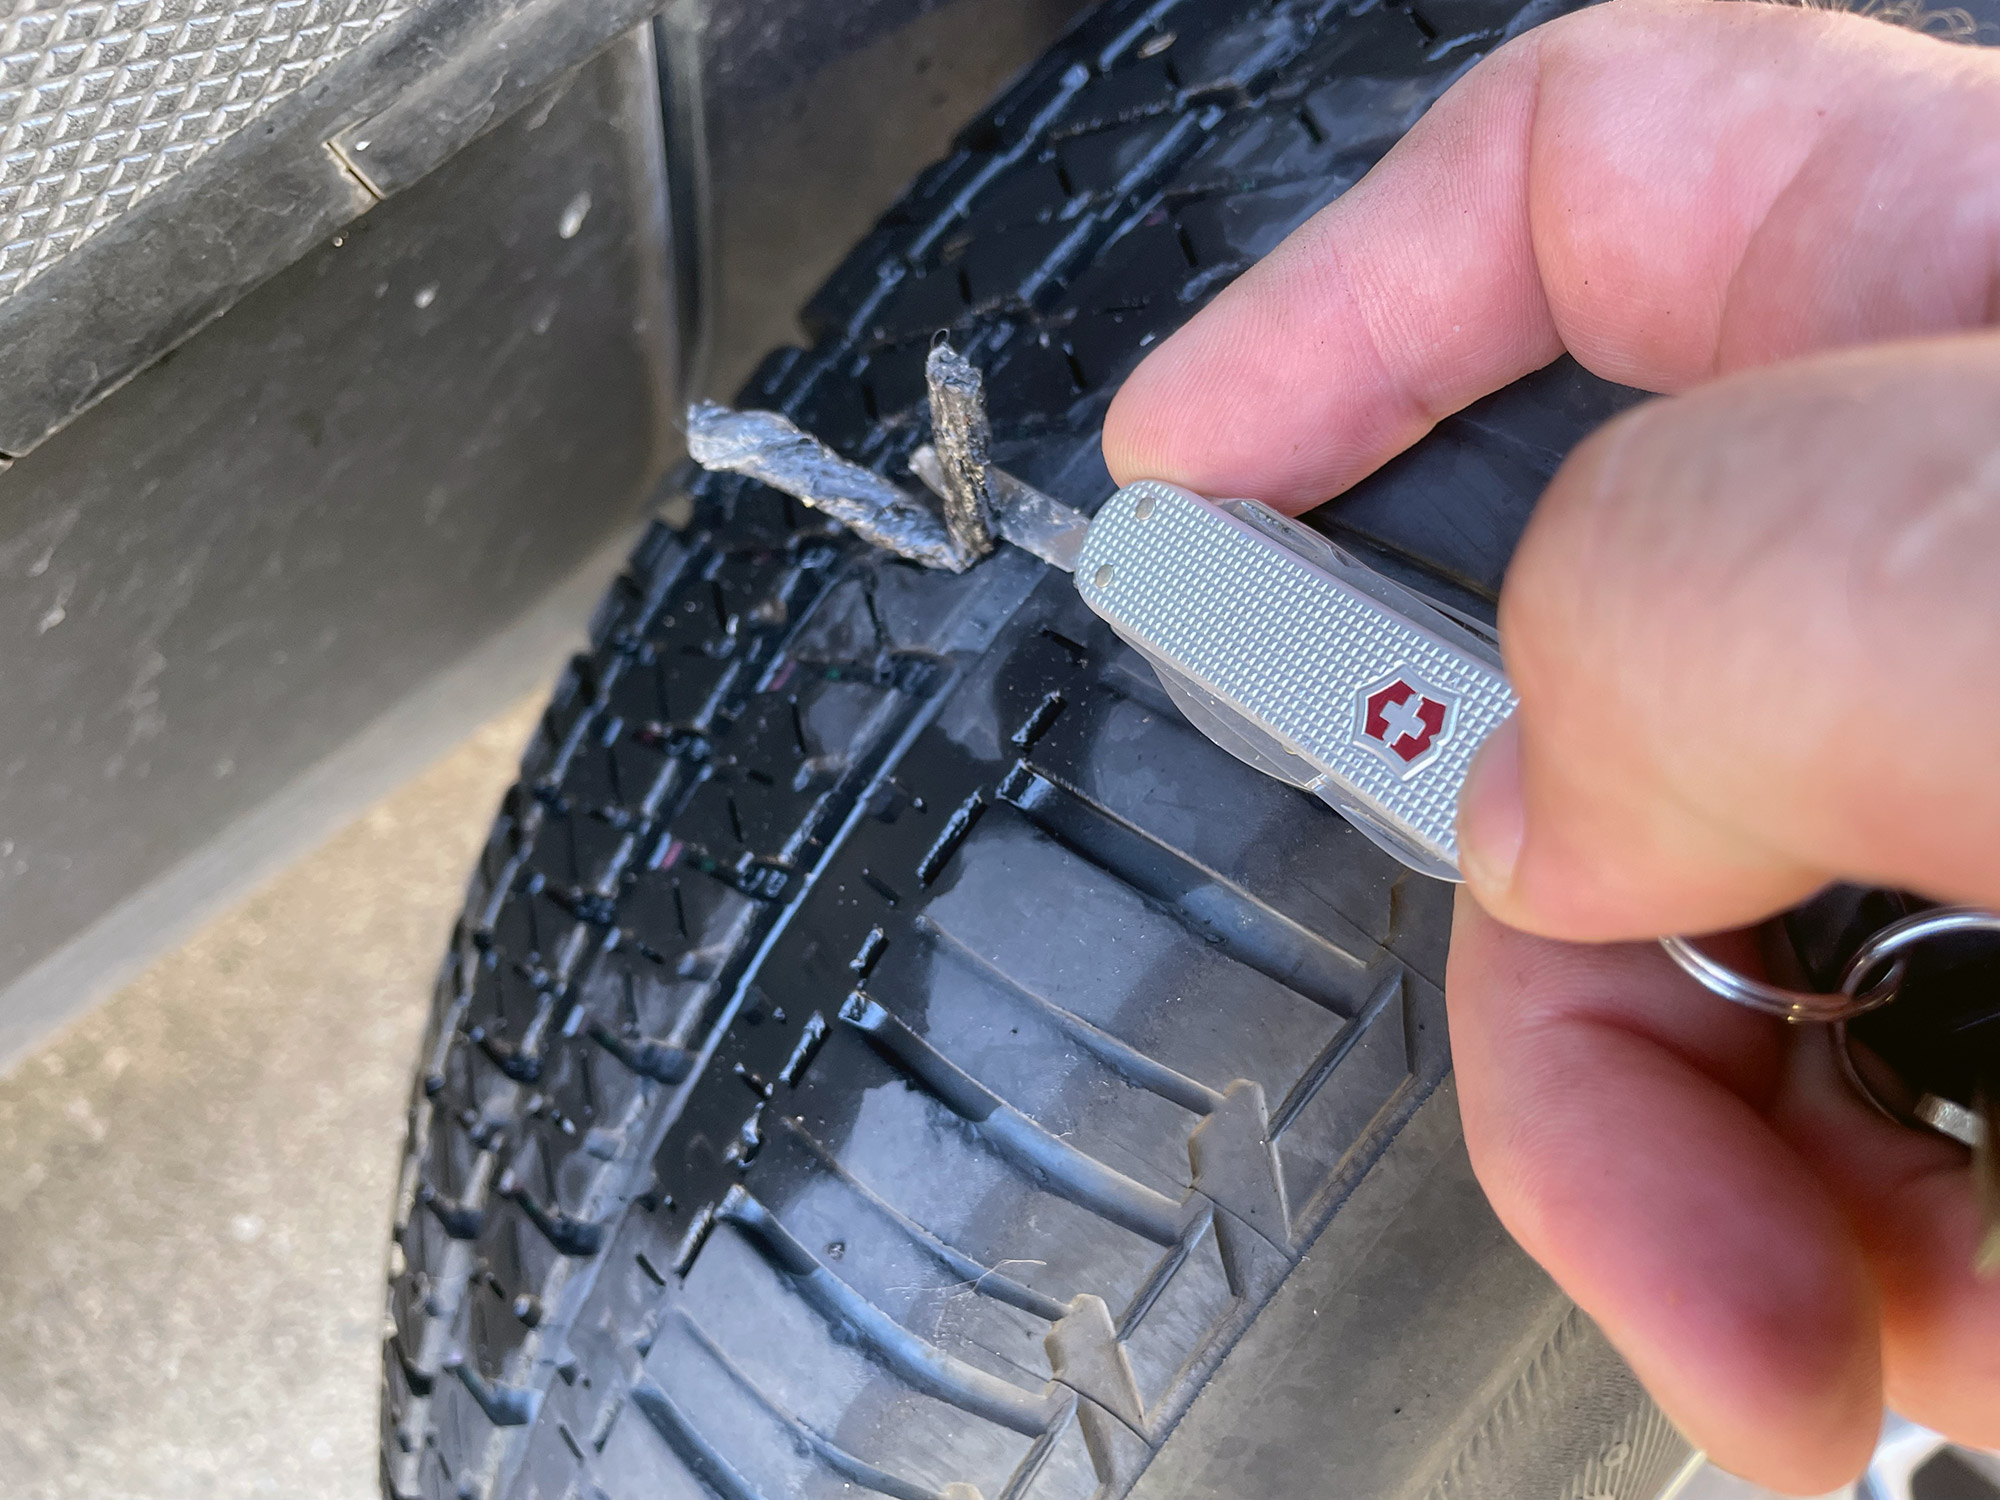
Plugging tyres
If you’re going to do any 4wding eventually you’ll get a puncture. To ensure you have a spare tyre still once this happens, learning how to plug tyres is a fairly helpful thing to do. To do this you will need a radial tyre plugging kit and it’s helpful to have additional plugs. Note that if you get something in your tyre and it’s just a slow leak, you’re often better off pumping up the tyre periodically and getting yourself to a town or a tyre repair place who can do a stronger plug from the inside rather than the rope style from the outside I show here.
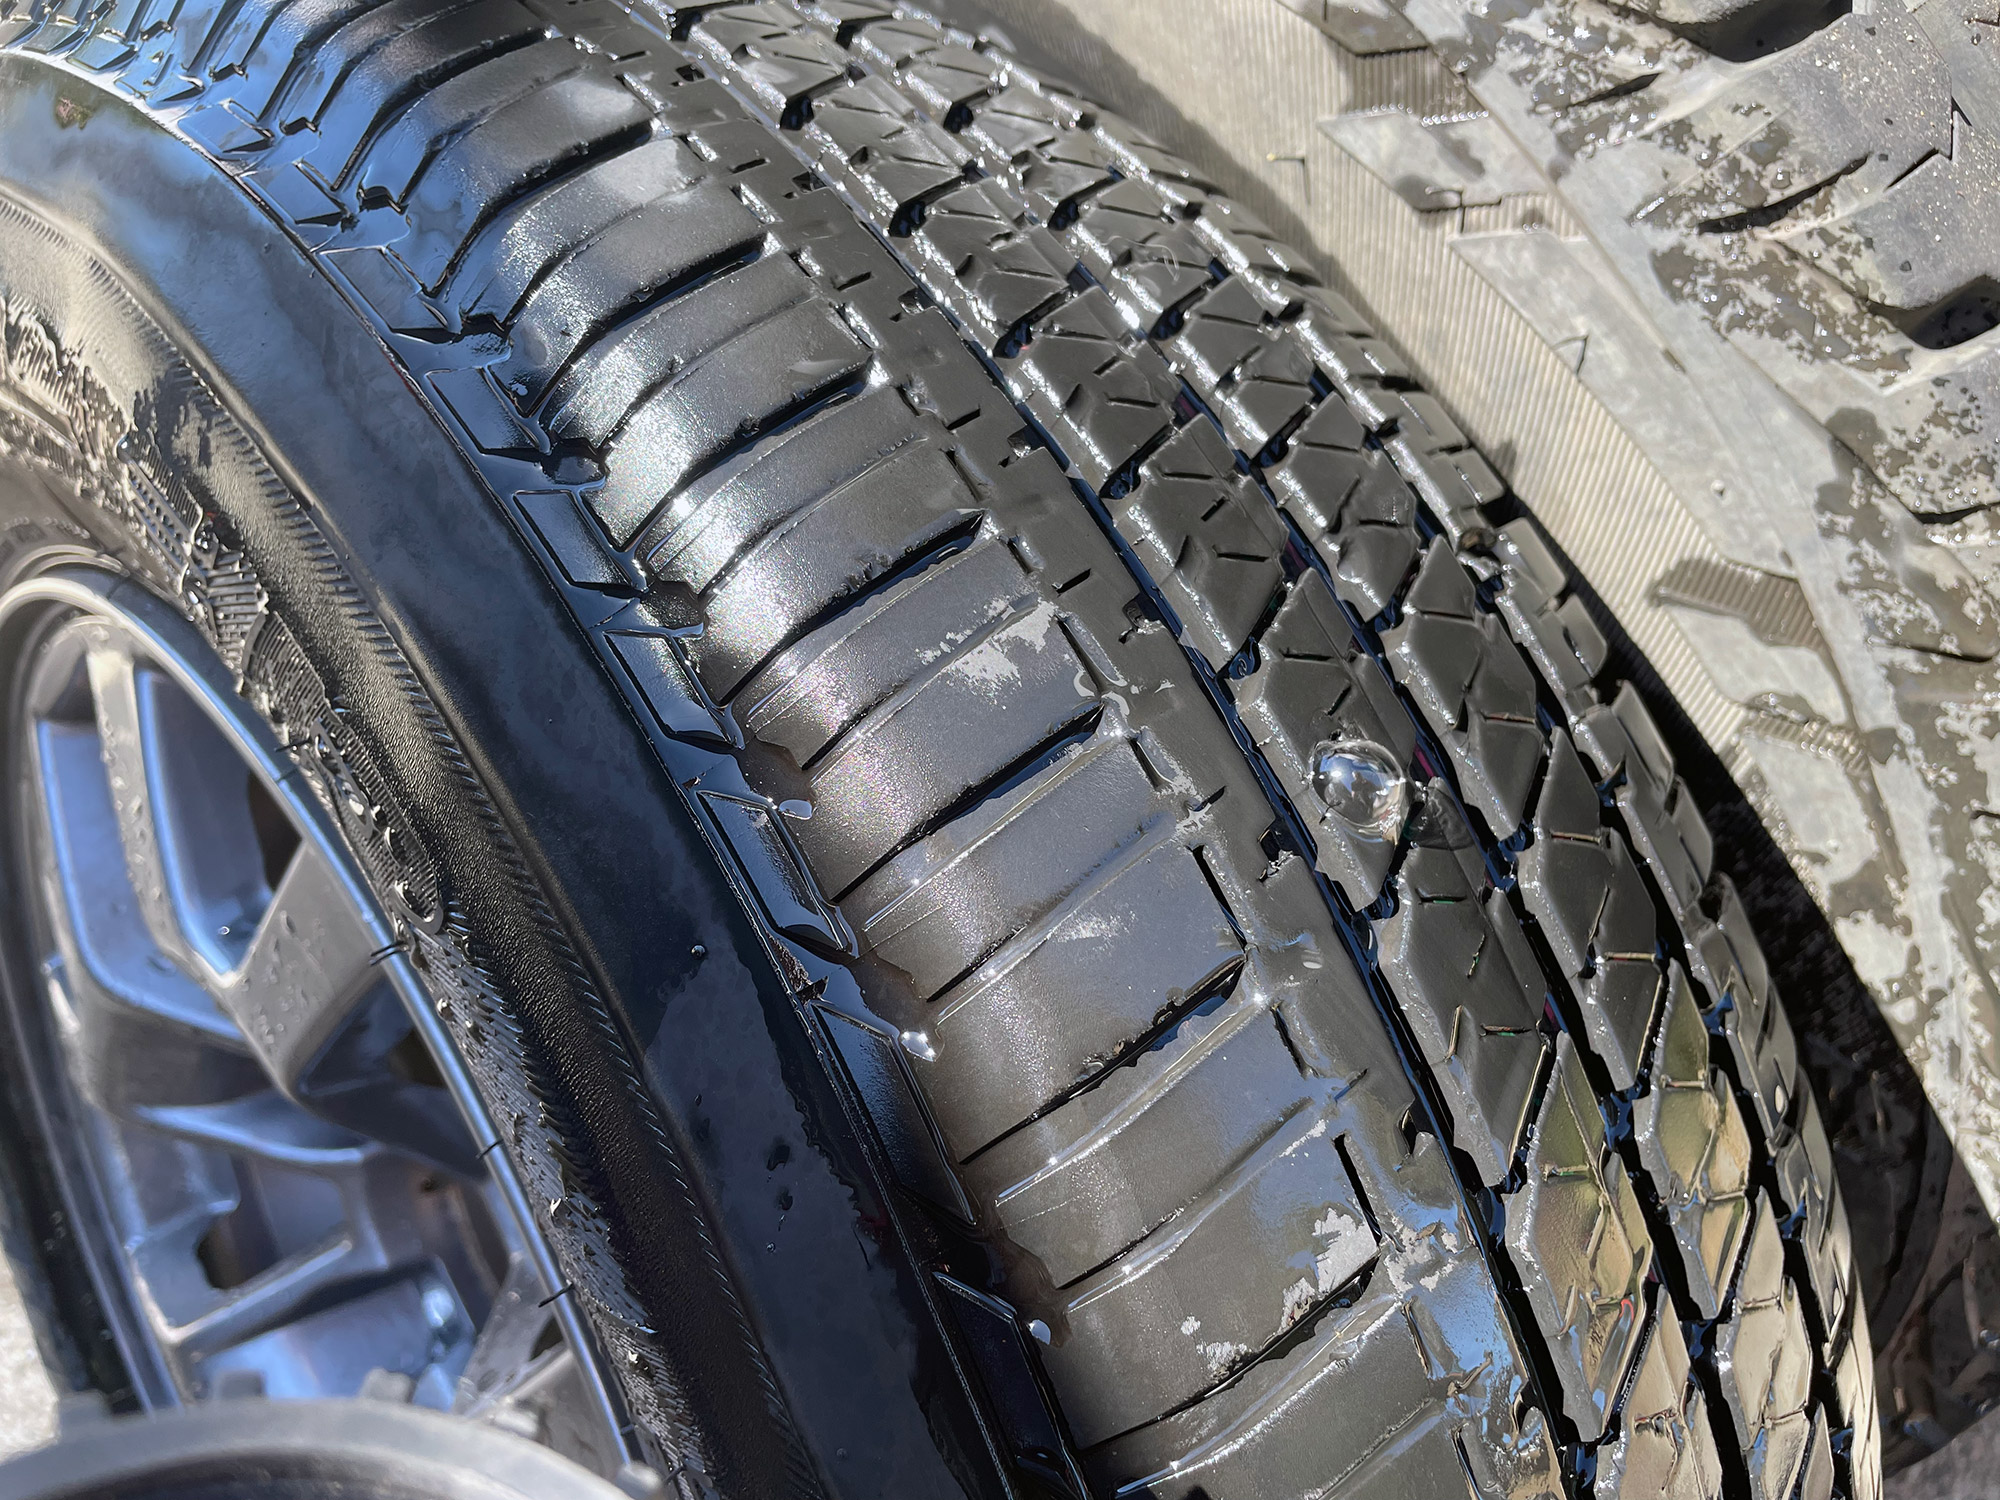
Start by identifying the reason for the puncture. If you can’t see anything obvious, either use a bit of water or water with some dishwashing detergent in it and put it over the tyre and look for bubbles. If there is something still in the hole causing the puncture, now is a good time to pull it out.
Even just plain water is great for blowing bubbles as I show here. Just a little bit of air added to the tyre and you’ll see the puncture pretty easily enough!
This step isn’t mandatory but I find it easier to take the valve core out as it lets me inflate the tyre faster when I’m filling it up after doing the repair. Not everyone does this step so it can be viewed as mandatory.
Now you need to take the reaming tool from your tyre plug kit and make the hole that is causing the puncture bigger and an even size.
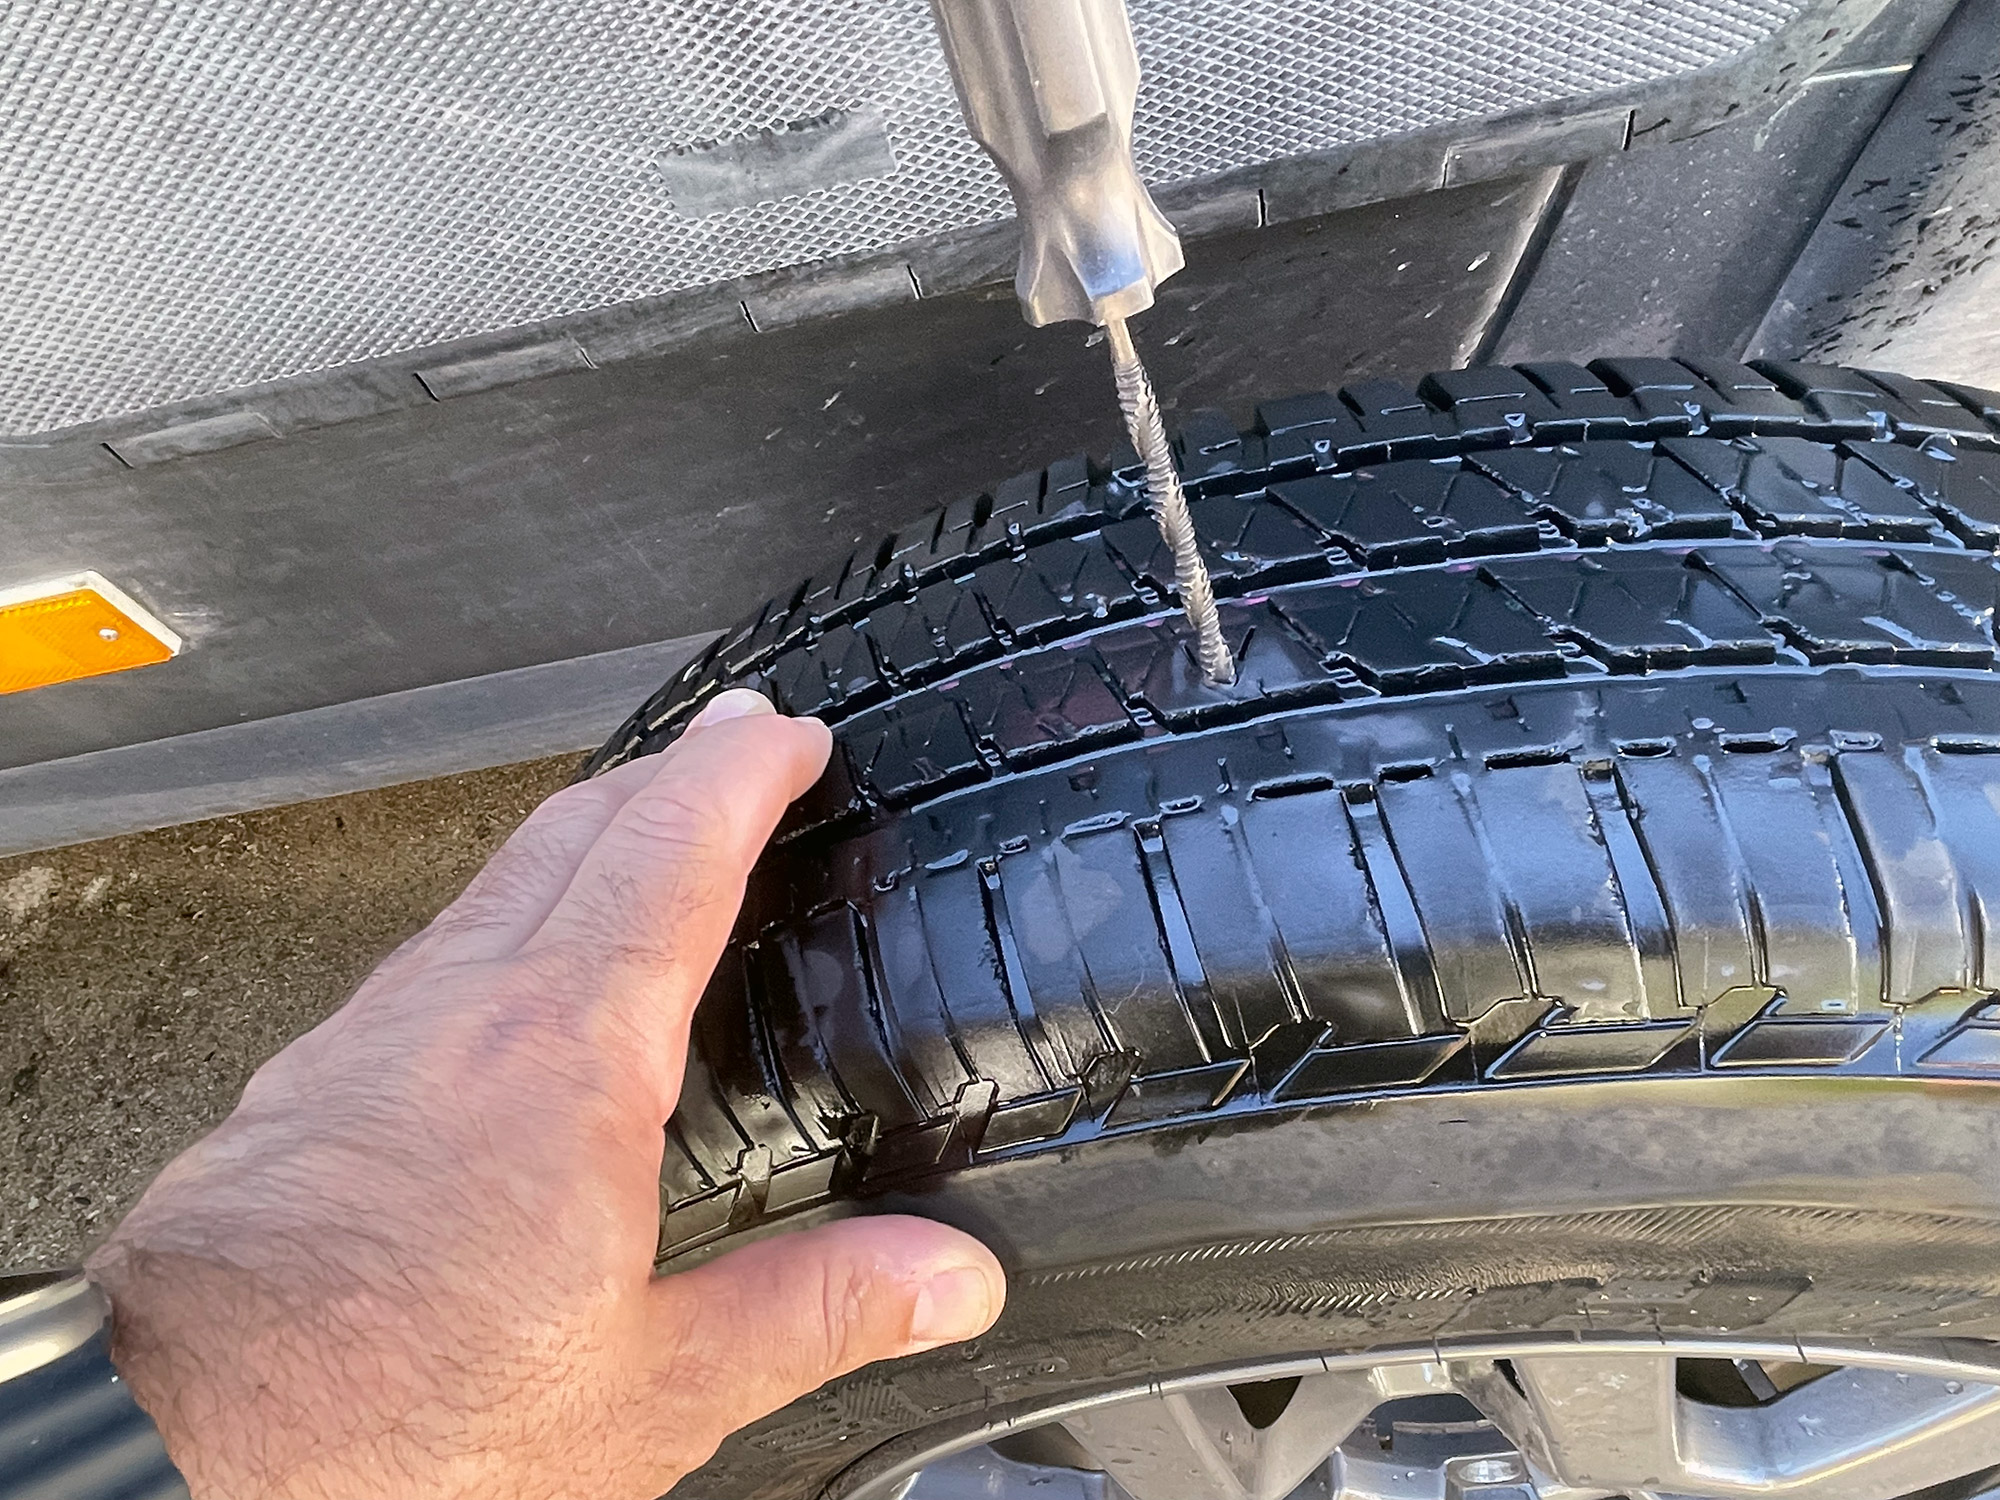
Note that the first few times you push in this tool it will be quite hard. Sometimes, like shown here, they have a spiral on them in which case you can twist it in like screwing in a bolt, and then pull it straight out and the ridges will do the reaming for you.
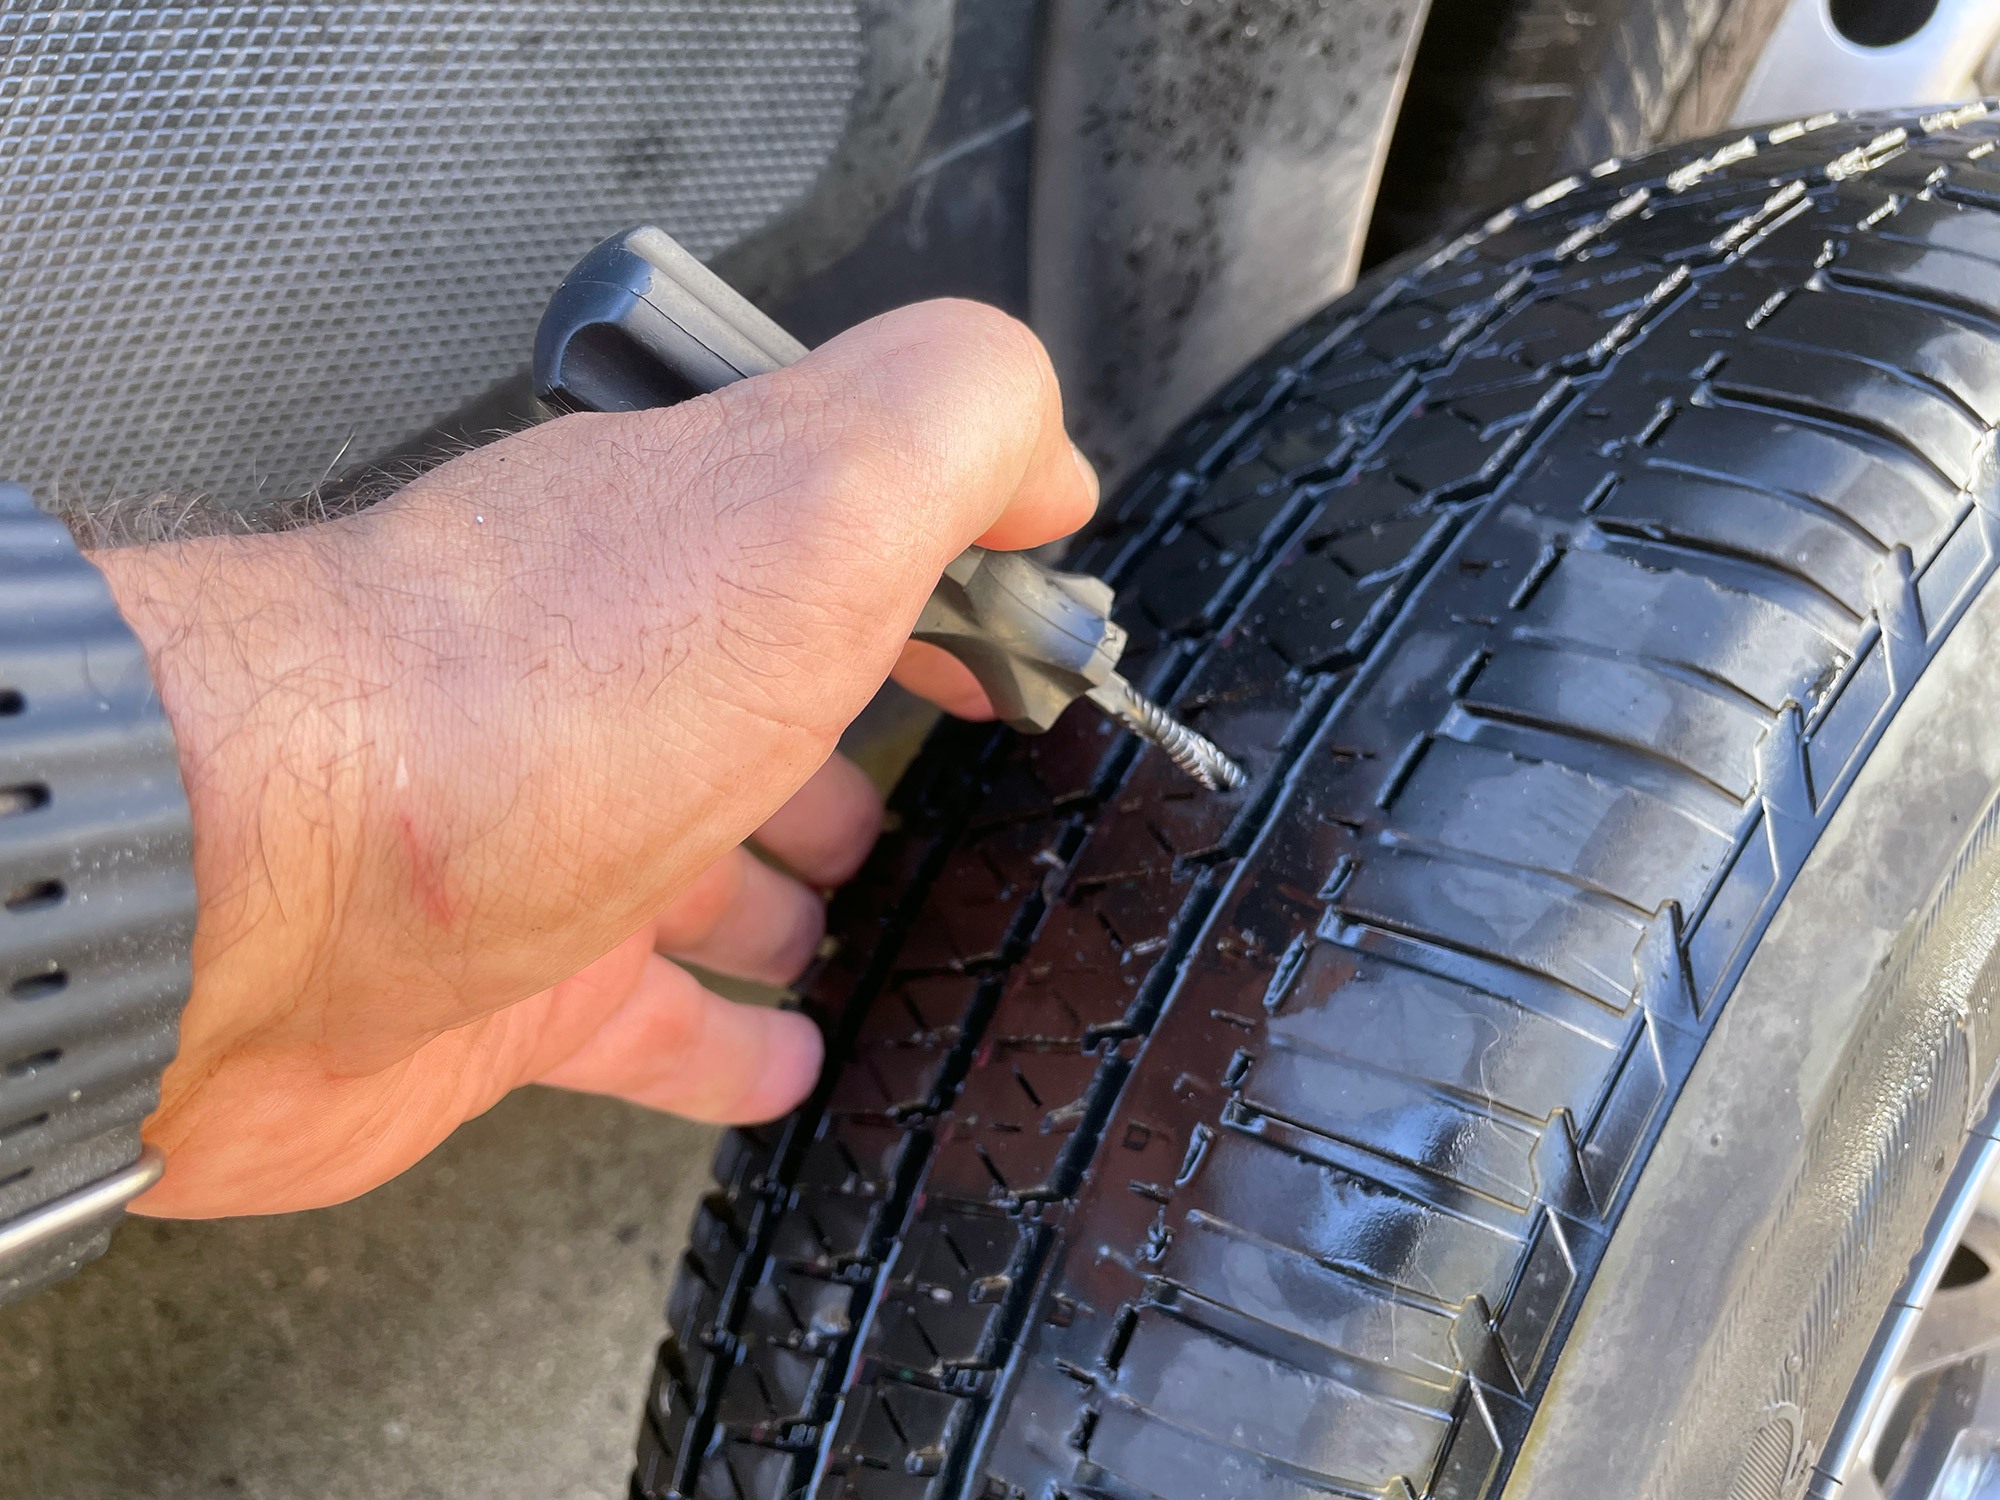
Keep going with the reaming till the tool goes in and out relatively easily. At this point you’re ready to prepare the plug itself. Take out one of your repair ropes and your inserting tool.
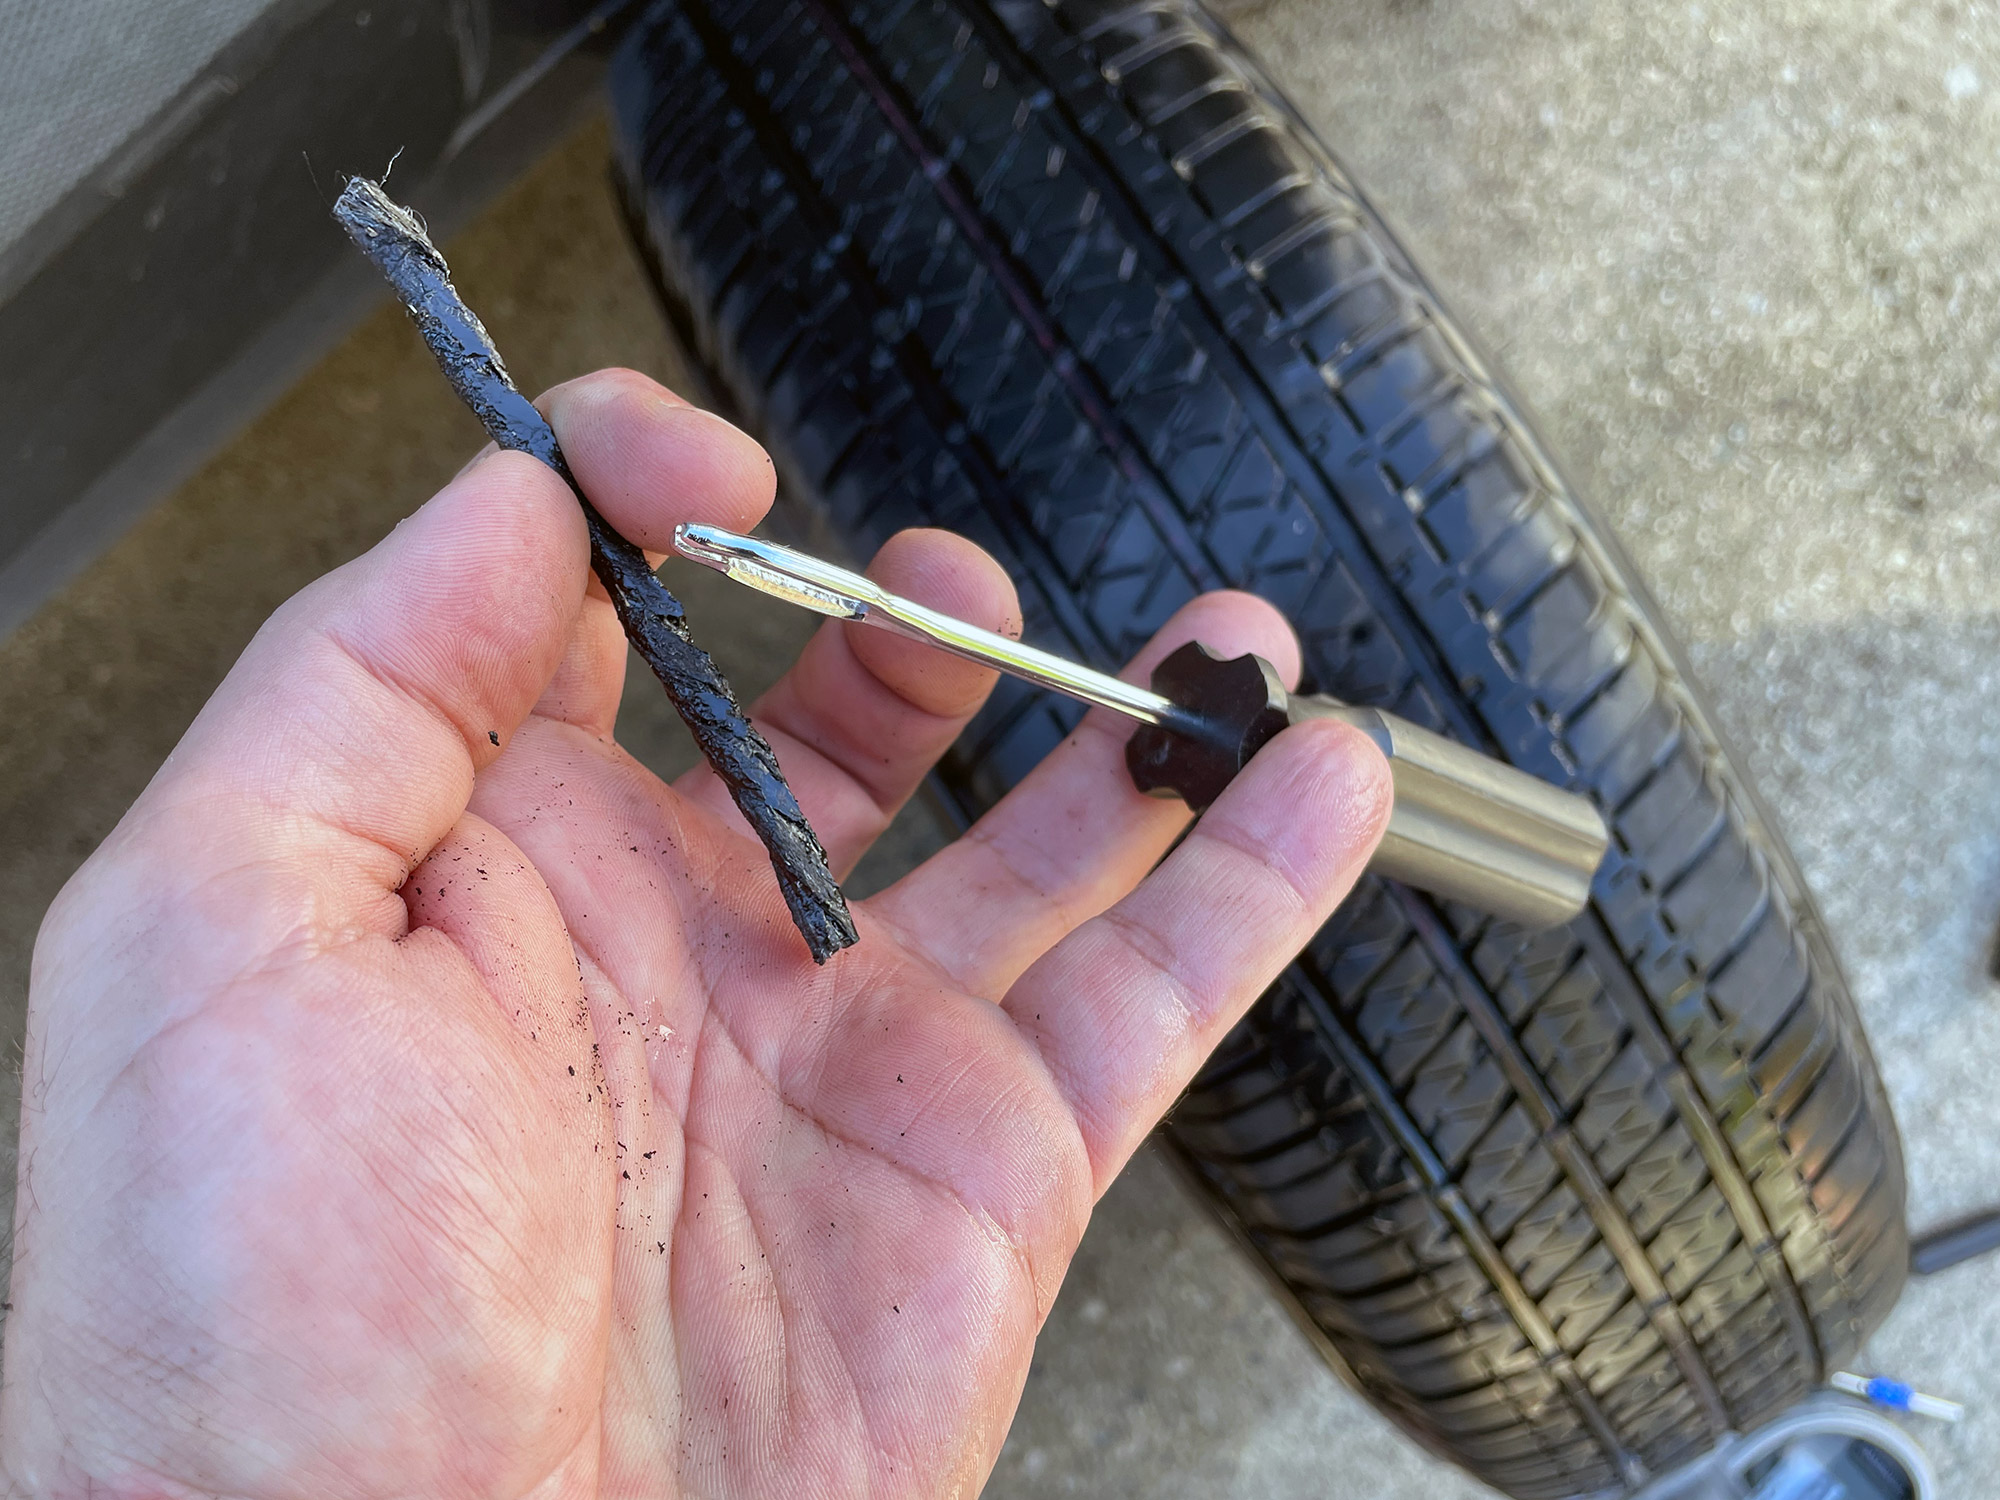
You’ll see there is a slot to put the plug into, but often it can be a bit tricky to get the plug into the slot. A bit of a life hack is to use the reaming tool to open up the slot and then you can just push the rope up through the gap and into the main slot.
With that the repair is ready to be inserted into the tyre.

In one motion you push the plug in. You don’t want to twist it too much, and also you don’t want to pull back on the insert tool at all till you’ve got the plug in relatively deep, with two little tails poking up from the tyre.
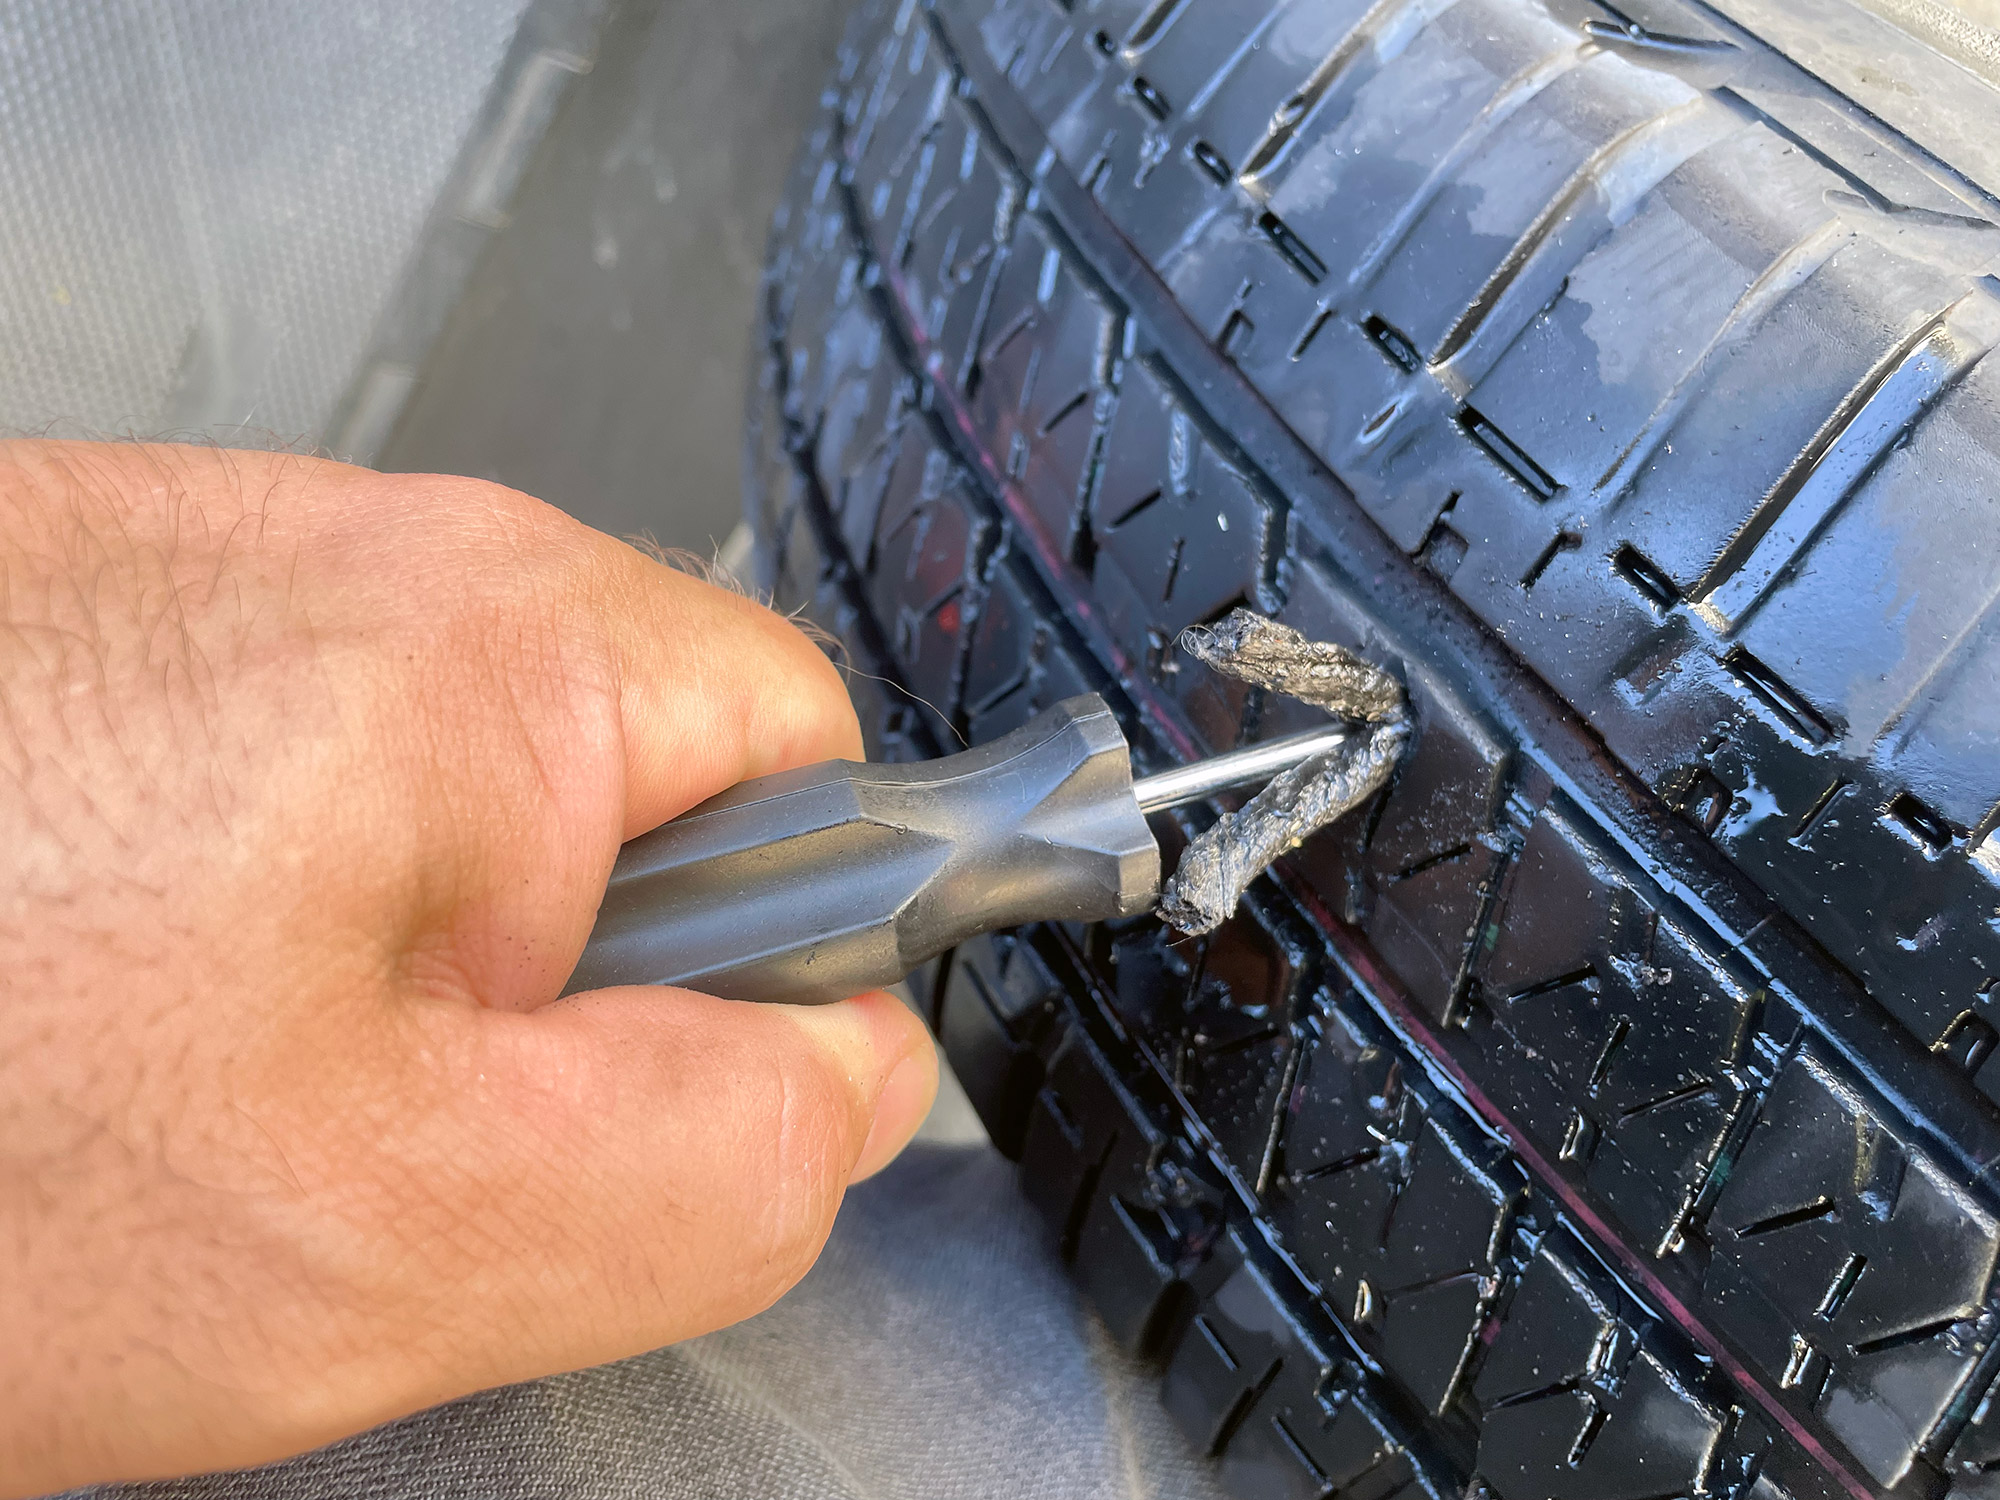
When you pull the tool out, just pull it straight away from the tread. The plug will get left behind and exit the tool via the slot you put it into earlier and it will now (hopefully) seal up the leak.

You can now fill the tyre up with some air and see how it’s doing. If you want to check the status of the repair then checking to see if it blows bubbles with water or water and detergent as you fill the tyre up is a useful way to go.
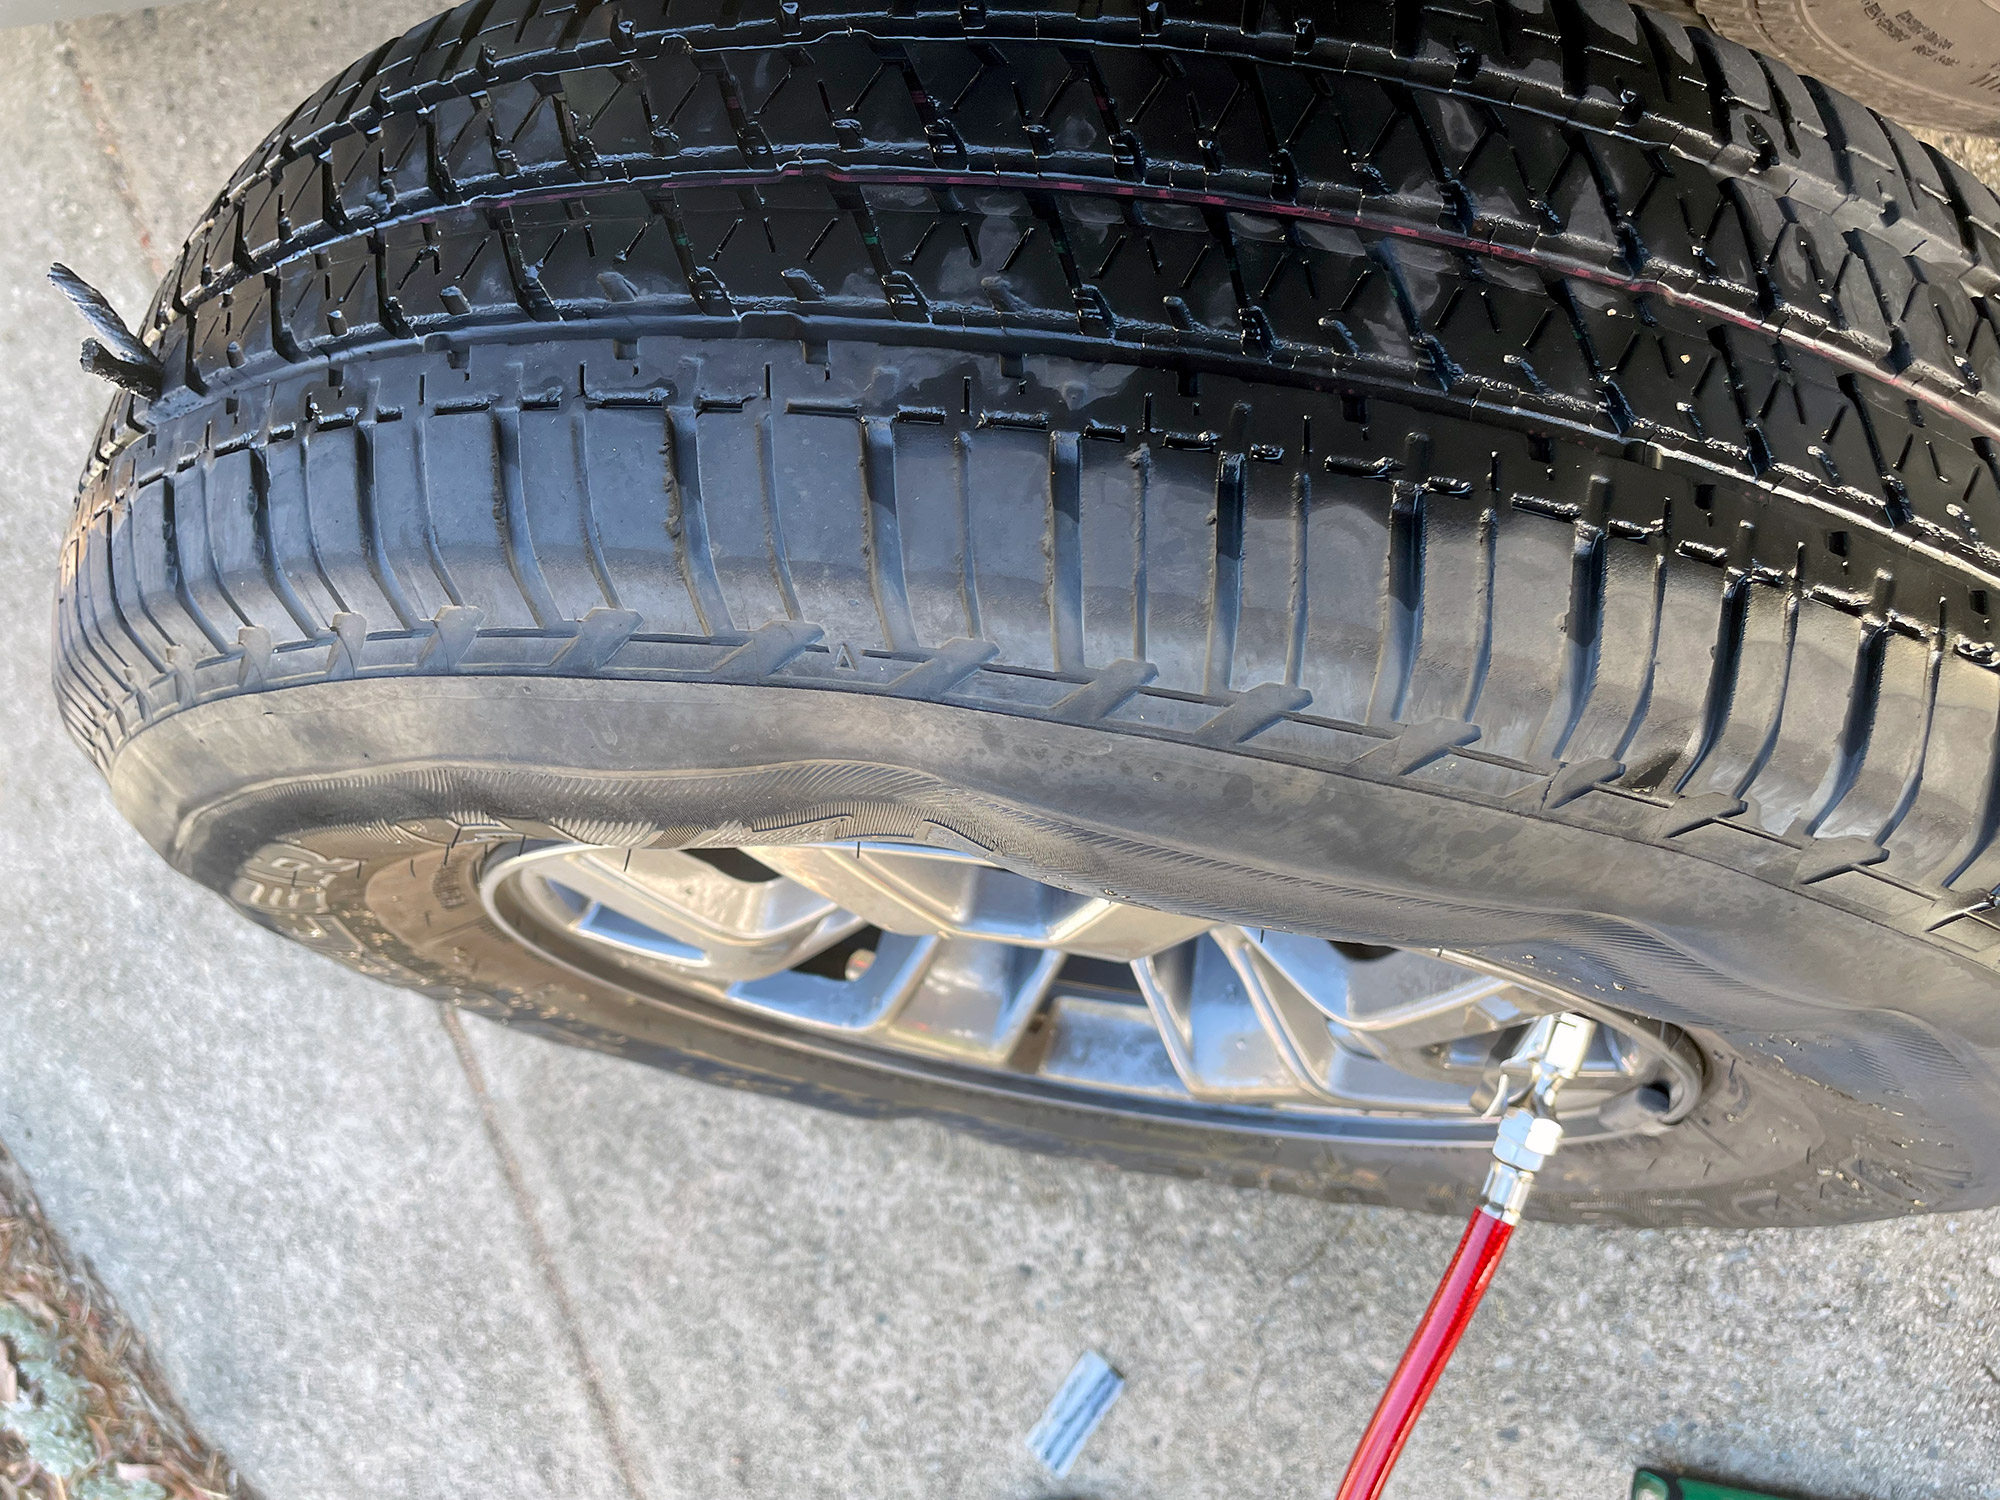
This tyre I’m demoing it on is a good example that it doesn’t always serve to get you home. This tyre got a flat and then was driven on for a bit. This breaks the reinforcing in the sidewall and the tyre will get some dramatic bulges. I wouldn’t drive on this tyre except in case of emergency, and even then slowly and without too much air pressure. Still, the pressure held with this repair so it was a successful puncture repair.
If you took out the valve core, now is the time you’d refit it.
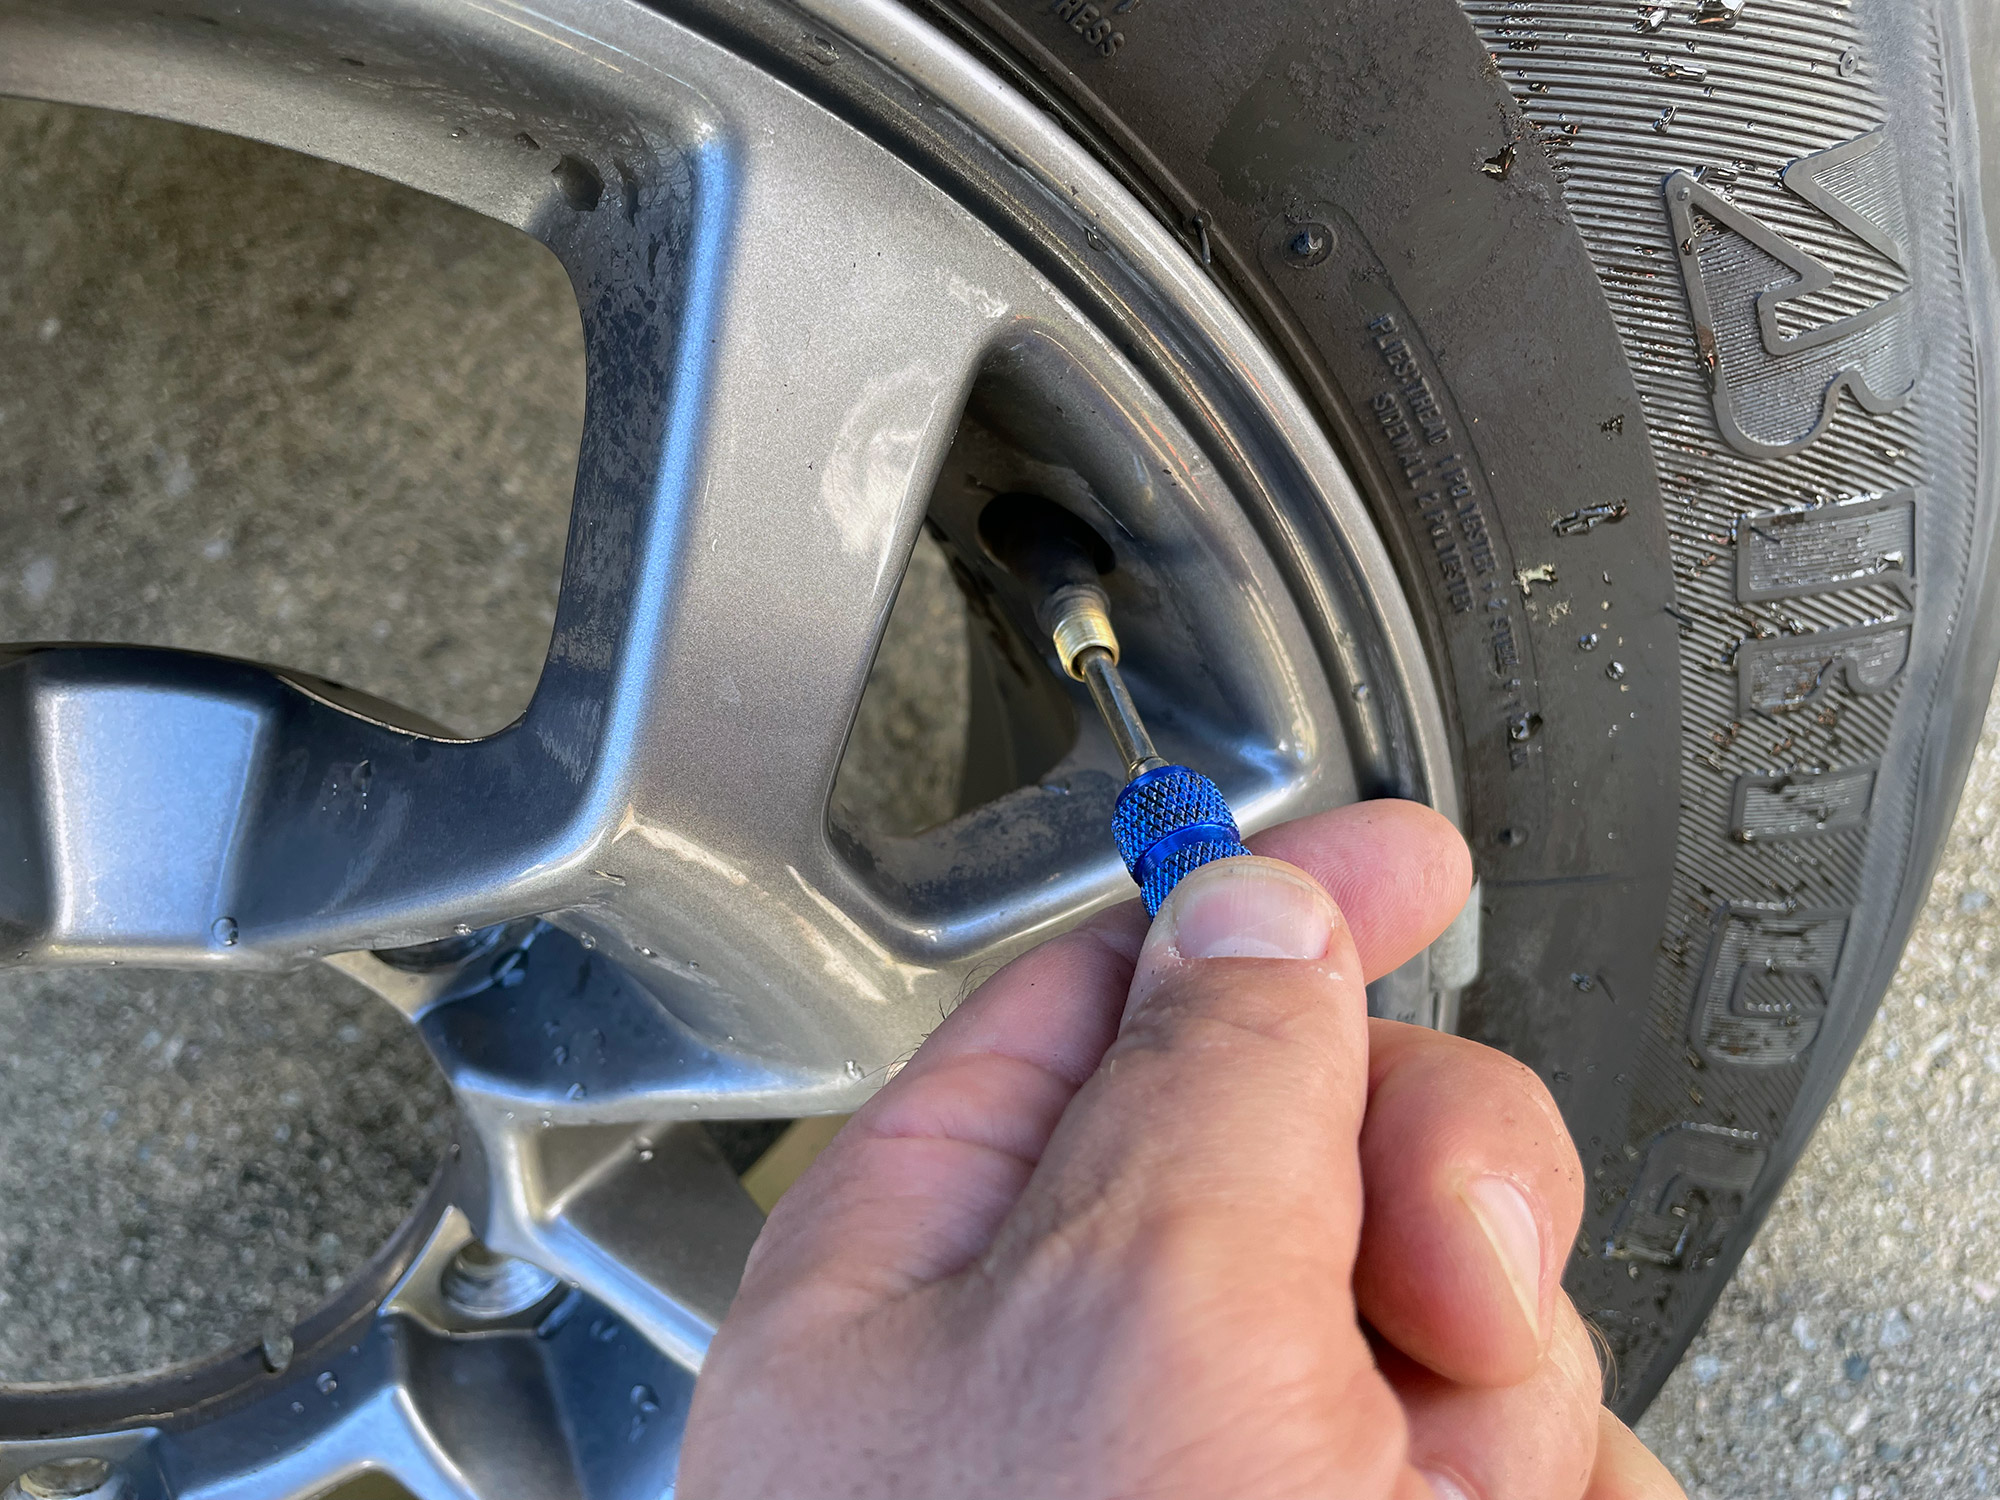
If you’re satisfied with the repair then it can be a good idea to trim off the ends. Although they naturally end up getting pushed into the tyre and then break off as you drive, with the remainder sealing to the tyre through the heat generated by use, it’s just a bit nicer I think to cut off the tails. Nothing special involved though, just slice through them with a knife or a cutter.
And with that the job is done and the tyre can be driven on safely or put onto the care as a spare.
If you have a really big cut causing a puncture then likely this type of repair won’t work, but more complicated repairs are somewhat out of scope for a basics lesson. If the hole causing the puncture is a bit big for one repair, then do the first one an add a second and a third and more if needed. Eventually you’ll plug the hole enough that it stops leaking.
Refitting a tyre onto the car: tightening up in a cross pattern
This is something people often forget about, but it’s super useful to get right. Bear in mind that the Jimny generally centralises the wheels on the wheel hubs using the wheel nuts and studs rather than having a central lip like most cars, so it is more critical to get right.
You start with one nut and just barely get it down onto the wheel. You’ll see that it sits a little off centre in the taper that the nut goes down onto.
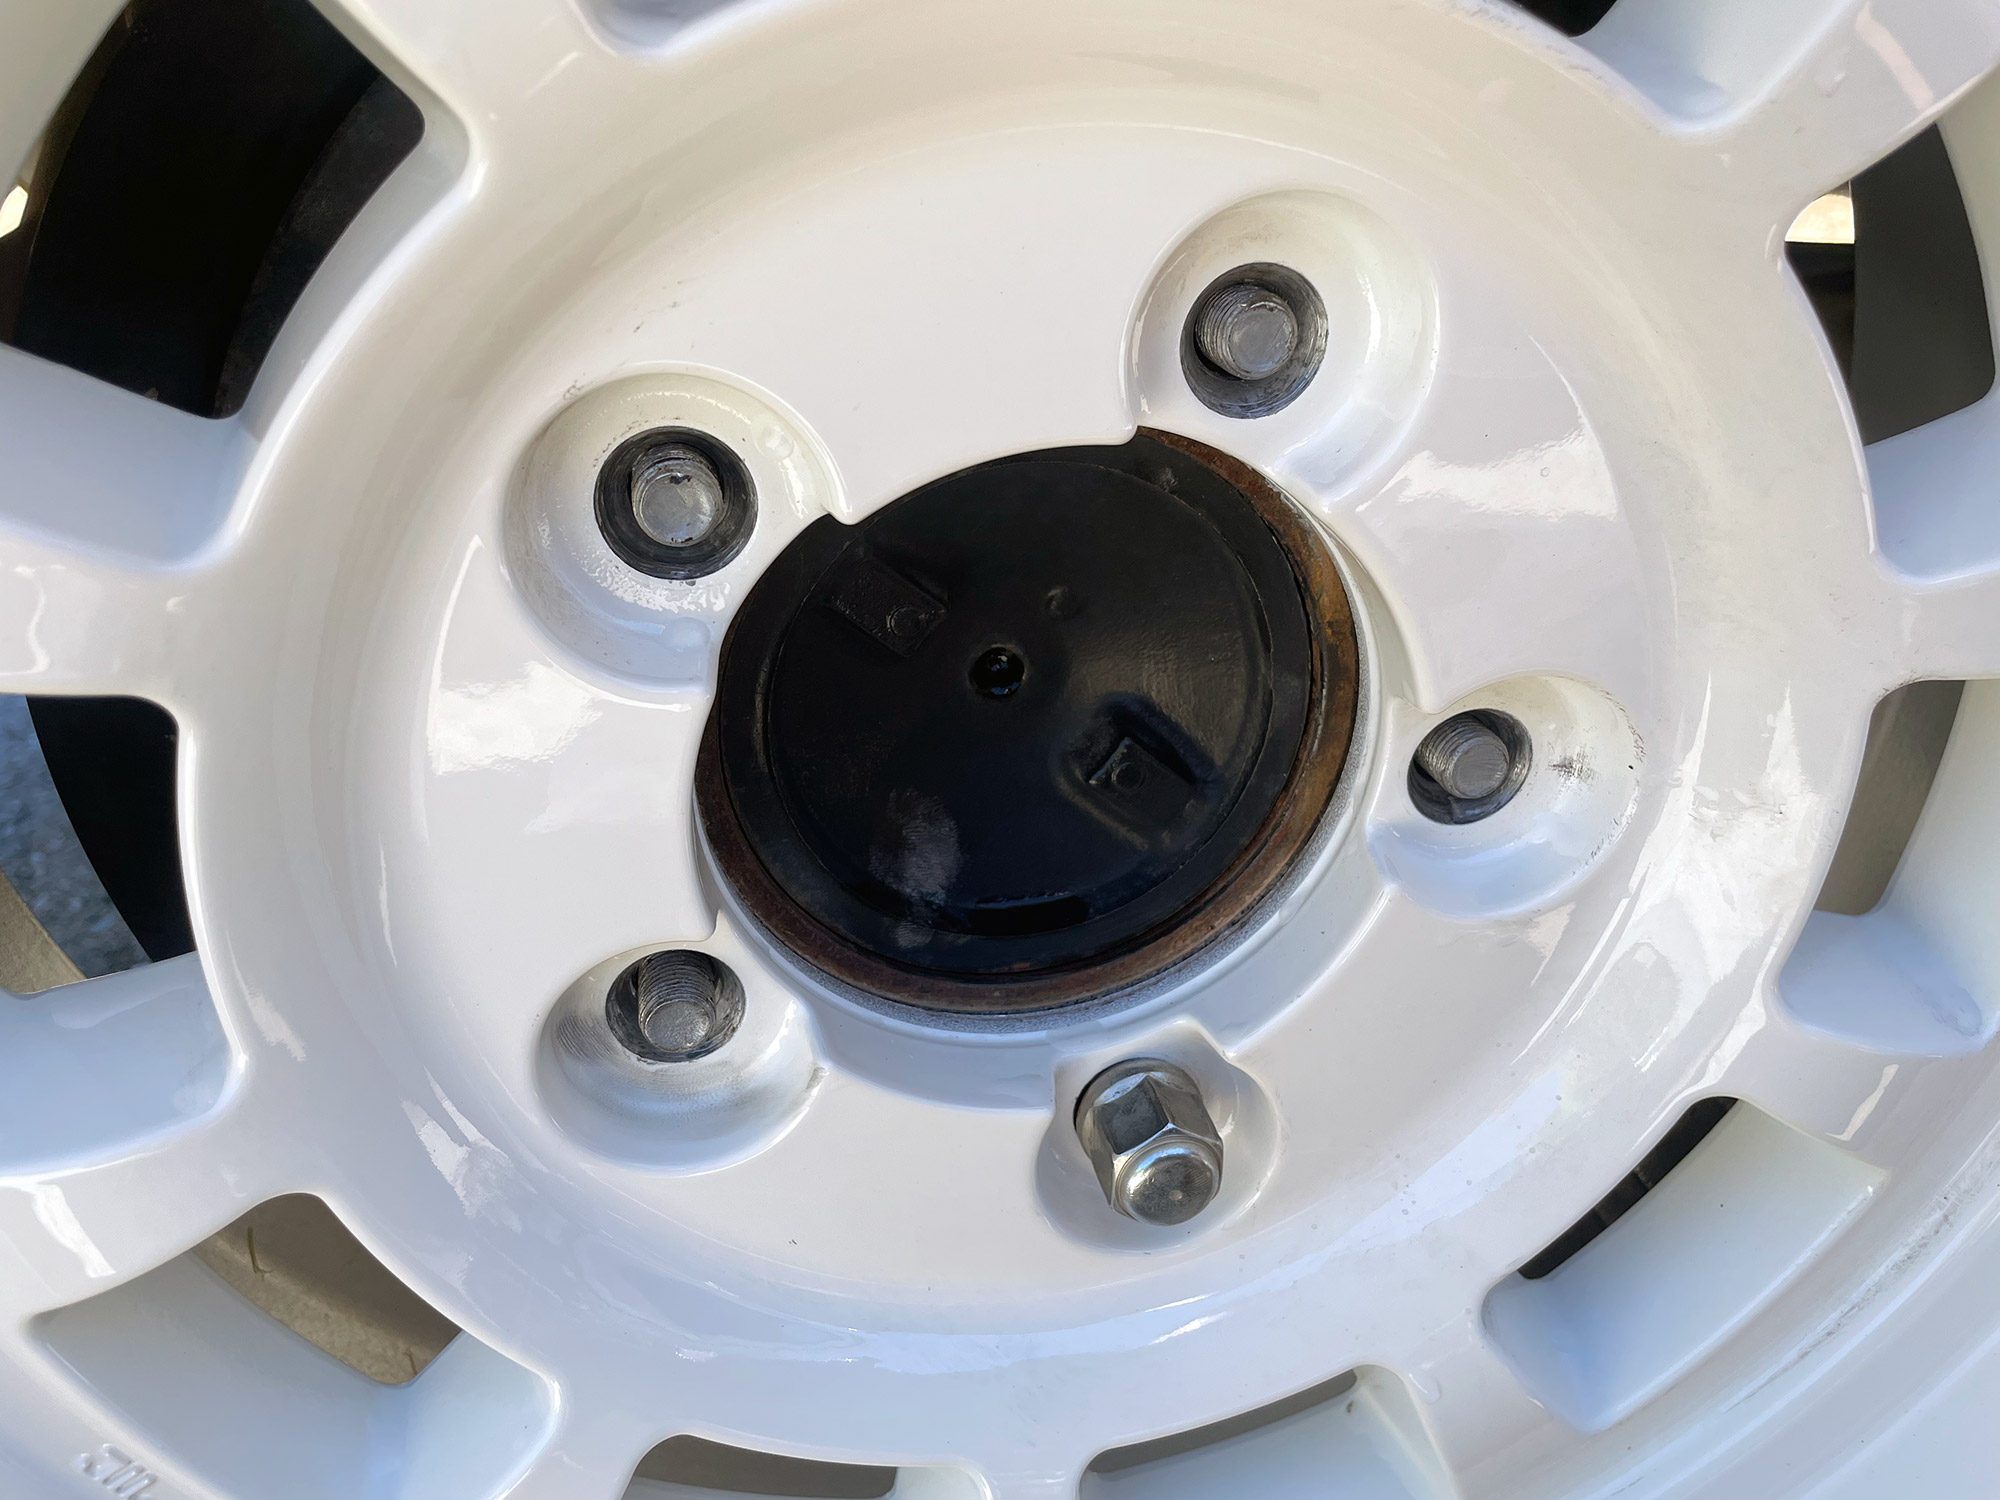
Add a 2nd nut as opposite of the first nut you fitted, and you’ll find it helps you get the wheel rotated and centred for both holes.
You then work your way around the nuts, always fitting them opposite to the last one, and slowly working them down by hand and wriggling the wheel so it gets more and more centred.
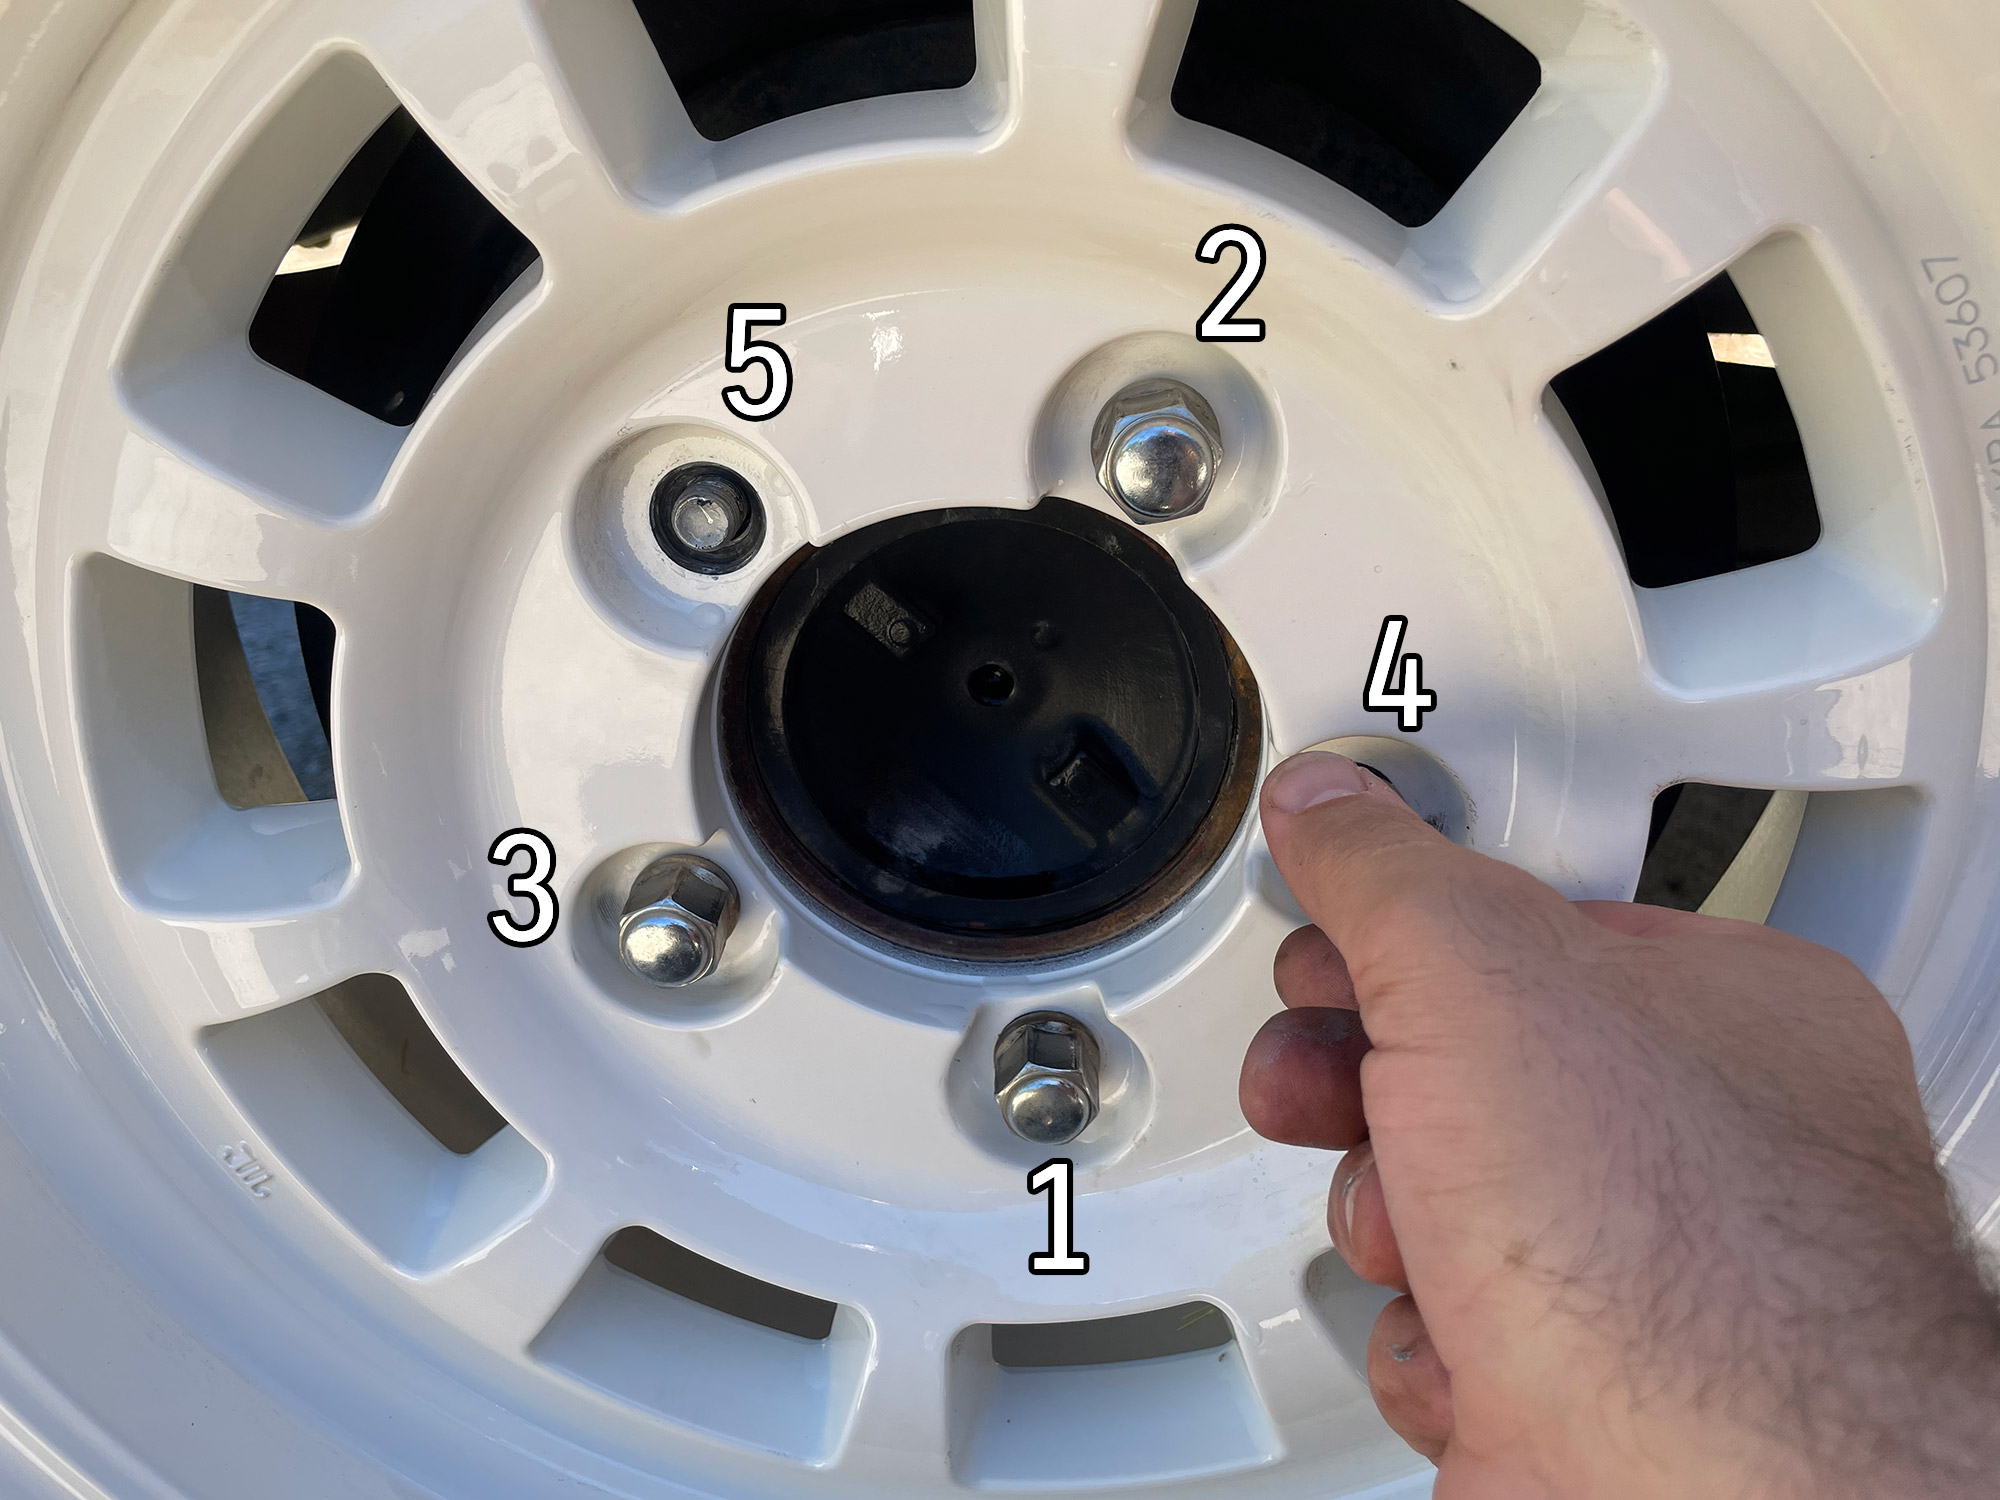
Once all nuts are finger tyre, give them a little tweak past this and lower the car and fully tighten them with the car helping you stop the wheel spinning as you tighten the nuts up.
If you have access to a torque wrench then the nuts are tightened to 100 Nm but basically reasonable but not super tight is what you aim for using the stock tyre lever.
Fixing another issue: jump starting
Nothing really complicated to understand here, just don’t connect batteries up backwards! Although a lot of people worry about jump starting any car that has an engine management computer, practically this has basically never been an issue. Cars with ECUs have existed since the 1980s and they haven’t really suffered ill effects from jump starting at any time.
The main consideration is to connect things up in a consistent manner. I like to do it in the following order, with the engine running on the jumping car and ignition off/no electrical draw on the dead car:
- Red cable to the positive of the dead car
- Other end of red cable to positive of the working car
- Black cable to the negative battery of the working car
- Other end of the black cable to a solid earth (say engine block, bare part of the chassis or something similar) on the dead car
The reason you put the final cable to an earth on the dead car is to avoid a spark at the battery, just in case there’s any explosive gasses built up. Usually not a problem connecting the cables but can be an issue when it is rapidly trying to charge a semi dead battery and you’re disconnecting the jump start cables once the car is running.
With the jump start cables all connected, get some reasonable revs on the working car (say 2000-2500 rpm), give it about a minute and try to start the dead car. When it does start, disconnect the cables in the reverse order to what I just described.
Post trip maintenance, checks and car cleaning
Checking for issues
Here’s a quick checklist of things I have in my brain when I’m cleaning the car
- Anything looking like it’s not longer connected to the car?
- Exhaust hangers
- Leaking shock absorbers
- Torn/broken rubber boots on things
- Wires pulled down or disconnected
- Weird noises?
- Scrapes and dings
- Wheel bearings
- Brakes: how much material do I have left?
Focus on the underbody first and foremost
I’ve got a whole article on cleaning the underbody without spending too much time doing so. I’d recommend reading that rather than me fully repeating it here.
Engine bay just in case you need to spot something wrong
Funnily enough I also have an article on cleaning the engine bay!
To reiterate what I said in that article: don’t blast everything with heaps of high pressure water, but just flush things out and make sure there’s not heaps of mud hanging off etc.
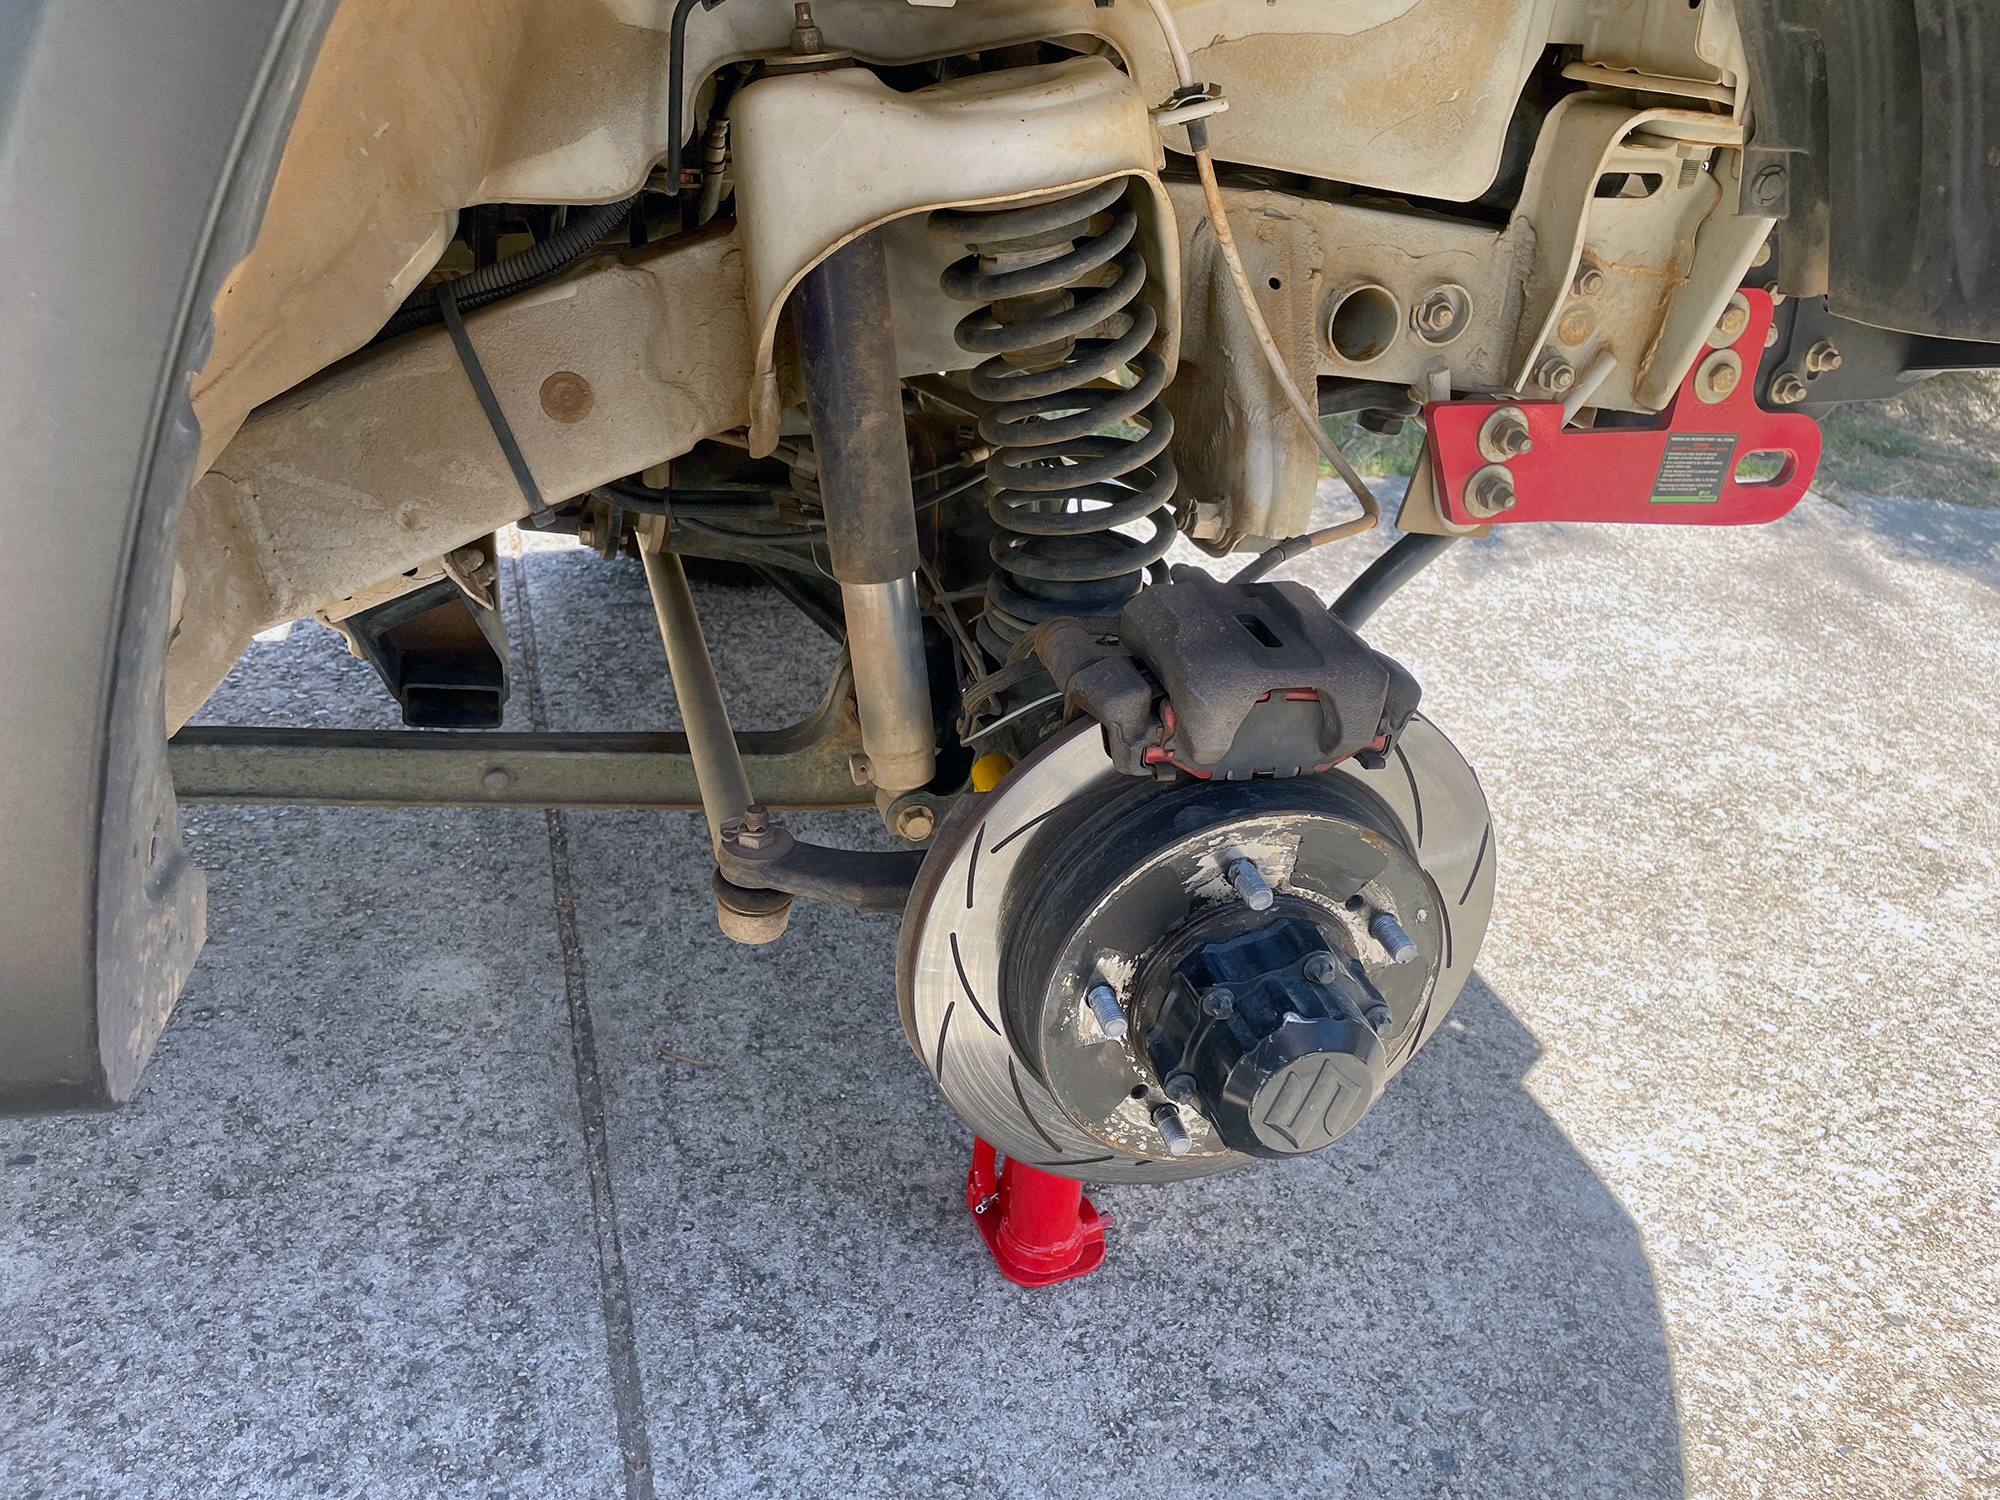
Digging deeper: wheels off clean of brakes and suspension
With the front wheel off, you’ll be greeted by a view like this.
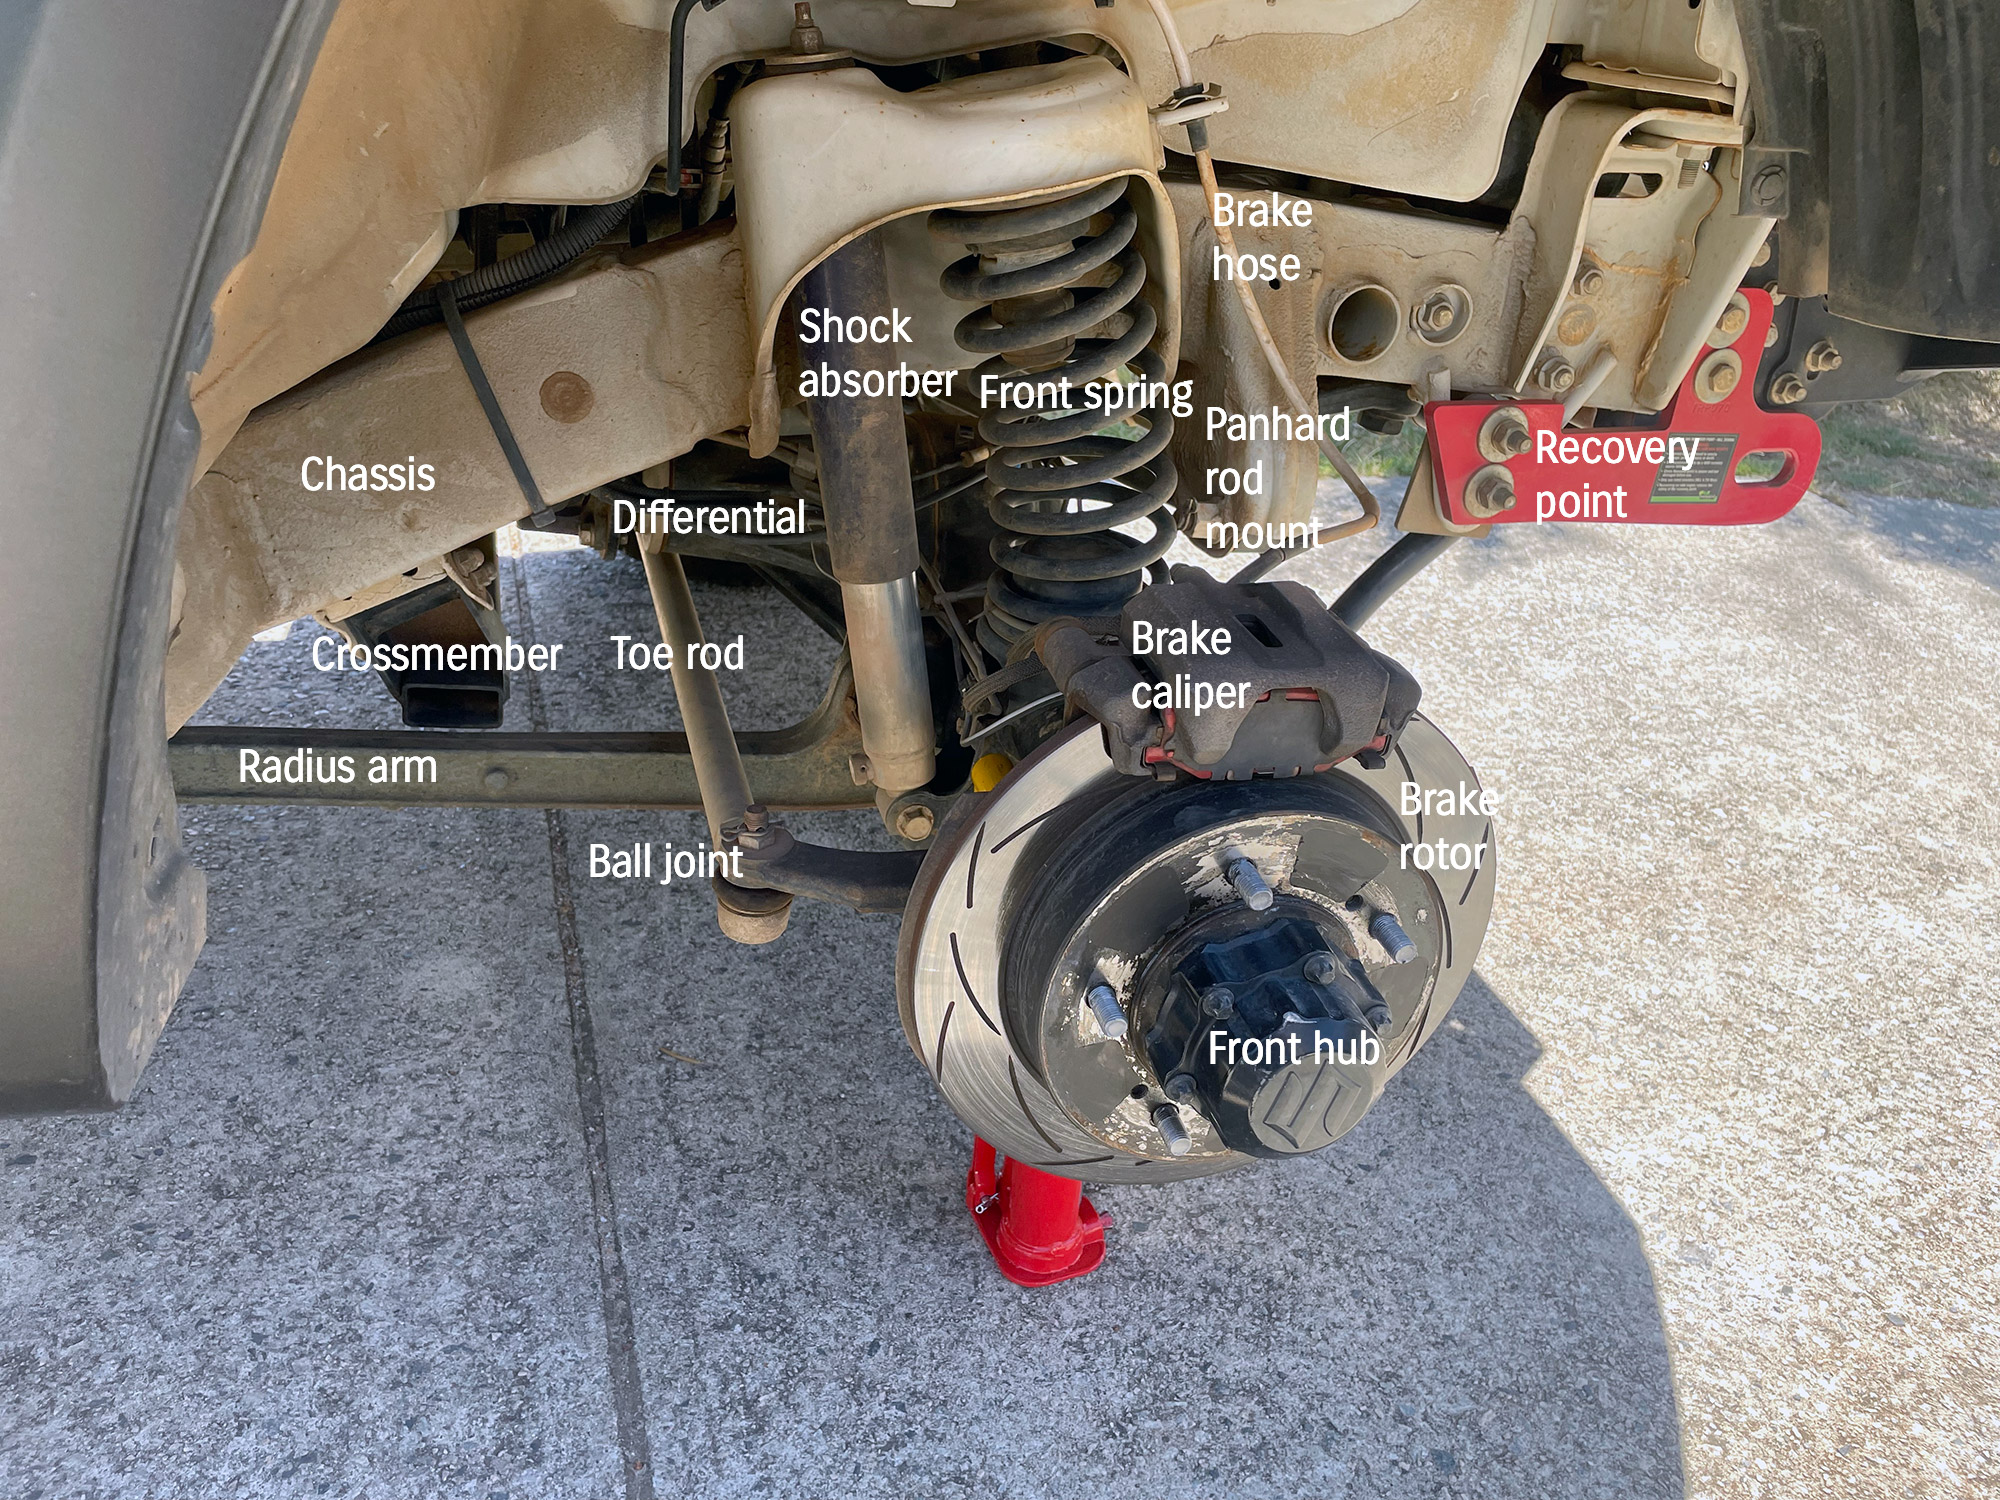
To make it easier to know what certain parts here, here’s that same picture labelled. Note I have a few aftermarket parts here, including addons like recovery points, but it’s useful to see what various things look like from a view you won’t typically see of a car parked or out and about normally.
A key thing to check while you’re here is how much brake pads you have left. You can do this by looking down the slot at the top of the caliper.
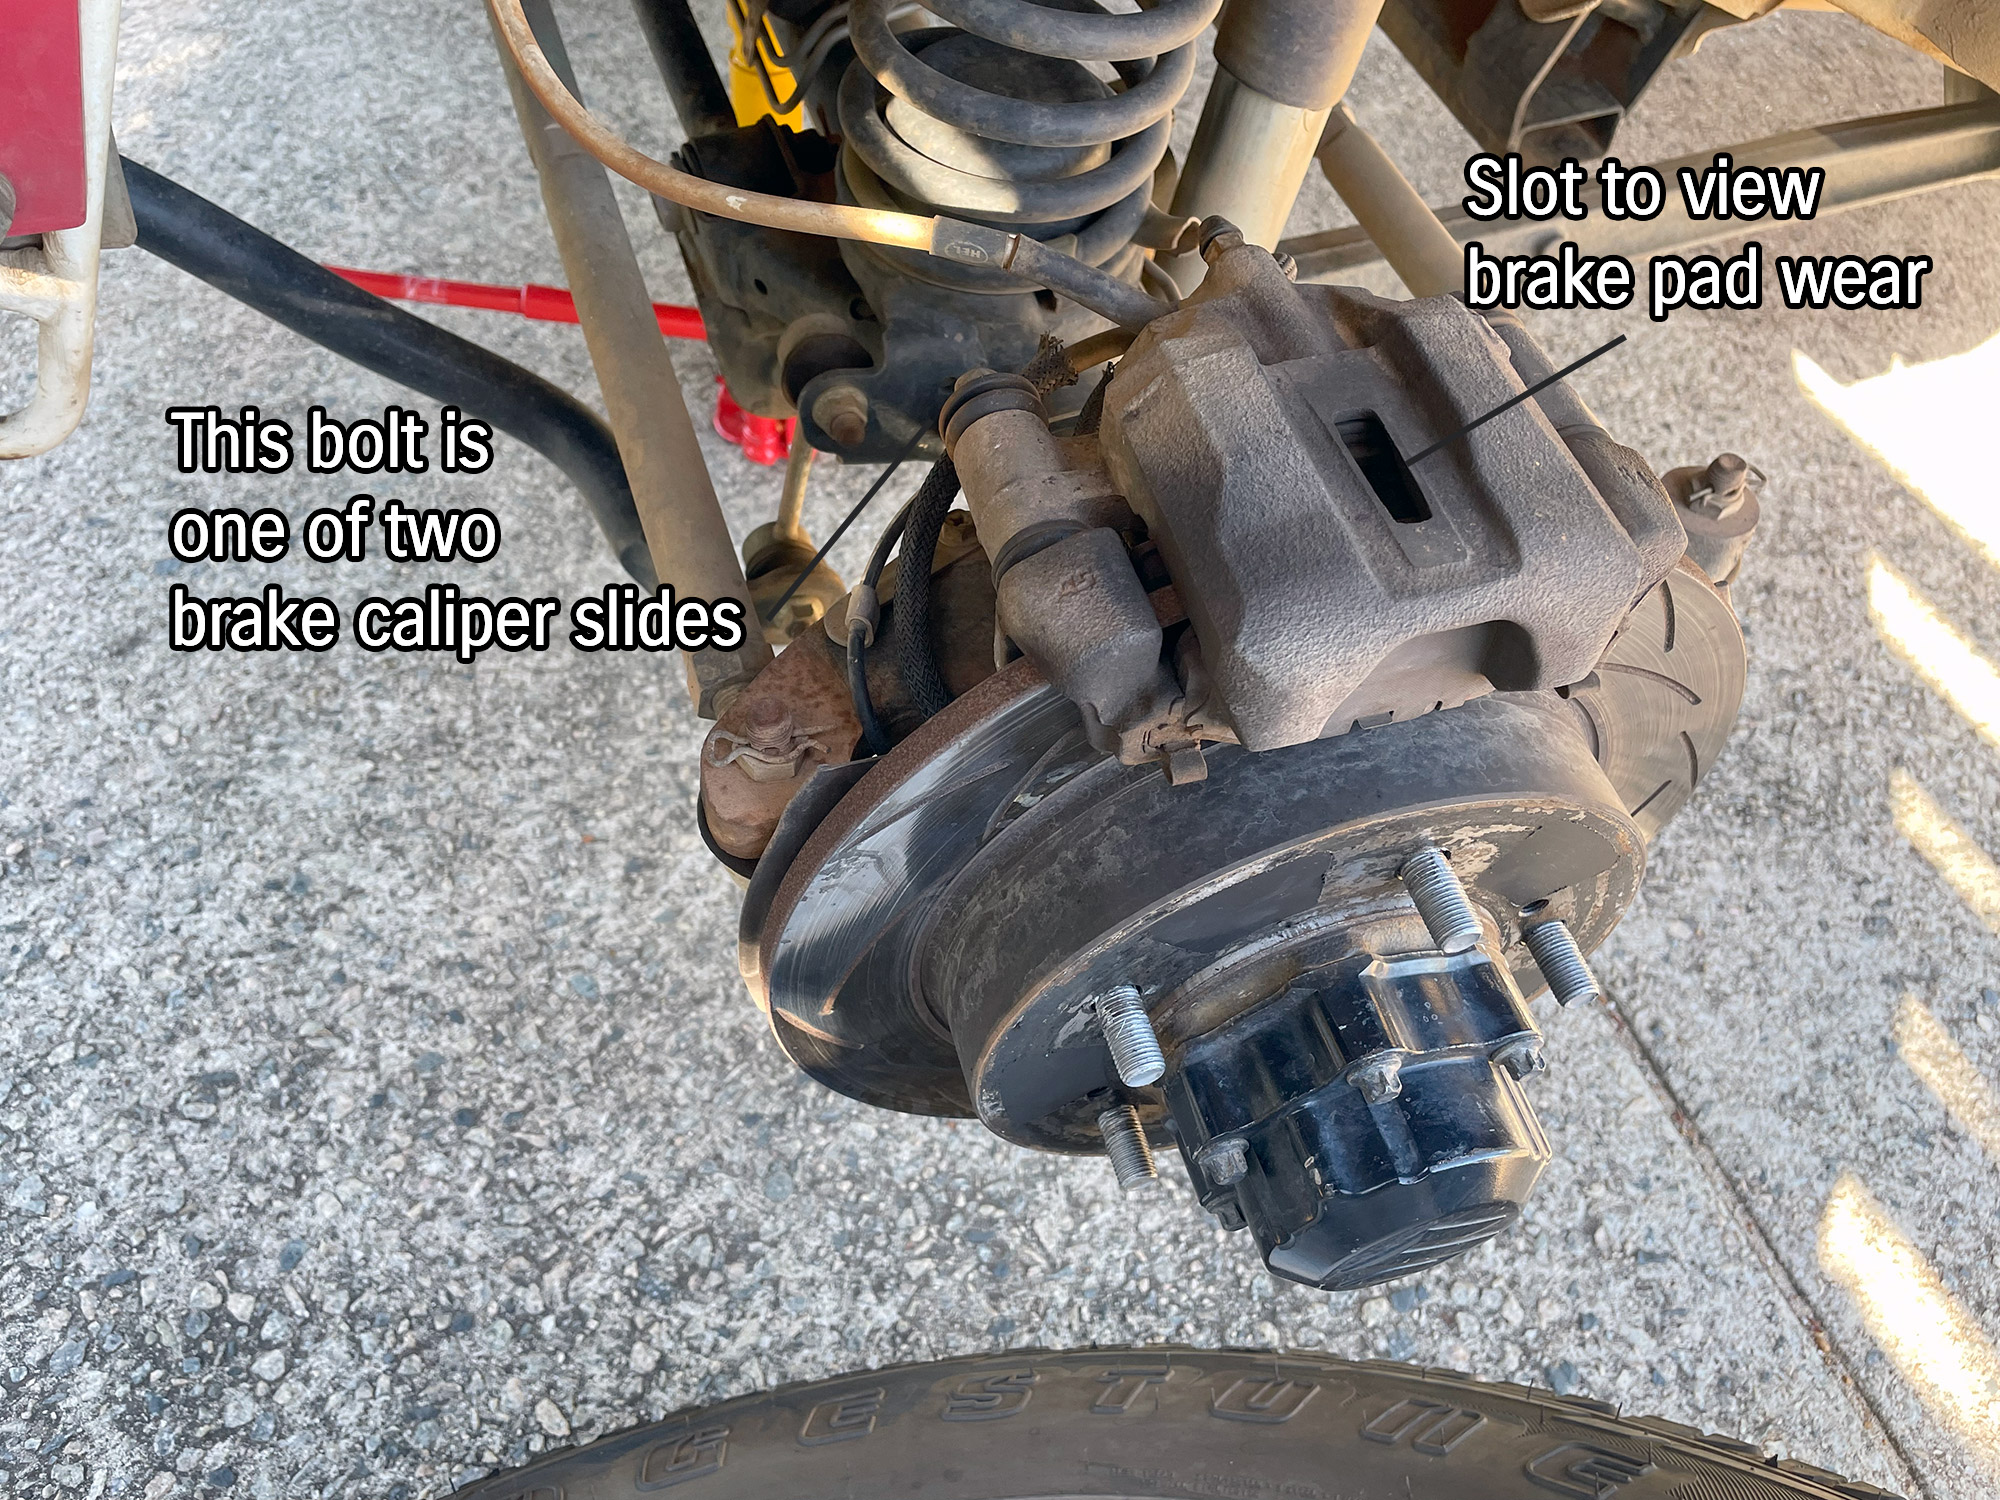
To make this easier I’ve highlighted the different bits you’ll be looking at when you peer down this slot. You want to replace your brake pads when they get to 1-2 mm of pad material left.
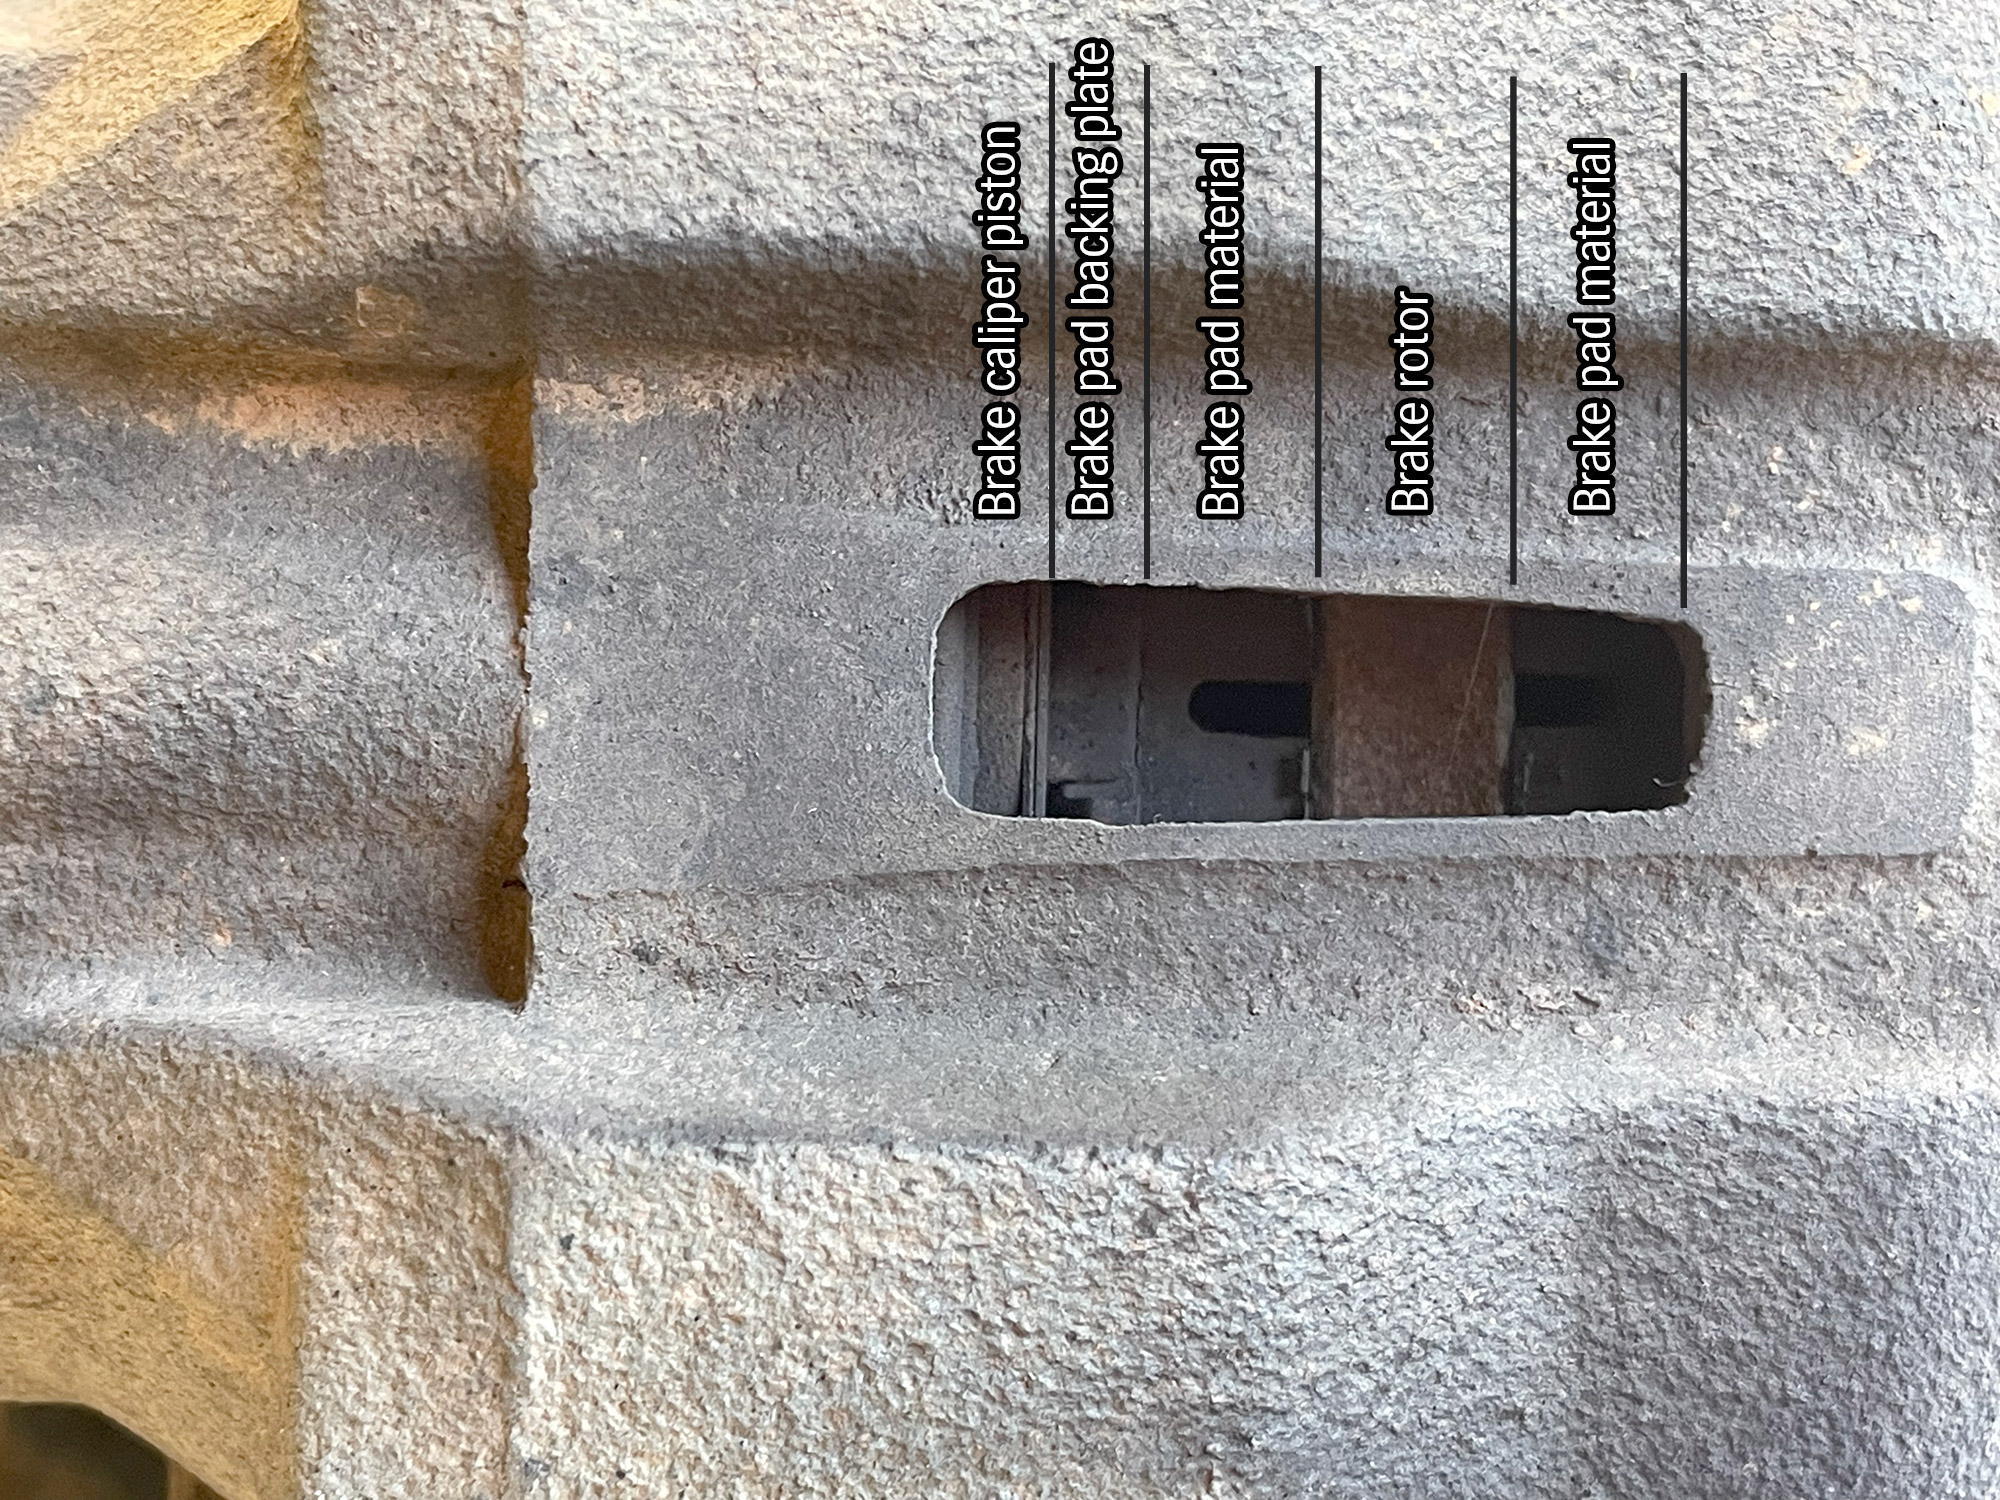
If your brake pads are worn on one side of the caliper more than the other then this can be a symptom of a dragging brake or ‘caliper slides’ that are not sliding, which will wear a pad on one side faster than the other.
If you’ve been offroad, cleaning the caliper and brakes just with some water, along with the inside of the mudguards, around the spring/shock absorbers and basically anywhere else you can see mud with plenty of water is a good idea.
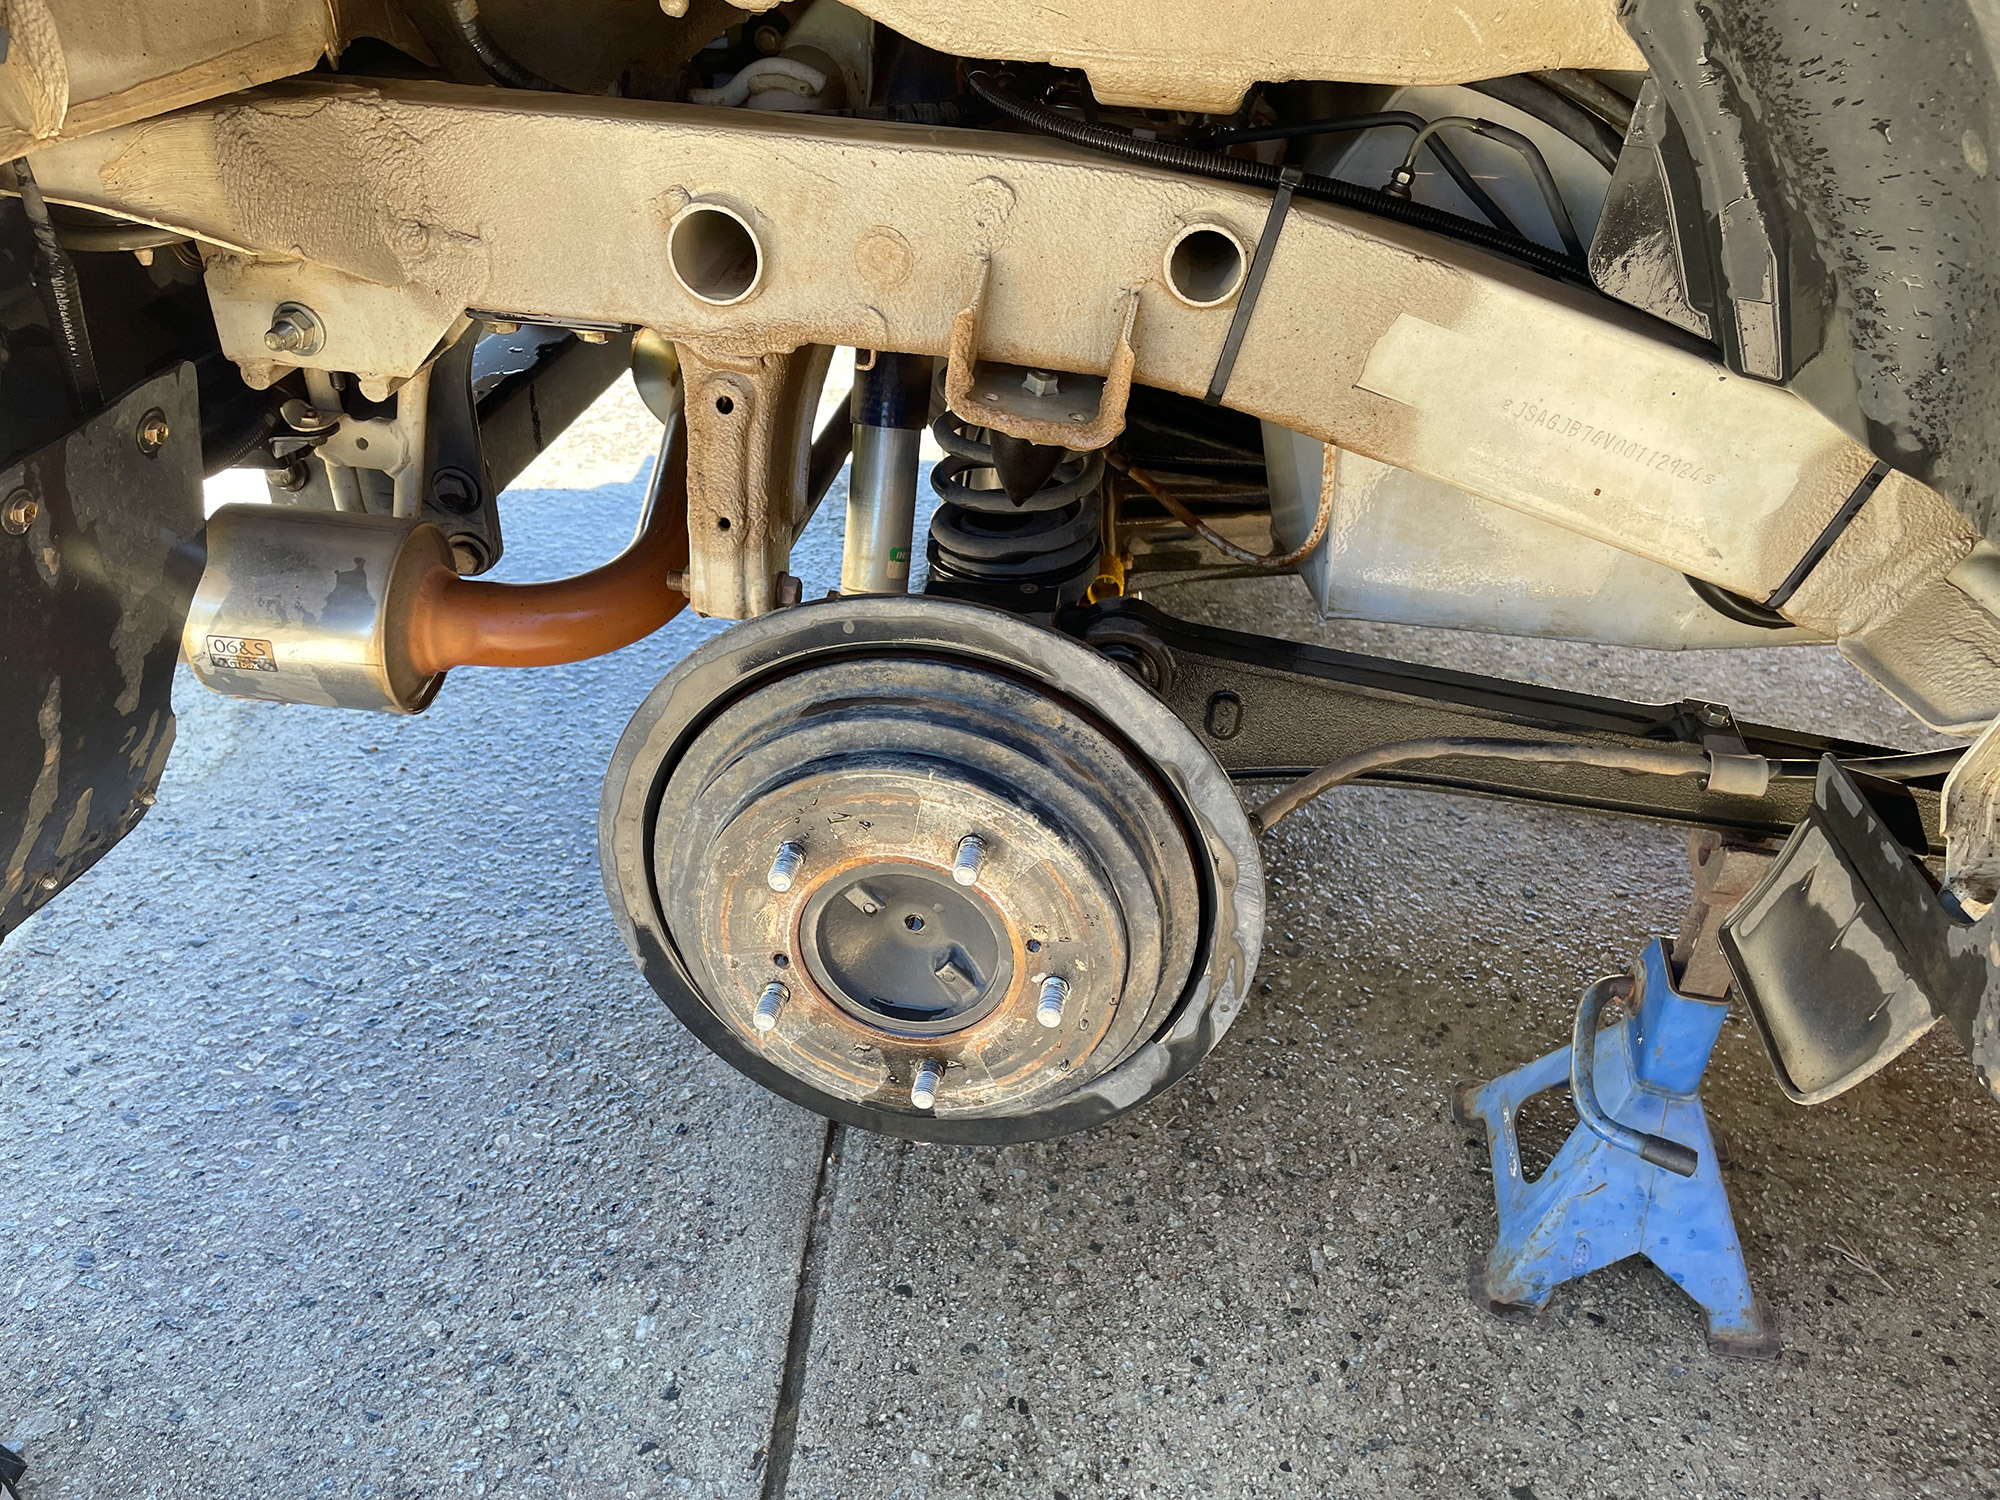
This is the corresponding view for a wheel off at the back end of the car. Again, some added extras for mine but should be familiar enough to your car even if your car is totally stock.
… and labelled for your reference.
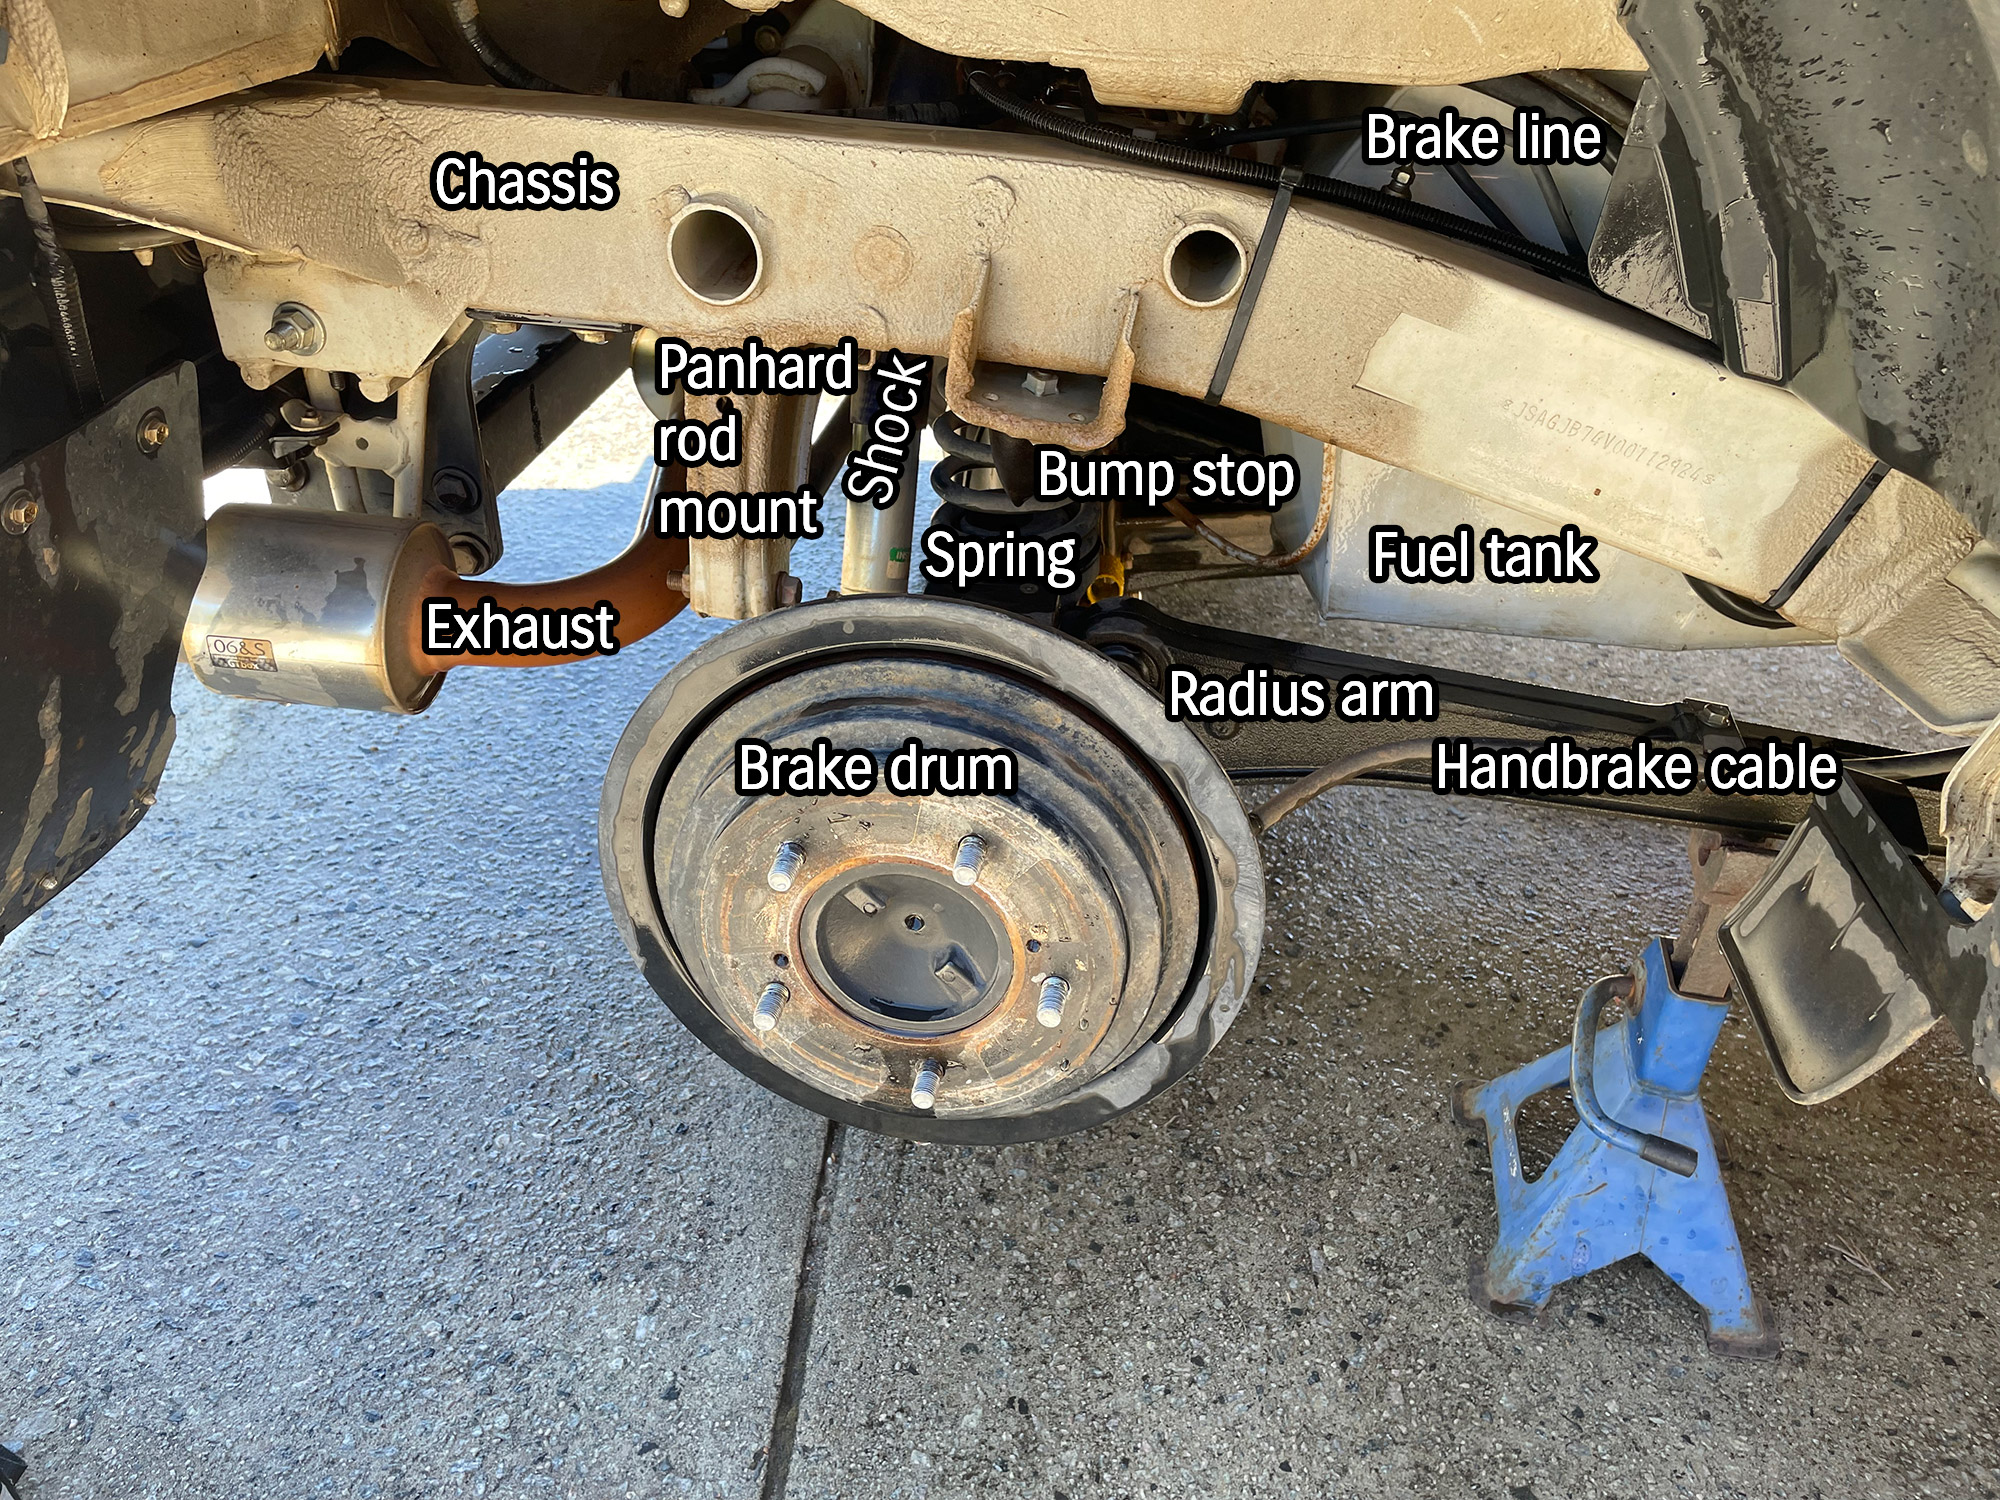
You’ll want to also clean around the brakes and things here significantly. One thing to note is you should consider pulling the brake drum off and really cleaning deeply in here if you’ve done a lot of mud.
There are two M8 holes that you use to pull the brake off with. You need fully threaded bolts here and just screw them into the brake drum. Make sure you have the handbrake off when you do this, and note it can be very hard to pull the drum off if there’s a heap of corrosion at the end of the axle.

Removing the brake drum exposes all of the brake hardware. This is an area to make sure you get rid of any mud as it can cause the brakes to drag, wearing them out and also making the car even slower than it normally would be. It also is a source of corroding stuff to prematurely wear out your wheel bearings.
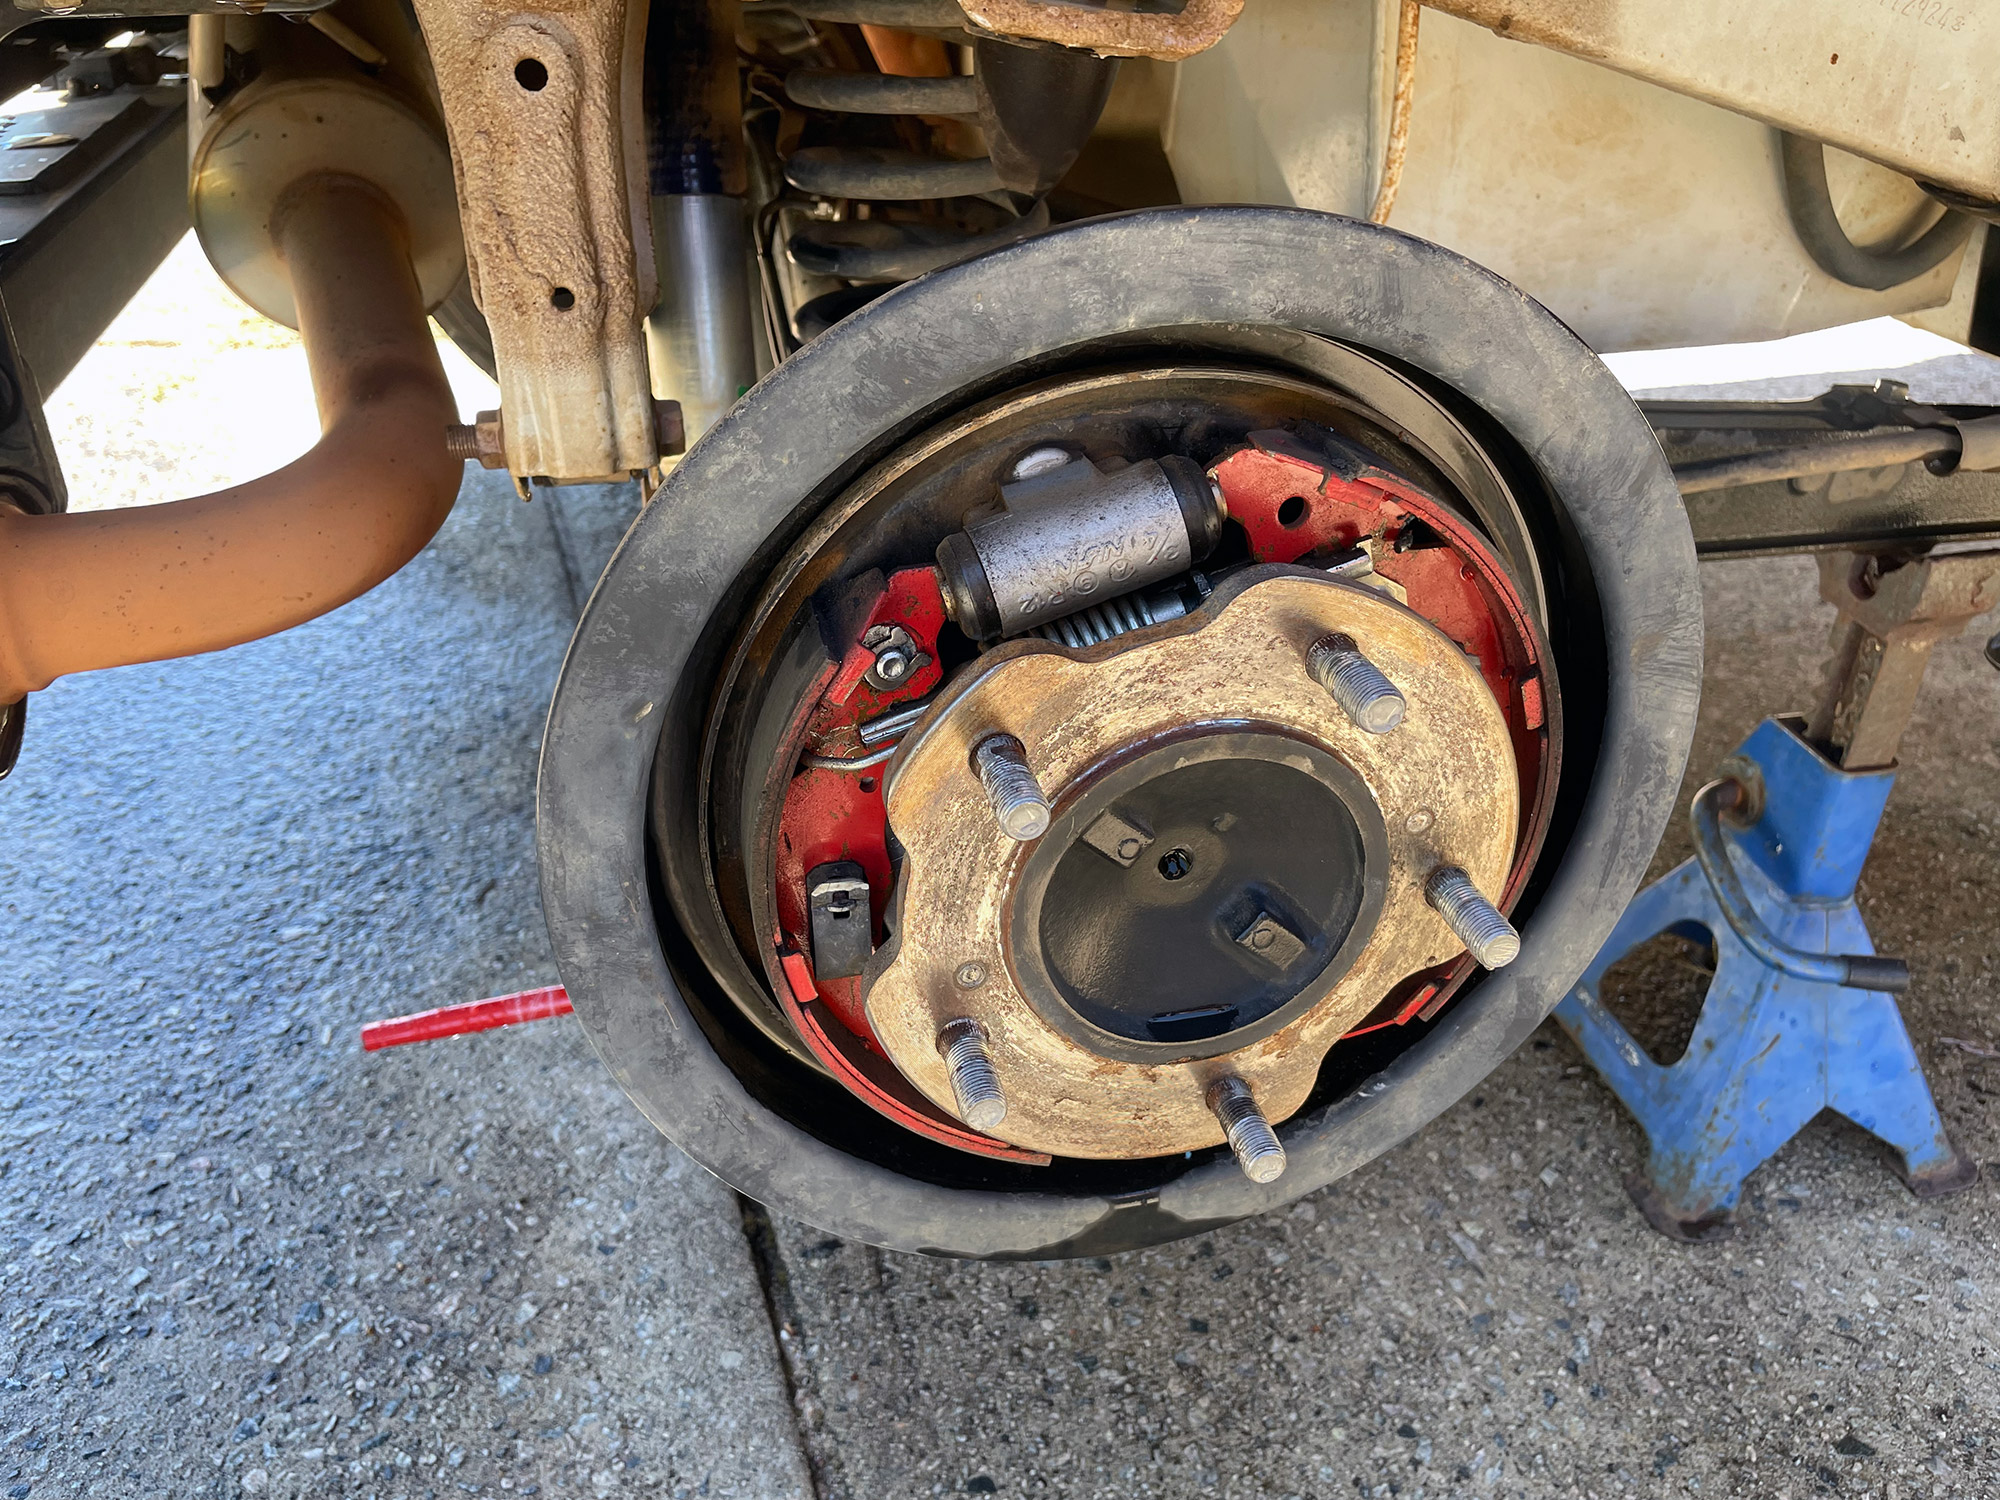
Refitting is really easy: remove the bolts, push the brake drum back on, refit the wheel and put the handbrake on a few times to make sure the brake is fully adjusted. Easy as!
Increased maintenance for 4wding
Jimnys are incredibly capable, but they do require increasing the maintenance if you are using the car 4wding. Even the toughest 4wds require more attention after some offroading: this is where taking control of your car’s health through good maintenance will pay off in terms of cheaper/less frequent repair bills and that’s more money for fuel for trips and mods for your car.
Diff oil checking and changing
Even with extended breathers and being sensible doing water crossings, consider at least doing axle oil every year you’ve done a water crossing above axle height. Water can still come in via the axle seals, and this is doubly true in the front hubs and it will ruin things in no time.
If you want to see if you need to change your diff oil or if you have an issue like water in the diffs, just remove the fill point with either a good quality 3/8″ drive ratchet or a proper 10mm square socket.
With the fill point open, if lots of oil rushes out then either you’re parked on a slope or the car has water in the diff. That water will displace the diff oil upwards, which is why heaps will come out of the fill point.
If only a small amount or no oil comes out, then use your finger in the fill/level hole to see where the diff oil level is at. If it’s a long way below the fill hole then you need to add differential oil. If it is basically there then you have the right oil, but you should check to see if the oil looks milky (contaminated with water) or smells really burnt and looks super dark and weird (in which case it should get changed.
I won’t cover the oil change here, but it’s a relatively straightforwards procedure I’ve documented before.
Transmission/transfer case oil changes
4wding adds load to components, especially in the driveline. I’m not sold it hurts the engine oil much more 4wding versus normal driving (oil temperatures are similar) but you should consider doing your gearbox oil and transfer case oil more often. They don’t take much fluid and are quite easy to change.
The automatic transmission is not as easy to change, but it’s also a lot harder to extend its breather and more sensitive to fluid contamination. If doing a lot of mud and water work with an automatic I would consider finding a good transmission specialist willing to do a fluid change up to every year to keep it healthy. Automatic transmissions were not particularly strong or long lasting (150,000 – 200,000 km at best) in the gen3 Jimnys, and the gen4s with more power and torque will not be any kinder to automatic transmissions. Looked after with regular fluid changes, however, and it probably will go a lot further than one that isn’t.
Brake fluid
This one is often forgotten, not hugely hard to change at home. Brake fluid absorbs water and it’s quite easy to get contamination of the fluid with mud and stuff around the brake calipers in particular. If you don’t want to do it then a non-dealership mechanic probably won’t charge much to give the fluid a change every year or at most every 2. It can also be easily changed at home, though, just using gravity and some cheap or free but improvised tools.
Servicing
Modifications
Choosing what to modify