
2019 Jimny wheel/tyre upgrade info
Factory the Australian JB74W 2019+ Jimny wears 195/80-15 highway terrain tyres on 5.5″ alloy wheels. While I quite liked the look of the wheels, it is advantageous to swap the wheels out for more offroad suitable wheels and tyres if you plan to really use the car.
tl;dr summary:
- Stock tyres/27.5″ are pretty good – if you can’t afford to change them out then don’t, use them and see how you go!
- 215/75-15/28″ if you want better choice of allterrain tyres and/or don’t want to have fitment issues
- 235/75-15/29″ tyres if you’re willing to swap out wheels for wider ones, are willing to deal with higher fuel consumption & potentially deal with needing to cut away at some of the inner guards
- Larger than that you probably need to do your own research beyond this site!
Finally, tyre pressures are a complicated subject: I cover Jimny tyre pressures including for different tyres sizes over on another page.
Sections
- Replacement tyre precis
- Some background info
- Legalities to consider
- Tyre size table
- Some tyre specifications
- Centering wheels
- Fitting factory rear centre caps to wheels with larger centre bores
- Locking wheel nuts
- Painting ends of rear axles
- Tyre and wheel weights
Replacement tyre precis
This is really just a few thoughts people should have going into it, and some suggestions on size and tyres that might be good for you
- Practically speaking, keeping it to the max legal tyre size increase in Australia to a 29″ tyre like a 235/75-15 is as big as most people need to go.
- A lift doesn’t necessarily fit a bigger tyre. You don’t need much trimming where the inner mudguard plastic meets the back of the front bumper to fit ‘235s’, and if you already have a bullbar installed you’re probably good to go.
- Going beyond a 215 width tyre formally requires a wider rim for full tyre fitment legality/manufacturer recommendations. It sucks to rock up to a tyre shop to be told the tyres you ordered won’t get fitted to those rims, so bear this in mind.
- When swapping rims consider going up to a 16″ rim (6 or 7″ wide) and run a 205R16 tyre instead of a 235/75-15. They’re lighter, easier to push through sand and mud being narrower and have better deflation characteristics than a wider tyre.
- If you’re not doing a lot of rock crawling where you need the under-differential clearance of a taller tyre, sticking to the stock size or 215/75-15 will give you better economy and better on-road characteristics. You then can also safely stick to the stock rims which are light and proven to be quite tough.
Going large can look cool, and it isn’t necessarily a huge drawback, but you do lose fuel economy the larger you go and the acceleration is noticeably lessened.
- Many of the popular and mainstream brands have good tyres at the moment, and many work well with the Jimny. Bridgestone D697s, BFGoodrich KO3s, Kumho AT52s, Falken Wildpeak AT3 or AT4, the Maxxis AT811, Toyo Open Country AT3s, Yokohama Geolandar A/Ts plus also their G003 M/T are probably the most commonly seen tyres used on Jimnys in Australia.
- Options for more of a road bias would be Bridgestone D697s, Kumho AT52s, the Yokohama Geolandar A/Ts
- For a balance of on and offroad use then options like Falken Wildpeaks or Toyo Open Countrys are common
- The highest offroad biases would be BFGoodrich KO3s, Maxxis AT811s, or Yokohama G003s, plus other mud-terrain options
Some background info on tyres, wheels and my choices
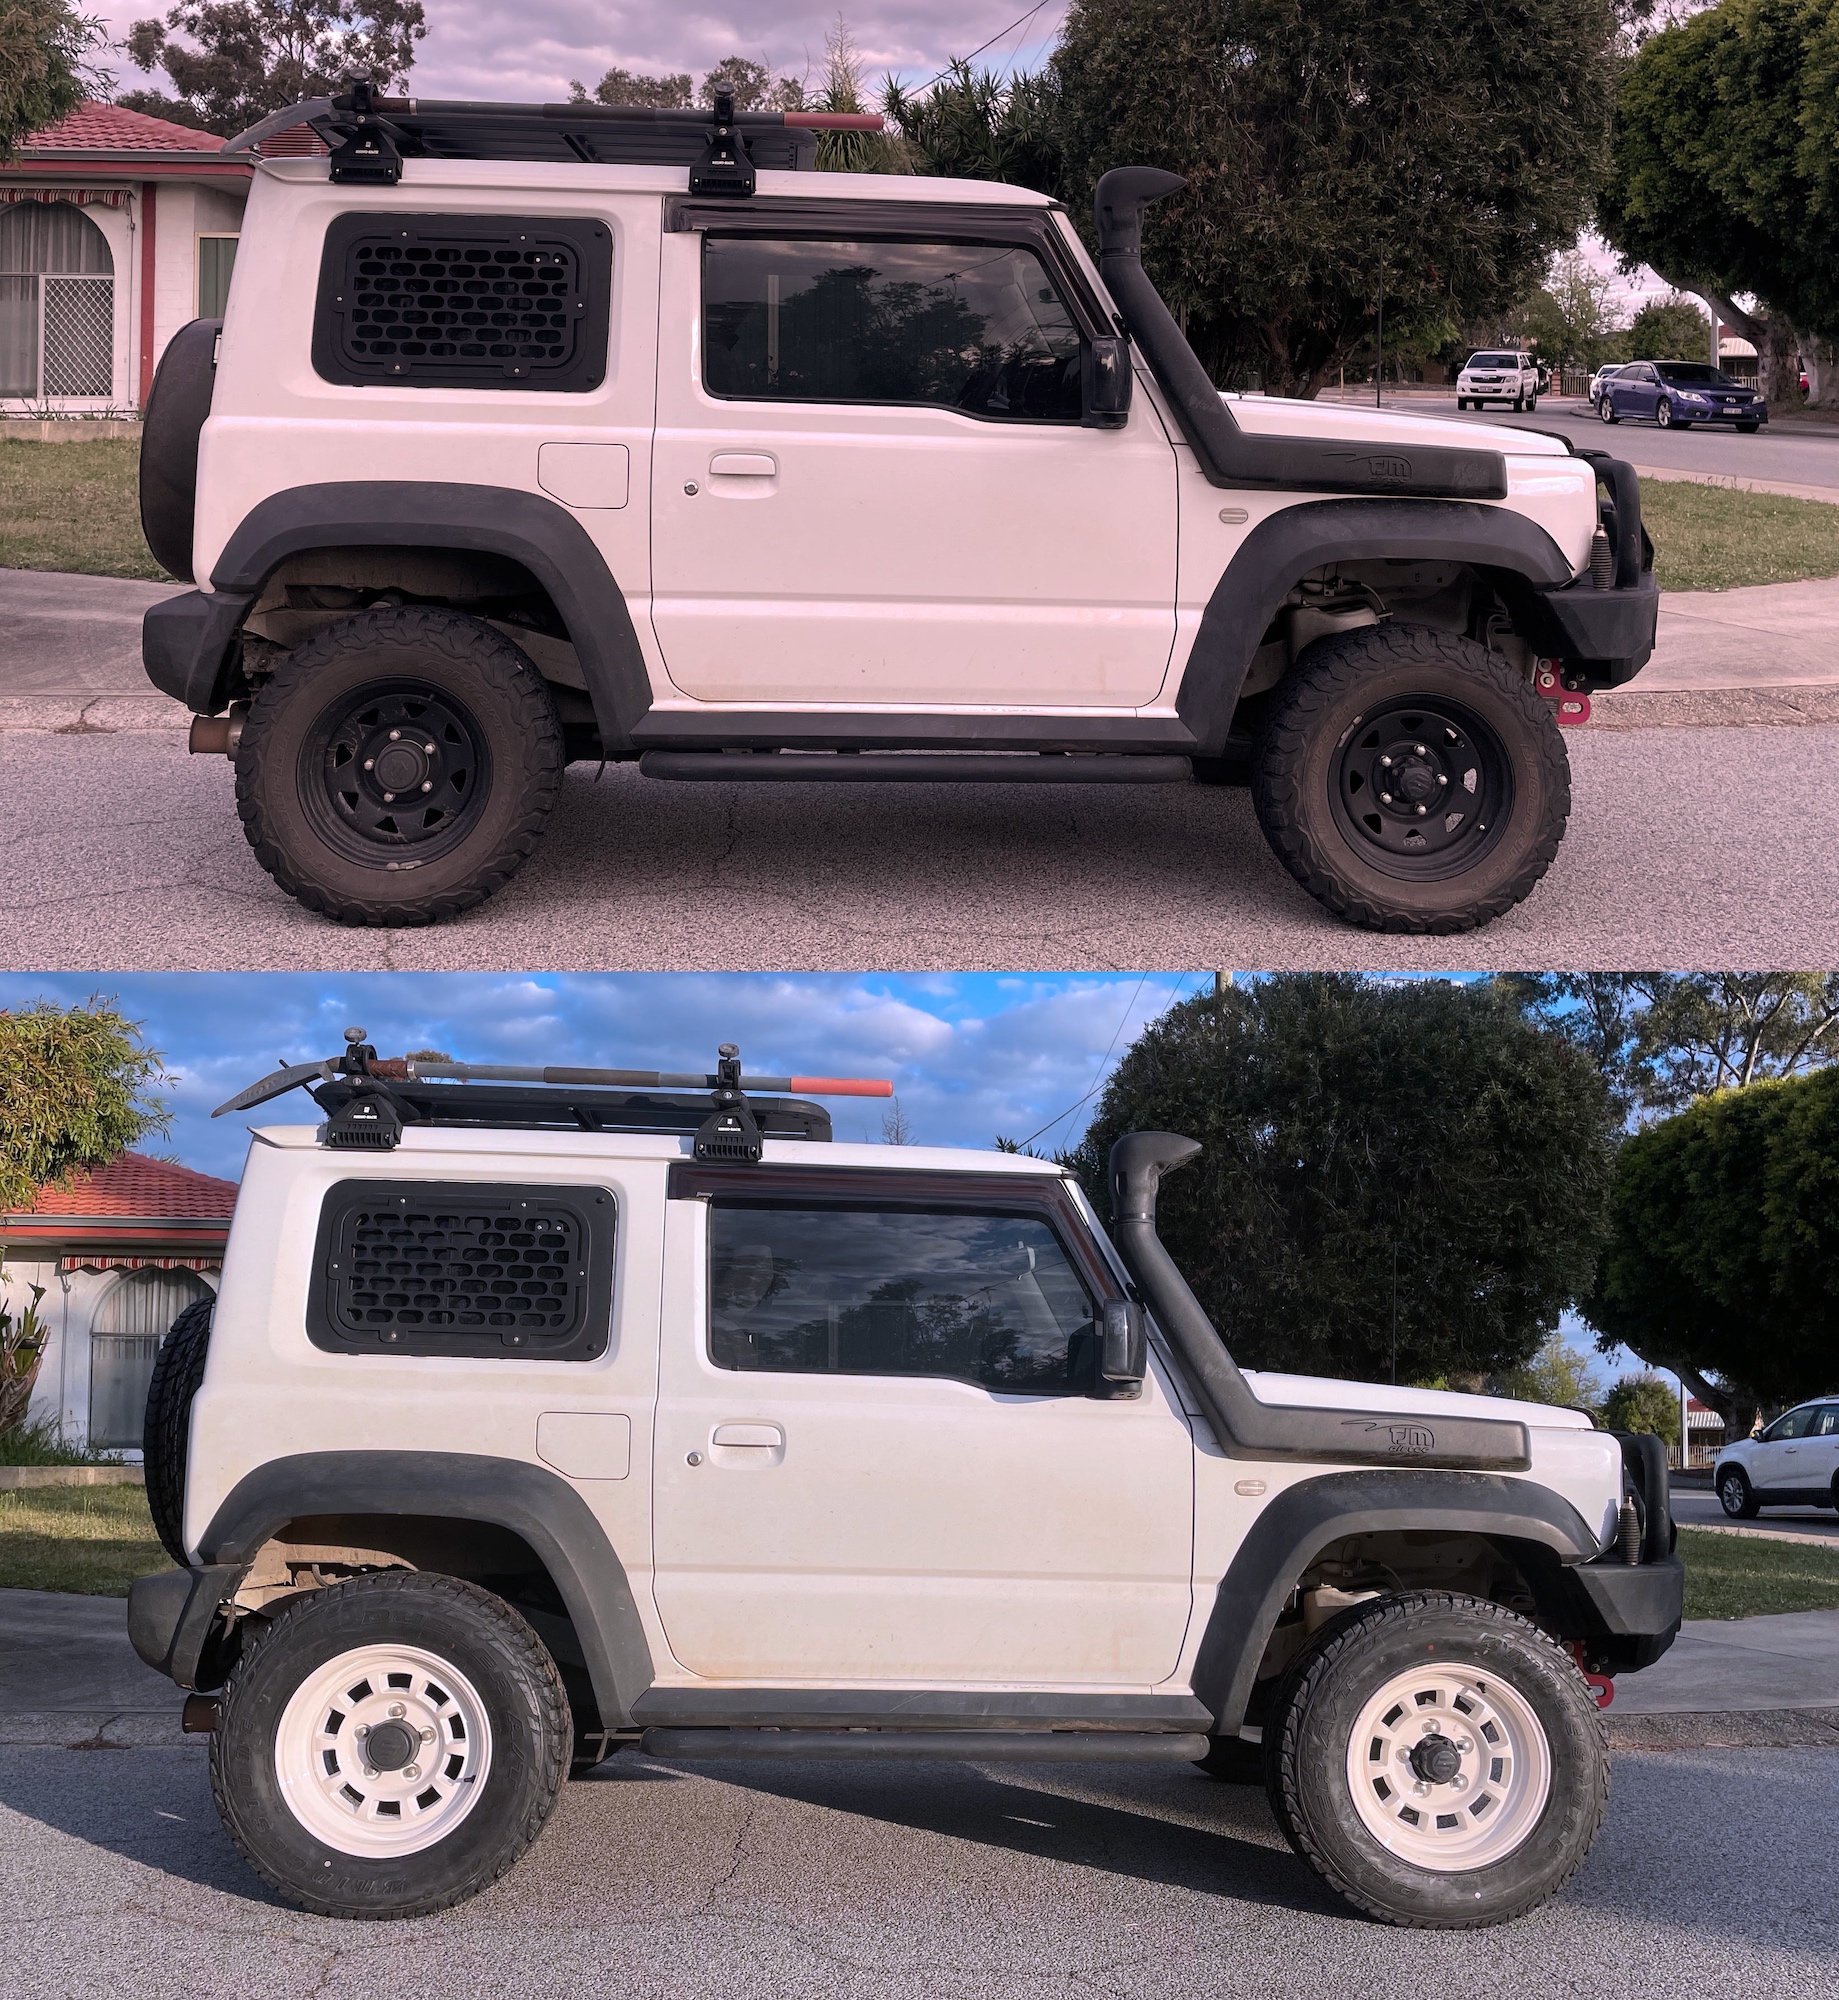
I’ve actually run two sets of aftermarket wheels/tyres on this car, along with the stock wheels and tyres. I first ran steel wheels in 15×6.0″, +3 offset with 215/75-15 BFGoodrich KO2 tyres and presently run alloy wheels in 16×6.0″, -5 offset with 205R16 Bridgestone Dueler D697 tyres.
There are benefits and drawbacks to all options for both tyres and wheels.
Wheels
- Steel wheels are cheaper; alloy wheels are more expensive. I bough the steel wheels new for $75 a wheel; delivered the alloy wheels work out to be closer to $400 once shipping/taxes etc are taken into account.
- Alloy wheels are lighter; steel wheels are heavier. In this case it’s only a couple of kg, but if you went more expensive forged alloy wheels they would be lighter again. The factory wheels are also quite light, most aftermarket wheels including alloys are going to be heavier than them (but also likely stronger).
- These particular alloy wheels have exactly the right centre bore to use the hubcentric lip on the front hubs and can fit the rear caps; steel wheels need centering rings to do both of these things.
- Steel wheels are often more durable than alloy, and if you bend them you can straighten them on an outback highway a lot easier.
I stuck to a 6″ wide wheel as it will be lighter than going a wider wheel. You really only need 7″ wide if you’re going to go a fair bit bigger than a 235 wide tyre, but, to be fully legal you need a 6″ wide wheel to go bigger than a 215 section tyre, too.
If you are looking for wheels, you need to find something that is between +5 and -20 offset if you’re going for full legality in Australia. The closer you keep things to stock the easier it is to keep the car happy, too. Larger offset wheels put more strain on bearings and change the steering geometry. More on legalities in a bit.
You need a 5×139.7 pitch circle (PCD), and if you want to easily retain the centre caps for the rear you need a 108mm centre bore. I discuss below how to fit the centre caps with wheels with a larger centre bore, which most steel wheels have. It’s not a dealbreaker but it’s something to consider.
I didn’t need to go a larger wheel for the 215s but I did it partly for the aesthetics, partly for the extra durability of steel wheels, and partly to try them out. I could have kept these and swapped to a larger 15″ tyre but I wanted to trial skinnier taller tyres so got the 16″ alloys as this opens up the possibility of those sizes.
The wheels I went for with the steel wheels were genuine Dynamic wheels in the classic Sunraysia style and the alloy wheels are the High Peak J-01 wheels from JimnyStyle in the UK.
Tyres
- Some people don’t like KO2s but I found them to be really good: they wore well, they weren’t that much worse in the wet than the stock tyres (and I drove them back to back!) and they are exceptionally good offroad for an allterrain tyre. The KO3s, released in 2024, are meant to be a better on road tyre without losing offroad ability.
- The D697s despite being a larger tyre are lighter than the KO2s and are significantly quieter and better for fuel efficiency. They also are pretty good offroad but I guarantee they won’t be as good in mud.
There are other tyre choices in both sizes I’ve gone, and you could definitely consider different sizes e.g. 235/75-15 (for 15″ wheels) or 235/70-15 (for 16″ wheels) are basically the same size as 205R16. Tyre size wise the easiest option is going to 215/75-15 tyres. These are a tiny bit taller than the factory ones but not enough that it’s noticeable (roughly a 6% change in speedometer reading). Given the error on the factory speedo calibration that’s perfectly acceptable. Note that although the speedo will now read ok, it means your odometer will underestimate how far you’ve travelled & your fuel economy will appear 6% worse. The odometer in modern cars is usually bang on, they just fudge the speedo to meet legal requirements.
A drawback to larger tyres is that have the potential to rub on things under the car. I cover this at the bottom of the legalities section.
Legalities to consider
There are some key legal considerations when swapping tyres. I can’t speak for every part of Australia let alone every part of the world, but here’s some key things.
Size
On vehicles with ESP, many states allow for a maximum lift of 2″ via the suspension and 1″ via tyres. This implies an overall diameter change to the tyres of 50mm. The factory 195/80-15 tyres are 693mm in diameter, allowing you up to a 743 mm diameter tyre. Practically, a 235/75-15 is closest to this.
There is an additional component of fitment relating to fitting these tyres on a rim, which I’ll cover in a moment. Tyre calculators exist to make this easier to work out, but if you’re staying with the same rim diameter then you can compare the ‘lift’ simply by looking at the difference between old tyre width * old profile / 100 and new tyre width * new profile / 100.
As an example of working this out: the difference in height between stock tyres and 235/75 tyres are:
195 * (80/100) = 156 mm; 235 * (75/100) = 176mm
This gives a 20mm height increase (40 mm diameter change).
If you swap rims to a different diameter you also need to account for the rim diameter, though.
Some states have a maximum width requirement, too. For example, Western Australia enforces a maximum of 30% increase in tyre width compared to the maximum available tyre width. This would limit you to a 245 width tyre at most (1.3 * 195 = 254 mm – just one off a 255 section tyre!).
Load and speed ratings
These are often not considered by people but it can, especially speed rating, catch people out. Some mud terrain tyres can be very low speed rated which can impact legalities. The factory tyres are rated at ’96S’. 96 is the load rating (710 kg), S is the speed rating (180 km/h).
VSB14, section LS handles what you’re allowed to do with regards to tyres. Two key elements apply here:
- A vehicle designed for offroad use (an MC complianced vehicle) can reduce the speed rating down to a speed rating of N (140 km/h).
Thus you’re allowed any letter between N and S in the speed rating part of the tyre info. - In addition, you can’t go to a lower load rating than specified on the tyre placard.
This limits you to tyres load rated to ’96’ or beyond.
Almost no tyre you’ll change to will be lower than this load rating, and generally it’ll be higher for the larger tyres, but it’s just something to look out for.
Tyre to rim fitment
This is the curly one that a lot of people don’t think of!
In Australia, tyres must fit to the rim according to ADR42, the General Safety Requirement for vehicles. According to this (ADR42, section 25.1), tyres must be a listed fitment to a rim combination in one of the following standards:
- Tyre and Rim Standards Manual, Tyre and Rim Association of Australia,
- the (US) Tire and Rim Association Inc. Year Book,
- the Japan Automobile Tire Manufacturers Association Year Book,
- the Japanese Industrial Standards (JIS-D4202) “Dimensions of Tires” and (JIS-D4218)
“Contours of Rims”; or, - the European Tyre and Rim Technical Organisation (E.T.R.T.O.) Data Book.
Many of these aren’t easy to access for newbies, but here’s some key extracts from the ETRTO (which is the simplest one to find a copy of, surprisingly enough, and also the most permissive). I’ve cut down the table to relevant rim diameters and likely profiles (/80, /75 and /70, on 15 and 16″ rims) that most people will want for a Jimny, including some sizes that would be beyond legal just for reference.
| Tyres | Approved rim fitments |
|---|---|
| 80 profile tyres | |
| 195/80 R 15 | 5J 5½J 6J 6½J |
| 205/80 R 16 (205R16) | 5J 5½J 6J 6½J 7J |
| 215/80 R15, 16 | 5½J 6J 6½J 7J |
| 235/80 R16 | 6J 6½J 7J 7½J 8J |
| 75 profile tyres | |
| 205/75 R14, 15 | 5J 5½J 6J 6½J 7J |
| 215/75 R14, 15, 16 | 5½J 6J 6½J 7J |
| 225/75 R15, 16 | 6J 6½J 7J 7½J |
| 235/75 R15, 16 | 6J 6½J 7J 7½J 8J |
| 245/75 R16 | 6½J 7J 7½J 8J |
| 255/75 R15 | 6J 6½J 7J 7½J 8J 8½J |
| 70 profile tyres | |
| 205/70 R14, 15, 16 | 5J 5½J 6J 6½J 7J |
| 215/70 R14, 15, 16 | 5½J 6J 6½J 7J |
| 225/70 R14, 15, 16, 17 | 6J 6½J 7J 7½J |
| 235/70 R15, 16, 17 | 6J 6½J 7J 7½J 8J |
| 245/70 R15, 16 | ½J 7J 7½J 8J |
| 255/70 R15, 16 | 6½J 7J 7½J 8J 8½J |
| 265/70 R15, 16, 17 | 7J 7½J 8J 8½J 9J |
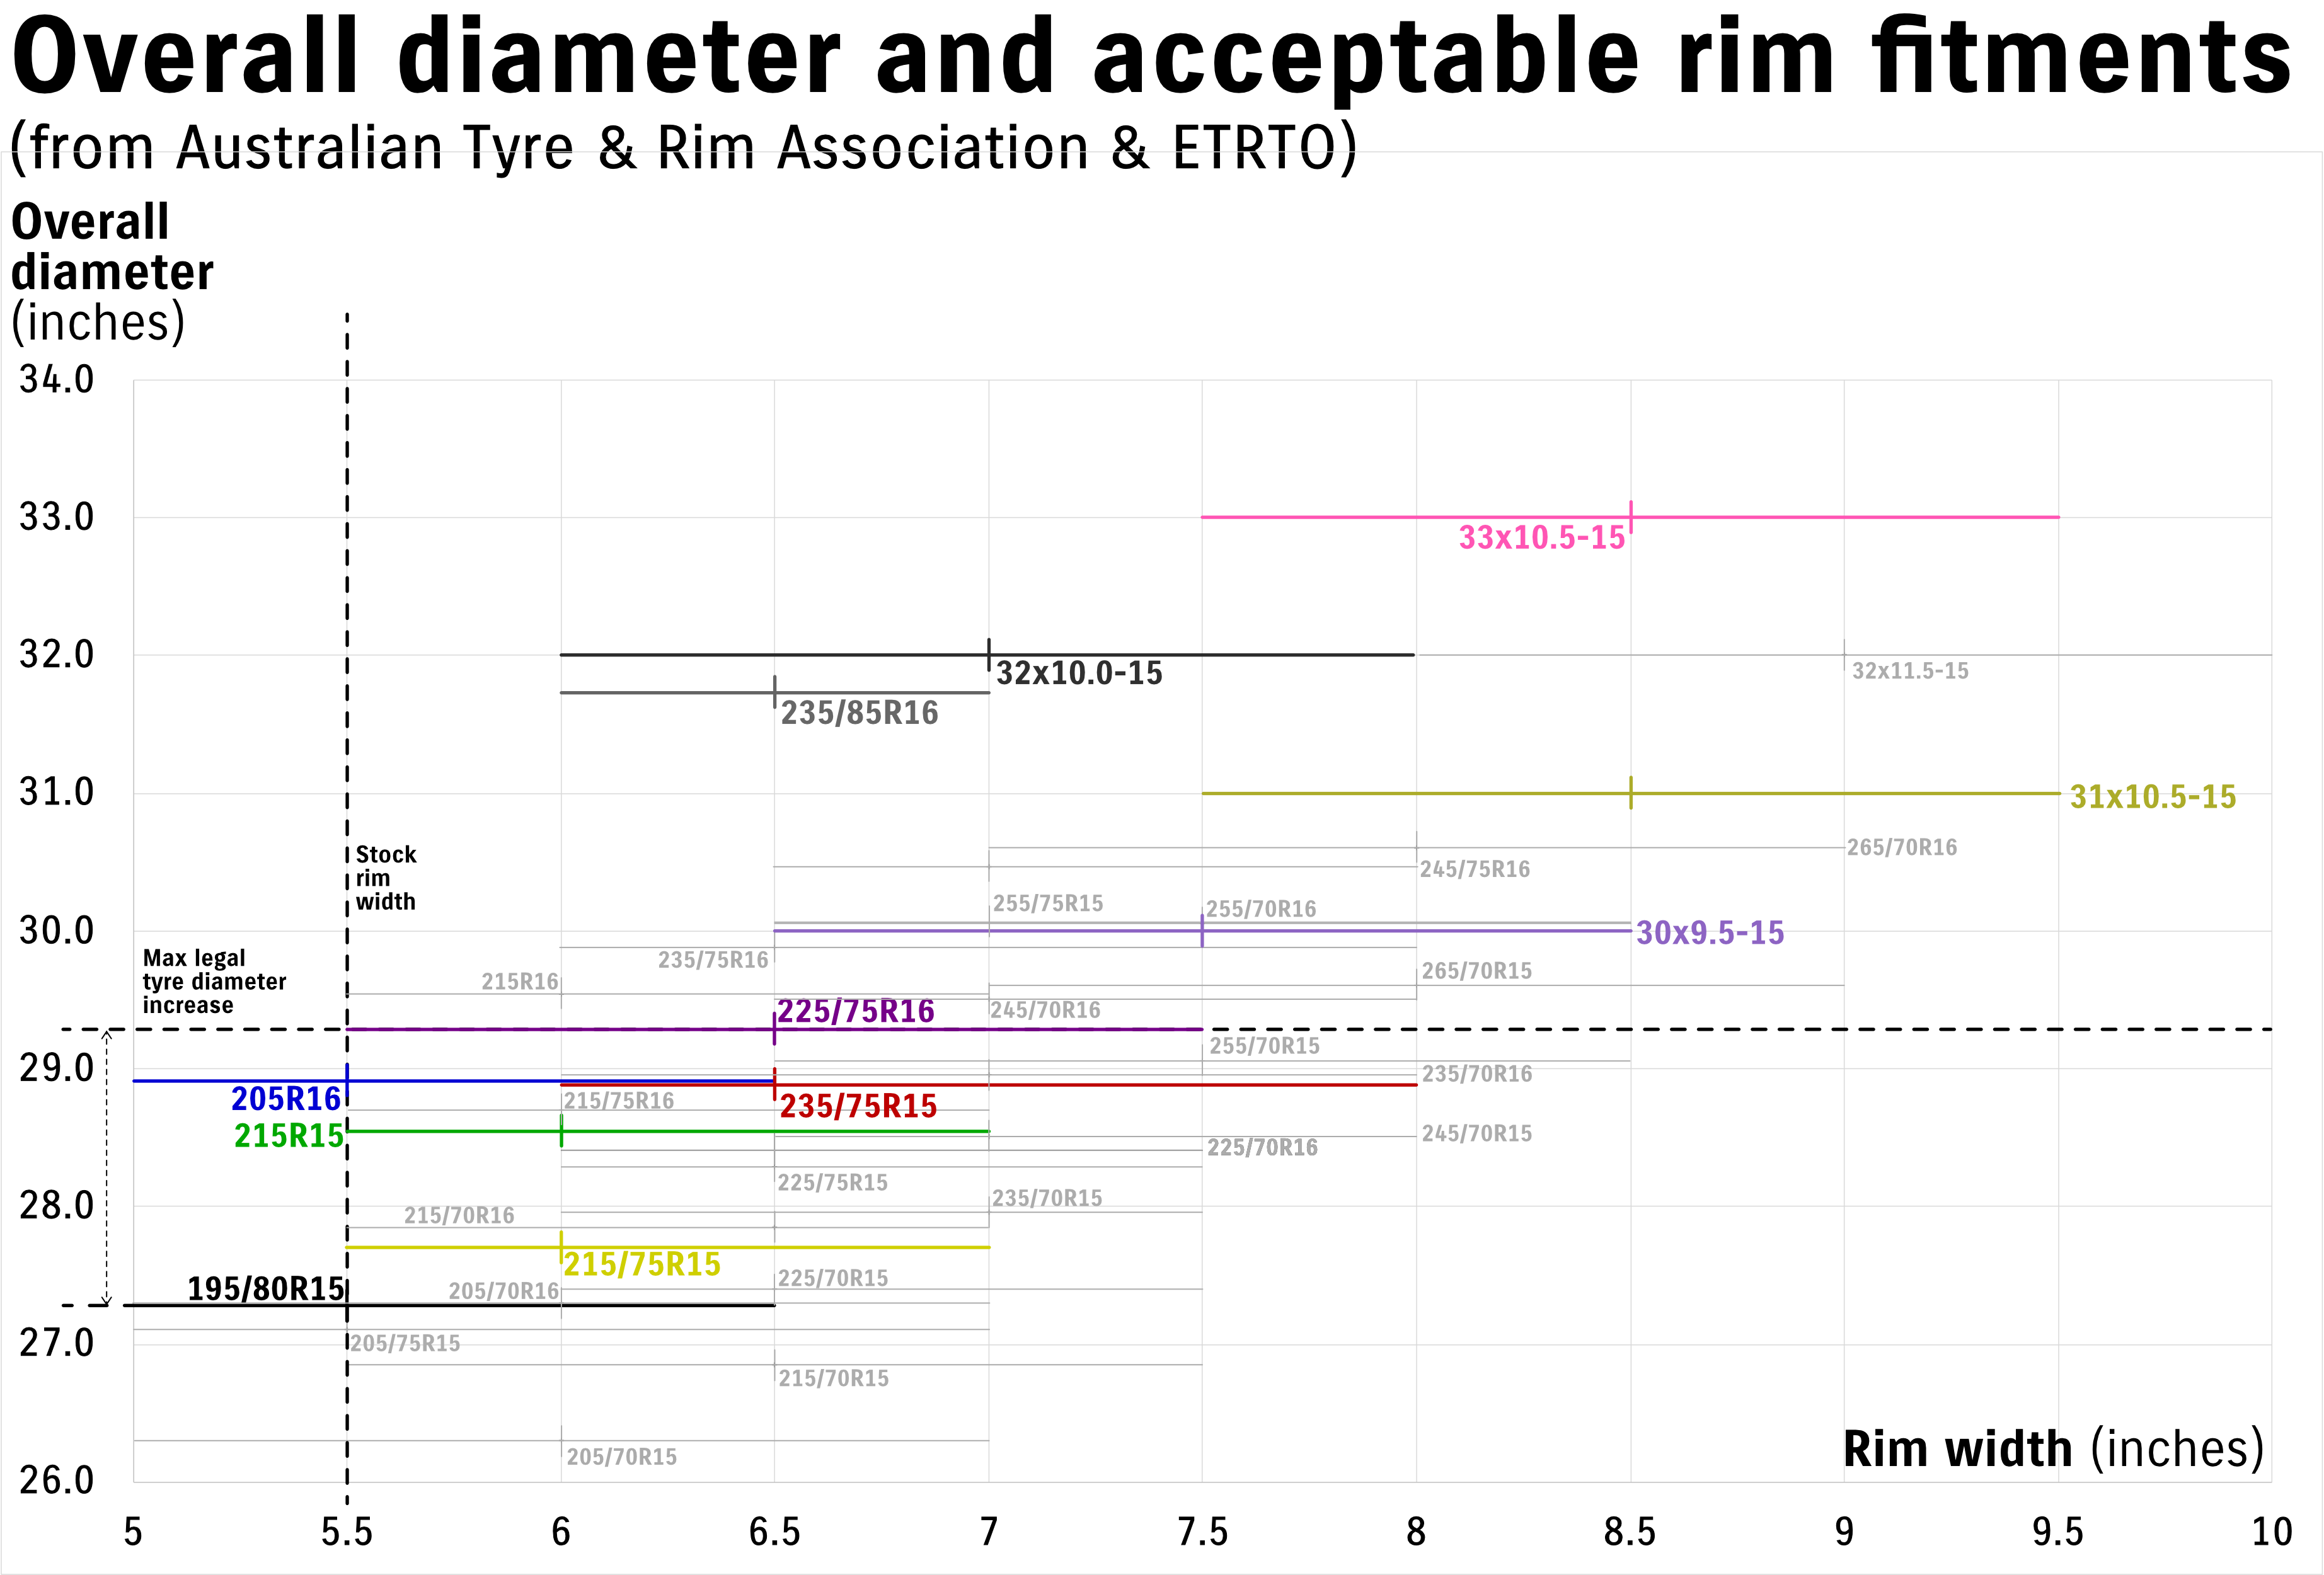
As you can see, a 225/ or 235/ tyre would need a minimum rim width of 6.00″. The Jimny’s wheel being 5.5″ wide limits you, in terms of full fitment legality, to a 215/ tyre. Some tyre places may well fit wider tyres to rims they aren’t a legitimate fitment, but this is why people might get away turning up with stock rims and wanting 235/75-15 tyres on them (the most common request).
As a chart, and including some much larger than would be legal in Australia options, tyre to rim fitments look like the following.
Rim/tyre to car fitment
This mostly relates to changing rims, which as discussed is required to go beyond a 215 section tyre. Some key elements here are:
- You cannot decrease the track width of the vehicle; and,
- For an offroad vehicle (compliance MC, like the Jimny is), you cannot increase the track width by more than 50 mm.
- You can’t poke out past the wheel arches/flares
The track width for a vehicle is measured between the wheel centres, which is given by the offsets of the wheels. Note! Most people incorrectly assume the track width is the width of the outside of the wheels, but it isn’t, so wheel width doesn’t come into it. You simply need to look at the differences in offsets between old and new wheels to compare track width changes. It really is that simple!
As a practical example, swapping from the factory +5 offset wheels to some that are -12 is a 17mm increase in track width per side of the car (34 mm overall track width increase). So long as you restrict yourself to offsets between +5 and -20 you’re fine in terms of the track width.
Poke is harder to measure and provide numbers on, as I’ve never measured a stock car to work out how wide you can go etc. Unless you go an excessively wide wheel (e.g. an 8″ wheel) with a 235/75-15 tyre and maximum offset you’re probably ok. This does, however, also depend on where your panhard rods are and how centred your wheels are: you can potentially poke on one side but not the other if the axles aren’t centred in the chassis & you’re cutting it fine poke-wise.
Excessively large offsets are not great for wheel bearings, so I’d stick for something around 0 through to lightly positive. You also change the scrub radius of the suspension with big offset changes, so again keep it simple and close to stock for the happiest results, unless you’re ok dealing with the consequences of screwing with it too much.
Finally: rubbing.
This isn’t really a legality thing but I might as well bring it up, too, as it’s the elephant in the tyre fitment room.
Larger tyres run the risk of rubbing on various bits of the bodywork. For the JB74 basically noone has ever had a problem with 215/75-15 tyres. Larger tyres the reports vary and there’s probably a lot of reasons for that. A few considerations about rubbing.
First off, offsets can help or hinder you here. It depends where it’s rubbing. If it’s rubbing on the inside of an arch then going to a more negative offset will pull it away. If, however, it’s rubbing on the outside then bigger offsets will not help.
Secondly: tyres are not millimetre-perfect. One tyre brand in a particular size might not rub but another will because of the shape of the tyre, size of the knobs etc. In addition, tyres will vary according to the rim they’re on. On a narrower rim the tyre will be pushed out a bit larger, more likely to rub in terms of overall diameter but less in terms of width.
Although people talk about tyres fitting with a suspension lift, ultimately nearly all suspension lifts for the Jimny do not change the clearance between the bodywork and the wheels at full suspension compression. You might not rub onroad with a suspension lift with your given tyres, but offroad with the wheel fully tucked up into the arch you might suddenly get some rubbing. SUSPENSION LIFTS ALONE DO NOT FIT TYRES. If you extend bump stops you will make the fitment better, however, you’ve now limited the travel of the suspension which may not always be ideal.
Bodywork changes can also make things fit. People with bullbars report less rubbing in general as the bullbar fitment usually cuts away at part of the inner wheel arch. You can do this trimming even without fitting a bullbar, though. On the JB74 Jimny there’s only plastic to trim, it doesn’t require angle grinders and the like until you get to much larger tyre fitments.
Tyre size table
This is the table that hopefully sums up a lot of what I’ve mentioned above about legality and fitment and the like.
This table is designed so ‘larger’ tyres are to the right. It should give the info, at a glance, that are some of the key dimensions. Some of the alternative tyres for that size are not exactly the same size so don’t rely on this for millimeteric perfection. Where there are multiples that I’d class as basically the same size, the calculations have been done based on the first size listed.
| 215/70-15 | Stock | ‘215s’ | Midway | ‘235s’ | 30s | 31s | 33s | |
| Inch size diameter | 26.9″ | 27.3″ | 27.7″ | 28.5″ | 29.0″ | 30.0″ | 31.0″ | 33.0″ |
| Usual sizes | 215/70-15; 205/75-15 | 195/80-15 | 215/75-15 | 215/80-15; 225/75-15 | 235/75-15; 235/70-16; 205R16 | 30×9.5-15; 245/75-16 | 31×10.5-15 | 33×12.5-15; 33×10.5-15 also common |
| Recommended wheel width & permissable range (ETRTO and/or Aus standard) | 6.5″ (5.5 – 7″) | 5.5″ (5.0 – 6.5″) | 6.0″ (5.5 – 7.0″) | 6.0″ (5.5 – 7.0″) | 6.5″ (6.0 – 8.0″) | 7.5″ (6.5 – 8.5″) | 8.0″ (7.0-9.0″) | 9.0″ or 8.0″ (8-10″, or 7.0-9.0″) |
| Diameter difference (% to stock) | -1.5% | 0% | 1.4% | 4.2% | 5.5% | 9% | 11.9% | 17.3% |
| Crawl speed km/h (idle @ 800 rpm, 1st gear low) Manual/Auto | 2.85 3.15 | 2.9 3.2 | 2.94 3.24 | 3.02 3.33 | 3.06 3.38 | 3.16 3.49 | 3.25 3.58 | 3.40 3.75 |
| Revs @ 110 km/h (actual, top gear) Manual/Auto | 3495 3395 | 3444 3345 | 3396 3298 | 3299 3205 | 3255 3161 | 3134 3044 | 3034 2947 | 2848 2766 |
| Available torque @ 90 km/h (top gear) Manual/Auto | 104 Nm 97 Nm | 100 Nm 92 Nm | 96 Nm 88 Nm | 88 Nm 81 Nm | 85 Nm 78 Nm | 76 Nm 70 Nm | 70 Nm 64 Nm | 59 Nm 55 Nm |
| Available torque @ 100 km/h (top gear) Manual / auto | 127 Nm 123 Nm | 125 Nm 119 Nm | 122 Nm 116 Nm | 116 Nm 108 Nm | 113 Nm 105 Nm | 103 Nm 95 Nm | 94 Nm 87 Nm | 79 Nm 72 Nm |
| Axle height change (lift over stock) | -5 mm | 0 mm | +5 mm | +16mm | +21mm | +34mm | +47mm | +72mm |
| Will they rub? | No | No | No | Probably not | Not always, especially with a bullbar | Yes | Yes | Absolutely yes |
Some tyres and specifications
August 2025 update: added a bunch more tyres, also starting to compile EU wet road, fuel consumption and noise ratings where they exist.
This compilation has been inspired by one of the Australian Jimny owners; while Ben has sold on his Jimny, his efforts in compiling tyre weights and some options beyond the usual suspects was instrumental to inspire me to pull this together. Over the years this compilation has been added to by some various FB and Reddit users, so thank you all. I also appreciate the increasing transparency with more tyre manufacturers publishing weights or at least providing the tyre weights when you get in touch with them.
In this following plot, the coloured diamonds are tyres that are (generally) available in Australia, but the greyed out ones are other tyres for which I’ve found weights. These might be of interest for more people overseas. Bold text in the table reflects the Australian available tyres.
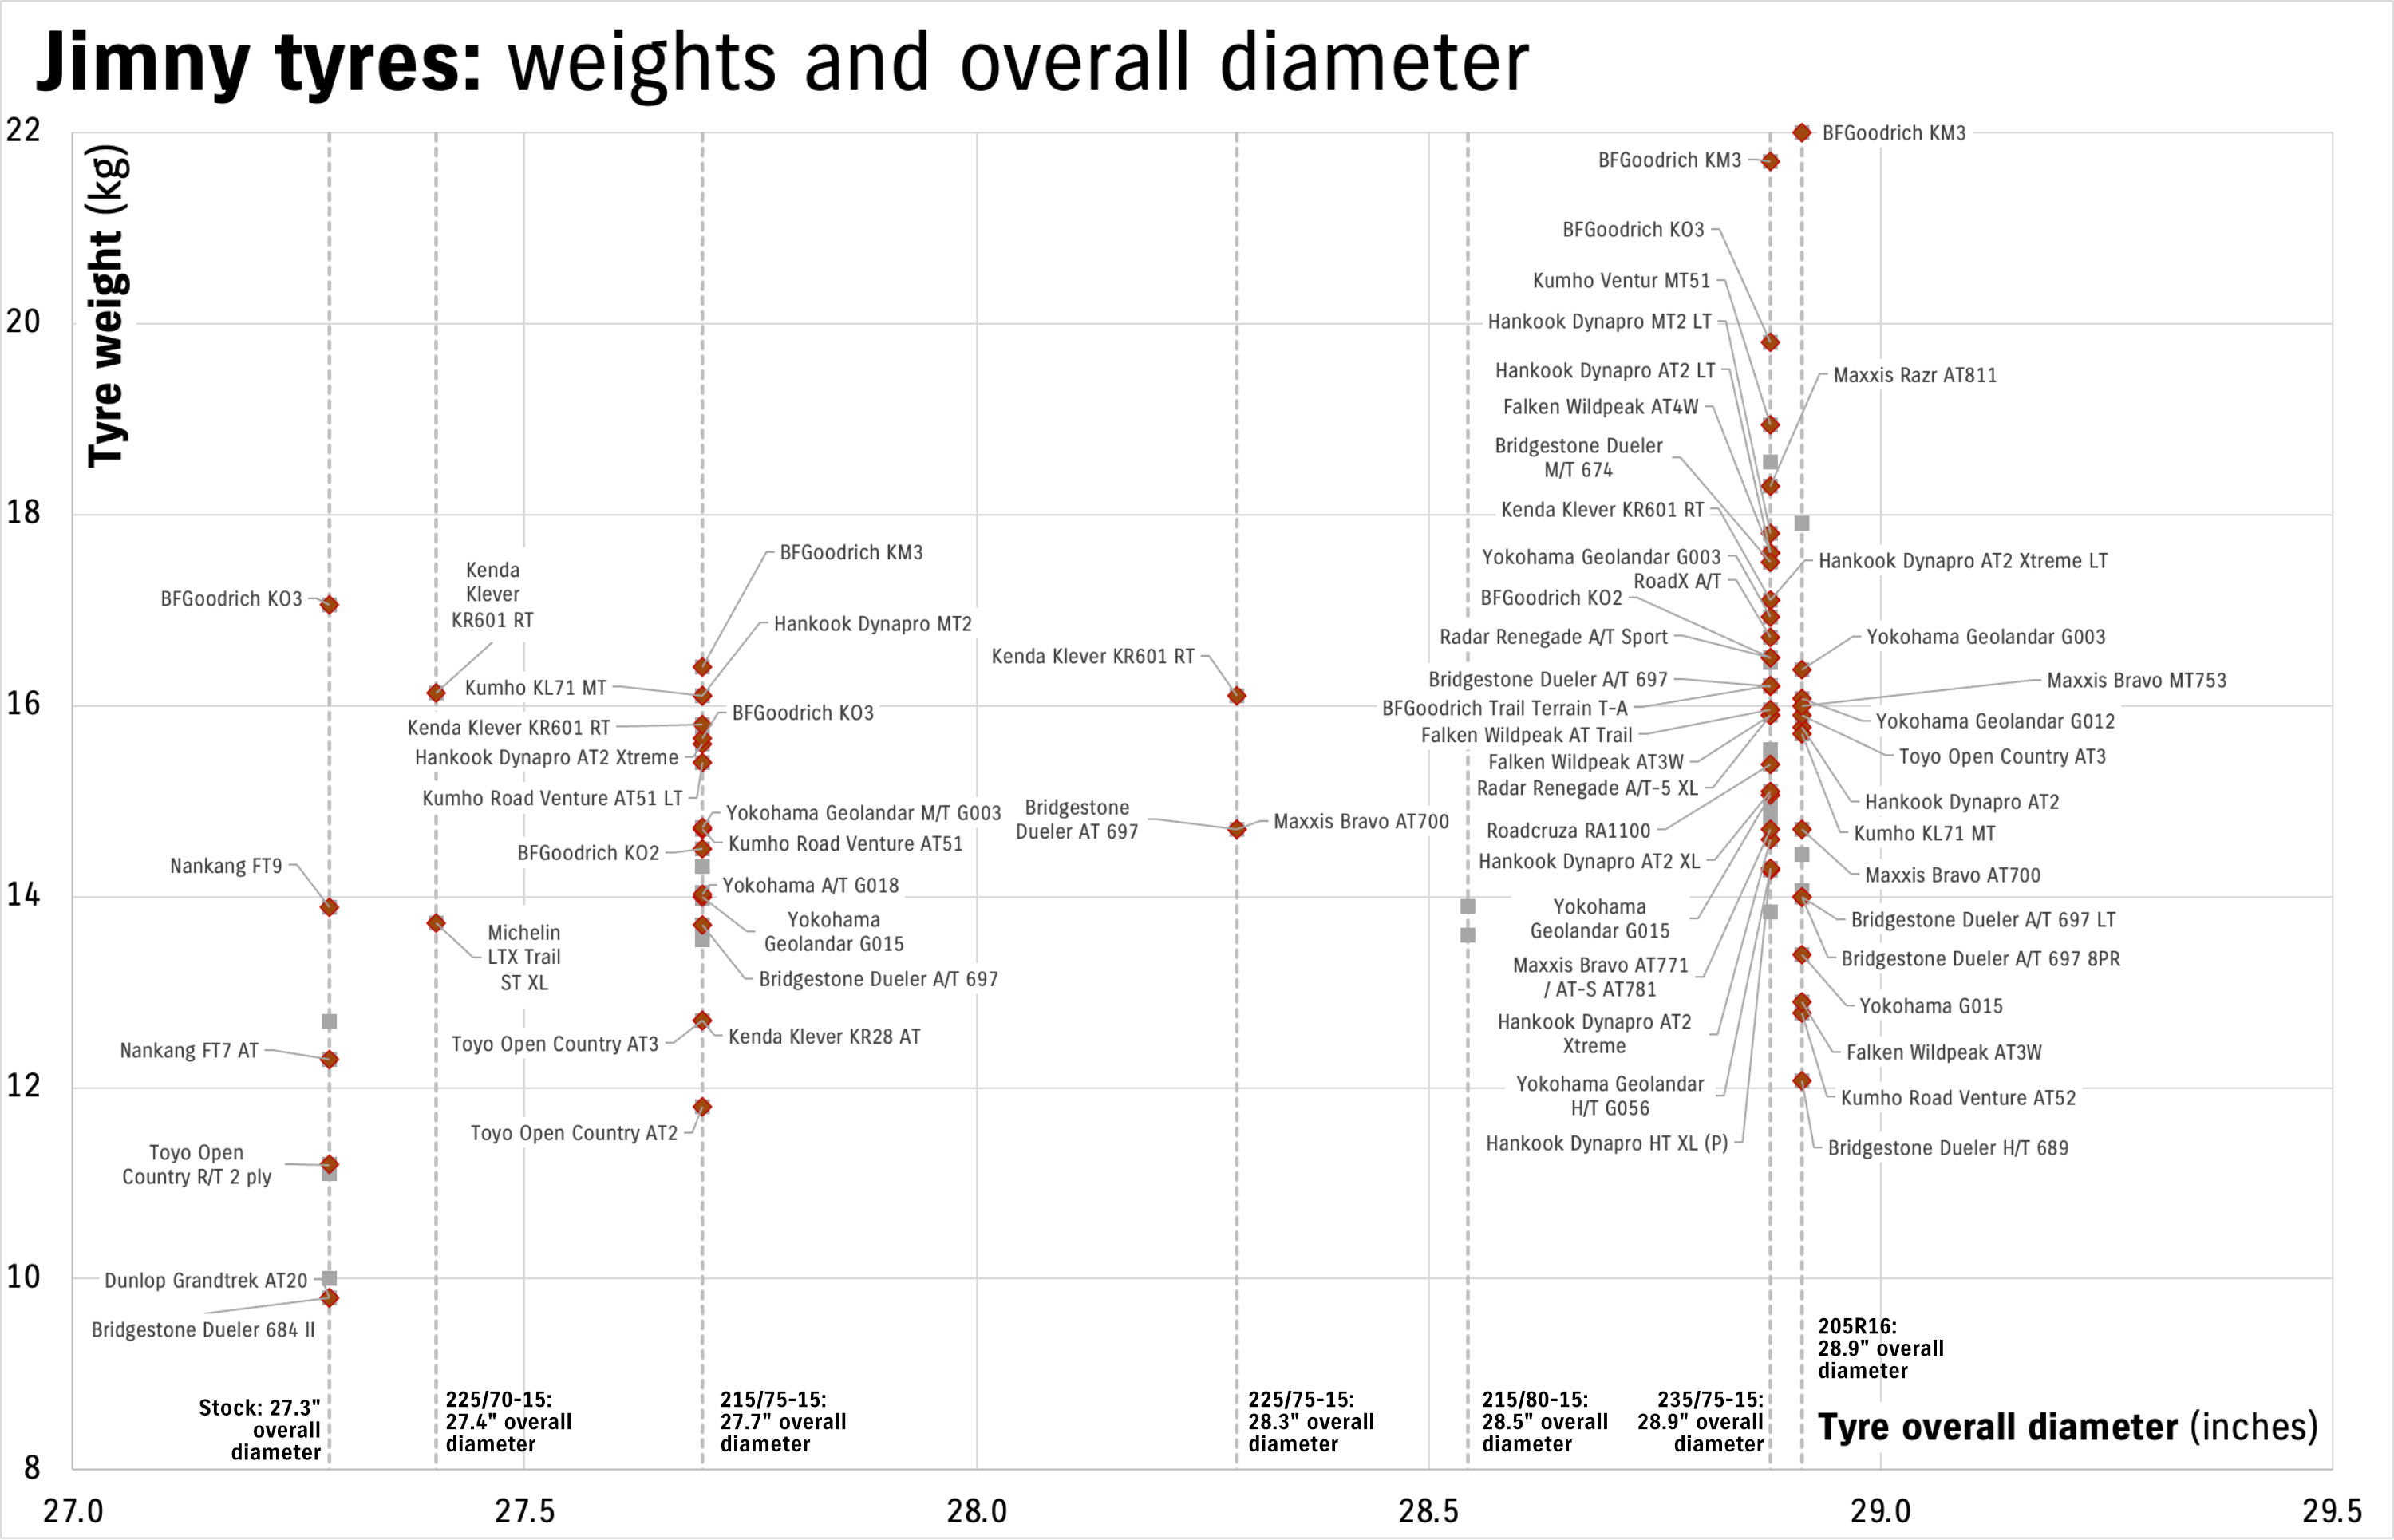
A few immediate things fall out of this data compilation:
- Bigger obviously weighs more; since a lot of that weight is out towards the tread then the larger diameter hurts you with worse inertia even for the same weight, and then you add higher weight. This is why larger tyres hurt your fuel economy more than you might think. In my experience it’s about 1L/100 km per tyre ‘size’ jump you make, e.g. up to 215/75-15 will be one jump, and then up to 235/75-15 is another jump.
- Later generation tyres have generally got heavier. BFGoodrich KO2 to KO3, Falken Wildpeak AT3 to AT4, and Toyo Open Country AT2 to AT3 all have got heavier, sometimes by a reasonable amount
- While mud terrain tyres can weigh more than allterrain tyres, it is possible to go for a more aggressive tyre and have less weight compared to some of the allterrains.
- Load rating has a huge impact on weight: the higher the load rating, the more strength needed in the tyre and therefore the heavier it is. In general, higher load rated tyres will also not ‘bag out’ offroad as effectively when the pressures are reduced for more traction. This is especially true with something lightweight like the Jimny.
These trends are best illustrated by looking at a few tyres that best illustrate it. I’ve picked out data for some allterrains (BFGoodrich KO2 and KO3, Toyo Open Country AT3) and also mud terrains (Yokohama Geolandar M/T G003 and BFGoodrich KM3).
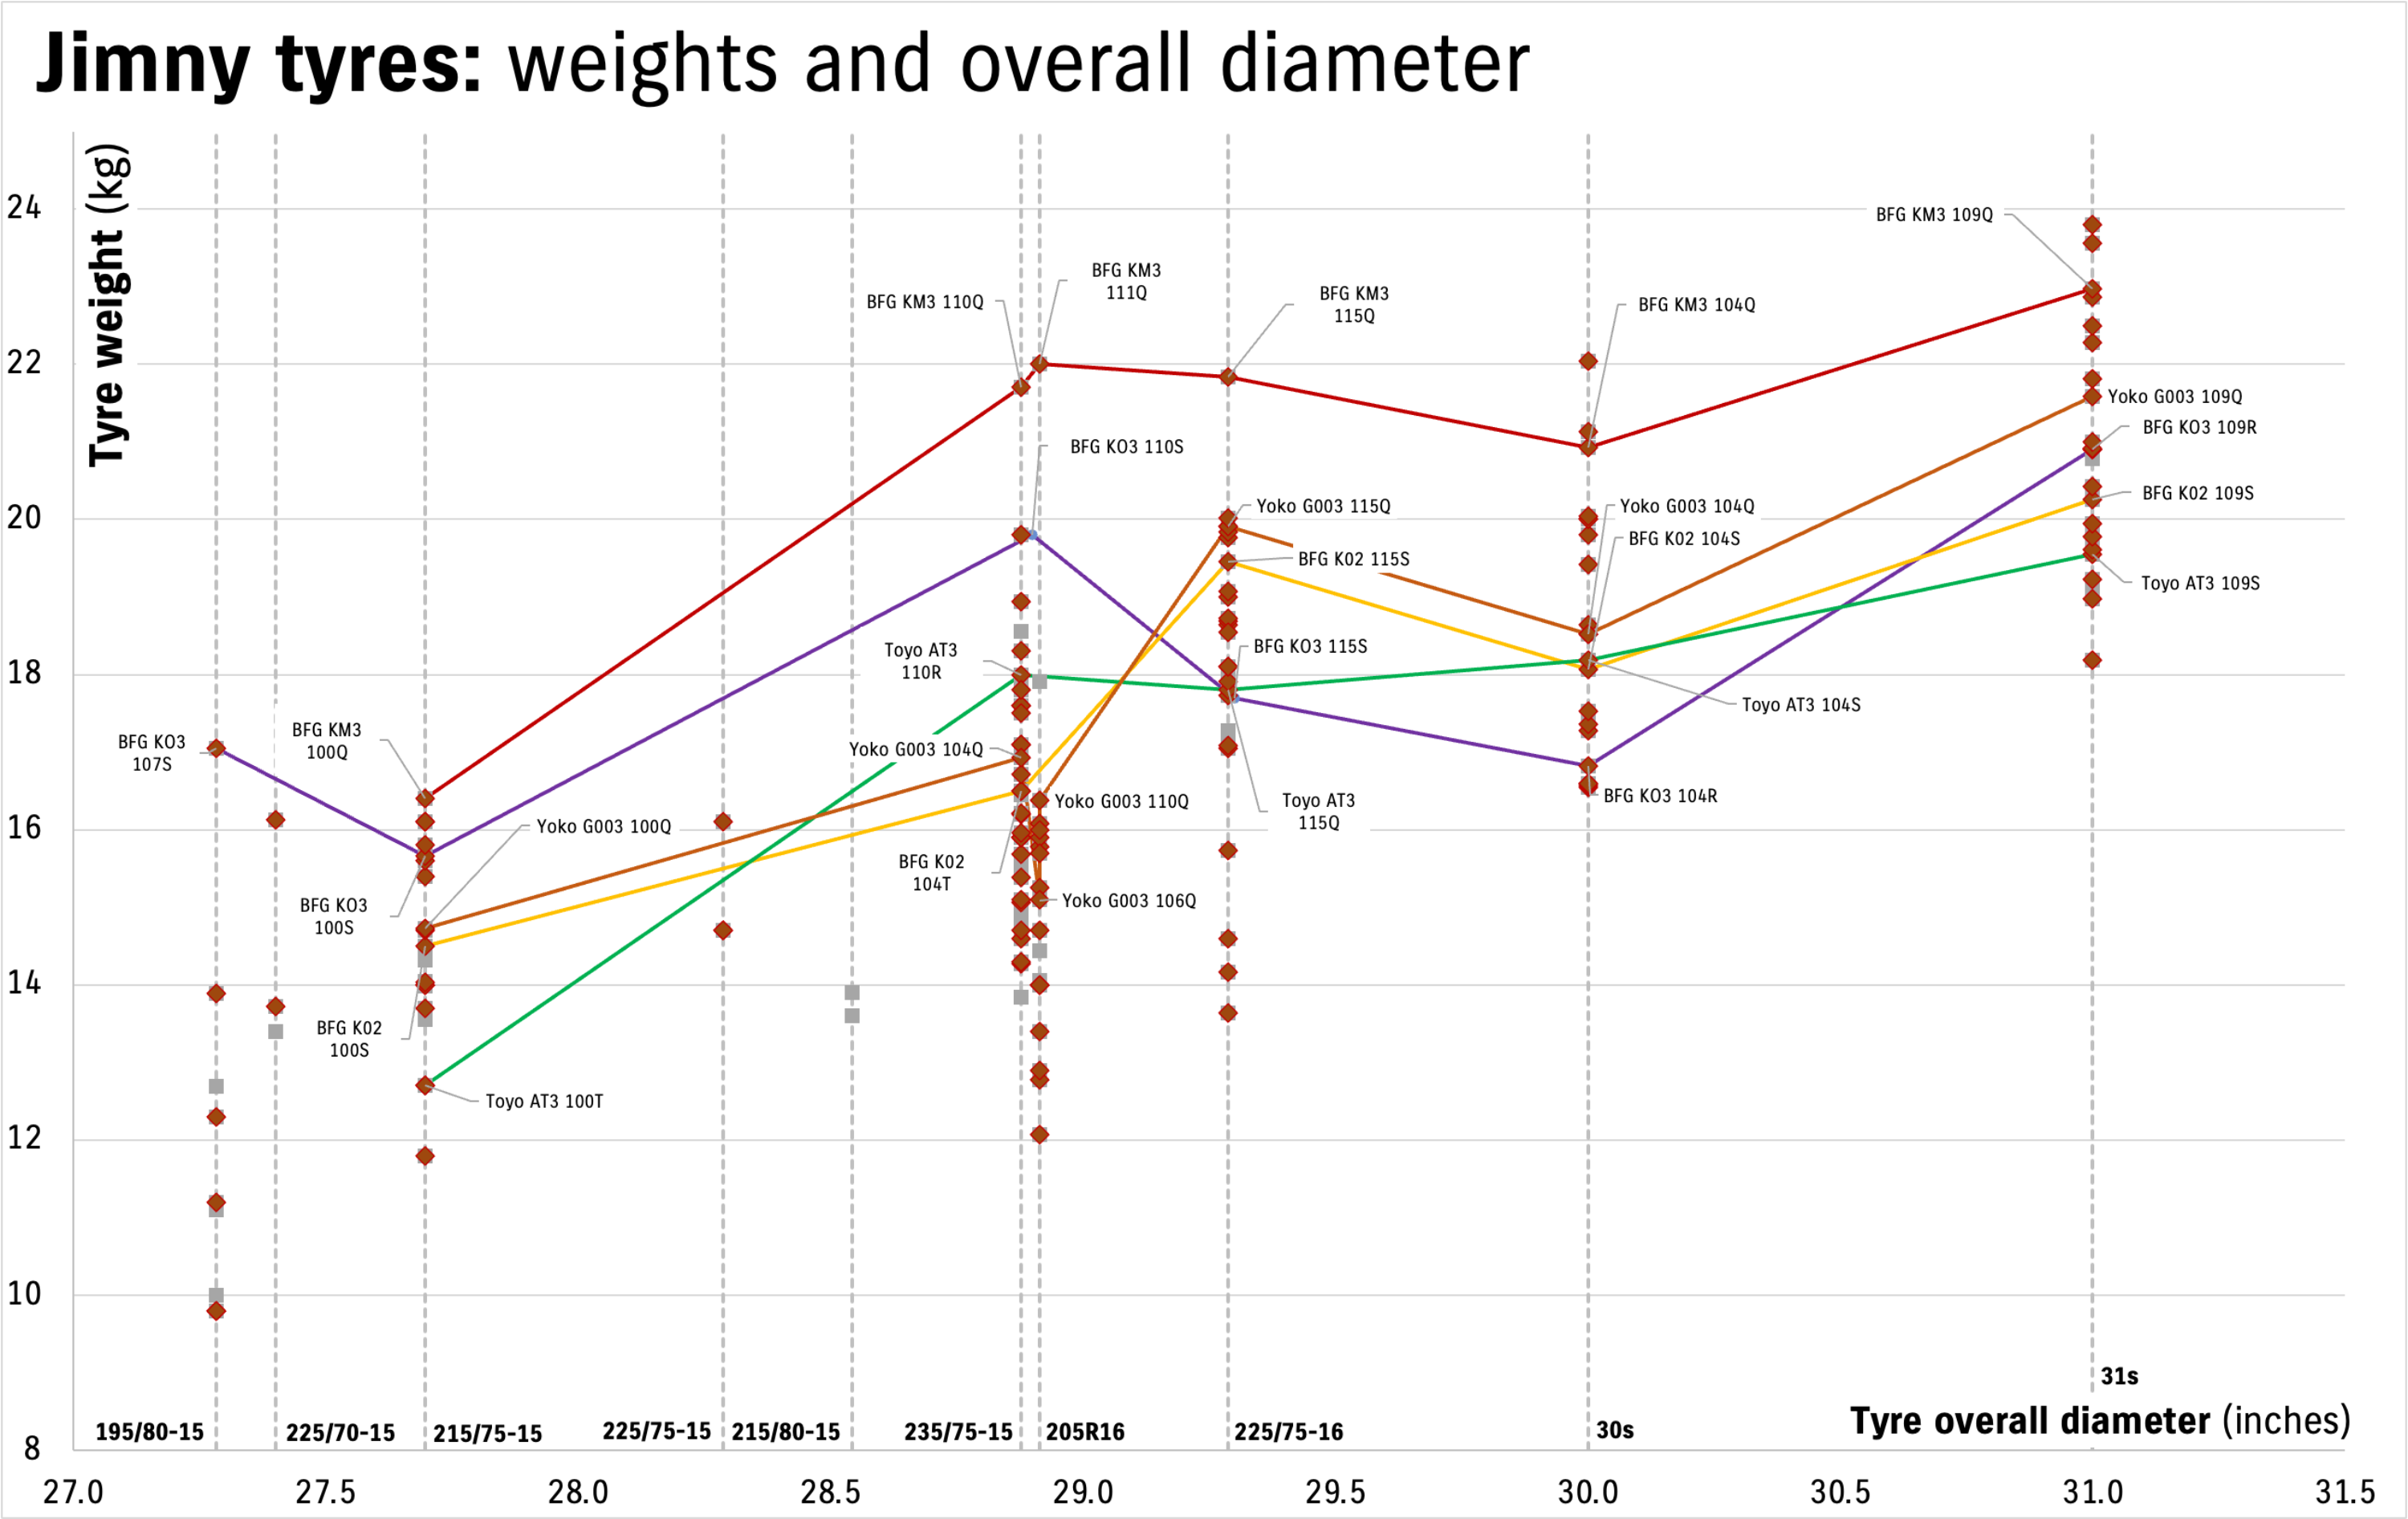
While it is true that, in general, larger tyres weigh more, there’s definitely some other factors that come into it. Load rating matters too, which is why 235s end up weighing more than 30×9.5-15 tyres for many of these examples. Toyo AT3s might weigh less in a 215, but weigh more than a BFGoodrich KO2 in larger sizes (or similar weights). It’s also possible to get a mud terrain tyre, like a Yokohama G003, in a lighter weight than some allterrains, so there’s also some optimisation that can be had there, too.
This plot gets super messy once you go out beyond legal sizes into the 225/75-16, 30″ and 31″ tyres, which is why I’ve not plotted them in the earlier compilation.
In terms of my compilation there’s a few caveats:
Not all weights for tyres are easily available, but I will keep up older/discontinued tyres as reference material. Weights are as accurate as I can find them. All load/speed indexes are the single wheel load (e.g. 215 KO2s are 100/97S, where 100 is the load index for single use, S is the speed class and 97 would be the load if mounted as dual tyres). Tyre weights are rounded to the nearest 10th of a kilogram, though calculations of % are done to the higher precision.
Class of tyre is going to be contentious, but I’m going to just split it between highway (H/T), all terrain (A/T) and mud terrain (M/T). ‘RT’ or rough terrain tyres will go in as all terrains, even if they are more aggressive than some A/Ts (but less than some others!).
I have also split the table into meaningful size classes but it’s biased around what suits most people. If you’re looking to go bigger than a legal fitment size and/or you’re going through the process of engineering then you’re probably advanced enough to do your own research in this space.
Finally, it should be obvious but I’ve sorted the table by class of tyre (H/T, then A/T, then M/T) and then sorted by weights.
I’ve started to compile the EU tyre ratings as an indicator of fuel economy/rolling resistance, wet road handling, and the noise rating (in dB). Where a range is given for a tyre, I use the worse of the scores given, e.g. if noise is 71-73 dB I’ll put in 73 dB. A is the best score in the fuel economy and wet road handling, E the worst. Interestingly, most people would rank BFGoodrich KO2s as bad in the wet, yet they rank some of the best in these official rankings; also, reviewers claim the KO3s are better in the wet but they rank worse than KO2s. ¯\_(ツ)_/¯
Stock size (195/80R15)
These are hard to find but interestingly it’s a tyre size BFGoodrich are targeting with their new KO3 allterrains. While heavy, they are a much higher load rating than other tyres in this size. If you’re running a GVM upgrade, want to stick to a stock size but want something that’s more rugged for heavy outback touring then this is the tyre for you. Another good option that balances weight and more offroad focussed tread is the Toyo Open Country R/T.
| Type | Brand / model | Load/speed index | Tyre weight (kg) | Weight difference to stock (kg, then %) | EU fuel economy | EU wet road rating | EU noise rating |
|---|---|---|---|---|---|---|---|
| H/T | Bridgestone Dueler H/T 684 II (Stock tyre) | 96S | 9.8 | 0 / 0% | C | C | 71 dB |
| H/T | Dunlop Grandtrek AT20 (Stock tyre) | 96S | 9.8 | 0 / 0% | C | D | 67 dB |
| A/T | Yokohama Geolandar G015 | 96H | 11.1 | +1.3 kg / +13% | E | C | 73 dB |
| A/T | Toyo Open Country R/T 2 ply | 96Q | 11.2 | +1.4 kg / +14% | D | C | 73 dB |
| M/T | Yokohama Geolandar G003 | 96S | 11.4 | +1.6 kg / 16% | – | – | – |
| A/T | Nankang FT7 AT | 96S | 12.3 | +2.5 kg / +26% | – | – | – |
| A/T | Cooper Discoverer AT3 Sport 2 XL | 100T | 12.7 | +2.9 kg / +30% | D | 71 dB | |
| A/T | Nankang FT9 | 107N | 13.9 | +4.1 kg / +42% | – | – | – |
| A/T | BFGoodrich KO3 | 107S | 17.1 | +7.3 kg / +74% | E | C | 74 dB |
Basically stock size: 225/70-15
Nominally this section width requires replacement wheels, at least in Australia to keep it fully legal, but it is the closest to the factory diameter. Very few offroad oriented tyres exist in this size in Australia, but there are a couple more in other markets.
| Type | Brand / model | Load/speed index | Tyre weight (kg) | Weight difference to stock (kg, then %) | EU fuel economy | EU wet road rating | EU noise rating |
|---|---|---|---|---|---|---|---|
| H/T | Michelin LTX Trail ST XL | 104T | 13.7 | +3.9 kg / +40% | – | – | – |
| A/T | Kumho Road Venture AT52 | 100T | 13.4 | +3.6 / +37% | D | E | 72 dB |
| A/T | Kenda Klever KR601 RT | 102Q | 16.1 | +6.3 kg / +65% | – | – | – |
‘215s’
(215/75-15, 1.5% over stock)
These are somewhat overlooked by people who want to go bigger. While only a minimal increase in overall diameter compared to stock, it does afford you a lot more choice in tyres. Most people going to this size will be going allterrains but it can be a good option for mud terrains, and highway terrains do exist. The supply chain disruption through covid has meant a lot less availability of these tyres, even now we’re fully ‘back to normal’. It does pay to check what you can get before getting too excited about some of these options.
There’s a few good tyres in this range. Open Country AT3s are popular, the KO3s are proving to be more popular for better on road manners than the older KO2s and best in class offroad performance, Kumho AT52s (supersede the AT51s I list here) are also popular, as are Yokohama Geolandar ATs.
| Type | Brand / model | Load/speed index | Tyre weight (kg) | Weight difference to stock (kg, then %) | EU fuel economy | EU wet road rating | EU noise rating |
|---|---|---|---|---|---|---|---|
| A/T | Toyo Open Country AT2 | 100S | 11.8 | +2.0 kg / 20% | D | D | 70 dB |
| A/T | Kenda Klever KR28 AT | 100S | 12.7 | +2.9 kg / 30% | – | – | – |
| A/T | Toyo Open Country AT3 | 100T | 12.7 | +2.9 kg / 30% | D | D | 72 dB |
| A/T | Roadcruza RA1100 | 100S | 13.6 | +3.8 kg / 38% | D | D | 71 dB |
| A/T | Bridgestone Dueler A/T 697 | 100S | 13.7 | +3.9 kg / 40% | – | – | – |
| A/T | Yokohama Geolandar G015 | 100S | 14.0 | +4.2 kg / 43% | E | C | 73 dB |
| A/T | Yokohama Geolandar G018 | 106S | 14.0 | +4.2 kg / 43% | E | B | 75 dB |
| A/T | General Grabber AT3 | 100T | 14.0 | +4.2 kg / 43% | E | D | 72 dB |
| A/T | Falken Wildpeak AT Trail | 100T | 14.0 | +4.2 kg / 43% | – | – | – |
| A/T | Falken Wildpeak AT3W | 100T | 14.0 | +4.2 kg / 43% | D | C | 75 dB |
| A/T | General Grabber ATX | 100T | 14.3 | +4.5 kg / 46% | E | D | 72 dB |
| A/T | BFGoodrich KO2 | 100S | 14.5 | +4.7 kg / 48% | E | B | 74 dB |
| A/T | Kumho Road Venture AT51 | 106R | 14.7 | +4.9 kg / 50% | – | – | – |
| A/T | Hankook Dynapro AT2 | 100S | 14.9 kg | +5.1 kg / 52% | – | – | – |
| A/T | Kumho Road Venture AT52 | 106R | 15.2 | +5.4 kg / 55% | – | – | – |
| A/T | Kumho Road Venture AT51 LT | 106R | 15.4 | +5.6 kg / 57% | – | – | – |
| A/T | Hankook Dynapro AT2 Xtreme | 100S | 15.6 | +5.8 kg / 59% | E | C | 73 dB |
| A/T | BFGoodrich KO3 | 100S | 15.7 | +5.9 kg / 60% | E | C | 74 dB |
| A/T | Kenda Klever KR601 RT | 100Q | 15.8 | +6.0 kg / 61% | – | – | – |
| M/T | Yokohama Geolandar M/T G003 | 100Q | 14.7 | +4.9 kg / 50% | – | – | – |
| M/T | Hankook Dynapro MT2 | 100Q | 16.1 | +6.3 kg / 64% | – | – | – |
| M/T | Kumho KL71 MT | 106Q | 16.1 | +6.3 kg / 64% | – | – | – |
| M/T | BFGoodrich KM3 | 100Q | 16.4 | +6.6 kg / 67% | – | – | – |
28″ tyres
(215/70-16)
If you’re switching over to 16″ rims, this is the ‘sort-of’ stock size option you’d go for. There’s a lot of highway terrain tyres, plus also a lot of tyres designed for commercial vans in this size, so it’s slimmer pickings for offroad tyres.
| Type | Brand / model | Load/speed index | Tyre weight (kg) | Weight difference to stock (kg, then %) | EU fuel economy | EU wet road rating | EU noise rating |
|---|---|---|---|---|---|---|---|
| A/T | Bridgestone Dueler 697 | 108S | 12.0 | +2.2 kg / +22% | – | – | – |
| A/T | Yokohama AT4 G018 | 100H | 12.1 | +2.3 kg / +23% | – | – | – |
| A/T | Falken Wildpeak A/T Trail | 104H | 12.2 | +2.4 kg / +25% | – | – | – |
| A/T | Toyo Open Country AT2 | 99S | 12.3 | +2.5 kg / +25% | – | – | – |
| A/T | Yokohama Geolandar G015 | 100H | 12.5 | +2.7 kg / +27% | E | C | 70 |
| A/T | Bridgestone Dueler 002 | 100T | 12.6 | +2.8 kg / +28% | C | C | 72 |
| A/T | Hankook Dynapro AT2 Xtreme | 100T | 12.8 | +3.0 kg / +31% | – | – | – |
| A/T | Yokohama Geolandar X-AT G016 | 100Q | 12.8 | +3.0 kg / +31% | – | – | – |
| A/T | Toyo Open Country AT3 | 100T | 12.9 | +3.1 kg / +31% | D | D | 72 |
| A/T | Cooper Discoverer AT3 Sport 2 | 100T | 13.4 | +3.6 kg / +36% | D | C | 71 |
| A/T | Falken Wildpeak AT3W | 100H | 13.4 | +3.6 kg / +37% | D | D | 70 |
| A/T | General Grabber AT3 | 100T | 14.6 | +4.8 kg / +49% | E | D | 72 |
| A/T | Kumho Road Venture AT51 | 108R | 14.7 | +4.9 kg / +50% | – | – | – |
| A/T | BFGoodrich KO2 | 100R | 15.6 | +5.8 kg / +59% | E | B | 74 |
| A/T | BFGoodrich KO3 | 100S | 17.2 | +7.4 kg / +75% | E | C | 74 |
28.5″ tyres
(215/80-15 or 225/75-15, 4.4% over stock)
These are rare to find, especially in 215/80-15, as they’re somewhat of an intermediate tyre. 215/80-15 would be the largest overall diameter you can fit on stock rims legally, due to the width of the stock rims. 225/70-15 works out to be a similar (but not identical) diameter, hence grouped here though the width aspect is the tricky part as you could need different wheels if your tyre fitted won’t fit them to the stock wheels.
There’s a couple I can’t find weights for but I would pick, e.g. the Bridgestone D697s in 215/80-15. These would would be my pick for a reasonable allterrain in this size, though they aren’t always in stock in Australia.
I’ve tried to order this table a bit on vibes for weights: in general, the Nankang FTs are lighter than the Bridgestones, and the higher load rating & taller sidewall of the 215/80-15 D697 would make it heavier than the 225/70-15 in the same size if I had to guess.
| Type | Brand / model | Load/speed index | Tyre weight (kg) | Weight difference to stock (kg, then %) | EU fuel economy | EU wet road rating | EU noise rating |
|---|---|---|---|---|---|---|---|
| A/T | Yokohama Geolandar G015 AT 215/80-15 | 102S | 13.6 | +3.8 kg / 39% | E | C | 70 dB |
| A/T | Goodyear Wrangler A/T Adventure 215/80-15 | 111T | 13.9 | +4.1 kg / 42% | D | D | 73 dB |
| A/T | Nankang FT7 AT 215/80-15 | 102S | – | – | – | – | – |
| A/T | Bridgestone Dueler AT 697 225/75-15 | 110S | 14.7 | +4.9 kg / +51% | – | – | – |
| A/T | Maxxis Bravo AT700 225/75-15 | 110S | 14.7 | +4.9 kg / +51% | |||
| A/T | Bridgestone Dueler AT 697 215/80-15 | 113R | – | – | – | – | – |
| A/T | Kenda Klever KR601 RT 225/75-15 | 102Q | 16.1 | +6.3 kg / +64% | – | – | – |
‘235s’
(235/75-15, 5.9% over stock)
This is the most commonly picked size for going ‘larger’ for meaningful clearance. It does come with some gearing/weight compromises plus you start to need to trim away plastic parts at the back of the factory bumpers to truly make it work. Nothing serious, however; no major surgery.
Similar comments to the 215s: KO3s, AT52s, some of the Dynapro AT2s, D697s, Open Country AT3s and Geolandar ATs are common. For more offroad biased people the Maxxis AT811 is popular albeit closer to a mud terrain tyre in tread and weight than an allterrain.
| Type | Brand / model | Load/speed index | Tyre weight (kg) | Weight difference to stock (kg, then %) | EU fuel economy | EU wet road rating | EU noise rating |
|---|---|---|---|---|---|---|---|
| H/T | Yokohama Geolandar H/T G056 | 108T | 14.3 | +4.5 kg / +46% | D | D | 70 dB |
| H/T | Hankook Dynapro HT XL (P) | 108T | 14.3 | +4.5 kg / +46% | – | – | – |
| A/T | Cooper Discoverer AT3 Sport | 105T | 13.8 | 4.0 41% | D | C | 72 dB |
| A/T | Hankook Dynapro AT2 Xtreme | 109T | 14.6 | +4.8 kg / +49% | E | C | 73 dB |
| A/T | Maxxis Bravo AT771 / AT-S AT781 | 109S | 14.7 | +4.9 kg / +50% | D | D | 72 dB |
| A/T | Goodyear Wrangler A/T Adventure XL | 109T | 14.8 | +5.0 kg / +51% | D | D | 72 dB |
| A/T | Cooper Discoverer AT3 Sport 2 | 109T | 15.0 | +5.2 kg / +53% | D | C | 72 dB |
| A/T | Yokohama Geolandar G015 | 109H | 15.1 | +5.3 kg / +54% | E | C | 70 dB |
| A/T | Hankook Dynapro AT2 XL | 109T | 15.1 | +5.3 kg / +54% | D | D | 72 dB |
| A/T | Roadcruza RA1100 | 105T | 15.4 | +5.6 kg / +57% | C | E | 75 dB |
| A/T | Nexen Rodian A/T | 104S | 15.5 | +5.7 kg / +59% | D | D | 72 dB |
| A/T | Kumho Road Venture AT52 | 109T | 15.7 | +5.9 kg / +60% | E | D | 72 dB |
| A/T | Falken Wildpeak AT3W | 109T | 15.9 | +6.1 kg / +62% | D | B | 75 dB |
| A/T | Radar Renegade A/T-5 XL | 109T | 15.9 | +6.1 kg / +62% | E | E | 72 dB |
| A/T | Falken Wildpeak AT Trail | 105T | 16.0 | +6.2 kg / +63% | – | – | – |
| A/T | Bridgestone Dueler A/T 697 | 110S | 16.2 | +6.4 kg / +65% | – | – | – |
| A/T | BFGoodrich Trail Terrain T-A | 109T | 16.2 | +6.4 kg / +65% | E | E | 72 dB |
| A/T | BFGoodrich KO2 | 104T | 16.5 | +6.7 kg / +68% | E | B | 75 dB |
| A/T | Yokohama Geolandar G015 (LT) | 104S | 16.5 | +6.7 kg / +68% | E | C | 73 dB |
| A/T | Radar Renegade A/T Sport | 110S | 16.5 | +6.7 kg / +68% | D | B | 75 dB |
| A/T | RoadX A/T | 110R | 16.7 | +6.9 kg / +71% | E | B | 72 dB |
| A/T | Hankook Dynapro AT2 Xtreme LT | 104S | 17.1 | +7.3 kg / +74% | D | D | 72 dB |
| A/T | Kenda Klever KR601 RT | 104Q | 17.1 | +7.3 kg / +74% | – | – | – |
| A/T | Falken Wildpeak AT4W | 109T | 17.6 | +7.8 kg / +80% | – | – | – |
| A/T | Hankook Dynapro AT2 LT | 104S | 17.6 | +7.8 kg / +80% | – | – | – |
| A/T | Maxxis Razr AT811 | 110S | 18.3 | +8.5 kg / +87% | – | – | – |
| A/T | BFGoodrich KO3 | 110S | 19.8 | +10.0 kg / +102% | E | C | 75 dB |
| M/T | Yokohama Geolandar G003 | 104Q | 16.9 | +7.1 kg / +73% | – | – | – |
| M/T | Bridgestone Dueler M/T 674 | 110Q | 17.5 | +7.7 kg / +79% | – | – | – |
| M/T | Hankook Dynapro MT2 RT05 | 104Q | 17.5 | +7.7 kg / +79% | – | – | – |
| M/T | Hankook Dynapro MT2 LT | 104Q | 17.8 | +8.0 kg / +82% | – | – | – |
| M/T | Kumho Ventur MT51 | 110Q | 17.8 | +9.1 kg / +93% | – | – | – |
| M/T | Kumho Road Venture MT KL71 | 104Q | 18.6 | +8.8 kg / +89% | – | – | – |
| M/T | BFGoodrich KM3 | 110Q | 18.9 | +11.9 kg / +121% | – | – | – |
29″ on 16″ rim
(205R16, 5.9% over stock)
This happens to be my pick because you end up with a lighter tyre and less rolling resistance. Narrow tyres also (theoretically) have some benefits in how their footprint changes. I also find it makes the Jimny look more stock. If that’s what you’re after then great, it can be a good way to divert police attention away to other modified vehicles. If you’re after a chunky look then this isn’t the route to go down.
D697s are a popular choice as they’re super common on dual cab utes as a base specification tyre.
| Type | Brand / model | Load/speed index | Tyre weight (kg) | Weight difference to stock (kg, then %) | EU fuel economy | EU wet road rating | EU noise rating |
|---|---|---|---|---|---|---|---|
| H/T | Bridgestone Dueler H/T 689 | 110R | 12.1 | +2.3 kg / +23% | C | C | 72 dB |
| A/T | Falken Wildpeak AT3W | 104T | 12.9 | +3.1 kg / +32% | E | B | 71 dB |
| A/T | Yokohama G015 | 104T | 13.4 | +3.6 kg / +37% | E | C | 70 dB |
| A/T | Kumho Road Venture AT52 | 110S | 13.9 kg | +4.1 kg / +42% | D | D | 72 dB |
| A/T | Bridgestone Dueler A/T 697 8PR | 110S | 14.0 | +4.2 kg / +43% | – | – | – |
| A/T | Bridgestone Dueler A/T 697 LT | 112S | 14.0 | +4.2 kg / +43% | – | – | – |
| A/T | Goodyear Wrangler A/T Adventure | 110S | 14.1 | +4.3 kg / +43% | – | – | – |
| A/T | Cooper Discoverer AT3 Sport 2 | 110S | 14.4 | +4.6 kg / +47% | – | – | – |
| A/T | Maxxis Bravo AT70 | 110Q | 14.7 | +4.9 kg / +50% | – | – | – |
| A/T | Dunlop SP Road Gripper F | 106N | 15.3 | +5.5 kg / +56% | – | – | – |
| A/T | Hankook Dynapro AT2 | 110R | 15.8 | +6.1 kg / +62% | E | C | 73 dB |
| A/T | Toyo Open Country AT3 | 112S | 15.9 | +6.1 kg / +62% | E | D | 75 dB |
| A/T | Kumho Road Venture AT51 | 112R | 16.0 | +6.2 kg / 63% | – | – | – |
| A/T | Yokohama Geolandar G012 | 110R | 16.1 | +6.3 kg / +64% | – | – | – |
| A/T | Falken Wildpeak AT3W | 110R | 16.6 | +6.8 kg / 69% | D | B | 71 dB |
| A/T | Toyo M55F | 112Q | 17.0 | +7.2 kg / 73% | – | – | – |
| A/T | General Grabber X3 | 110Q | 17.9 | +8.1 kg / +83% | – | – | – |
| M/T | Kumho KL71 MT | 104Q | 15.7 | +5.9 kg / +60% | – | – | – |
| M/T | Maxxis M8060 Trepador | 110Q | 15.9 | +6.1 kg / +62% | – | – | – |
| M/T | Maxxis Bravo MT753 | 110Q | 16.0 | +6.2 kg / +63% | D | C | 72 dB |
| M/T | Yokohama Geolandar G003 | 106Q 110Q | 15.1 16.4 | +5.3 kg / 54% +6.6 kg / +67% | – – | – – | – – |
| M/T | BFGoodrich KM3 | 111Q | 22.0 | +12.2 kg / +124% | – | – | – |
Then we can get into the not exactly legal in Australia, at least without engineering, sizes. A 225/75-16 is not legal on a Jimny by exactly 1 mm, alas, which is annoying as it provides some good sizes. 30s and 31s would be the most commonly really big tyre people run. Beyond that, a mid 32″ tyre like a 235/85-16 or even 33″ tyres would be the next step… at the point at which you want them then you need more insights than just what you read on a random internet page though. Practically, a 235 is a more than sufficient tyre for the vast majority of Jimny owners, even those who wheel their cars very hard in tricky terrain.
235/70-16
This is the other 29″ tyre on a 16″ rim option.
| Type | Brand / model | Load/speed index | Tyre weight (kg) | Weight difference to stock (kg, then %) | EU fuel economy | EU wet road rating | EU noise rating |
|---|---|---|---|---|---|---|---|
| A/T | Bridgestone Dueler 697 | 110S | 13.1 | +3.3 kg / +34% | – | – | – |
| A/T | Yokohama AT4 G018 | 106T | 14.0 | +4.2 kg / +42% | – | – | – |
| A/T | Pirelli Scorpion AT Plus | 106T | 14.5 | +4.7 kg / +48% | – | – | – |
| A/T | Yokohama Geolandar G015 | 104T | 14.7 | +4.9 kg / +50% | – | – | – |
| A/T | Hankook Dynapro AT2 Xtreme | 109T | 14.8 | +5.0 kg / +51% | – | – | – |
| A/T | Kumho Road Venture AT51 | 104T | 14.8 | +5.0 kg / +51% | – | – | – |
| A/T | Kumho Road Venture AT52 | 106T | 15.0 | +5.2 kg / +53% | – | – | – |
| A/T | Michelin LTX Trail | 109T | 15.0 | +5.2 kg / +53% | – | – | – |
| A/T | Falken Wildpeak AT3W | 109T | 16.7 | +6.9 kg / +71% | – | – | – |
| A/T | BFGoodrich Trail Terrain T-A | 106T | 16.8 | +7.0 kg / +72% | – | – | – |
| A/T | Yokohama AT4 G018 | 110S | 17.0 | +7.2 kg / +73% | – | – | – |
| A/T | Falken Wildpeak AT4W | 109T | 17.4 | +7.6 kg / +77% | – | – | – |
| A/T | Yokohama Geolandar X-AT G016 | 104Q | 18.3 | +8.5 kg / +87% | – | – | – |
| A/T | BFGoodrich KO3 | 110S | 20.5 | +10.7 kg / +109% | – | – | – |
| M/T | Yokohama Geolandar M/T G003 | 100Q | 12.8 | +3.0 kg / +31% | – | – | – |
| M/T | Yokohama Geolandar M/T G003 | 104Q | 16.8 | +7.0 kg / +72% | – | – | – |
| M/T | BFGoodrich KM3 | 110Q | 22.3 | +12.5 kg / +127% | – | – | – |
225/75-16 (barely not legal)
| Type | Brand / model | Load/speed index | Tyre weight (kg) | Weight difference to stock (kg, then %) | EU fuel economy | EU wet road rating | EU noise rating |
|---|---|---|---|---|---|---|---|
| A/T | Toyo Open Country AT3 | 115Q | 13.6 | +3.8 kg / +39% | – | – | – |
| A/T | Cooper Discoverer AT3 Sport 2 | 104T | 14.2 | +4.4 kg / +45% | D | C | 71 |
| A/T | Hankook Dynapro AT2 RF11 | 108T | 14.6 | +4.8 kg / +49% | D | D | 72 |
| A/T | BFGoodrich Trail Terrain T-A | 108T | 15.7 | +5.9 kg / +61% | E | E | 72 |
| A/T | Yokohama Geolandar X-AT G017 | 115S | 17.0 | +7.2 kg / 74% | – | – | – |
| A/T | Yokohama Geolandar AT4 G018 | 115S | 17.1 | +7.3 kg / +74% | E | B | 75 |
| A/T | Toyo M55F | 115Q | 17.3 | +7.5 kg / 77% | – | – | – |
| A/T | BFGoodrich KO3 | 115S | 17.7 | +7.9 kg / +81% | – | – | – |
| A/T | Toyo Open Country AT3 | 115Q | 17.8 | +8.0 kg / +82% | – | – | – |
| A/T | Yokohama Geolandar G015 | 115S | 17.9 | +8.1 kg / +83% | – | – | – |
| A/T | Falken Wildpeak AT3W | 115S | 18.1 | +8.3 kg / +85% | E | C | 73 |
| A/T | Kumho Road Venture AT52 | 115S | 18.1 | +8.3 kg / +85% | E | C | 73 |
| A/T | Kumho Road Venture AT51 | 115S | 18.6 | +8.8 kg / +90% | – | – | – |
| A/T | Hankook Dynapro AT2 Xtreme RF12 | 115S | 18.7 | +8.9 kg / +91% | E | C | 73 |
| A/T | Falken Wildpeak AT4W | 18.7 | +8.9 kg / +91% | – | – | – | |
| A/T | Hankook Dynapro AT2 RF11 | 115S | 19.0 | +9.2 kg / +94% | D | C | 73 |
| A/T | BFGoodrich KO2 | 115S | 19.5 | +9.7 kg / +99% | E | B | 74 |
| A/T | General Grabber AT3 | 115S | 19.8 | +10.0 kg / +102% | E | B | 75 |
| A/T | Cooper Discoverer ST MAXX | 115Q | 19.9 | +10.1 kg / +103% | F | C | 76 |
| A/T | Bridgestone Dueler A/T 697 | – | – | – | – | – | |
| M/T | Kumho Road Venture MT51 | 115Q | 18.6 | +8.8 kg / +89% | – | – | – |
| M/T | Hankook Dynapro MT2 RT05 | 115Q | 19.1 | +9.3 kg / +95% | – | – | – |
| M/T | Toyo Open Country MT | 115P | 19.8 | +10.0 kg / +102% | – | – | – |
| M/T | Yokohama Geolandar G003 | 115Q | 19.9 | +10.1 kg / +103% | – | – | – |
| M/T | Kumho Road Venture MT KL71 | 115Q | 20.0 | +10.2 kg / +104% | C | C | 78 |
| M/T | BFGoodrich KM3 | 115Q | 21.8 | +12.0 kg / +123% | – | – | – |
| M/T | Bridgestone Dueler M/T 673 | – | – | – | – | – |
30×9.50-15
| Type | Brand / model | Load/speed index | Tyre weight (kg) | Weight difference to stock (kg, then %) | EU fuel economy | EU wet road rating | EU noise rating |
|---|---|---|---|---|---|---|---|
| A/T | Yokohama Geolandar AT4 G018 | 104S | 16.5 | +6.7 kg / +69% | – | – | – |
| A/T | Yokohama Geolandar G015 | 104S | 16.6 | +6.8 kg / +69% | E | C | 73 |
| A/T | Kumho Road Venture AT52 | 104S | 16.6 | +6.8 kg / +69% | – | – | – |
| A/T | Toyo Open Country AT2 | 104S | 16.6 | +6.8 kg / +69% | – | – | – |
| A/T | BFGoodrich KO3 | 104R | 16.8 | +7.0 kg / +72% | – | – | – |
| A/T | Bridgestone Dueler A/T 697 | 104S | 17.3 | +7.5 kg / +76% | – | – | – |
| A/T | Hankook Dynapro AT2 Xtreme | 104S | 17.4 | +7.6 kg / +77% | E | C | 73 |
| A/T | BFGoodrich KO2 | 104S | 18.1 | +8.3 kg / +84% | E | B | 75 |
| A/T | Toyo Open Country AT3 | 104S | 18.2 | +8.4 kg / +86% | – | – | – |
| A/T | Kenda KR28 Klever AT | 104Q | 18.6 | +8.8 kg / +90% | – | – | – |
| A/T | Cooper Discoverer ST MAXX | 104S | 19.8 | +10.0 kg / +102% | – | – | – |
| A/T | Cooper Discoverer ST PRO | 104Q | 20.0 | +10.2 kg / +104% | – | – | – |
| A/T | Falken Wildpeak AT4W | 104S | 20.0 | +10.2 kg / +104% | – | – | – |
| A/T | Falken Wildpeak AT3W | 104S | 20.0 | +10.2 kg / +105% | – | – | – |
| M/T | Kumho KL71 MT | 104Q | 17.5 | +7.7 kg / +79% | F | C | 78 |
| M/T | Hankook Geolandar G003 | 104Q | 18.5 | +8.7 kg / +89% | – | – | – |
| M/T | Kenda Klever KR29 MT | 104Q | 19.4 | +9.6 kg / +98% | – | – | – |
| M/T | BFGoodrich KM3 | 104Q | 20.9 | +11.1 kg / +114% | – | – | – |
| M/T | Falken Wildpeak MT | 104Q | 21.1 | +11.3 kg / +116% | – | – | – |
| M/T | Hankook Dynapro MT2 | 104Q | 22.0 | +12.2 kg / +125% | – | – | – |
31×10.5-15
| Type | Brand / model | Load/speed index | Tyre weight (kg) | Weight difference to stock (kg, then %) | EU fuel economy | EU wet road rating | EU noise rating |
|---|---|---|---|---|---|---|---|
| A/T | Toyo Open Country AT2 | 109S | 18.2 | +8.4 kg / +85.5% | – | – | – |
| A/T | Yokohama G015 | 109S | 19.0 | +9.2 kg / +93.6% | – | – | – |
| A/T | Yokohama Geolandar AT4 G018 | 109S | 19.2 | +9.4 kg / +96.2% | – | – | – |
| A/T | Kenda Klever KR601 RT | 109Q | 19.4 | +9.6 kg / +98% | – | – | – |
| A/T | Toyo Open Country AT3 | 109S | 19.5 | +9.7 kg / +99.4% | – | – | – |
| A/T | Hankook Dynapro AT2 RF11 | 109Q | 19.6 | +9.8 kg / +100.1% | – | – | – |
| A/T | Yokohama Geolandar G015 | 109S | 19.8 | +10.0 kg / +101.8% | – | – | – |
| A/T | Kenda KR28 Klever AT | 109Q | 19.9 | +10.1 kg / +103.5% | – | – | – |
| A/T | BFGoodrich KO2 | 109S | 20.3 | +10.5 kg / +106.7% | – | – | – |
| A/T | Falken Wildpeak AT3W | 109Q | 20.9 | +11.1 kg / +113.3% | – | – | – |
| A/T | BFGoodrich KO3 | 109R | 20.9 | +11.1 kg / +113.4% | – | – | – |
| A/T | Nankang FT9 | 109Q | 20.9 | +11.1 kg / +113.4% | – | – | – |
| A/T | Maxxis Razr AT811 | 109Q | 21.0 | +11.2 kg / +114.3% | – | – | – |
| A/T | Cooper Discoverer ST PRO | 109Q | 21.8 | +12.0 kg / +122.6% | – | – | – |
| A/T | Falken Wildpeak AT4W | 109S | 22.9 | +13.1 kg / +133.3% | – | – | – |
| A/T | General Grabber X3 | 109Q | 23.6 | +13.8 kg / +140.4% | – | – | – |
| A/T | Toyo Open Country R/T | 109Q | 25.5 | +15.7 kg / +159.7% | – | – | – |
| A/T | Bridgestone Dueler A/T 697 | – | – | – | – | – | |
| A/T | Kenda KR629 Klever | 109Q | – | – | – | – | – |
| A/T | Kumho Road Venture AT52 | 109S | – | – | – | – | – |
| A/T | Toyo Open Country AT Plus | 109S | – | – | – | – | – |
| A/T | Yokohama Geolandar X-AT G016 | 109Q | – | – | – | – | – |
| M/T | Kumho KL71 MT | 109Q | 20.4 | +10.6 kg / +108% | – | – | – |
| M/T | Yokohama Geolandar G003 | 109Q | 21.6 | +11.8 kg / +120% | – | – | – |
| M/T | Cooper Discoverer ST PRO | 109Q | 22.3 | +12.5 kg / +127% | – | – | – |
| M/T | Kumho Road Venture MT KL71 | 109Q | 22.5 | +12.7 kg / +130% | – | – | – |
| M/T | BFGoodrich KM3 | 109Q | 23.0 | +13.2 kg / +134% | – | – | – |
| M/T | Falken Wildpeak MT | 109Q | 23.8 | +14.0 kg / +143% | – | – | – |
| M/T | Toyo Open Country MT | 109R | 25.7 | +15.9 kg / +163% | – | – | – |
| M/T | Kumho Road Venture MT51 | – | – | – | – | – |
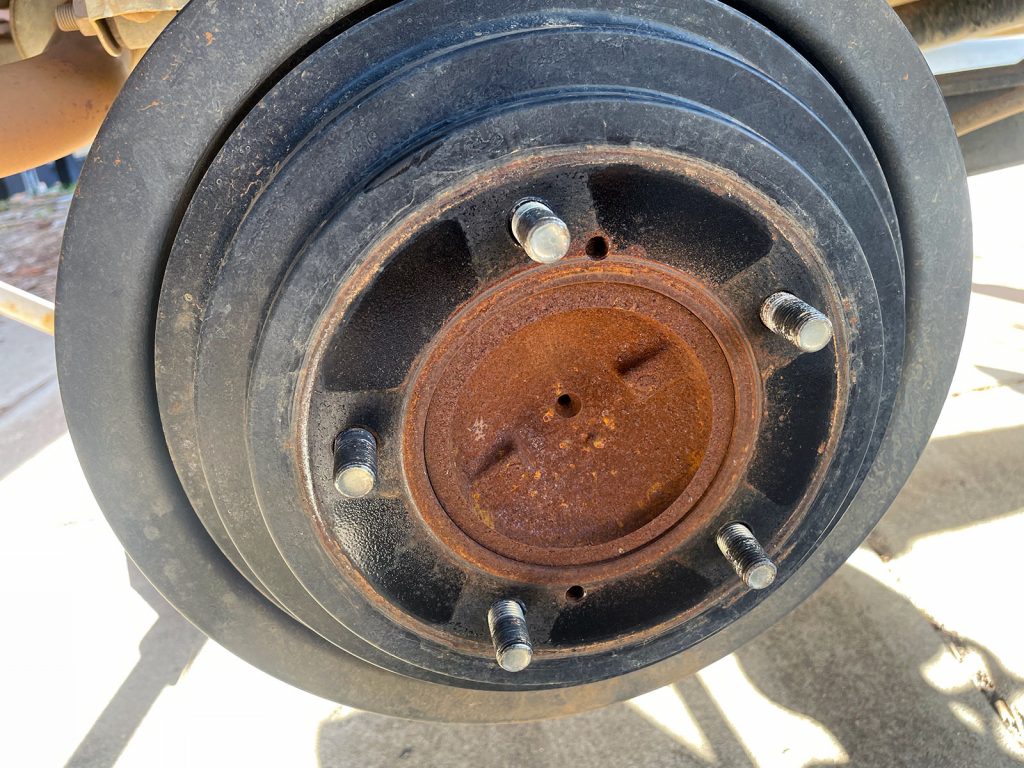
Centering wheels on a Jimny
You see a lot of commentary that you can never get steel wheels balanced or centred correctly. One of the challenges on the Jimny is it has a very very very small centering ring on the front, designed for wheels with a centre bore of 108.0 mm. Most aftermarket wheels in 5×139.7mm stud pattern are for a more common 110.0 mm centre bore. Also note there is no centering at all on the back wheels, they are studcentric only. While most people think it’s an issue with steel wheels, plenty of aluminium wheels for the Jimny are also a 110mm centre bore.
The secret to getting things centered is to carefully tighten down the nuts, using the taper on the wheel nuts to centre the steel wheels. You should also do this on aluminium wheels, in fact, if you have aluminium wheels off centre e.g. on the back then you can ruin the taper in the wheels themselves.
Start by fitting the wheel up and hold it up just a bit off the studs. You’ll note it’s very much not centred by default with the studs way more to one side of the wheel holes to the others.
Start one wheel nut, and you’ll note how it touches more on one side of the wheel hole than the other. This will help get the first stud centred.
Once you get one nut sort of centred by hand, start an opposite nut; if you work back and forwards between a couple of opposing nuts and are careful you’ll get it all centred.
At that point tighten everything up to an appropriate torque. Remember to retorque the wheels after 100-200 km especially if they are new wheels when they will settle down a bit.
Fitting factory centre caps to aftermarket wheels
The other factor with aftermarket wheels having a larger centre bore than the Jimny runs is the factory centre caps for the wheels need some spacing. I used some plastic centering rings with to go from 108 to 110 mm and fitted them to the caps. This lets me run the factory caps in my wheels.
Locking nuts
This is sometimes asked about; it’s a super simple change but can be worth doing if you have fancy aftermarket wheels.
The nuts themselves are M12, 1.25 pitch & with a conical seat (not an acorn seat, and definitely not a shanked nut; if you have different wheels which take different wheel nut seats then obviously you get those).
There’s a few options out there, including factory optional security nuts, but I ended up getting some McGard ones. I partly got these as their tightening tool also has a 19mm hex end on it, some others had different socket sizes and that would annoy me as it’s nice to replicate the 19mm stock nuts. I also wanted a set of 5; many options I found were only a set of 4 and I’d like to secure the spare wheel too.
Obviously you should store the security tool in the car so you aren’t stranded in the middle of nowhere without the wheel removal tool. Although you should also store it somewhere not obvious just in case people break in and then use the tool to steal your wheels anyway.
Fairly easy to change: just undo one nut on a wheel, fit the new security nut, and move on. 100 Nm just like the factory nuts and you’re good to go.
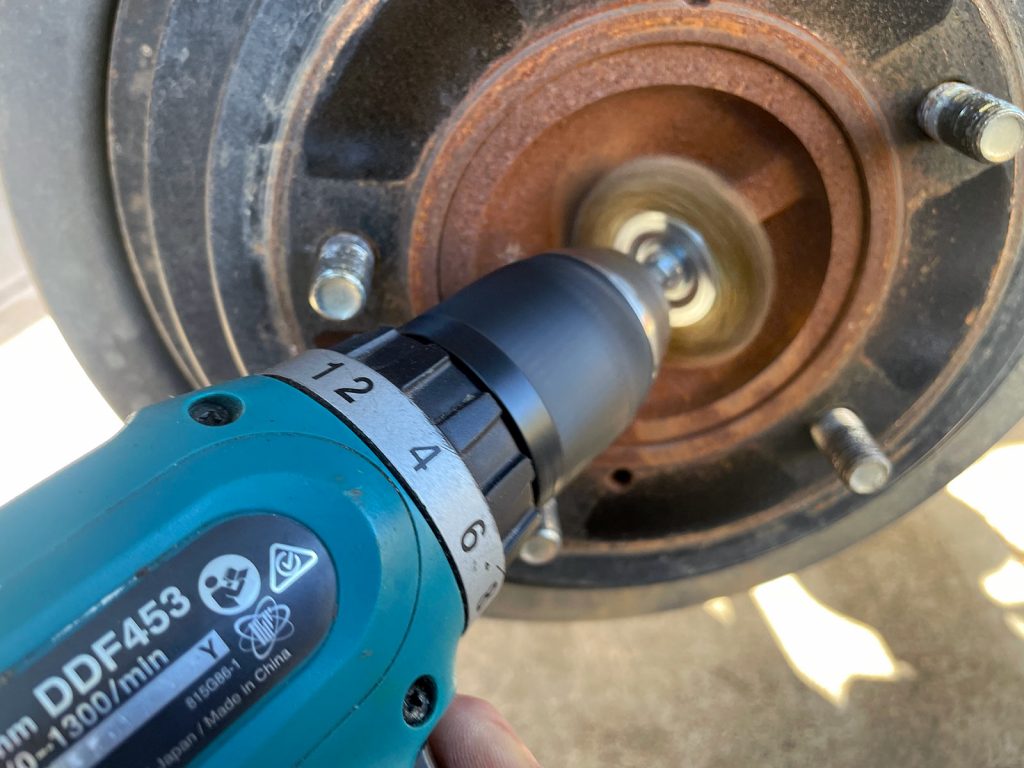
Painting the ends of your axles
If you’ve been driving around without the centre caps on the back for a while, or even in many cases if they are on, you might find your rear axle ends get a bit of surface rust on them.
This honestly looks worse than it is, it’s just very fine surface rust, but still a good idea to clean it up and treat it and stop it coming back.
A wire wheel is the best way to clean it up.
Then a bit of wax and grease remover and you’re good to go, after masking up the brake drum and other parts of the car to avoid overspray.
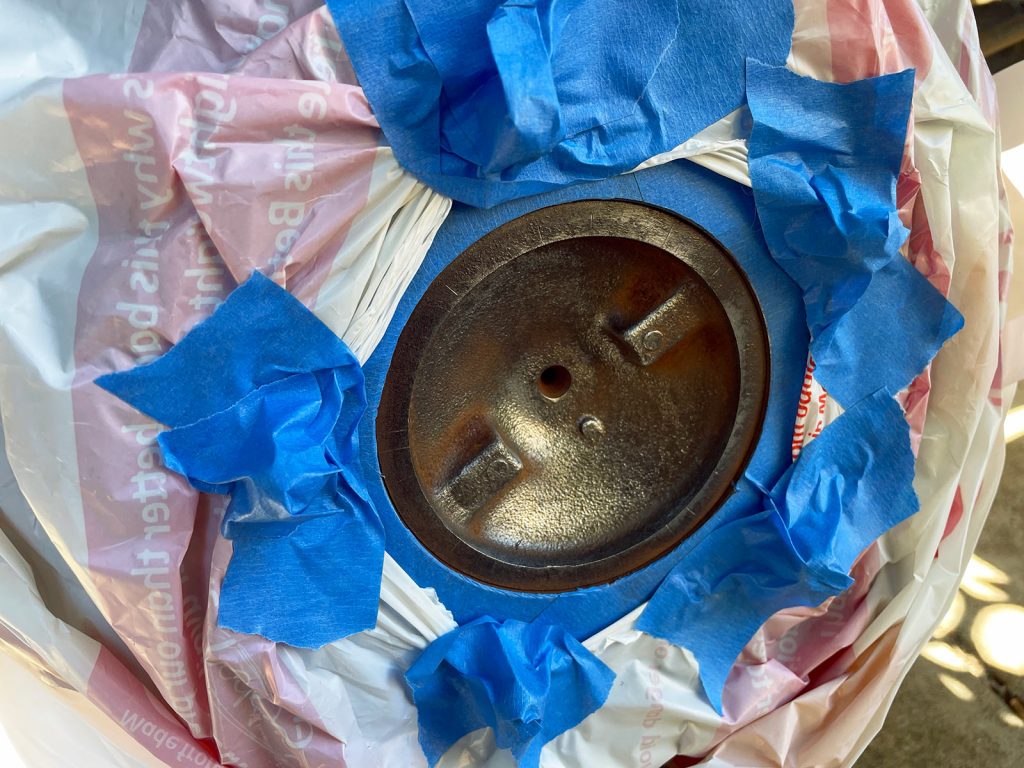
Use a good quality rust converter/treatment and then a rust preventing primer first for the best results here.
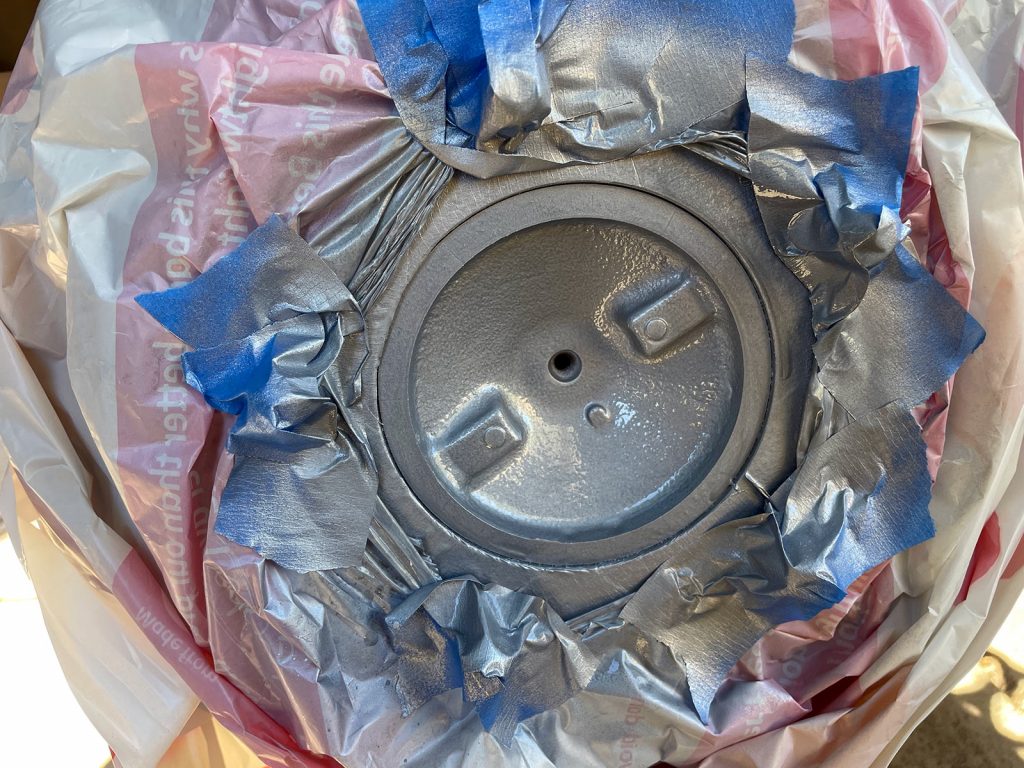
Then a nice top coat or two. I guess you could colourmatch this to your car if you were feeling fancy, but I went with plain ol’ black.
Peel back the masking tape, give a little clean out of the axle to drum interface with a thing like a sharp cutting blade, and you’re done.
I guess you could paint the drum too but I’ve found people end up with wheels that don’t sit straight when they do this.
Wheel weights
The weight for the BFG KO2 215/75-15 and also the 15×6 steels wheels comes in at 24.9 kg (54.9 lbs). The internet seems to suggest about 14.2 kg (32.1 lb), so each steel wheel is 10.7 kg on top of this.
Standard wheels and highway terrain tyres come in at 17.4 kg. Harder to find a weight for the standard Bridgestone Dueler H/T tyres but relying on a random person on the internet it seems 9.8 kg might be the number (21.6 lb). That’s based on a call to Bridgestone Australia so I’ll go with that for the moment. Add a comment to this article if you have more info!
My setup weights over time
| Wheel weight (kg) | Tyre weight (kg) | |
|---|---|---|
| Stock GLX alloy & H/T tyre (17.4 kg) | 7.6 kg | 9.8 |
| Steel wheel setup setup (24.9 kg) steel 15×6″ + BFG KO2 215/75-15 | 10.7 kg | 14.2 kg |
| Alloy wheel setup (22.9 kg) alloy 16×6 + Bridgestone D697 205R16 | 8.9 kg | 14.0 kg |
Compilation of wheel options and weights
Wheel weight is also a potential factor in your selection. This list isn’t comprehensive as there are other wheels out there, but this should give a reasonable indication.
| Wheel | Size (diameter x width) | Offset (mm) | Weight |
|---|---|---|---|
| Stock GLX alloy1 | 15×5.5″ | +5 | 7.6 kg |
| Stock lite steel2 | 15×5.5″ | +5 | 9.0 kg |
| American Racing AR62 (alloy)3 | 15×7.0″ | 7.5 kg | |
| Rays ALap-J (alloy)3 | 16×5.5″; 16×6.0″ | -5, -20 | 4.8 kg |
| Rays ALap-J07X (alloy)4 | 16×6.0″ | -5 | 6.1 kg |
| Rays Gram Lights 57DR-X4 | 16×5.5″ | 0 | 6.9 kg |
| American Racing AR23 (alloy) | 15×8.0″ | -19 | |
| American Racing Baja (alloy) | 15×7.0″ | -6 | |
| Apio WILDBOAR SR15 (alloy)3 | 15×6.0″ | -5 | 7.6 kg |
| EVOCorse DakarZero (alloy)3 | 15×7.0″, 16×7.0″ | 0, -14 | 9.5 kg |
| Dynamic steel rim (6″, 7″ wide)1,3 | 15×6.0″, 15×7.0″ | +3, -12 | 10.7 kg (6″ wide) 11.5 kg (7″ wide) |
| High Peak J-01 (alloy)1 | 16×6.0″ | -5 | 8.9 kg |
| High Peak J-02 (alloy)3 | 15×6.0″ | -5 | 9.2 kg |
| Dirty Life Roadkill (alloy)4 | 15×7.0″ | +3 | 8.2-8.4 kg (depends on colour) |
| King Summit (alloy) | 15×7.0″ | 0 | |
| ROH One Twenty (alloy)4 | 15×6.0″; 16×6.0″ | 0 (15″), -10 (16″) | 8.1 kg |
| Dirty Life Canyon Pro (alloy)4 | 15×7.0″ | +3 | 8.2-8.4 kg (depends on colour) |
| Method 301 (alloy) | 15×7.0″ | -6 | |
| Advan RJ-D2 (alloy)5 | 16×5.5″ | 0 | 5.1 kg |
| Showa Garage R8 (alloy)3 | 15×6.0″ | 0 | 6.8 kg |
| Rota Grid Type X (alloy)3 | 15×7.0″ | 0 | 8 kg |
| DAMD STYLING EFFECT Little G | 16×6.0″ | -5 | |
| Rota J-Vee3 | 16×5.5″ | -20 | 7.0 kg |
| APIO Wildboar SR15 (alloy)4 | 15×6.0″ | -5 | 7.6 kg |
| APIO Wildboar Venture (alloy)4 | 15×6.0″ | -5 | 8.0 kg |
Where a weight is listed, the number by the model information relates to the source of the information:
- Measurement by me
- ThrowingTofu on Reddit measurement
- Production specifications on manufacturer or reseller website
- Direct from manufacturer either phone or email
- Interpreted from product listing for a similar product e.g. 6 vs. 5 spoke wheel