Jimny lift selection, suspension terms & things to know
People new to modifying 4wds get bombarded with a lot of suspension terminology and also obfustication about differences between lifts (or their similarities).
If there is a term you see in the ad blurb for a lift kit, or you’re unsure of what lift kit will suit your gen4 Jimny then this is the article for you.
Note that it primarily applies to the 3 door JB74 ‘GJ’ Jimny. The 5 door JC74 ‘JJ’ Jimny XL does basically run the same suspension but spring rates at least likely differ, and I don’t have any first hand experience to lean on. You can extrapolate from what I say about the 3 door lifts but I’m limiting myself factually to it.
Sections
- Lift selector: what might work for you
- Suspension glossary
- Does my suspension lift allow me to fit bigger wheels and tyres?
- GVM upgrades
- Supporting data
Lift selector: what might work for you
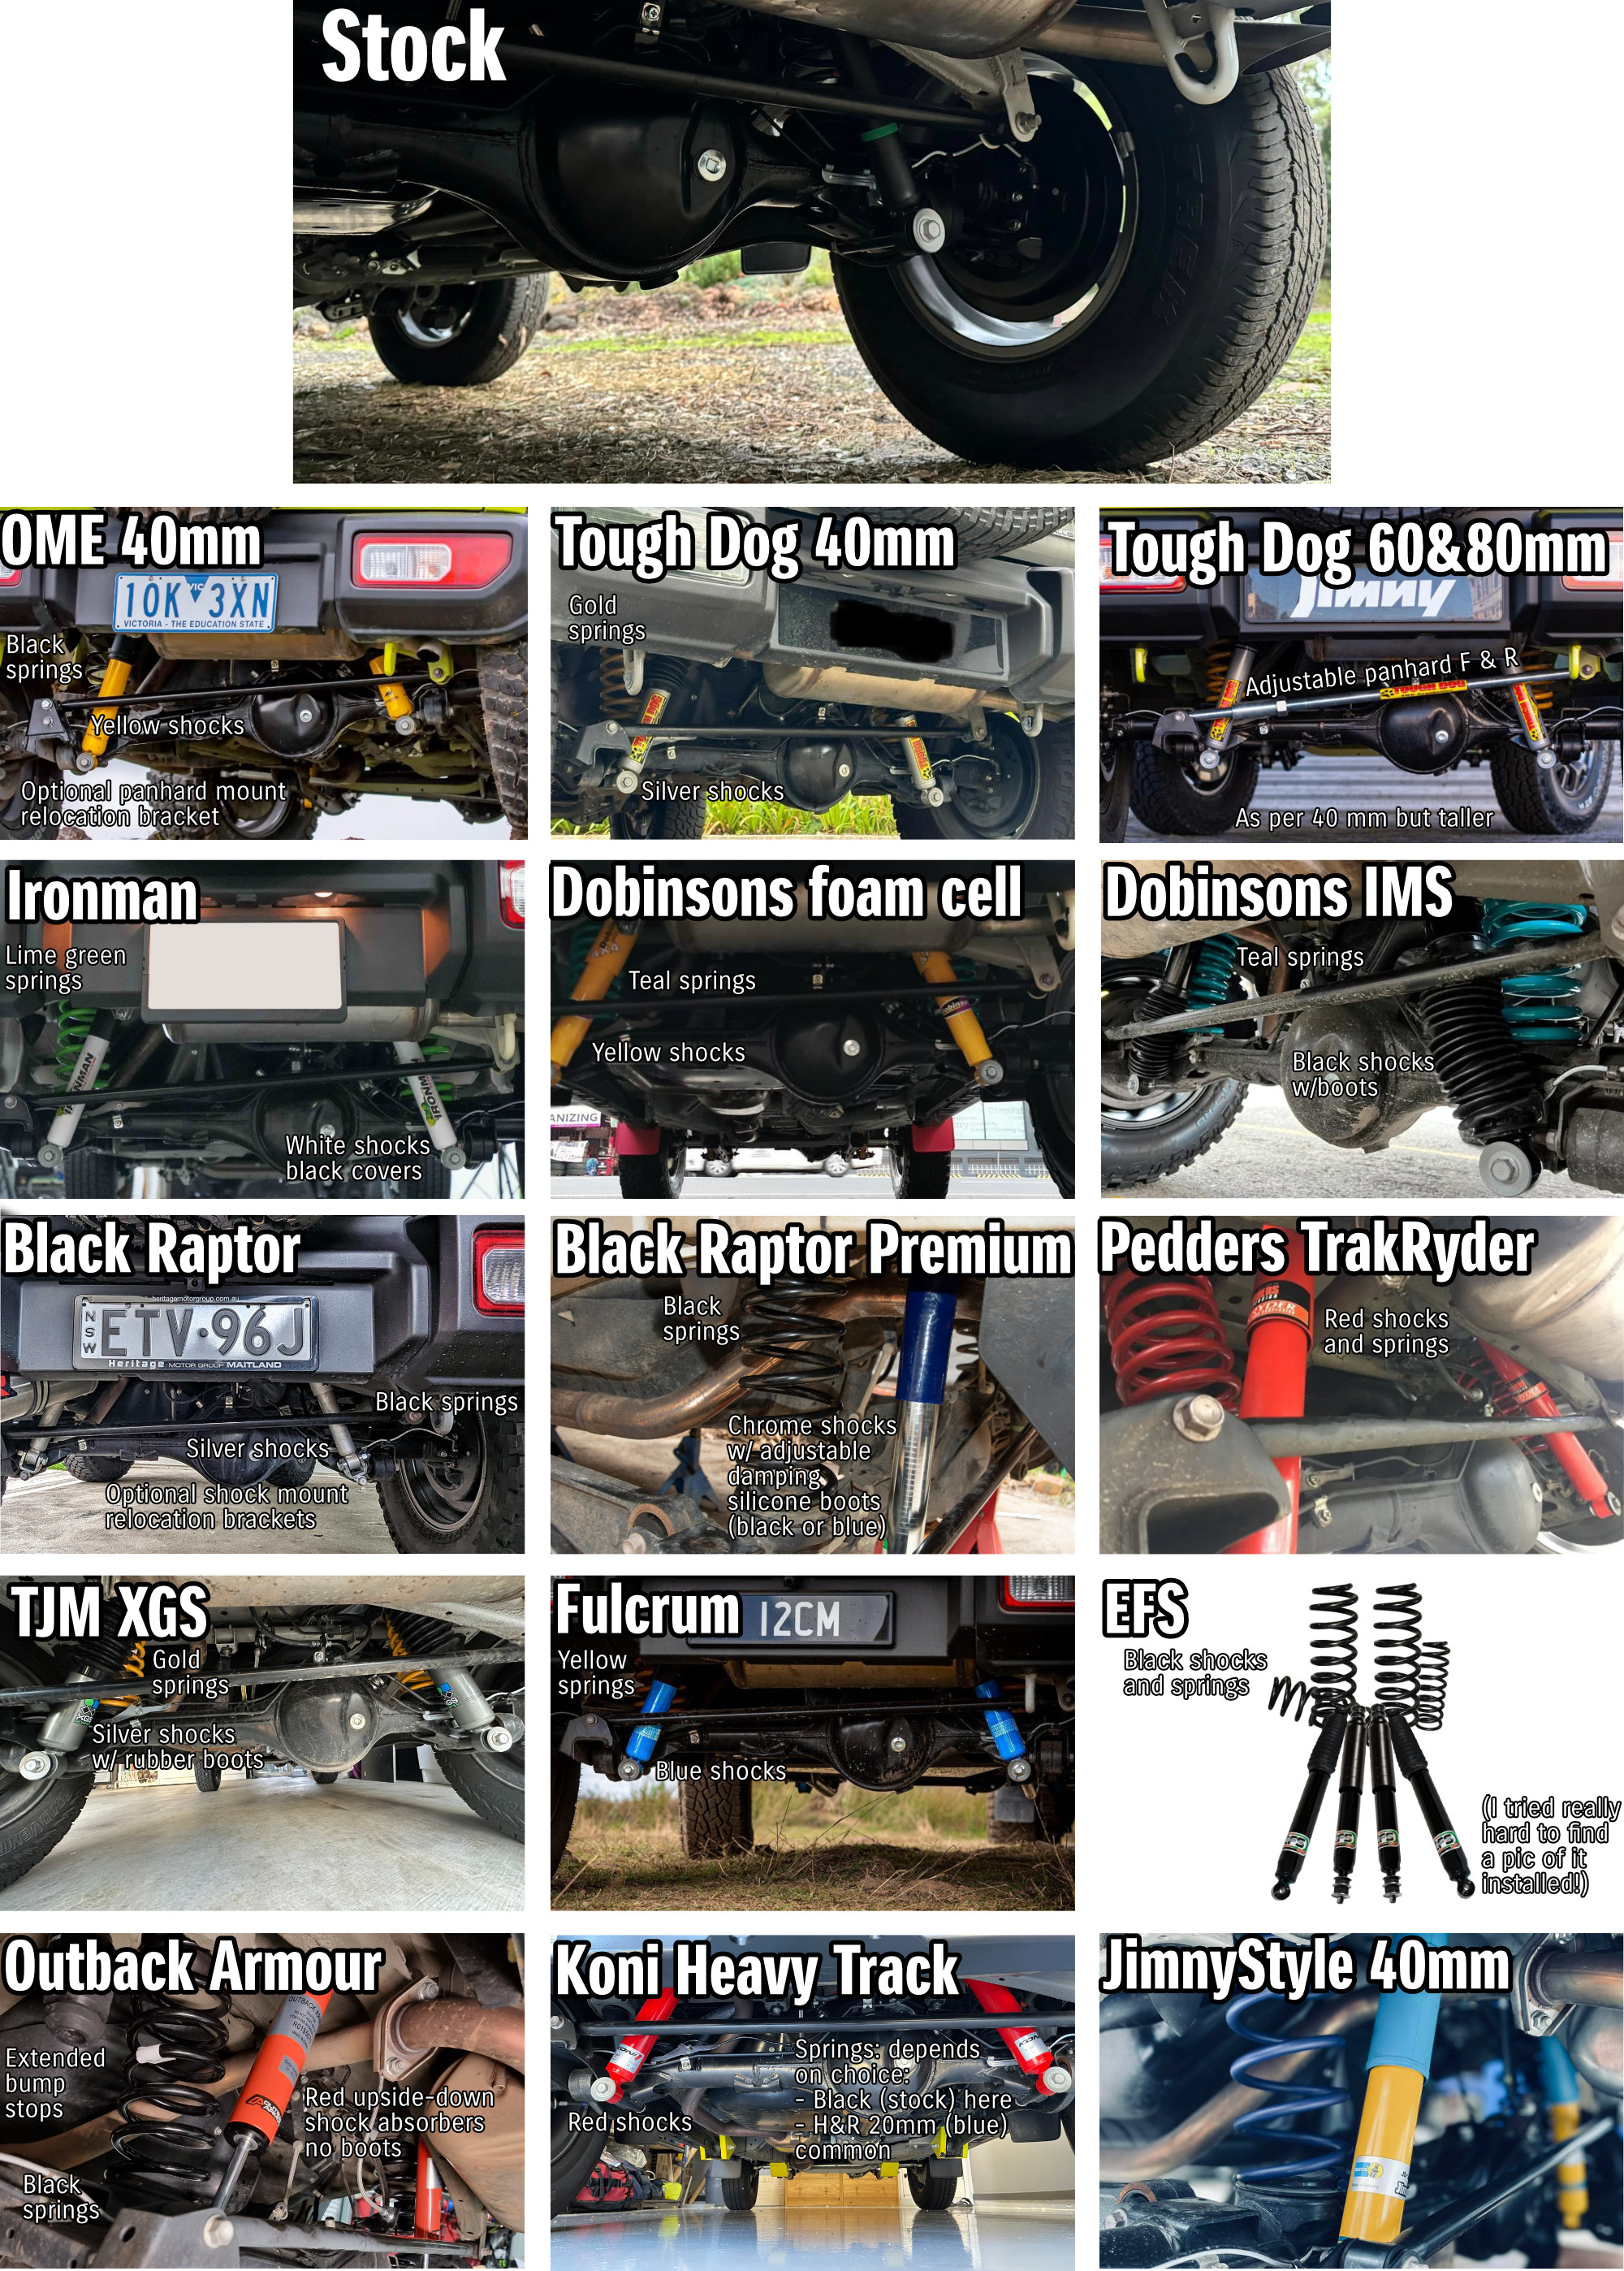
This is upfront but if you want to understand a bit more you’ll want to dig deeper into this article.
If you want an upgrade to the actual weight capacity then you’ll need a GVM (gross vehicle mass – total maximum allowable weight for the vehicle) upgrade. Unless you’re in Queensland this locks you into offerings from Ironman, Tough Dog or TJM only. In Queensland there is a route to upgrade the GVM to the sum of the weight limits of the front and rear axles, but all of these details will get discussed below in the GVM selection.
If you aren’t getting a GVM upgrade you have a wider selection of lifts which is what I will now discuss. As of late 2024, my recommendations based on what people have found with different lifts, things that are more easily bought/fitted in Australia and also looking carefully at the differences between lift brands. If you are getting someone to fit your lift kit then potentially their choice of brand to deal with might be a factor to consider in your decision making.
If you mostly want to improve the ride quality and are ok with a small to nonexistent lift then the H&R springs and upgraded shock absorbers (either Koni or Bilstein) are worth getting. Total suspension travel ends up about the same as standard, you don’t have any more ability to carry weight, but the car will ride better especially on road but offroad isn’t compromised. I would not recommend this option if you have a bullbar, or if you think you’ll go offroad reasonably extensively. Downward travel on these shock absorbers is basically the same as stock so even with a small 20mm lift you might actually have little to no additional wheel travel over stock.
If you generally are lightly loaded in the back and you mostly like the ride of the car on a relatively normal road then the OME 40mm lift through ARB is a good choice for you. The spring rates are the same as standard (though higher for the front if you have a bullbar) but taller. If you carry a lot of camping gear a lot of the time then the lower spring rate in the back
If you are more heavily loaded in the back then you will want something with a higher spring rate and for this you have a lot of choices. Two good options are the Dobinsons 50mm lift or the Formula 4×4 lift through Fulcrum. The Pedders Track Rider lift also looks to use very similar spring rates to these other two though I haven’t measured it. The Black Raptor 50mm lift from JimnyBits, either in the normal or in the premium with adjustable shocks is a good option.
If you want ultimate flex then another option is to look into the Japanese lifts, especially if you are not running much more base weight than a stock car. A lot of the Japanese lifts run relatively soft spring rates which is great for flex.
Once you start going beyond a 40-50-60mm sort of lift options get more limited and you really need to understand more of what you are doing. Potentially there will be nothing off the shelf for what you are after; that said most people seem to be happy with going with 4xfourart for the taller of the lift options, and the 80mm Tough Dog is not quite so well loved in this segment.
Suspension glossary
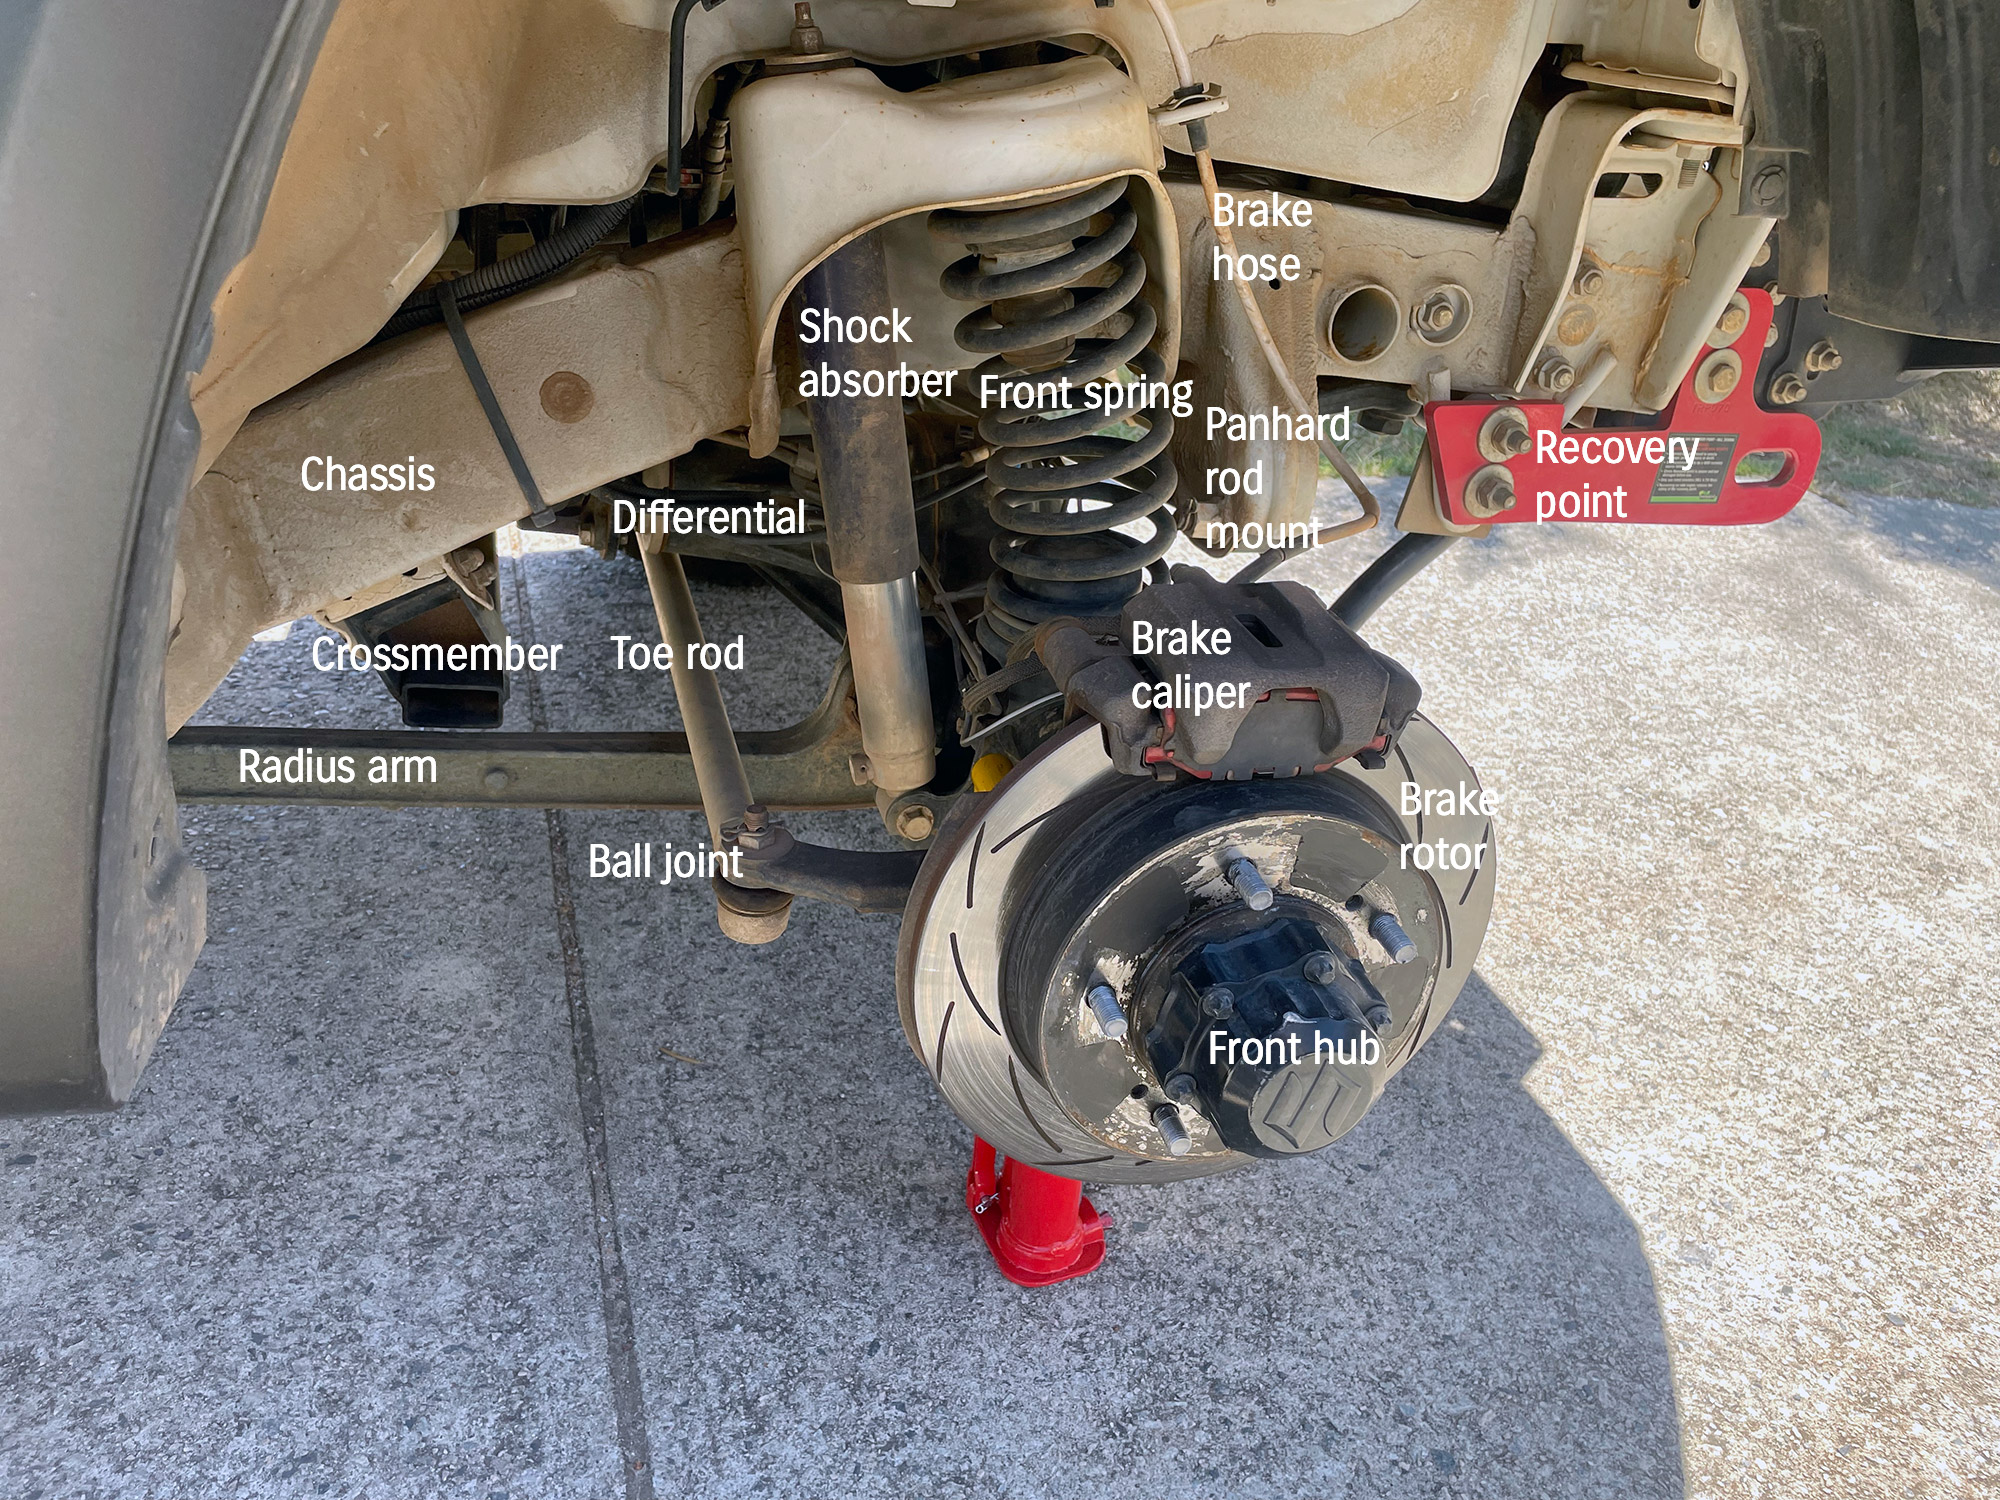
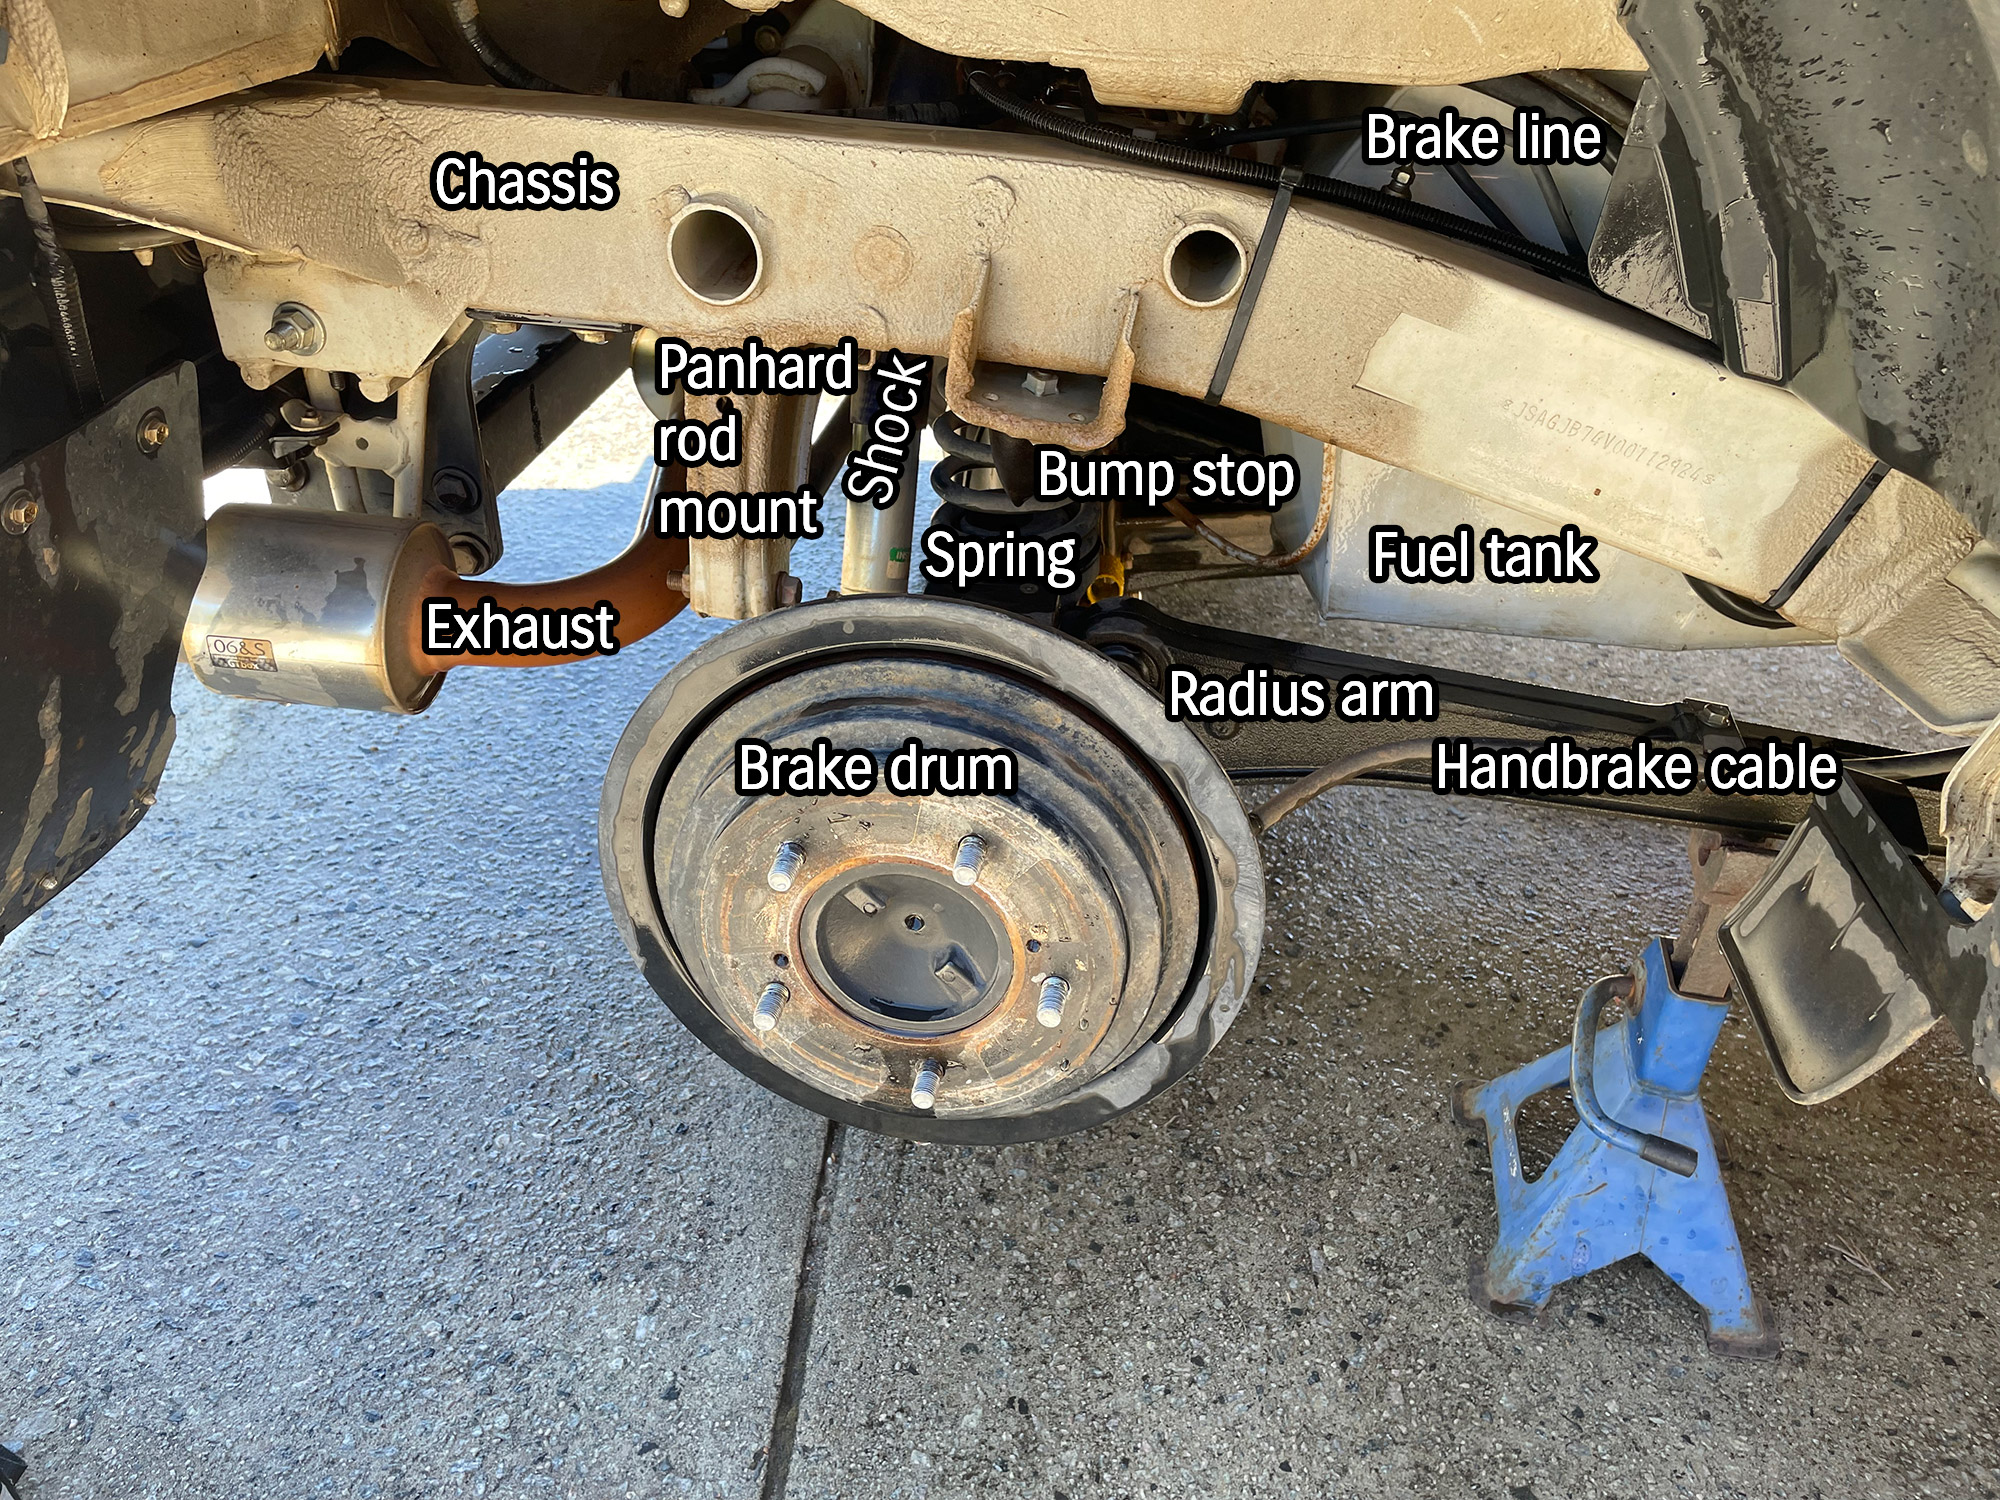
Springs are the main element that set your suspension up. They resist the weight of the vehicle and what you put in and on it, and then they also control how the wheels move when they encounter bumps or holes offroad. In a gen4 Jimny they are ‘coil springs’ i.e. just a bit of metal wound around and around and around. They sit between the axle and mounting points on the chassis.
Springs can be linear rate, i.e. the same stiffness everywhere, or progressive rate, where they get stiffer the more they are compressed. Arguments vary as to what people want: ultimately offroad you want to use all of the suspension travel and potentially you don’t want it getting more and more stiff; however, on road, the initial softer movement can mean initial bumps are more easily handled with less movement of the car. You can also have suspension which is digressive, i.e. starts stiff and ends soft but that requires a level of investment and a system beyond simple springs which is beyond most people’s Jimny budgets.
Springs are what dictates the height your car sits at. A law called Hooke’s Law simply states that for the same given force such as the weight of the car bearing down, a stiffer spring moves less far. A longer spring will move the same distance down, but since it starts at a taller position it will be at a taller height once it has moved.
In Hooke’s Law, the spring rate is the amount of force it takes to compress a spring a certain distance, usually measured in N/mm for us metric folk. A Newton is a measure of force, but for these purposes it can be thought of as the weight force and is 9.8 x the mass in kg. The vast majority of springs in 4wds are constant rate springs and so their rate does not vary as they compress. (Progressive suspension gets stiffer the more you compress it; digressive suspension get softer as you compress it. This gets to be a deep argument about what’s right as a choice especially offroad where digressive suspension might make sense. Fundamentally, there’s a reason why most springs end up linear rate and it’s not worth overthinking beyond that).
The spring preload is the amount of force applied to the spring initially, essentially it’s where the spring is somewhat compressed in its initial sitting position and this sets the ride height of the car. It reflects the force that is initially in the spring. Adding spring spacers increases the preload on the spring which increases the ride height, meaning there is more force required to overcome this initial load on the spring. Two manufacturers might have the same lift height but achieve it through different means e.g. stiffer spring rate versus softer rate with more preload. If you have more preload but a softer spring, the spring will take overall less force to reach the end of its travel, but it requires more force initially to move it. On the other hand, if you have a stiffer spring it’ll require less force to move it initially but it’ll require more force to reach the end of the travel. Great for avoiding bottoming out the suspension, but less good for flex offroad where you want the wheels to be able to move up and down.
I list common suspension spring rates where obtainable over on my writeup on installing Jimny suspension, but the next couple of graphs show how various ones handle their combination of preload/length and spring rate to end up with a similar lift height. You can be long and softer or shorter and stiffer and end up with the same result. A really good example of this is the change in 50mm rates and free lengths: the Showa Garage ones are softest but longest, and the Ironman ones are the shortest and stiffest. Constant load can be accommodated via more preload (expressed as more free length) or a higher spring rate, or potentially both as this accommodates the higher weight of the car sitting at a static position.
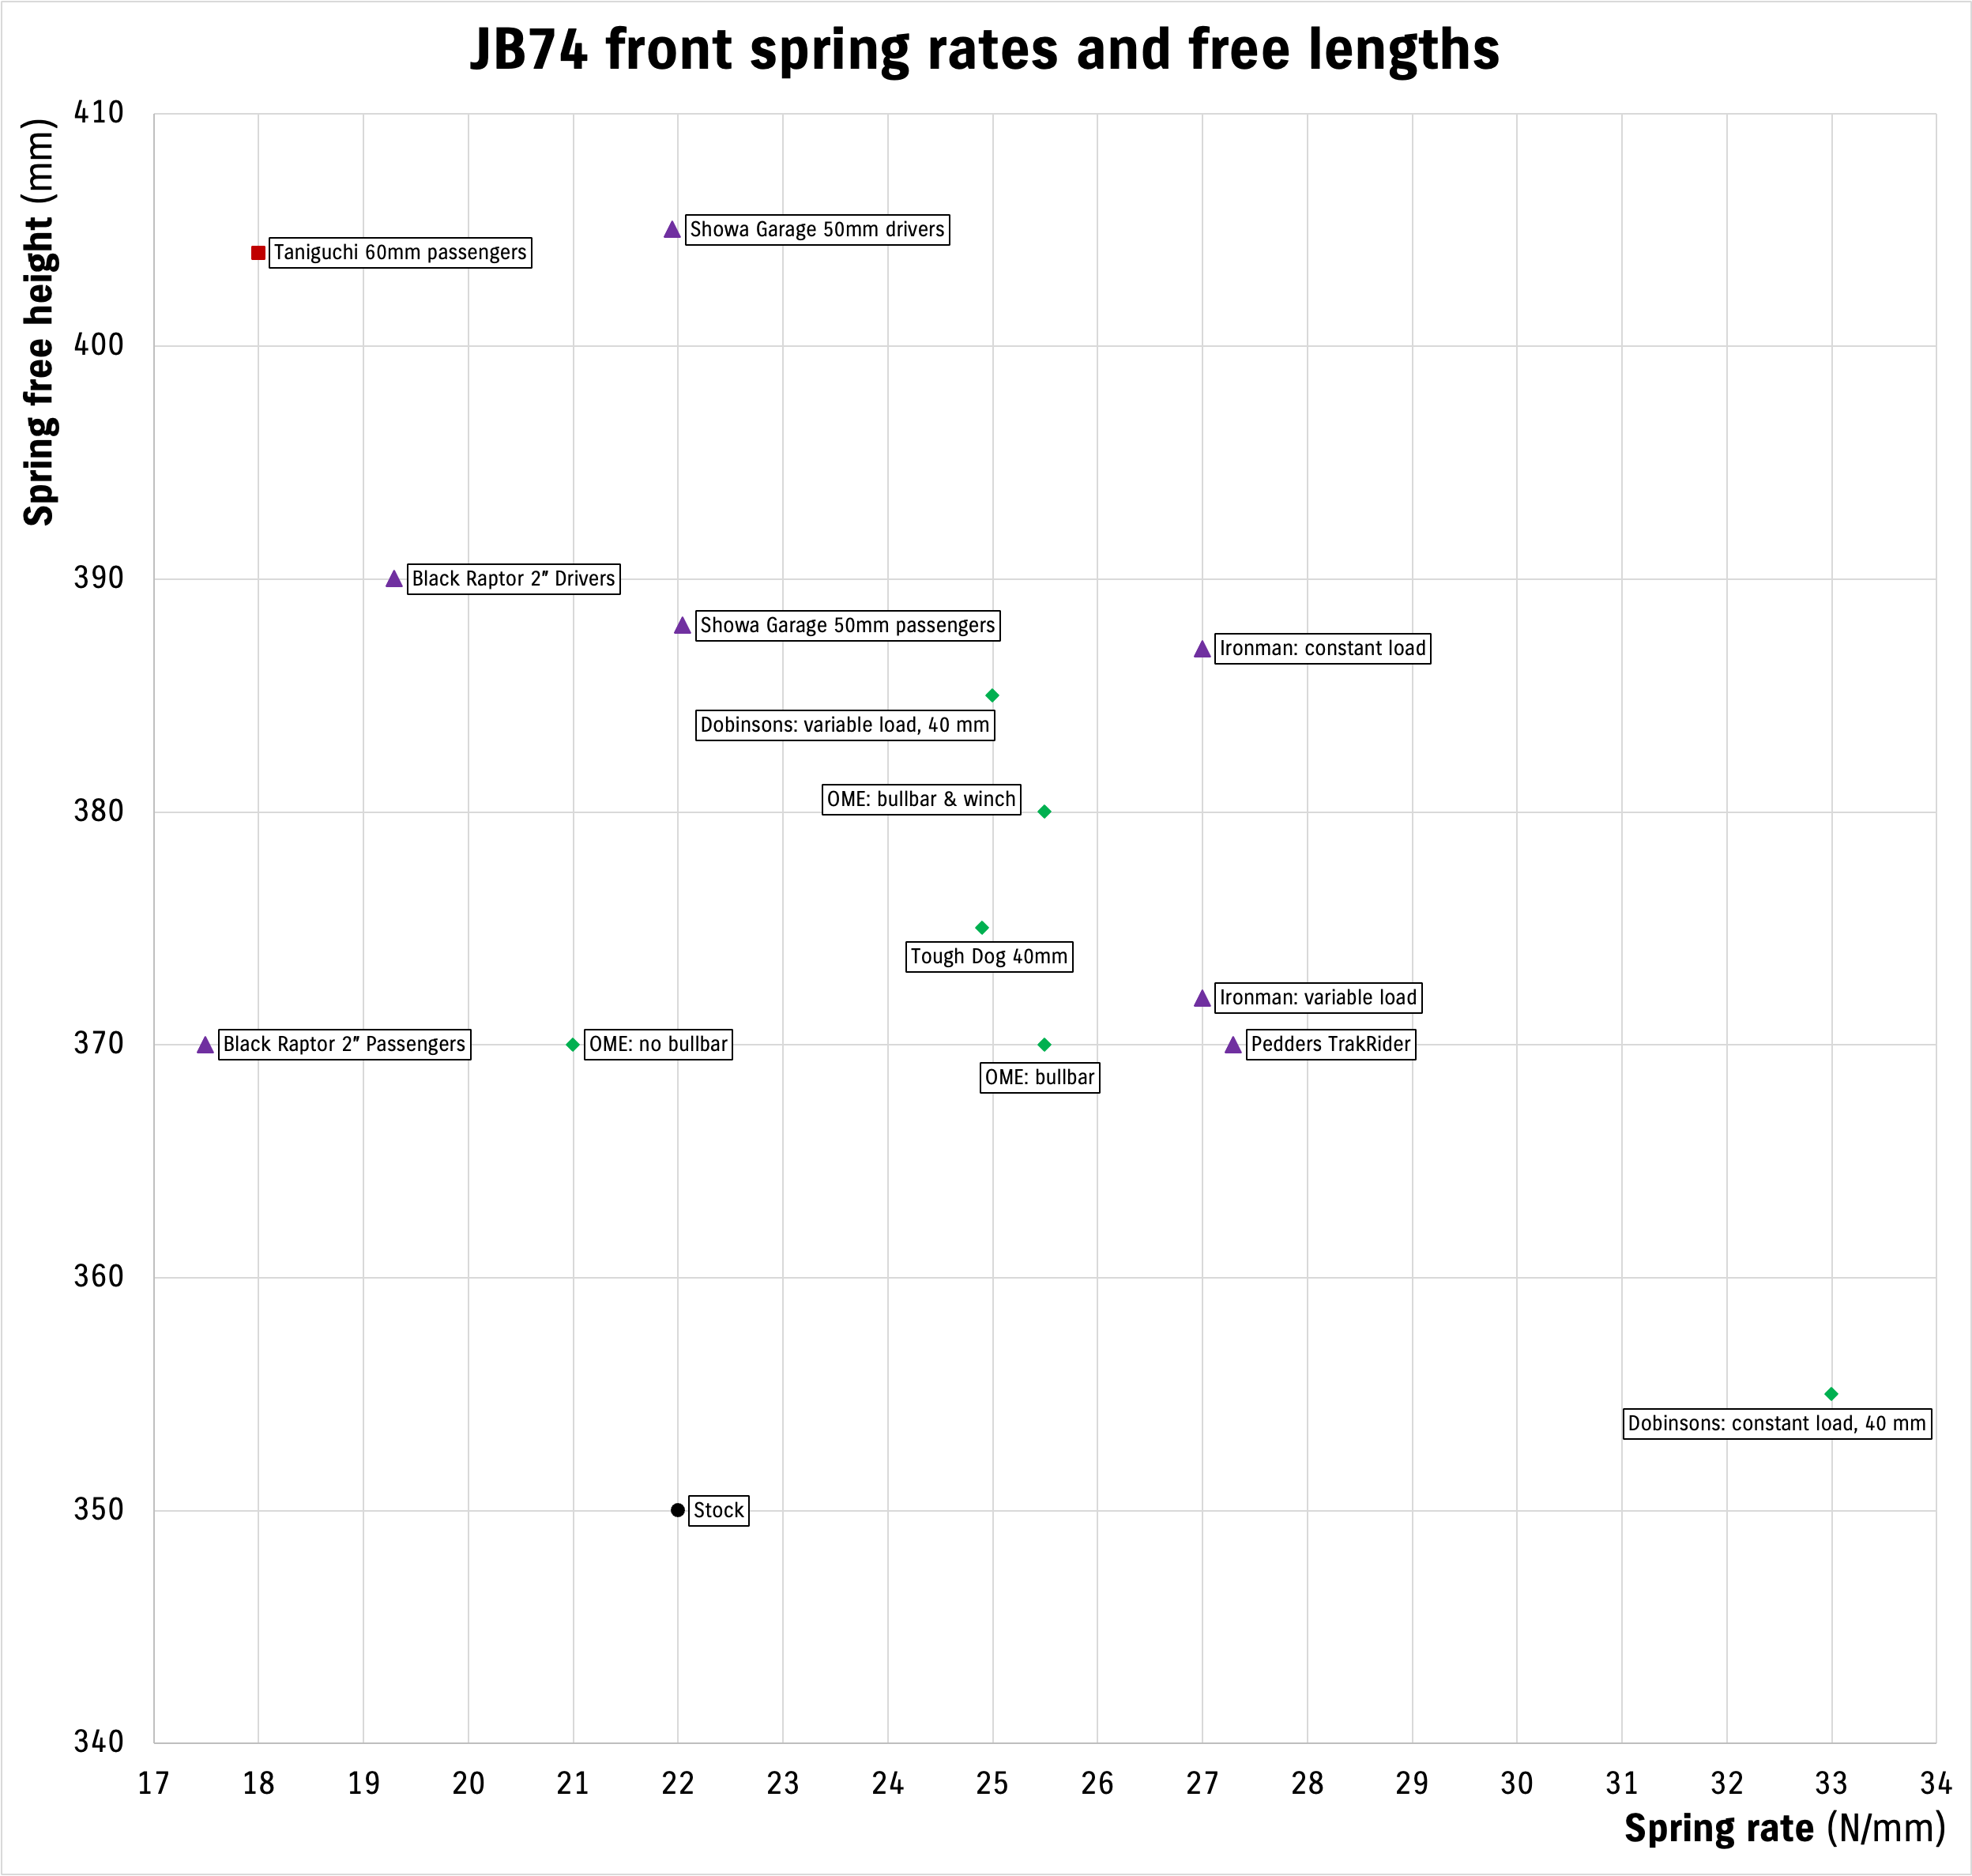
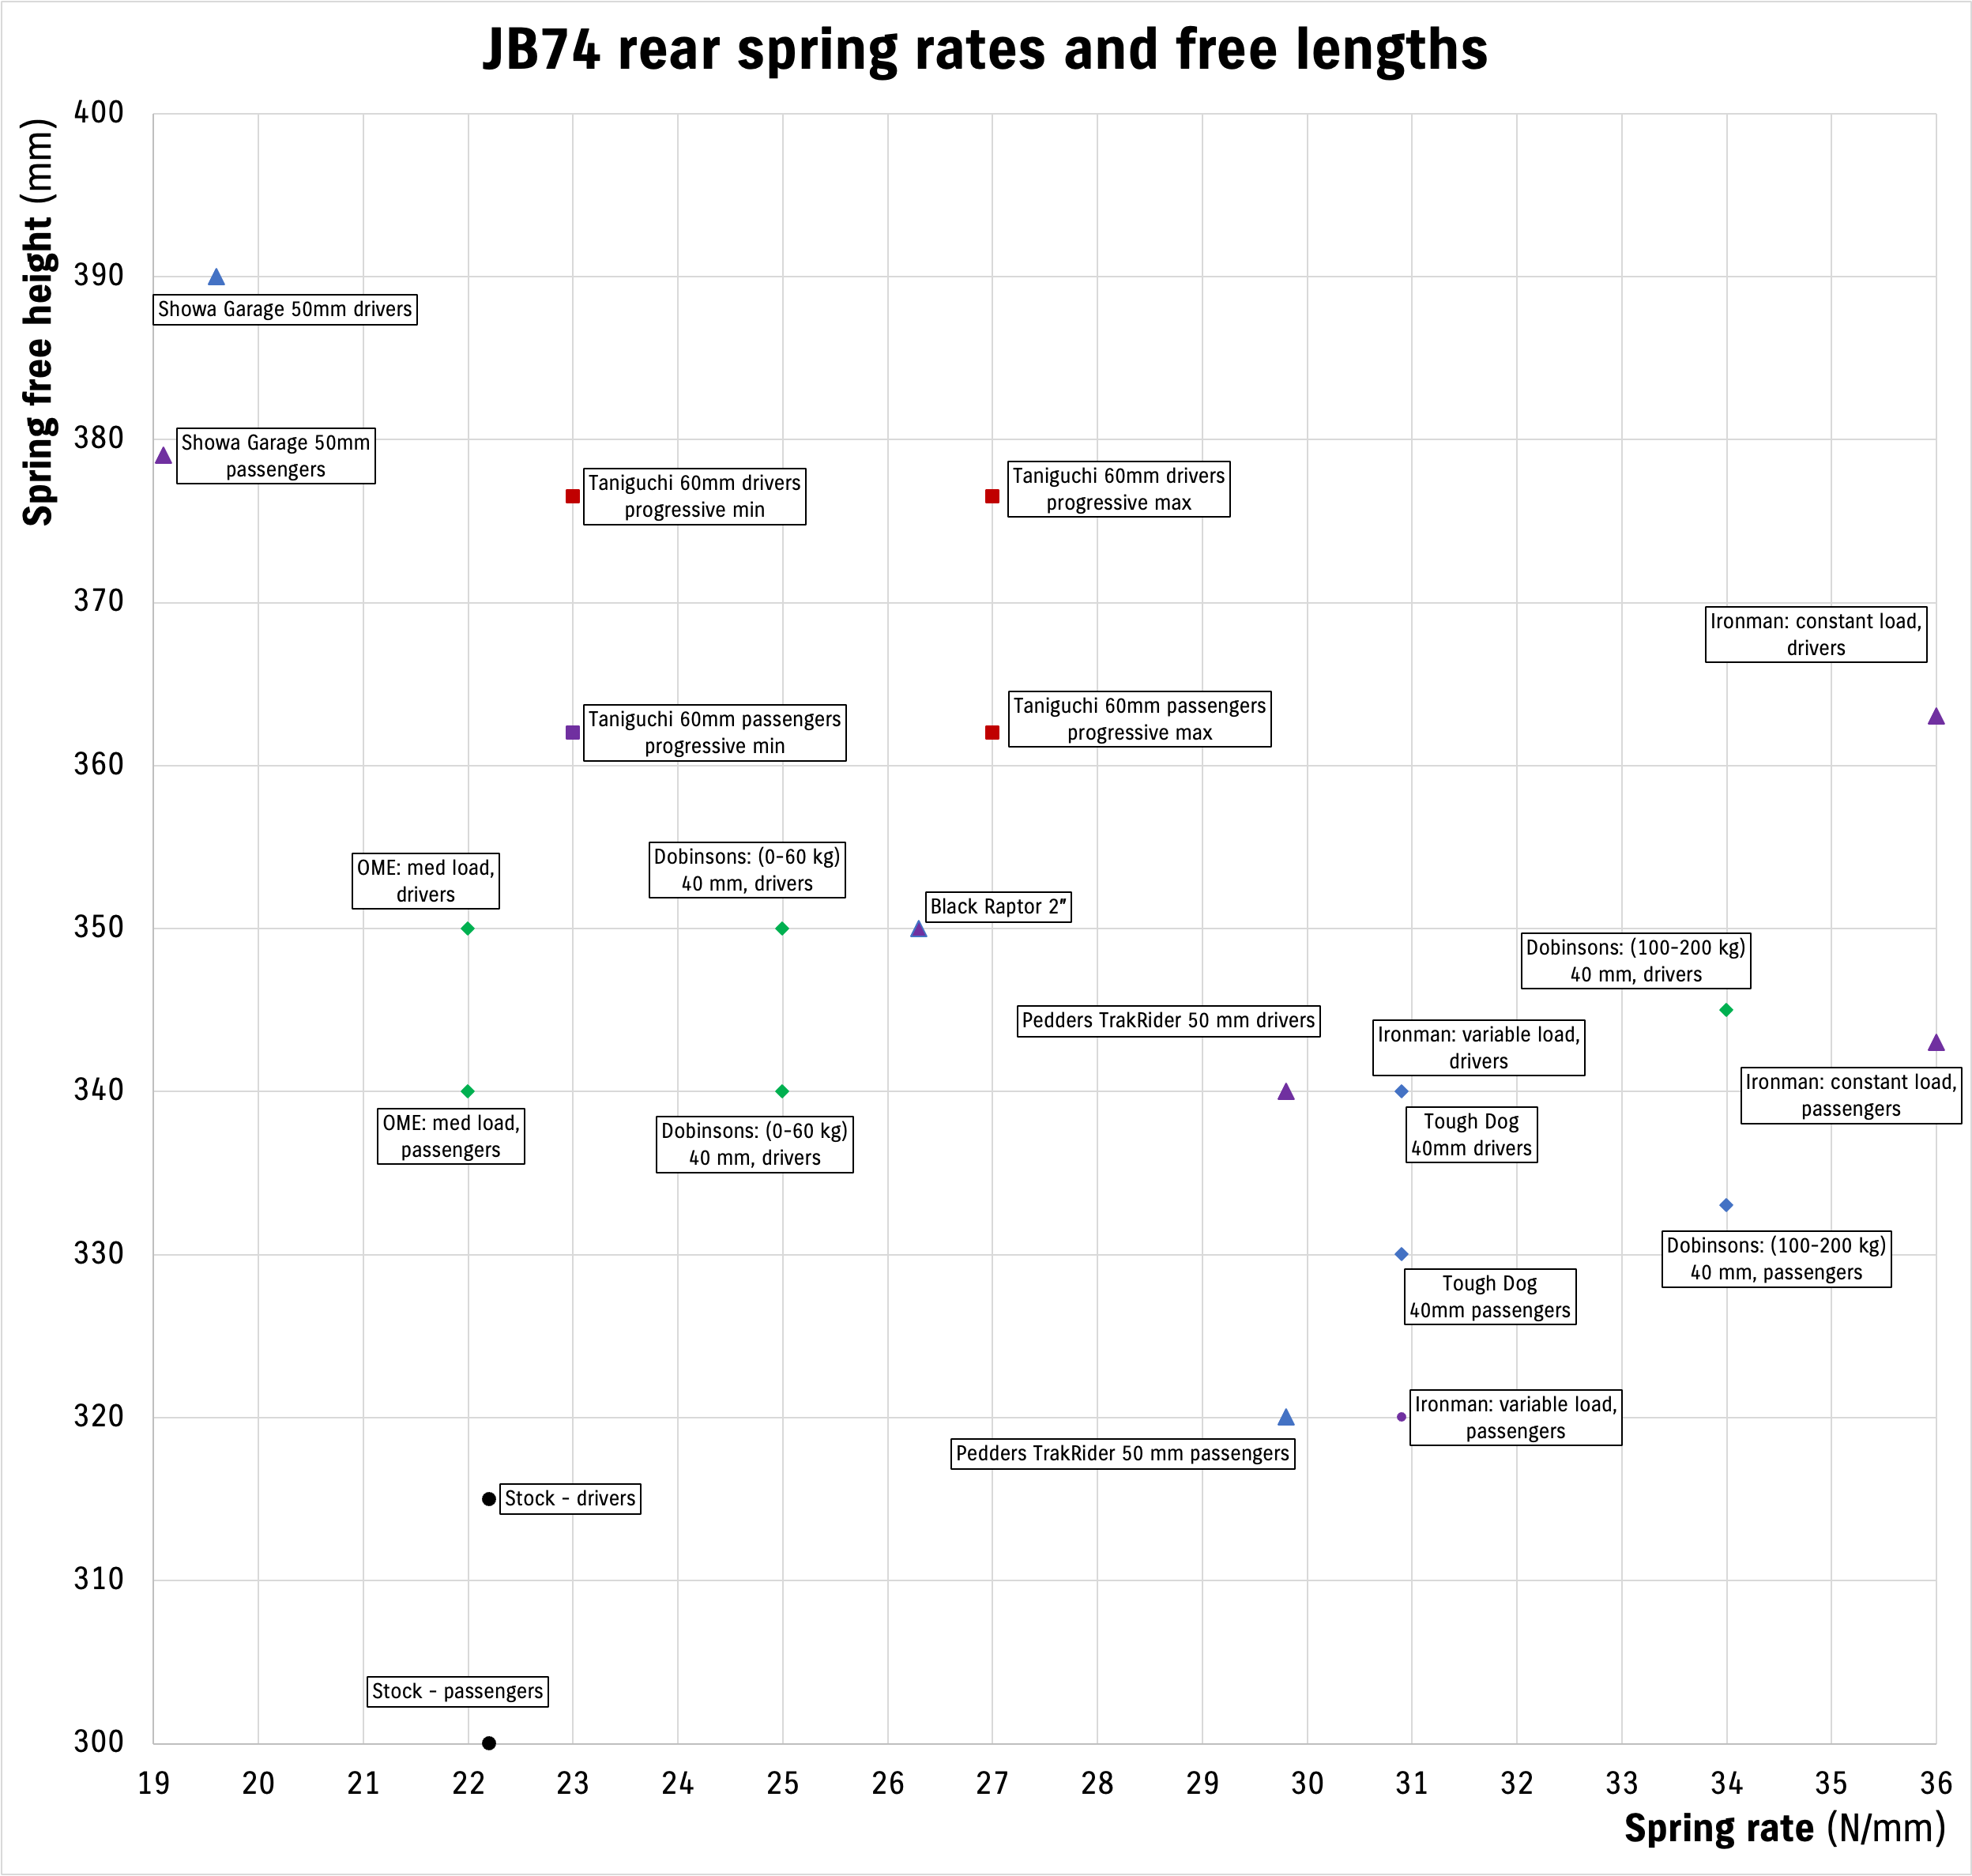
The spring rate will let you estimate the amount of sag the suspension will have for a given load. The simplest example would be, say, taking 50 kg of stuff camping. It will get loaded into the boot directly above the back axle. If we compare the OME and the Tough Dog springs then the OME has 2 x 22 N/mm springs, versus the 40 mm Tough Dog with 2x 30.9 N/mm springs. The OME runs 10mm more preload, though, as the springs are longer. They have the same ride height statically, so we can ignore the initial preload. 50 kg is a weight force of 490 N, so the OME will drop 11 mm to carry this weight and the Tough Dog 8 mm. Not a huge difference, but if you’ve added 50 kg of drawers or something to your car then 10mm spacers will take this up for the OME lift; adding the same spacers to the Tough Dog lift in fact give you a little extra static ride height. This isn’t to say go stiff for springs for carrying weight, it depends how much and how often you’ll take that weight as to the best choice here. Preload means you’ve gained height for no extra change in the force required to move the suspension after this point; going stiffer means it needs more force per mm of wheel travel.
Shock absorbers are the other key element that sets how your car rides and handles. They are sometimes called dampers as they dampen oscillations set up by the spring – a car with no shock absorbers will sit at the same height as one with it, but will then bounce repeated after hitting a bump. The characteristics of how the shock absorber resists this bouncing gives part of the ride quality of the vehicle (the springs set the other part of it – it’s all about them working together). Adjustable shock absorbers let you vary this bouciness, usually an all in one adjustment for Jimnys but potentially they can be adjusted for how fast or slow they both resist being compressed (compression damping) or how they extend (rebound damping). Shock absorbers mount between the chassis and to the axle, and they work in tandem with the springs.
Shock absorbers set how the ride ‘feels’; they change the speed at which suspension changes happen but they do not influence exactly where it sits. If you remove the shock absorbers from a Jimny it will sit in exactly the same position that it did before, except it will now bounce around rather than the wheels moving and then settling. The speed of response is part of what makes a car feel soft or stiff: from the same spring rate, the damping respond could be underdamped where it responds fast but oscillates, or it can be quite slow and overdamped where it won’t oscillate but it will take more time to move, inducing more movement to the body instead of the suspension absorbing the bump. I’ve drawn up (using spring-mass damper equation) what that looks like for suspension encountering a bump. Because of the inertia of the wheel it takes time to move, and without any damping it would oscillate up and down. With the damping of a shock absorber it responds slower, but the oscillations are damped down.
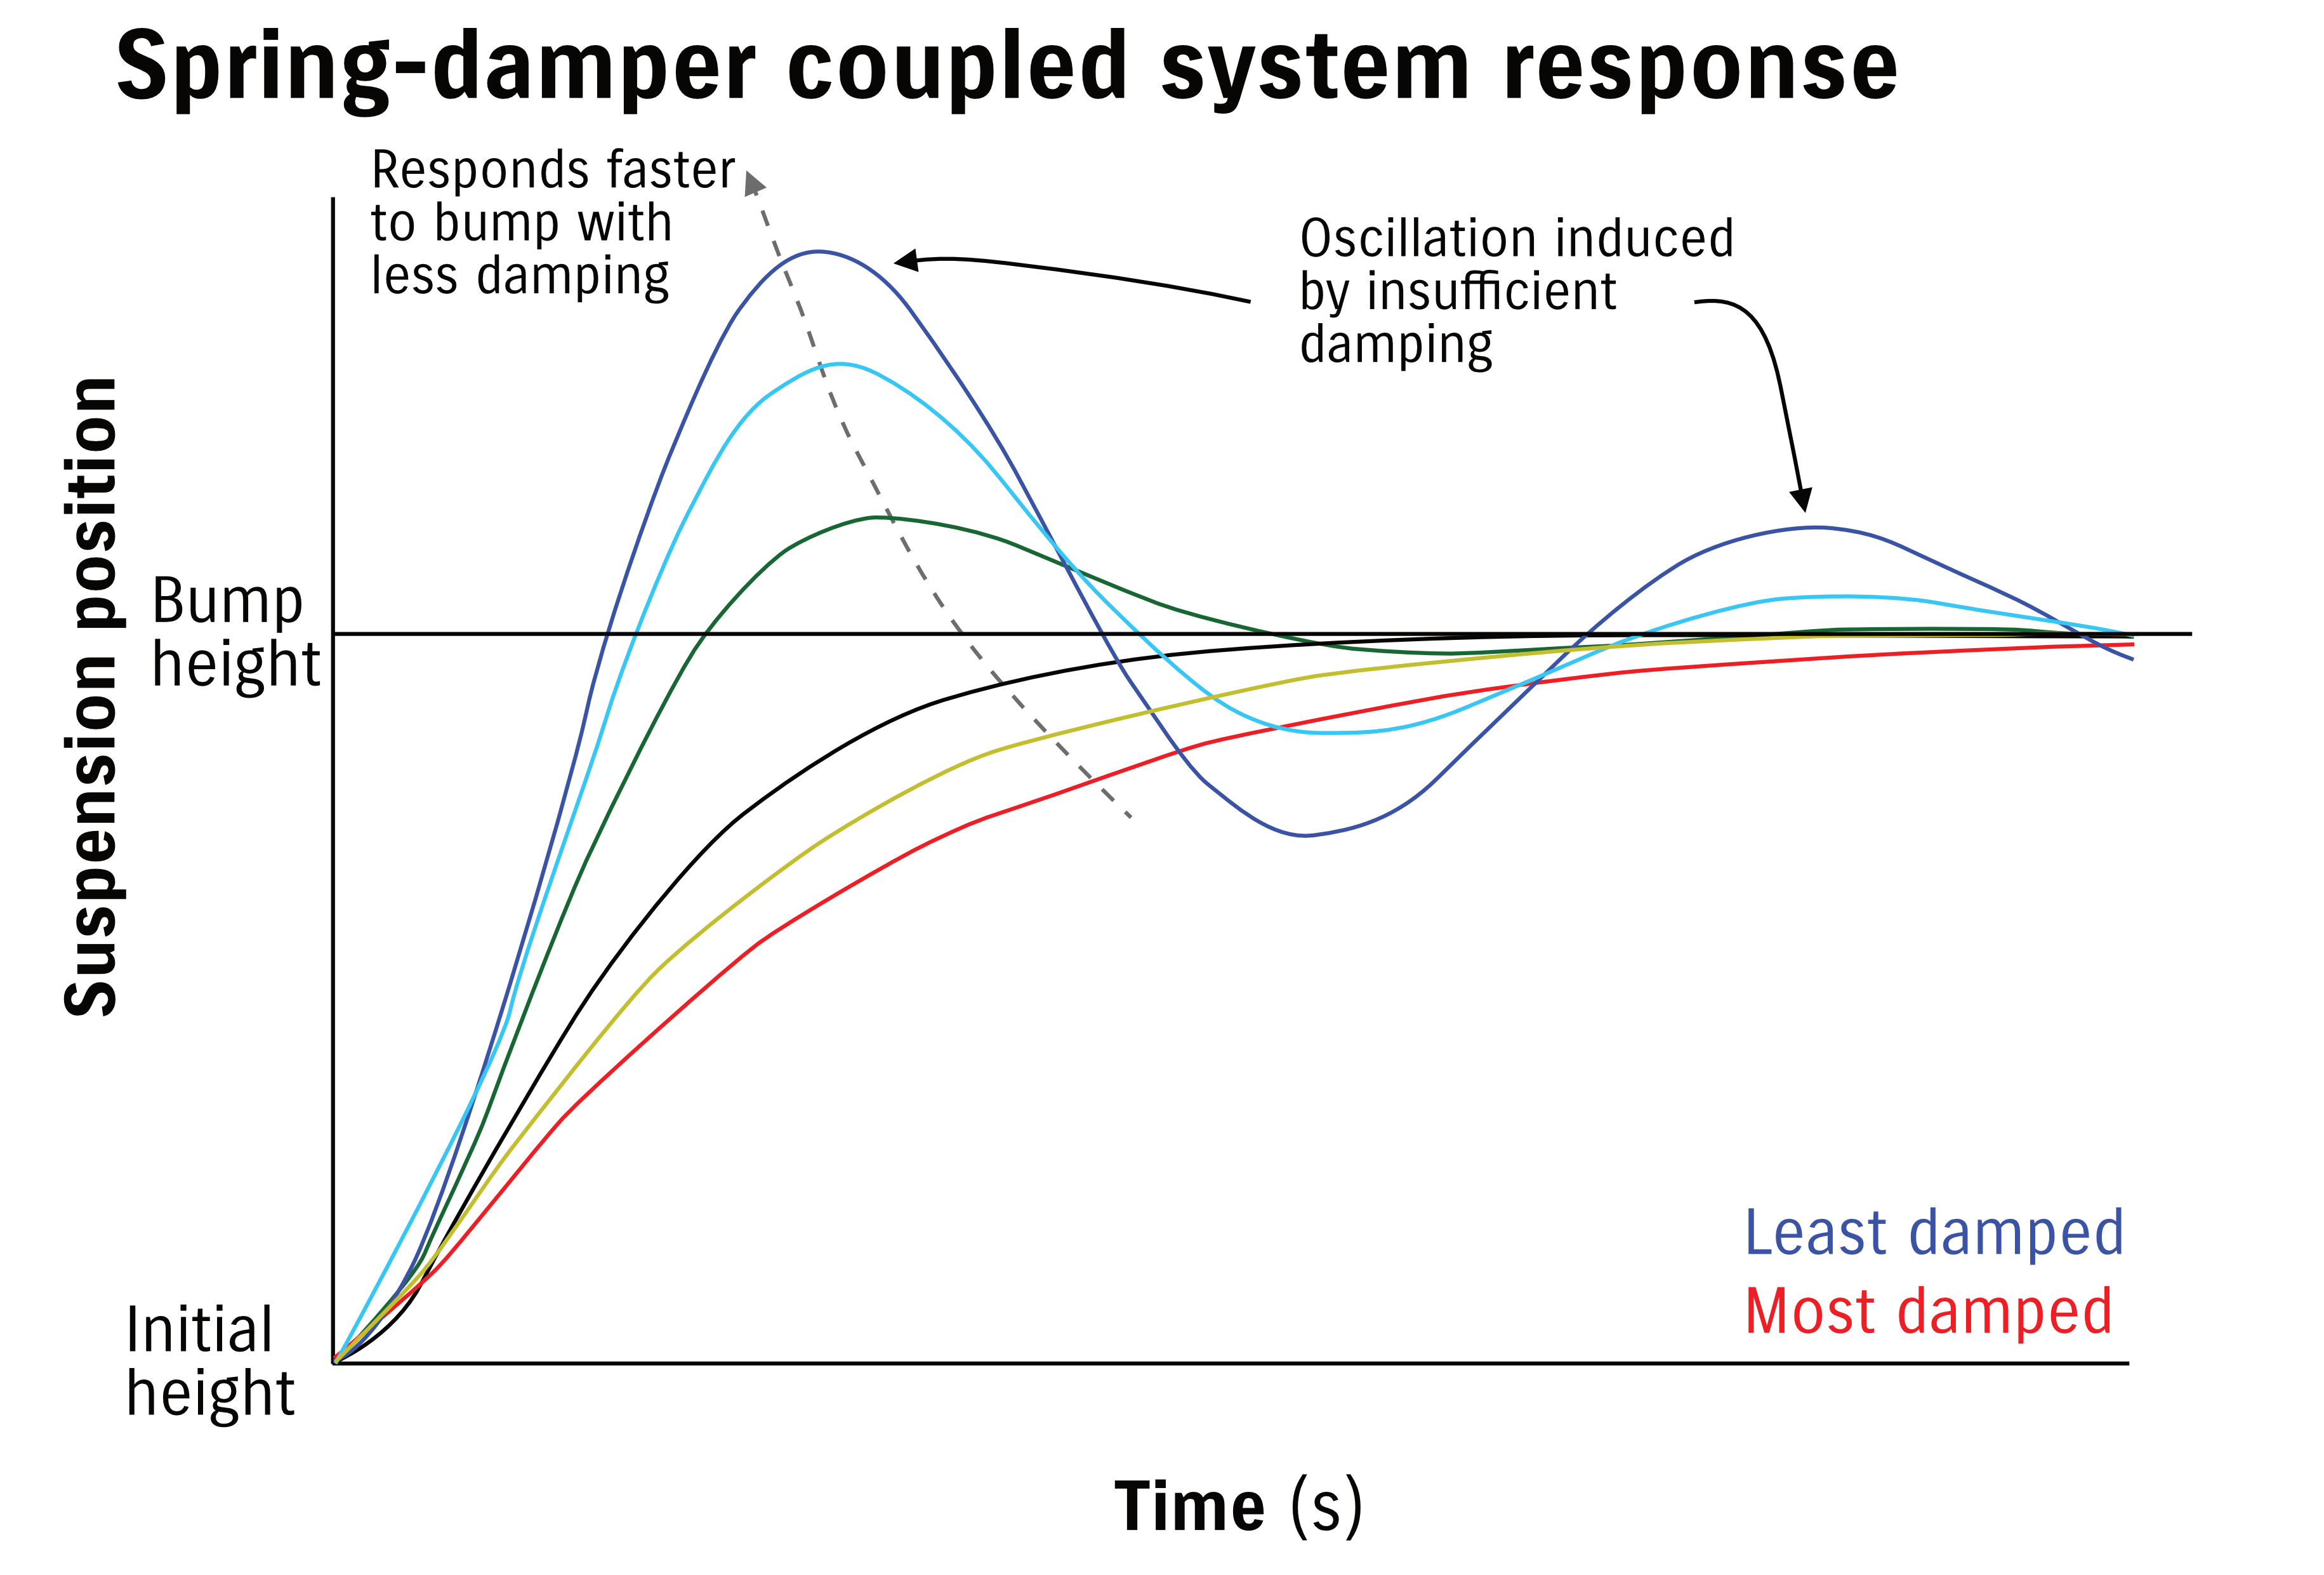
Shock absorbers also dictate how extended the wheels can become away from the car (the droop of the suspension). The less damping you have the more the suspension will oscillate in a simple harmonic motion (think a pendulum, but the wheel going up and down not a weight swinging side to side). The less damping you have the faster the suspension will react, too. Over damped suspension moves slowly; this produces the packing down feeling of the rear of a stock JB74 over repeated bumps as it is overly damped in the rebound direction, so it goes down and stays down.
Bump stops are, imaginatively named, parts of the car that dictate the minimum distance between the wheel and the body of the car: they stop the movement of the suspension upwards, a type of travel that nerds call bump. Extended bump stops are simply ones that are taller than standard bump stops. Sometimes you can get stiffer or softer bump stops: stiffer ones give you more absolute end to suspension travel, whereas softer ones might give you that little bit more flex before the car moves.
The combination of droop travel and bump travel gives you the total travel of the suspension, more commonly termed by bogans to be the flex of the suspension. More flex means the wheels are in contact with the ground for more time, but since suspension movements need to be accounted for in terms of things like the wiring to sensors or the pipes running to the brake system there’s a lot you need to think about when increasing the flex of the car. So in short: shocks dictate droop travel, bump stops dictate bump travel, and the combination of the two is what dictates total wheel travel. If you don’t adjust the bump stops, the clearance between the bodywork at full upwards travel of the suspension remains the same and so you won’t be fitting larger tyres to your 4wd without dealing with any potential interractions of wheel/tyre to the bodywork.
Next up we move to some of the main other components of the suspension.
Radius arms are the links leading forwards and backwards from the chassis to the axles. Their role is to control the position of the axle forwards and backwards. The front ones go from the middle of the car forwards to the front axle, and the rear ones go from the middle of the car backwards to the rear axle. Among other things this is where the factory jack points are. They are termed radius arms as they define the radius of the circles around which the axles rotate as the suspension moves up and down. This means the axle moves not just up and down, but also can move a bit forwards or backwards as the suspension moves.
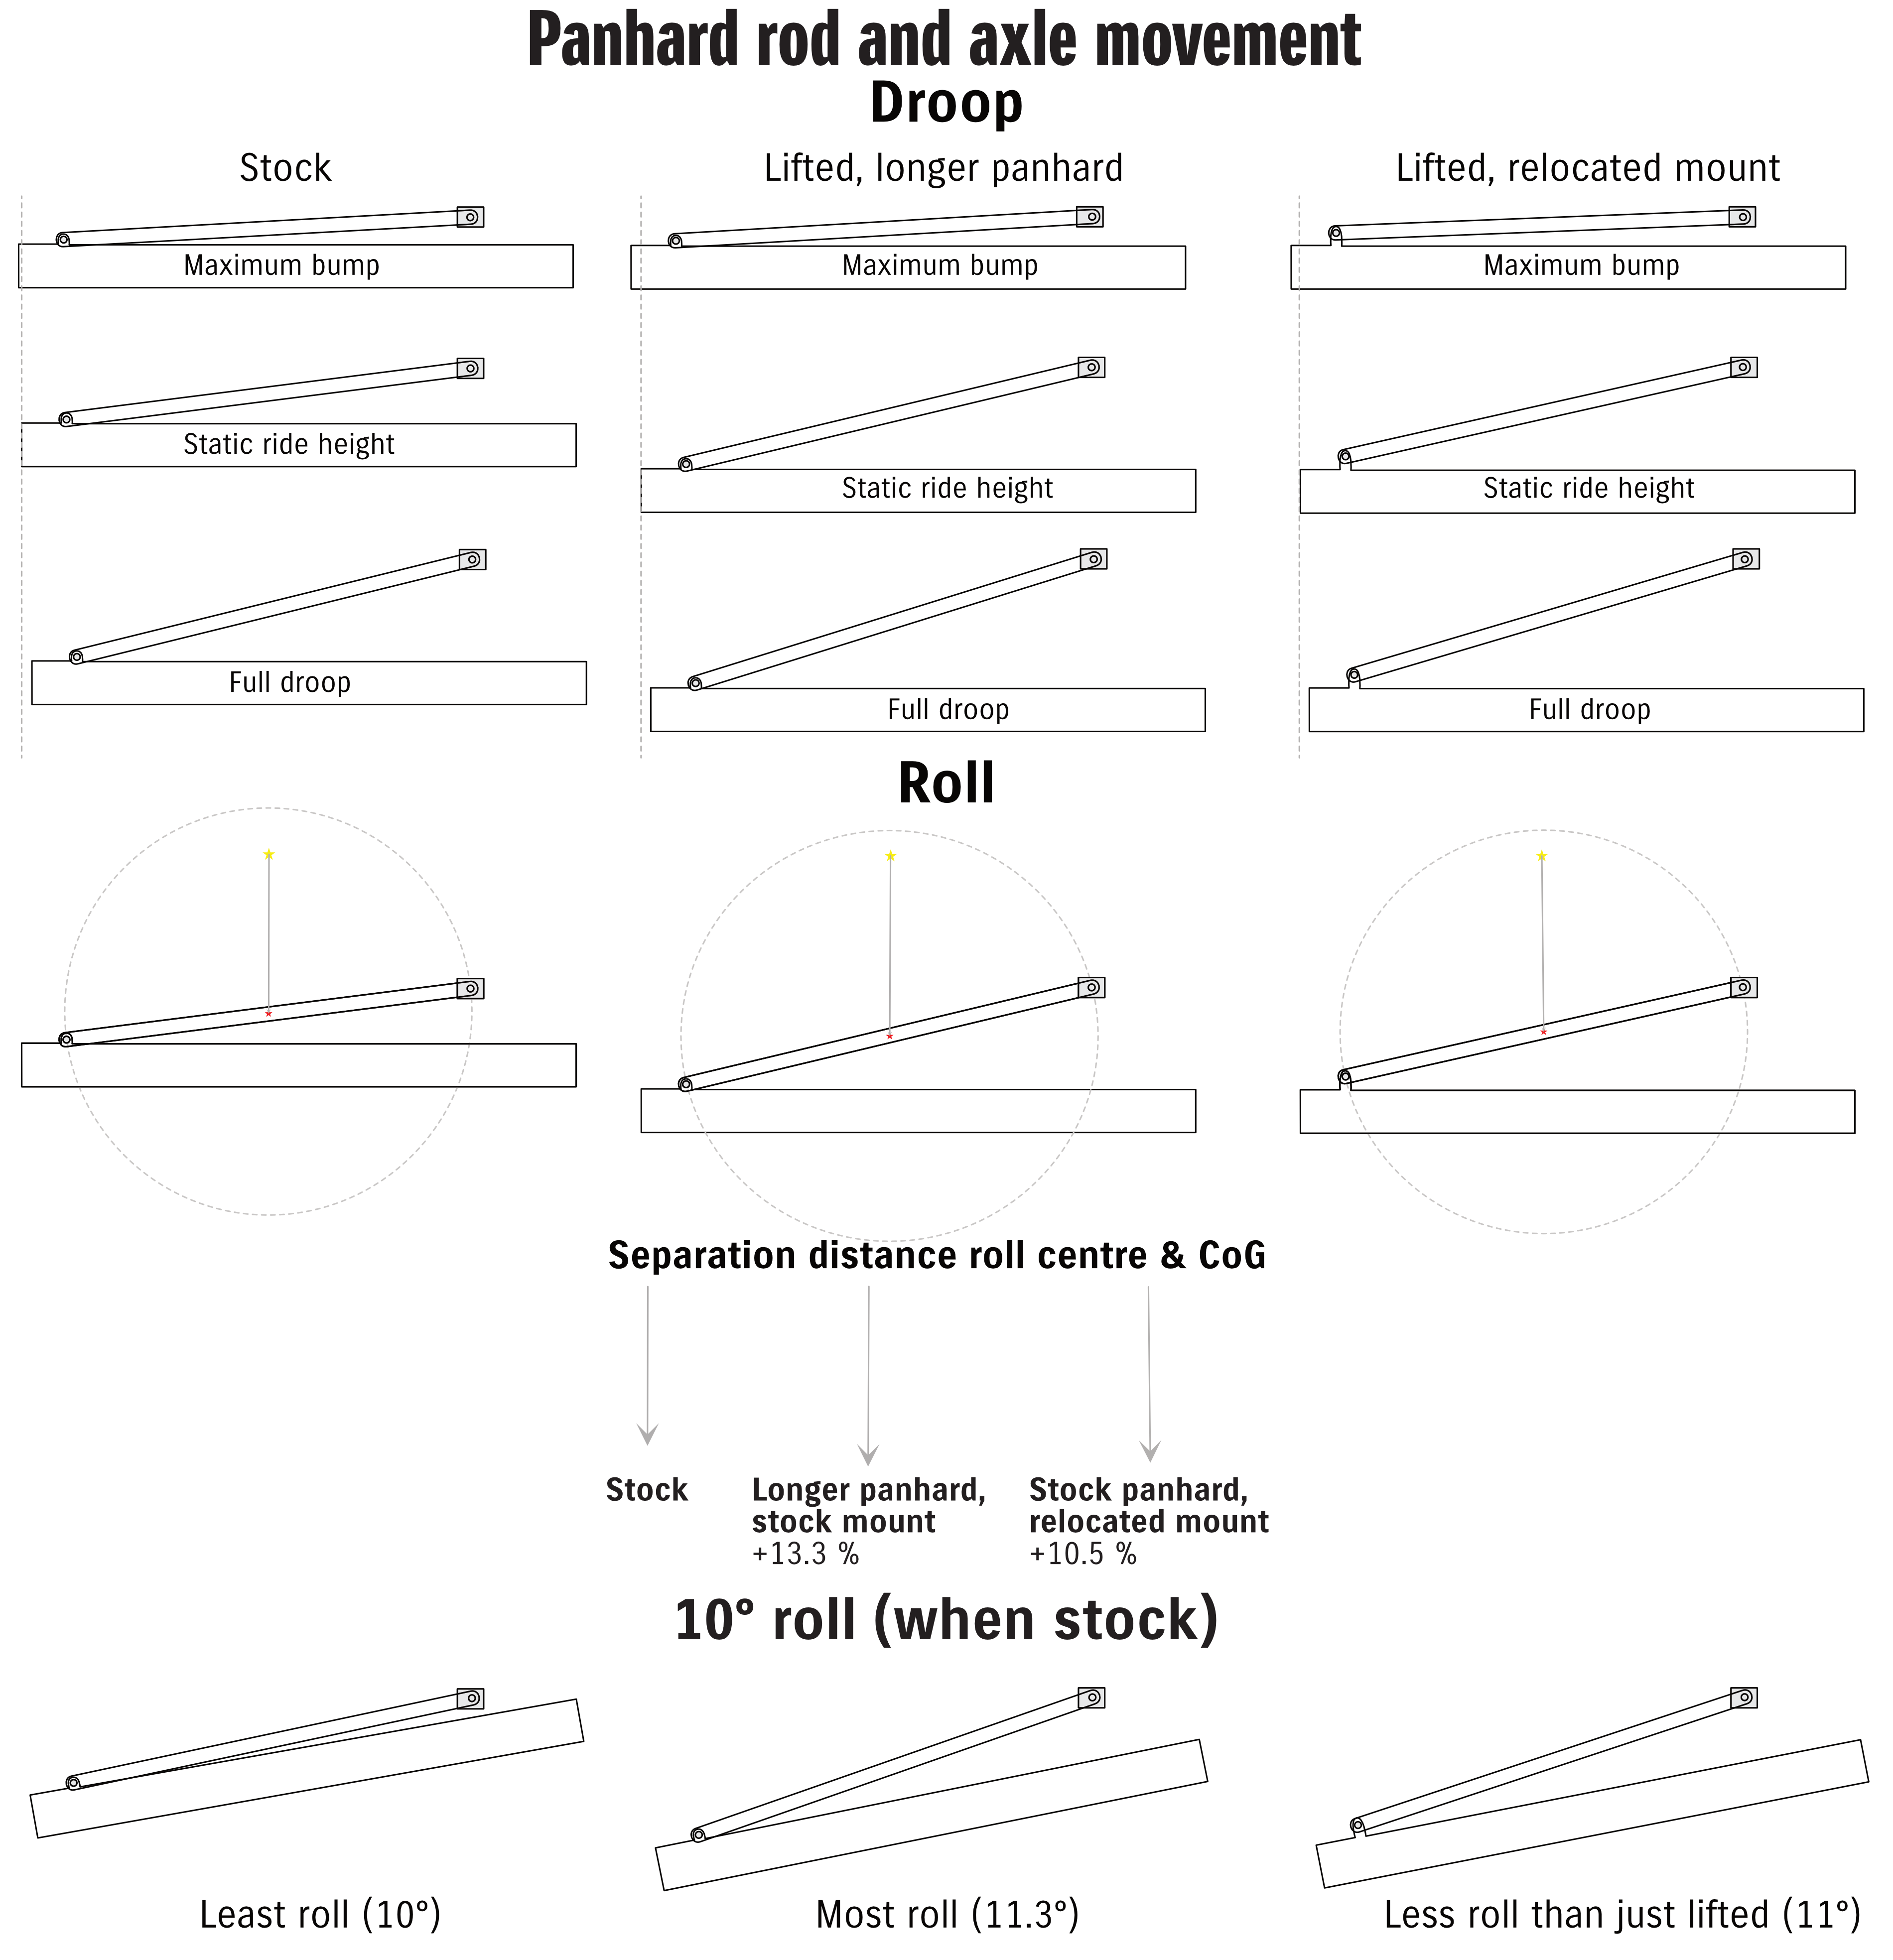
Panhard rods are the links that lead sideways from the axles up to the chassis. They control the position of the axles side to side. As the suspension is compressed or extended the axles do move a little sideways with these, but they keep the axles mostly centred. Adjustable length panhard rods are how you correct the position of the axles with respect to the chassis at static ride height. Panhard rods also control where, vertically, the suspension appears to rotate around as the car rolls in corners. Relocated panhard rod mounts/brackets alter this roll centre to help the car’s handling after a lift. Generally only performed on the back of the Jimny for smaller (40-50mm lifts) but a revised mount lower on the chassis is needed at the front for taller lifts (in the 80+ mm range). Note the difference: adjustable panhard rods get you side to side adjustment, and the panhard bracket relocation varies the roll centre of the car. They are not equivalent changes.
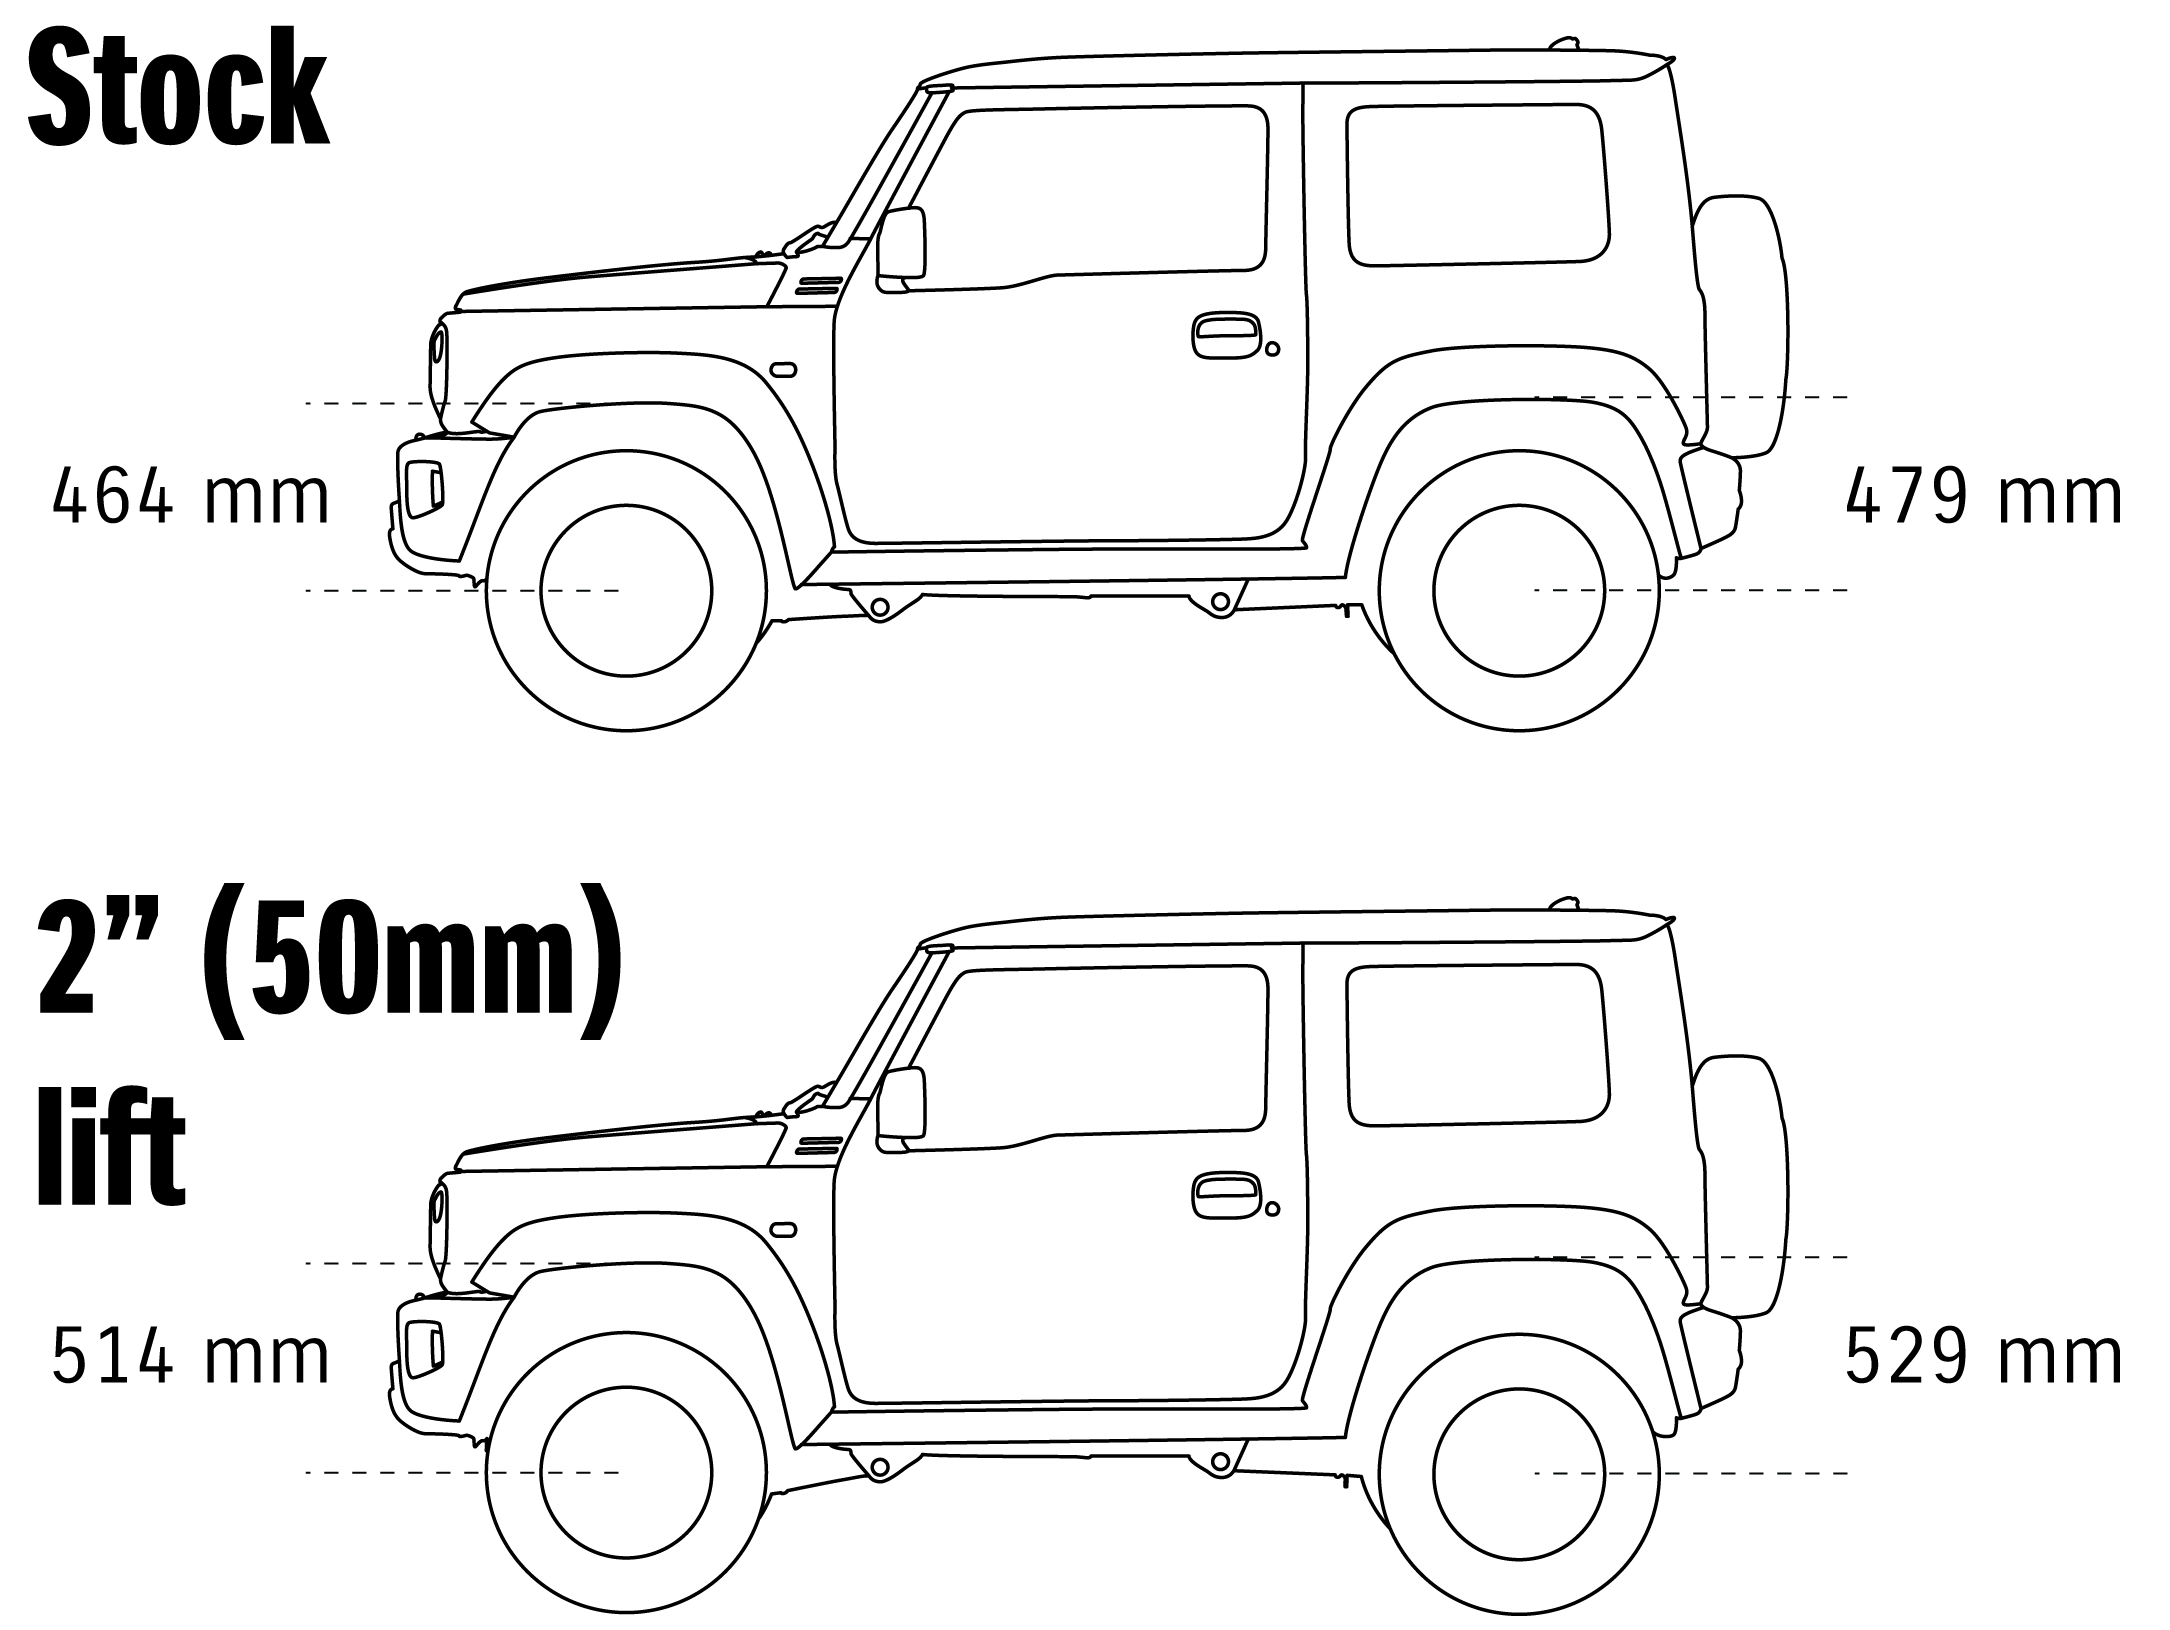
Lift height is the height that the car sits at rest on a flat surface. To remove any variance if you fit different wheel diameters or different sized tyres, the official measurement is from the centre of the axle to the highest opening part of the relevant wheel arch, as illustrated below. The lift height is often measured in mm (e.g. 20, 40, 50 or 60 mm lift) or inches (e.g. 1.5″ or 2″). It is a measure of the difference between the static ride height without the suspension lift kit installed and after it has been installed.
The exact amount of lift depends on a lot of factors but the simple thing to understand it is a product of the combination of the weight you have on the car and also the spring rate (and preload) which I’ll explain more in a moment. Lifts can be done as a suspension lift or a body lift though only a suspension lift is common and easily legal with a gen4 Jimny in Australia. Suspension lifts increase suspension travel (articulation – discussed below) whereas body lifts change the separation between the car’s body and the chassis. Since only one of these is common I’ll stick to discussing suspension lift stuff in this article.
Caster is the angle between the steering axis and vertical. It is a measure of how well the steering will self centre: most cars run slightly positive caster which is the steering axis leans back a little. Negative caster will require the car to turn less, but it will have less stability. Positive caster will make the car slower to respond to the steering, the steering will be heavier but it will be more stable and more prone to self centering.
The specs of the Jimny have the factory caster at 1º55′ (1.916….º caster), +/- 1º. As the car is raised up the suspension pivots around the radius arm, which serves to rotate the axle forwards as the car rises, and rotates backwards as the car falls. In practise this means the caster becomes more negative as your raise the car and more positive as you lower the car. Because a lifted car sits higher than an unlifted one, this means the caster is a bit more negative than the factory specification once a lift kit is installed. Exactly how much only depends on the height of the lift, no brand will be better or worse for caster change: height is height.
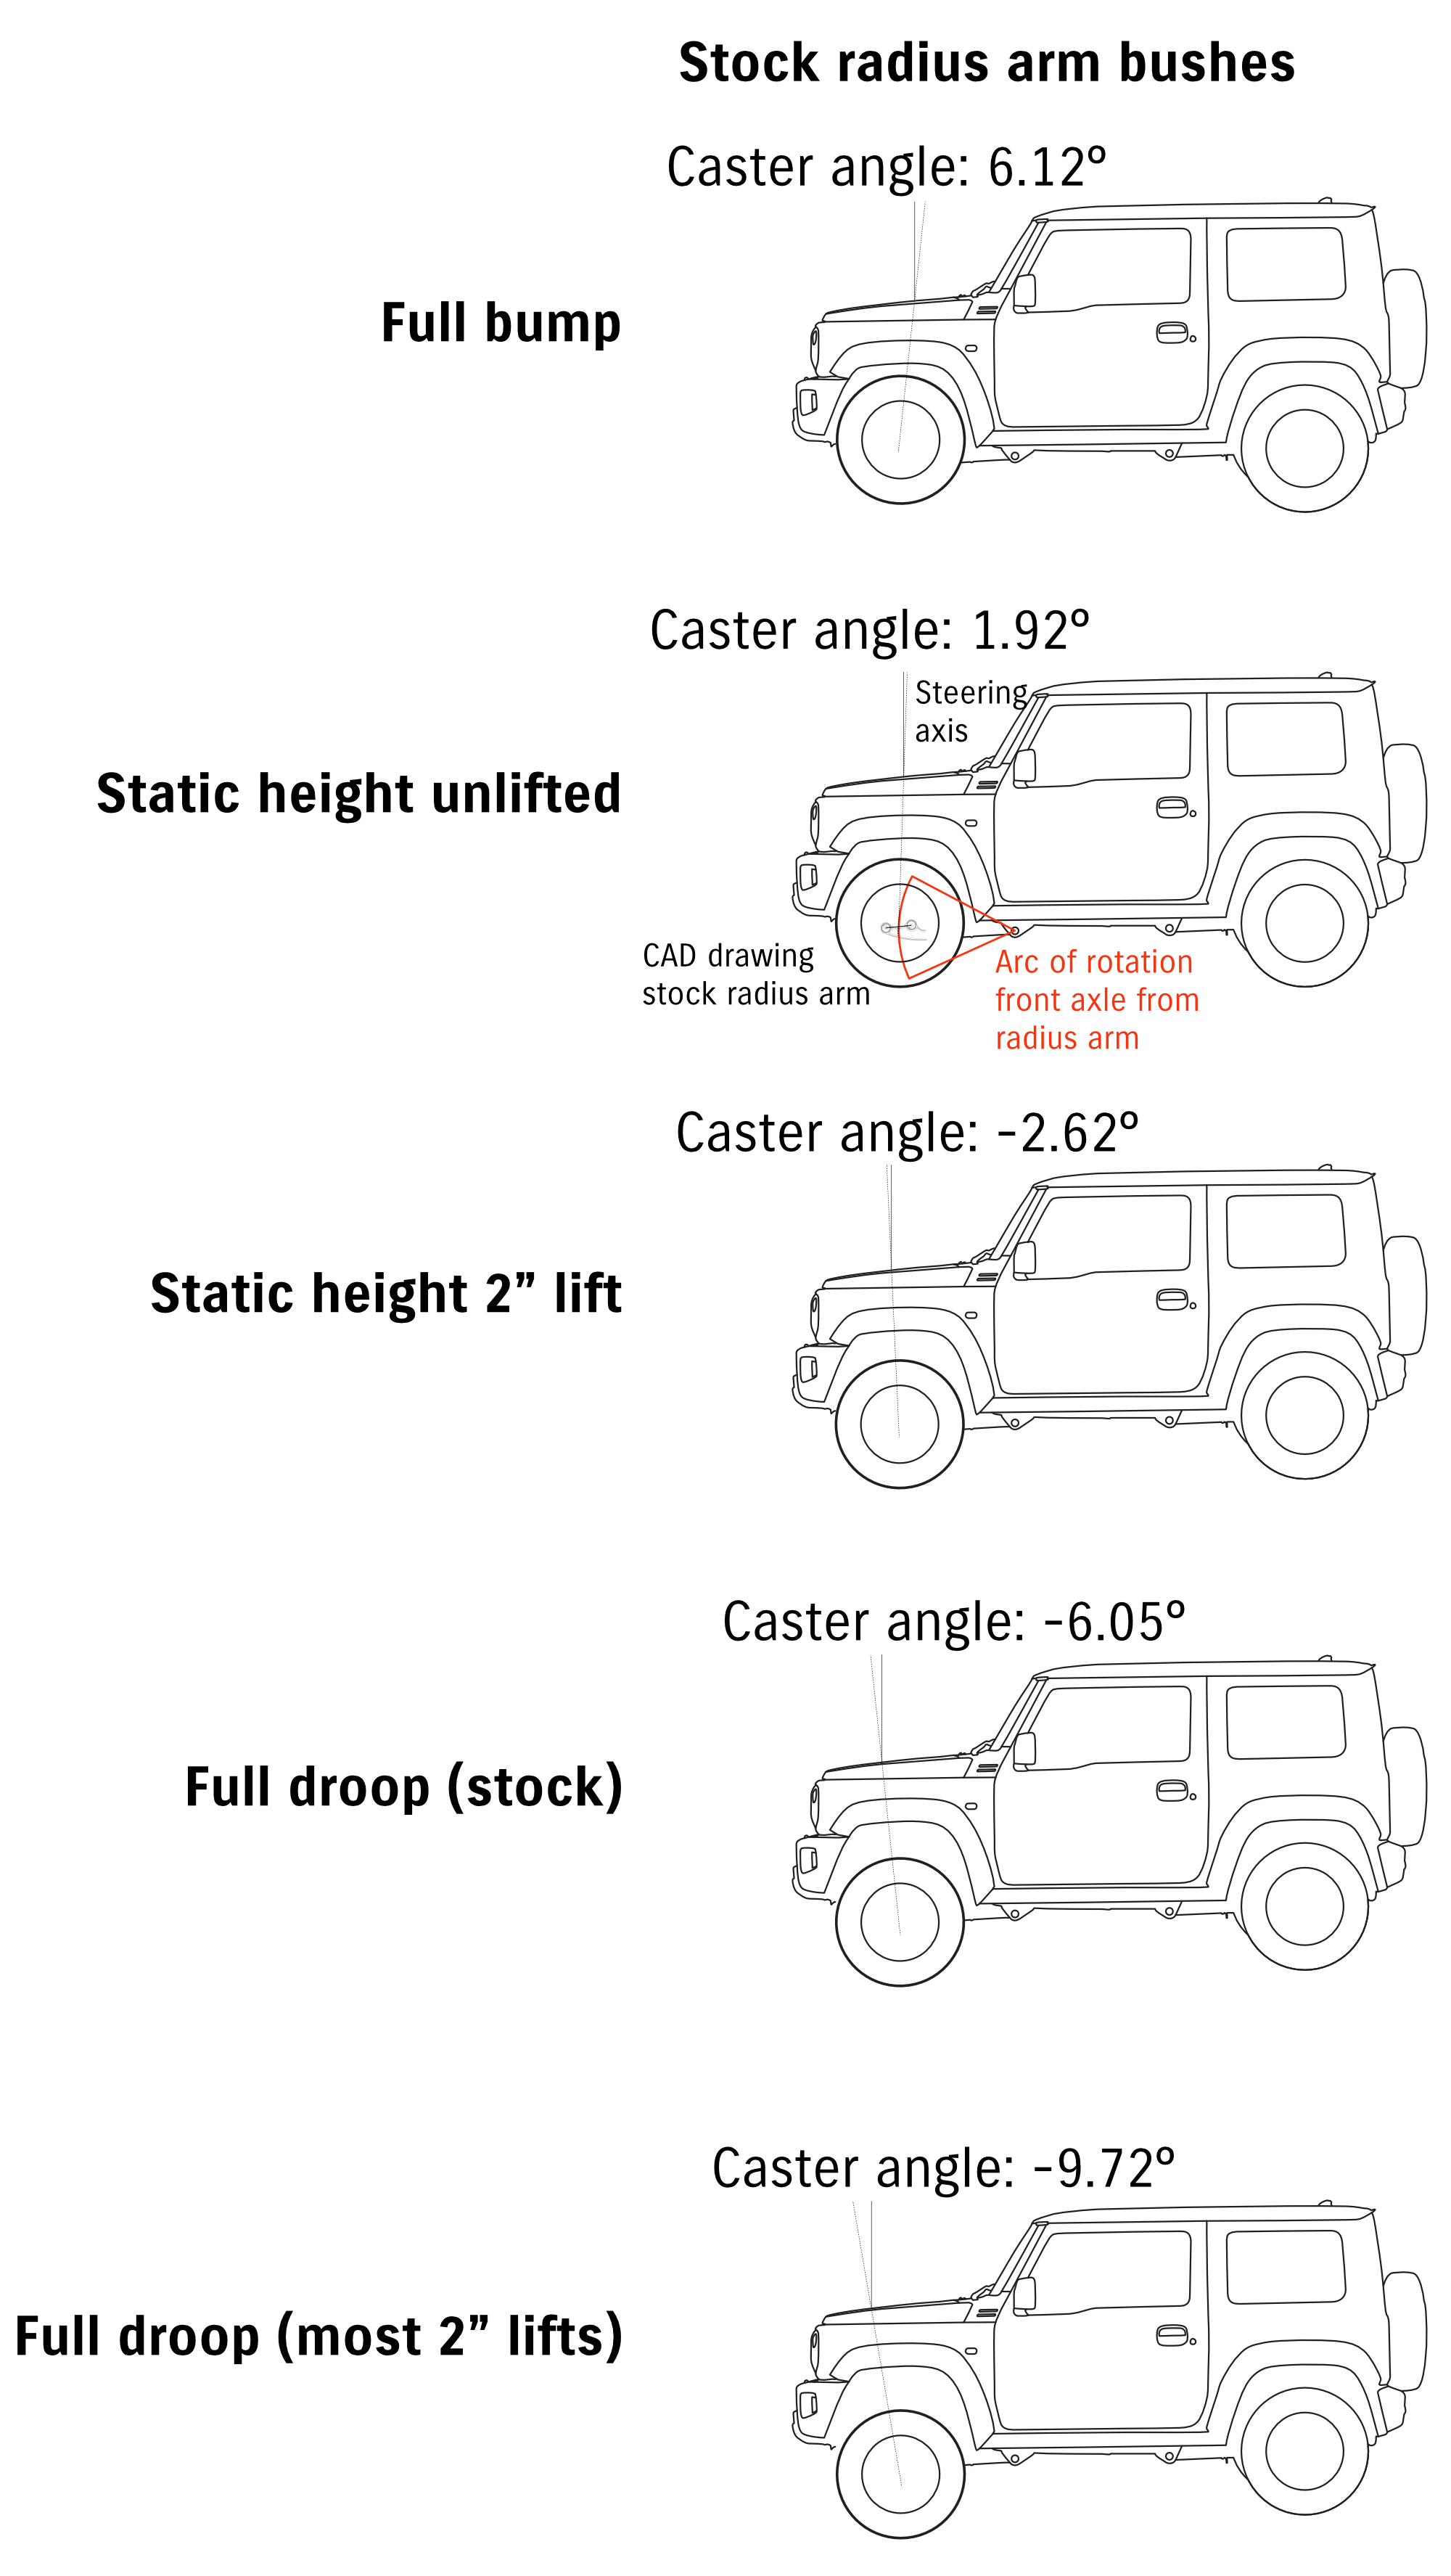
Caster correction is about changing the caster angle so that it ‘corrects’ for the difference in the caster at the static ride height for a suspension lift. The amount of correction required does vary on the exact amount of the suspension lift. It is often achieved by replacing the bushes in the radius arms, but replacing the radius arms with different geometry will achieve the same thing and potentially more fully correct the change needed.
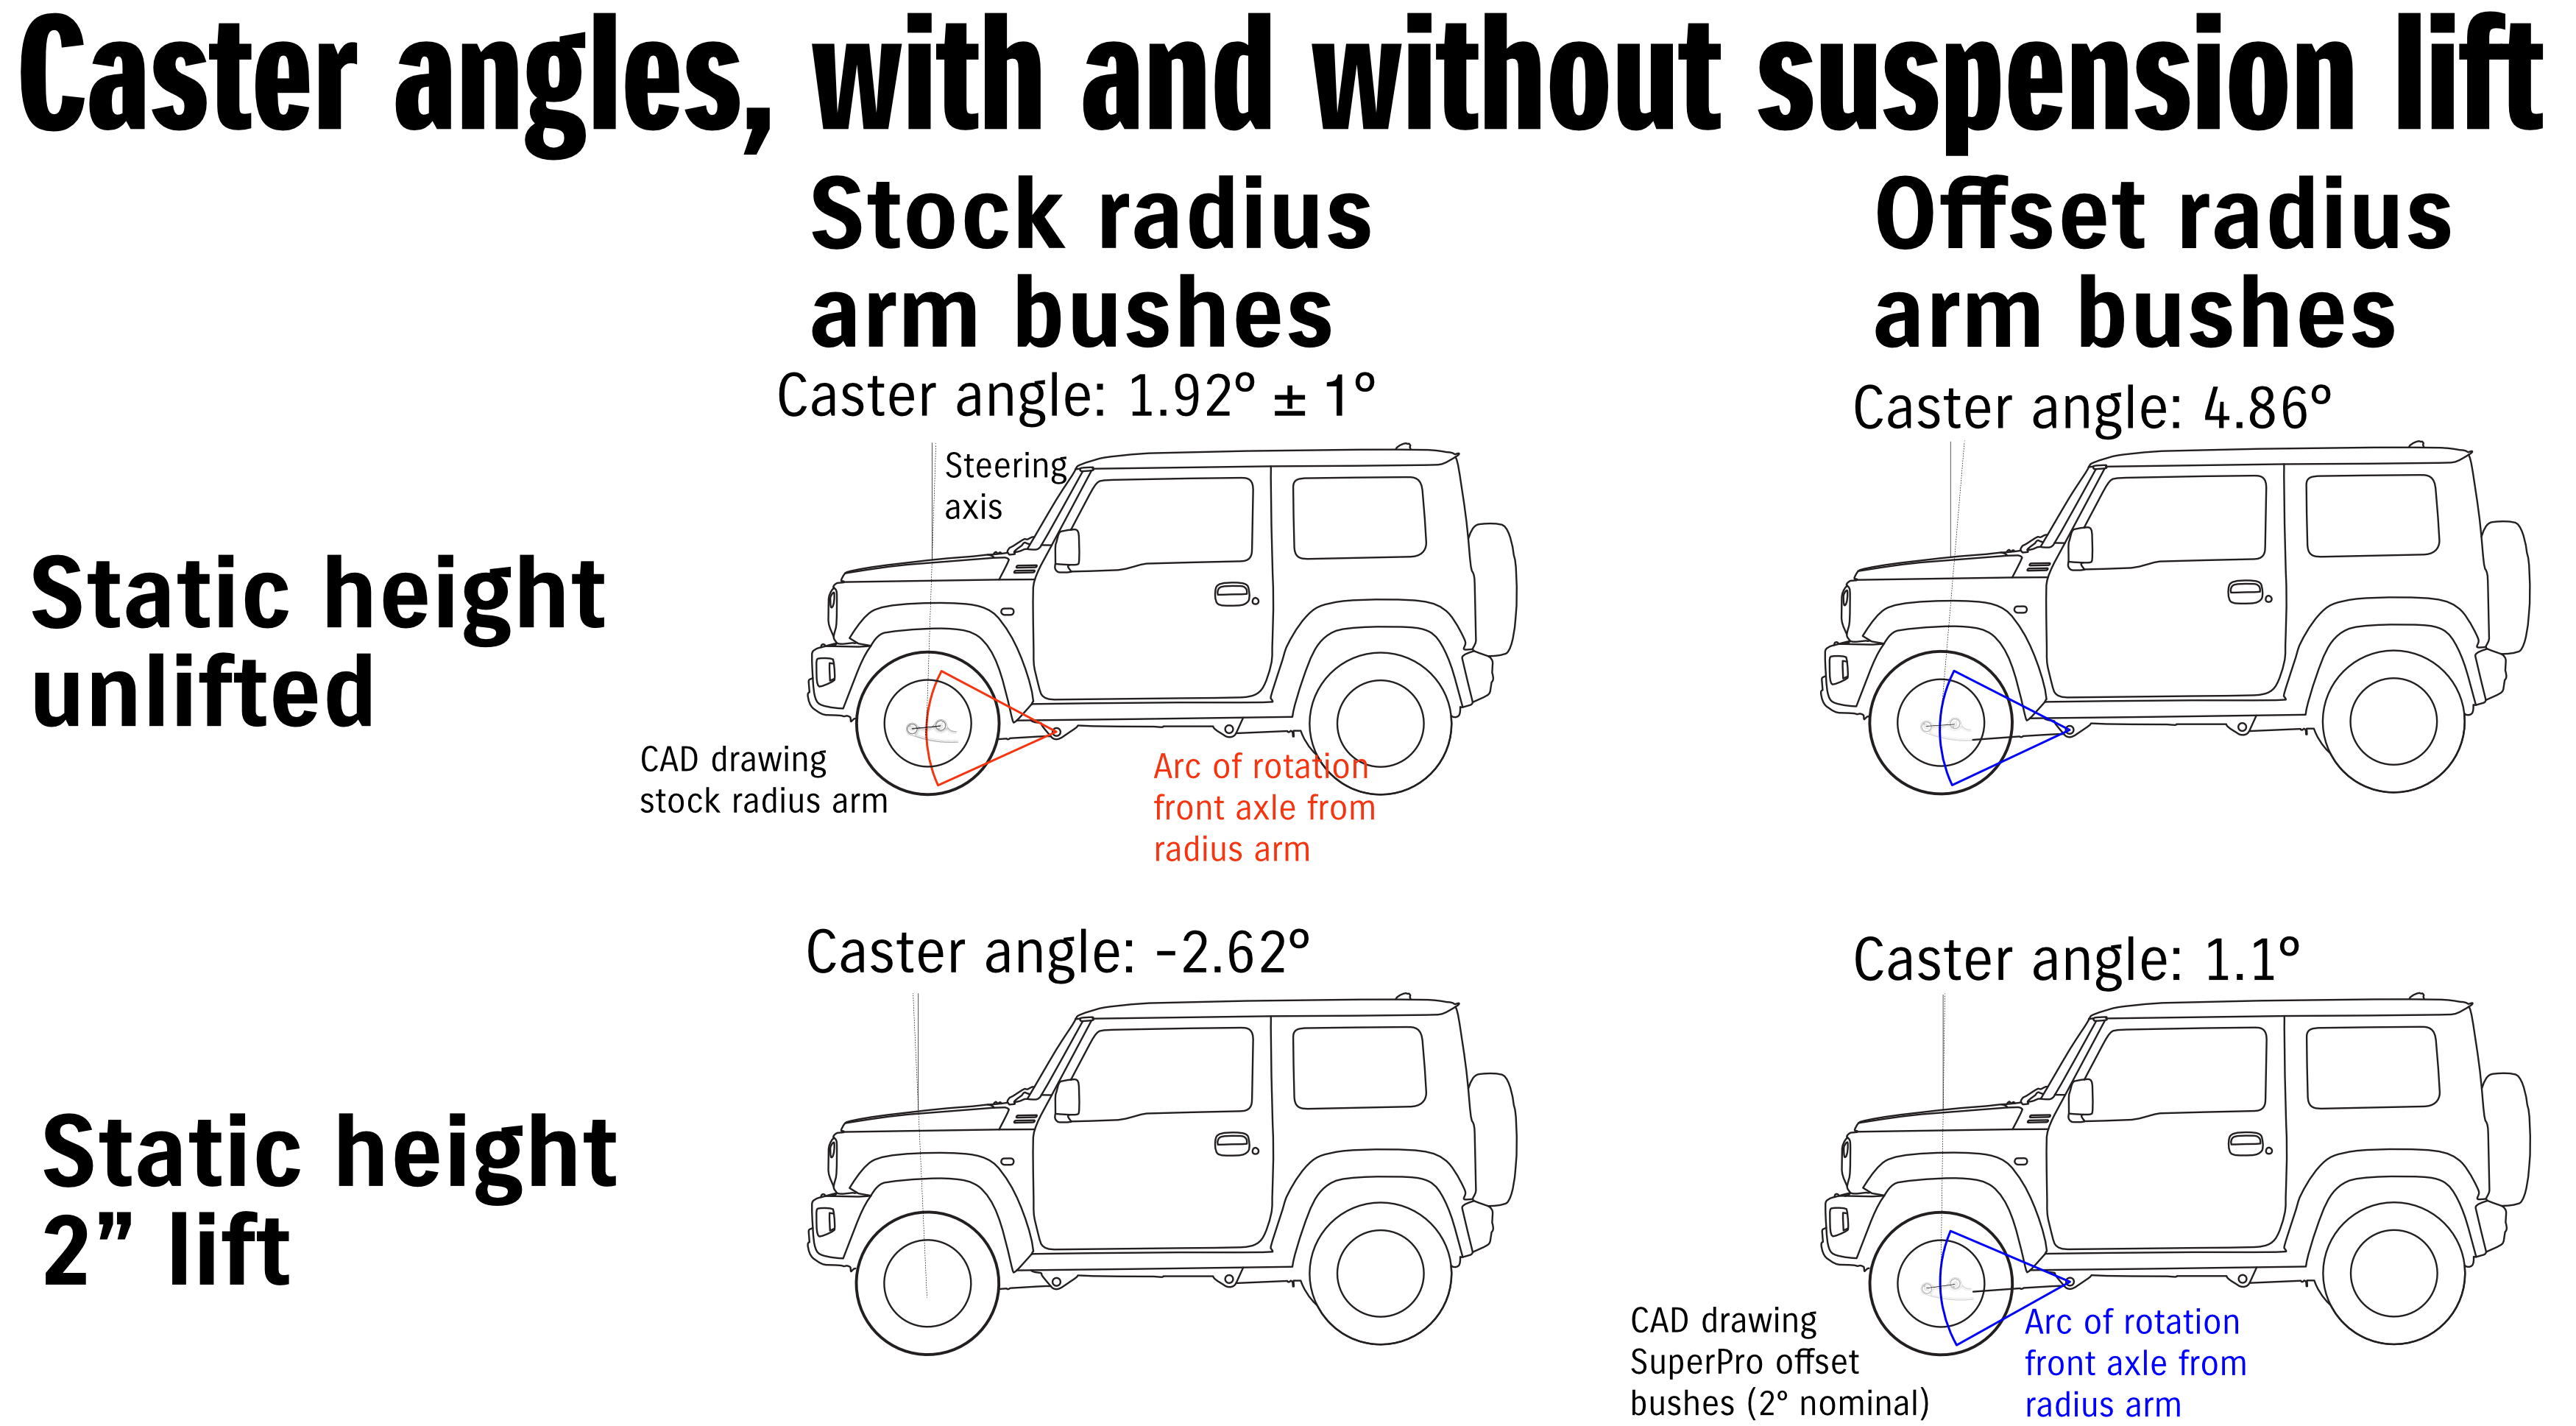
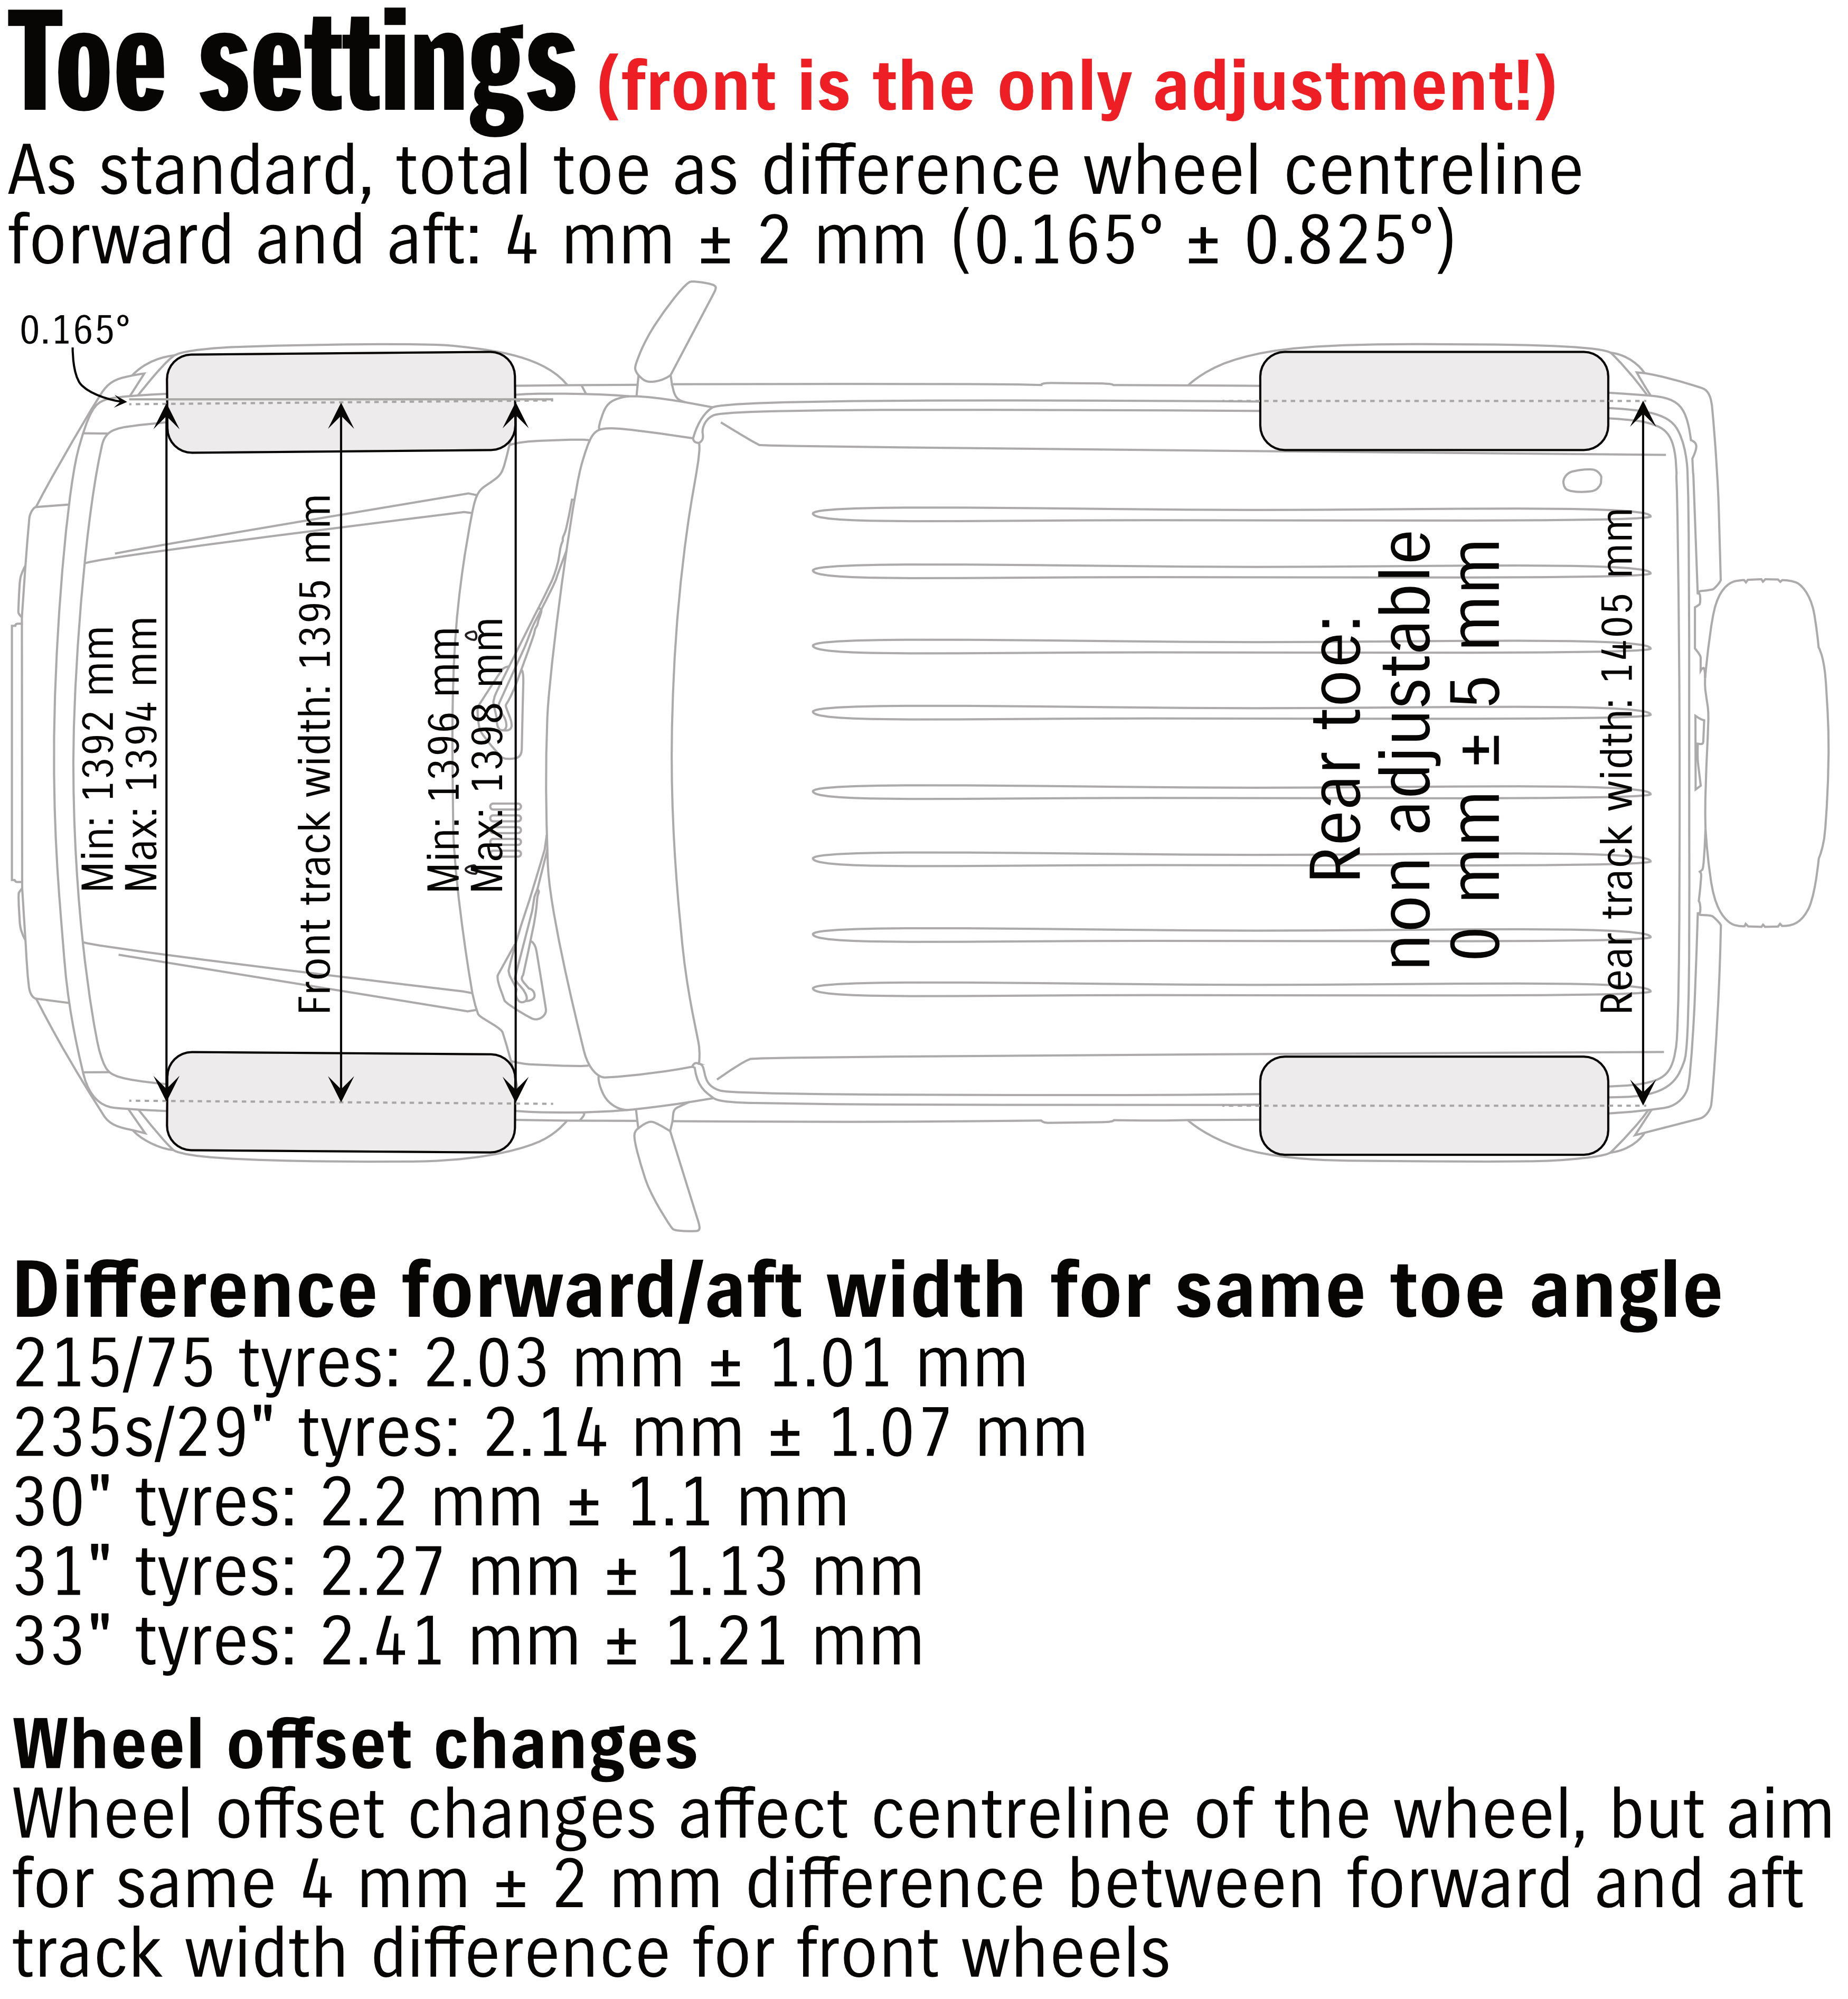
Toe is the amount the front wheels point in or out. The front toe is the only thing adjustable in a Jimny’s wheel alignment. It is unaffected by the installation of a lift kit correctly. The car should slightly toe in i.e. front wheels point a little in towards each other. Toe is adjusted by the toe bar between the two front wheels, behind the axle: it is adjusted equally on both sides to set the toe to ensure that the steering angle remains equal on both sides. Jimnys are meant to run a reasonable amount of toe out which aids stability; many alignment shops run them close to zero toe which gives better tyre wear and marginally better fuel economy as the tyres are scrubbing less in a straight line, but at the expense of steering stability.
This is also a good time to talk about steering dampers, which work like shock absorbers but for your steering system. They damp side to side oscillations in the steering, which arise from either incorrect caster or from large, balloon-like 4wd tyres acting like springs. The gen4 Jimnys come with a steering damper standard, and it works reasonably well if the toe is set to aid stability and the caster is in the ballpark of correct i.e. caster correction is added after a lift if it is needed. Some people add return to centre steering dampers which mask the effect of poor caster; this is especially true for lifts that are quite tall as just using offset caster bushes will inadquately correct the caster. Worn suspension components also cause oscillations in the steering aka the death wobbles but again a steering damper just masks an underlying problem. An incorrectly adjusted return to centre steering damper can also give rise to a feeling of the car not steering straight.
Speaking of steering, the steering drag link is the rod that connects the steering box on the chassis on the drivers side down to the opposite wheel. The drag link is what sets the relationship between ‘straight ahead’ from a physical geometry perspective of the front wheels and the steering wheel. When you raise the suspension on a Jimny, the steering box gets further away from the steering arm and thus the steering wheel is tilted over. The Jimny has a self-learning steering angle sensor to determine which way the steering is turned; it is possible to confuse this through a set of incorrect adjustments and/or rotating the rear wheels with the front wheels turned but not rotating, but in general the system will eventually find the new centre as you drive. Recalibration of the ESP system and the steering angle sensor might be needed in extreme cases, although as I note in my article on Jimny issues, the fact this mostly arises from professional wheel alignment places indicates it’s a failure to do things in the right order. Nearly all self-installed suspension lifts at home that just adjust the drag link to get the steering wheel straight have no issues.
A wheel alignment on a Jimny only consists of adjusting the front toe to get it correct, and then adjusting the drag link to have the steering wheel in the centre. Nothing else is adjustable at a wheel alignment: if you need the caster changed then you are changing the bushes or the radius arms; if you need to re-centre the axles after a lift then that’s done with adjustable panhard rods.
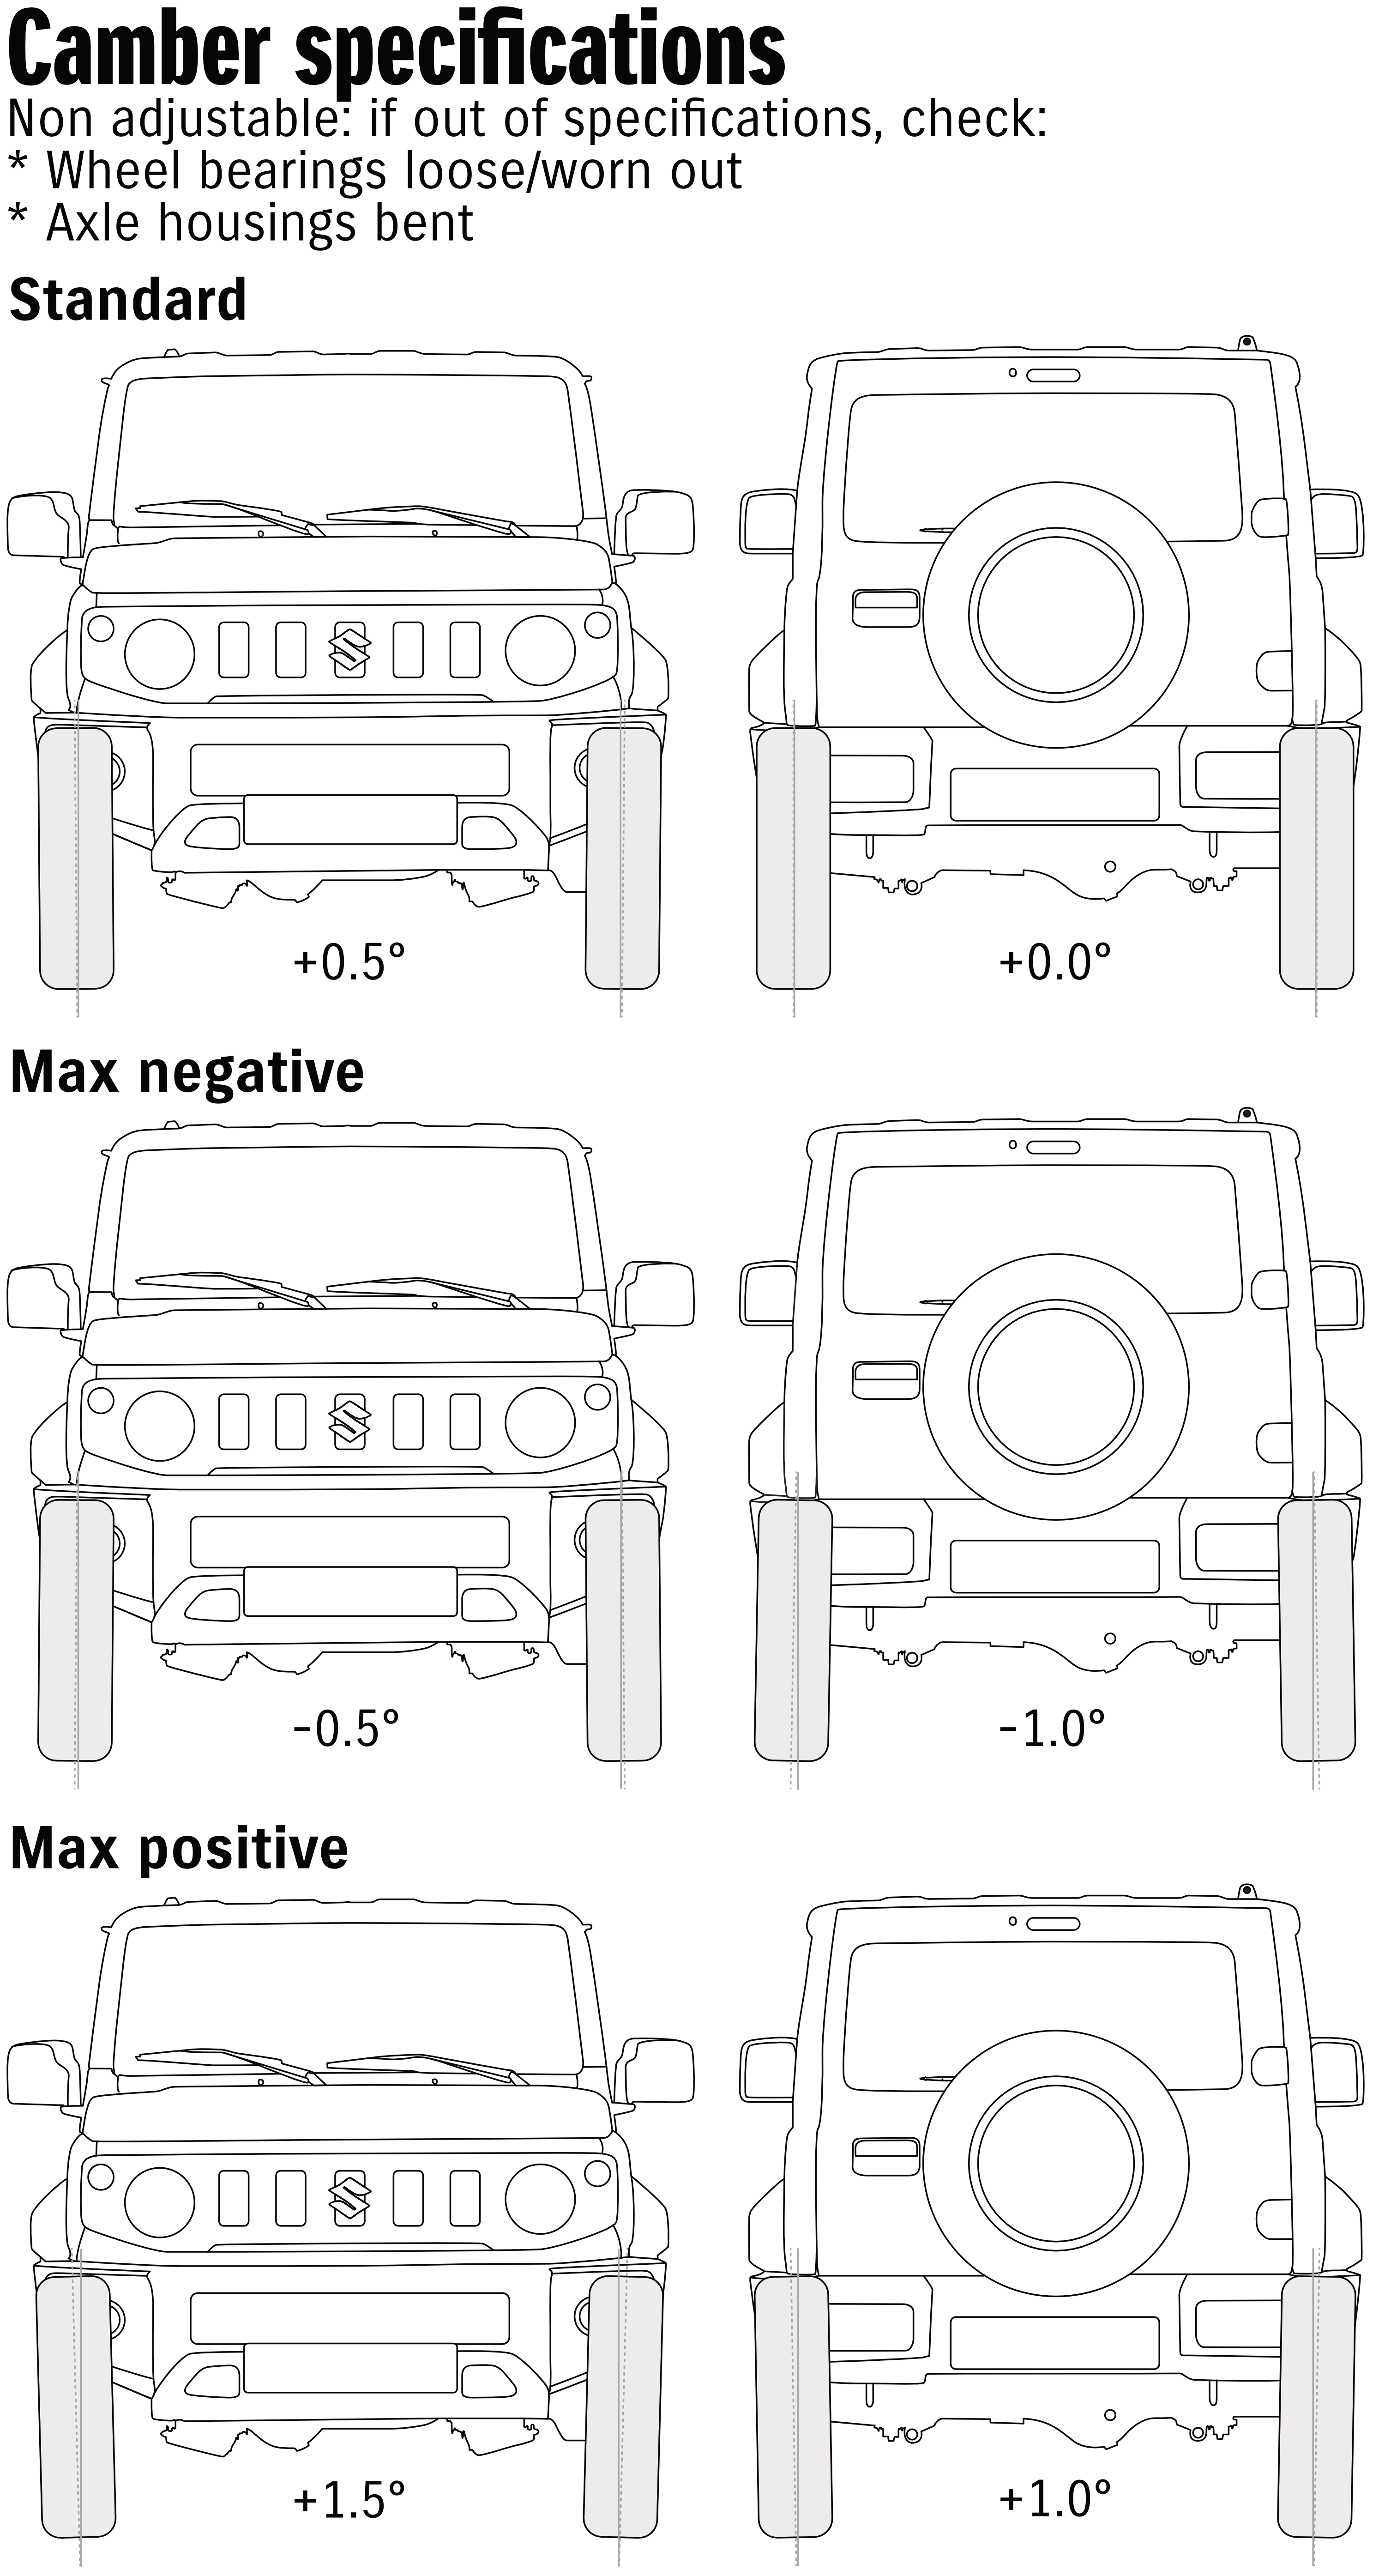
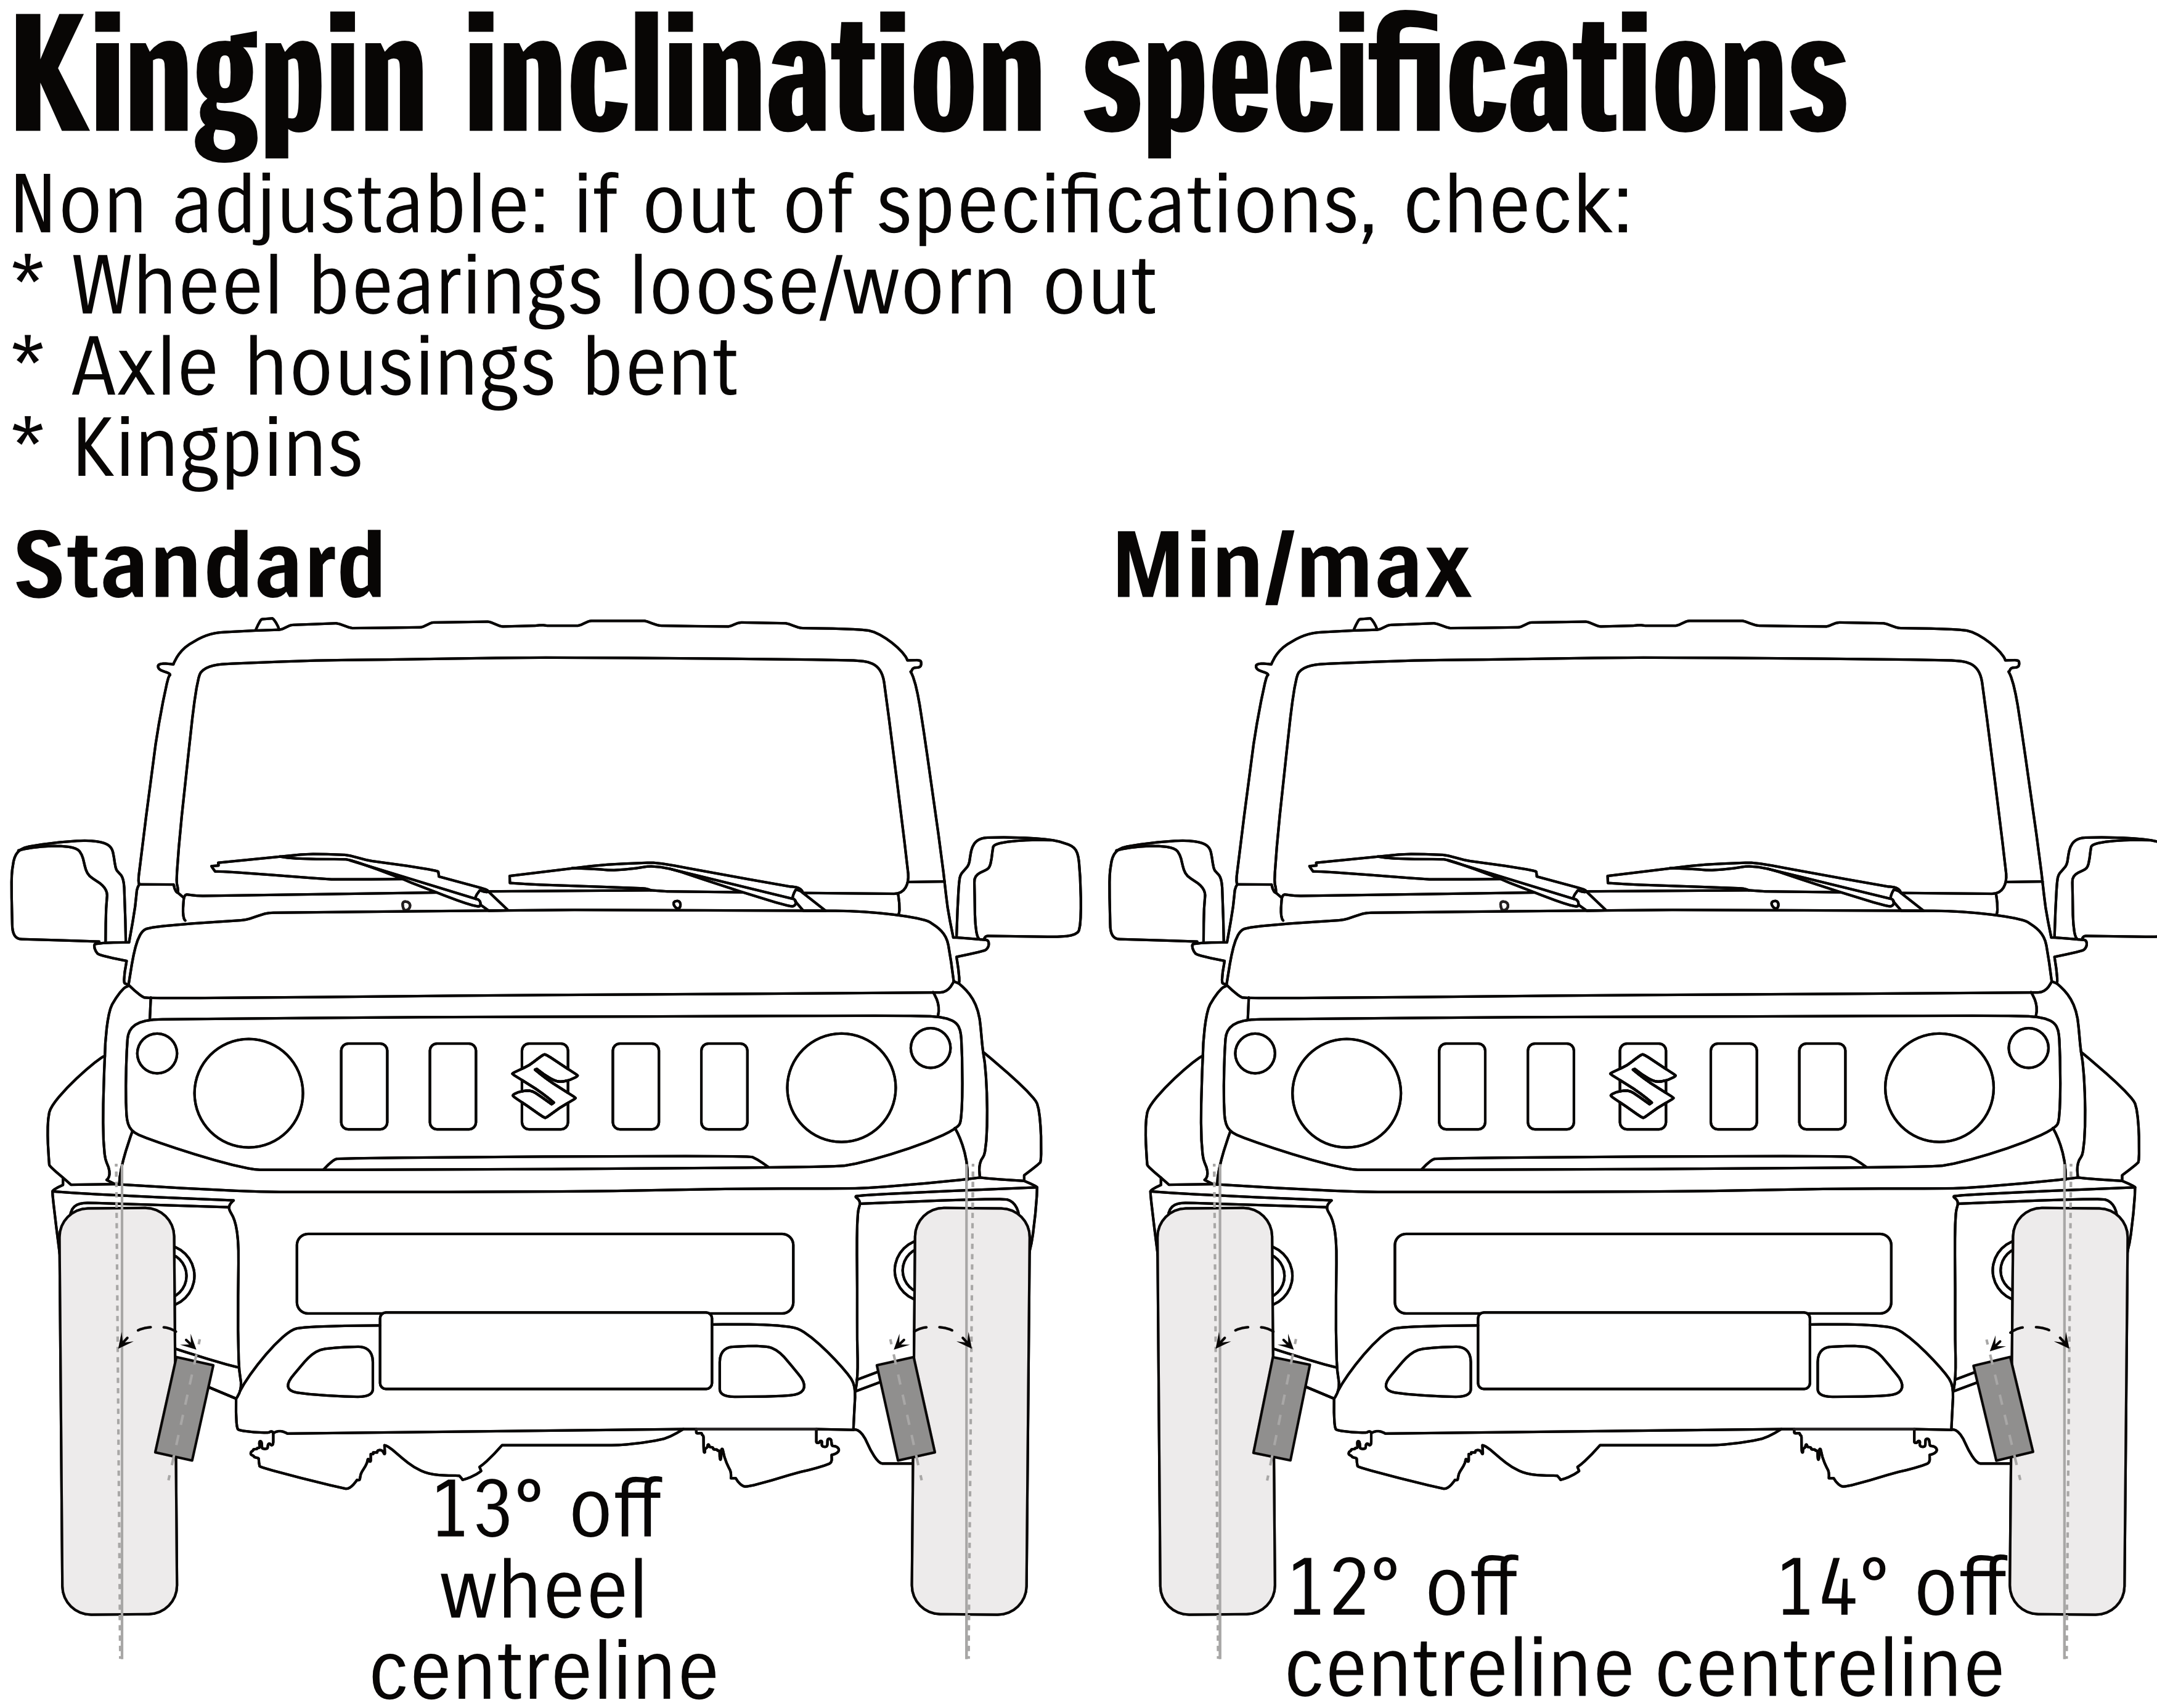
Other things that you’ll get reported at a wheel alignment might be the camber, which is the angle the wheels sit at with respect to the vertical, and maybe the kingpin inclination angle which is the other steering axis angle at the front. These are probably best explained by diagrams and then we move on; they’re basically not adjustable and if they’re out of spec you’ve bent something on your car. Note in the kingpin inclination angle I have drawn the kingpins a bit further towards the centre of the car to accentuate the KPI angle. I’ll adjust this with the diagram below on scrub radius.
Another component you might have reported at a wheel alignment is the wheel track, which is the difference between the centrelines of the wheel for each axle. Contrary to many people’s intuition, it’s the centreline that dictates the track not the outside of the wheel. The centreline of the wheels is dictated by the wheel offset, so changing the offset is what changes the track of the car and it isn’t changed by wider wheels of the same offset. Wheel offsets are a bit hard to wrap your head around, but in essence the more negative the wheel offset is the more the centreline moves outwards. In Australia you are not allowed to narrow the track of a vehicle without reengineering it, so you can only go more negative with offsets.
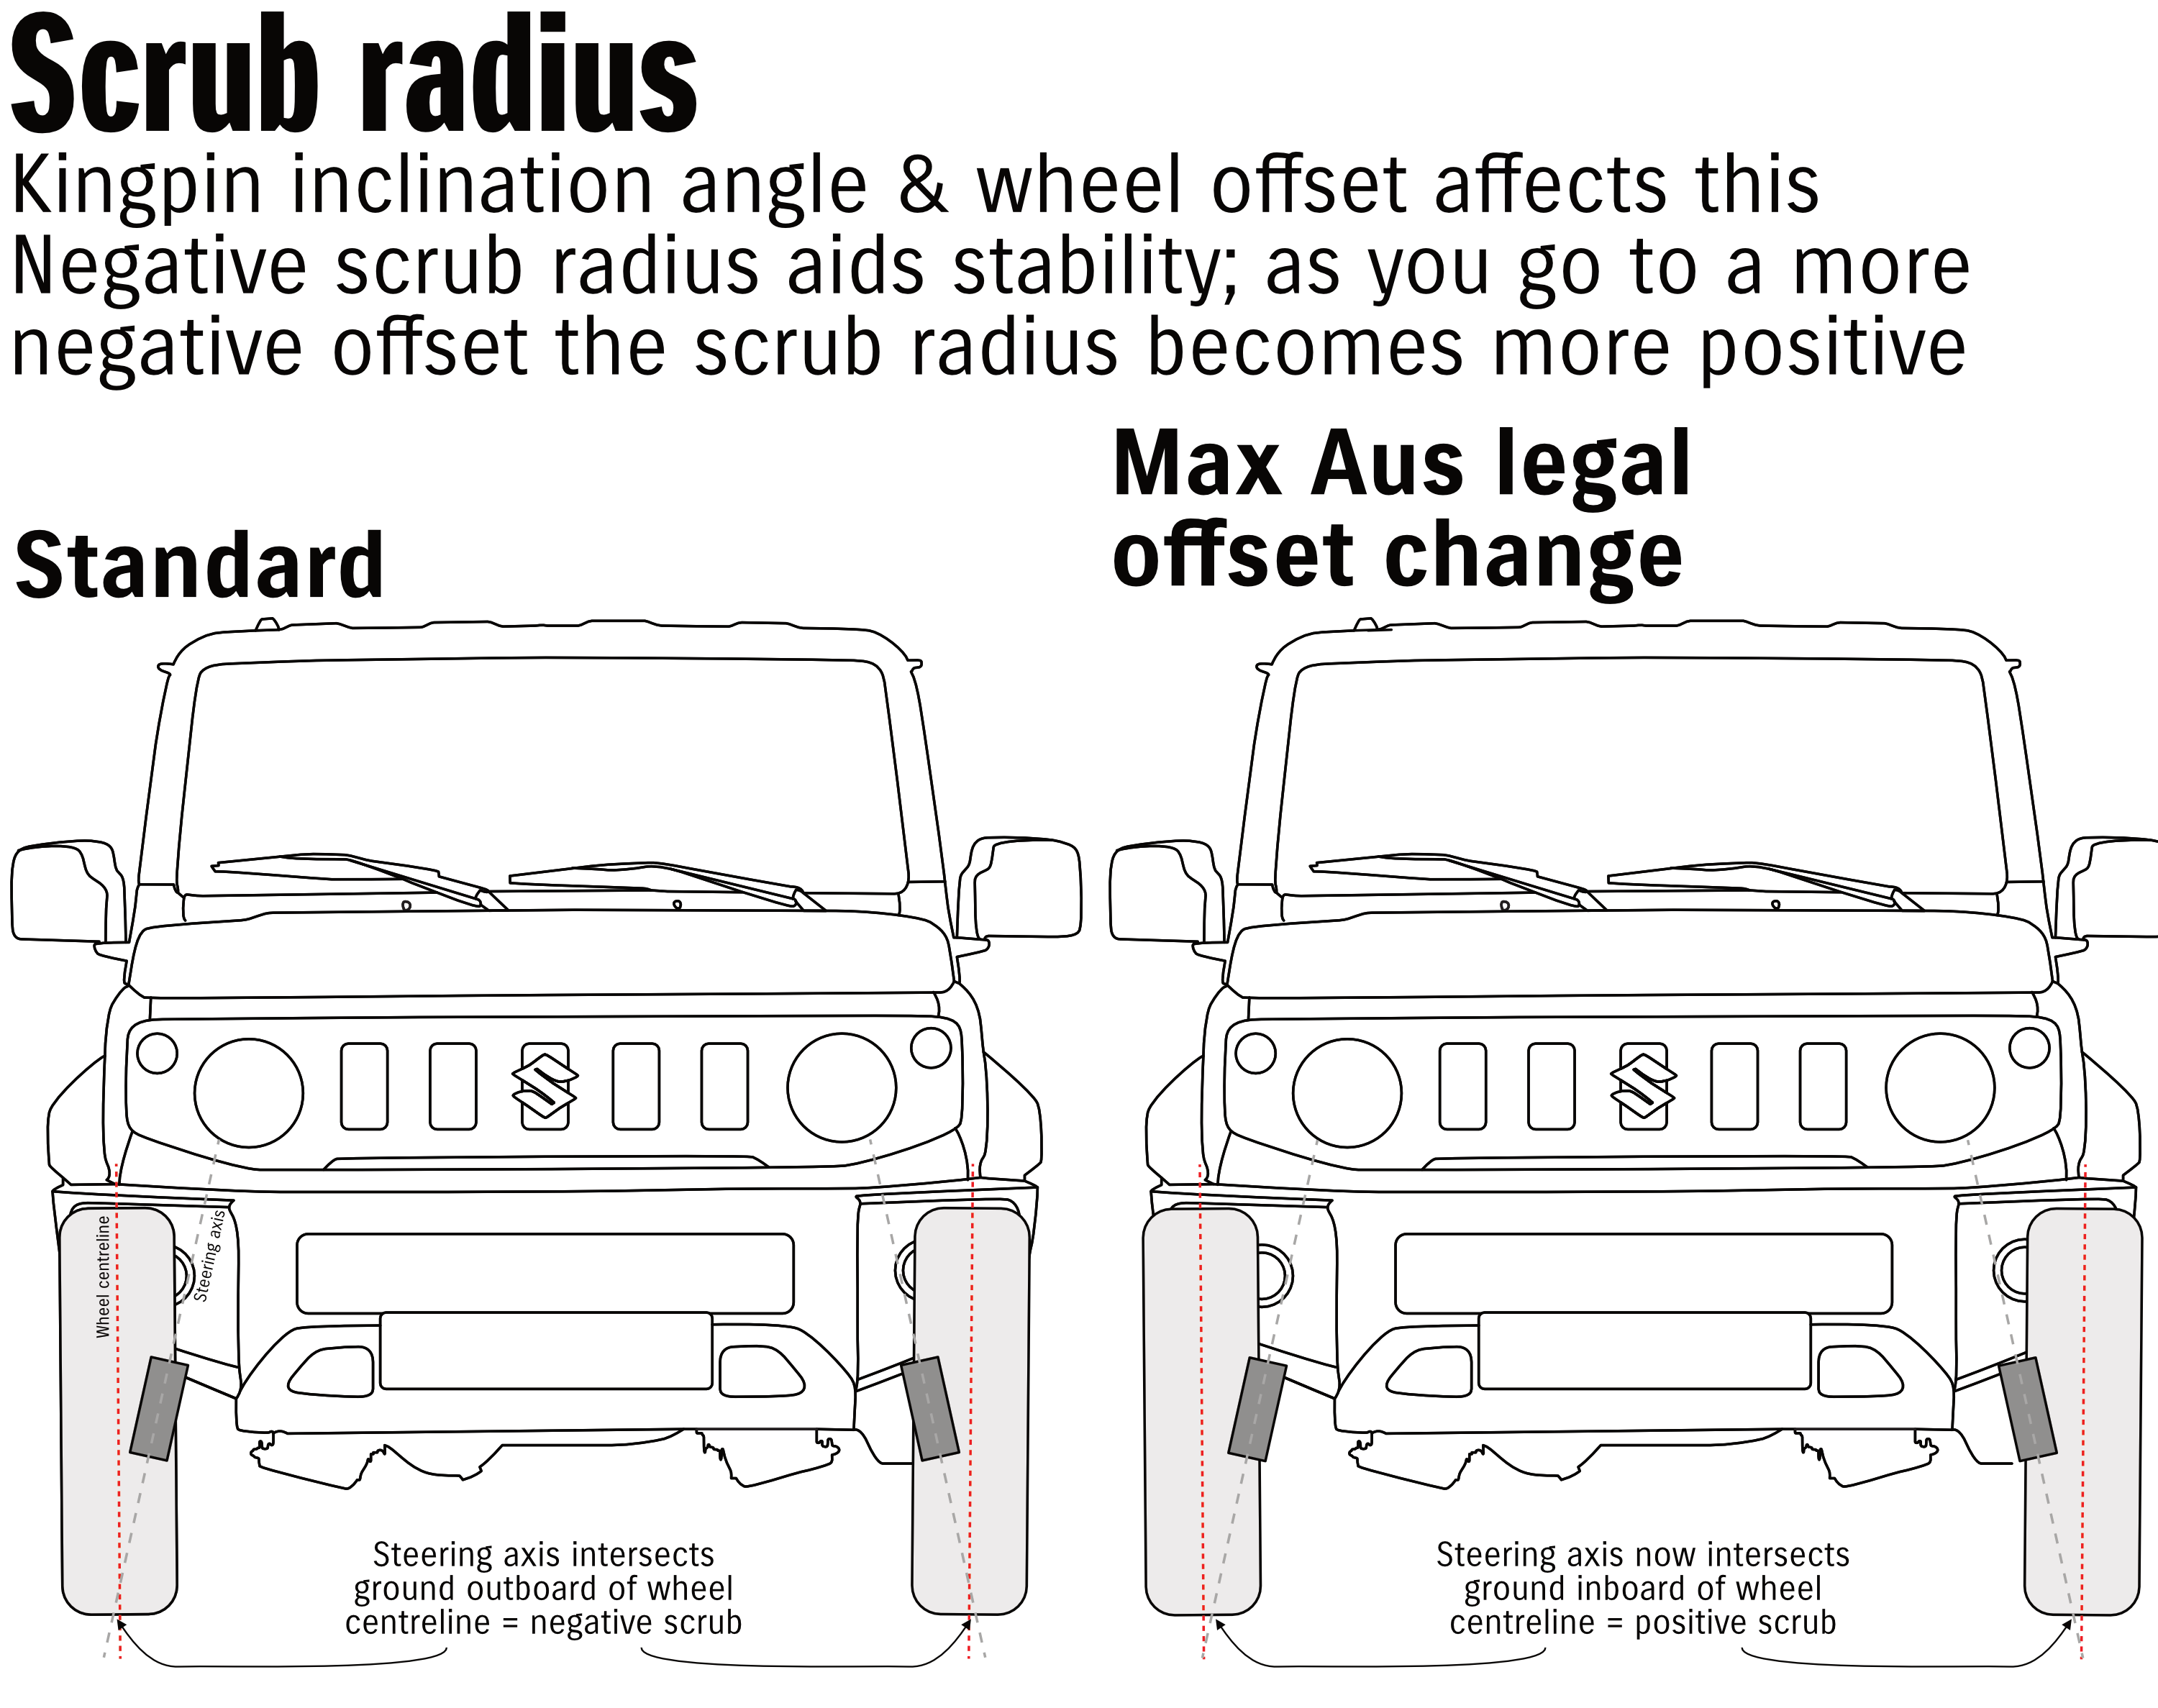
An often ignored component of suspension is its relationship to the wheels and what happens during the act of steering. The scrub radius is something dictated by the kingpin inclination angle (discussed bellow) and what happens to the wheel centreline as you steer. As you go to a more negative offset wheel, the wheel centreline is pushed further outward, widening the track of the car. However, it also changes the scrub radius which has a significant effect on steering stability. Sticking to wheel offsets close to stock also keeps the scrub radius in a good region for steering stability. Scrub radius is a bit hard to estimate for the Jimny but given the steering stability (or, rather, the lack thereof) it’s likely only marginally negative. I did my best to measure my car to have a stab at drawing it roughly to scale. Ultimately the less negative the scrub radius is, and especially the more positive the scrub radius becomes, the less the car is stable under braking and in a straight line. Any offset change that is legal in Australia (since you can’t narrow the track i.e. you can’t go more positive in offset) will result in either a less negative or even a positive scrub radius with a Jimny, and thus less steering stability.
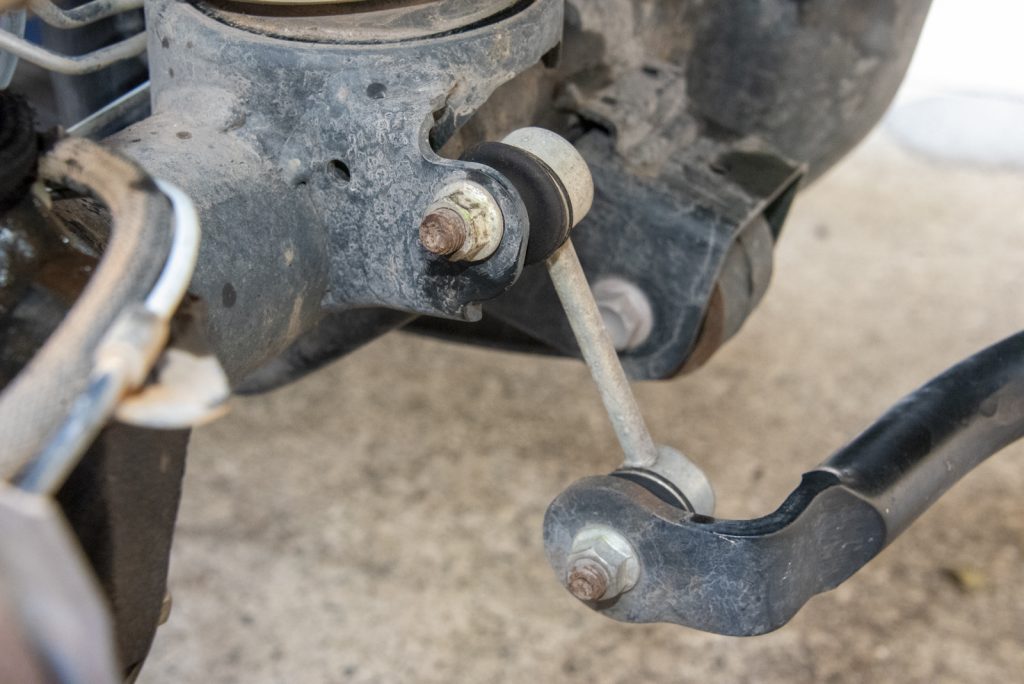
Moving our attention from the steering system to further aspects of how the car acts dynamically: The swaybar or anti-roll bar is a component of the front suspension which serves to take load from the inside wheel and add it to the outside wheel, essentially making the car more level at the front in corners. Although many cars have front and rear swaybars, the Jimny only has one fitted to the front. After a suspension lift, these end up being pulled a little by the taller suspension and so might require swaybar relocation mounts which connect it to the chassis or shortened swaybar end links, which are what connect it to the front suspension. Not doing this can add a little instability in a straight line as the swaybar acts as a sort of spring as you turn the wheel just off centre, but only changes the feeling of the car at the start of steering. Swaybar disconnects are a way of stopping the swaybar working, as it limits the front bump travel and thus front flex. This can be as simple as unbolting one swaybar end link entirely from the car, or you can buy aftermarket swaybars that are designed to be able to be disconnected with a simpler system. For many 4wders with the Jimny front flex is not their limiting factor making it through tracks, so generally you’ll know if you’ll need some way to disconnect the swaybar for added flex.
The below picture is a factory swaybar end link (looking a bit scabby from a few years of 4wding).
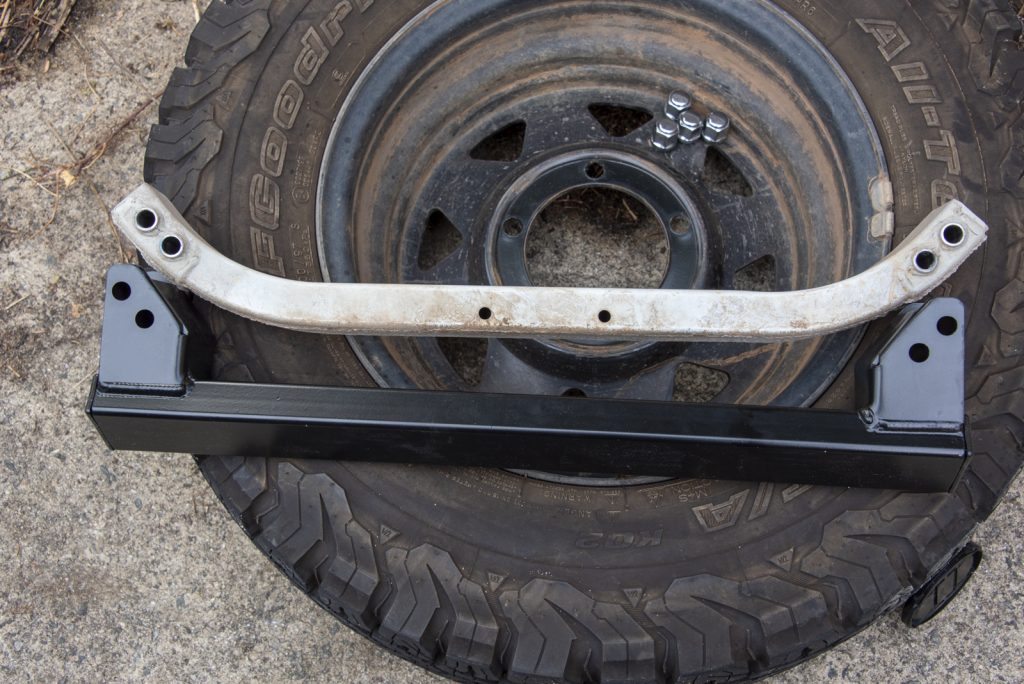
Dropped crossmember / offset crossmember bracket is about fixing an issue specific to a gen4 Jimny. To aid in crashworthiness of the car, an additional chassis ‘cross-member’ connecting each side of the chassis together was added. This crossmember can interfere with the propshaft/front drive shaft as the suspension droops: in general, suspension lifts above 45mm require the crossmember to be changed somehow to give more clearance to the driveshaft. Different manufacturers achieve this differently: some, such as Ironman or Tough Dog, simply provide brackets to space the standard crossmember down. Some, such as Black Raptor through Jimny Bits, replace the crossmember entirely. There are other solutions that provide additional clearance by being notched or they go above the propshaft completely, but these are generally not part of a suspension lift but instead additional parts you buy separately to a lift kit.
Brake hoses is another element to consider with a lift. The need to replace these does depend on the lift chosen; although people talk about it related to a lift height, it’s actually the maximum droop of the lift set by the extended length of the shock absorbers that necessitate these. In order, one and then both of the rear brake hoses need to be extended for lifts, and then the fronts also need it at about the same amount of droop that requires relocating the crossmember. Extended brake hoses are just that, longer brake hoses to account for the longer suspension travel of a lifted car. Most kits include what they need for the shocks they have, but if you are going a bit more custom then it is something to consider putting some thought into getting right.
Does my suspension lift allow me to fit bigger wheels and tyres?
Short answer: no.
Longer answer: if you add extended bump stops, potentially.
Even longer answer: the most commonly applied tyre upgrade size in Australia requires very minimal trimming of the plastic inner fender where it meets the back of the front bumper for most people for most tyre choices. You will require this offroad even if you have a lift since, unless you fit extended bump stops, your clearance at full bump does not change with a lift.
If you are going bigger than legal then you potentially need to consider other aspects beyond just body clearance: your gearing, in particular, suffers a lot and the car can get a lot worse to drive, so you might be up for more than just new wheels and tyres if you want to go big or go home.
GVM upgrades: what are they and do you need them?
This one is really specific to Australia: the vehicle’s maximum weight it can carry is something called the gross vehicle mass, often abbreviated to just the initialism GVM. This is where you can jump through a few hoops and your car is now legally allowed to carry more weight. There a couple of routes to do this according to where you live in Australia, though they all require some degree of engineering paperwork and some relatively specific upgrades to the car’s suspension.
GVM upgrade versus a lift: are they the same?
In theory no, they aren’t the same though practically for the Jimny all available GVM upgrades get you a 40-50 mm suspension lift. This is because you need to upgrade the springs to higher spring rates to accommodate the higher total mass of the vehicle when it is fully loaded to the revised GVM, hopefully this requirement has become obvious from the above discussion of Jimny suspension. Although in theory you could go a higher spring rate and a lower preload to end up at the same static height, in general people combine a slightly less high spring rate with a bit of preload and end up with a taller static height giving a lift, but also giving the car more ability to carry the weight.
We can look at this mathematically: there is about 500 kg (4900 N) of weight on the front axle of a stock Jimny. To accommodate this using two 22 N/mm springs there needs to be this level of preload applied, i.e. there’s 111 mm of effective spring travel taken up from its free length: the front springs, with the added weight of the front of the car, go from 350 mm long to 239 mm long.
The Ironman front springs are 27 N/mm, so this same 4900 N force needs 91 mm of spring travel from the free length to accommodate it. With the variable load spring having a free length of 372 mm and the constant springs 387 mm, this means they are respectively 281 mm or 296 mm long, in other words +42 mm or +57 mm on standard springs. If they were designed to maintain stock height they would need to be shorter: in fact, 330 mm long, which would mean less preload due to the higher spring rate.
Pre versus post rego
The other question around GVM upgrades is about getting it applied pre or post registration. The three Federally approved GVM upgrades through Ironman, Tough Dog or TJM are ones that can be applied before the car is first registered: this is called a pre-registration (or pre-rego) GVM upgrade. This means the car is ‘born’ with the higher maximum weight, and, should you move states and need to re-register the car there’s no further paperwork to deal with. On the flipside, post registration modification plates or post-rego upgrades can also be applied for: if you buy the car 2nd hand and it hasn’t been pre-rego upgraded then this is what you have to do. Generally post rego costs you more (since you pay for the States’ particular modification permit along with the other associated costs), however, in some jurisdictions it also gives you flexibility around having other modifications signed off at the same time which is ideal if you want to maximise how legal your modified car is. Note that there’s often always something that trips people up and therefore you can’t always keep things as legal as you might first think you can.
Do I need one?
This is a more complicated question. I go into this in some detail elsewhere to help you decide if a GVM upgrade is for you, but ultimately there’s a few factors:
- Will I be adding a lot of heavy accessories to the car?
- Do I plan on camping light and nimble or more heavily packed?
- Am I risk averse around legality?
The final point is a double-edged sword: ultimately GVM upgrades require keeping things as per the paperwork. Need to replace the shocks down the road or unhappy with how it rides? Well, you’re out of luck since you’re locked into the specific modifications used to get your car signed off. Depending on jurisdiction and how they interpret this, this can be as strict as needing to be on stock tyre sizes which obviously severely limits other aspects of using the car. You may have gained legality around being weighed, but that paperwork might be null and void according to other changes you might have wanted to make to the car.
Supporting data
Stock measurements
Distance between centre of wheel hub and opening of wheel arch, static height: 464 mm front, 479 mm rear.
Maximum acceptable sag, stock (also distance to opening of wheel arch from centre of hub): 437 mm front, 447 mm rear
Distance between centre of wheel hub and opening of wheel arch, maximum bump: 384 mm front, 382 mm rear.
Springs unseat: front shocks 145 mm or shorter than the spring free height; rear shocks 210 mm or shorter than the spring free height (thanks Liam for doing the research on that one).
Major lift kits and what they include
I can’t (obviously) include every option and every kit, especially as some are more reseller specific. This is a bit more Australian focussed but hopefully helps illustrate what’s out there.
| Lift kit | Approx RRP (without install) | GVM? | Height | Caster correction | Shock type | Panhard rods | Crossmember bracket | Panhard relocation bracket | Headlight levelling | Brake hoses | ABS/Vacuum hose relocation |
|---|---|---|---|---|---|---|---|---|---|---|---|
| Old Man Emu (ARB) | $2200 | No | 40 mm | Optional, offset bushes | Twin tube nitrogen | Uses factory | Optional, brackets | Optional | Optional (but noted as required) | Optional rear (noted as highly recommended) | Uses stock |
| Tough Dog 40 mm | $1400-$1500; $3k+ GVM | Yes, optional | 40 mm | Optional | Twin tube foam cell | Uses factory | Uses factory | Uses factory | Included | Included (rear left) | Included |
| Tough Dog 60 mm | $2600 | Yes | 60 mm | Included; offset bushes | Twin tube foam cell | Adjustable included | Includes brackets | Uses factory | Included | Included (all) | Included |
| Ironman | $1400-$1500, $3k+ GVM | Yes, optional | 45 mm | Included; offset bushes | Twin tube nitrogen | Uses factory, but optional | Includes brackets | Uses factory | Included | Included (rear, both) | Uses stock |
| Dobinsons | Standard: $1465 IMS: $1860 | No | 40 mm | Optional but recommended via offset bushes | Standard: twin tube nitrogen IMS: monotube | Uses factory, but optional (RHD) | Included | Uses factory | Included | Optional but stated as required | Uses stock |
| Dobinsons | IMS: $2650 IMS remote reservoir: $3750 | No | 75 mm | Included via offset bushes (also includes rear offset bushes for changing pinion angle) | Standard: twin tube nitrogen IMS: monotube, or remote reservoir | RHD suitable adjustable panhard included | Included | Uses factory | Included | Included | Uses stock |
| Fulcrum Formula 4×4 | $2250 | No | 50 mm | Included (as replacement arms?) | Twin tube nitogren | Uses factory | Full replacement | Uses factory | Included | Included (all + DOT3 brake fluid) | Instructions include adjusting bracket |
| Pedders TrakRyder | $1924 | No | 40-50 mm | Optional; offset bushes | Twin tube foam cell | Uses factory | Includes brackets | Uses factory | Included | Included (rear, both) | Uses stock |
| Black Raptor and Black Raptor Premium (JimnyBits) | $1500-$1900 (all options, 2024 exchange rate) | No | 50 mm | Optional; offset bushes | Twin tube gas on standard; Oil adjustable on premium | Uses factory | Full replacement | Uses factory | Optional | Optional | Optional |
Lift kit spring rates
Rather than repeat myself, the spring rates I have been able to collect for the Jimny are tucked away at the bottom of my suspension lift article.
Lift kit shock absorber lengths
Also again at the risk of repeating myself I won’t; shock lengths for gen4 Jimnys are also included at the end of the suspension lift installation article.
