
Auxiliary battery, power sockets and solar charging
This is an evolving article as I put the battery into my car and wire it all up. It builds upon my electrical upgrades article where I do things like wire up in-cab winch controls, diff locks, air compressor etc.
Sections
- Design criteria
- Plan and parts
- Installation
- Under seat cradle
- Rear accessory bulkheads: Anderson connectors
- Rewiring factory cigarette sockets off 2nd battery
- Wiring up DC-DC converter/charge controller
Design criteria
- Take up unused space
Viable candidates here are underneath the false floor in the back, under the seats, or in the engine bay. I can rule out using the side rear mounted batteries as I use up the full width in the rear for how I have my fridge arranged. Underneath the false floor is good, but there might well be times when I need to have the car as a 4 seater but maybe still with the battery in place. Engine bay is good but it’s hard to accommodate along with keeping the air compressor under the bonnet, and I’d prefer underbonnet compressor to under seat compressor.
For an under-seat installation, I want as much of the wiring/fuse holders etc to be waterproof just in case of drowing the car, so this drives decisions about the fuse holders and things. - Relatively easy to go back to stock
If I ever sell the car, it would be good to at least semi simplify things or at least remove the auxiliary battery system to use in some other car I buy. - Lightweight and not huge energy storage
I won’t ever be off grid/not driving for long periods of time, so the battery really just needs to support either temporary high current devices or overnight camping. - Battery removable from the car and all additional circuitry still able to work off the main battery/charging system alone
This is separate to the requirement to make it go back to stock easily. Just in case something happens or I need a lighter setup, this should allow me to whip out the full auxiliary battery setup (including its charger) and let me go back to stock entirely. I want things to be colour coded so it’s easy to plug things into the right place on installation, but given black and grey Anderson plugs are interchangable then it’s possible to unplug everything and just plug auxiliary circuitry wiring into the wiring from the car’s battery and it will all still work.
One use case for this is actually extended power outage at home: with 4 bolts and a couple of plugs, I can have dragged it inside. I could do this with a more portable battery but that didn’t fit with where I wanted my battery to go. - Low voltage cutoff for the auxiliary battery, but with override
I’m sometimes forgetful and I’d prefer the system to fail gracefully and disconnect accessories if the auxiliary battery gets too low; however, this also should be capable of being overriden if required. - Front and rear cigarette lighter sockets to be independently capable of 10A draw continuously each
The factory arrangement shares the front and rear cigarette lighter sockets and they are rated for a maximum of 120W (i.e. 10A) shared. I want them by default to be switched like they are standard, but with an override switch to make them permanently receive power if required. - Additional USB sockets, capable of power delivery (i.e. USB PD), front and rear
Lots of things charge via USB, and it would be good to have them separately powered. These also should be able to be overriden by a switch to turn on auxiliary power devices independently. - Permanent power Anderson sockets in rear
I’d like these to be separated side to side and capable of 50A per side (though probably also limit maximum draw to 70A across all auxiliary accessories). These don’t need to be switched on like an auxiliary - Unregulated solar input at rear of car for use with a portable panel/solar blanket
I’m not sure I want a permanent solar panel arrangement (if I did, probably a bonnet mounted one would make the most sense) but I want to have an external socket for solar panel input to the charger. This would let me run a solar blanket or portable panel at camp, and reposition it for sun.
Plan and parts
To house the battery, I went with the TLR under drivers seat cradle. This lets me put up to 100 Ah of slimline lithium and gives a really straightforwards
Battery wise I did a power audit and really only need 50 Ah. I went with the Invicta 50 Ah slimline lithium from Springers Solar, though I didn’t get the one with the bluetooth monitoring system.
Charge controlling is via the Redarc BCDC1225N Core charger. This gives me the ability to charge batteries via solar as well as work with the Jimny’s smart alternator.
To connect to the car and make it easily removable I use SB50 Anderson connectors.
- Black is the connection from the car’s battery/charging system
- Grey connects the 2nd battery to the auxiliary circuits wiring
- Red connects to unregulated solar inputs (like a solar blanket)
Because black and grey connectors can join together, this means I can wire it such that the black connector from the car and the grey connector into the auxiliary circuits could be connected together, bypassing the dual battery setup entirely if I want to remove it temporarily.
For USB ports in the back I am adding bulkhead USB ports capable of reasonable levels of power delivery a la these setups. (Exact ones will differ as they do evolve a lot). For the front I actually care a lot less about big scale power delivery; I’ve gone with USB (1x type A and 1x type C) in a short Toyota sized switch fitting. The main reason for this is I will cut a hole into the dashboard for the passenger’s side USB port and I want to have it so I can fill it with a blanking plate if I remove it, which will make it look factory.
To perform the voltage cutoff I’m using a relatively cheap but override capable low voltage disconnect. While this can disconnect up to 30A, I’m only using it to trigger a 70A capable relay which will do all accessory circuits. While you can get ones that can do 70A, they are way more expensive compared to a proper 70A automotive relay and this LVD. The relay for switching the accessory circruits is a maxi relay using a waterproof base.
Fusing is a trickier thing to work out given I want it a bit more removable. For the main fuses I’ll use midi fuses in inline holders, however, I’ll also want to individually fuse accessory circuits. For this I’m using two metripack mini blade fuse holders that can hold 3 fuses each. To hold everything down I’ll actually use some velcro/hook and loop strips, with the hook side on the devices that would stay with the car if the battery system is removed. These parts can then velcro down to the carpet if the battery tray is removed from the car, giving a super elegant way to hold them in a modifiable way.
This ends up with a confusing mess of wiring on a diagram like so:
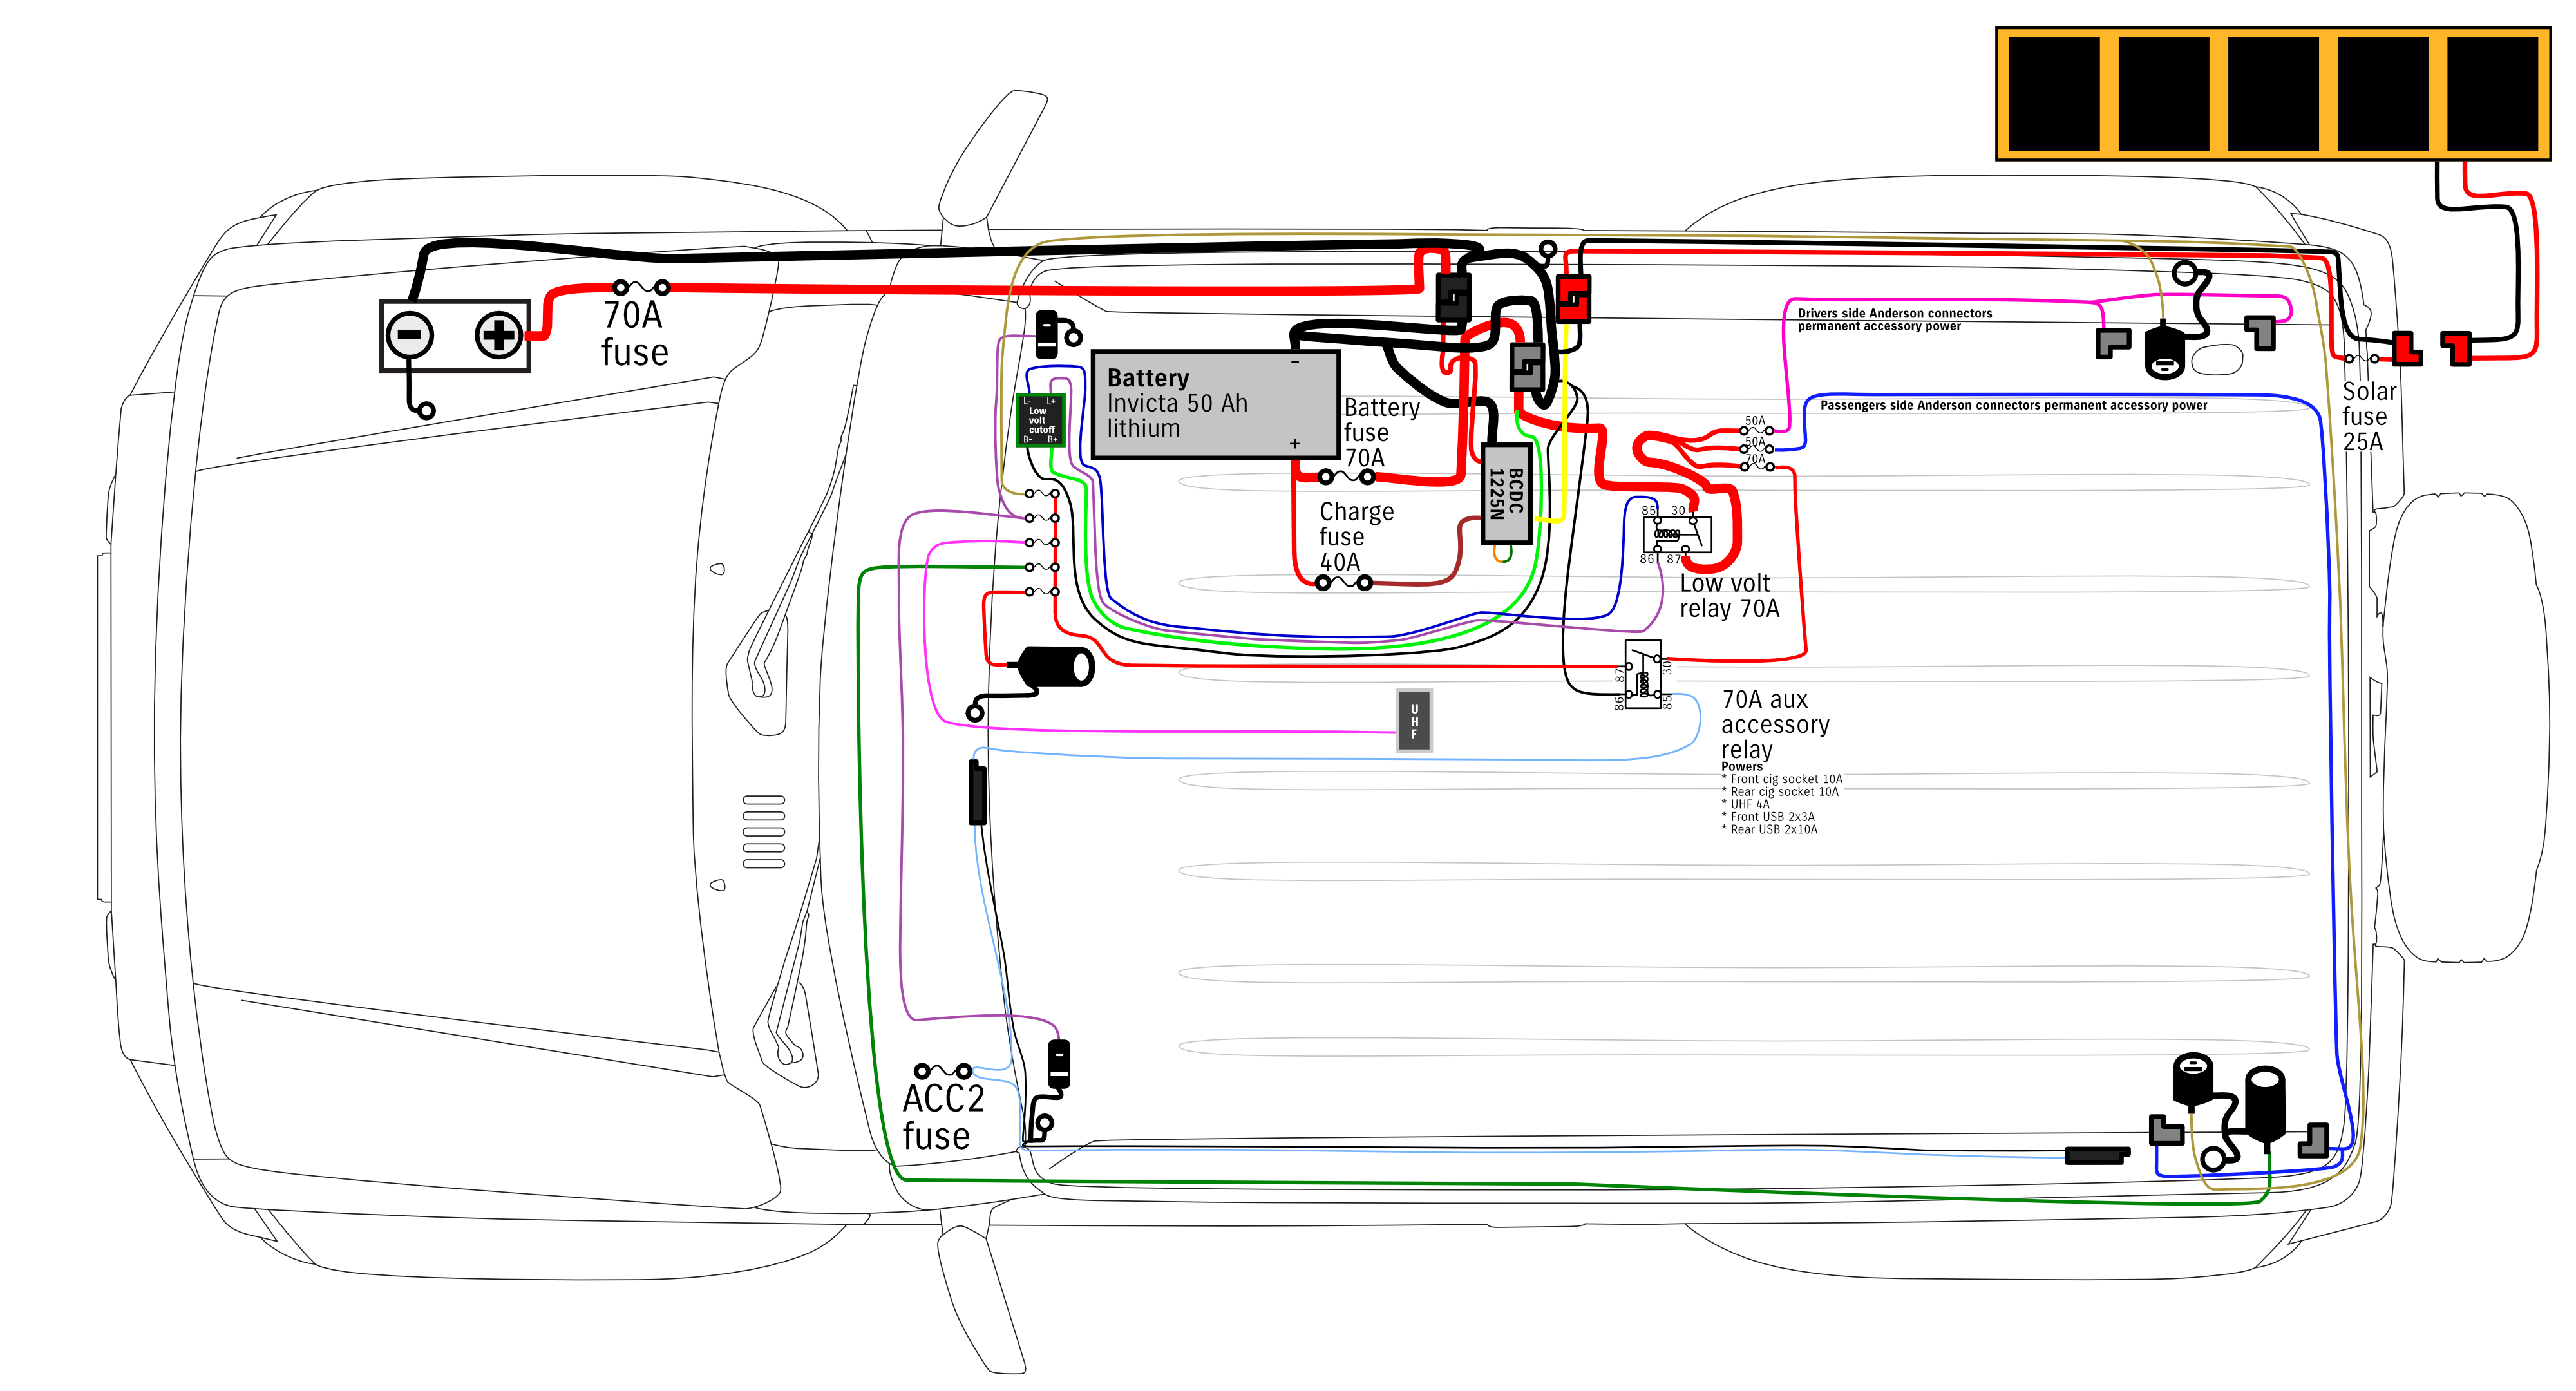
I acknowledge it’s a bit messy to illustrate on one diagram, so I’ll also break it down a bit. If we delete all the accessory circuits and just show off the connections to/from the battery etc it gets a little clearer.
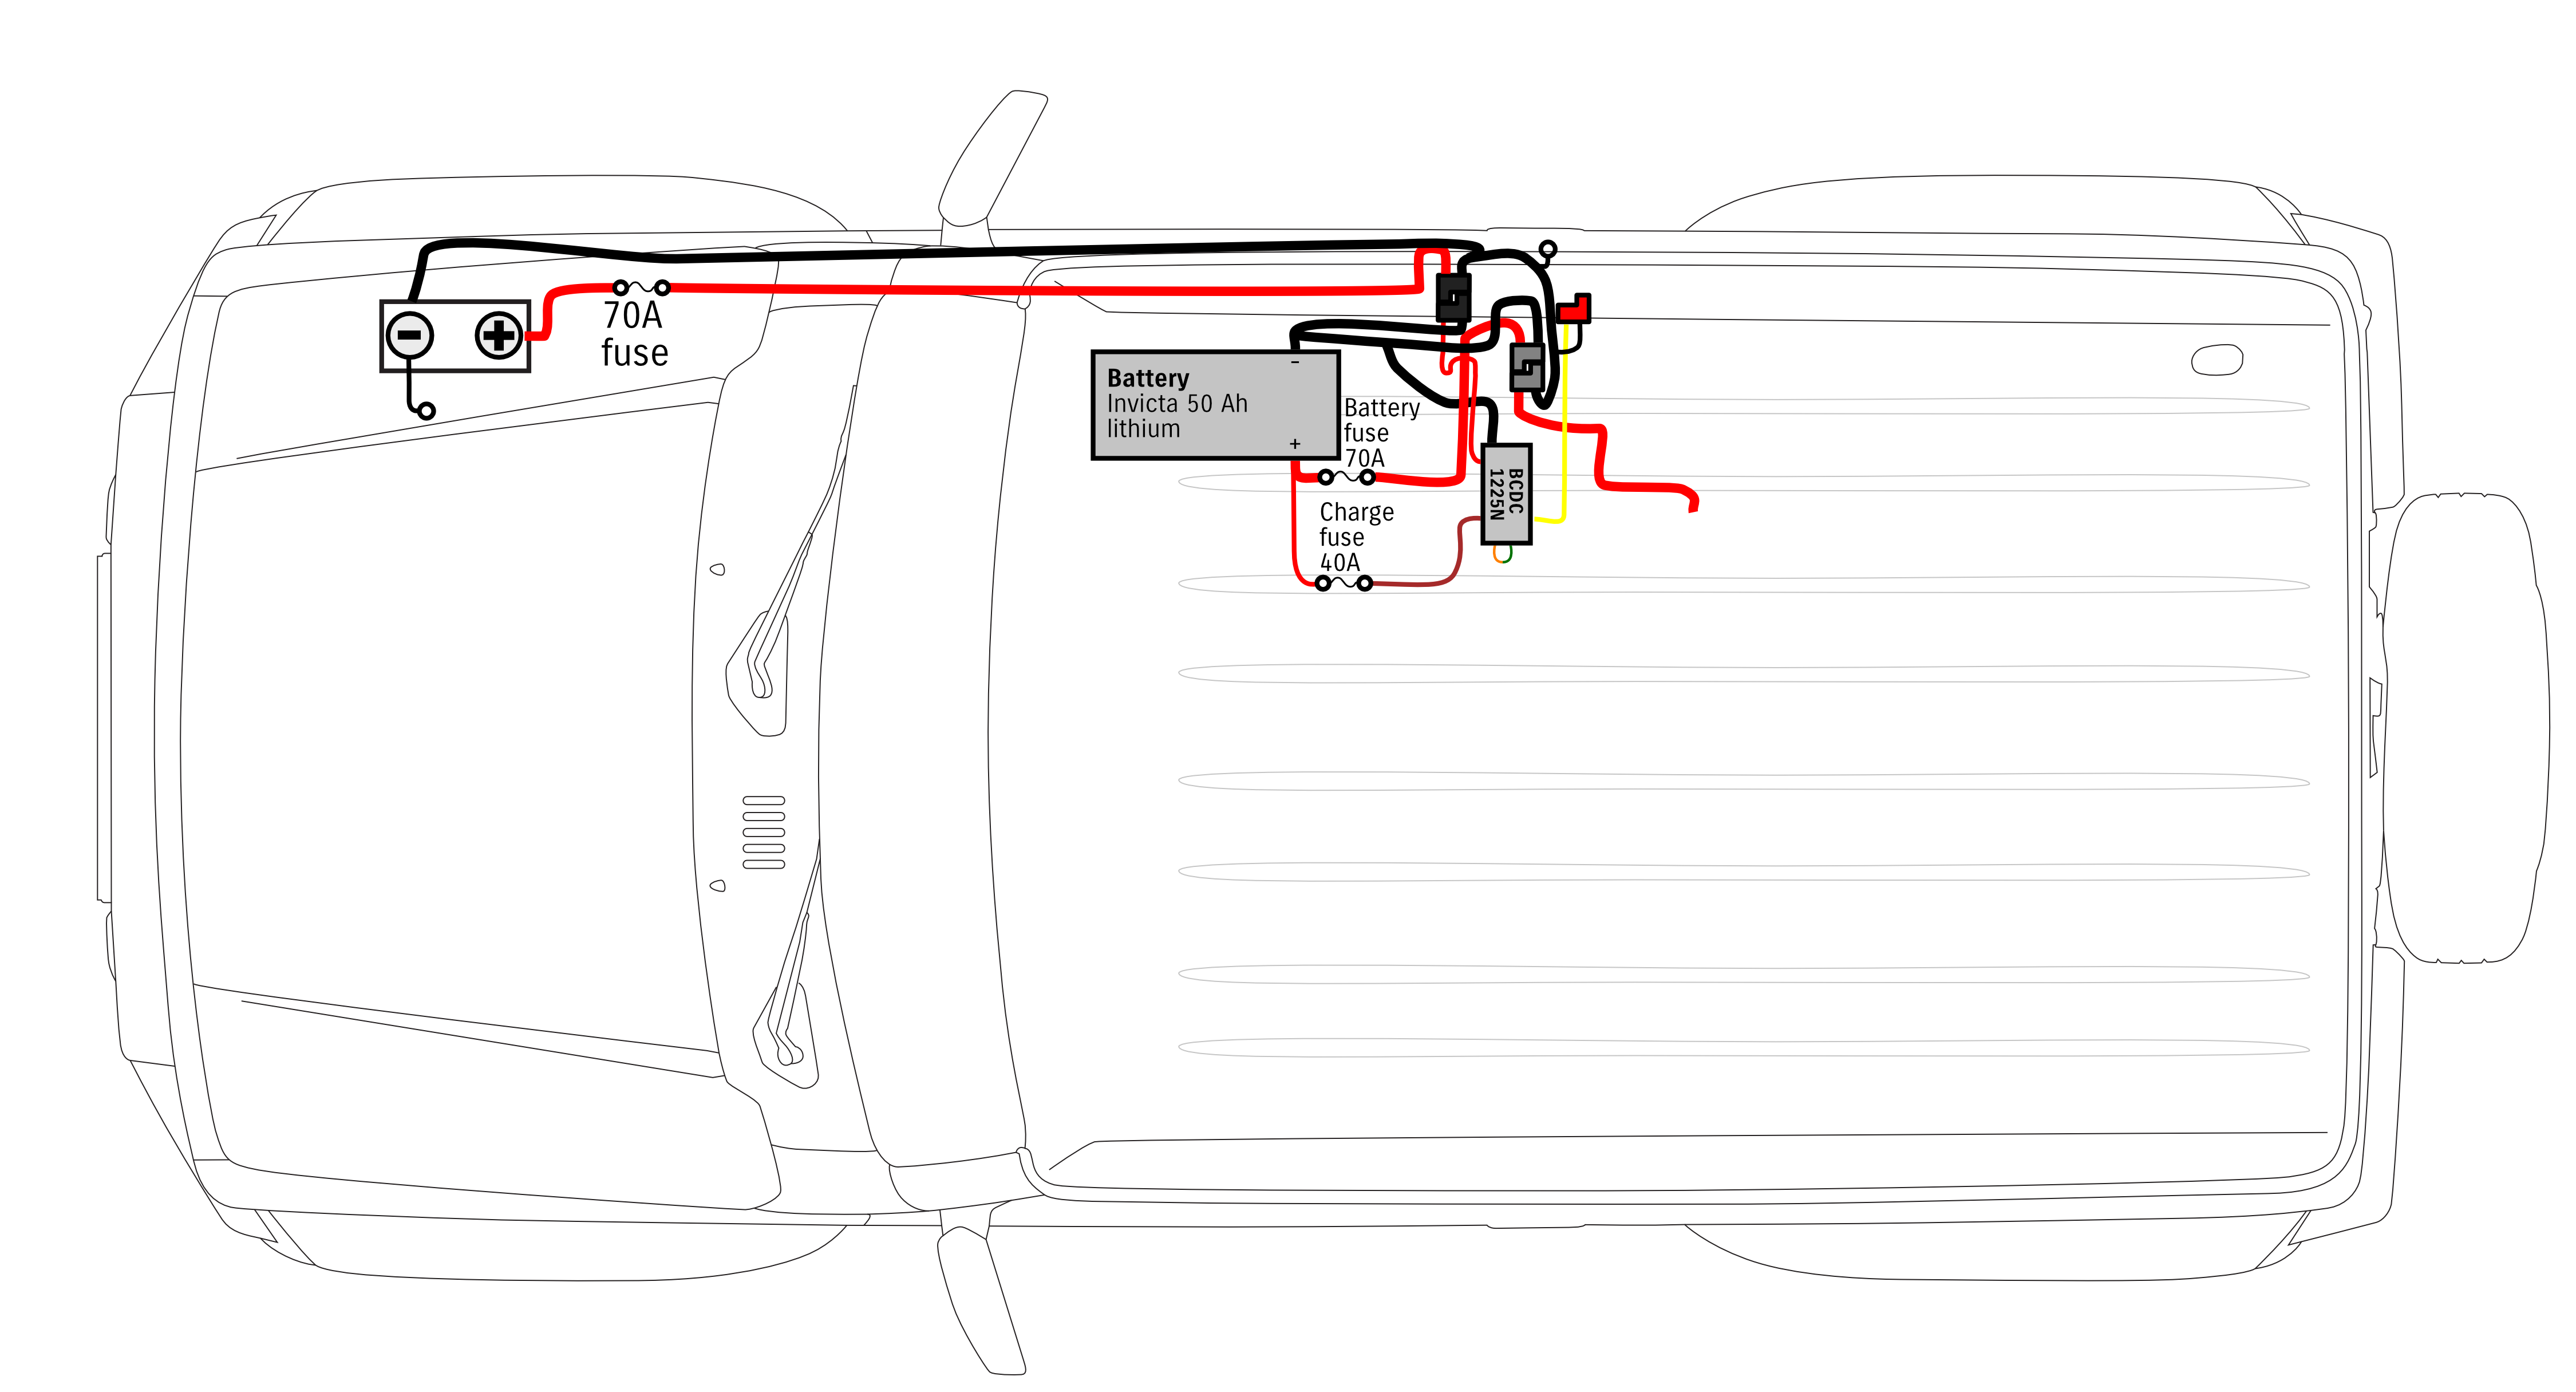
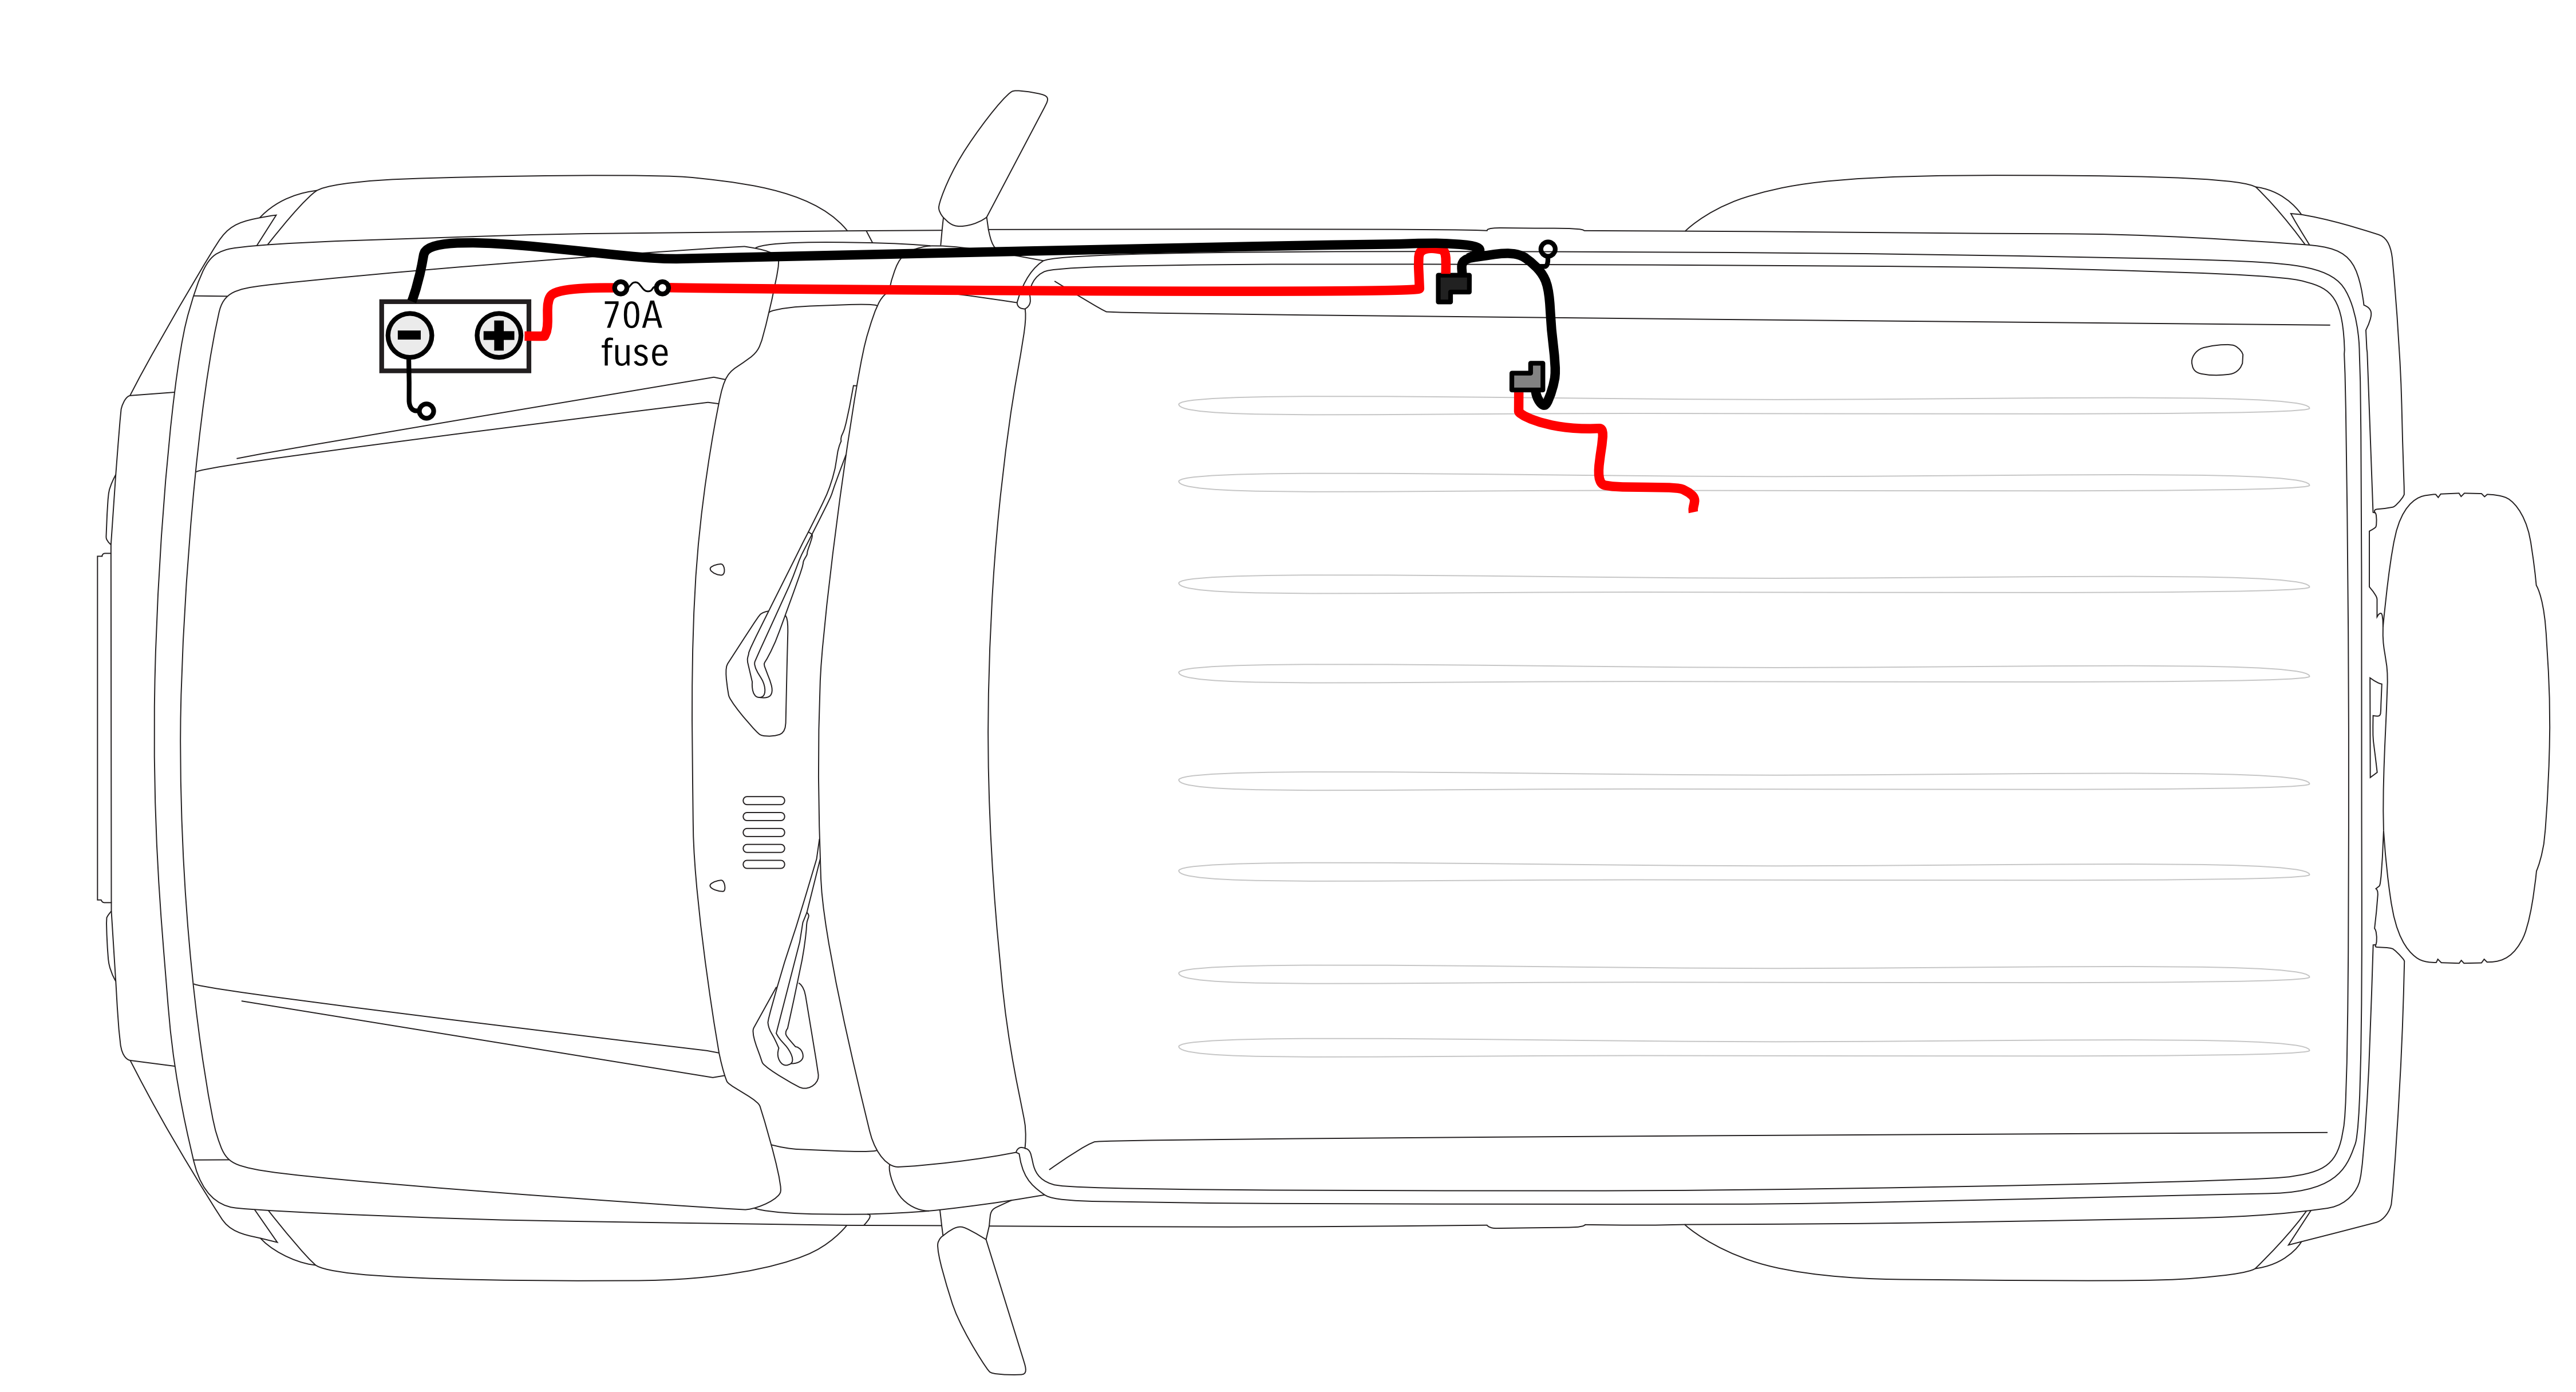
It’s still a little complicated around the black/grey Anderson connectors but that’s basically so I can separate it out and unplug things cleanly (hence the earths going a bit weird). Indeed, if we now remove all of the auxiliary battery stuff you just end up with a couple of Anderson plugs to give you permanent power in from the battery, and an initial starting point for that power to go somewhere on the car side of things.
If we now add in all of the accessory circuits, including the super funky low voltage disconnect stuff and everything, we can see how it would work if there was no auxiliary battery and charging stuff there.
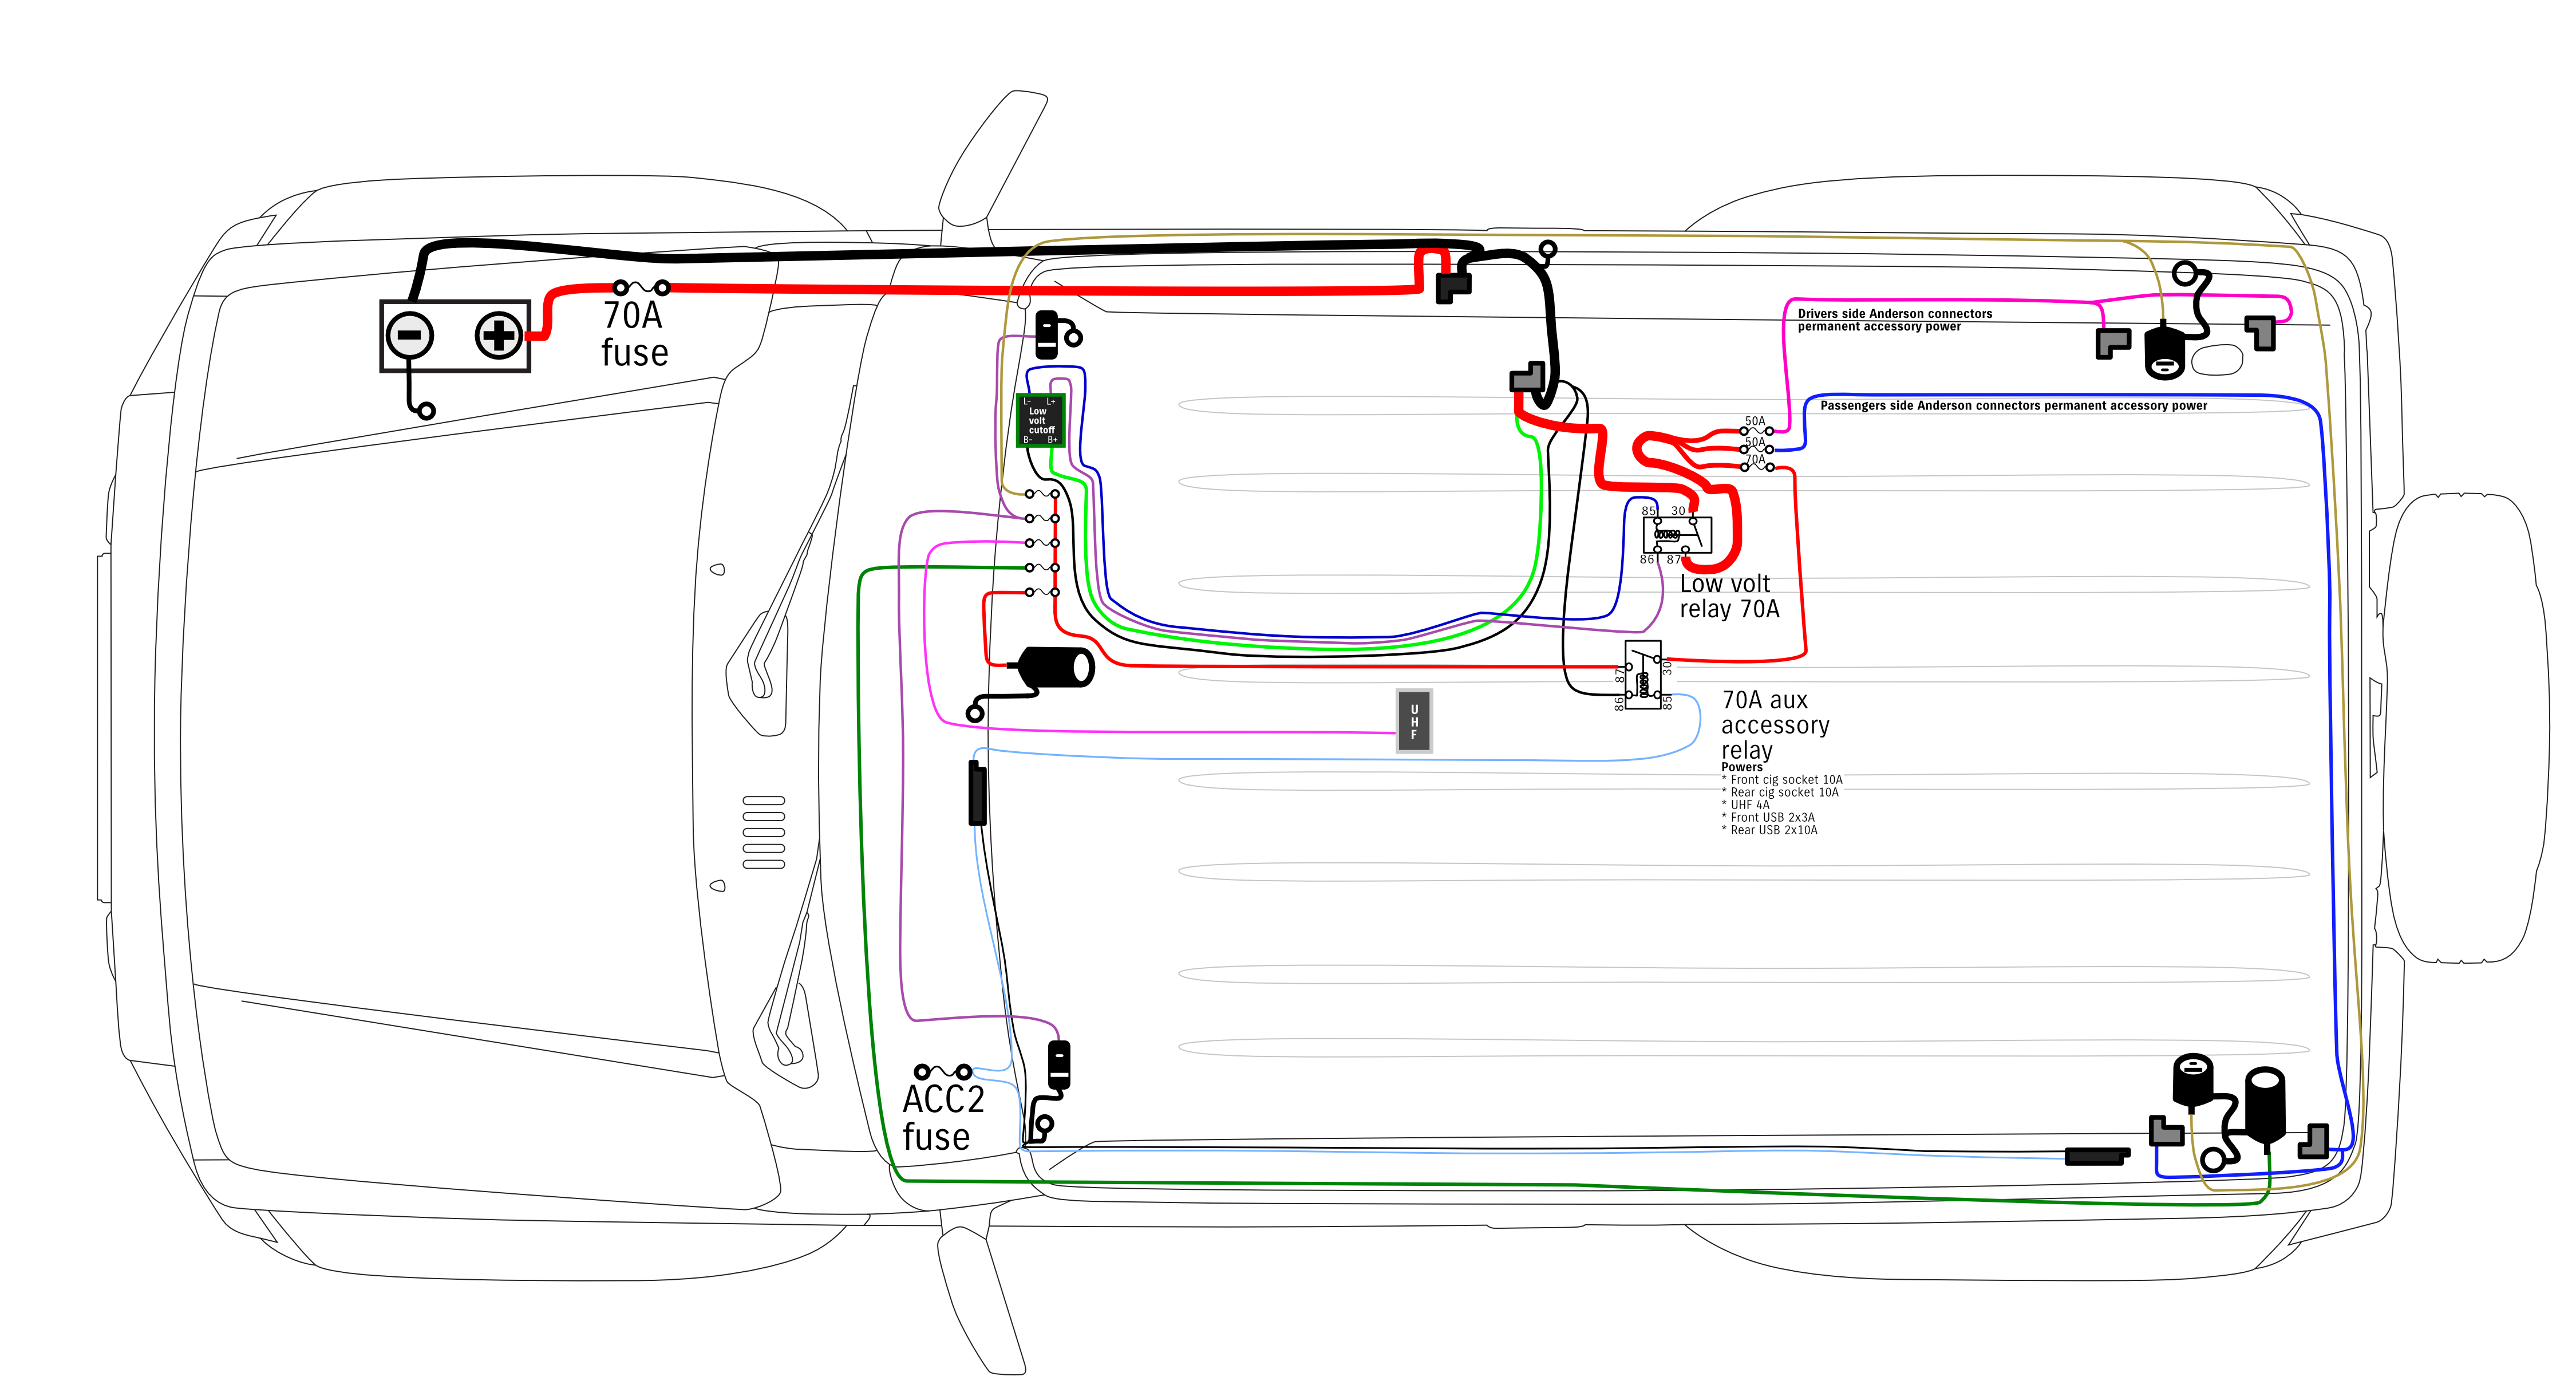
To make this arrangement work you just need to plug that grey Anderson to the accessory circuits into the black Anderson from the battery and everything will still work, including that it’ll shut off all of the circuits with low battery voltage, except now that low voltage is detected from the main battery not the 2nd battery.
The other funky thing I’ve done is use the front factory cigarette lighter socket power to switch the auxiliary accessory relay. This is so I can have some accessories (e.g. my front and rear USB ports etc) that work just like standard ones i.e. with ignition on. Since I possibly want to add an override switch so I can force those auxiliary power circuits to be on permanently just in case, here’s what that looks like. Just need to tap into a permanent power source that’ll stay with the car if the 2nd battery is removed (so feed line to the low-voltage disconnect will do) & add some diodes to stop any backfeeding the car’s ACC2 circuit and any issues from the low voltage disconnect seeing a 2nd and different voltage.

Once again, I acknowledge this might look pretty funky and complicated but it’s all relatively simple, despite my drawings. It’s less so once you break it down like I did above and also when you see stuff installed. I have some electrical articles that will help with the more basic stuff if you want to get into a bit more easily, including some simpler suggestions for adding a 2nd battery including easily removable ones.
Installation
Under seat cradle