
DIY multi tyre deflator/inflator
Tyre deflation and reinflation is something that is often done on a 4wd, yet there’s a lot of ways in which commercially available options aren’t ideal, especially for the Jimny. I decided to make my own out of random parts to let me deflate or inflate my tyres. Read on for why and how I did it, plus I’ll go through some of the more common (at least for Australia) options.
Sections
- Options out there
- Manual deflating
- Valve core removers
- Automatic deflators
- Multi-headed deflators
- The DIY option
- What I’m after
- Parts list
- Building it
- Using it
Commercial options you might consider
These are a bit more biased towards the deflation side: how you choose to reinflate depends a bit on your chosen compressor setup.
The manual option
The simplest option for deflation is something to poke the valve core down, and a pressure gauge to check where it is at.
Not really much else to say about this! If you are savvy you time how long it takes to get to the desired pressure on the first tyre and use a stopwatch to time letting down the other tyres to make it faster.
Pros: Simple to perform; minimal cost; not much to go wrong
Cons: Can be slow as you go back and check pressures; cannot do simultaneous tyres without multiple people
Valve core removers
This is maybe the next step up. Two options here, either just use a valve core removal tool and remove the valve for faster deflation…
… or use one that is self contained and screws onto the valve, ideally with an integrated gauge.
These can work well: they aren’t expensive, and generally are going to be faster than going back and checking the pressure multiple times although you do have the time taken to unscrew and rescrew the valve core in. I actually use tyre valve caps with an integrated valve core tool so I always have this option on the car.
Pros: Pretty fast per tyre; relatively inexpensive
Cons: Cheap ones can crossthread valve cores, ruining the valve stem; can only do one tyre at a time; doing it manually with just removing the valve core can involve you losing your valve core…
Automatic on valve deflators
These can get pretty fancy but basically are just some kind of device you screw onto the valve and let the pressure out to some set value. Some let you set a pressure relatively easily, some need calibration. I have experience with a few and all have in some way not worked just how I wanted which sucks, cause these otherwise would be ideal.
Pros: Can be fast (depending on the design); lets you do multiple tyres simultaneously; set and forget (mostly)
Cons: Plenty are not consistent with their settings if you can adjust them on the fly; can get quite expensive for reasonable quality one
Multi-headed deflators
This is where you get into the really fancy stuff. Two or four hoses to connect to tyres, integrated pressure gauge, usually with a connection direct to a compressor to make it easy to reinflate too. Examples of this might be the Maxtrax indeflate (4 tyre option: $329 rrp) or the MORRFlate quad (also 4 tyres: $315 rrp).
These are great, but they are not cheap (as per the above) and generally the hoses are way longer than you need on a Jimny. A lot also don’t seem to have a way to do front and rears differently, which is needed if you’re heavily loaded at the back or need different traction requirements (e.g. go a bit higher on the front if you’ll be turning under power in deep sand to avoid popping the tyre bear, and the extra traction with lower pressure at the rear will give you grip for longer)
The DIY option
The other alternative is to make your own multi-headed deflator. This works out to be quite economical and takes about 30 minutes of time plus however long it takes parts to turn up.
What I’m after
Ideally, I want something that is:
- Fast
- Inexpensive
- Lets me do multiple tyres together
- Lets me set the front and rear tyres separately, or just equalise all 4 together
- Has hoses that can be reused if something goes wrong (e.g. plugged direct into compressor)
- Hoses are a bit more nicely routed to not be a mess around the car
- Links in nicely with the ARB onboard compressor I have for inflation
The last point about linking in with my ARB onboard compressor is actually the most annoying part about this. The ARB inflation kit uses ‘US industrial’ air fittings. These are not compatible with the Nitto fittings common in Australia or the European industrial fittings. It’s also really, really hard (read: impossible) to find US industrial fittings with a BSP thread. The reason this is a problem is the neatest manifolds that are compact seem to only be made in a BSP thread. Two options here:
- Make your own manifold/modify an existing one to be a BSP/NPT hybrid
- Be a hack and just screw 1/4 NPT fittings into BSP threads.
Option #2 shouldn’t work but it basically does for the air pressures we’re dealing with, but bear in mind it isn’t ‘right’ to do it this way. If I was building one to sell commercially I’d do it all with NPT fittings and make my own manifold. You can also get 4 way NPT manifolds that are ok, and tap in a 5th fitting for the air pressure gauge, in which case you’re best off using NPT for everything and substitute accordingly when ordering parts.
I tried two desgns, the first was set up in this way:
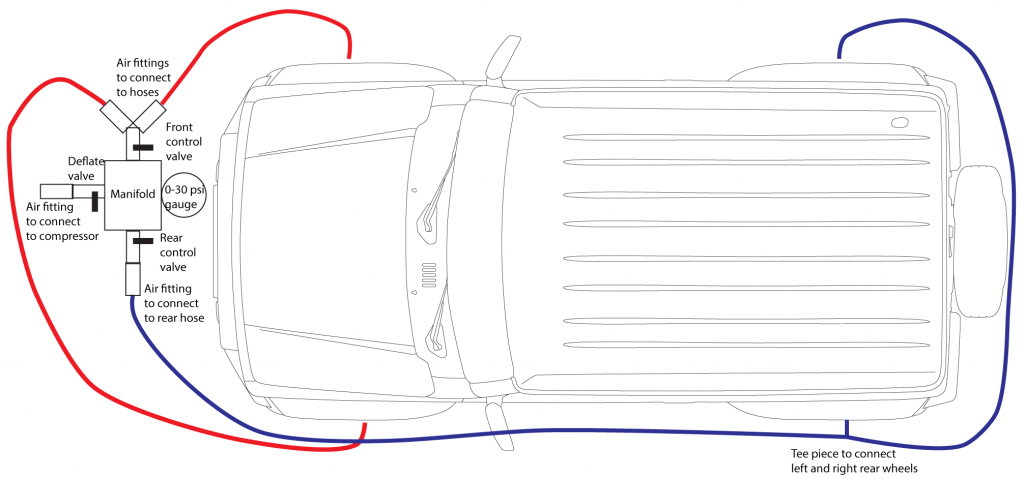
I found it slightly annoying in terms of the hose routing and it ended up overly bulky. I then designed one around a 5-way cross connector as the manifold to make it much more compact, and split the hoses off left and right. This necessitated using an inline tap for the rear tyre connectors, which lets me inflate either all 4 tyres, or just the fronts. This is a compromise where you have to fill everything to what you want in the rears and then either bleed down or fill up the fronts to where you want them, but, I’m ok with this choice.
Parts list
As stated, there is a compromise needed here for fittings because you cannot easily get both air fittings and a nice compact manifold in the same pipe thread form.
- 5 way manifold block (1/4″ BSP): links everything together
- 1/4″ BSP ball valve: acts as the dump valve
- 1/8″ BSP rear entry pressure gauge: lets the gauge sit neatly on the front of the inflator/deflator
- 1/4″ BSP Schrader valve fitting: gives you the option of filling up using a regular compressor or tyre fitting
- 2x US industrial female fittings with 1/4″ NPT male threads: these are for each side’s hose to connect into
- 3x US industrial male fittings with 1/4″ NPT male threads: one is the dump/fill fitting, the other 2 go onto the hoses for each side
- 2x 8mm to 1/4″ NPT female thread hose barbs: ‘starts’ the hose run for each side
- 2x 1/4″ BSP tee piece, female threads: splits each side’s hose into front and back run
- 2x 1/4″ BSP ball valve, male threads (get as low profile as you can): isolates front from rear tyres
- 10x 1/4″ BSP male threads to 8mm hose barb: this connects the hose for each side’s run
- 4x tyre valve chucks, female threads: go for an auto locking style for maximum ease of use
- ~8m of 8mm or 5/15″ ID compressor hose: best compromise for the hose to be fast at filling/deflating but also not bulky to pack up
- Hose clamps to suit the OD of the compressor hose you chose. Worm drive, double ear or crimp ones are all easily obtainable, I used worm drive ones just cause ease of use.
Total cost of all of this was $78 including shipping the bits from China from aliexpress. After waiting a couple of weeks everything turned up and it was time to build it.
Building it
The building part is really pretty simple, just screw stuff together really.
I generally hate using thread tape, so permatex pipe sealant in a tube it is… unless I can’t find it, in which case thread sealant tape it is. You’ll see a mix of both here.
I plan to use nicer hose clamps at some point but worm drive ones do for making it work.
It’s really annoying with cheap parts to get the valves to line up so I just did my best while also making sure the seal. Probably the thing to do here would be using some rotatable swivel fittings to allow you some freedom on it.
The dump point is an air fitting so I can just connect a normal air hose, including the ARB inflation kit hose. This means I can use a longer hose and go fill up someone else’s Jimny off my car relatively easily, although I plan to carry a shortish hose that means they just have to park nose first to my car and then it’ll all fit ok.