Camping electrical 301: connections, wire selection
This really is a page about making good choices, such as what thickness of wire to use and how to select connectors that are appropriate for your use. I also will try to demonstrate how to get good connections with whatever connector I talk about.
Sections
- Tools
- Wire cutters
- Wire strippers
- Crimping pliers
- Needle nose pliers
- Depinning tools
- Soldering iron
- Wire types and thicknesses
- Why wire thickness matters
- Recommended wire thicknesses and current capacity
- Some additional thoughts
- Connector types
- Basic insulated crimp terminals
- Unsealed/uninsulated crimp terminals
- Large gauge uninsulated terminals
- AMP superseal
- Sumitomo sealed connectors
- Deutsch connectors
- Anderson connectors
- MC4 connectors
- Wire protection and retention
- Fuses, circuit breakers and fuse holders
- Heat shrink
- Electrical tape
- Loom tubing
- Suppliers
Tools
Wire cutters / side cutters / diagonal cutters
Doing any wiring results in needing to cut wire and trim things. A good pair of cutters is essential. You can get away with a single set, however, if you cut really thick wire then you need a good set of thick cable cutters, and I find for detail work you really need a small pair to work best. On the Jimny’s wiring tasks I really have used the following 3 cutters: a large pair of side cutters, a smaller pair, and a large cable cutter for doing big diameter wires like battery cables or winch wiring.
Wire strippers
These are not essential. Starting out you can just use wire cutters, you just partially cut through the wire using the side cutters to break the insulation and then pull it off. It’s very easy to go too deep and cut into the wire which is not ideal, however, with practise this is an easy way to strip wire without even needing dedicated strippers.
Once you get to large diameter wires, stripping just by cutting the insulation and manually removing it is practically required.
While I can do wire stripping manually, I use an automatic set of strippers for the most part. I’ve had them for years and they work very well, and do help to make it easy to make repeated wire stripping a breeze.
Another option I have are my favourite pliers I usually have with me when I am doing electrical tasks can strip 0.5-0.75 mm2, 1.5 mm2 and 2.5 mm2 wire direct in their jaws with 3 appropriately sized cutting positions.
Antoher type of stripper I have used a lot, but never actually owned myself, are the shell style with multiple wire sizes denoted on them. An example are the Knipex 16 85 125 universal strippers which provide a low profile way to have a universal stripper to hand. While not automatic, so long as you select the right wire diameter you’ll get a good wire strip. There is also a blade at the end which can be used to help with stripping larger cables or the outer for multicore cables.
Crimping pliers
Exactly what you pick here will depend on what you are crimping. I use a few sets for different types of connectors.
Hydraulic crimpers for large sized connectors can be really good if you struggle with crimping big connectors e.g. Anderson connectors or battery lugs.
Needle nose pliers
Not essential, but the more electrical work you do the more you’ll find yourself pulling on things. Sometimes the best option to do this are moderate sized needle-nose pliers. They don’t have to be expensive, but just something that’ll help you out if you need to yank on things.
Depinning tools
There are expensive depinnings sets made by terminal manufacturers which are specifically engineered for their fancy proprietary terminals. I don’t have them, I have the cheapest set of universal depinning tools I could find on ebay and some really tiny jewellers style screwdrivers. That gets me through everything I need to do.
Soldering iron
I actually think this isn’t necessary for a lot of automotive connectors. People will disagree with me on this point, but generally soldering results in a connection which is more liable to fatigue and cracking as it introduces a hard point in the wiring. Sometimes it’s unavoidable, however, and some people do like to use a soldering iron as a way of soldering a joint once it’s crimped for added protection. (I also think this is unnecessary, but, some people do it).
Soldering irons can be bought really cheap for a basic wired soldering iron.
If you’re going to do this a lot and/or your car is a bit away from a power source I actually think a gas soldering iron is good value. You have lots of adjustability in terms of heat, and, they’re entirely wireless and lightweight. I use mine a lot for car work. They are also a good source of heat to use on heat shrink so they are multipurpose in that way.
Don’t be tempted by cheap wireless/rechargeable soldering irons. They struggle to get good battery life if they are able to get appropriately hot, and if they don’t heat up fast they a) suck and b) will frustrate the hell out of you.
Wire types and thicknesses
This almost is an endless area of debate of how thick one should go with wiring. Car manufacturers like to scrimp in this area and get by with the minimum thickness needed as it saves costs, and this filters down to aftermarket accessory makers. Making your own harnesses means you can use adequate wiring rather than the bare minimum and that can result in better longevity of your accessories and/or better performance, although there can be diminishing returns.
Why wire thickness matters
The simple answer is that wire thickness matters because thicker wire can carry more current. The thinner the wire, the more resistance it has and therefore the more voltage it drops across its length. This also serves to act like a heating element, and so a thinner wire will get hotter when current is drawn along its length. Surely that means you also use the thickest wire you can, right?
The problem is that there’s a lot of factors that determine what you can use. A small device doesn’t have much room for a giant cable connecting to it. There is also space and weight to consider; running a giant cable under the carpet to power a tiny light is also not going to be a good time with a giant lump under your feet or around the seat.
Optimal wire thickness selection requires you to consider how long the device will be on for, what distance is covered from power source to your device, how that device is connected as well as how much power the device draws.
Recommended wire thicknesses and current capacity
The problem here is that it depends on both the current draw and the length of the wire involved. You can get away with a smaller diameter wire than might be often recommended if it is for a short run, within limits, but also if it is a longer wire run then you might need to go larger to be in the right ballpark. It all comes back to voltage drop.
That said, a Jimny is a small car and there are limits to just how long a wire run will be. This following chart is not made up to match any international standards but kind of cover what works for sort of regular Jimny length runs of wire; they are a bit rounded, too, so the sizes are not exactly bang on international standards. Where possible I’ve linked to appropriate wire.
| Thickness (diameter, mm) | Thickness (area, mm2) | American wire gauge | Jimny-appropriate length current capacity (typical) | Typical usage |
|---|---|---|---|---|
| 0.5 | 0.2 | 24 | 1-2A | Super thin switching wire |
| 0.8 | 0.5 | 20 | 5A | Often used for low power switching |
| 1.3 | 1.3 | 16 | 10A | Normal circuit wiring |
| 2 | 3 | 12 | 15A | Higher power circuit wiring e.g. driving lights |
| 2.5 | 5-6 | 10 | 30A | Battery charging / higher current applications like underbonnet compressors |
| 3.2 | 10 | 8 | 50-70A | Auxiliary battery charging cable Audio amplifiers for fully sick subwoofers |
| 5 | 20 | 4 | 100-140A | Cheap jumper leads; ATV winch cables |
| 6 | 35 | 2 | 140-200A | Larger winch power |
| 8 | 50 | 0 | 200-300A | Big chungus winch power |
| 10 | 75 | 00 | 300+A | Big chungus winch power |
If you want totally official calculations as to what is acceptable then you would calculate minimum cable size according to AS/NZS 3008, using a 5% voltage drop as the acceptable maximum drop for a run from the battery out to the device. (The official standard would be 5% from source to use, so 3% if it’s a sub-circuit is typically used for a safety margin).
Some additional thoughts
- Be a little critical of wiring that comes with an accessory, though don’t overspend.
Manufacturers supply wiring that’ll usually do for your accessory but sometimes can be woefully inadequate. I have seen quite poor wiring harnesses supplied with some of the cheaper brand spotlights (including brands people think are somewhat ‘premium’), and things like charging harnesses for auxiliary batteries with woefully small main wiring plus incorrectly chosen fuse holders. Eventually you’ll have to have a big charge into your fancy lithium battery and you’ll end up melting the wiring, so it is worth being a bit critical to save yourself issues into the future.
Wiring, however, isn’t cheap and paying retail on much larger cables than you need can also be a false economy so don’t overdo it here, either. Indeed sometimes you can end up with wire that doesn’t work with the appropriate connector for your accessory and then you compromise reliability by having to modify things further or stuffing the wrong sized connector onto something. - If you think you’ll end up with a few accessories consider running a multicore cable through the firewall grommet when you first wire up your car.
I use 7 pin trailer wiring harness quite often for this. Depending on the wire size, likely you can pull 7, 10 or 15A through each core so it’s enough for switching circuits or even reasonable power draw.
It saves you having to do this later even if all you’re controlling is a set of driving lights (needs 2 cores) or wanting to do something like have fancy rock lights. Later on you’ll add another accessory and you just need to tap into the wiring harness you’ve already run. - If you want permanent power in the car or need to connect to the car’s charging system then pull an 8 gauge wire through the firewall grommet, even for a 10 or 25A load.
It is also possible to go through the floor grommets but I generally prefer my high current wires to be more obvious so I can make sure they are not suffering any physical damage and therefore at risk of a short circuit. This rules out pulling them along the chassis or similar, even if adequately protected.
That said, if you know what you’re doing and it is appropriately protected physically and fused then less harm can be done, and it might be a neater option depending on where you have your high power needs (e.g. underseat auxiliary battery might be well suited by coming in through the floor). - Most winches come with insufficient wiring, causing poor performance.
Consider upgrading to adequate wire diameters to accommodate this.
Connector types
I use the standard generered terminology for housings because it makes my writings compatible with other people’s terminology. If it is a pin that goes into another it is a male pin, and if it is a housing which is inserted into another then it is a male housing. Female housings have an opening which a housing is inserted, and female pins have an opening into which a pin is inserted.
Basic insulated crimp terminals
These are the classic automotive crimp connectors people think about and come in three shell colours. The colours relate to the wire size they can accommodate:
- Red: 0.5 to 1.5 mm2
- Blue: 1.5 to 2.5 mm2
- Yellow: 2.5 to 6 mm2
There are multiple types of connection too: spade (flat) connectors, bullet (round) connectors, ring and fork terminals. The spade and bullet terminals come in both male and female genders. The spade connectors, and sometimes the bullet connectors, can be insulated around the connection or have that connection remain open; usually you’d want an insulated connection point if you are dealing with the positive side of a circuit to limit the chance of short circuits arising.
If you want to crimp these then I recommend getting a good set of ratcheting crimpers. They are no longer expensive and hard to buy, and if you get a set that take swappable jaws then you can crimp other wires no problems at all.
Crimping is quite straightforwards, although it pays to understand how you are squashing the terminal. Many crimpers flatten one side more than the other, the flatter side is intended for the one where the conductor is crimped and the larger side for the wire insulation end of the terminal.
Cheap crimpers do not adequately crimp these terminals, and different brand terminals crimp better or worse. I have had good luck with quality ratcheting crimpers but only for good terminals; crap terminals are awful and never ever seem to stay on the wire. It is for this reason that these terminals have a bad name, but they can be fine if crimped correctly and good quality terminals.
Unsealed/uninsulated crimp terminals
These are a lot like the coloured crimp terminals but are entirely unsealed. Sometimes they are designed to go into housings, sometimes just to connect to other terminals.
Not much to say other than they are crimped using a different crimper to the insulated terminals but you also more readily get to see what happens with the crimp.
If you are prepared to appropriately insulate these or at least use multipin connectors where they are separated then these are great options. Some of the Jimny’s interior wiring is connected using multipin shells for otherwise uninsulated terminals.
An example of these are the 90 degree connectors used for the speakers, which use uninsulated 0.250″ (6.3 mm) flat/spade terminals.
Large gauge uninsulated terminals
This is the sort of thing used to crimp for battery connections on 8AWG and above wire sizes. You need some big fat crimpers for this sort of a task.
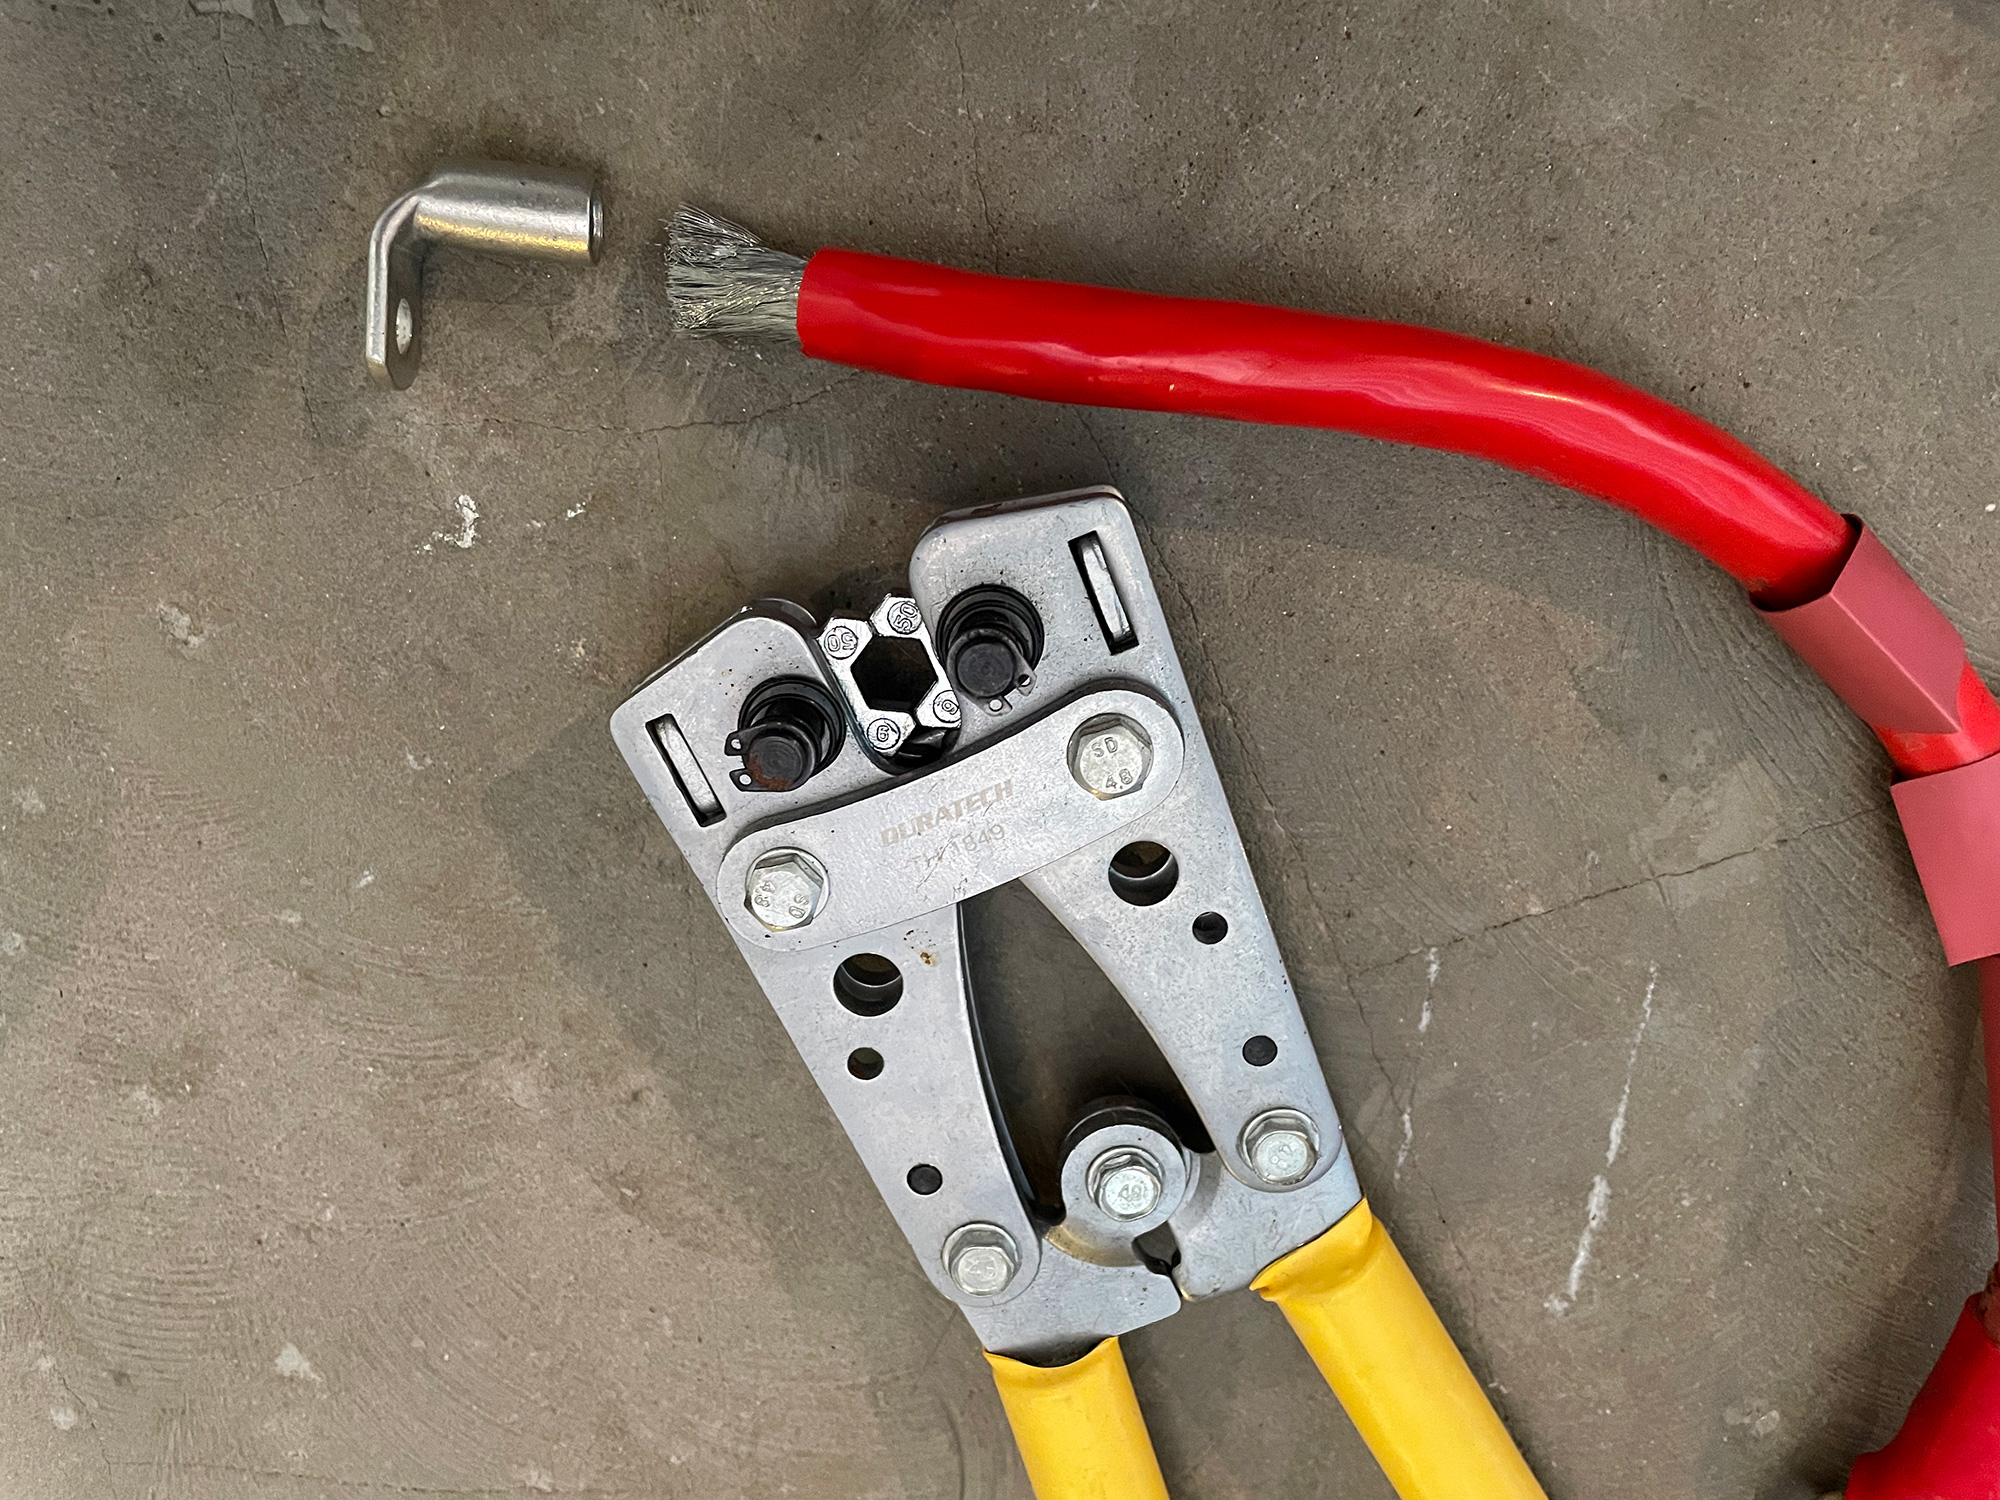
You can also buy hydraulic crimpers for this purpose, but I like my large manual crimpers as I get better feel for what I’m doing.
With the wire strands all inside the lug terminal, you use the appropriate sized die and crimp away.
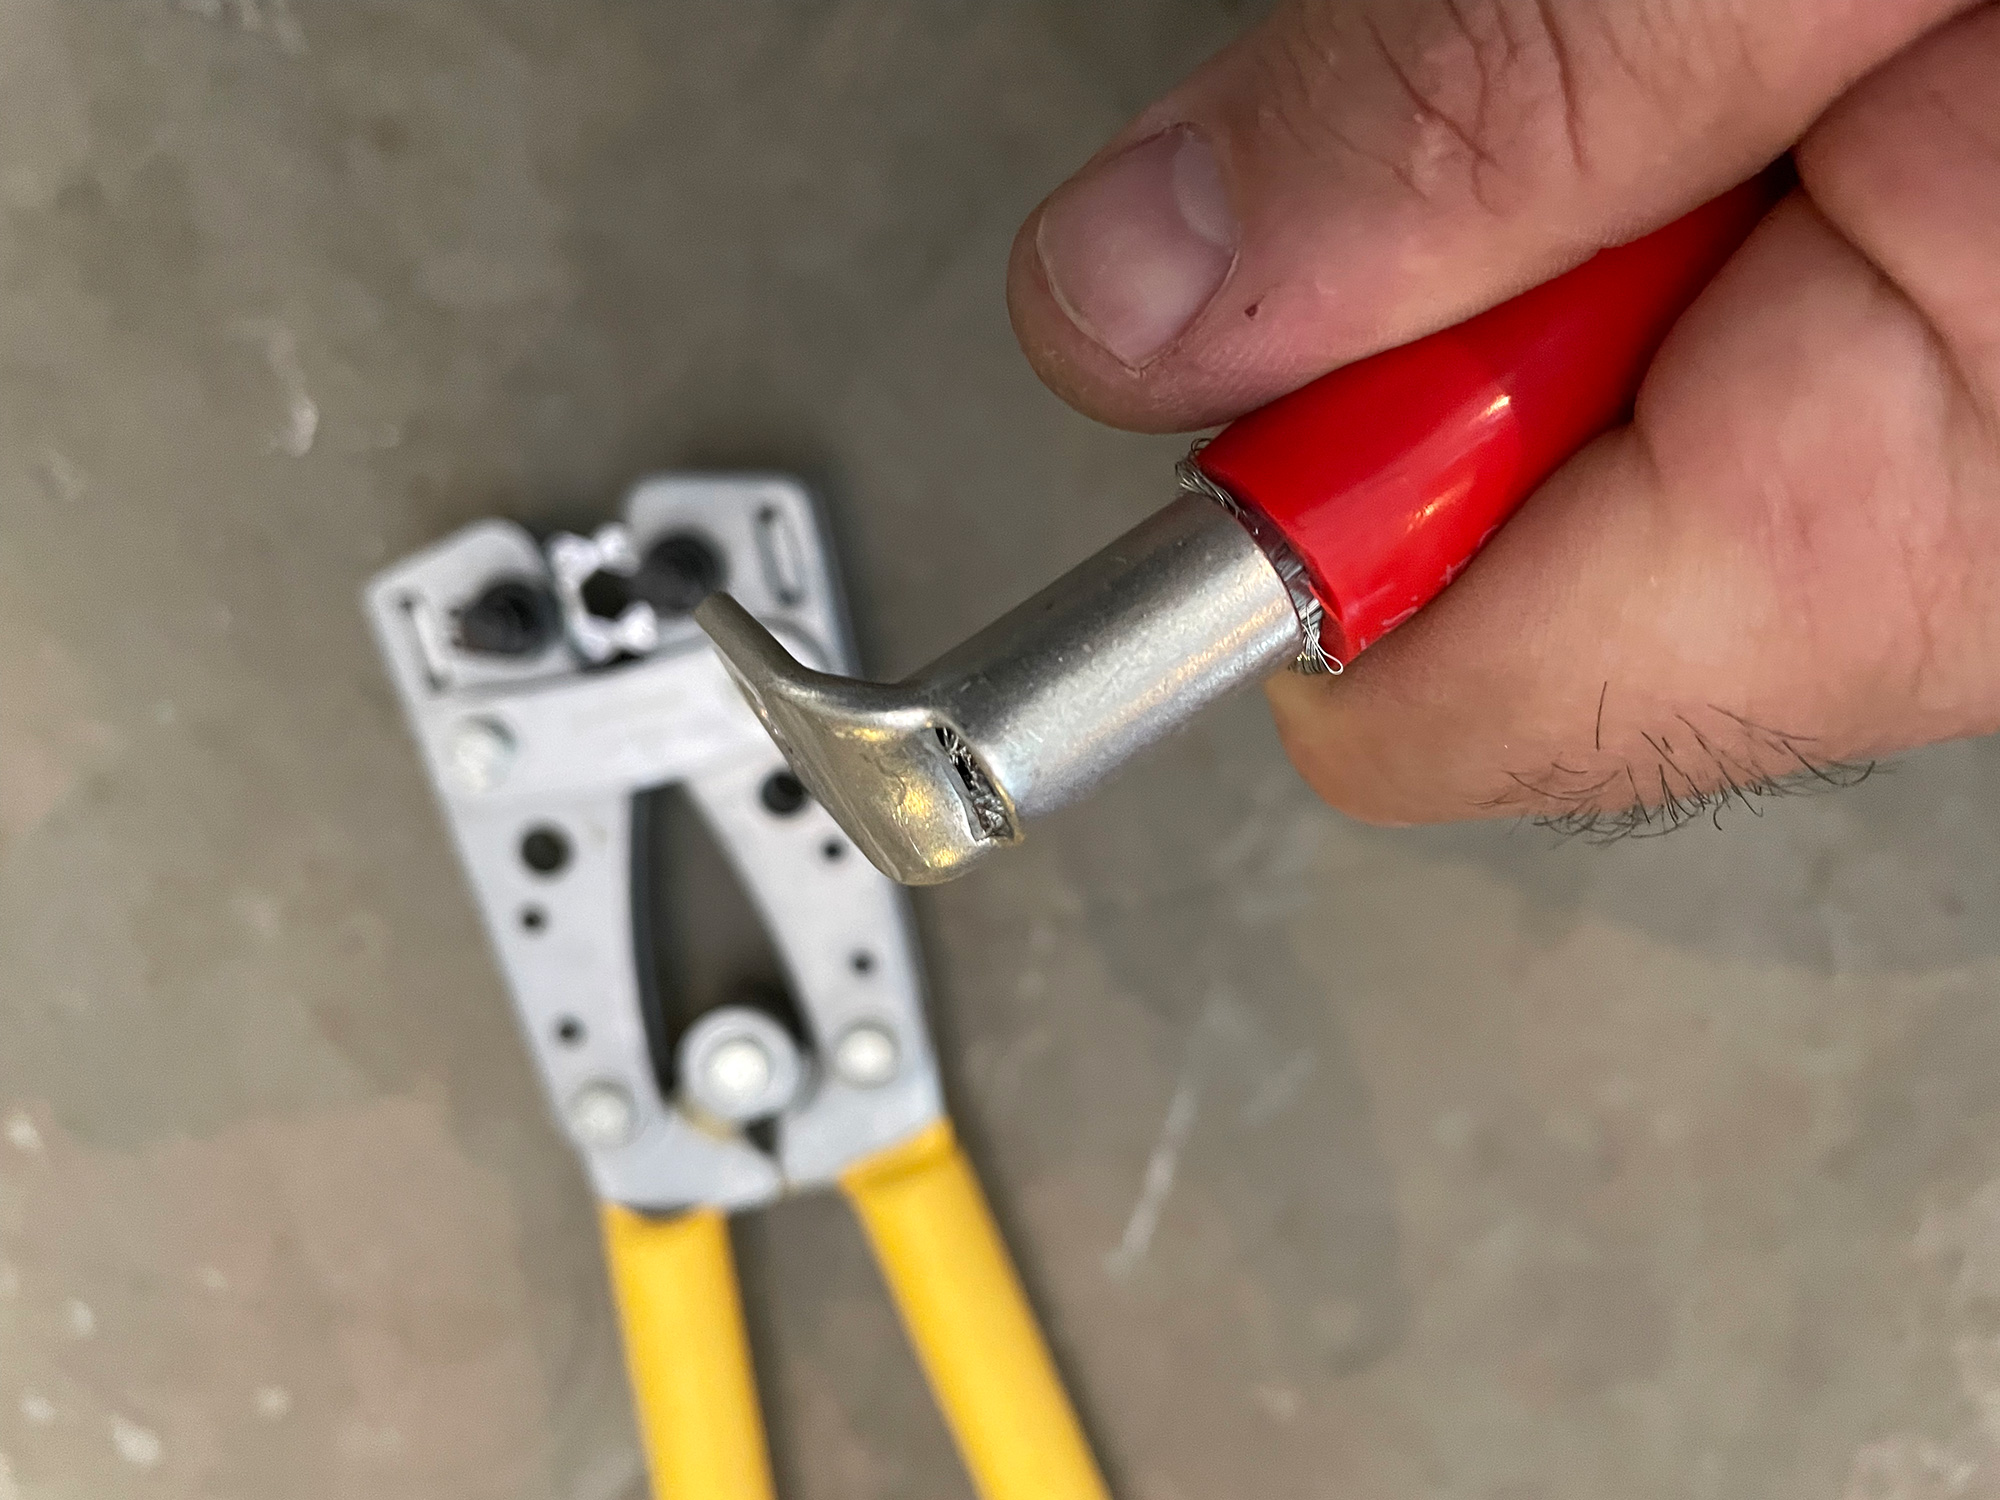
To be fair the cheaper large lug crimpers do not produce the neatest results but they do hold, assuming you have good quality terminals. This particular wire has done 5+ years as a winch power cable with zero dramas.
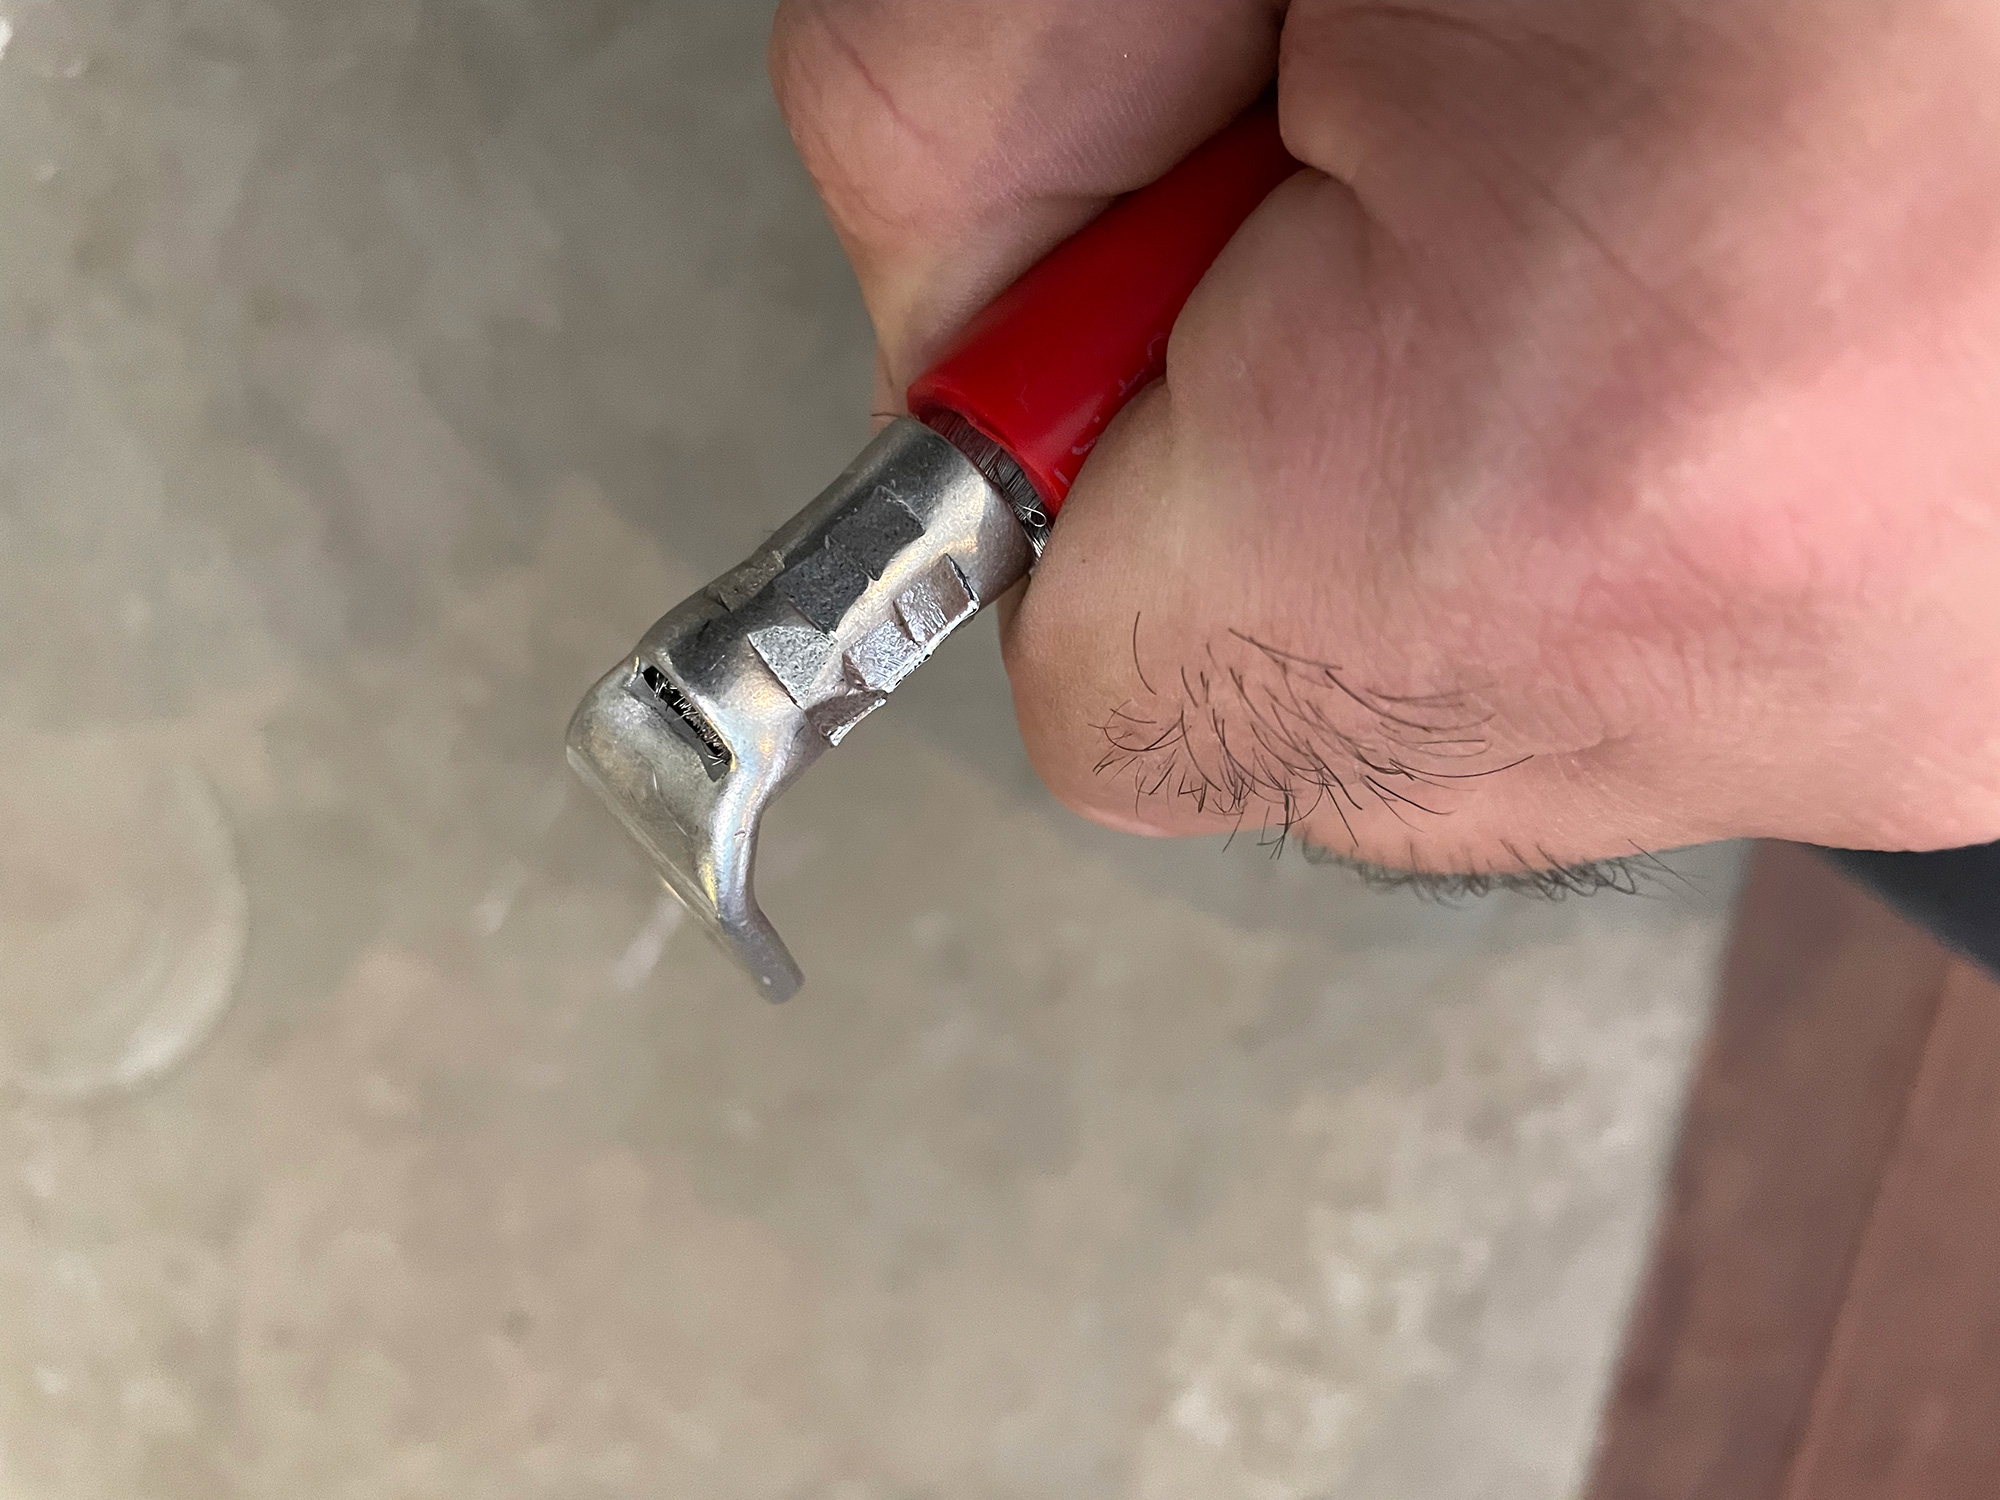
Some people fill connectors like this up with solder and use that for the connection but it’s super easy to end up with a dry solder joint that eventually fails. It’s also not worth using the impact style crimpers, just get a set of heavy duty lug crimpers and you’ll save a fortune making up thick cables for charging systems.
AMP superseal
These are used in some 4wd applications, including the back of ARB bullbar indicator/park lights. I also like them for some applications where waterproof connectors are needed, but that’s only because I have a stack of them as they’re used on some of my motorbikes.
Their pins can require a careful crimp, as deforming the pin will stop it locking into the housing correctly. Once they are properly seated into the connectors though they are very resistant to pushing out. Male housings have the male pins pushed into them and female housings have the female pins pushed into them.
Sumitomo sealed connectors
A lot of the Jimny’s factory connectors are Sumitomo connectors. These pins are made up the same as the AMP pins and also use different coloured rubber seals to seal each individual wire.
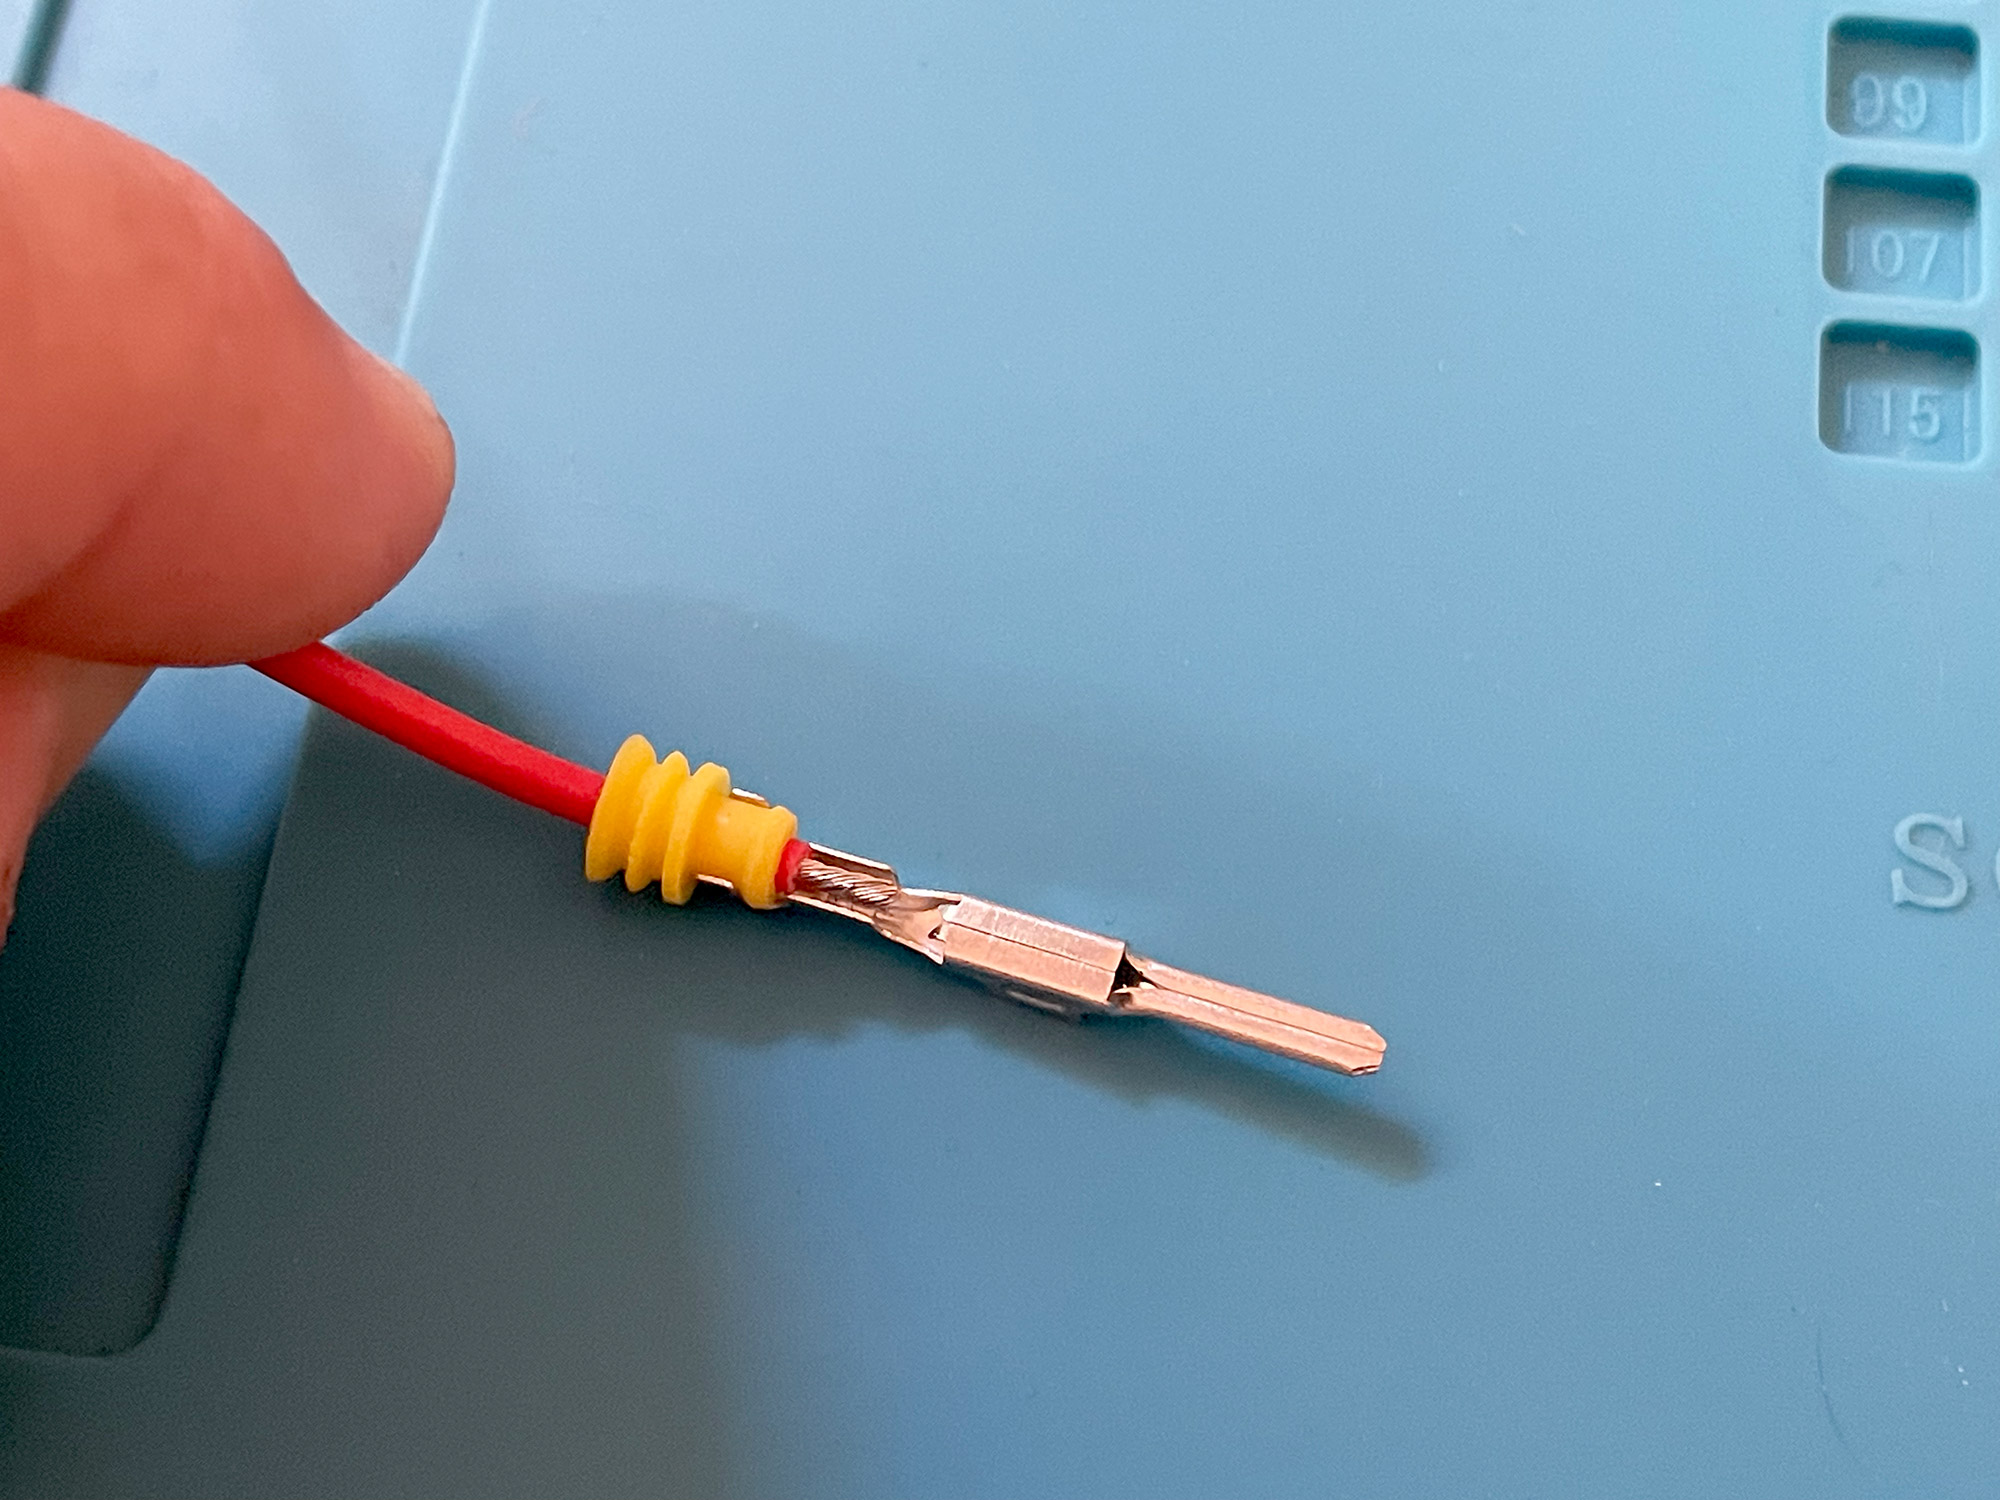
You then use appropriate crimp tools to crimp the inner tabs to the conductor.
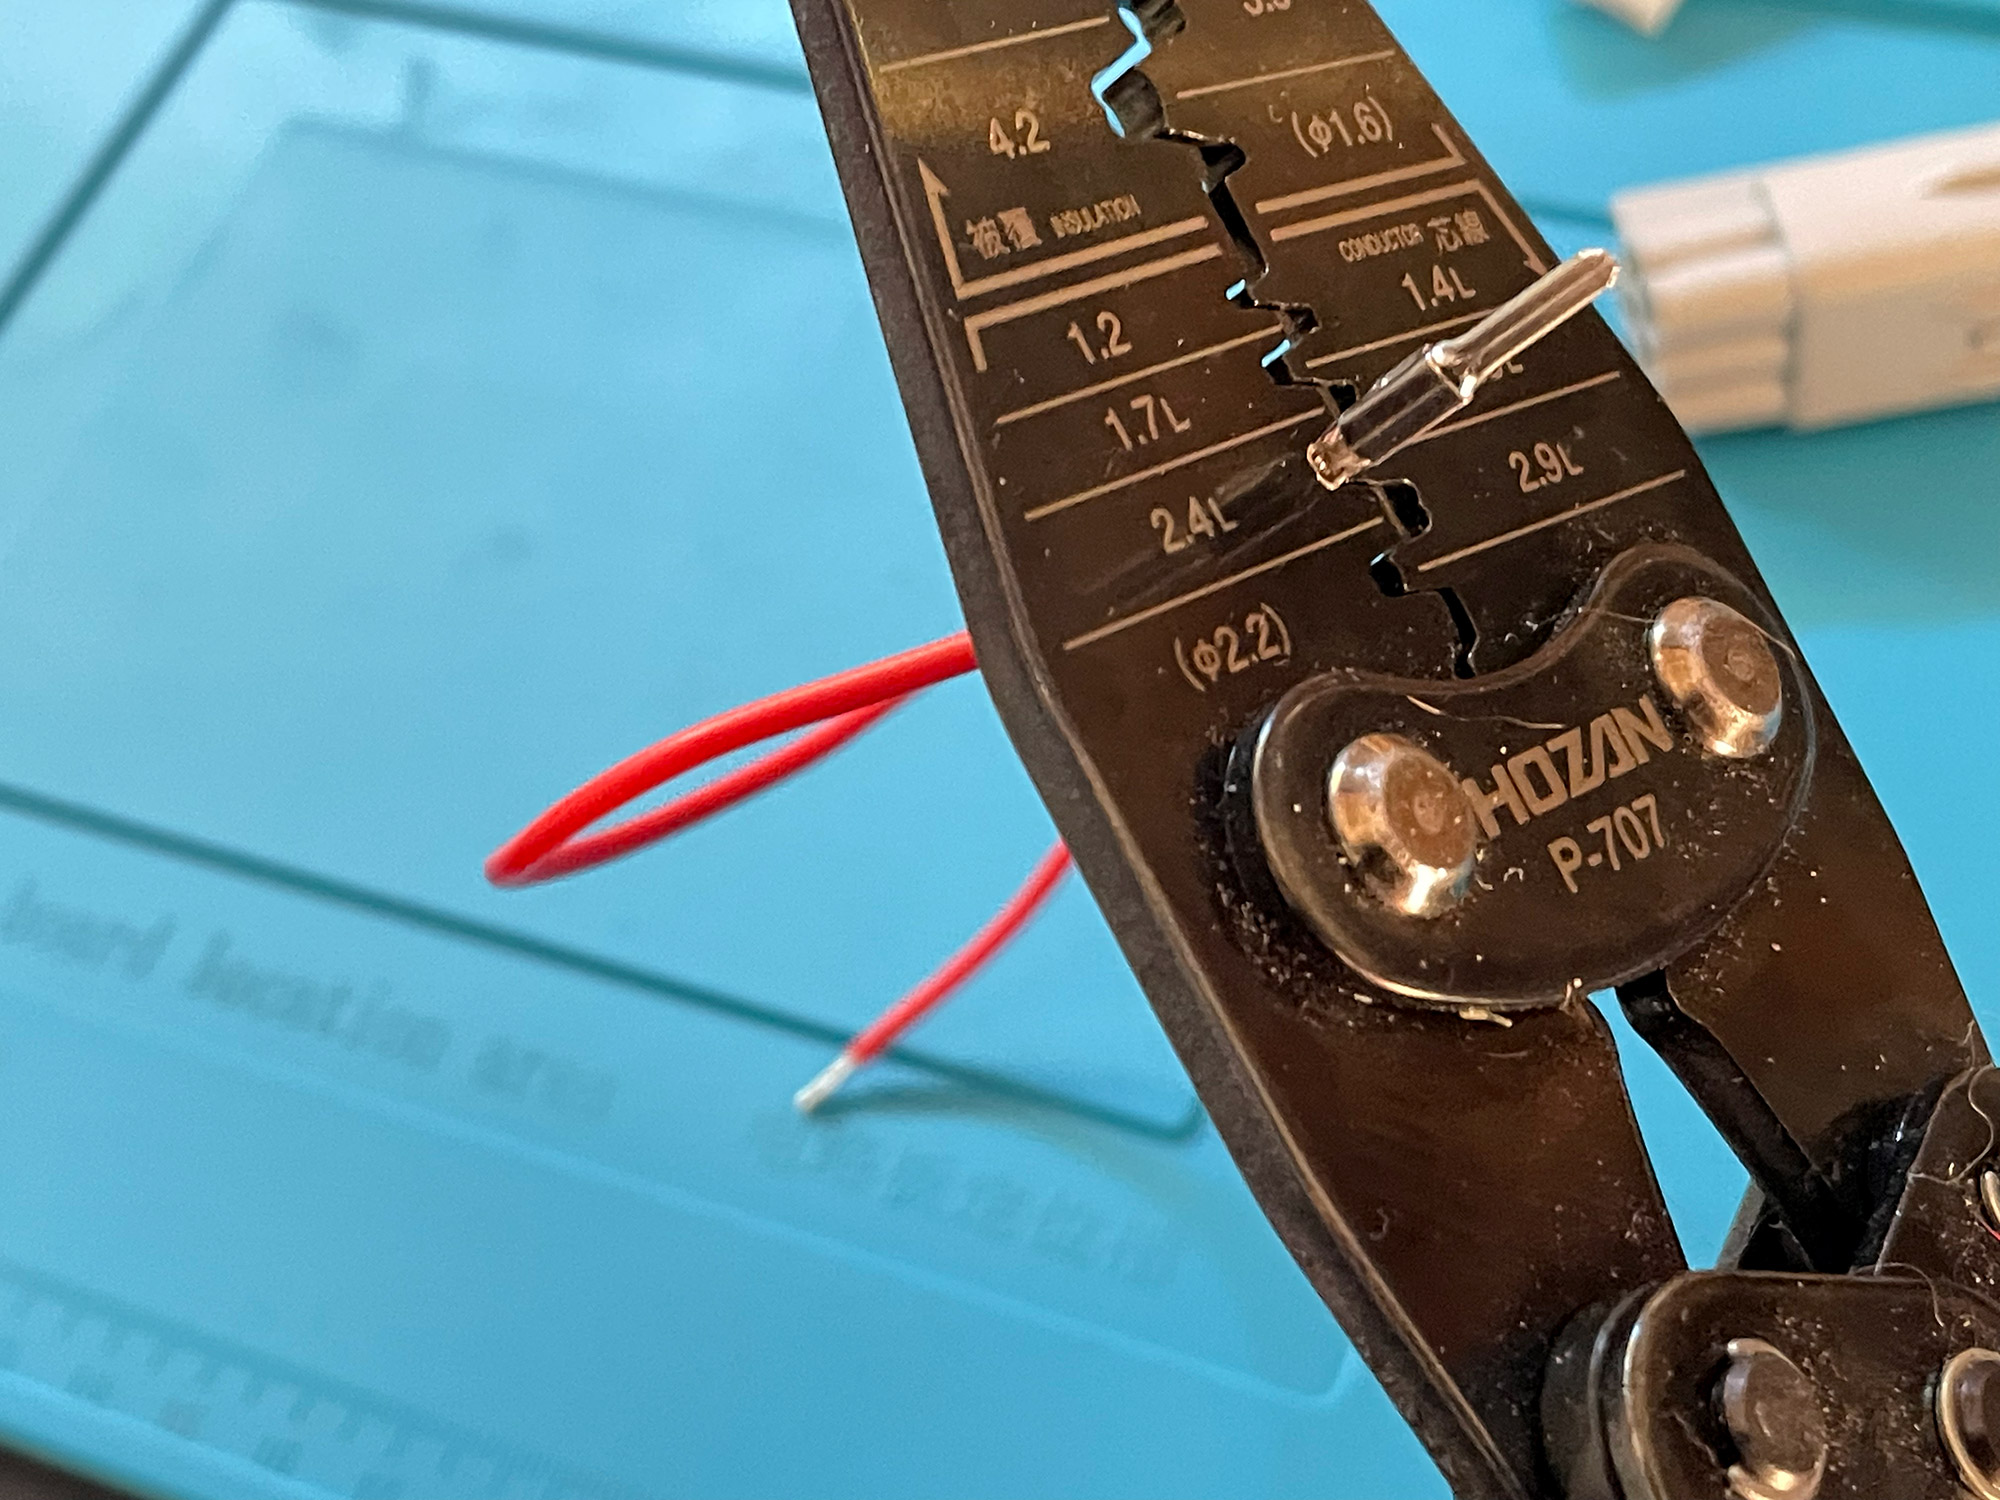
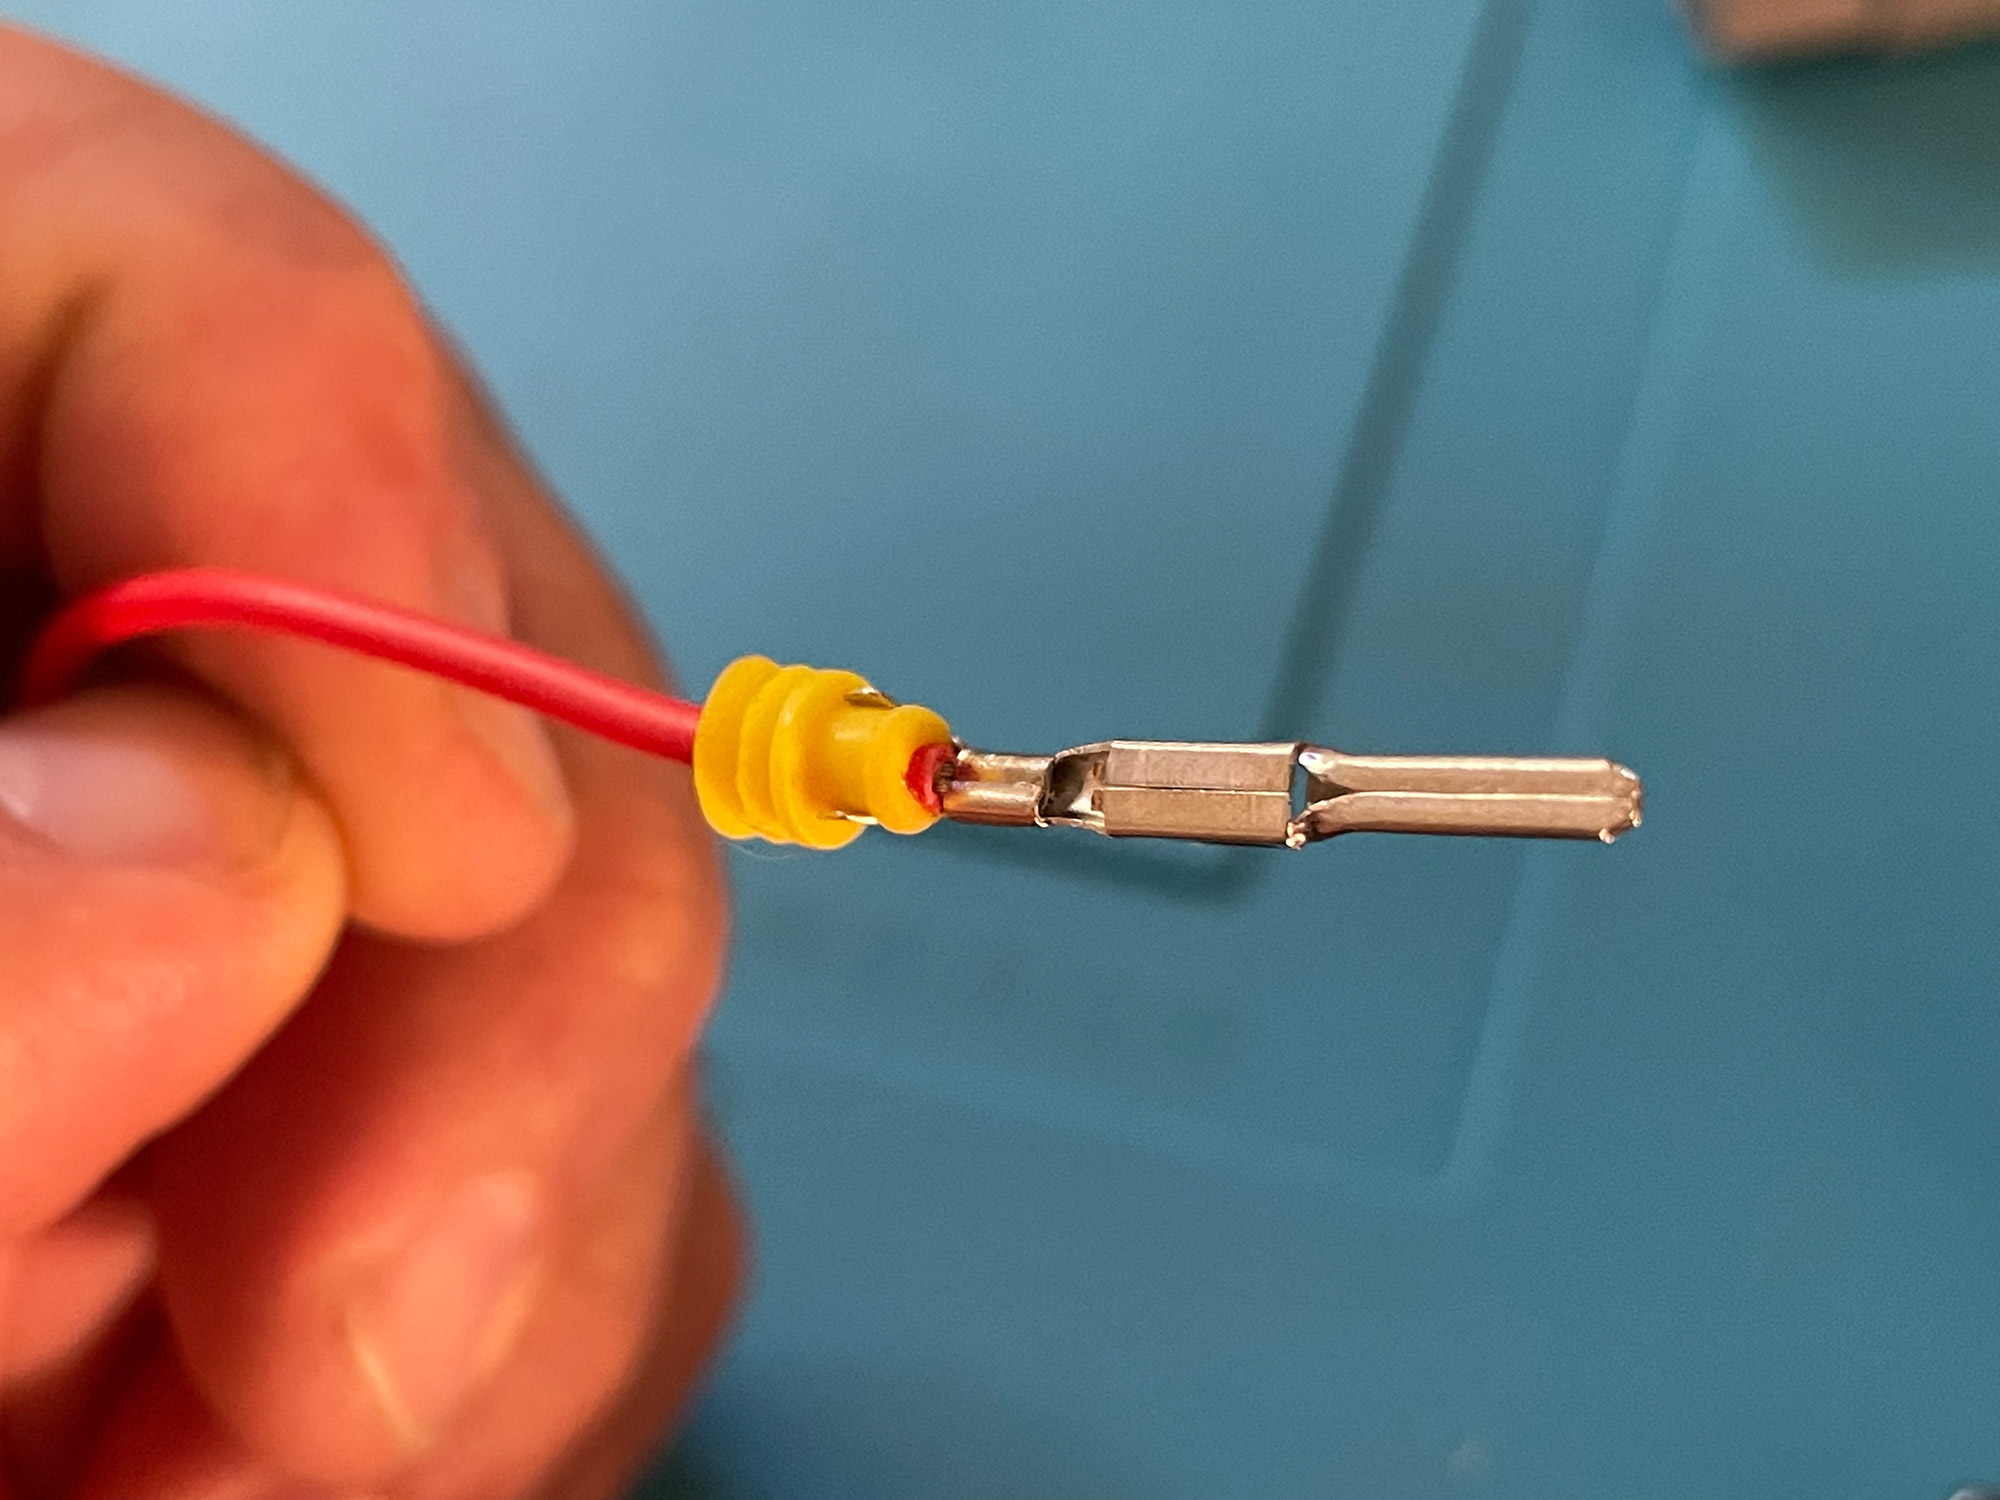
After that you just repeat the process using an appropriately sized crimper to crimp the rearward tabs to hold the waterproof sheath on.
Here’s a set of wires all crimped up ready for use in headlight piggyback connectors using this style of connector.
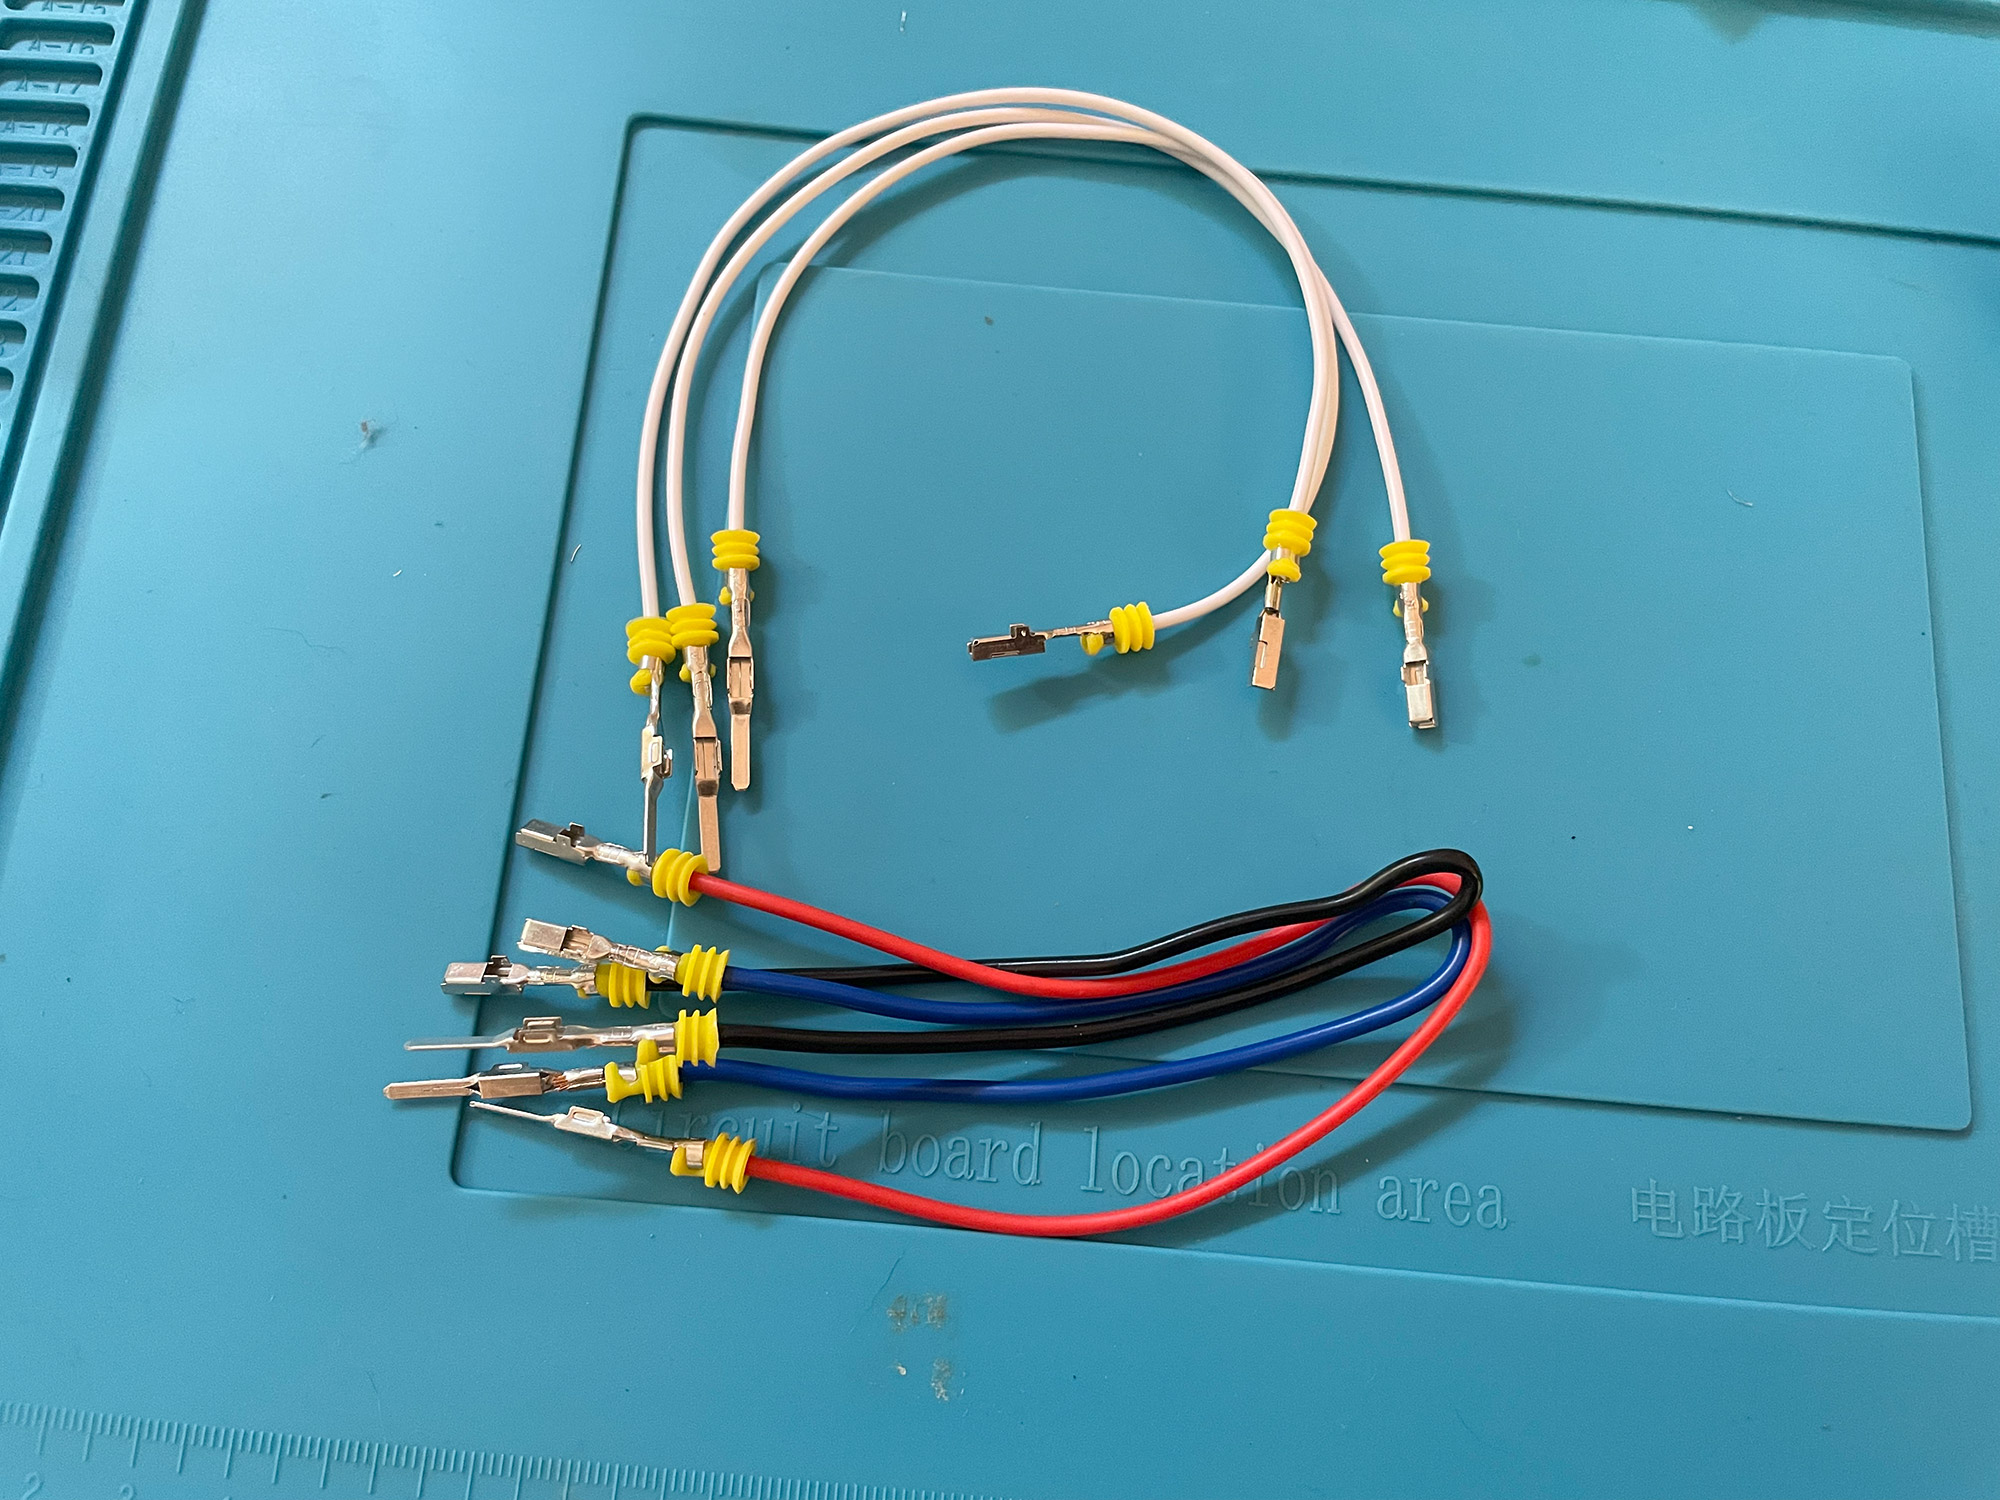
The pins are then poked into their appropriate housing and locked in place with pin retention clips, easy peasy.
Deutsch connectors
These are becoming the standard people reach for when they think water resistant/water proof connectors. A lot of modern driving lights seem to come with Deutsch connectors, usually DT series connectors.
Three pin sizes are common, giving size to 3 different series of Deutsch connectors:
- DTM: 0.5-1.5 mm wire size, 7.5A capacity (90W power max) per pin, size 20 pins
- DT: 0.75 – 4 mm wire size, 13A capacity (160W power max) per pin, size 16 pins
- DTP: 2.5 – 6 mm wire size, 25A capacity (300W power max) per pin, size 12 pins
These get crimped with a barrel crimper which maintains the circular shape of the back of the pin. Note that the crimper die needs to match the pin size being used, which in turn means it needs to match the series of the Deutsch connector you are trying to use. Note that wire needs to be pulled or pushed through the back of the connector before attaching the pin to the wire.
Anderson connectors
These are classic high current DC connectors well loved by the 4wd world. With many clones available it is important to make sure you select compatible connectors. There are multiple variations of sizes to accommodate different current draws, though typically you see the SB50 connectors used (which are rated up to 120A, though only 50A if you are plugging in a turned-on device to active power).
You will often see Anderson connectors on high current draw applications, but also for areas where a solid connection is needed for something removable e.g. portable solar panels, removable additional batteries and even sometimes on fridges.
Making up your own wires using these connectors requires you to crimp relatively large connectors. You can buy quite long handled crimpers which are perfect for these connectors and also large battery connectors.
Some people do like to solder Anderson connectors as that’s more accessible for people at home. You do need to punch in quite a lot of heat to the pins to get them to solder correctly.
Different colour genuine connector shells will only mate with connectors of the same colour, so it is also important to verify the particular connector arrangement you need.

MC4 connectors
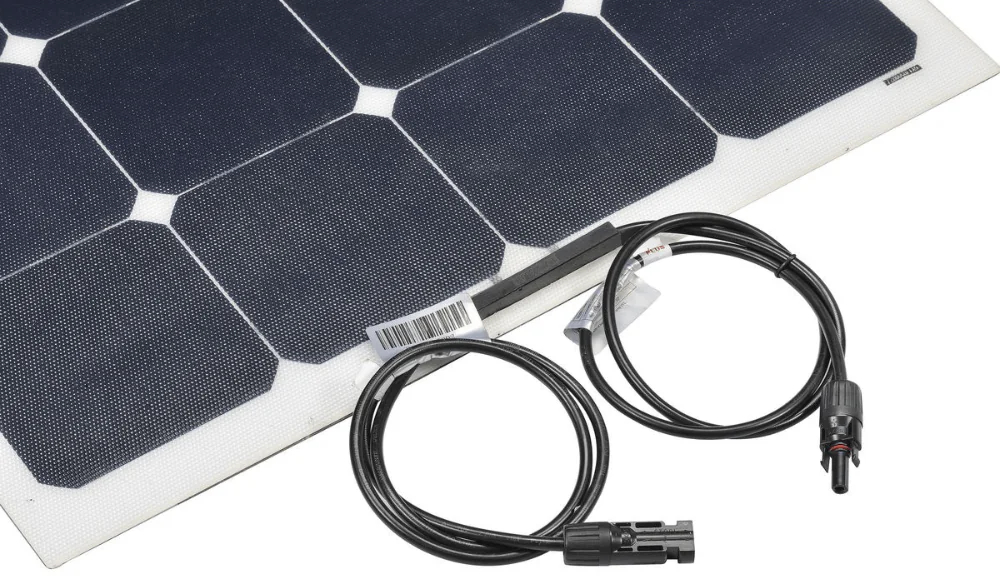
These are more something you see in the solar world, but I’ve seen them sometimes used for solar panels for some 4wd application. They are single pole connections (i.e. one connector per wire), and they are a weatherproof way of making DC connections.
I have no images of them handy from times I have used them for work, but this image from a Projecta semi-flexible panel gives you an idea of what they look like.
Genuine MC4 connectors should be disconnected using a disconnect tool, although many people don’t use these disconnectors and wonder why they can’t easily get the cables disconnected. If you have these connectors then it is worth having a disconnect tool. I use the Amphenol genuine MC4 disconnect tool, though some connectors come with wrenches to assemble the connectors where the back serves as a disconnect tool.
They crimp in a similar way to many of the other barrel connectors and have some weatherproof seals to make sure you include before fully assembling them.
Wire protection and retention
Physical protection/sheathing
Loom tape
Heat shrink
Cable ties
Fuses, circuit breakers and fuse holders
While I did point out that the purpose of a fuse is to protect the wiring from burning up with short circuits in a previous writeup, I didn’t go into detail about the selection of fuses and fuse holders, and also the use of circuit breakers. Fuses should be put as far ‘upstream’ towards the positive connection they tap into as required to ensure protection of the entire line. Fuse size should be selected on its ability to protect the downstream lines it needs to. If, for instance, you run a high current line then at the start of this wire you’d have a fuse appropriate for it. If the wire branches off to several smaller wires then they should also be individually fused appropriately.
Where this gets tricky is a judgement call on tapping into factory wiring, e.g. the dashboard illumination circuit for adding in your own switches. This circuit is already fused by the factory and most switch wiring will cope with the current it can pull before blowing its fuse. In that case no point adding an extra.
With selecting fuses, different types of fuse holders have different current capacities. As a rough guide:
- Mini blade fuse holders usually go up to 30A maximum
- Normal blade fuse holders can go up to 40A though generally 30A is also the recommended maximum
- Maxi blade fuses
- Inline large maxi fuses
- OEX inline style midi fuses are often used for battery connections up to 250A
Generally the principle is the closer connections are together, or the smaller those connections are, the less current they can carry.
Multi-fuse holder
Fuse and relay holder
Heatshrink
Electrical tape
Electrical tape is a real staple of any DIY wiring task. A lot of electrical tape doesn’t cope well especially in hot, oily or dusty environments (which sums up 99% of all 4wd wiring). I used to use the more regular smooth electrical tape but it gets really gooey after a couple of years. I’ve switched over to genuine tesa tape. This feels a lot more like a cloth tape but it is waterproof and it lasts years, even in engine bays.
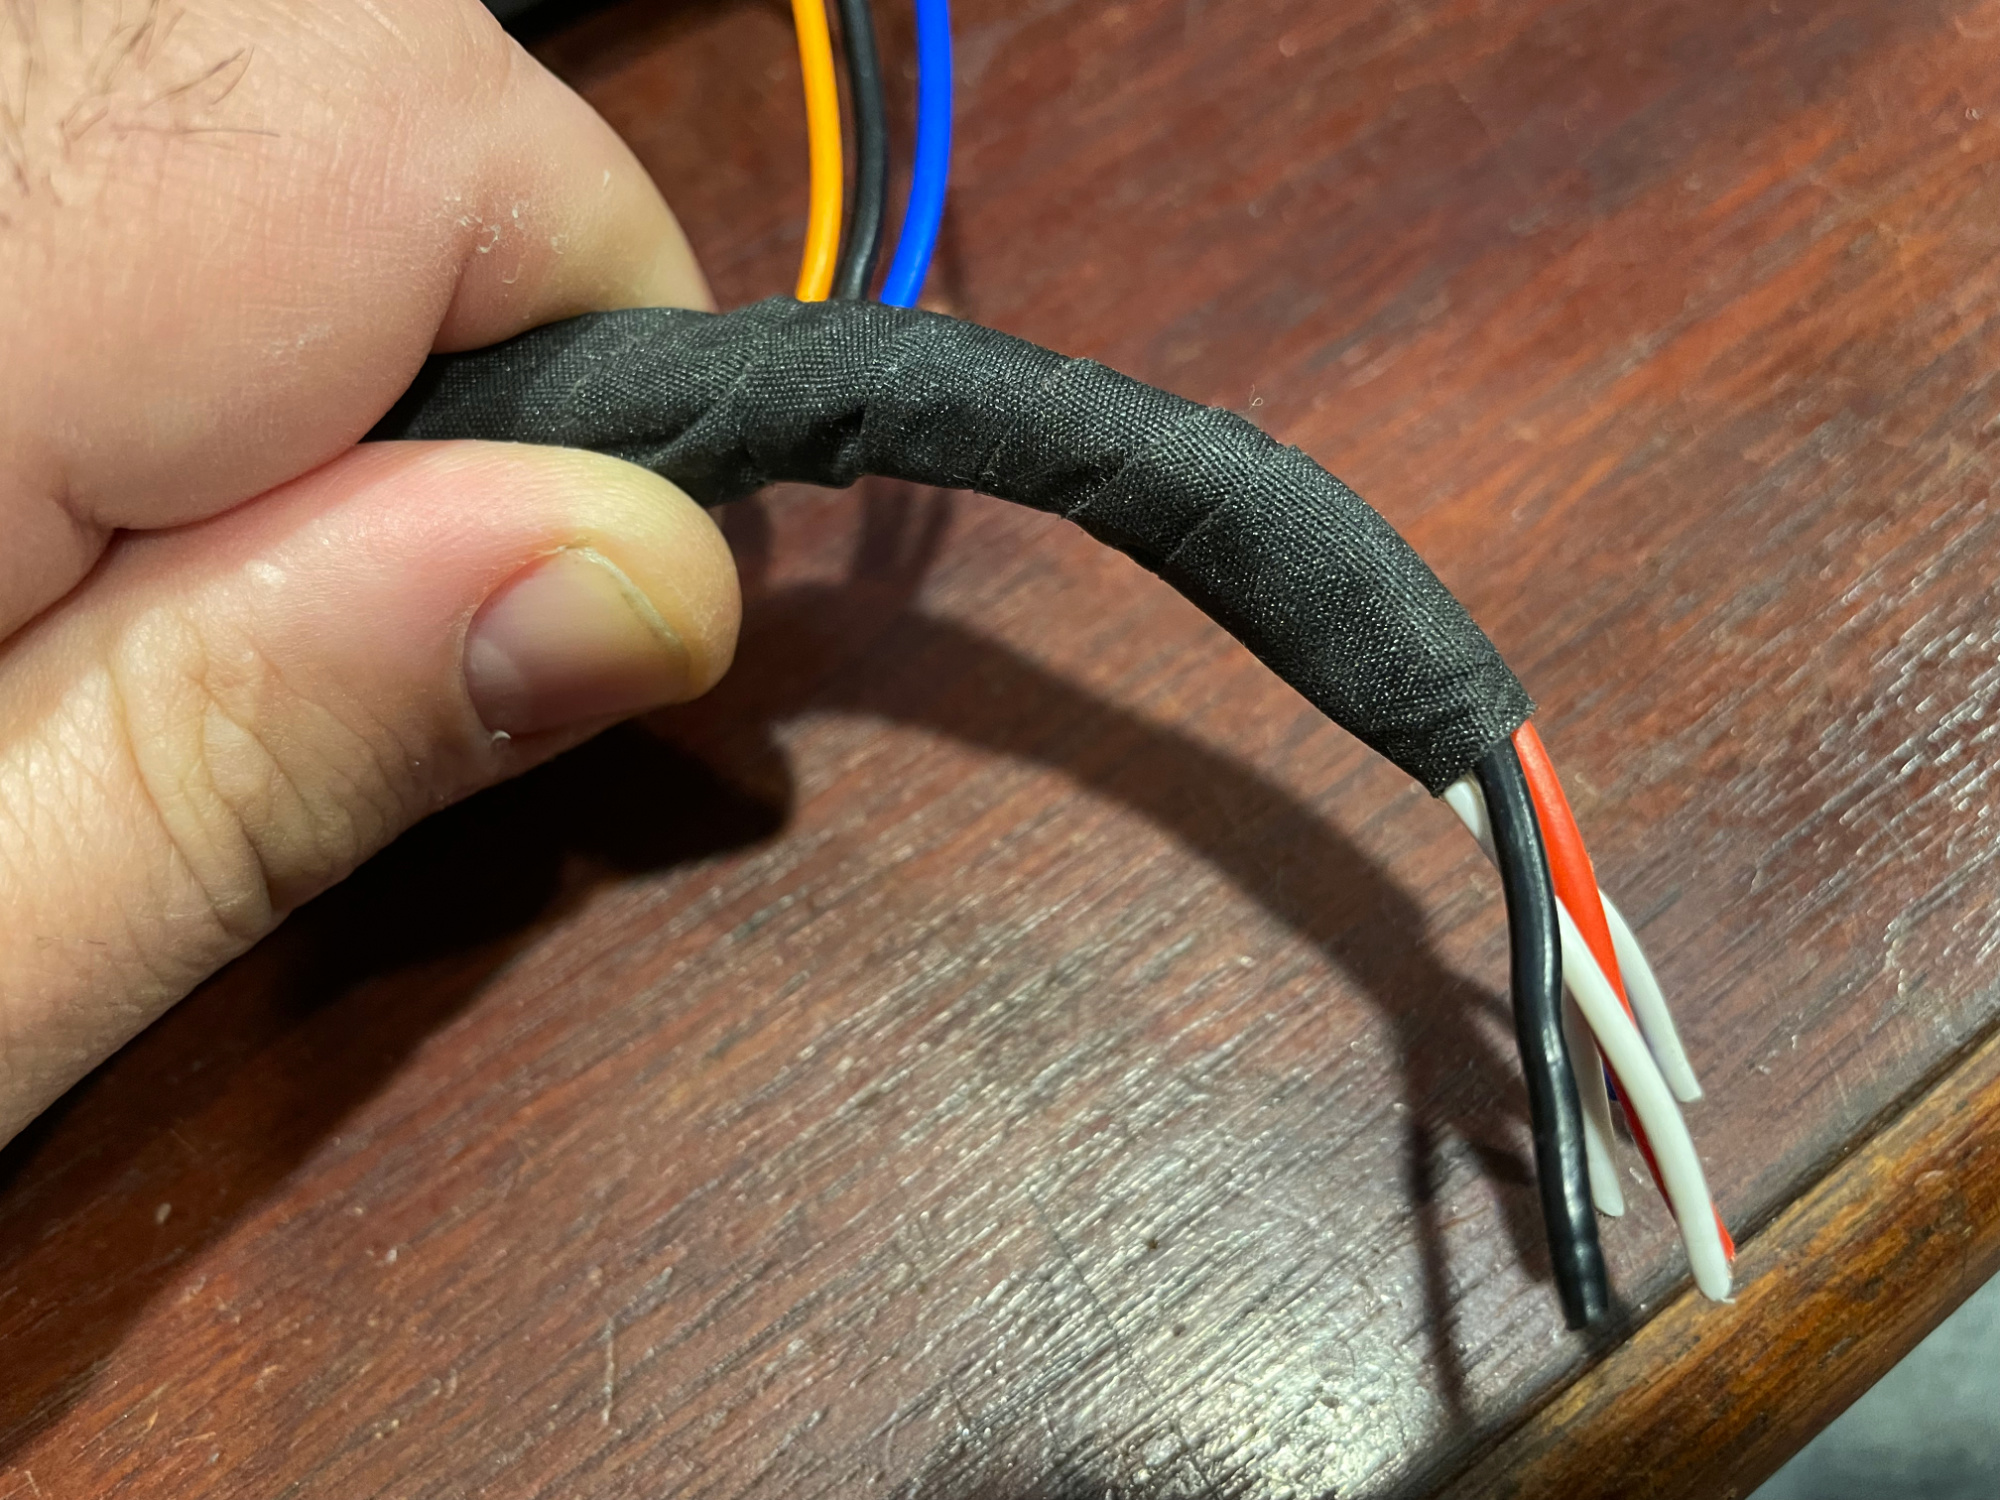
There are more and more brands claiming to produce ‘tesa tape’ like it is a generic term, but I still haven’t found a non-genuine option that is up to scratch. While not cheap, they are large rolls: I bought 5 years ago in a bulk buying deal and I still have a fair chunk of that left after quite a lot of wiring for myself and my friends.
What you are looking for specifically is tesa 51036 tape. While it comes in multiple colours, I’ve only ever bought black because it goes with everything.
Loom tubing
Heatproof / heat resistant sheaths
Got some wiring close to heat sources? It’s worth considering heatproof wire sheathing to protect them. I use either silicone/fibreglass sheathing or aluminiumised/aluminized insulation to protect wires close to things like the exhaust.
This is an offcut of the silicone/fibreglass heatproof sheath I used near the Jimny’s exhaust to properly extend the upper oxygen sensor cable.
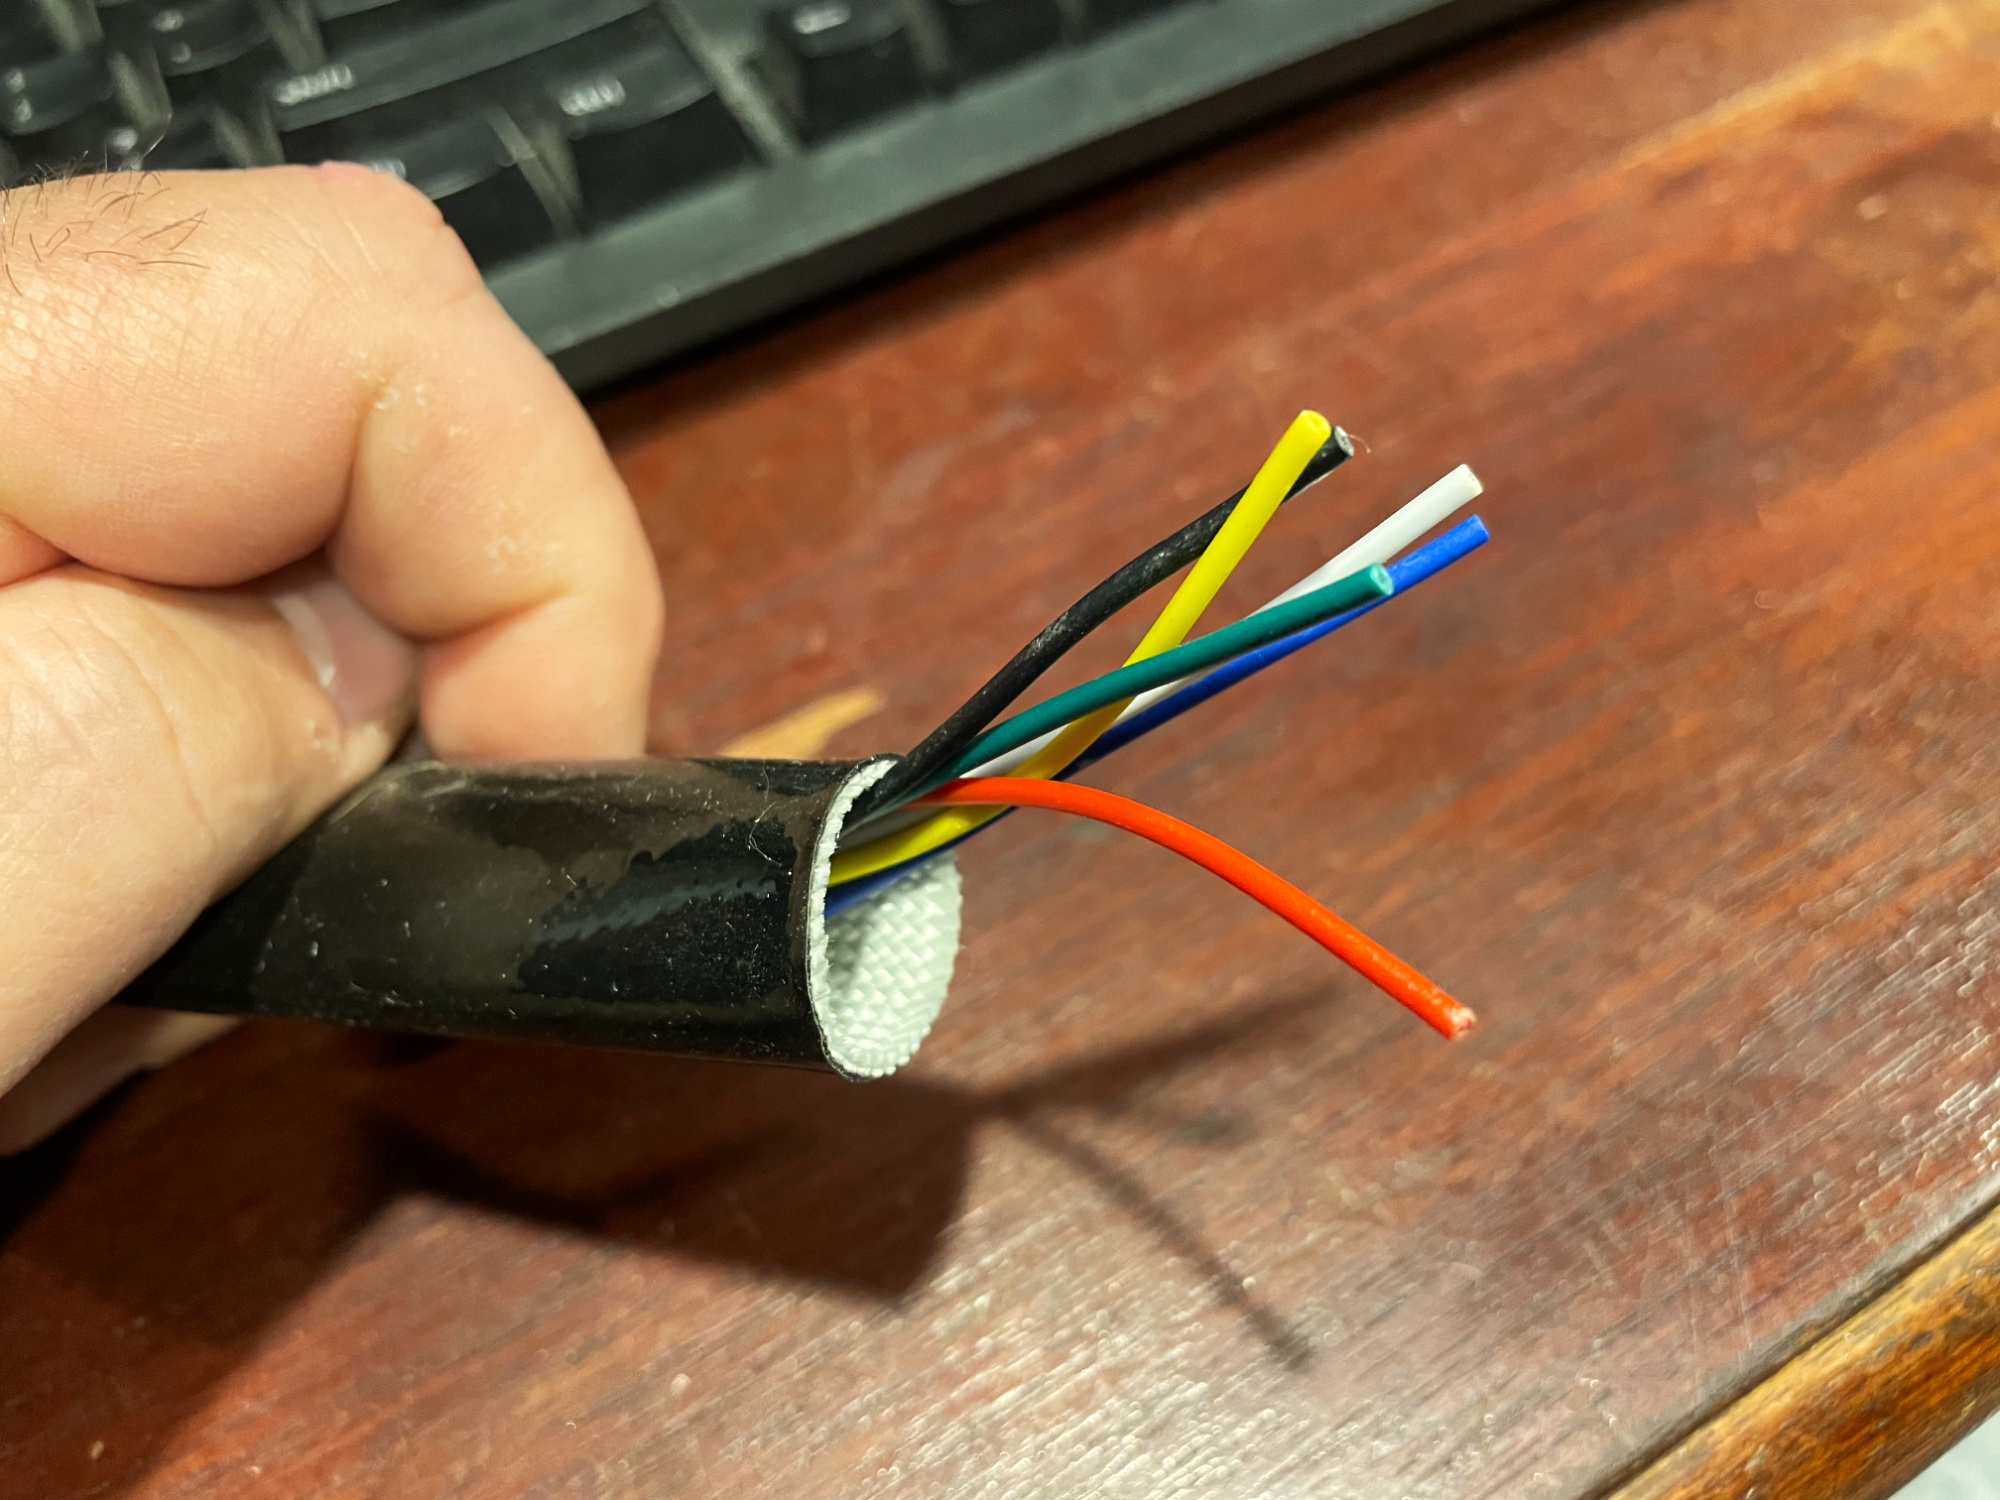
Before I extended the cabling, the factory wiring just reached but was pretty close to the coolant pipe plus the factory exhaust manifold heat shield. A bit of heatproof sheathing/insulation worked a treat to look after it.
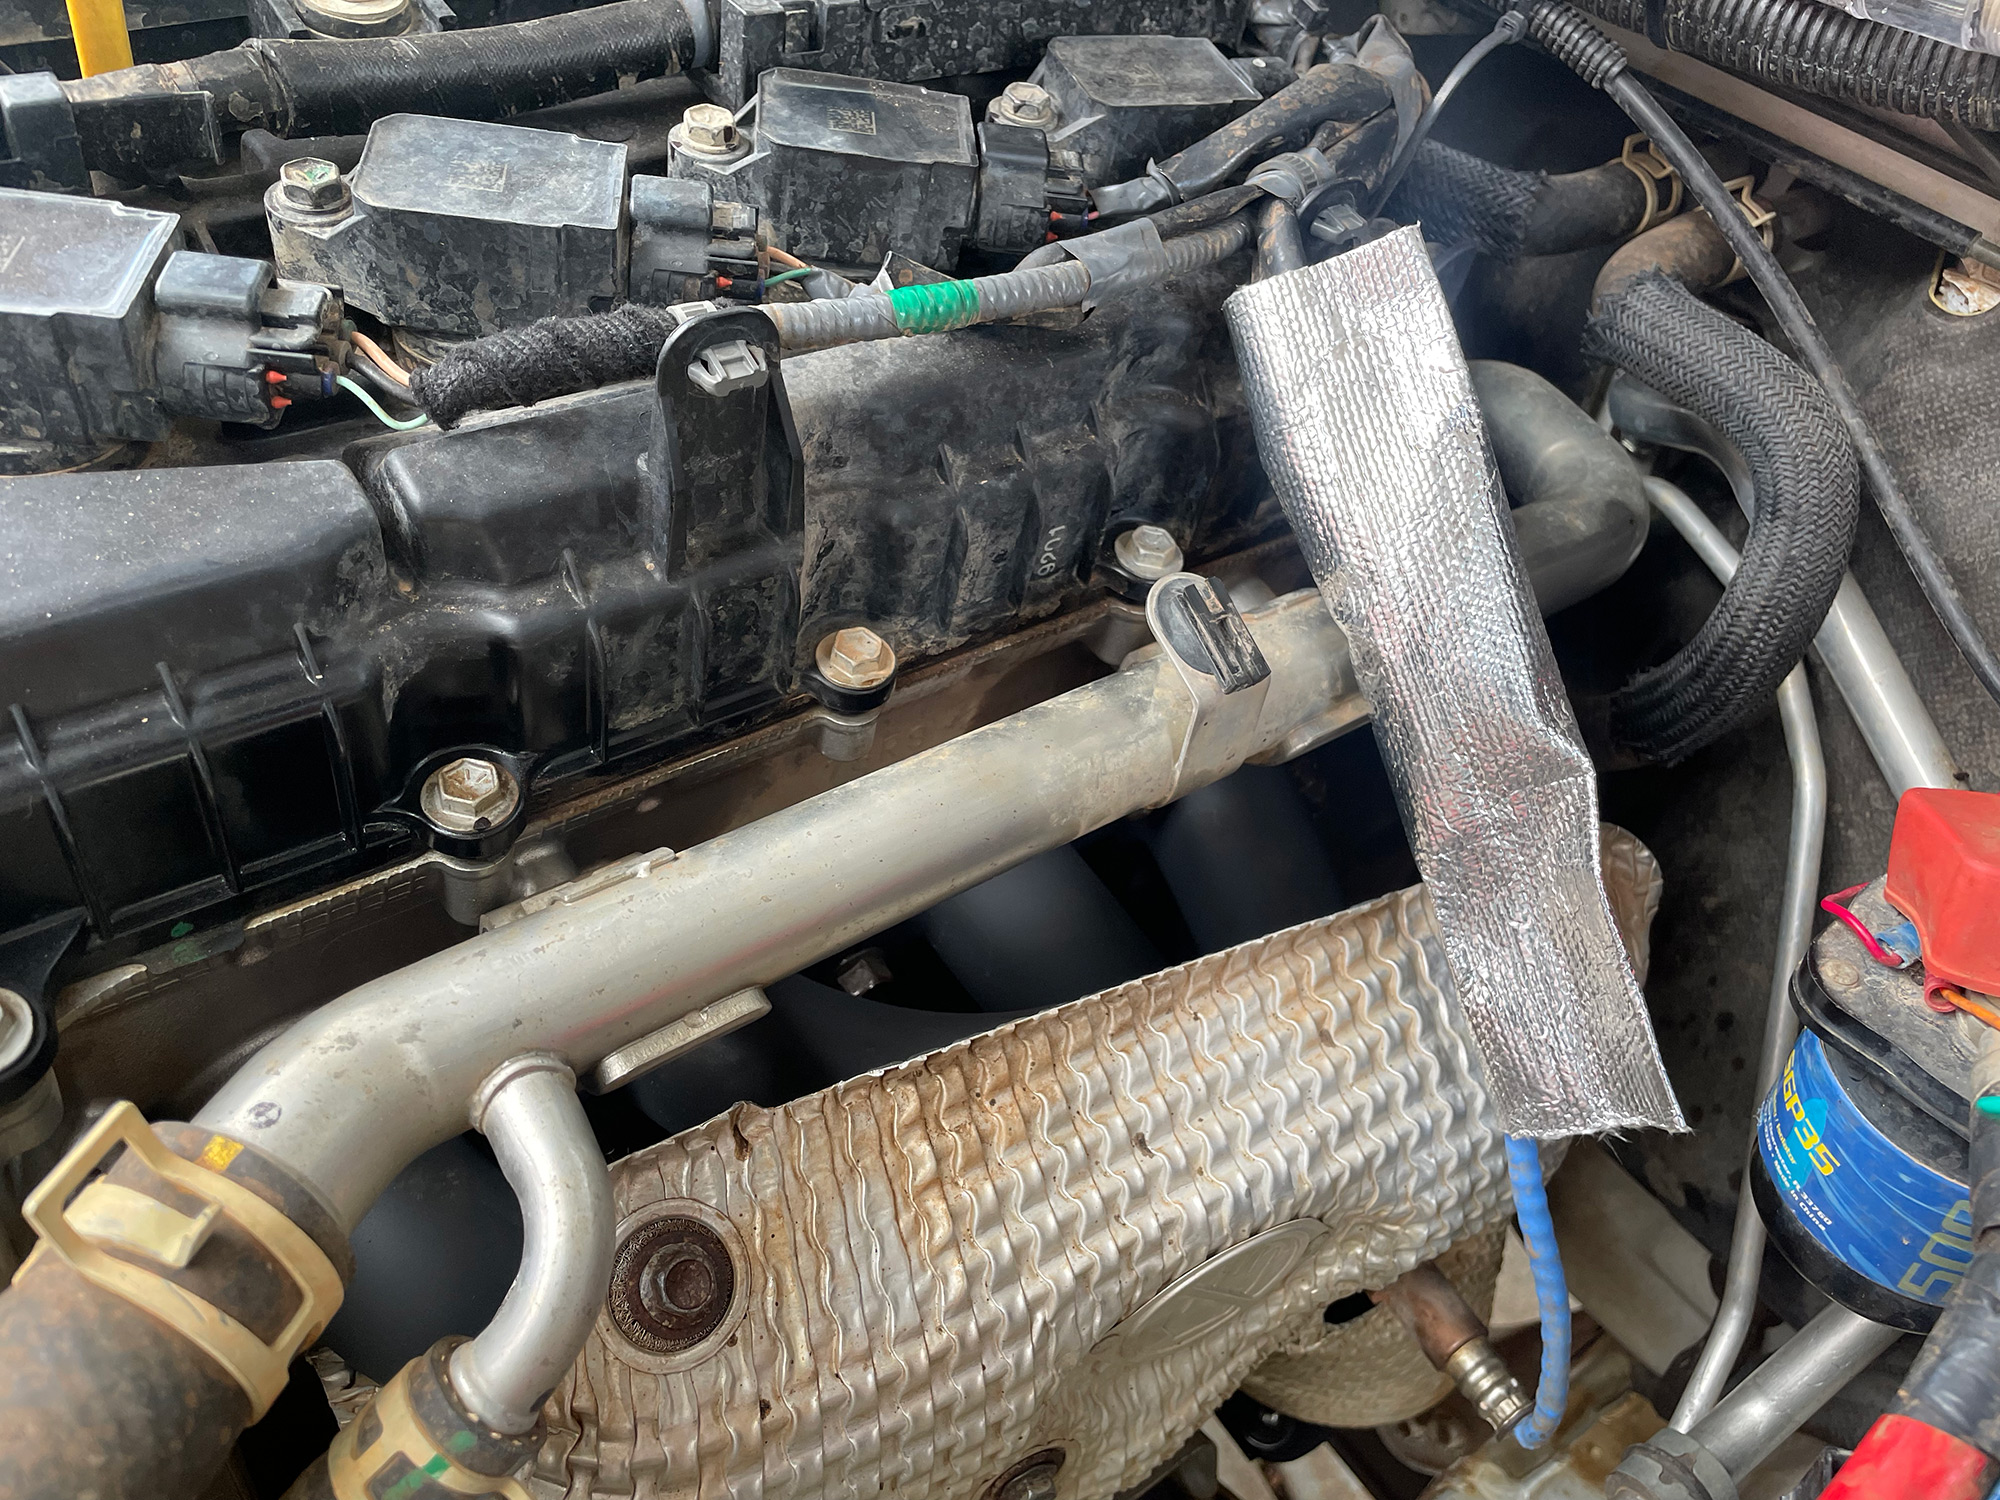
This is something I don’t see people do in 4wd engine bays quite enough. Modern car engine bays can get pretty hot, and the hotter the wiring is the more resistance it has. This adds to the heat in the wiring and also reduces the current carrying capacity of the wire. You don’t have to do it everywhere, but exposed wiring close to the exhaust side of the engine definitely should get treatment, and any wiring I’ve added along the chassis very close to the exhaust pipes I like to add extra protection there as well.
Suppliers
This really is a roundup of suppliers I’ve routinely used, arranged just in alphabetical order
- 12V Shop
The 12V shop is a physical shop in Perth I’ve used a bunch. Great for advice on projects and the best way to go about things, and they have a very good online store, too. - Altronics
Altronics is a chain of electrical supplies stores, mostly in WA (where they begun). A lot like Jaycar, this is a good place for a lot of random supplies - Cycle Terminal
A motorcycle oriented terminal supplier, based out of the USA. Over the years I’ve bought a range of connectors from them, plus their connector kits are a good way to have a ready stock of multiple types of factory connectors on hand. - Eastern Beaver
This is a great electrical supplies online store based out of Japan. While their specialty are motorcycle related connectors, there are a lot of the Jimny specific connectors available here. Also a great place for tools, such as some of the better crimper tools out there. - Highmount Guy
This is a specialty store around the supplies needed for high current applications e.g. big cable lugs and cables for winches. They also sell winches, but I’ve only ever bought some wiring products from them. - Jaycar
Probably the largest chain of electrical supplies stores around. They have some good tooling options (e.g. my interchangeable crimper & large terminal crimpers are both from Jaycar) and also are your easiest location for grabbing wiring for projects when it is needed. Their staff are often very knowledgeable and good at problem solving so sometimes if you need a hand it’s worth dropping in for that perspective, too. - Narva (bought from various suppliers)
Narva supply a lot of electrical needs. Their insulated (3 colour system) crimp terminals are really good quality and hold together when crimped properly, unlike many other brands. They also have a huge range of other things such as fuseholders, switches and globes etc. It’s worth going through their catalogue and finding what you need, then googling those part numbers to find a supplier. They are very commonly carried by major automotive stores plus many online retailers so you can easily get what you need. - Swe-check
Swe-Check are an amazing supplier of fantastic fuse, relay and other electrical components. Probably the best resource when it comes to planning things like a fusebox and the fundamentals of how you want to do the wiring. Customer service is also top notch.
