
Camping electrical 101, with a Jimny slant
This is a pretty long article but I wanted everything wrapped up together. I suggest you flick through bits that interest you and come back to the other content within it as you build on your understanding. Some topics might seem out of order but they are designed to build off the previous section, so if you don’t totally get something then skim backwards and you might dredge up something to help.
- Electrical basics
- Energy storage
- Battery capacity and battery types
- How much capacity do I need?
- Charging stuff
- Solar charging considerations
- Charging from the car
- Relays and other electrical things you need to know about
- Some suggested options
Electrical basics
There’s a lot of units of measurement that can make it intimidating for newbies to understand camping electrical systems. People also tend to interchange units around and they can because of some assumptions
Volts (V) are relatively easy: with the Jimny we’re talking about 12 V, there or thereabouts. (When it is charging it is more like 14.5V, and the exact voltage of a battery depends on how recharged it is). Voltage is effectively the ability to push electrons around: it’s much easier to push electrons around with a higher voltage, which is why your house is on 220-240V in Australia, and it means you have thinner wires for carrying the same amount of power.
Amps (A) are the bit people get more tricked up on: amps is related to the amount of electrons you’re pushing around. If voltage is the ‘slope’ driving a river, amps are the width/depth of the river: more and you can flow more water. Different devices pull different amounts of current, which is what amps measure:
- A typical compressor fridge/freezer will draw down about 4-5A while the compressor is running (but they don’t run all the time)
- An air compressor to pump up your tyres depends on the size of the compressor:
- Plugged into a cigarette lighter socket around 10A
- Small single compressor you plug onto a battery or an underbonnet single compressor 40A
- Large double compressor up to 90A
- Lights often used as camp lights will pull at most a couple of amps, but plenty of low power LEDs will be < 1A, and things like long awning LED poles will be ~1.5A per pole.
- Charging your phone will need about 1A at 12V
- Electric camp oven will pull down 10A when it is running.
- An inverter to give you 240V electricity depends on its power rating in watts, but, if you are using it to its fullest capacity:
- 150W inverter means about 15A at 12V
- 300W inverter means about 30A at 12V
- 1000W inverter means 100A at 12V
- 2000W inverter means 200A at 12V
(Note these numbers take into account that inverters are not 100% efficient)
More current means thicker wires at a given voltage, which is why cables to charge a phone are small and jump start cables are huge.
Watts (W) is measuring power, and it’s actually quite easy to calculate: watts = amps * voltage. Sometimes people will take about power in amps instead, and you can work that out from knowing the voltage in the car is ~12V, so power in amps multiplied by 12 is the power in watts (or, the power in watts divided by 12 gives you the current required to give you that power). The watts of a device is actually how you work out how much current it will take, which is super useful when planning out an electrical system.
Watt-hours (Wh) measures energy, though you might more commonly know this as kWh for the amount of energy you’ve used at home. (Part of my annoyance is that domestic electricity companies call this power, but it is actually energy).
Amp-hours (Ah) is another way to look at energy, usually in the context of the amount of storage a battery provides. It can tell you how long a battery will last depending on the amount of current drawn, e.g. 100 Ah capacity implies you can draw 1 A for 100 hours. This relationship doesn’t perfectly hold as the universe doesn’t like anything to be perfect: if you draw lots of power it’ll deplete the battery a bit faster than you anticipate and if you draw very slowly it will deplete it a bit less fast (though natural discharge comes into play, too).
Energy storage
Battery capacity and battery types
There are a multitude of battery types. Some key ones/terms you’ll see:
- Wet lead acid batteries are what you think of when you talk normal car batteries under the bonnet. These can be either ‘cranking’ or ‘start’ batteries designed mostly for low discharge but ability to pull heaps of power to start a car, or, they can be ‘deep cycle’ (sometimes ‘marine’ or ‘storage’) to support
- Sealed lead acid batteries (SLA)
Some cars run these (you won’t find any vents on them) but these are starting to become what people think of - AGM (absorbed glass mat)
These also don’t have vents, but are a newer type of battery compared to older style lead acid systems - Lithium batteries are the newest type of batteries, and often are all people think of when it comes to a 2nd storage battery for a 4wd.
We talked about battery capacity before in the section about amp-hours, and how it represents the amount of energy the battery can hold. Part of the difficulty is that almost all battery manufacturers talk about capacity assuming you discharge from 100% charged to 0% charged. The challenge is that different battery types support different levels of discharge:
- Lead acid batteries (sealed and not sealed) are happiest kept to 40-50% max discharge
- AGM batteries also are happiest at around a 50-60% depth of discharge
- Lithium batteries can more safely be pulled down 80-90%, though some companies maintain they can safely be recovered all the way to a 100% discharge repeatedly
Different types of batteries also support more or less discharge cycles, too (and the amount does depend on how deeply you discharge it). A typical starter battery for a car only wants to be absolutely fully discharged a small number of times before it becomes problematic; a deep cycle battery can support a lot more discharge cycles. In general, lithium batteries can support more discharge cycles than AGM batteries, though if you are going to deep discharge repeatedly then it might be not ideal.
All this means that you potentially need more capacity in an AGM or lead acid style battery than a lithium battery. Given AGMs weigh more than lithium batteries, potentially this can add a lot of weight. On the flipside, AGM batteries cost less, so you need to weigh up your usage and your weight requirements when selecting a battery. An AGM battery at, say 100 Ah may only be usable for repeated drawdown of 50 Ah; you might be able to achieve this with a lithium battery of 50-60 Ah instead. Weighing this up is important.
Batteries also do cost more: a lithium battery will cost the most and a standard lead-acid battery the least so there’s (sadly) a lot to consider. Sadly lithium batteries also can vary significantly in quality, and poor quality ones come with the fun of a higher fire risk, so you can’t really cheap out too much either. Lithium batteries also are pickier about how they are charged and managed so you potentially also require a more expensive charging system to make the most out of them.
- If you can afford the space and weight, an AGM might be the best option if you’re after something cost effective;
- If space or weight for a given capacity matters then absolutely get a lithium battery; and,
- If you’re going for an additional battery under the bonnet then probably a lead acid or AGM battery is going to be better (lithium doesn’t like heat so much).
How much capacity do I need?
Almost always people end up buying more capacity than they need with Jimnys as they’re usually not parked off-grid for a week without moving.
The equation for working out the capacity you need is fundamentally pretty simple: total capacity needed = total energy draw per day – total charge per day. To calculate this well you need to do a battery capacity budget.
To calculate the battery capacity a device will draw it is simply the current draw multiplied by the hours that it will be on for. Run a device that pulls 3A for 4 hours and you’ve pulled out 12Ah from the battery.
Once you’ve got that total Ah you need for a period of camping between recharges (e.g. overnight) then you need to account for battery type. If you are using just the car’s main battery, then multiply the total Ah needed by 2.5; if your battery is an AGM then double the Ah needed, and if it is a lithium battery then multiply it by 1.2. This will give you the battery size you need given the type of battery you plan to use.
Example energy draws
Compressor fridges will pull, on average, about 1 A over the hour that they’re on (accounting for them turning on and off). Thermoelectric coolers, which are cheaper and lighter, however, pull way more power, so if you have one of these you’ll be pulling more like 4-6 A.
Cooking appliances, if you have electric cooking options, can pull heaps of power. The small pie ovens pull about 4A, the large ones 10A. Heating a pie or warming up a pre-cooked meal might be a couple of hours, so maybe 8-20Ah taken out of the battery to do so. If you want something like induction cooking with a 2000W benchtop cooker then we’re talking a 3000W inverter and you’re at 300A at that point accounting for inefficiencies. That extreme end member requires a battery setup that can be done in the Jimny, but not that cheaply or space or weight efficient, and I (personally) think it isn’t worthwhile. If you have a camper, though, and you’re willing to invest in batteries designed for high current draw then it is totally possible.
Coffee makers like Nespresso machines usually require an inverter around 1000W, so you probably have to support a good current draw of ~100A at most but it will only be on for 5-10 minutes maximum (call it 0.1 hours) so you’ll have pulled out 10 Ah for morning coffee for a couple of you.
If you’ve got some other device and want to see how much it will take to use then there’s a couple of ways. You can measure the current draw but that’s not always straightforwards; the other way is to use the unit conversions I talked about right at the top. Let’s say you’ve got something that is ’45W’ and you want to use it for, let’s say, 1.5 hours. Divide watts by voltage and you get the current draw for that power rating; 45W / 12V = 3.75A. Multiply this by the time you’ll use it and you end up with 5.625 Ah. It really is that easy!
Well, maybe not quite that easy: You do have to consider efficiency, especially for devices where a voltage conversion is involved. Consider an inverter to run normal household electrical devices. Their wattage rating is how much ~240V electricity wattage; because they cannot be 100% efficient they have to draw more wattage on 12V to give you the peak power. Higher power inverters can have significant current draw without even powering a device, which also adds to the energy requirements you need.
The table below is designed to be something you can print out and fill out (eventually I’ll make it a fillable PDF!) to have a crack at understanding your power needs. Time-wise go off how long you’d use something for however long it’ll be before you’d recharge the battery; that way you can work out how much capacity is needed before.
I’ve given a few extra cells to add in things you might have on top of these things, and I’ve given some likely amounts to help you calculate it. Put in the number of hours you’d use something for, and multiply this by the power draw. Add up all of the Ah taken and that total is your required accessible Ah.
| Item | Power draw | Time on (hours) | Ah taken |
|---|---|---|---|
| Fridge (compressor; average per hour) | 1A | ||
| Fridge (thermoelectric) | 4A | ||
| Pie warmer | 10A | ||
| Camp lights | 3A | ||
| Phone charging | 2A | ||
| Camp shower pump (while running) | 3A | ||
| . | |||
| . | |||
| . | |||
| . | Total Ah: |
Understanding recharge is more of a function of how you’ll recharge and how often, so we’ll cover that now.
Charging off the car
If you’re recharging by the car driving, then it’s a function of the charger size * the amount of time you’ll spend driving. A 10 A charger running off a cigarette lighter socket generates 10 Ah for every hour it runs, a 25 A charger running for an hour generates 25 Ah, a 40 A charger running for an hour generates 40 Ah and so on.
The only exception to this is if you’re driving with lots of current draw on the alternator from the car itself: if you have the rear window demister on, the headlights on, the blower fan on full then the alternator will probably not supply the full current the battery charger needs.
Solar charging
Solar is a slightly different thing to consider. Solar panels are listed in terms of power in watts, not Ah like we’ve been working with. While there’s some assumptions involved, if you take 90% of the power rating of the solar panel and divide it by 12 you roughly have the Ah that it can generate at maximum, e.g.:
- A 100W panel would generate 90/12 = 7.5 A maximum current
- A 200W panel generates 15 A maximum current
- A 300W panel generates 22.5 A maximum current
Note that this is maximum current. If the solar panel is flat then you can expect 25-50% less at its peak depending on your latitude, and you will only generate maximum for about 4 hours a day in any case (~10am – 2pm). As a rough rule of thumb, you generate around 2/3rds of your energy at this time, and 1/3rd outside of it. So, 4 hours for a 100 W panel at its peak is 30 Ah put into a battery, and you’ll put in another 15 Ah outside of that for a total of 45 Ah. If you want to slightly optimise your charging from solar then a solar panel you can tilt and also rotate to follow the sun will help.
Calculating a power budget: my worked example
I run very few electrical devices with my camping: a compressor fridge, charging a few camp lights and maybe some technology devices. The fridge roughly pulls in 1 Ah per hour it’s plugged in, but we’ll call it 25 Ah a day. Charging lights is a couple of Ah maximum as they’re high efficiency LEDs, and then a bit of technology is another 10 Ah, coming in roughly around 35 Ah. Add in that you don’t want to fully draw down on the battery so another 20% for lithium and you’re at 42 Ah.
Based on this, I use a 50 Ah lithium mounted under the drivers seat. It’s absolutely perfect, with even hot days and heavy fridge usage never pulling it down to flat. In winter, when the fridge has to work less hard (basically staying cold overnight without even turning on the compressor) then the battery gets worked less hard. These numbers are all quite conservative though.
Testing in my front yard with the fridge on my car will go 4+ days before the auxiliary battery is depleted. That’s before considering recharging
On the charging side, I have two ways to charge it:
- Using a DC-DC charger from Redarc, I can charge at up to 25 A when the car is running (2 hours to fill the battery)
- Using a 100W solar blanket and the inbuilt solar regulator in the Redarc charger, I can put in up to 7.5A in a solar maximum when camping. I can put in roughly 40 Ah into the battery in a reasonable day by angling the solar blanket to aim it at the sun, which is perfect.
This means I can basically replenish even significant battery usage every day either when parked (through solar) or a couple of hours driving.
Relays and other electrical things you might need to know about
I feel like relays in particular are some of the most misunderstood electrical devices despite how simple they are, so we’ll start there. A relay is nothing more than a fancier switch that can handle lots of current. Rather than physically switching it, you give it some electricity on the switching (low power) side and then it lets current flow on the high power side. They come in a range of current handling capacities which is why you want to use them: a switch can only handle a relatively small amount of current especially when dealing with DC electricity. 4-5A is easily dealt with via even a small switch, larger ones might be ok with 10 or maybe 20A, but beyond that you have to use relays.
Because relays are switched electrically, you can switch a lot of current using a small switch to provide a little current on the switching side and it’ll let big current flow on the high power side. You don’t need to switch things using a physical switch, however. If you, say, give a relay an input from power that only exists when the car is turned on then your relay is now able to give you high current direct from the car’s battery but only when the car is running. The relay has let you turn a permanently live lead from the car’s battery into one that’s switched with the ignition system, but you’ve also done it without pulling large current through the car’s standard wiring/electrical system.
Relays can also switch based on other types of control, e.g. you could have a timer relay which turns on when the car is turned on, but then stays on for another hour after you turn the car off so it can charge your camping battery that little bit longer after driving to camp. It could also be a voltage sensing relay which will determine when the voltage has reached a minimum value and switched on (this can indicate the car is charging) and then switches off when the car’s battery reaches a minimum value, letting you start the car and not overly drain the battery.
Relays are often used for driving lights/light bars because you cannot pull the high current needed for those lights directly through the car’s normal headlight circuits, so you use a switch in the car and also high beam inputs to switch the relay on. They do have more uses though, and hopefully my above explanation helps you see where else they could be useful.
Fuses are not really misunderstood but sometimes forgotten when adding extra electrical devices to your car, or, you add too many and then when stuff doesn’t work you’re not actually sure what’s run. A key thing to remember here is that fuses protect the wiring, not the device; you put them in so they interrupt short circuits to a particular device so you don’t melt down the wiring. They come in different physical sizes and that partly dictates what current they can protect again. Small ones like the Jimny uses as its factory fuses let you go up to about 30A, if you’re pulling a lot more current on a device than that then you need to consider other fuse form factors.
You may also come across fuses in something called a fuse tap or an add-a-circuit fuse. These are basically replacement fuses which plug in place of a particular fuse in the car’s circuit board and let you add another circuit while protecting the original circuit. They can make wiring things in easier but they also usually require you to remove the fuse cover which is not ideal, especially if they’re in the engine bay fuses where stuff might now get wet or muddy. I generally avoid them, but sometimes they are the easiest way to access permanent or ignition switched power for your application.
The other way to protect circuits are circuit breakers, like you might be familiar with from your house wiring. These are resettable (unlike fuses, which blow and need replacing) and can often handle more current than a standard fuse can. This can be a good way to protect high current wiring like into a charging system for a second battery, though sometimes a fuse is a better choice as fuses take more time to blow versus circuit breakers that might act more instantly. Sometimes electrical devices need a huge current for a couple of seconds on startup; this isn’t a risk to the wiring (as it won’t get too hot in those few seconds) but if the circuit breaker trips then the device won’t start up. Non starting devices is definitely a bad time. Fridges, for instance, can require a bunch of power to initially kick over the compressor so are best off protected with fuses.
The electrical world is full of a bunch of connectors, but the one you end up seeing a lot of are Anderson connectors. These are usually grey and give you a repeatable way to connect high power devices; most of the time 4wders only get to see the 50A variants but there are higher current versions. They come in different colours; genuine Anderson connectors of different colours will only physically work with that particular colour as they’re subtly different shapes internally. Many non genuine manufacturers of this style of connector don’t honour these colour differences, though, so you need to do a bit of research.
Anderson connectors have a reputation as being hard to DIY the connection but they really aren’t difficult to assemble and heavy duty crimpers to make their connections are inexpensive and widely available these days. I think they’re worth having around to DIY the connections, as buying premade leads for your application can be a real pain and a false economy over buying the right tools.
Step up or step down converters are ways to convert voltages either up or down as needed. Often the best thing you can do here is minimise voltage conversions. As an example, if you want to charge your laptop while camping you might be better off looking at a direct car compatible charger (much easier now a lot of laptops charge via USB-C) rather than taking an inverter and plugging in your regular charger. This also goes for battery boxes with included 240V inverters; they’re only useful if you have specific devices you can’t easily run from something converted from closer to 12V. A good example of this is Starlink if you go this way for the internet when off grid: buying converters to directly power it rather than using an inverter can save you a fair bit on required battery capacity, which can have its own cost benefits along with size benefits for your electrical setup!
The thickness of an electrical wire is referred often as its wire gauge. Smaller numbers, annoyingly, are thicker wires. Wire thickness is potentially referred to not just by gauge but by three different numbers: the diameter in mm of the conductor(s); the cross-sectional area in mm2 of the conductor(s); or, the ‘American wire gauge’ or AWG number. The thicker the wire the more current it can carry; this does vary for different lengths of wire. For a much longer wire you need to go thicker to carry the same amount of current without overheating the wire, but below I’ve tried to put in typical ranges of current that wire thicknesses can carry.
Note these are also rounded a bit and aren’t official standard conversions.
| Thickness (diameter, mm) | Thickness (area, mm2) | American wire gauge | Jimny-appropriate length current capacity (typical) | Typical usage |
|---|---|---|---|---|
| 0.5 | 0.2 | 24 | 1-2A | Super thin switching wire |
| 0.8 | 0.5 | 20 | 5A | Often used for low power switching |
| 1.3 | 1.3 | 16 | 10A | Normal circuit wiring |
| 2 | 3 | 12 | 15A | Higher power circuit wiring e.g. driving lights |
| 2.5 | 5-6 | 10 | 30A | Battery charging / higher current applications like underbonnet compressors |
| 3.2 | 10 | 8 | 50-70A | Auxiliary battery charging cable Audio amplifiers for fully sick subwoofers |
| 5 | 20 | 4 | 100-140A | Cheap jumper leads; ATV winch cables |
| 6 | 35 | 2 | 140-200A | Larger winch power |
| 8 | 50 | 0 | 200-300A | Big chungus winch power |
| 10 | 75 | 00 | 300+A | Big chungus winch power |
Some suggested options
I didn’t just want this article to be a bunch of theoretical advice but wanted to give you some practical buying tips or ways to go about your electrical system. Below are a few ‘recipes’ that hopefully will help out.
The “I’ll just use the car’s battery option”
One option is just to use the car’s battery! If you aren’t parked up for that long (say, no more than overnight) and you select wisely you can get away with this. I know, because I have for multiple years. So long as you’re starting the car the next morning and moving onto the next camp site you’ll probably find this route will absolutely work for you.
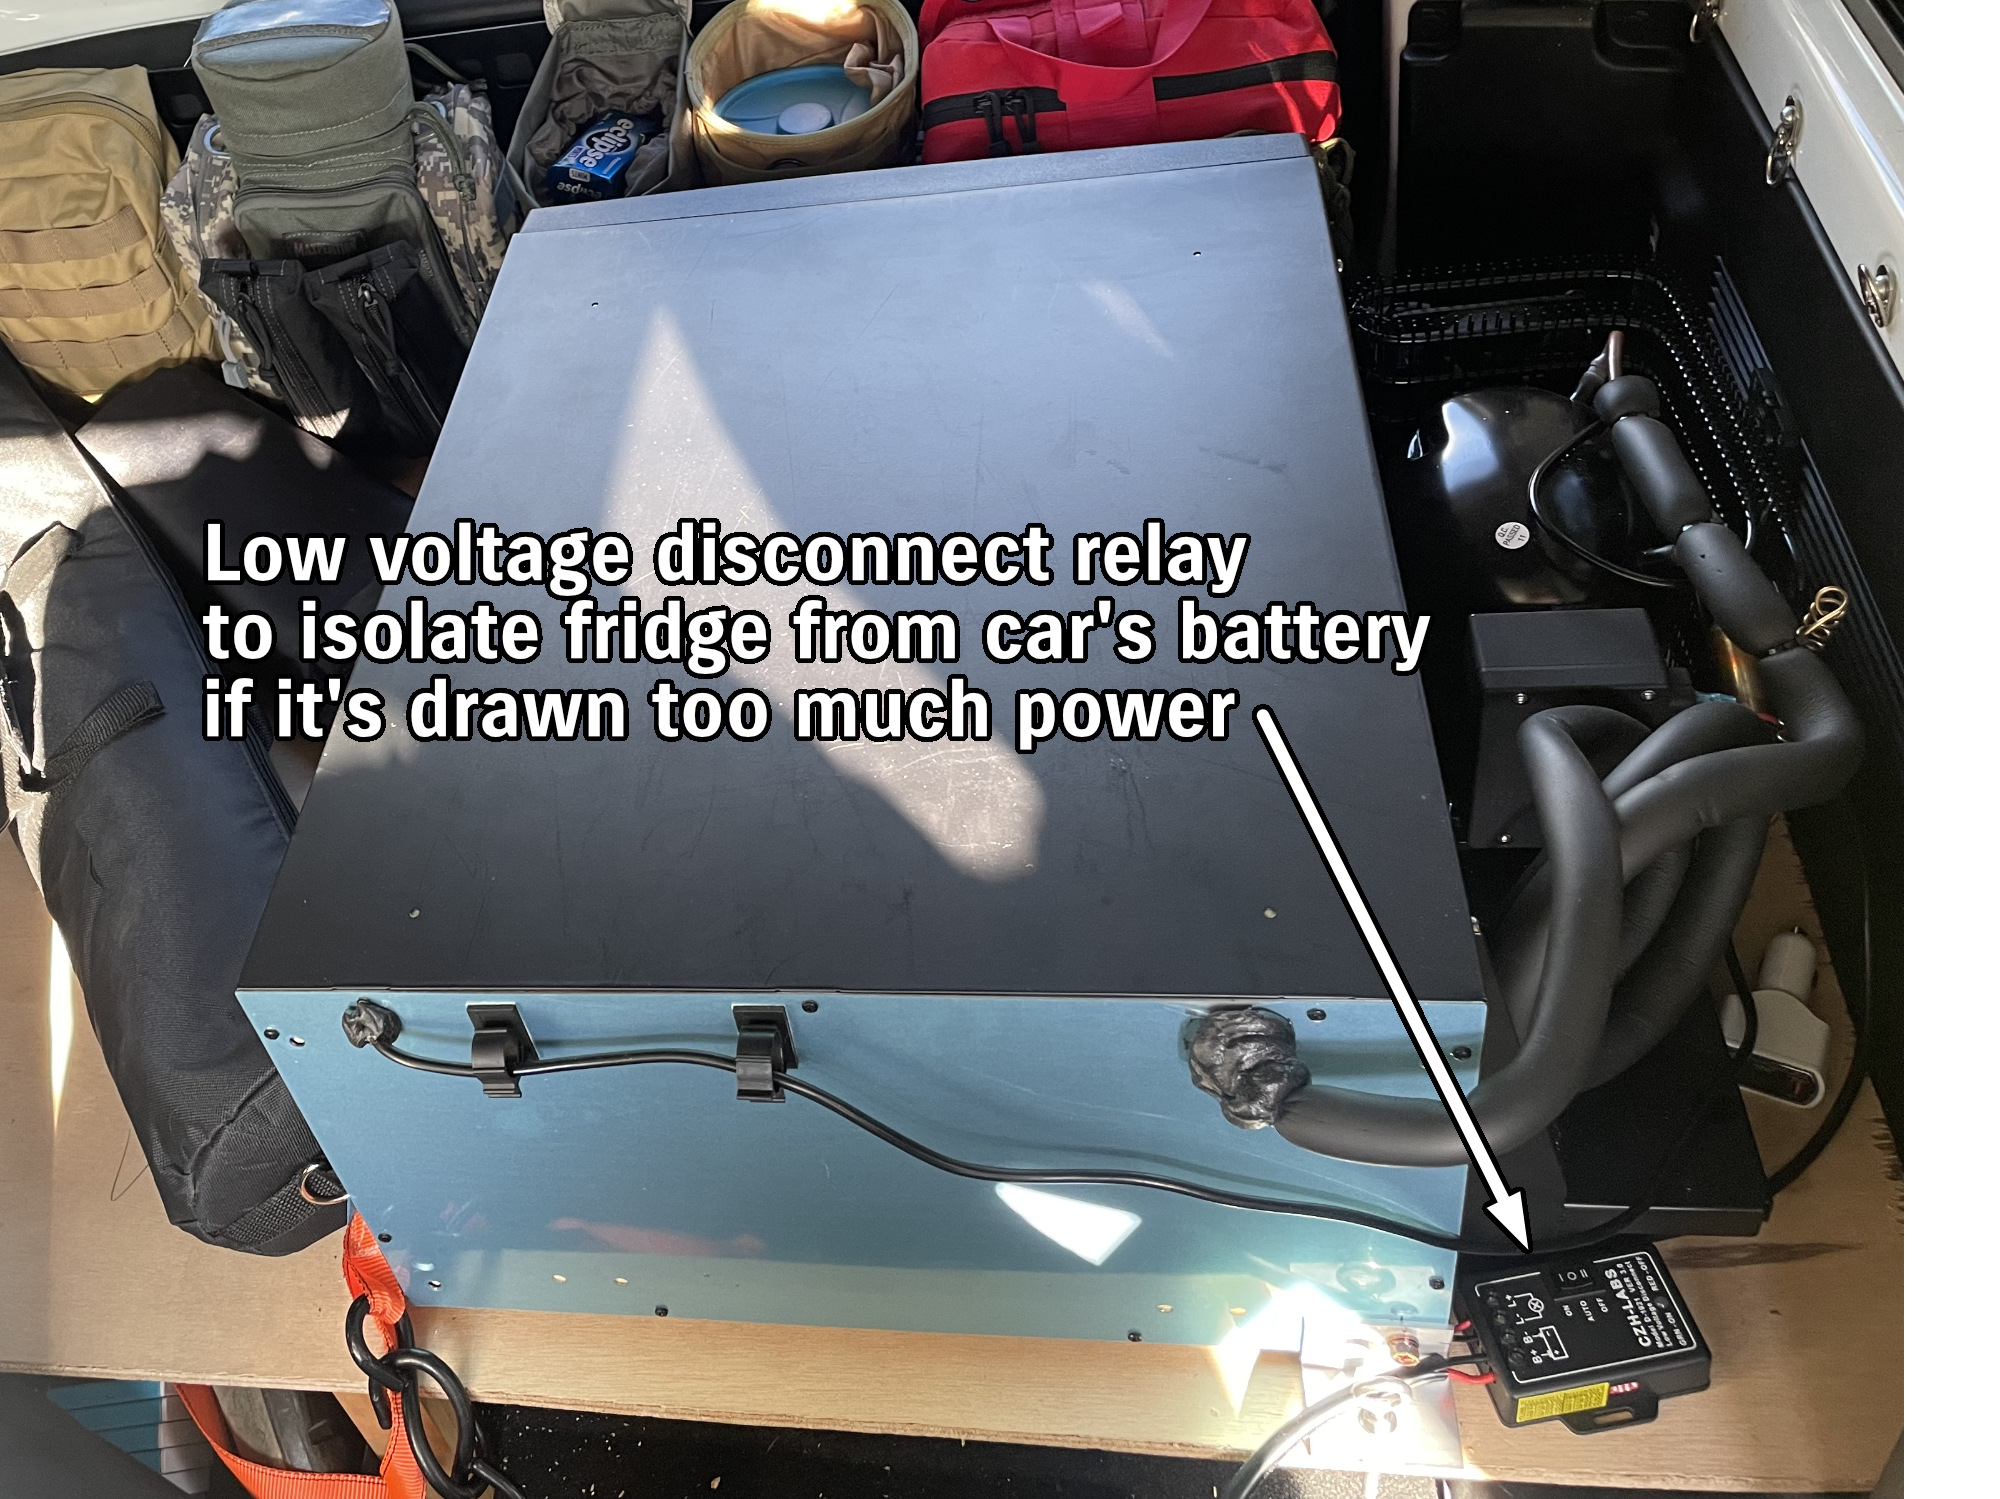
It’s easier if you don’t want to use a fridge, but even if you do the only thing to do is to ensure that the fridge has a voltage cutoff switch or just wire it up to plug in using one. I use a max 30A low voltage cutoff unit which can be overridden and has multiple voltage settings. If you’re camping overnight and it’s relatively cold then the fridge will run very little anyway, and the fact it will cut the power to the fridge before the car’s main battery is too flat to start the car means you’ll still be fine.
This is also a good route if you upgrade the main battery to a larger one and/or one that can support deeper discharges. The stock Jimny battery is a relatively low capacity lead acid battery (36Ah, so at most 18Ah usable capacity for camp electricity needs) not suited to deep discharges. There are routes to upgrade this to a larger battery which makes this even more viable. An example is the Legendx battery upgrade cradle, which lets you swap in a ‘DIN65’ battery, which can end up giving you closer to 75Ah total capacity (so 35+Ah usable capacity for camping). (This isn’t necessarily an endorsement for that battery cradle, and I’m exploring other options that might be more affordable, too).
The DIY battery box route
This can be as simple or as complicated as you make it, and I’ve written this around making a battery box you can easily remove from the car. In principle, you need:
- A battery
- A box it can fit in
- A way of charging it
Battery is sort of easy: pick the chemistry you can afford and that gives you the capacity you need, and you can start there. This is easiest if you stick to ‘normal’ battery shapes i.e. nothing slimline, just a standard rectangular cubic thingo is going to be easier for generic battery boxes, although slimline boxes exist too.
Battery box is where you get into some interesting options, and you sort of have to shop for this at the same time as you look for a battery. There are a multitude of options where you bring your own battery but they include all the charge controllers and things; I think that’s actually less ideal if you want to cut costs. What you really need is just a plain battery box, and then add whatever little accessories to it that you think you need.
How you charge it gets a little tricky, but it’s not impossible. If you want to charge it from the car and you’re limited only to the rear auxiliary power socket in the Jimny then you’re limited to < 10 A total for charging. (The wiring to this socket is piddly, and it isn’t quite as simple as just running bigger wiring to make it charge better, especially if you want it on permanently). Ideally you would put in a set of thicker wiring and a relay triggered off this rear socket; this will mean the battery box you install will charge only when the car is on but also can pull down more than 10 A.
Shopping list
Battery box e.g.
Battery say
Commercial all-in-one batteries
Integrated electrical system inside the car
Underbonnet second battery
Camping electrical mostly in a caravan