
Optimal gear-change points: how torque and gearing interact
So, we all know an engine produces power and torque. Although the power is how quickly an engine releases energy, torque is what accelerates a vehicle. The other aspect is that torque is multiplied through the gears of the vehicle. What I want to look at is how the torque is multiplied and the implications for when you might want to change gears on a motorbike.
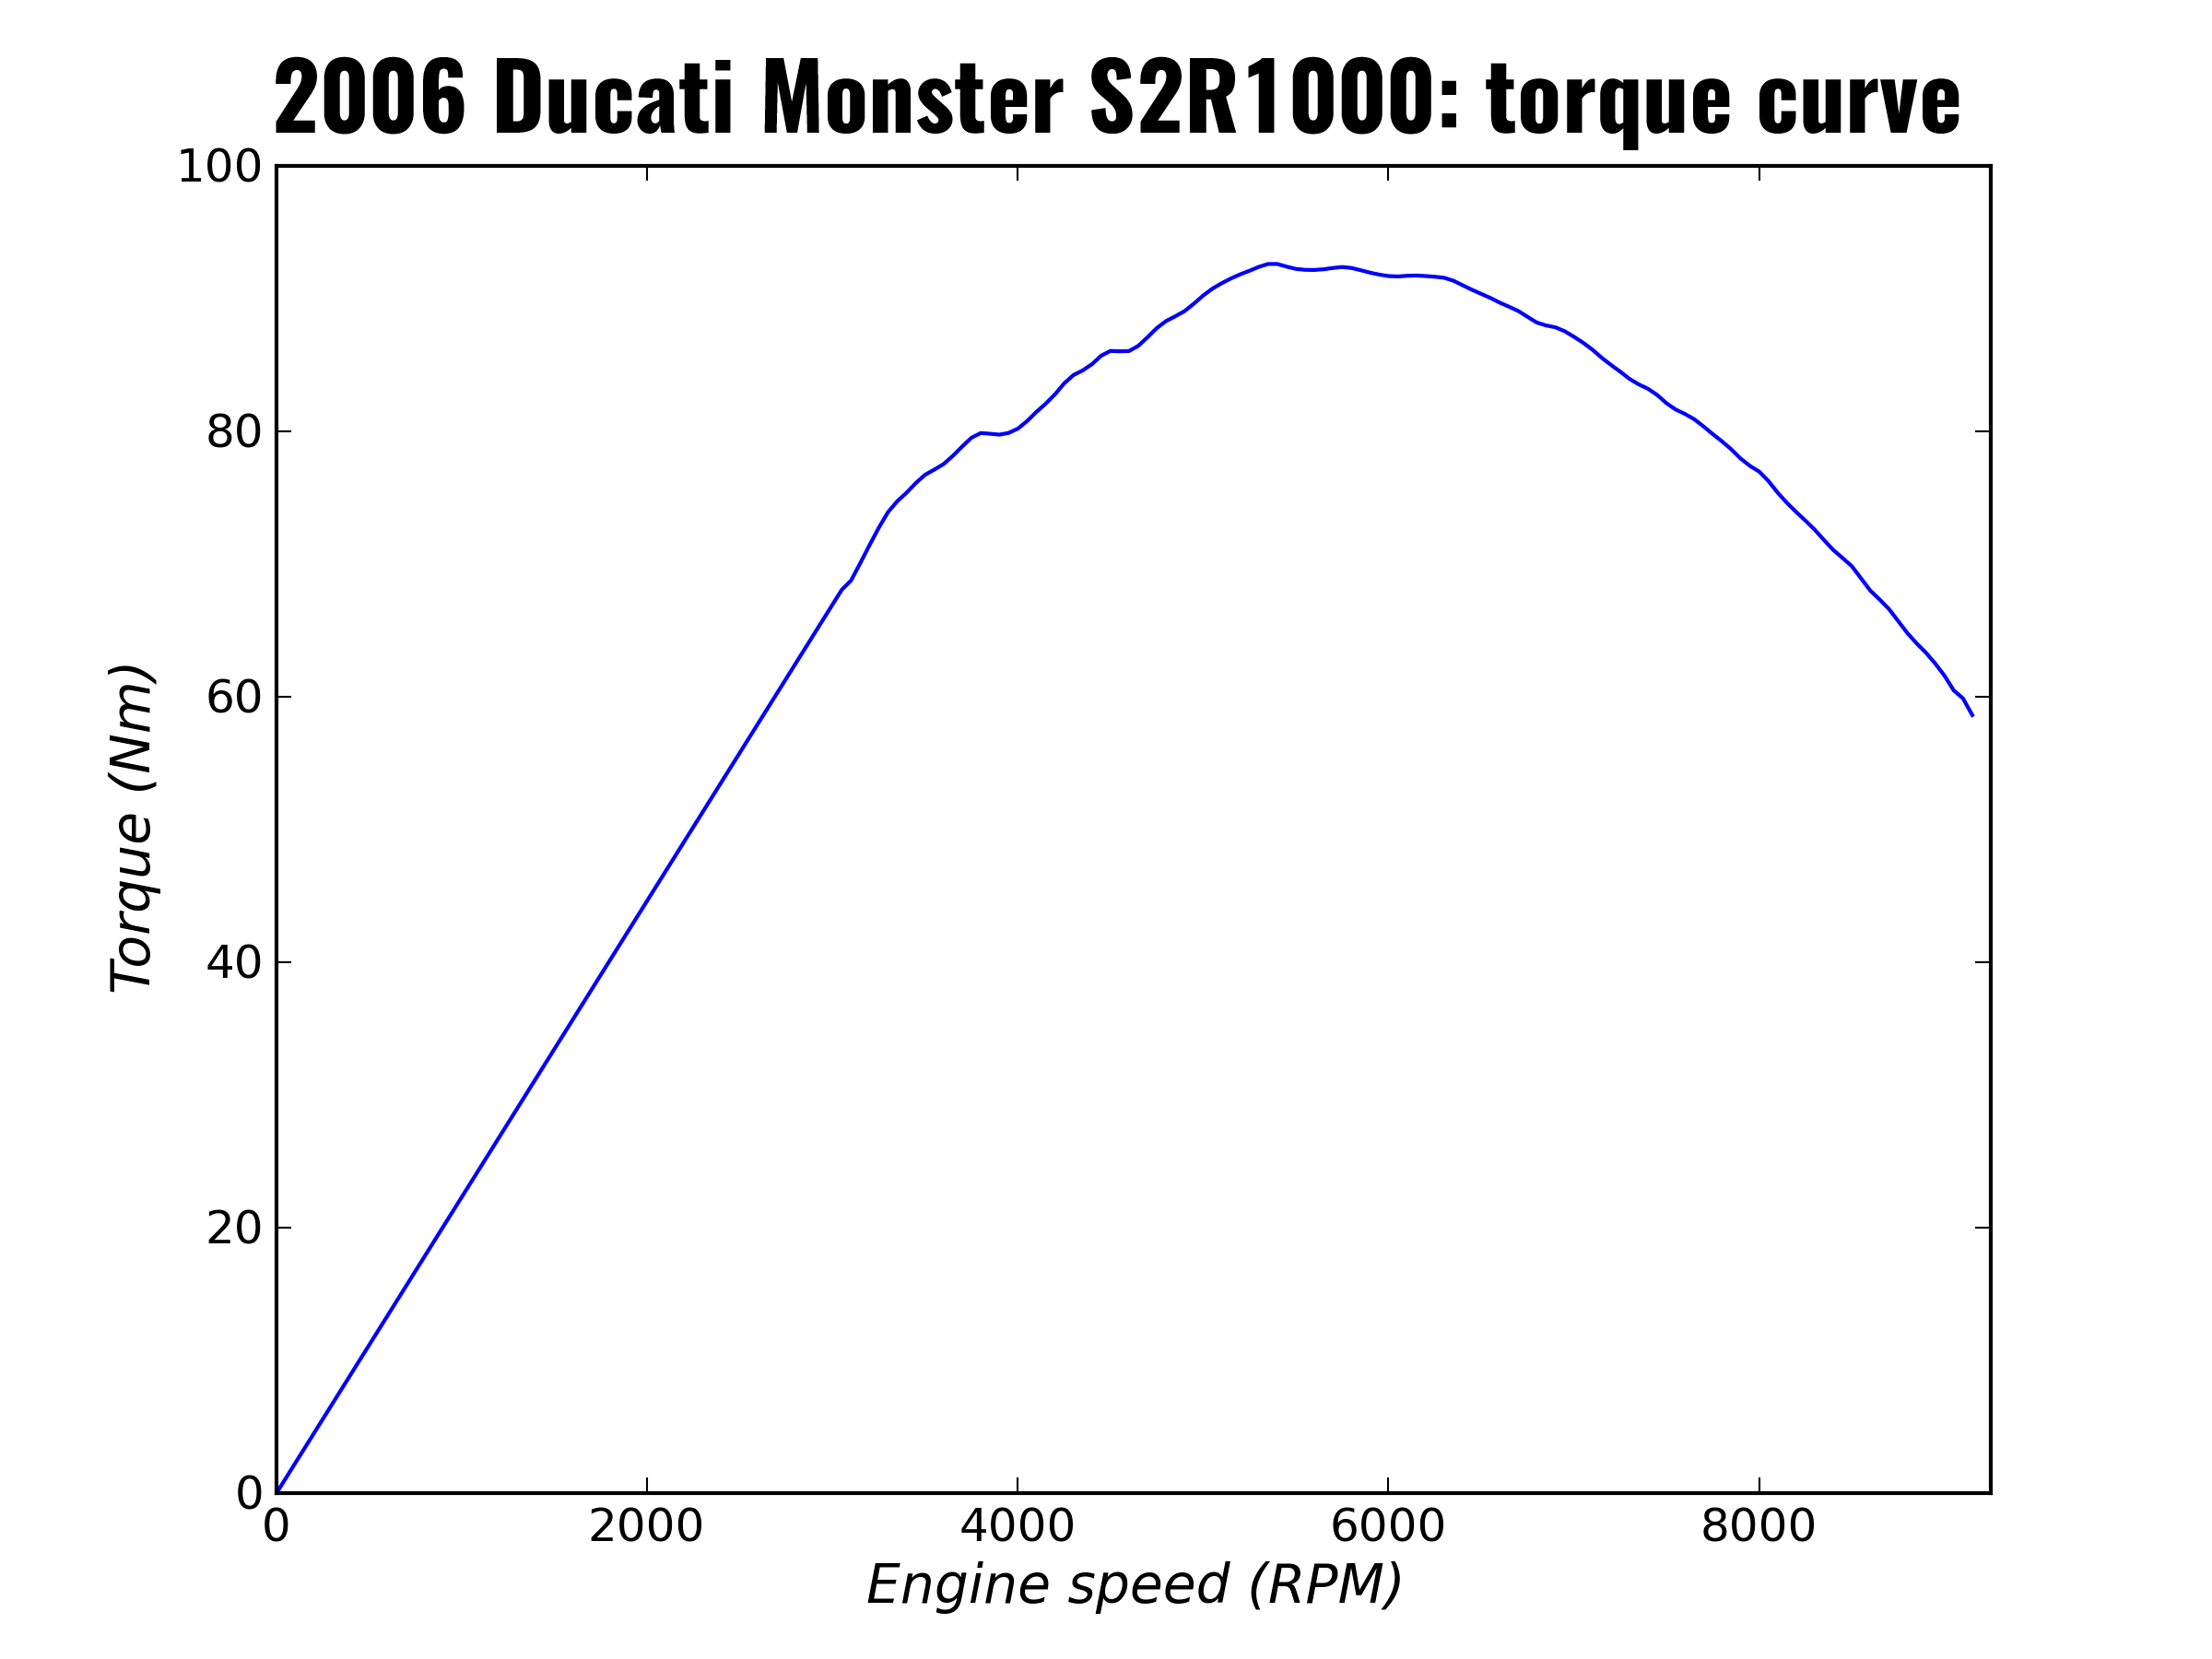
For this article, I’ll illustrate all of the concepts using the measured torque curve for my 2006 Ducati Monster. It’s nothing special, but this is the torque curve after it was remapped at Moto Garage in 2010 to match the full exhaust system, cut airbox and general awesomeness of the motor.
[visualizer id=”703″]Just in case that graph doesn’t work, here’s the same graph as an image generated by the code I wrote to do this article:
Note here I’m using SI units for everything. Because #science, bitches.
In the case of (most) motorbikes, the overall gearing between the engine and the rear wheel (and hence the RPM to road speed relationship) is made up of multiple components. The purposes of gearing is to multiply engine torque; obviously, you accelerate harder in lower gears due to the extra torque multiplication. There is a downside to the torque multiplication: you don’t go as fast in lower gears. Let’s look at how the torque is multiplied throughout the gearing on a motorbike.
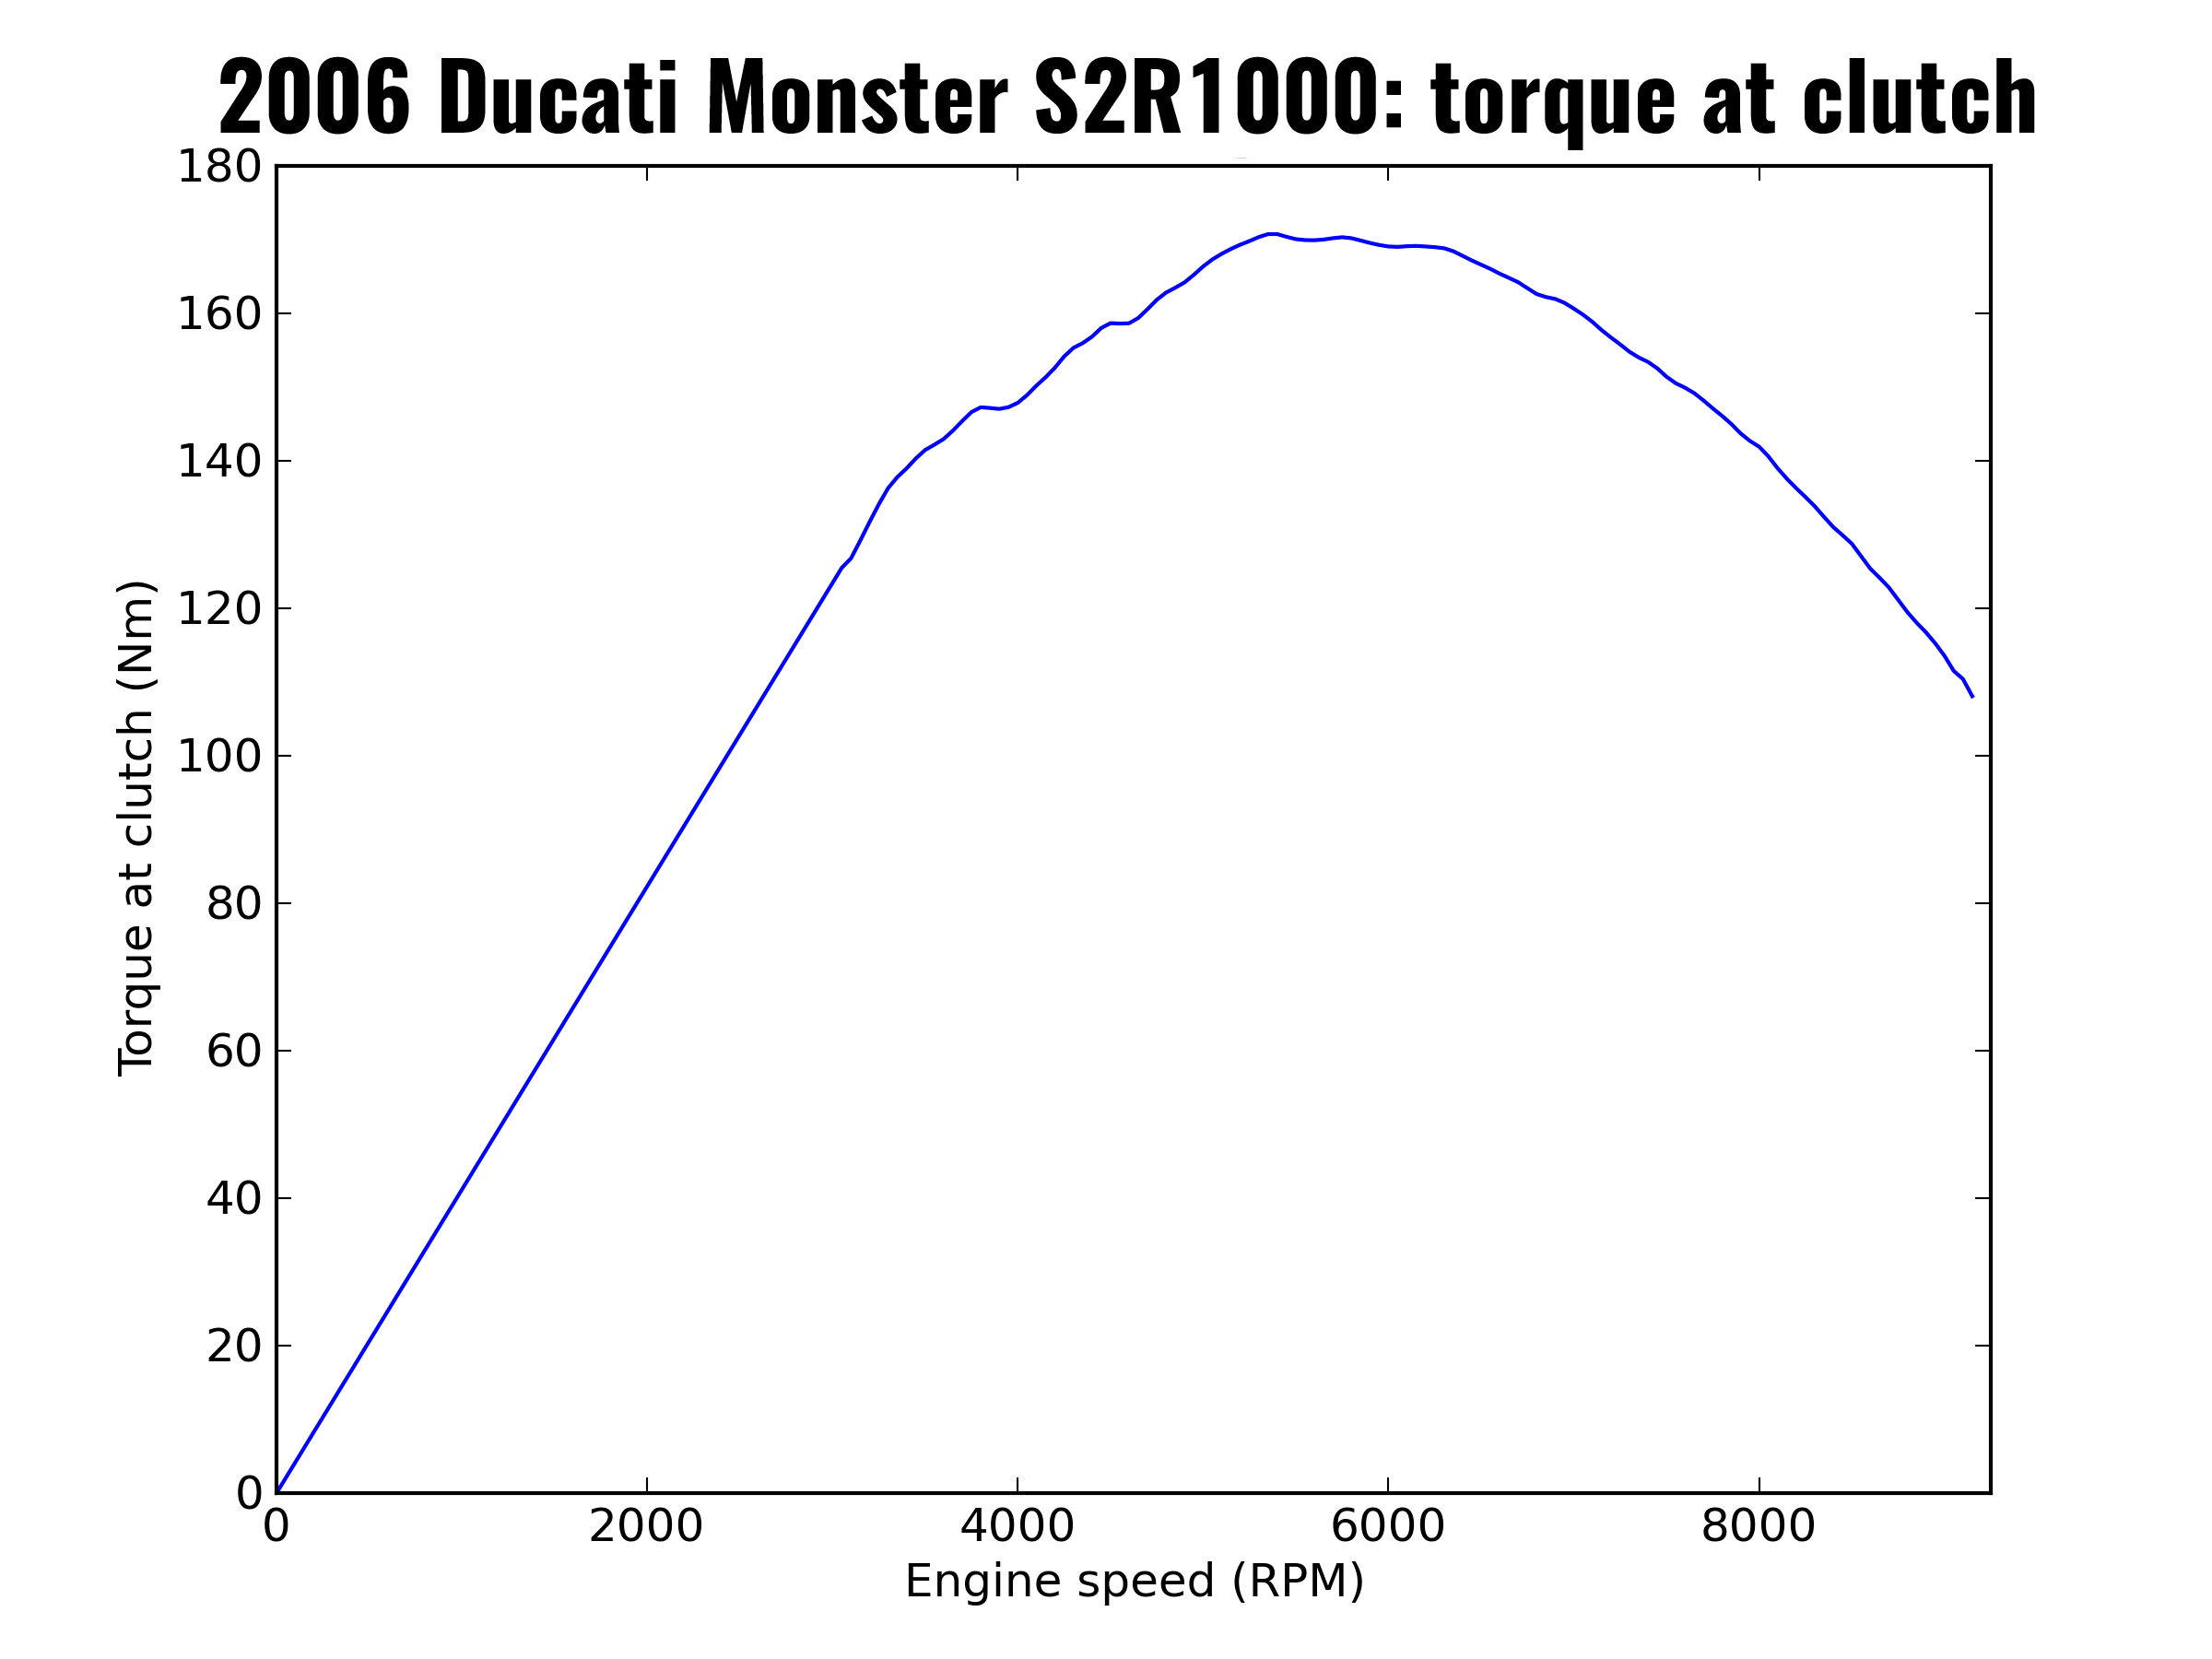
The first of these gearing components is the primary drive. This is the gearing between the output of the engine at the crankshaft, and the clutch. On the Monster, this gearing is 32 teeth on the output of the engine, and 59 teeth on the input to the clutch. This means the torque at the engine is multiplied by a factor of (59/32), or approximately 1.84 times. We are multiplying torque here as the output of the engine will spin nearly twice as fast as the input to the clutch.
We can look at the torque the clutch sees by multiplying the engine torque by the multiplication factor, which means our torque curve now looks like this:
[visualizer id=”705″]Again, if that graph doesn’t work for you, here it is as a picture from my Python code:
Now, the next stage in the overall gearing process is the gearbox. Lower gears will multiply torque more than higher gears, but they don’t let you go as fast. We can now look at what the torque will look like at the output of the gearbox. We have to split this into 6 different curves now to represent the 6 forward gears in the Monster.
[visualizer id=”707″]And as an image:
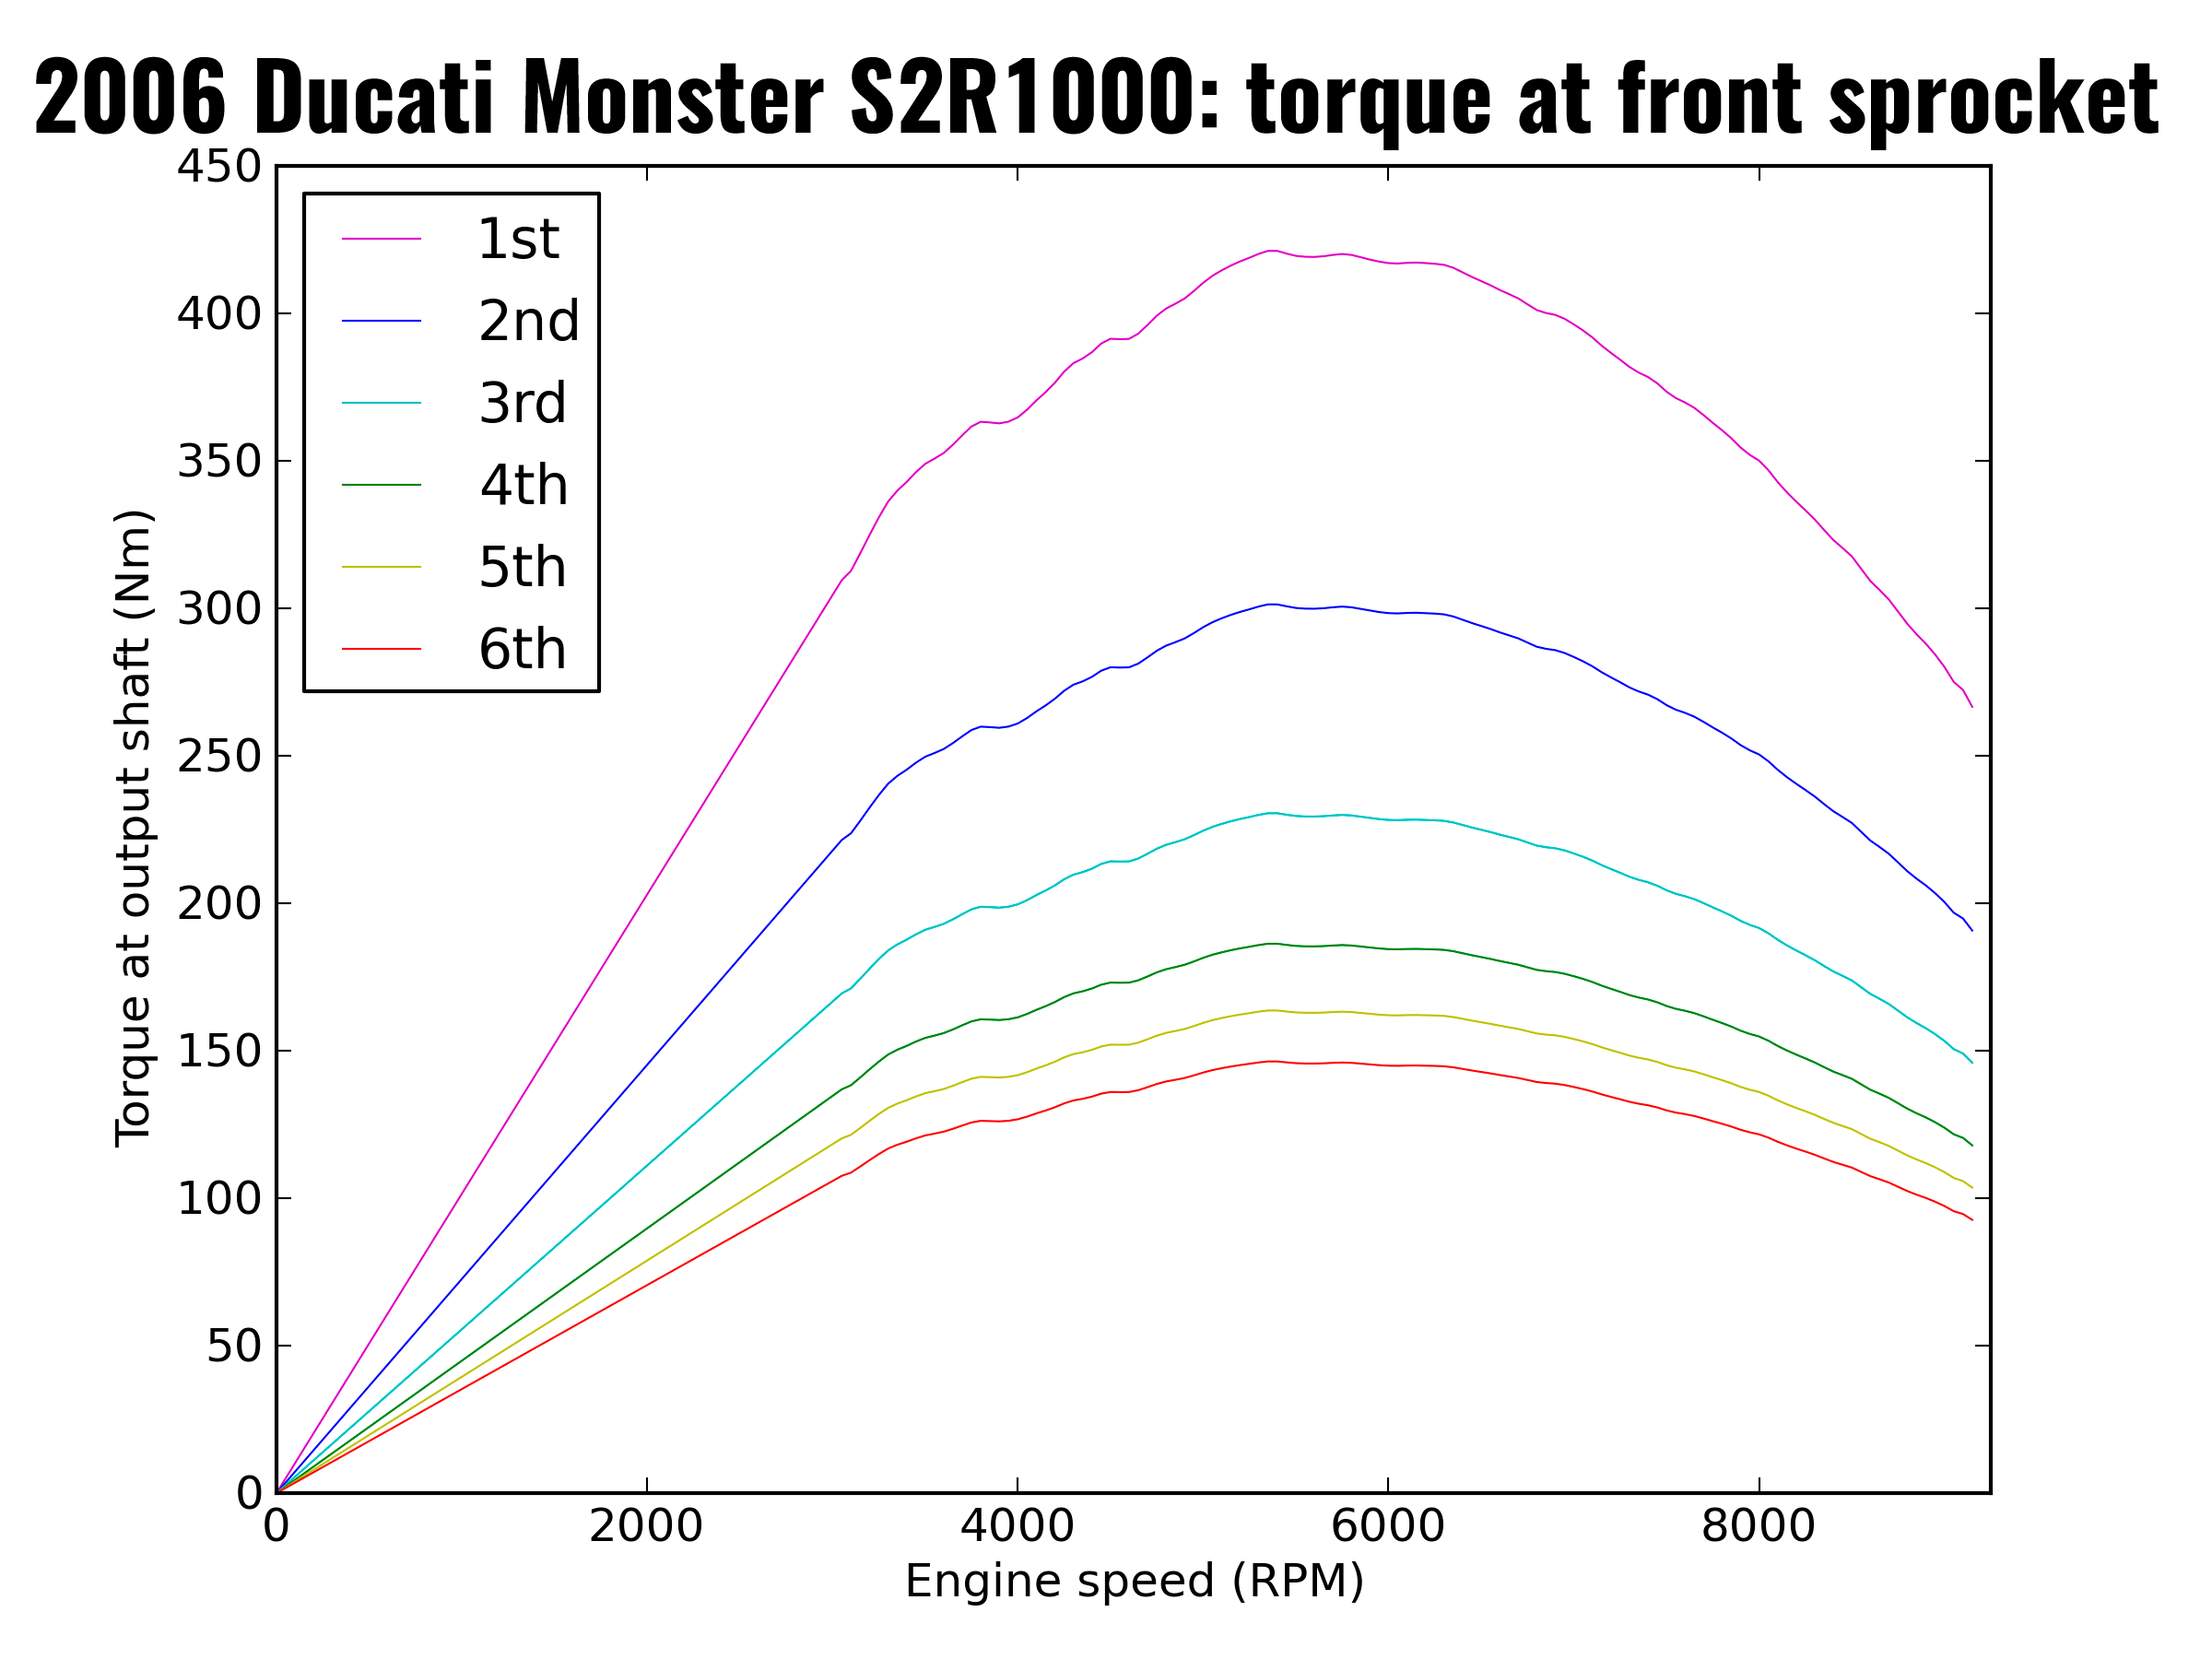
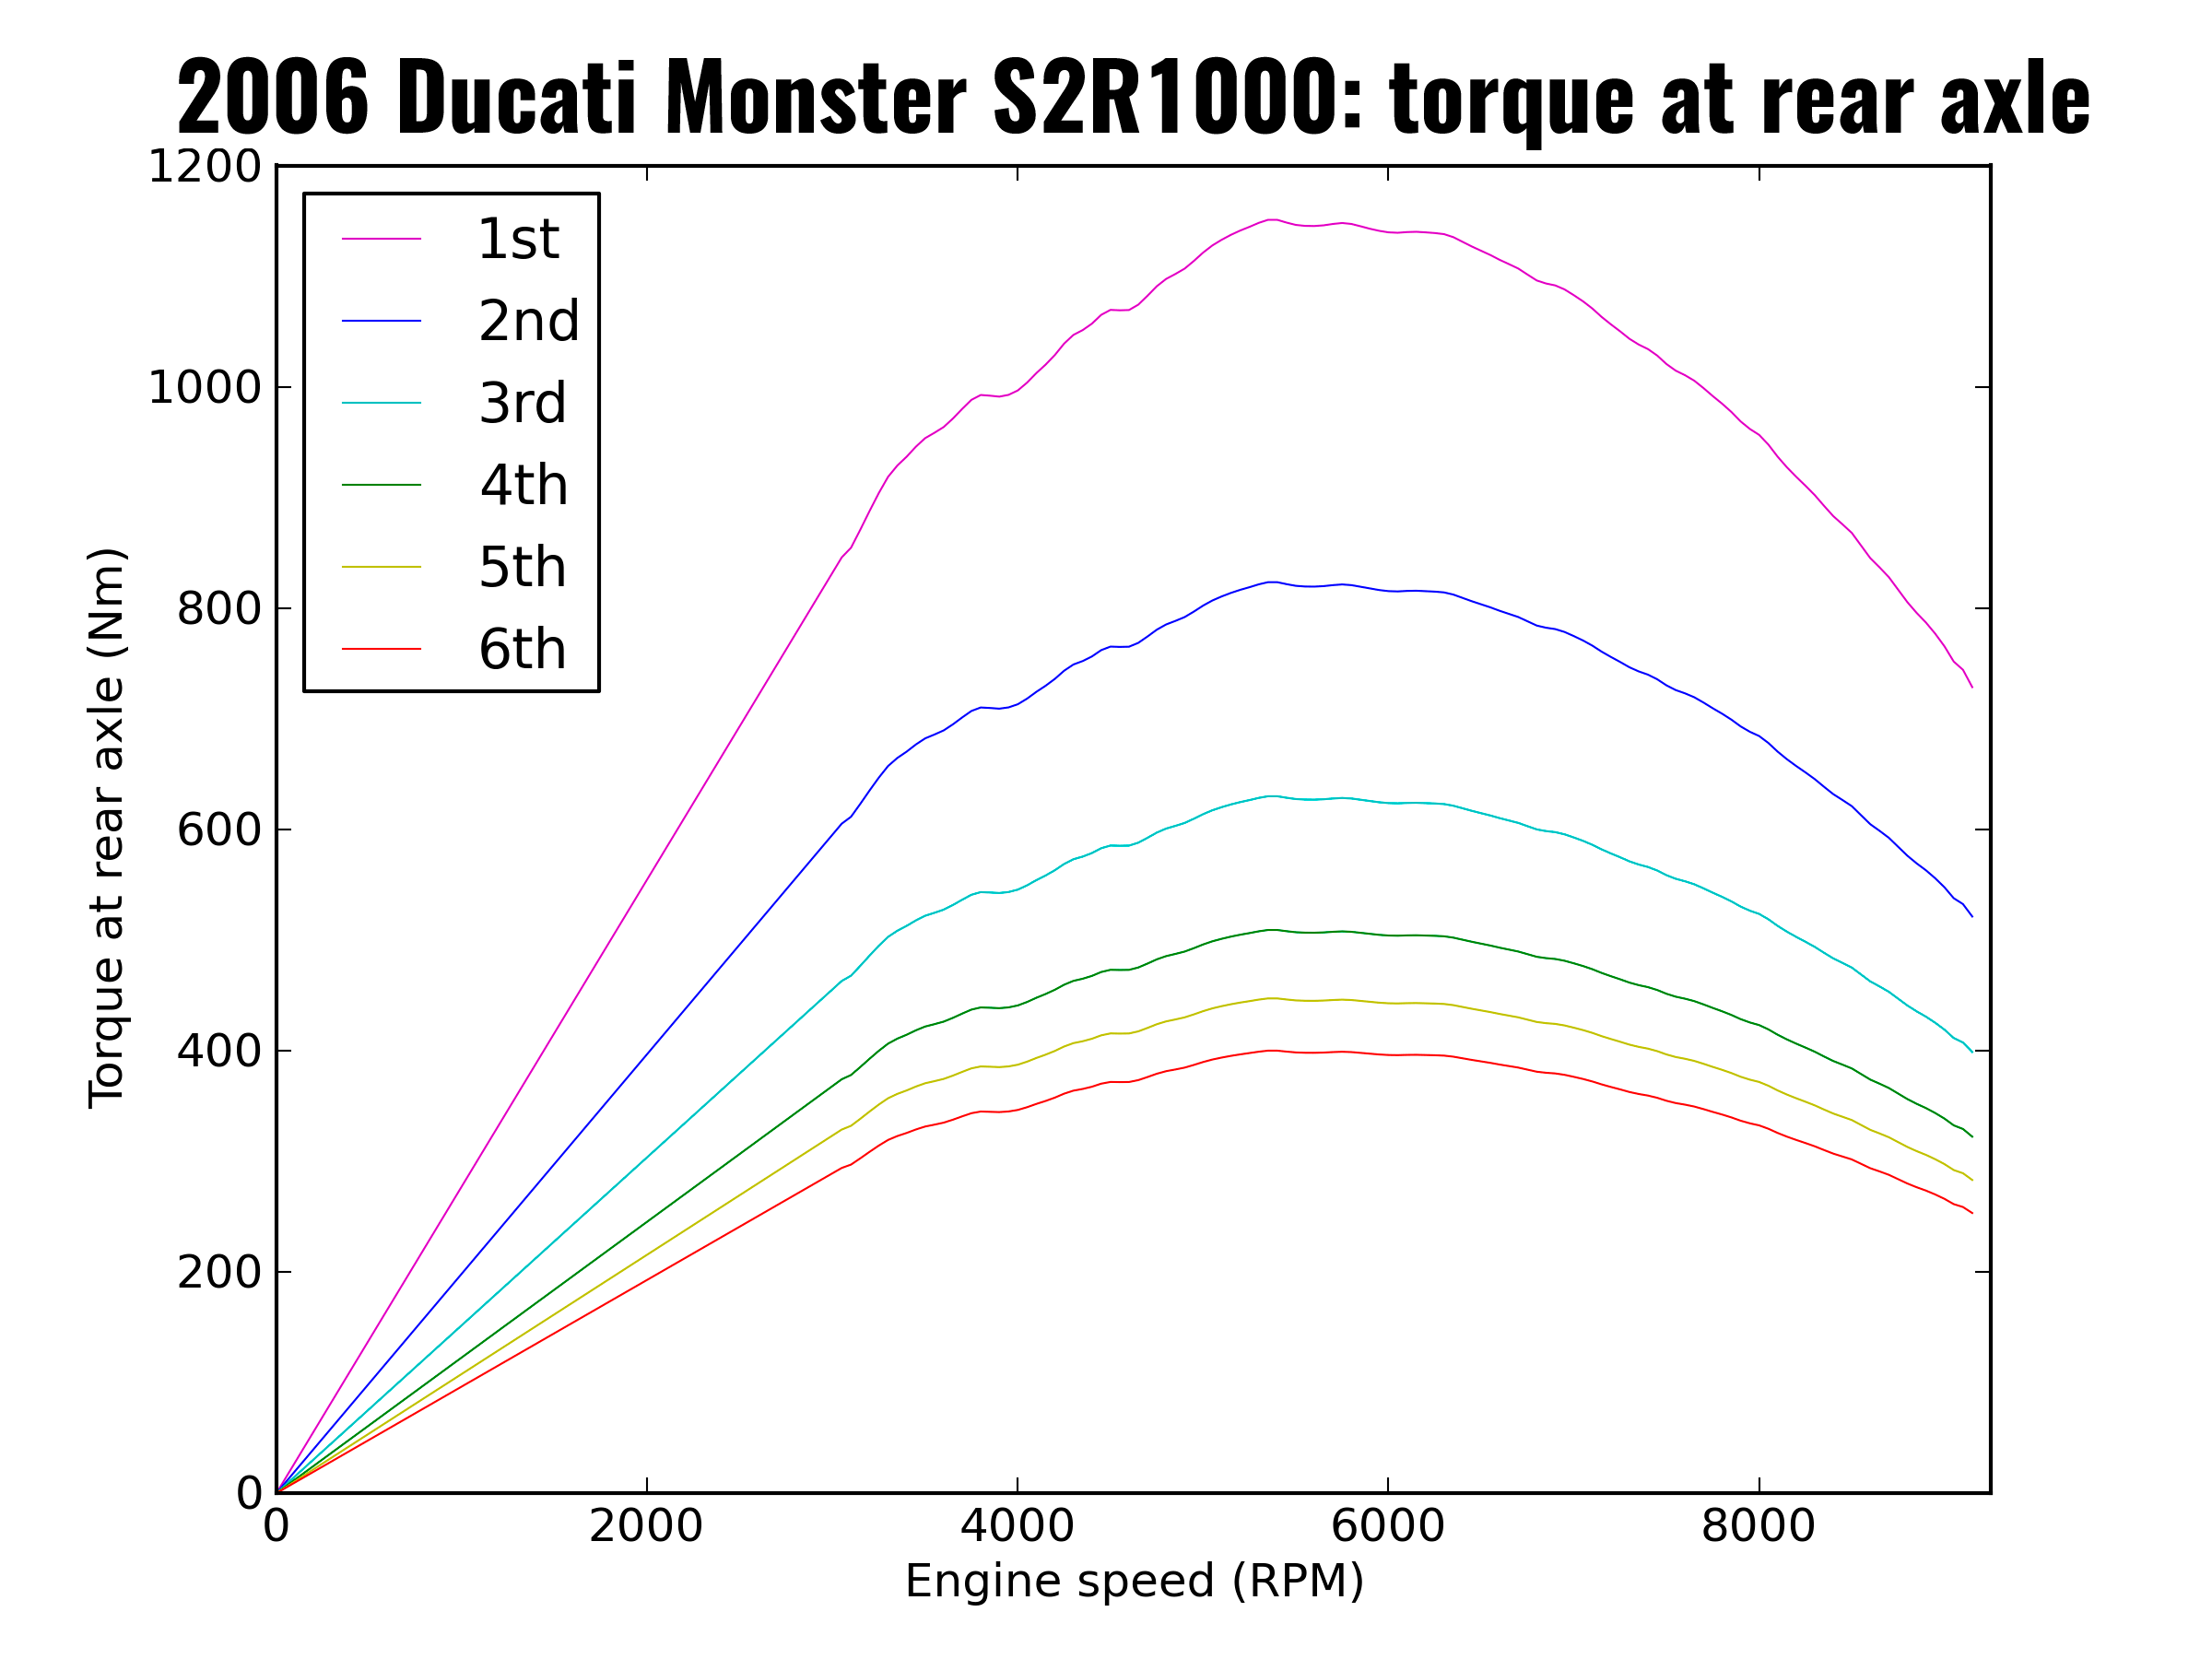
The next stage in the gearing is the torque multiplication of the ‘final drive’, which is the ratio of the rear sprocket to the front sprocket. On the Monster this is 41/15, roughly a multiplication factor of 2.7. We can again have a look at how this influences the torque which is now the torque the back wheel sees.
[visualizer id=”710″]As an image:
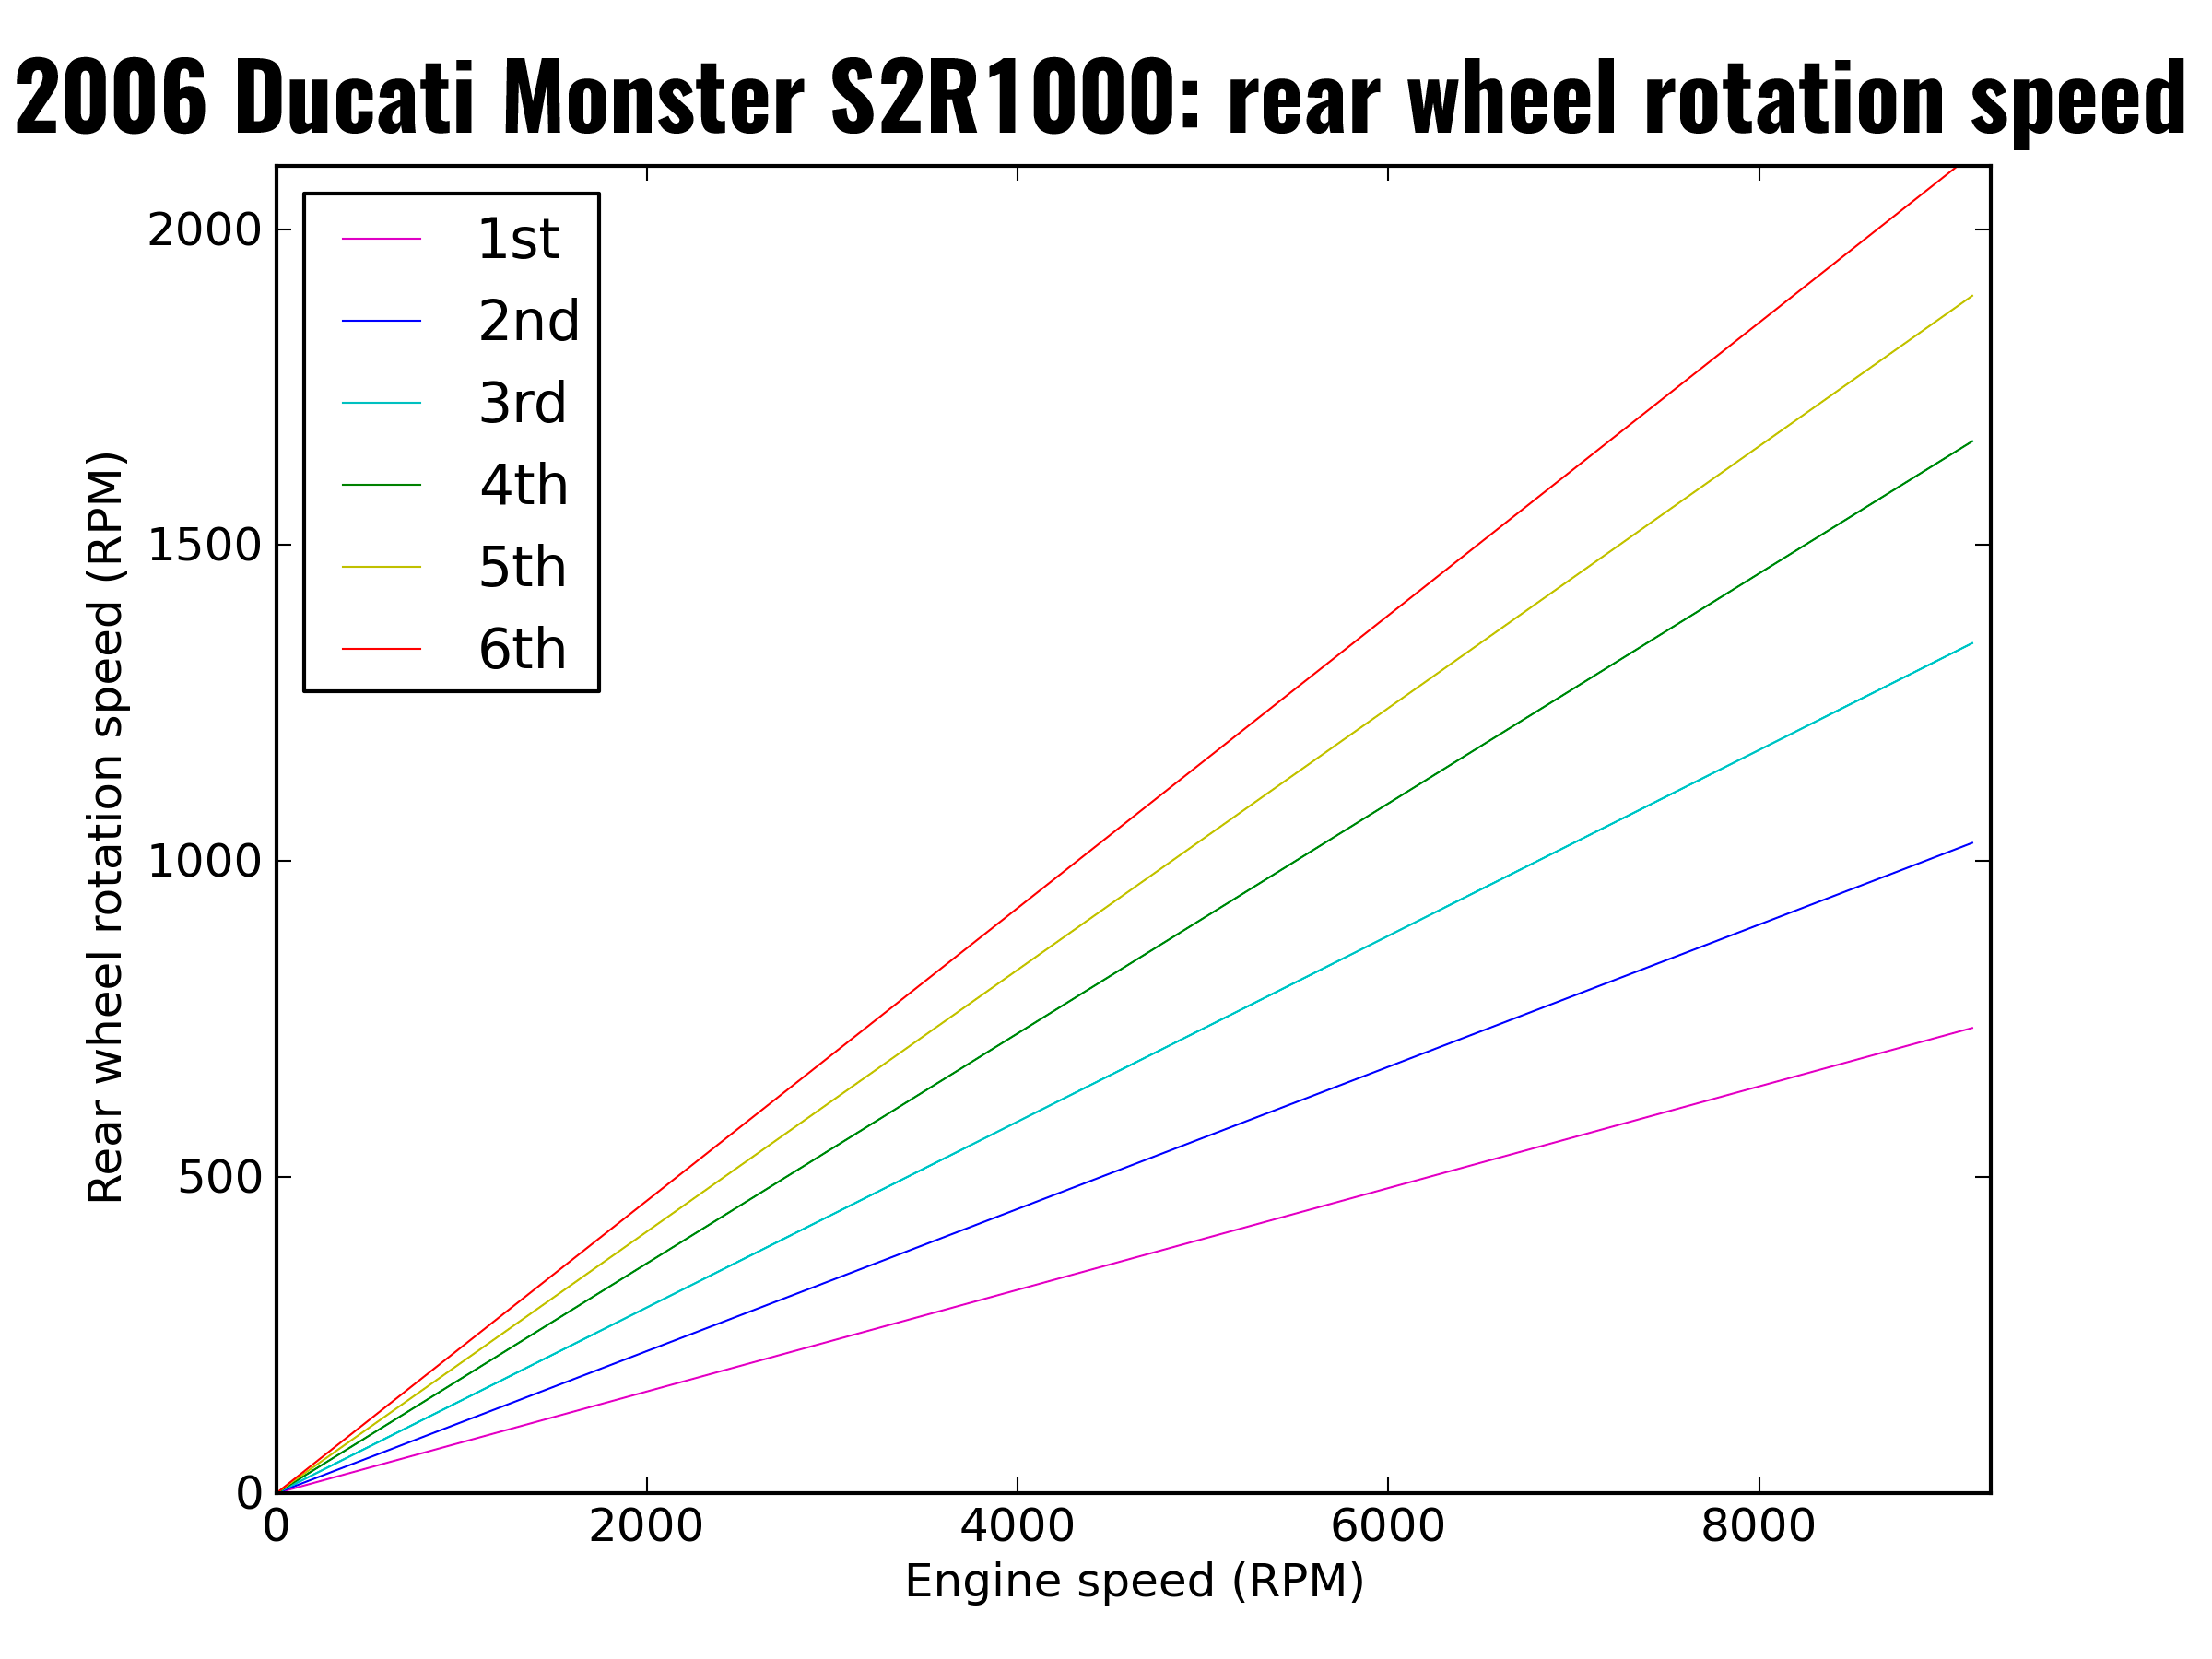
So far we have been looking at engine RPM, we now need to look at how we convert this engine RPM to road speed so we can see what torque is available for each gear at a given road speed. Our torque multiplication from our gearing works in reverse when we think of how the engine RPM relates to wheel RPM; we have been multiplying torque at the engine to get torque at the rear wheel by multiplying by the gear ratios. To get rear wheel RPM, we divide our engine RPM by the gear ratio for each gear.
[visualizer id=”711″]and as an image:
The next aspect is to look at the circumference of the rear wheel and tyre to see how rear wheel RPM translates to engine RPM. This takes a little maths but bear with me. The thing to remember is that tyres are sized according to their width (in mm), the percentage “aspect ratio” of the tyre which is the height of the sidewall of the tyre, and the wheel rim diameter (in inches).
The Monster wears 180/55-17 tyres. This means the wheel is 17″ diameter (431.8 mm), or a radius of half that (215.9 mm). We also need to take into account the height of the tyre, which is 180 * 55% mm, which works out to be 99 mm. The radius of the rear wheel and tyre is the radius of the wheel plus the height of the tyre => 215.99 + 99 mm, or 314.9 mm.
The circumference is how far the wheel will travel for one rotation. The circumference is pretty easy to work out, it is pi times twice the radius. So, for this example, it is 3.1415… * 2 * 314.9. Bit more useful if we work this out in metres, so we will do that (0.3149 m is the radius in this case).
Out of this little bit of maths, our circumference for the rear wheel and tyre is 1.9786 m.
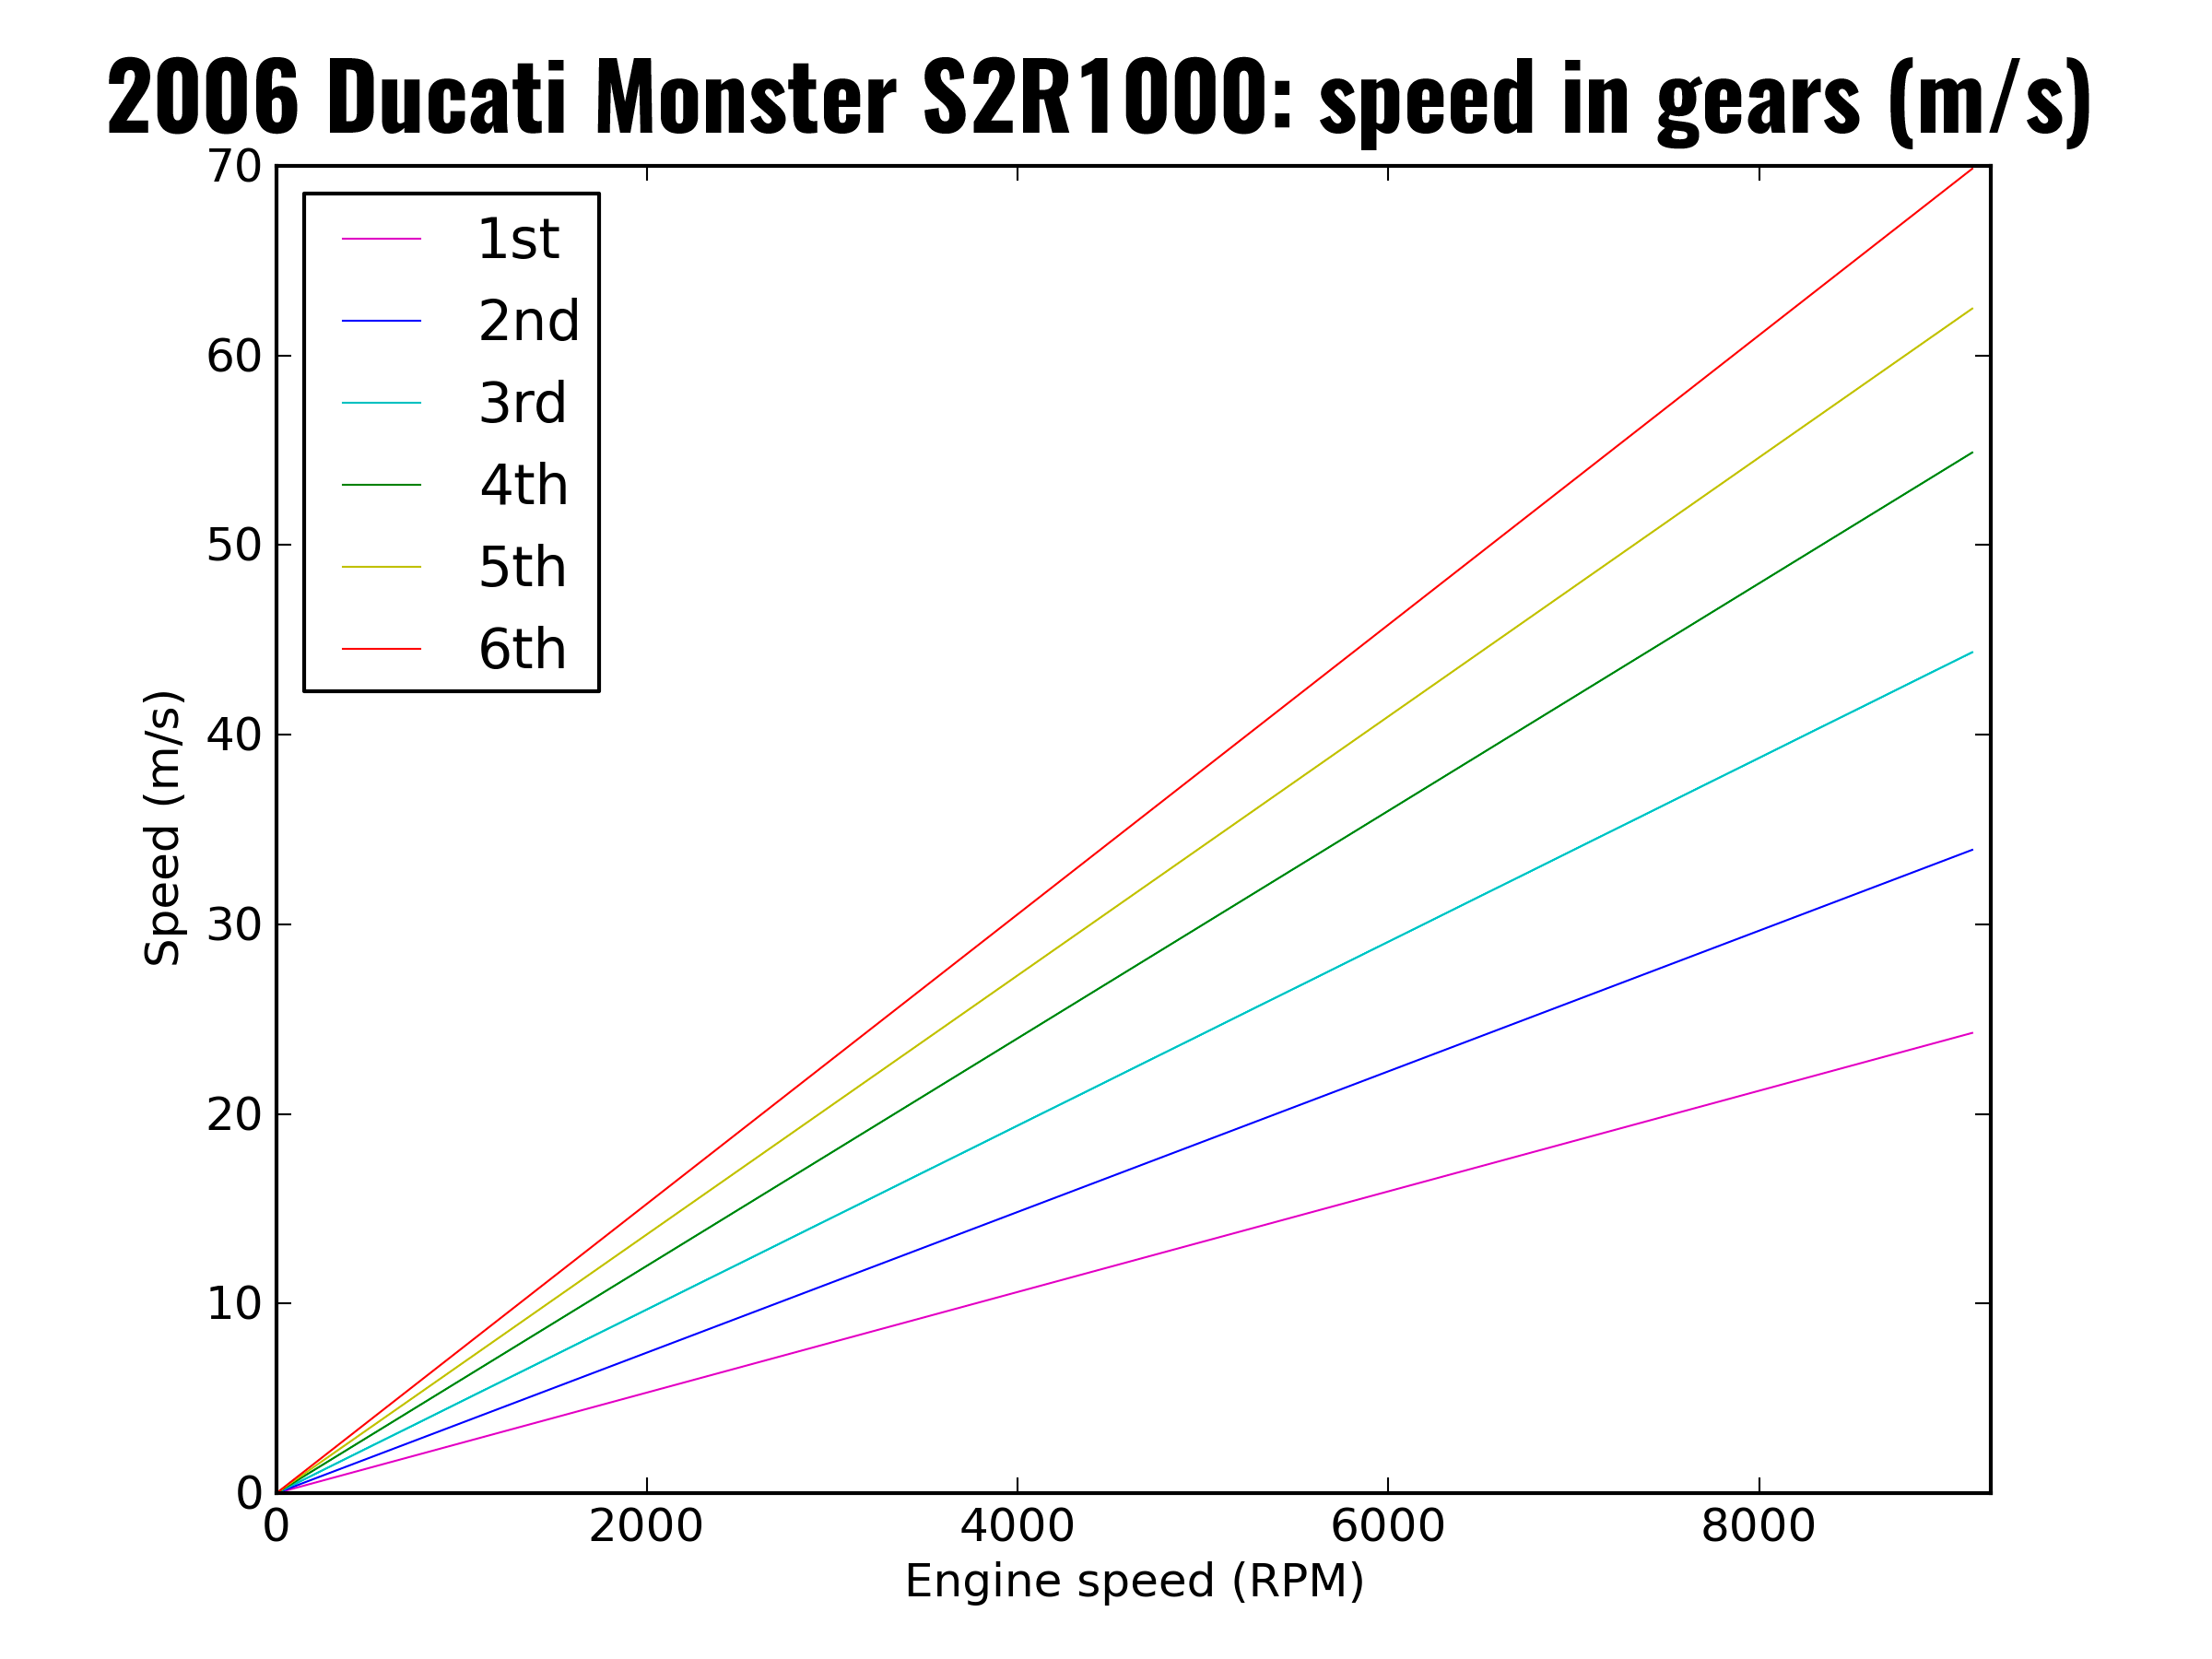
The next useful thing would be to think about what is the speed in metres per second, so we will divide our RPM by 60 to convert it to RPS. We then multiply the rear wheel revolutions per second by the wheel and tyre circumference we just worked out, giving us a speed in metres per second.
[visualizer id=”724″]as an image:
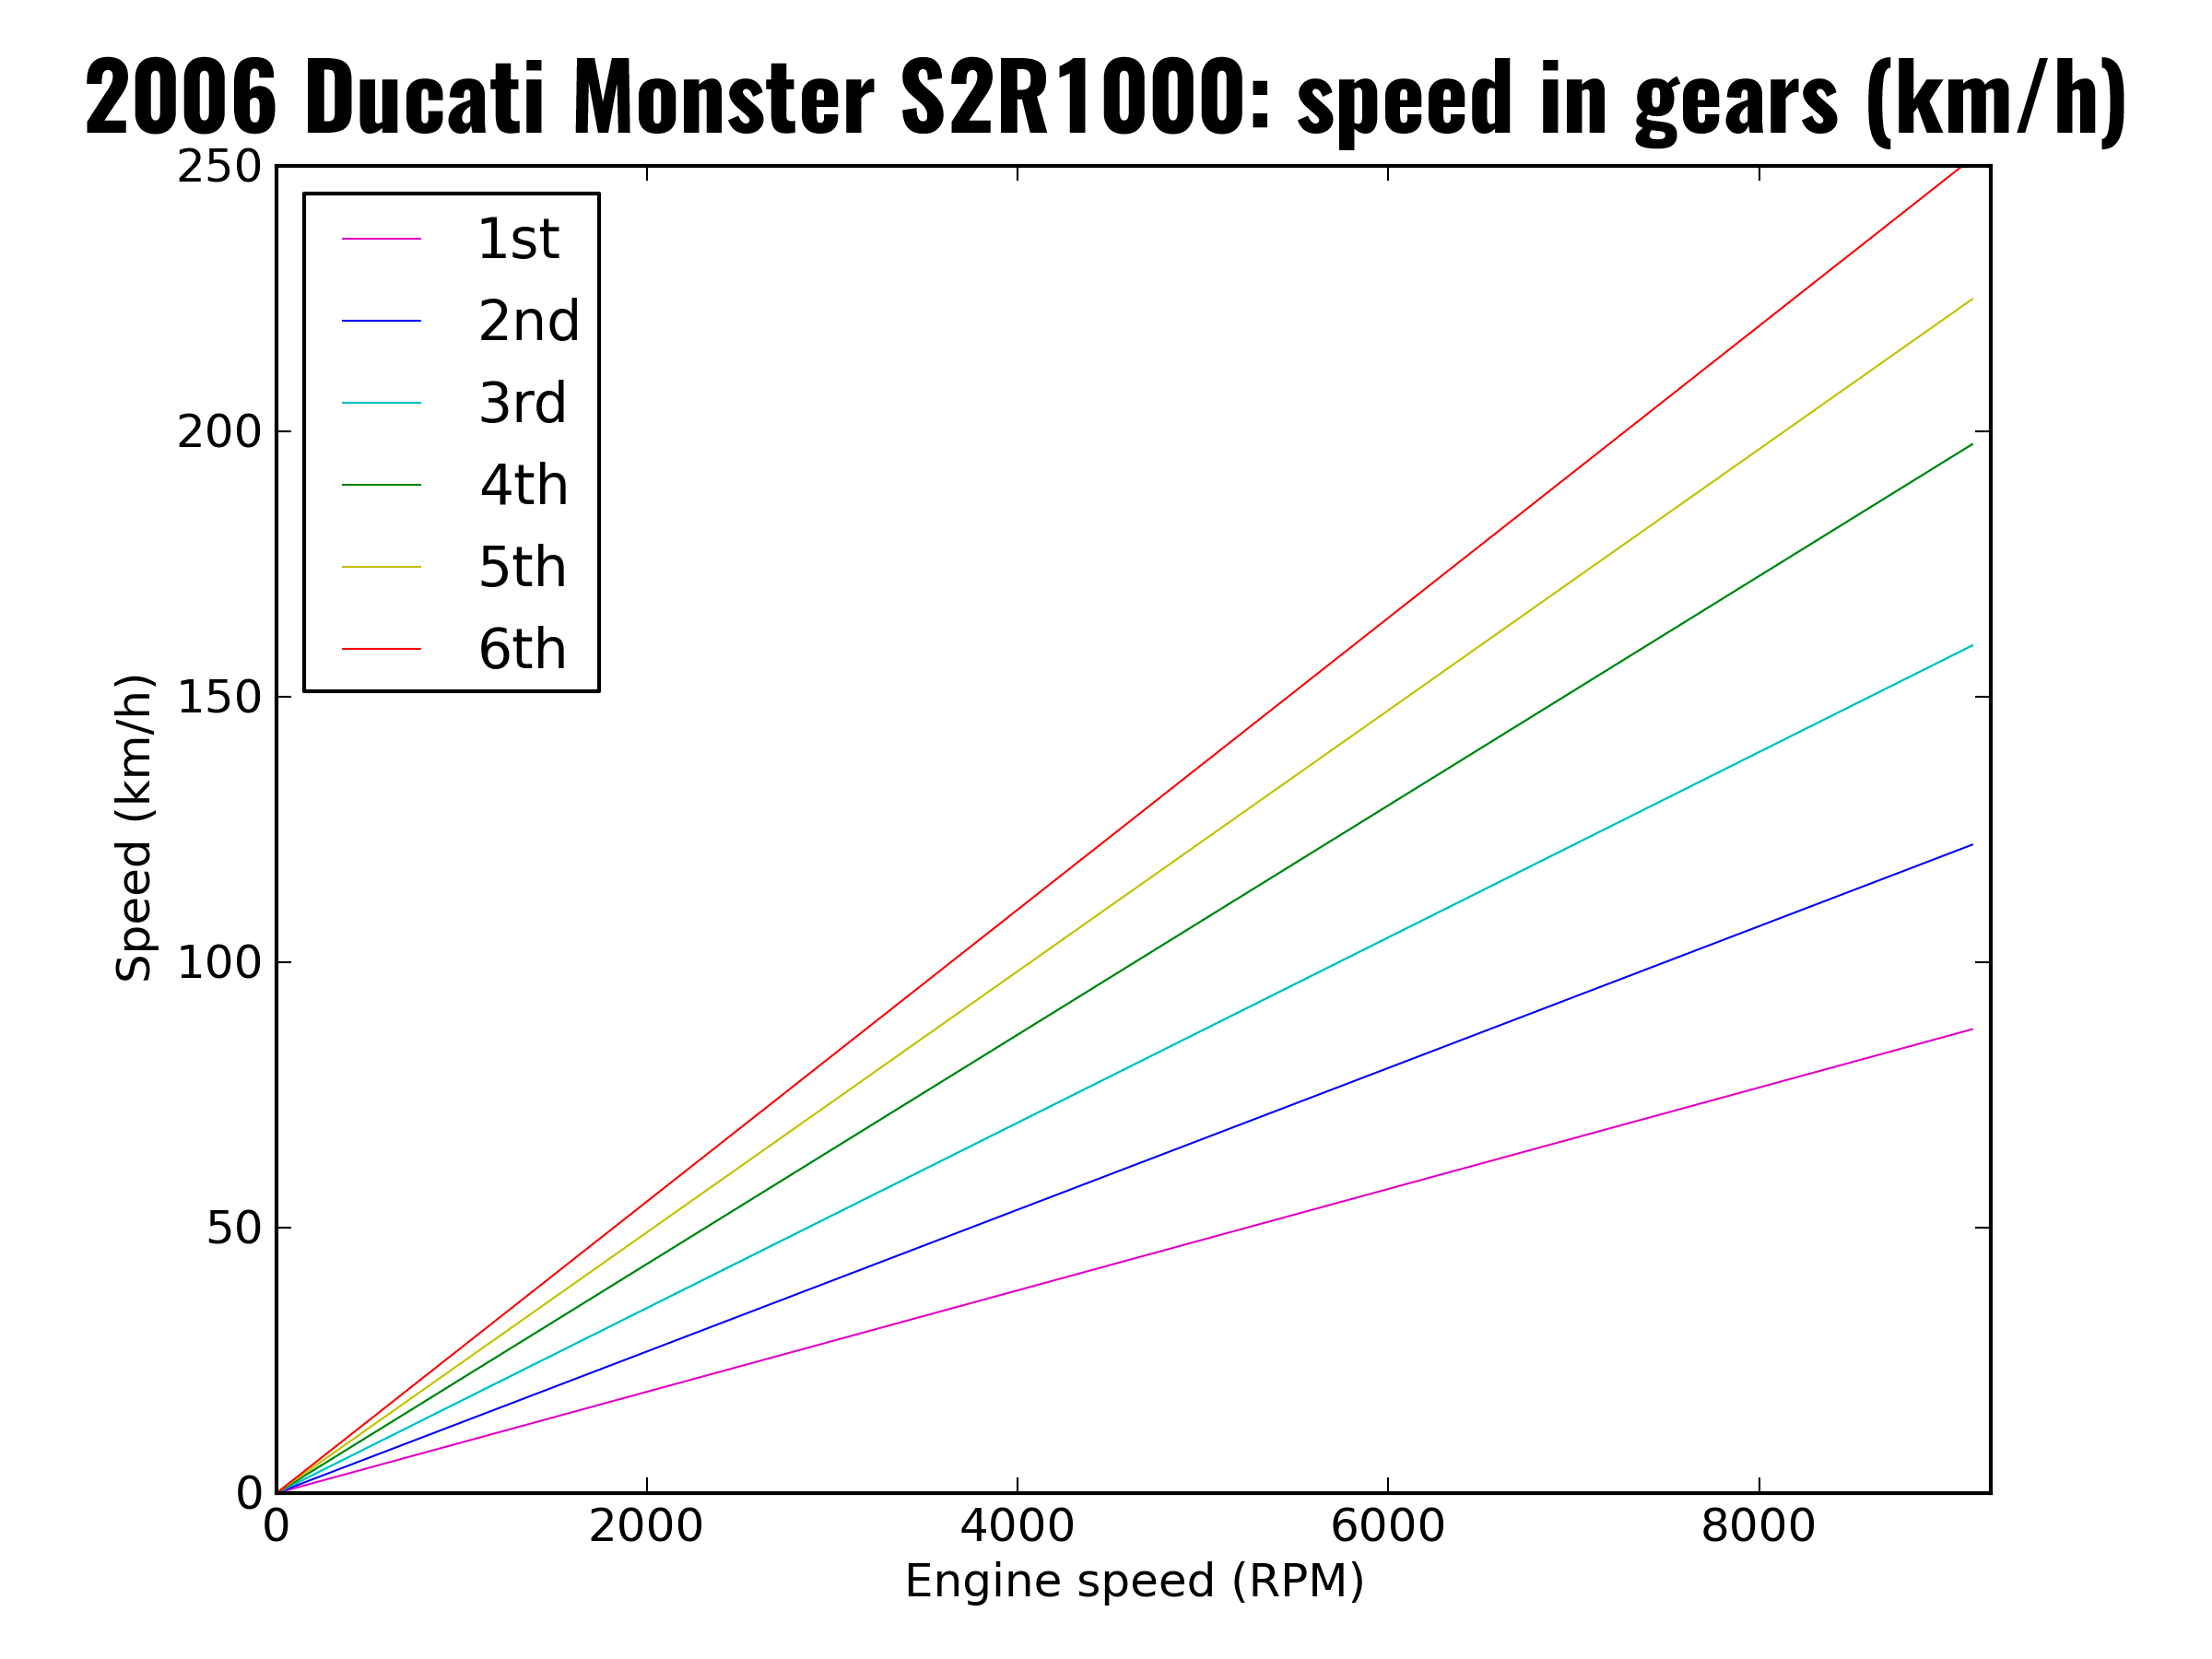
Not a difficult conversion to give this in more useful units: to convert m/s to km/h you just multiply by 3.6.
[visualizer id=”726″]as an image:
Now that’s one thing, but let’s flip the graph around so we have speed along the bottom axis.
[visualizer id=”727″]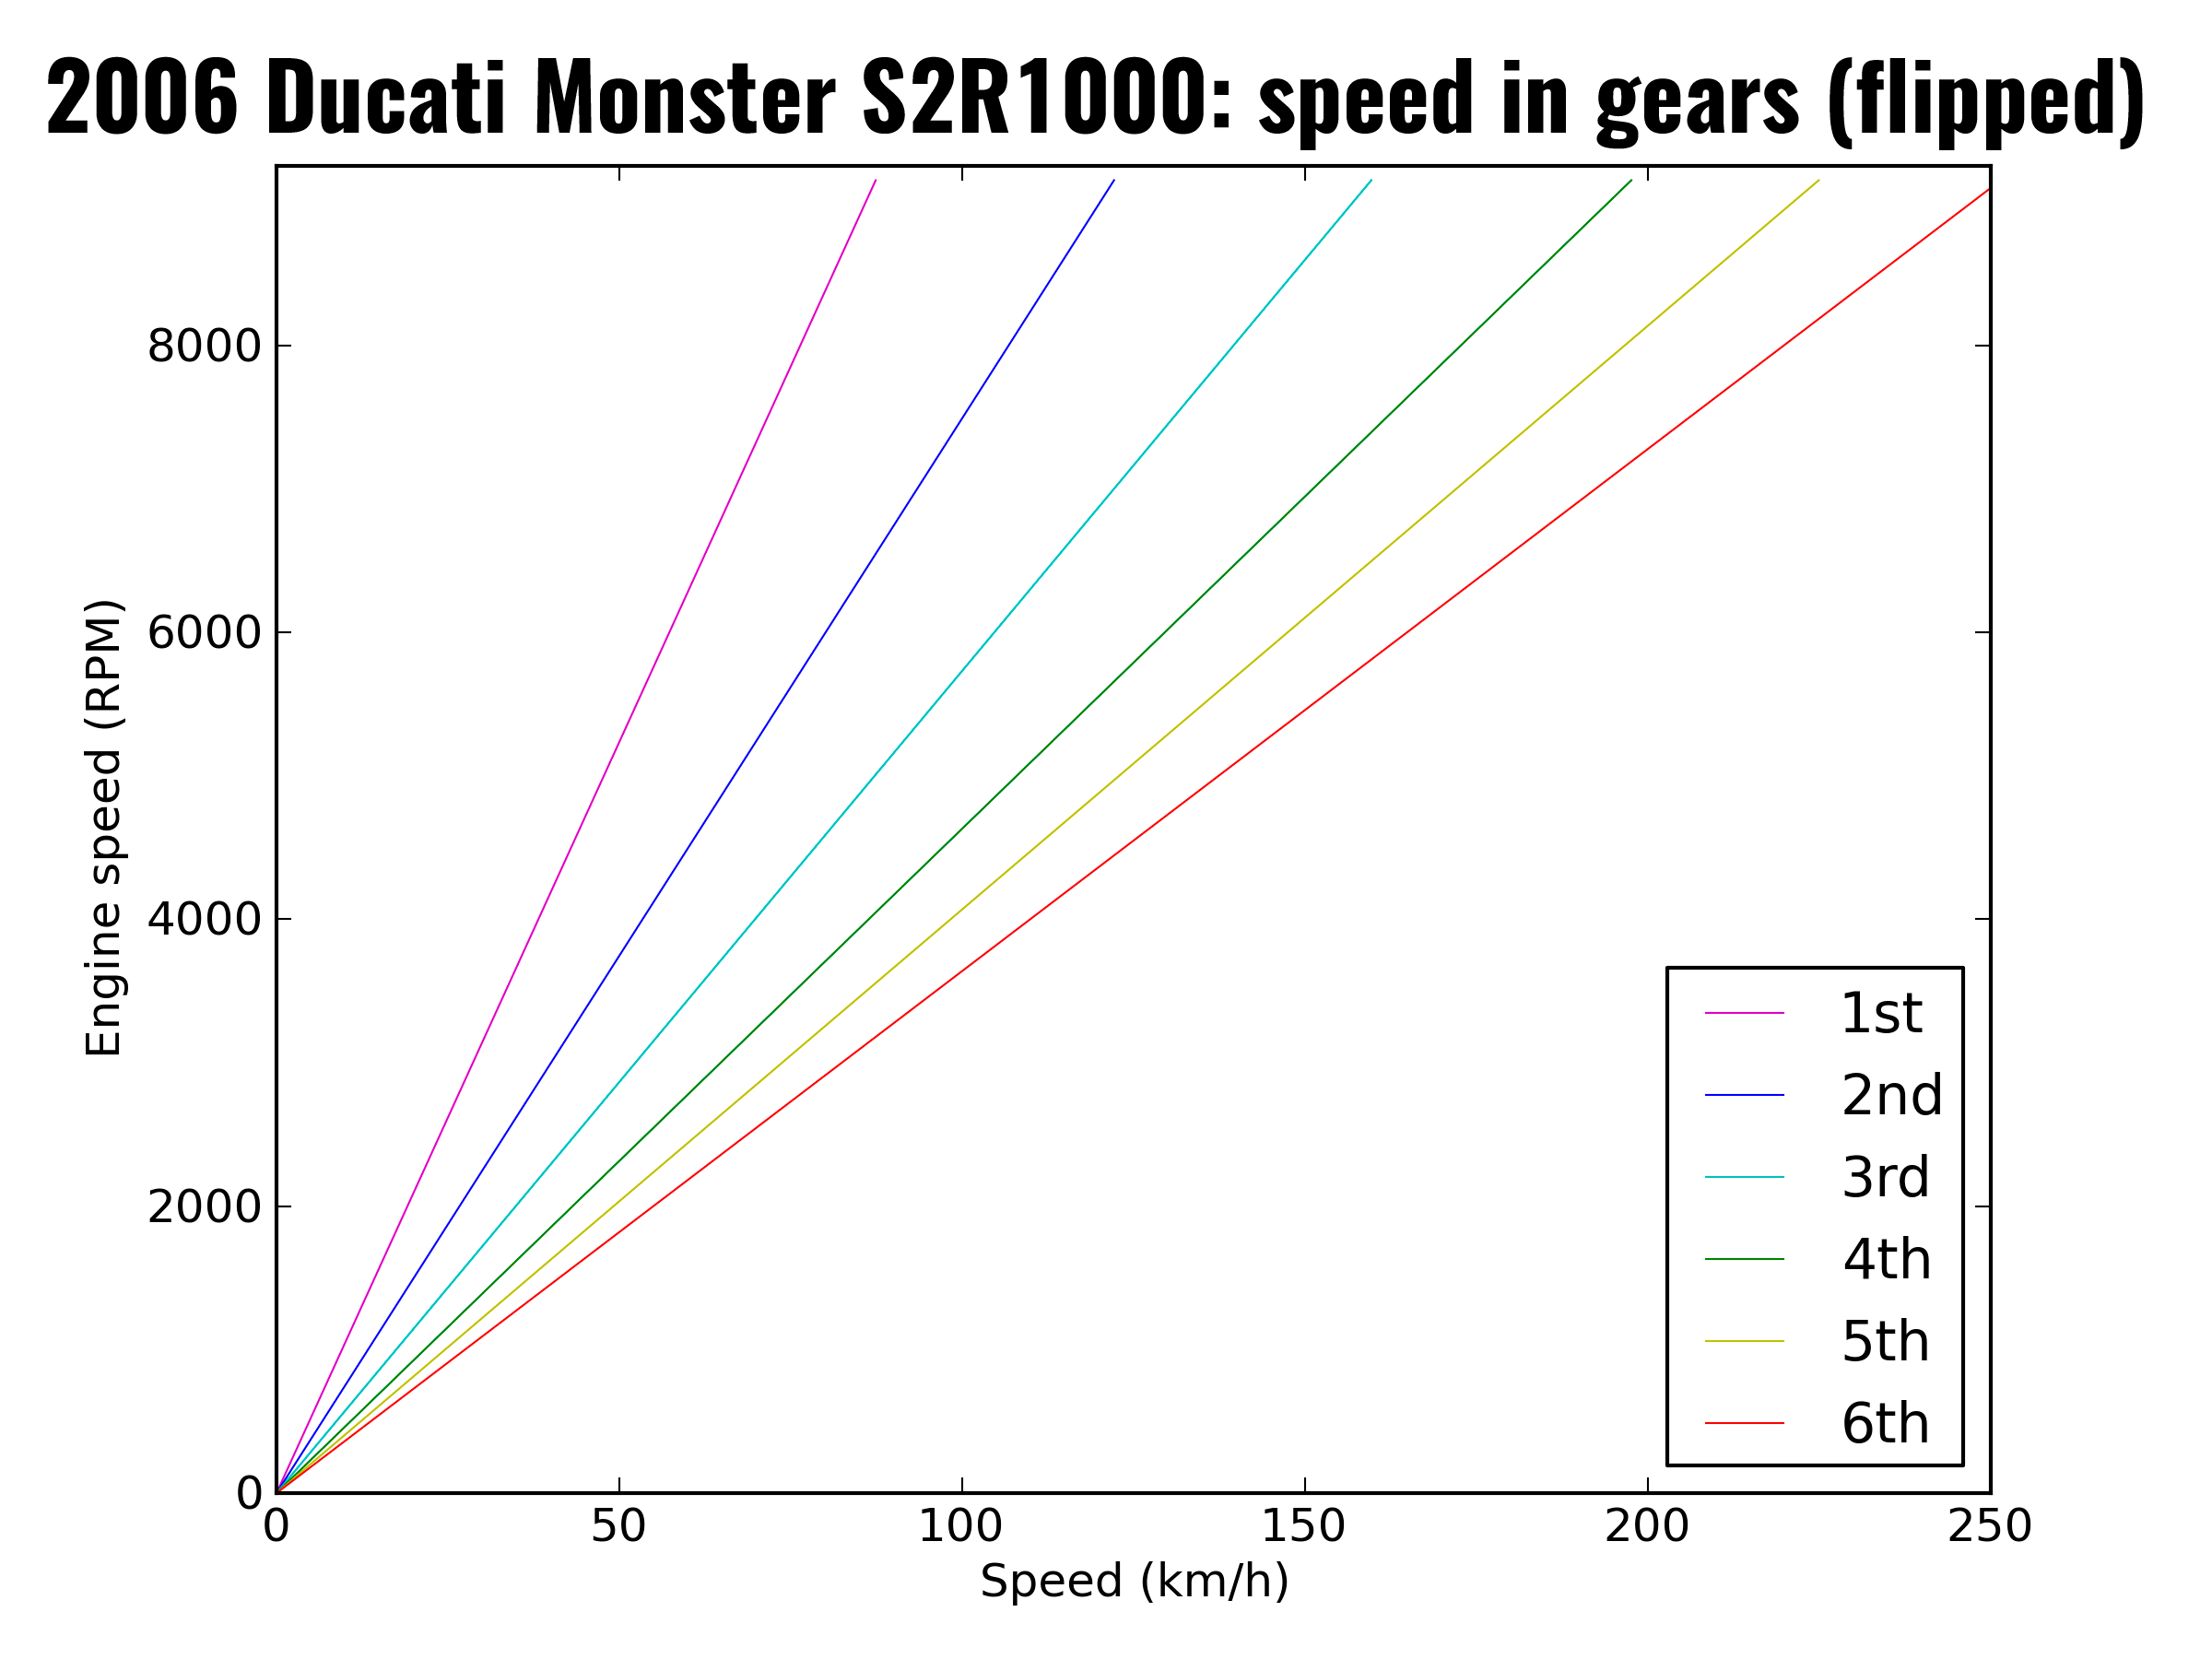
The other thing is so far, we haven’t said anything that is useful to selecting the best points to change gear on this bike. Let’s work a bit further on that point. Given a particular RPM, our engine produces a particular torque. Let’s recall what that looks like, after we have taken all of the gearing into account:
Remember lower gears give us more torque multiplication, and higher gears give us less. On the flipside, lower gears let us go less fast overall and higher gears let us go faster.
So let’s take all of that into account, and look at what the torque at the back wheel looks like for each gear against the speed we can do in each gear.
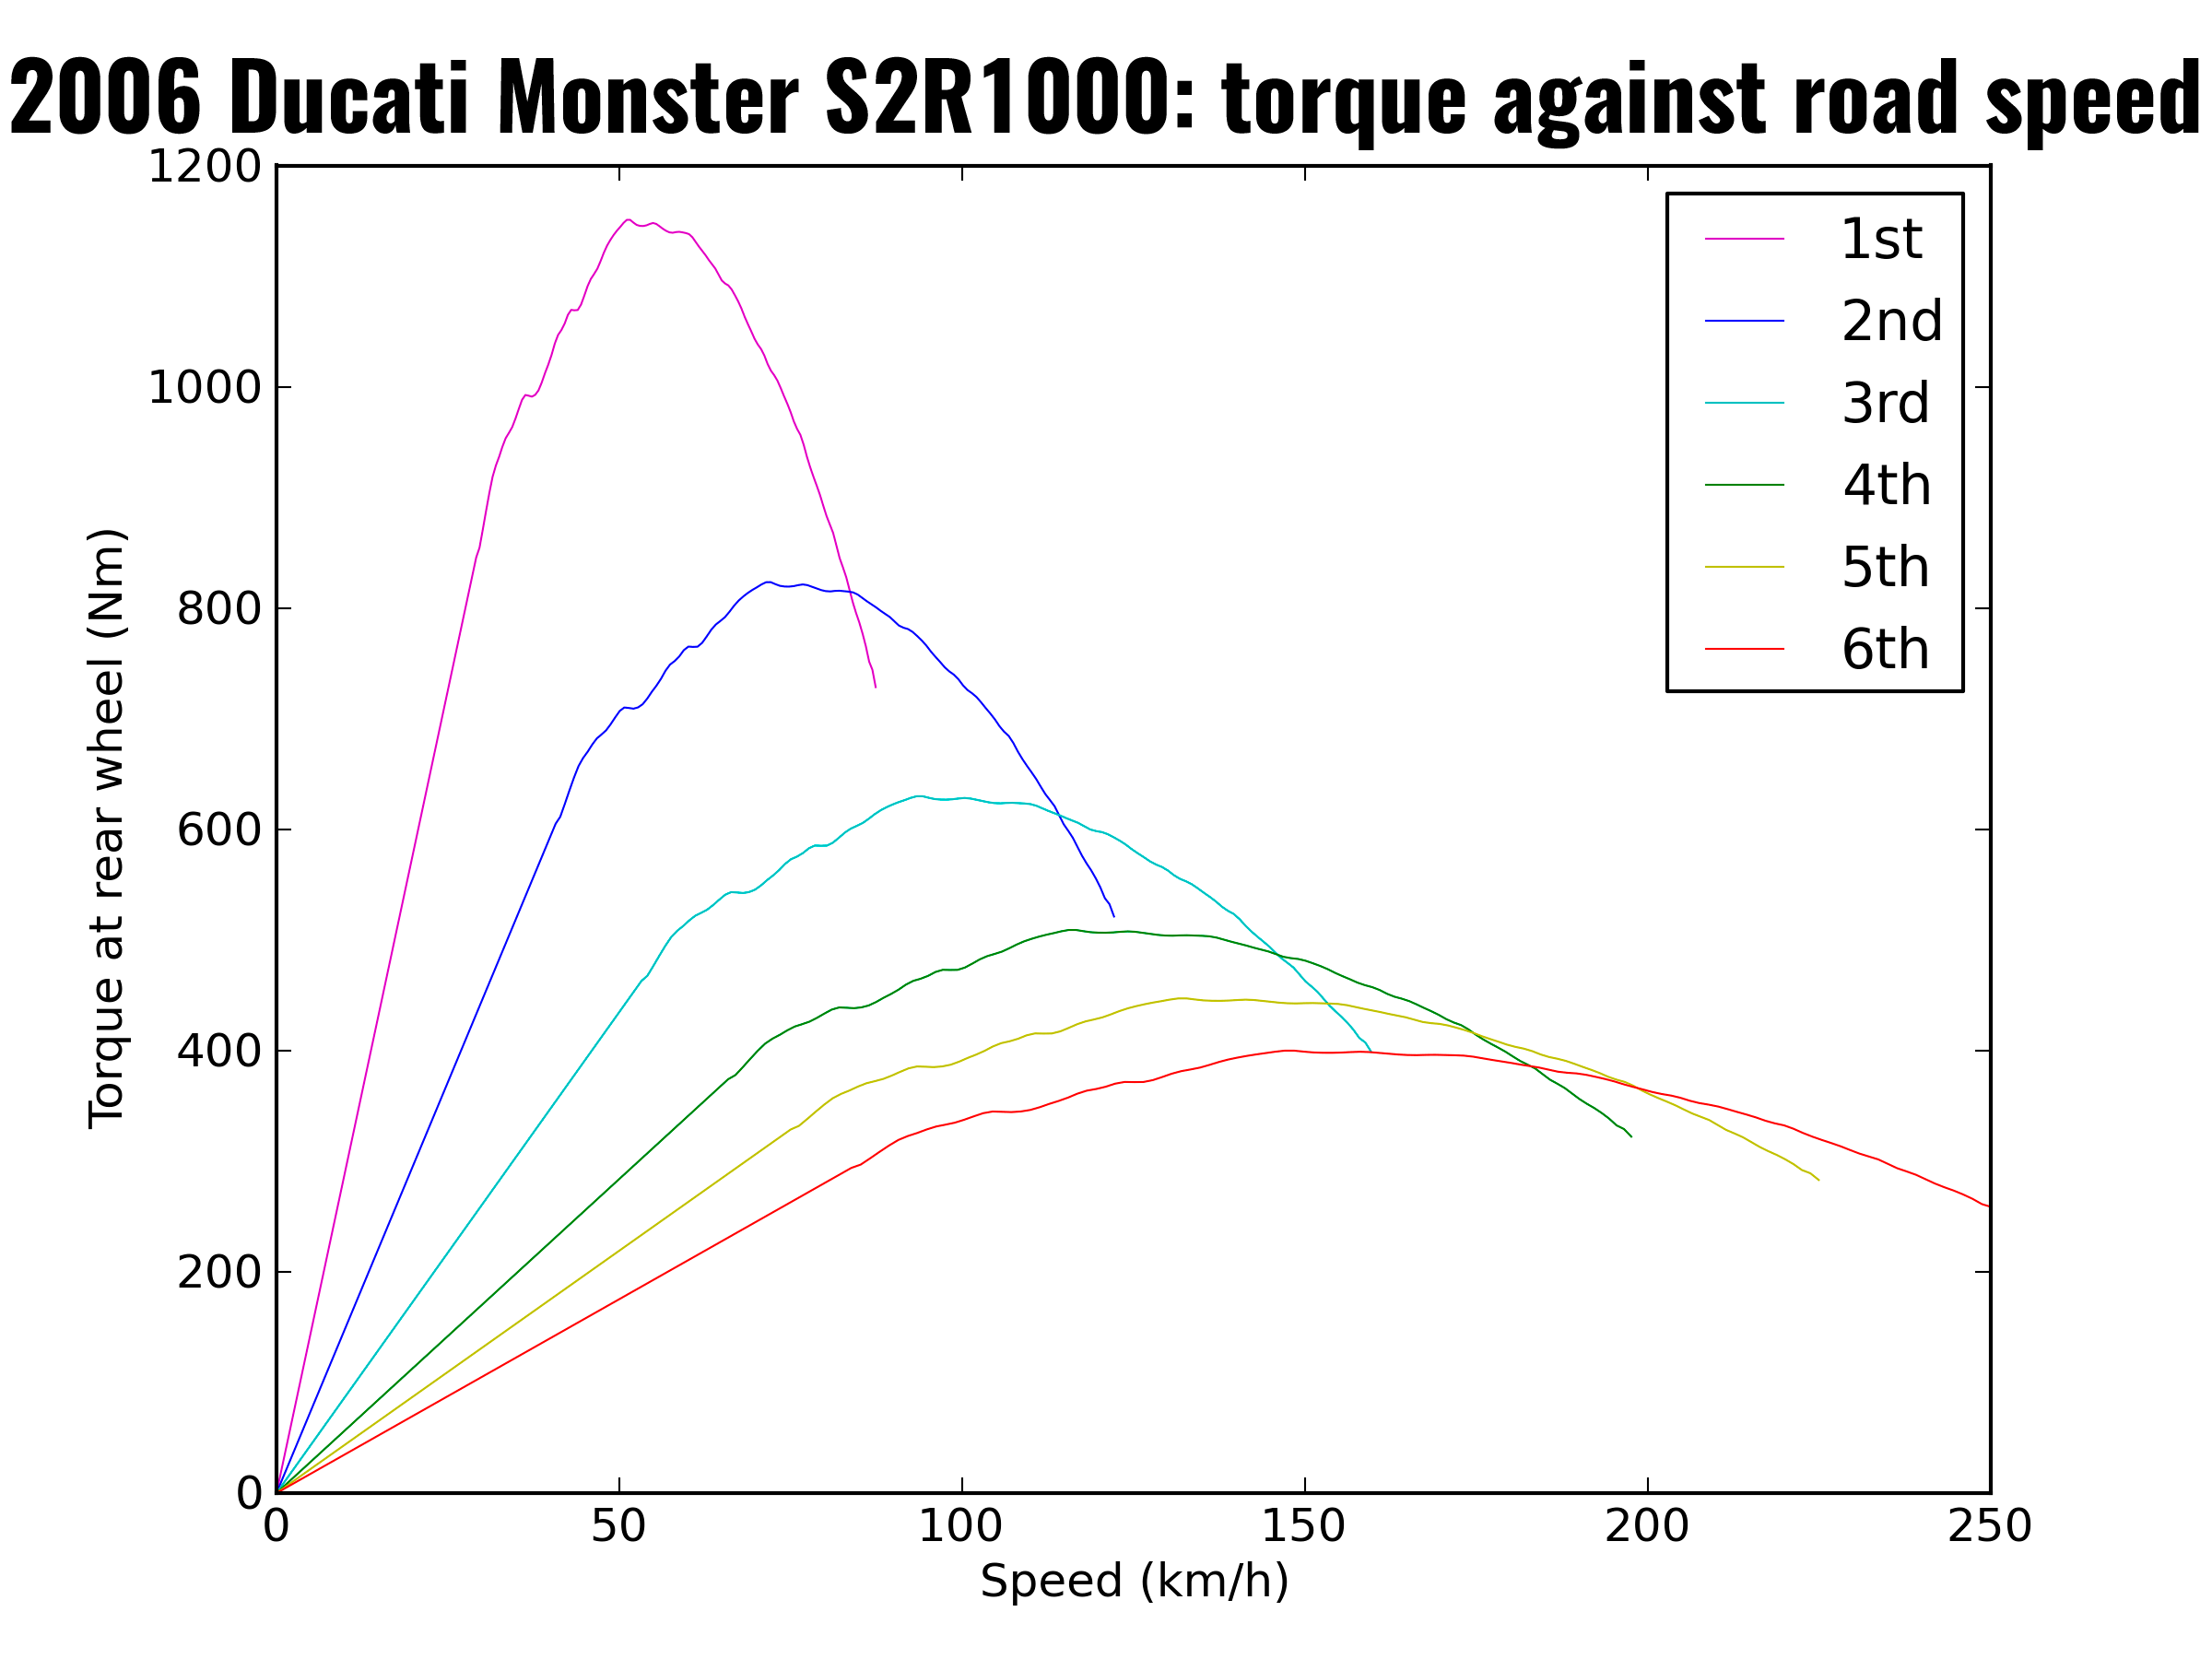
Now this is much more useful. It lets us see, for a given speed, what is the result of the torque multiplication in a given gear. We can go a bit further though, the actual FORCE that propels the motorcycle (in Newton’s physics, the force is the F in F = ma, where m is the mass of the motorcycle and a is the acceleration the bike experiences).
The force is pretty easy to calculate too, this is simply the torque at the rear wheel divided by the radius of the rear wheel that we calculated before. This gives us a force in Newtons.

The point of this is that we need to take into account the torque multiplication of individual gears to decide when we want to shift. Let’s take three hypothetical examples of where to shift from first to second on this particular bike.
If we shift at the RPM where the engine makes maximum torque in first gear (5350 rpm), equivalent to a rear wheel thrust of xx N, then we will be doing xxxx rpm in second gear, producing only xx Nm at the engine, which after multiplication through the gearbox in second gear is only xx N. Clearly, we have much more thrust available in first gear still than we do in 2nd gear at the corresponding road speed.
We can now consider the case of where we shift at maximum power in first gear (7650 rpm), equivalent to a rear wheel thrust of xx N (after taking into account the torque multiplication of first gear). We will be doing xxxx rpm in second gear, but producing only xx Nm at the engine… and this is multiplied through 2nd gear to give a thrust of xx N. This is clearly closer to the thrust we had in first gear, but we still have more thrust in the lower gear.
Let’s look at if we shift at 8760 rpm in first gear, then. At this point, the two thrust curves intersect, so
If we held our shift off until 9000 rpm, the situation is far worse in first gear: we are only developing xx N at these revs; at the corresponding revs in 2nd gear (xxxx RPM) we are making xx N, which is clearly higher. So if we’d waited till this point, we would have waited too long.
All in all, although the torque drops off from after maximum torque in the lower gear you still have MORE thrust at the rear wheel after gear multiplication because the lower gear can multiply the torque further. It is only until the revs that you would be doing in the next gear for a given road speed mean that you are developing enough torque in the next gear that you should shift.
A couple of things fall out from this.
1. You cannot select one single “rpm” to shift at in every gear;
2. The RPM tends to change to lower revs for higher gear shifts, because the gaps between the gears are smaller.
We can also look at it another way. At 80 km/h, we have a choice of a total of 6 gears that will work. At 80 km/h, we are doing the following revs:
Gear Revs Torque (at engine) Thrust (rear wheel)
1st 8500
2nd 6100
3rd 4750
4th 3750
5th 3400
6th 3000
I know this might seem a little mind bending, but it is because you cannot just look at the torque curve of an engine in isolation. You have to look at it in the context of the torque multiplication of each of the gears, and, the implications this has for road speed. For a given road speed, you have (potentially) a large choice of gears, but if accelerating and you want to maximise acceleration you need to select gears that always maximise your thrust at the rear wheel.
Note that this is all predicated on full throttle. In lower gears, especially on powerful bikes, you might not be able to use full throttle. In these situations, the torque in the lower gear is less because of the throttle position you’ve specified. It’s these sorts of scenarios as to where you short-shift because there’s no point applying more thrust to the back than you can either put down (through traction) or putting down so much that it just lofts the front wheel instead.
[…] shift point. He has listed the RPM of each shift point and it isn't the same for each shift…Optimal gear-change points: how torque and gearing interact – TGR: Team Ghetto Racing 2013 KTM 300 EXC. Lectron carb, Gnarly pipe, modified head. Bike lowered by 50mm because […]